Artemide Logico Single Pendant Light Guide d'installation
- Taper
- Guide d'installation

F
Designed by M. De Lucchi / G. Reichert
~
Fig.1
D
~
~
C
~
F
B
~
Fig.2
~
L
~
L
~
B
~
L
~
E
~
E
A
LOGICO MICRO SUSPENSION
LOGICO MINI SUSPENSION
LOGICO SUSPENSION
LOGICO
LOGICO MICRO - LOGICO MINI
~
D
~
~
C
~
B
A
AVIS
Déconnecter la tension de réseau avant toute opération sur l’appareil. Employer exclusivement
les ampoules du type et de la puissance indiquée sur la plaque de l’appareil. ARTEMIDE S.p.a.
décline toute responsabilité pour les produits modifiés sans autorisation préalable.
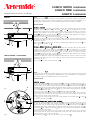
INSTALLATION
Version LOGICO
Décrocher le boîtier A du culot B en insérant la pointe d’un tournevis dans une des rainures
présentes sur le culot. Ensuite séparer le boîtier A du culot B en le faisant glisser sur le câble
d’alimentation. Déterminer la distance approximative entre le corps lumineux et le plafond.
Marquer cette distance sur les trois câbles C avec un crayon-feutre. En pressant l’arrêt de
sécurité D, faire glisser le câble en acier C jusqu’à atteindre le signe marqué avant. Répéter
l'opération pour les autres deux câbles en acier.
Desserrer les deux vis E pour séparer la plaque F du culot B.
Connecter le câble blanc sortant de l’appareil au câble blanc de la j-box, le câble noir sortant
de l’appareil au câble noir de la j-box. Connecter aussi le câble vert sortant de l’appareil au
conducteur de terre.
Fixer la plaque F à la j-box à l’aide des deux vis fournies avec l’appareil. Fixer le culot B à la
plaque F à l’aide des deux vis E.
Version LOGICO MICRO et LOGICO MINI
Décrocher le boîtier A du culot B en insérant la pointe d’un tournevis dans une des rainures
présentes sur le culot. Ensuite séparer le boîtier A du culot B en le faisant glisser sur le câble
d’alimentation. Déterminer la distance approximative entre le corps lumineux et le plafond.
Marquer cette distance sur les trois câbles C avec un crayon-feutre. En pressant l’arrêt de
sécurité D, faire glisser le câble en acier C jusqu’à atteindre le signe marqué avant. Répéter
l'opération pour les autres deux câbles en acier.
Connecter le câble blanc sortant de l’appareil au câble blanc de la j-box, le câble noir sortant
de l’appareil au câble noir de la j-box. Connecter aussi le câble vert sortant de l’appareil au
conducteur de terre.
Fixer le culot B à la j-box à l’aide des deux vis E.
NOTE
Prior to any work on the fixture always switch off the mains. Only use bulbs of the type and
wattage indicated on the rating plate. ARTEMIDE S.p.a. does not shoulder any responsibilities
for products which are modified without prior authorisation.
INSTALLATION
LOGICO version
Unhook the ceiling rose A from the bottom plate B by inserting a screwdriver bit into one of
the slots in the bottom plate. Then separate the ceiling rose A from the bottom plate B and
make it slide over the feeding cable. Determinate the approximate distance between the
illuminating body and the ceiling. Mark this distance with a felt-tip pen on the three cables C.
Press retainer D and make the steel cable C slide up to the previous mark. Repeat the operation
for the other two steel cables.
Unscrew the two screws E and remove plate F from the bottom plate B.
Connect the white cable coming from the fixture to the white cable of the j-box, the black
cable coming from the fixture to the black cable of the j-box. Also connect the green cable
coming from the fixture to the ground wire.
Fix plate F to the j-box by means of the two screws supplied. Fix the bottom plate B to plate F
by means of the two screws E.
LOGICO MICRO and LOGICO MINI versions
Unhook the ceiling rose A from the bottom plate B by inserting a screwdriver bit into one of
the slots in the bottom plate. Then separate the ceiling rose A from the bottom plate B and
make it slide over the feeding cable. Determinate the approximate distance between the
illuminating body and the ceiling. Mark this distance with a felt-tip pen on the three cables C.
Press retainer D and make the steel cable C slide up to the previous mark. Repeat the operation
for the other two steel cables.
Connect the white cable coming from the fixture to the white cable of the j-box, the black
cable coming from the fixture to the black cable of the j-box. Also connect the green cable
coming from the fixture to the ground wire.
Fix the bottom plate B to the j-box by means of the two screws E.
EN

AMPOULE
BULB
Artemide se réserve d’apporter à n’importe quel moment toute modification technique et structurelle qu’on trouve nécessaire pour l’amélioration du produit.
Artemide reserves the right to introduce all the technical and structural changes required for the improvement of the product.
Attention: la sécurité de l’appareil n’est garantie que si les instructions sont convenablement suivies. Il est donc nécessaire de les conserver.
Warning: this equipment is guaranteed only when used as indicated in these instructions. Therefore they should be kept for future reference.
En cas de réclamation, veuillez citer le numéro
In case of complaint, please quote number
cod. Y503001969
Via Bergamo, 18
I-20010 Pregnana M.se (MI) - ITALIA
t. +39 02.935.18.1 f. +39 02.935.90.254-496
info@artemide.com
www.artemide.com
P. Iva IT 00846890150
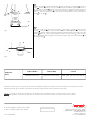
Desserrer la bague G et défiler une garniture H. Placer le diffuseur I, la garniture H et visser la
bague G. Insérer l’ampoule. Au cas où il serait nécessaire de balancer l’appareil, desserrer un
des trois arrêts de sécurité D, pousser l’arrêt vers le plafond et faire glisser le câble de support;
ensuite revisser l’arrêt de sécurité D. Pour effectuer un léger réglage circulaire, desserrer les
trois vis L, tourner la partie interne du culot et serrer de nouveau les trois vis. Renfermer le
boîtier A sur le culot B.
LOGICO MICRO
MAX 60W G16 1/2 E12
LOGICO MINI
MAX 100W TYPE A19 E26
LOGICO
MAX 150W TYPE G30 or/ou G40 E26
Fig.4
G
H
H
I
Fig.3
H
G
Unscrew the ring nut G and remove one gasket H. Place diffuser I, gasket H and screw the
ring nut G. Insert the bulb. In case the fixture should be balanced, loosen one of the three
retainers D, push the retainer towards the ceiling and make the support cable slide, screw the
retainer D again. For a slight circular adjustment, loosen the three screws L, rotate the inner
part of the bottom plate and tighten the three screws again. Snap shut the ceiling rose A on
the bottom plate B.
F
EN

-
 1
1
-
 2
2
-
 3
3


