Ugolini 417003 Manuel utilisateur
- Catégorie
- Jouets
- Taper
- Manuel utilisateur

41700 3 G15EFD 1/20
O
O
P
P
E
E
R
R
A
A
T
T
O
O
R
R
’
’
S
S
M
M
A
A
N
N
U
U
A
A
L
L
C
C
A
A
R
R
N
N
E
E
T
T
D
D
’
’
I
I
N
N
S
S
T
T
R
R
U
U
C
C
T
T
I
I
O
O
N
N
S
S
G
G
E
E
B
B
R
R
A
A
U
U
C
C
H
H
S
S
A
A
N
N
W
W
E
E
I
I
S
S
U
U
N
N
G
G
Delice 3L

41700 3 G15EFD 2/20
D
D
e
e
l
l
i
i
c
c
e
e
3
3
L
L
EC DECLARATION OF CONFORMITY
We Ugolini S.p.A. - Via dei Pioppi 33 - 20090 Opera Milano - Italy declare, under our responsibility, that the apparatus
HOT DRINK DISPENSER - Trademark: UGOLINI S.p.A. - Manufacturer: UGOLINI S.p.A. - Model: DELICE 3lt - DELICE
SILVER 3lt - DELICE GOLD 3lt 230V 50Hz are in conformity with the following Standards:
Following the provisions of the Directives 2006/42/CE, 2006/95/CE, 2004/108/CE.
DECLARATION DE CONFORMITE CE
Nous Ugolini S.p.A. - Via dei Pioppi 33 - 20090 Opera Milano - Italy déclarons, sous notre responsabilité, que les appareil
DISTRIBUTEUR DE BOISSONS CHAUDES - Marque: UGOLINI S.p.A. - Constructeur: UGOLINI S.p.A. - Modèle:
DELICE 3lt - DELICE SILVER 3lt - DELICE GOLD 3lt 230V 50Hz sont conformes aux Normes suivantes:
Conformément aux Directives 2006/42/CE, 2006/95/CE, 2004/108/CE.
EG-ÜBEREINSTIMMUNGSERKLÄRUNG
Wir Ugolini S.p.A. - Via dei Pioppi 33 - 20090 Opera Milano - Italy erklären auf eigene Verantwortung, daß die Gerät
WARMEGETRÄNKE DISPENSER - Marke: UGOLINI S.p.A. - Hersteller: UGOLINI S.p.A. - Modell : DELICE 3lt - DELICE
SILVER 3lt - DELICE GOLD 3lt 230V 50Hz mit den folgenden Normen übereinstimmen:
Gemäß den EWG-Richtlinien 2006/42/CE, 2006/95/CE, 2004/108/CE.
-
-
-
-
-
EN ISO 12100-1 (2010)
EN ISO 12100-2 (2010)
EN60335-1 (2012)
EN60335-2-24 (2010)
EN60335-2-75 (2004)+A1(2005)+A11(2006)+A2(2008)+A12(2010)
-
-
-
-
EN62233:2008-11; EN62233:2009-04;
EN 55014 -1 (2006) + A1 (2009) + A2 (2011);
EN 55014-2 (1997) + A1 (2001) + A2 (2008)
EN 61000-3-2 (2006) + A1/A2 (2009); EN61000-3-3 (2008)
-
-
-
-
-
EN ISO 12100-1 (2010)
EN ISO 12100-2 (2010)
EN60335-1 (2012)
EN60335-2-24 (2010)
EN60335-2-75 (2004)+A1(2005)+A11(2006)+A2(2008)+A12(2010)
-
-
-
-
EN62233:2008-11; EN62233:2009-04;
EN 55014 -1 (2006) + A1 (2009) + A2 (2011);
EN 55014-2 (1997) + A1 (2001) + A2 (2008)
EN 61000-3-2 (2006) + A1/A2 (2009); EN61000-3-3 (2008)
see data plate on the machine
voir la plaque sur l’appareil
siehe Dispenser Typenschild
Ugolini S.p.A.
L’Amministratore Delegato
(luogo ed anno di prod. - place and mfr. year - lieu et an de production
Produktionsort und Produktionsjahr - lugar y año de producción)

41700 3 G15EFD 3/20
D
D
e
e
l
l
i
i
c
c
e
e
3
3
L
L
1 TECHNICAL CHARACTERISTICS
The manufacturer reserves the right to make
changes without any prior notification.
2 INTRODUCTION
It is necessary to read this instruction manual ca-
refully to know the specifications of the dispenser.
As all mechanical products, this unit requires cle-
aning and maintenance. Its working order can be
compromised by possible errors made by the
operator during disassembly and cleaning. For
this reason it is important that the staff in charge
of the dispenser is qualified to carry out the day to
day operations, which are dismantling, cleaning,
sterilisation and reassembly.
3 INSTALLATION
1Remove the dispenser from the packaging.
(This should be kept for any future requirement)
2Check the dispenser has not been damaged
during transport. The forwarding agent must be
notified immediately of any claim.
3Install the dispenser on a counter top that will
support its weight, even with a full load.
4Before connecting the dispenser electrically
check that the voltage (in the network) is as
shown on the data plate. Plug the unit into a
grounded, protected single phase electrical sup-
ply according to the applicable electrical codes
and the specifications of your machine. The
electrical disconnect switch shall have a contact
separation in all poles , providing full discon-
nection under over voltage category III condi-
tions. not use extension cords to connect the unit
electrically.
5The dispenser does not leave the factory
presanitized and sanitized. Prior to use it must be
disassembled, cleaned and sanitized according
to the instructions in chapter 7 CLEANING AND
SANITIZING PROCEDURES.
4 TO OPERATE PROPERLY AND
SAFELY
1Read the instruction booklet before using the
dispenser.
2Use the dispenser only if it is grounded cor-
rectly.
3Do not use extension cords to connect the
dispenser electrically.
4Do not operate the dispenser if it is not clo-
sed and blocked with screws.
5Do not place fingers or objects in the cooling
fissures and faucet outlet panels louvers.
6Do not remove the container when the unit is
in operation.
7This unit is not meant to be used outside.
8This unit is not to be installed in areas
subject to water-spouts.
9Do not use water-jets to clean the unit.
10 This unit can work in a room temperature
range between +5° and +35°C.
Delice
Transparent removable bowls n 1
Capacity of each bowl, approx. l 3
Dimensions:
width cm 24
depth cm 29
height cm 41
Net weight, approx. kg 4
Gross weight, approx. kg 5
Adjustable thermostats n 1
Noise level lower than 70 dB (A)
IMPORTANT
Electric specifications: read the informa-
tion on the data plate of each single
dispenser, situated on the underside. The
serial number of the units is preceded by #
ATTENTION
Ensure that the unit is grounded correctly;
if not it may cause electric shock to per-
sons or damage the dispenser.
ATTENTION
Do not remove the container until the hot
plate is cold.
ATTENTION
Do not remove the container from the
dispenser when it contains hot products.

41700 3 G15EFD 4/20
5 OPERATING PROCEDURES
1Clean and sanitized the dispenser prior to
use following the instructions in chapter 7 CLEA-
NING AND SANITIZING PROCEDURES.
2Fill the bowl with the product, prepared
according to the instructions of the manufacturer.
3Install the cover above the container making
sure that it is placed correctly.
4Set the control switch (see charter 5.1. COM-
MAND DESCRIPTIONS)
5The dispenser should always operate with
the cover installed in order to prevent possible
contamination of the product.
6The dispenser must run uninterruptedly; hea-
ting will stop automatically when the product is
ready for dispensing. The mixing device will con-
tinue to operate.
7The dispenser is supplied with a container
with a closed removable bottom to facilitate clea-
ning and sterilisation.
5. 1 DESCRIPTION OF CONTROLS
The dispenser is equipped with a general switch
whose functions are:
The dispenser is equipped with a thermostat, on
the right side, to adjust the temperature of the
product.
6 OPERATION HELPFUL HINTS
preparation hot chocolate: preparation fol-
lowing the traditional artisan method, mix the co-
coa with milk or water well in a pan before pouring
it into the bowl. Follow the instructions of the ma-
nufacturer if using packaged instantaneous pro-
ducts. It is possible to mix these directly in the
container.
Activate the dispenser turning the switch to posi-
tion 1. Turn the thermostat knob to 90°C to obtain
the cooking temperature of the product. When the
hot chocolate is ready lower the temperature to
the value required for dispensing turning the ther-
mostat knob.
7 CLEANING AND SANITIZING
PROCEDURES
Cleaning and sanitizing are essential to maintain
perfect taste and maximum efficiency from your
dispenser. The procedures described below are
general and can vary due to the sanitary
regulations of the local health authorized.
The product must be taken out of the dispenser
before it is disassembled for cleaning.
7. 1 DISASSEMBLY
1Empty the bowl and remove the lid
2Remove the mixer from the central shaft
IMPORTANT
Place the unit on an horizontal surface.
ATTENTION
In case of damages, the power cord must
be replaced by qualified personnel only in
order to prevent any shock hazard.
IMPORTANT
This appliance is not intended for use by
person (including children) with reduced
physical sensory or mental capabilities, or
lack of experience and knowledge unless
they have been given supervision or
instruction concerning use of the appliance
by a person responsible for their safety.
Children should be supervised to ensure
that they do not play with the appliance.
Position 0 :power is turned off
Position I :mixer and heating device in wor-
king order
IMPORTANT
Before switching off the dispenser comple-
tely (switch at position 0), bring the thermo-
stat to the lowest temperature and wait for
the product to cool down. This stops the
product (if not agitated) from sticking to the
hot plate.
ATTENTION
Before proceeding to disassemble any
component always disconnect the unit
from the electricity removing the plug.

41700 3 G15EFD 5/20
D
D
e
e
l
l
i
i
c
c
e
e
3
3
L
L
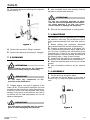
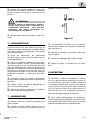
3Dismantle the faucet following the sequence
shown (see fig. 1).
figure 1
4Remove the container, lifting it upwards.
5Remove the drip-tray and empty it. lavaggio.
7. 2 CLEANING
1Prepare approx. two litres (2 gallons) of hot
water (45-60° C) and specific detergent in a bowl
according to the instructions of the manufacturer;
a solution, which is too concentrated, may cause
damage to the parts to be washed, one that is
too diluted will not clean adequately. Do not use
abrasive detergents.
2Use a suitable brush and carefully clean all
the parts in contact with the drink.
3Rinse all the washed parts in running water.
7. 3 SANITIZING
The dispenser must be sanitized prior to starting
the machine, every day. Do not allow the unit to
sit for extended periods of the time after sanitiza-
tion.
1Before starting the procedure described
below wash hands with an anti-bacterial soap.
2Prepare at least two litres of hot water (45-
60°C) and sterilising product legally approved in
your Country, following the instructions of the
manufacturer. If there is no specific sterilising
product prepare a solution of water and bleach in
the following ratio: 1 tbsp: 2 litres of water.
3Immerse all the parts to be sterilised in the
solution for time indicated by the manufacturer.
4Allow the sterilised parts to air dry on a clean
surface.
5Use non-abrasive cloths to dry the external
parts.
7. 4 ASSEMBLY
1Put the drip-tray and grill in place.
2Lubricate the faucet piston (in the area A
shown in fig. 2) using food grade approved lubri-
cant.
figure 2
ATTENTION
Before cleaning disconnect the dispenser
from the electricity taking out the plug.
IMPORTANT
Do not wash any component of the
machine in the dishwasher.
IMPORTANT
Use detergents compatible with the plastic
parts to avoid damaging the dispenser.
ATTENTION
Do not use excessive amounts of water
near the electric components of the dispen-
ser when washing it as this can cause
electric shock or damage the dispenser.

41700 3 G15EFD 6/20
3Reassemble the faucet assembly on the con-
tainer in the opposite way to which it was
dismantled (see fig. 1).
4Install the container putting the central shaft
in place.
5Insert the mixer in the central shaft.
6Position the cover on the container.
8 MAINTENANCE
1Daily: check the dispenser for any loss of
product from the gaskets. If there is, first check
the dispenser is assembled correctly making
sure that the gaskets need no lubricating and
they are not faulty or worn. In this case they must
be replaced with original parts.
2To avoid damage to the dispenser the plastic
parts must be lubricated only with the grease
supplied by the manufacturer or other grease
compatible with polycarbonate.

41700 3 G15EFD 7/20
D
D
e
e
l
l
i
i
c
c
e
e
3
3
L
L
TROUBLESHOOTING
PROBLEM CAUSE SOLUTION
Mixer doesn't turn Drive shaft coupling not cor-
rect Check that it's in the cor-
rect operating position
Drive shaft coupling broken Replace mixer and/or drive
shaft
Gear motor not working See “Gear motor doesn't
turn”
Electrical wires disconnected
or interrupted Connect or replace
electrical wires
Product too dense Dilute the product
Gear motor doesn't turn Motor overheated: “Thermal
Protection” tripped Check the voltage of the
outlet. Check the
ventilation (fins on the side
panels obstructed or lower
part of the distributor
obstructed). Check the
viscosity of the product
Stator winding burned out or
interrupted Replace the motor
Rotor shifted Check the alignment of the
rotor bearings
Gears in the reducer box
damaged or worn Replace the motor
Beverage leaks from the
container
Container gasket seal broken
or worn Replace gasket seal
Tap piston o-ring broken or
worn Replace the piston o-ring
Tap piston not in closed posi-
tion Check the tap lever or
spring and replace the
worn part

41700 3 G15EFD 8/20
Heating element not hot Heating element burned out Replace the heating
element
Thermal fuse burned out Adjust it to a suitable
temperature
Thermal fuse burned out Thermal fuse defective Replace with a good one
I'm not getting a suffi-
ciently dense product
The temperature of the
service thermostat (located on
the side of the distributor) is
set too low
Adjust it to a suitable
temperature
Product excessively diluted Increase the concentration
of the product
I'm not getting a suffi-
ciently hot product
The temperature of the
service thermostat (located on
the side of the distributor) is
set too low
Adjust it to a suitable
temperature
The bottom of the tub is not
touching the heating element Position the tub on the
heating element correctly
PROBLEM CAUSE SOLUTION

41700 3 G15EFD 9/20
D
D
e
e
l
l
i
i
c
c
e
e
3
3
L
L
1 CARACTERISTIQUES
TECHNIQUES
Nous nous réservons le droit d'apporter des
modifications sans avertissement préalable.
2 INTRODUCTION
Il est nécéssaire de lire attentivement ce carnet
d’istructions, de façon à connaître toutes les
caractéristiques du distributeur.
Comme tous les produits mécaniques, ce
distributeur nécessite hygiène et soin. Son bon
fonctionnement peut être compromis par
d'éventuelles erreurs de l'opérateur au cours des
phases de montage et de nettoyage. C'est la
raison pour laquelle il est important que les
procédures quotidiennes de démontage et
remontage soient connues par tout le personnel
qui s’occupe du distributeur sans courir le risque
de commettre des erreurs.
3 INSTALLATION
1Retirez le distributeur de l'emballage. Nous
vous conseillons de conserver l'emballage, vous
pourriez en avoir besoin plus tard.
2Assurez-vous que le distributeur n'a pas subi
de dommages au cours du transport. Si c'est le
cas, présentez immédiatement une réclamation
auprès du transporteur.
3Posez le distributeur sur un comptoir qui
supporte son poids lorsqu'il est plein.
4Avant d'effectuer les branchements électriq-
ues, vérifiez que la tension du réseau est la
même que celle indiquée sur la plaquette. Bran-
chez le distributeur à un réseau monophasé à
l'aide d'une prise comprenant la mise à la terre,
conformément aux normes en vigueur. En cas
d’utilisation d’un interrupteur unipolaire pour cou-
per l’alimentation électrique de l’appareil, celui-ci
doit garantir le respect d’une distance d’ouver-
ture des contacts permettant un débranchement
intégral dans des conditions de surtension de
catégorie III. N'utilisez pas de rallonge pour bran-
cher l'appareil au réseau électrique.
5Le distributeur n'est ni lavé ni désinfecté
avant de sortir de la fabrique. Avant de l'utiliser, il
vous faut le démonter, le laver et le désinfecter
suivant les indications du chapitre 7 NET-
TOYAGE.
4 POUR UN FONCTIONNEMENT
CORRECT ET SANS DANGER
1N'utilisez pas le distributeur avant d'avoir lu
ce carnet d’istructions.
2N'utilisez pas le distributeur s'il n'est pas cor-
rectement relié à la terre.
3N'utilisez pas de rallonge pour le branche-
ment électrique du distributeur.
4Ne mettez pas le distributeur en fonction si
les panneaux ne sont pas en place et fixés par
des vis.
5N'introduisez pas les doigts ou des objets
dans les fentes des panneaux ou dans l'ouver-
ture du robinet.
6Ne retirez pas le conteneur lorsque la
machine est en route.
7L'appareil n'est pas indiqué pour l'installation
DELICE
Réservoirs transparents démontables n 1
Capacité chaque réservoir, environ l 3
Dimensions:
largeur cm 24
profondeur cm 29
hauteur cm 41
Poids net, environ kg 4
Poids brut, environ kg 5
Thermostats réglables n 1
Niveau de bruit inférieur à 70 dB (A)
IMPORTANT
Caractéristiques électriques : lire les don-
nées qui figurent sur la plaquette de cha-
que distributeur. Cette plaquette se trouve
sous le distributeur. Les numéros d'imma-
triculation des appareils sont précédés du
symbole #. Les données figurant sur la pla-
quette sont toujours celles auxquelles vous
devez faire référence.
ATTENTION
Vérifiez que l'appareil est correctement
relié à la terre. S'il ne l'est pas, les person-
nes pourraient subir des chocs électriques
et le distributeur pourrait être endommagé.

41700 3 G15EFD 10/20
à l'extérieur.
8N'installez pas l'appareil en zones sujets à
jets d'eau.
9Ne pas employer des jets d'eau pour le net-
toyage de l'appareil.
10 La température ambiante adapte pour le bon
fonctionnement de l'appareil est entre +5° et
+35°C.
5 MODE D'EMPLOI
1Avant d'utiliser le distributeur, lavez-le et
désinfectez-le suivant les indications du chapitre
7 NETTOYAGE.
2Remplissez le conteneur du produit voulu
préparé selon les indications du producteur.
3Montez le couvercle sur le conteneur en veil-
lant à le positionner correctement.
4Agissez sur les commandes (voir chapitre
5.1 DESCRIPTION DES COMMANDES).
5Le distributeur doit toujours fonctionner à
couvercle fermé, afin d'éviter une éventuelle con-
tamination du produit.
6Le distributeur doit fonctionner sans interrup-
tion. Le chauffage s'arrêtera automatiquement
lorsque le produit sera prêt à la distribution. Le
dispositif d'agitation continuera à fonctionner.
7Le distributeur est équipé d'un conteneur à
fond clos amovible afin de faciliter les opérations
de nettoyage et désinfection.
5. 1 DESCRIPTION DES COMMAN-
DES
Le distributeur est doté d'un interrupteur général
dont les fonctions sont :
Le distributeur est équipé d'un thermostat, placé
sur le côté droit, pour le réglage de la température
du produit.
6 SUGGESTIONS
Préparation du chocolat chaud : conformez-
vous à la production artisanale. Diluez bien le
cacao dans une casserole avant de le verser
dans le conteneur du distributeur. Si vous utilisez
des produits instantanés emballés, suivez les
indications du fabricant. Avec ce genre de
produits le mélange peut être effectué
directement dans le conteneur.
Actionnez ensuite le distributeur en plaçant
l'interrupteur en position I. Tournez le bouton du
thermostat jusqu'à la position 90°C de façon à
obtenir la température de cuisson du produit.
Lorsque le chocolat est prêt, baissez la
température à la valeur désirée pour la
ATTENTION
Ne retirez par le conteneur tant que la pla-
que chauffante est chaude.
ATTENTION
Ne retirez pas le conteneur du distributeur
lorsque celui-ci contient du produit chaud.
IMPORTANT
L’appareil doit être installé sur une surface
horizontale.
ATTENTION
Si le câble est endommagé, il doit être rem-
placé par le fabricant ou par son service
technique ou de toute façon par du person-
nel qualifié pour éviter tout risque.
IMPORTANT
L'appareil ne doit pas être utilisé par des
enfants ou par toute personne ayant un
déficit mental ou sensoriel, ou qui n'a pas
l'expérience et la connaissance requise,
sauf si une surveillance ou une formation
complémentaire sur l'utilisation de l'appa-
reil est donnée par la personne respon-
sable de sa sécurité.
Les enfant doivent être surveillés afin qu'ils
ne puissent pas jouer avec l'appareil.
Position 0 :le distributeur est éteint.
Position I :l'agitateur et le ventilateur sont
en fonction.

41700 3 G15EFD 11/ 2 0
D
D
e
e
l
l
i
i
c
c
e
e
3
3
L
L
distribution en tournant le bouton du thermostat.
7 NETTOYAGE
Laver et nettoyer le distributeur sont des
opérations fondamentales pour une parfaite
conservation du goût de la boisson et la meilleure
efficacité de votre distributeur. Les procédures
décrites ci-après doivent être considérées
comme des opérations de caractère général et
peuvent varier selon les normes sanitaires en
vigueur.
Videz le produit avant de démonter le distributeur
pour le nettoyer.
7. 1 DEMONTAGE
1Videz le conteneur et retirez le couvercle.
2Faites glisser le mélangeur de l'arbre central.
3Démontez le robinet selon la séquence indi-
quée (voir figure 1).
figure 1
4Retirez le conteneur en le soulevant vers le
haut.
5Faites glisser vers l'extérieur le tiroir qui
recueille les gouttes et videz-le.
7. 2 LAVAGE
1Dans une bassine, préparez environ deux
litres d'eau chaude (45-60°C) et du produit lavant
spécial en vous conformant aux prescriptions du
fabricant. Une solution trop concentrée peut
endommager les pièces à laver et une solution
trop diluée peut ne pas nettoyer correctement.
N'utilisez pas de produits abrasifs.
IMPORTANT
Avant d'éteindre complètement le distribu-
teur (interrupteur en position 0), placez le
thermostat sur la température minimum et
attendez que le produit refroidisse. Cela
évite que le produit, s'il n'est pas agité, ne
se colle à la plaque chauffante.
ATTENTION
Avant de procéder à toute intervention de
démontage, débranchez toujours le distri-
buteur en sortant la fiche de la prise
électrique.
ATTENTION
Avant de procéder à toute intervention de
nettoyage, débranchez toujours le distribu-
teur en sortant la fiche de la prise
électrique.
IMPORTANT
Ne lavez aucun des éléments de l'appareil
au lave-vaisselle.
IMPORTANT
Pour ne pas endommager le distributeur,
utilisez uniquement des produits lavant
adaptés aux pièces en plastique.

41700 3 G15EFD 12/20
F
2Utilisez une brosse adaptée et lavez soi-
gneusement à l'aide de la solution nettoyante
toutes les pièces qui sont en contact avec la
boisson.
3Rincez toutes les pièces lavées à l'eau cou-
rante.
7. 3 DESINFECTION
La désinfection doit être effectuée avant de
mettre en marche le distributeur, quotidien. Evitez
que celui-ci reste trop longtemps inactif après
avoir été désinfecté.
1Avant de commencer les procédures
décrites ci-après, lavez-vous les mains avec du
savon antibactérien.
2Dans une bassine, préparez environ deux
litres d'eau chaude (45-60°C) et de produit dés-
infectant approuvé par les autorités de votre
pays en respectant les doses indiquées par le
fabricant. En l'absence de produit désinfectant
spécifique, préparez une solution d'eau et
d'hypochlorite de sodium (eau de javel) dans les
proportions suivantes : 1 cuiller pour deux litres
d'eau.
3Immergez toutes les pièces à désinfecter
dans la solution pendant la durée indiquée par le
fabricant.
4Laissez sécher les pièces désinfectées à
l'air, sur une surface propre.
5Séchez les parties extérieures du distribu-
teur sans utiliser de linges abrasifs.
7. 4 REMONTAGE
1Mettez le tiroir qui recueille les gouttes et la
grille en place.
2Lubrifiez le piston robinet (dans la zone A
indiquée sur la figure 2) uniquement avec la
graisse à usage alimentaire.
figure 2
3Ré assemblez le robinet sur le conteneur,
dans le sens inverse des indications de démont-
age (voir figure 1).
4Montez le conteneur en enfilant l'arbre cen-
tral à sa place.
5Insérez le mélangeur dans l'arbre central.
6Mettez en place le couvercle sur le conte-
neur.
8 ENTRETIEN
1Quotidien : vérifiez le distributeur et vérifiez
qu'il n'y a pas de fuite de produit par les joints. Si
vous remarquez des fuites, contrôlez avant tout
le montage du distributeur. Assurez-vous ensuite
que les joints n'ont pas besoin d'être lubrifiés et
enfin qu'aucune pièce n'est défectueuse ou
abîmée. Dans ce cas, remplacez-la avec une
pièce de rechange originale du fabricant.
2Pour éviter d'endommager le distributeur,
lubrifiez les pièces en plastique uniquement avec
de la graisse fournie par le fabricant ou une autre
graisse compatible avec le polycarbonate.
ATTENTION
Durant le lavage du distributeur, veillez à
ne pas utiliser trop d'eau à proximité des
composants électriques : vous pourriez
provoquer des chocs électriques ou
endommager le distributeur.

41700 3 G15EFD 13/20
D
D
e
e
l
l
i
i
c
c
e
e
3
3
L
L
INCONVENIENTS EVENTUELS ET SOLUTIONS
PROBLEME CAUSE SOLUTION
Le mélangeur ne tourne
pas
Le branchement sur l'arbre de
transmission n'est pas
effectué correctement
Vérifier la bonne position
de fonctionnement
Le branchement sur l'arbre de
transmission est cassé Remplacer le mélangeur
et/ou l'arbre de transmis-
sion
Le motoréducteur ne fon-
ctionne pas Voir “le motoréducteur ne
tourne pas”
Les conducteurs électriques
sont débranchés ou interrom-
pus
Relier ou remplacer les
conducteurs électriques
La densité du produit est
excessive Diluer davantage le produit
Le motoréducteur ne
tourne pas
Le moteur est surchauffé :
intervention du “protecteur
thermique”
Contrôler le voltage de la
prise de courant. Contrôler
la ventilation (ailettes des
panneaux latéraux
obstruées ou partie
inférieure du distributeur
obstruée). Contrôler la
viscosité du produit
La bobine de l'inducteur est
brûlée ou interrompue Remplacer le moteur
Le rotor est désaxé Contrôler l’alignement des
coussinets du rotor
Les engrenages de la boîte
du réducteur sont endomma-
gés ou usés
Remplacer le moteur
La boisson fuit du conte-
neur
Le joint du conteneur est
détérioré ou usé Remplacer le joint
L'O-Ring du piston robinet est
détérioré ou usé Remplacer l'O-Ring du pi-
ston
Le piston robinet n'est pas
fermé Contrôler le levier ou le
ressort du robinet et rem-
placer la partie usée

41700 3 G15EFD 14/20
F
La résistance ne chauffe
pas
La résistance est brûlée Remplacer la résistance
Le thermolimitateur de
sécurité est brûlé Voir “le thermolimitateur
de sécurité est brûlé”
Le thermolimitateur de
sécurité est brûlé
Le thermolimitateur est
défectueux Le remplacer par un neuf
Je n'arrive pas à obtenir
un produit suffisamment
dense
Le thermostat de service
(placé sur le côté du
distributeur) est réglé sur une
température trop basse
Le régler à la bonne
température
Le produit est trop dilué Augmenter la
concentration du produit
Je n'arrive pas à obtenir
un produit suffisamment
chaud
Le thermostat de service
(placé sur le côté du
distributeur) est réglé sur une
température trop basse
Le régler à la bonne
température
Il n'y a pas ce contact entre le
fond du réservoir et la
résistance
Placer correctement le
réservoir sur la résistance
PROBLEME CAUSE SOLUTION

41700 3 G15EFD 15/20
D
D
e
e
l
l
i
i
c
c
e
e
3
3
L
L
1 TECHNISCHE DATEN
Wir behalten uns das Recht vor, ohne
Vorankündigung Änderungen vorzunehmen.
2 EINFÜHRUNG
Es ist nötif Ihnen, das vorliegende
Anleitungshandbuch aufmerksam zu lesen, um
sich mit allen Eigenschaften des Distributors
vertraut zu machen.
Wie alle mechanischen Bauteile macht auch
dieser Distributor eine sorgfältige Reinigung und
Pflege erforderlich. Der ordnungsgemäße Betrieb
kann außerdem durch eventuelle Fehler des
Bedieners während der Zerlegung und der
Reinigung beeinträchtigt werden. Aus diesem
Grund ist es wichtig, dass die täglichen
Prozeduren Zerlegung, Reinigung,
Hygienisierung und Montage bekannt sind, so
dass Fehler durch das für den Distributor
personal ausgeschlossen werden können.
3 INSTALLATION
1Der Distributor aus seiner Verpackung
entnehmen, die für zukünftige Verwendungen
aufbewahrt werden muss.
2Sicherstellen, dass der Distributor während
des Transports keinerlei Beschädigung erfahren
hat. Anderenfalls dem Spediteur sofort Meldung
erstatten.
3Den Distributor auf einen Tisch auflegen, der
in der Lage ist, das Gewicht auch mit voller
Füllung zu tragen.
4Vor dem elektrischen Anschließen des
Distributors sicherstellen, dass die
Netzspannung mit der auf dem Typenschild
angegebenen Betriebsspannung übereinstimmt.
Den Distributor unter Verwendung eines
Netzsteckers mit Erdung unter Beachtung der
geltenden Bestimmungen an das
Einphasenstromnetz anschließen. Sollte das
Trennen des Geräts von der Stromversorgung
über einen allpoligen Schalter erfolgen, muss
dieser Schalter einen Öffnungsabstand der
Kontakte garantieren, der die vollständige
Unterbrechung zu den Bedingungen der
Überspannungskategorie III gestattet. Für den
elektrischen Anschluss des Gerätes keine
Verlängerungskabel verwenden.
5Der Distributor verlässt das Werk nicht
vorgereinigt und hygienisiert. Vor der Benutzung
muss es daher zerlegt, gereinigt und hygienisiert
werden; dabei die Anweisungen im
entsprechenden Abschnitt 7 REINIGUNG
beachten.
4 SICHERHEITSMAßNAHMEN
1Den Distributor nicht benutzen, bevor das
vorliegenden Anweisungshandbuch gelesen
worden ist.
DELICE
Abnehmbare Klarsicht-Behälter stück 1
Fassungsvermögen Einzelbehälter,
ungefähr l 3
Abmessungen:
Breite cm 24
Tiefe cm 29
Höhe cm 41
Nettogewicht, ca kg 4
Bruttogewicht, ca kg 5
Einstellbare Thermostaten stück 1
Geräuschpegel unter 70 db (A)
WICHTIG
Elektrische Eigenschaften: Die auf dem
Typenschild eines jeden einzelnen Distri-
butors angegebenen Daten lesen; das
Typenschild befindet sich unter dem Distri-
butor. Den Seriennummer der Geräte geht
das Symbol # voraus. Es muss stets auf die
Daten Bezug genommen werden, die auf
dem Typenschild angegeben werden.
ACHTUNG
Sicherstellen, dass das Gerät ordnung-
sgemäß geerdet worden ist; anderenfalls
besteht die Gefahr von elektrischen
Schlägen für Personen sowie die Gefahr
der Beschädigung des Distributors.

41700 3 G15EFD 16/20
F
2Den Distributor nicht benutzen, wenn es
nicht ordnungsgemäß geerdet worden ist.
3Für den elektrischen Anschluss des
Distributors keine Verlängerungskabel benutzen.
4Den Distributor nicht in Betrieb nehmen,
wenn er nicht geschlossen und mit Schrauben
gesichert ist.
5Nicht die Finger oder Gegenstände in die
Kühlungsschlitze oder die Öffnung des Hahns
einführen.
6Den Behälter nicht entfernen, wenn die
Maschine in Betrieb ist.
7Dieses Geräte wurde nicht für den Betrieb im
Freien entwickelt.
8Dieses Gerät darf nicht in Bereichen
aufgestellt werden, in denen Wassertropfen
seien können.
9Nicht mit einem Dampfstrahler reinigen.
10 Dieses Gerät kann bei Raumtemperaturen
zwischen +5° und +35°C betrieben werden.
5 GEBRAUCHSANLEITUNGEN
1Den Distributor vor der Benutzung unter
Beachtung der Anweisungen in Abschnitt 7
REINIGUNG des vorliegenden Handbuches
spülen und hygienisieren.
2Den Behälter mit dem gewünschten Produkt
füllen, das unter Beachtung der Anweisungen
des Herstellers zuzubereiten ist.
3Die Abdeckung über dem Behälter
anbringen und sicherstellen, dass sie
ordnungsgemäß positioniert worden ist.
4Die Bedienelemente betätigen(siehe
Abschnitt 5.1 BESCHREIBUNG DER
BEDIENELEMENTE).
5Der Distributor muss immer mit montierter
Abdeckung in Betrieb genommen werden, um
eine eventuelle Verunreinigung des Produkts zu
vermeiden.
6Der Distributor muss ununterbrochen
betrieben werden: Die Heizung schaltet sich
automatisch ab, wenn das Produkt für die
Ausgabe fertig ist. Das Rührwerk läuft weiter.
7Der Distributor weist einen Behälter mit
geschlossenem Boden auf, der zur
Vereinfachung der Reinigung und
Hygienisierung entfernt werden kann.
5. 1 BESCHREIBUNG DER
BETRIEBSSCHALTER
Der Distributor weist einen Hauptschalter mit den
folgenden Funktionen auf:
Der Distributor weist auf der rechten Seite
außerdem ein Thermostat für die Einstellung der
ACHTUNG
Den Behälter nicht entfernen, bis die
Heizplatte kalt ist.
ACHTUNG
Den Behälter nicht vom Distributor entfer-
nen, wenn dieser heißes Produkt enthält.
WICHTIG
Das Geräte muss auf einer waagerechten
Oberfläsche ausgestellt werden.
ACHTUNG
Sollte dieser beschädigt sein, muß das
Stromkabel ausgetauscht werden, umder
Gefahr eines Stromschlages vorzubeugen.
Dieser Austausch darf nur vonqualifizier-
ten Fachleuten ausgeführt werden.
WICHTIG
Dieses Gerät ist nicht für den Gebrauch
von Personen, insbesondere Kindern, mit
eingeschränkten physischen oder menta-
len Fähigkeiten bestimmt. Ausserdem sol-
lte das Gerät nicht mit einem Mangel an
Erfahrung oder Verständnis bedient wer-
den, bevor nicht eine Einweisung von
einem Fachmann erfolgt ist.
Es ist sicherzustellen, dass Kinder nicht
unbeaufsichtigt in die Nähe der Maschine
gelangen.
Position 0 :der Distributor ist abgeschaltet
Position I :sowohl das Rührwerk, als auch
die Heizung sind in Betrieb.

41700 3 G15EFD 17/20
D
D
e
e
l
l
i
i
c
c
e
e
3
3
L
L
Temperatur des Produkts auf.
5. 2 NÜTZLICHE HINWEISE
WÄHREND DES GEBRAUCHS
Zubereitung von Schokolade: Unter Beachtung
der Handwerklichen Vorgehensweise den Kakao
in einer Kasserolle temperieren, bevor er in den
Behälter des Distributors gegossen wird. Bei
Verwendung von konfektionierten Instant-
Produkte die Anweisungen des Herstellers
beachten. Bei diesem Produkttyp kann die
Mischung direkt im Behälter vorgenommen
werden.
Den Distributor einschalten, indem der Schalter in
Position I gebracht wird. Den Knauf des
Thermostats in die Position 90 °C drehen, so
dass die Temperatur für das Kochen des
Produkts erreicht wird. Wenn die Schokolade
fertig ist, die Temperatur durch Drehen des
Thermostatknaufs auf den für die Ausgabe
gewünschten Wert senken.
6 REINIGUNG
Zur Gewährleistung einer perfekten
Konservierung des Geschmacks des Getränkes
sowie der uneingeschränkten Effizienz Ihres
Distributors sind das Spülen und die Reinigung
von grundlegender Bedeutung. Die im Folgenden
beschriebenen Prozeduren haben allgemeinen
Charakter und unterliegen in Abhängigkeit von
den geltenden Hygienebestimmungen
Abweichungen.
Vor dem Zerlegen des Distributors für das Spülen
muss das Produkt entleert werden.
6. 1 DEMONTAGE
1Den Behälter entleeren und die Abdeckung
abnehmen.
2Das Rührwerk von der zentralen Welle
abziehen.
3Den Hahn in der angegebenen Reihenfolge
zerlegen (siehe Abbildung 1).
Bild 1
4Den Behälter entnehmen, indem er nach
oben abgehoben wird.
5Die Tropfschublade herausnehmen und
ausleeren.
6. 2 WASCHEN
1Ein Becken mit ca. vier Litern heißem
Wasser und spezifischem Reinigungsmittel
WICHTIG
Vor dem vollständigen Abschalten des
Distributors (Schalter in Position 0) das
Thermostat auf die Position der Mindest-
temperatur einstellen und warten, bis das
Produkt abgekühlt ist. Dadurch wird vermie-
den, dass das (nicht umgerührte) Produkt
auf der Heizplatte festklebt.
ACHTUNG
Vor dem Abbauen von Komponenten die
Stromversorgung des Gerätes unterbre-
chen; dazu den Netzstecker aus der Netz-
steckdose ziehen.
ACHTUNG
Vor allen Reinigungsarbeiten die elektri-
sche Speisung des Distributors unterbre-
chen; dazu den Netzstecker aus der
Netzsteckdose ziehen.
WICHTIG
Keine Teile des Gerätes in der Geschirr-
spülmachine waschen.

41700 3 G15EFD 18/20
D
vorbereiten und dabei die Angaben des
Herstellers genau einhalten; eine zu starke
Konzentration kann eine Beschädigung der zu
reinigenden Bauteile verursachen, während eine
zu starke Verdünnung die Reinigungswirkung
beeinträchtigt. Keine scheuernden
Reinigungsmittel verwenden.
2Eine geeignete Bürste benutzen und alle
Bauteile, die mit dem Getränk in Kontakt
kommen, sorgfältig mit der Reinigungslösung
reinigen.
3Alle gereinigten Bauteile unter fließendem
Wasser abspülen.
6. 3 DESINFEKTION
Die Hygienisierung muss unmittelbar vor der
Inbetriebnahme des Distributors
vorgenommen werden, täglich; eine längere
Nichtbenutzung nach der Hygienisierung
muss vermieden werden.
1Vor Beginn der im Folgenden beschriebenen
Prozeduren die Hände mit antibakterieller Seife
waschen.
2Eine Wanne mit ca. zwei Litern Lösung aus
heißem Wasser (45 - 60 °C) und
Hygienisierungsprodukt zubereiten, das von den
Behörden Ihres Landes genehmigt worden ist;
dabei die Angaben des Herstellers beachten.
Falls kein spezifisches Hygienisierungsmittel
vorhanden ist, eine Lösung aus Wasser und
Natriumhypochlorit (Chlorbleichlauge) in einem
Verhältnis von 1 Löffel je 2 Liter Wasser
zubereiten.
3Alle zu hygienisierenden Bauteile für die vom
Hersteller des Produkts angegebene Zeit in die
Lösung eintauchen.
4Die hygienisierten Bauteile auf einer
sauberen Fläche an der Luft trocknen lassen.
5Die Außenflächen des Distributors
abtrocknen; dabei keine kratzenden Lappen
verwenden.
6. 4 MONTAGE
1Die Tropfschublade und den Rost in seinen
Sitz einsetzen.
2Den Kolben des Hahns (in Bereich A,
gezeigt auf Abbildung 2) ausschließlich mit
einem lebenmitteltauglichen Fett schmieren.
Bild 2
3Den Hahn an den Behälter anbauen; dabei
mit Bezug auf die Zerlegung in der umgekehrten
Reihenfolge vorgehen (siehe Abbildung 1).
4Den Behälter montieren und dabei die
zentrale Welle in den entsprechenden Sitz
einführen.
5Den Mischer auf die zentrale Welle
einführen.
6Die Abdeckung auf dem Behälter
positionieren.
7 WARTUNG
1Täglich: Den Distributor kontrollieren und
überprüfen, ob an den Dichtungen Produkt
austritt. Im Falle von Lecks zuerst kontrollieren,
ob der Distributor ordnungsgemäß montiert ist,
dann kontrollieren, ob die Dichtungen geschmiert
werden müssen, und anschließend kontrollieren,
ob die Dichtungen beschädigt oder abgenutzt
sind; in diesem Fall müssen sie durch
Originalersatzteile des Herstellers ersetzt
werden.
2Zur Vermeidung von Beschädigungen des
Distributors dürfen die Kunststoffbauteile
ausschließlich mit dem vom Hersteller
gelieferten Fett oder einem anderen mit
Polykarbonat kompatiblem Fett geschmiert
werden.
WICHTIG
Zur Vermeidung von Beschädigungen des
Distributors ausschließlich Reinigungsmit-
tel verwenden, die mit den Bauteilen aus
Kunststoff kompatibel sind.
ACHTUNG
Während der Reinigung des Distributors
keine zu große Menge Wasser in der Nähe
der elektrischen Komponenten verwenden;
anderenfalls besteht die Gefahr von elektri-
schen Schlägen oder die Gefahr einer
Beschädigung des Distributors.

41700 3 G15EFD 19/20
D
D
e
e
l
l
i
i
c
c
e
e
3
3
L
L
MÖGLICHE STÖRUNGEN UND IHRE BEHEBUNG
PROBLEM URSACHE ABHILFE
Mischvorrichtung dreht
sich nicht
Verbindung an Mitnah-
mewelle nicht richtig erfolgt Die richtige Betriebsposi-
tion prüfen
Verbindung zu Mitnahmewelle
defekt Mischvorrichtung und /
oder Mitnahmewelle
austauschen
Getriebe nicht funktionsfähig Siehe unter "Das Getriebe
dreht sich nicht"
Elektrische Leiter gelöst oder
unterbrochen Die elektrischen Leiter
anschließen oder
austauschen
Zu hohe Dickflüssigkeit des
Produktes Das Produkt stärker ver-
dünnen
Getriebe dreht sich nicht Motor überhitzt: “Thermo-
schutz” ausgelöst Die Spannung des
Stromanschlusses prüfen.
Die Belüftung prüfen
(Lamellen der
Seitenwände oder unterer
Teil des Verteilers
verschlossen). Die
Viskosität des Produktes
prüfen
Statorwicklung durchge-
brannt oder defekt Den Motor austauschen
Rotor nicht gelagert Die Ausrichtung der Motor-
lager prüfen
Zahnräder im Getriebe
beschädigt oder abgenutzt Den Motor austauschen
Austritt von Getränk aus
dem Behälter
Dichtung des Gehäuses
defekt oder abgenutzt Die Dichtung austauschen
O-Ring des Ventilkolbens
defekt oder abgenutzt Die O-Ringe des Kolbens
austauschen
Ventilkolben nicht in geschlos-
sener Position Den Hebel oder die Feder
des Ventils prüfen und den
abgenutzten Teil austau-
schen

41700 3 G15EFD 20/20
D
Der Widerstand erwärmt
sich nicht
Widerstand durchgebrannt Den Widerstand
austauschen
Sicherheits-
Temperaturbegrenzer
durchgebrannt
Siehe unter “Sicherheits-
Temperaturbegrenzer
durchgebrannt”
Sicherheits-Temperatur-
begrenzer durchgebran-
nt
Temperaturbegrenzer defekt Durch einen
funktionstüchtigen
ersetzen
Es gelingt nicht, ein au-
sreichend dickflüssiges
Produkt zu erzielen.
Das Betriebsthermostat
(seitlich des Verteilers) ist auf
eine zu niedrige Temperatur
eingestellt
Auf die entsprechende
Temperatur einstellen
Produkt zu stark verdünnt Die Konzentration des
Produktes erhöhen
Es gelingt nicht, ein au-
sreichend heißes Pro-
dukt zu erzielen.
Das Betriebsthermostat
(seitlich des Verteilers) ist auf
eine zu niedrige Temperatur
eingestellt
Auf die entsprechende
Temperatur einstellen
Es besteht kein Kontakt
zwischen Beckenboden und
Widerstand
Das Becken richtig auf
dem Widerstand
positionieren
PROBLEM URSACHE ABHILFE
-
 1
1
-
 2
2
-
 3
3
-
 4
4
-
 5
5
-
 6
6
-
 7
7
-
 8
8
-
 9
9
-
 10
10
-
 11
11
-
 12
12
-
 13
13
-
 14
14
-
 15
15
-
 16
16
-
 17
17
-
 18
18
-
 19
19
-
 20
20


Ugolini 417003 Manuel utilisateur
- Catégorie
- Jouets
- Taper
- Manuel utilisateur
dans d''autres langues
- English: Ugolini 417003 User manual
- Deutsch: Ugolini 417003 Benutzerhandbuch
Documents connexes
-
Ugolini Delice Manuel utilisateur
-
-
-
-
-
-
-
-
-