GEAppliances PFE28RSH Technical Service Manual
- Catégorie
- Frigos
- Taper
- Technical Service Manual

GE Appliances
Louisville, Kentucky 40225
31-9250
*($GRUD&DIp3UR¿OH
TM
)UHQFK'RRU5HIULJHUDWRUV
7HFKQLFDO6HUYLFH*XLGH
April 2016
GE Appliances
&)(76+
&)(86+
&<(76+
&<(86+
')(-*+
')(-0+
')(-6+
*)(**+
*)(*0+
*)(*6+
*)(+*+
*)(+0+
*)(+6+
*<(.0+
*<(.6+
3)(56+
3)+36+
3<(36+

– 2 –
,03257$176$)(7<127,&(
The information in this service guide is intended for use by
individuals possessing adequate backgrounds of electrical,
electronic, and mechanical experience. Any attempt to repair a
major appliance may result in personal injury and property
damage. The manufacturer or seller cannot be responsible for the
interpretation of this information, nor can it assume any liability in
connection with its use.
:$51,1*
To avoid personal injury, disconnect power before servicing
this product. If electrical power is required for diagnosis or test
purposes, disconnect the power immediately after performing the
necessary checks.
5(&211(&7$//*5281',1*'(9,&(6
If grounding wires, screws, straps, clips, nuts, or washers used to
complete a path to ground are removed for service, they must be
returned to their original position and properly fastened.
GE Appliances
Technical Service Guide
Copyright © 2016
All rights reserved. This service guide may not be reproduced in whole or in part
in any form without written permission from the GE Appliances.

– 3 –
(Continued next page)
7DEOHRI&RQWHQWV
Table of Contents .............................................................................................................................................................................3
Safety Requirements .....................................................................................................................................................................6
Introduction .......................................................................................................................................................................................7
Nomenclature ...................................................................................................................................................................................8
Technical Data ..................................................................................................................................................................................9
(OHFWULFDO6SHFL¿FDWLRQV ................................................................................................................................................................10
Tools Needed .....................................................................................................................................................................................10
,QWHULRU$LUÀRZ ..................................................................................................................................................................................11
Installation .........................................................................................................................................................................................12
Fresh Food Door and Freezer Drawer Handles .....................................................................................................13
Freezer Drawer, Bin, and Basket ....................................................................................................................................13
Freezer Drawer Front ..........................................................................................................................................................14
Fresh Food Doors ..................................................................................................................................................................15
Control Features ..............................................................................................................................................................................18
About the Dispenser .......................................................................................................................................................................22
$ERXW$XWR¿OO .....................................................................................................................................................................................23
About the GE RPWFE Water Filter Cartridge.......................................................................................................................24
About the Climate Zone and Temperature Controlled Drawer .................................................................................25
About the Automatic Ice Maker ................................................................................................................................................26
Dealer Demo Mode .........................................................................................................................................................................27
Consumer Control LCD Models .................................................................................................................................................29
About the Home Screen.....................................................................................................................................................29
About Temperature Adjustments ..................................................................................................................................29
About Dispenser Selections .............................................................................................................................................30
About TurboCool
and TurboFreeze ...............................................................................................................................30
About Precise Fill Options ..................................................................................................................................................31
Auto Fill Diagnostic Procedure ........................................................................................................................................32
About Consumer System Settings ................................................................................................................................33
About Sabbath Mode ..........................................................................................................................................................34
About Keurig K-Cup .............................................................................................................................................................35
Component Locator Views ..........................................................................................................................................................45

– 4 –
Control Board Connector Locator ...........................................................................................................................................51
Refrigeration System .....................................................................................................................................................................54
Operation Overview .......................................................................................................................................................................57
Components ......................................................................................................................................................................................60
Hinge Cover .............................................................................................................................................................................60
Ambient Thermistor .............................................................................................................................................................61
RJ45/Wi-Fi Board ..................................................................................................................................................................61
Door Closure Mechanisms ................................................................................................................................................62
Door/Drawer Gaskets .........................................................................................................................................................63
Interior Lights ..........................................................................................................................................................................63
Deli Pan Assembly ...............................................................................................................................................................65
Thermistors ..............................................................................................................................................................................68
Fresh Food Evaporator Cover .......................................................................................................................................69
Fresh Food Defrost Heater ...............................................................................................................................................70
Fresh Food Overtemperature Thermostat ................................................................................................................70
Fresh Food Fan .....................................................................................................................................................................71
Freezer Drawer Slide Assemblies .................................................................................................................................71
Freezer Fan .............................................................................................................................................................................73
Freezer Defrost Heater .......................................................................................................................................................74
Freezer Overtemperature Thermostat........................................................................................................................74
Freezer Evaporator Thermistor ......................................................................................................................................75
Ice Box Fan...............................................................................................................................................................................75
Machine Compartment Cover ......................................................................................................................................76
Freezer and Fresh Food Drain Trap Tubes ..............................................................................................................77
Condenser Fan .......................................................................................................................................................................77
3-Way Valve Coil ...................................................................................................................................................................78
3-Way Valve ...........................................................................................................................................................................79
Inverter ......................................................................................................................................................................................79
Compressor Replacement ................................................................................................................................................80
Inverter Compressor............................................................................................................................................................81
Single-Speed Compressor ................................................................................................................................................81
Dispenser Assembly ............................................................................................................................................................82
(Continued next page)

– 5 –
Ice Box Door Assembly .......................................................................................................................................................85
Ice Bucket ................................................................................................................................................................................86
Icemakers ................................................................................................................................................................................87
Ice Box Thermistor................................................................................................................................................................90
Auger Motor.............................................................................................................................................................................91
RFID Water Filter ..................................................................................................................................................................92
Chilled Water Tank ...............................................................................................................................................................96
Isolation Water Valve ..........................................................................................................................................................99
Water Valve and Flowmeter ............................................................................................................................................99
Articulating Door Mullion .................................................................................................................................................101
Circuit Boards .........................................................................................................................................................................102
Service Diagnostic Mode .............................................................................................................................................................104
Accessing Service Mode for Diagnostic Tests ............................................................................................................104
Boards ........................................................................................................................................................................................105
Thermistors ..............................................................................................................................................................................106
Motor, Damper, Heater .......................................................................................................................................................107
Fans .............................................................................................................................................................................................108
Seal System, Icemaker, Dispenser, Heaters, Lights ...............................................................................................109
Fault Codes.........................................................................................................................................................................................112
Accessing Service Mode for Fault Codes ...................................................................................................................112
Fault Codes & Display .........................................................................................................................................................113
Thermistors ..............................................................................................................................................................................114
Fan Motors ...............................................................................................................................................................................115
Defrost .......................................................................................................................................................................................116
Sealed System ........................................................................................................................................................................117
Main Board ...............................................................................................................................................................................117
Door Board ...............................................................................................................................................................................118
Hot Water and Icemaker ...................................................................................................................................................119
Interaction ................................................................................................................................................................................121
Schematics .........................................................................................................................................................................................123
Warranty .............................................................................................................................................................................................127
Index ...................................................................................................................... ................................................................................128

– 6 –
Prior to disassembly of the refrigerator to access components, GE
Factory Service technicians are REQUIRED to follow the Lockout /
Tagout (LOTO) 6 Step Process:
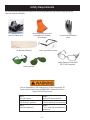
6DIHW\5HTXLUHPHQWV
GE Factory Service Employees are required to use safety glasses with side shields, safety gloves and
steel toe shoes for all repairs.
Steel Toed Work Boot
Electrically Rated Glove and
Dyneema® Cut Resistant
Glove Keeper
Dyneema®Cut Resistant
Glove
Plano Type Safety Glasses
Prescription Safety Glasses
Safety Glasses must be ANSI
Z87.1-2003 compliant
Brazing Glasses
Cut Resistant Sleeve(s)
6WHS
Plan and Prepare
6WHS
Apply LOTO device and lock
6WHS
Shut down the appliance
6WHS
Control (discharge) stored energy
6WHS
Isolate the appliance
6WHS
“Try It” verify that the appliance is
locked out

– 7 –
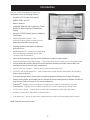
7KH&DIH3UR¿OH*(DQG$GRUD)UHQFK'RRU
Refrigerators have the following features:
• Available in 22-28 cubic foot capacity
• ENERGY STAR
®
TXDOL¿HG
• Made In America
• Integrated Dispenser with Crushed Ice, Chilled
Water, Hot Water and Actual Temperature
Display
• Keurig ® K-CUP® Brewing System available on
Cafe Models
• $GYDQFHG¿OWUDWLRQV\VWHP³*(·V
H[FOXVLYH¿OWUDWLRQV\VWHPUHPRYHVKDUPIXO
pharmaceuticals from water and ice.
• Seamless stainless steel water/ice dispenser
with pullout tray
• Hands-free $XWR)LOO³$OORZV\RXWRZDONDZD\
ZKLOHWKHGLVSHQVHUDXWRPDWLFDOO\¿OOVPRVW
FRQWDLQHUVZLWK¿OWHUHGZDWHU
• Space-saving icemaker in the door and an additional icemaker on some models
• 6WDLQOHVVVWHHOGRRUVZLWKKLGGHQKLQJHV³2ȺHUDVOHHN¿QLVKZLWKWKHFOHDQORRNRIFRQFHDOHGKLQJHV
• An articulating door mullion attached to the left-side door provides a movable center mullion that
maximizes access to the fresh food compartment.
• 6HFXUH&ORVH'RRU6\VWHPV³6HFXUHO\SXOOVWKHGRRUVDQGGUDZHUVVKXW
7ZLQ&KLOOZLWK'XDO(YDSRUDWRUV³8VHVHYDSRUDWRUVWRKHOSPDLQWDLQWHPSHUDWXUHDQGKXPLGLW\
levels to keep foods fresh.
• A full-width deli pan with 3 electronically controlled temperature settings and Colored LED lighting.
• External air thermistor and Humidity Sensor changes the control setting based on ambient condition to
keep the fresh food and freezer at the correct temperature.
• TurboCool
TM
³5DSLGO\FRROVWKHUHIULJHUDWRUFRPSDUWPHQWLQRUGHUWRPRUHTXLFNO\FRROIRRGV
• TurboFreeze
TM
³5DSLGO\FRROVWKHIUHH]HUFRPSDUWPHQWLQRUGHUWRPRUHTXLFNO\IUHH]HIRRGV
• /('3LQ3RLQW/LJKWLQJ³&DVWVDFOHDQEHDXWLIXOOLJKWWKURXJKRXWWKHIUHVKIRRGDQGIUHH]HU
• $YDLODEOHLQ6ODWH:KLWH%ODFN¿QLVKRUVWDLQOHVVVWHHO
• 'URSGRZQWUD\³$OORZVIRUH[WUDGRRUVWRUDJHZKHQ\RXQHHGLWDQGWXFNVDZD\ZKHQ\RXGRQ·W
,QWURGXFWLRQ
127( Features may vary by model.

– 8 –
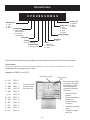
1RPHQFODWXUH
The nomenclature plate
is located on the upper
right wall of the fresh
food compartment. It
contains the following
information:
• Model and Serial
Number
• Minimum Installation
Clearances
• Electrical Voltage,
Frequency
• Maximum Amperage
Rating
• Refrigerant Charge
and Type
The nomenclature breaks down and explains what the letters and numbers mean in the model number.
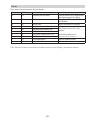
6HULDO1XPEHU
7KH¿UVWWZRFKDUDFWHUVRIWKHVHULDOQXPEHULGHQWLI\WKHPRQWKDQG\HDURIPDQXIDFWXUH7KHOHWWHU
designating the year repeats every 12 years.
([DPSOH: LA123456S = June, 2013
A – JAN
D – FEB
F – MAR
G – APR
H – MAY
L – JUN
M – JUL
R – AUG
S – SEP
T – OCT
V – NOV
Z – DEC
2024 – Z
2023 – V
2022 – T
2021 – S
2020 – R
2019 – M
2018 – L
2017 – H
2016 – G
2015 – F
2014 – D
2013 – A
The mini-manual
is located inside
the hinge cover.
Brand/Product
C - Café
G - GE
D - Adora
C F E 2 8 U S H B S S
Configuration
F - French Door,
Standard Depth
Y - French Door,
Counter Depth
Feature Package
U - Keurig K-Cup
Engineering Digit
Finish
G - High Glass
S - Stainless Steel
M - Slate
Model Year
H - 2014
Handle Color
S - Stainless
B - Black
W - White
Energy Star
Capacity
22 to 28 Cubic Foot
Exterior Color
E - Slate
S - Stainless
B - Black
W - White
Nomenclature
Mini-Manual Location

– 9 –
COLD AIR
FRESH FOOD
FREEZER
MIXED AIR
AIR RETURN TO
EVAPORATOR
EVAPORATOR
EVAP FAN
REFRIGERATOR AIRFLOW
ICEMAKER
FAN
ICE SYSTEM AIRFLOW
FRESH FOOD
FREEZER
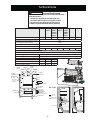
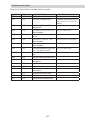
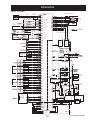
7HFKQLFDO'DWD
$,5)/2:
(/(&75,&$/63(&,),&$7,216
PFE28/ ')(
*)(
GYE22/
PYE22
&:(
3:(
=:(
*1(
*1(
GFE26/
')(
GFE28/
GFE27/
3)+
CFE28 CYE22
5()5,*(5$17&+$5*(DR] 5.375 5.5 5.25 5.25 5.50 5.375 5.25
Thermistor kilo-ohm resistance @ 32°F 16.3
Over temperature Thermostat 140°F
Adaptive Defrost Control Fresh Food 32 hrs
Adaptive Defrost Control Freezer 96 hrs
Electri cal Rating: 115 VAC, 60 Hz 9.5 Amp 9.5 Amp 9.5 Amp 9.5 Amp 9.5 Amp 12 Amp 12 Amp
12/2$'3(5)250$1&(
Control Position 37/0 and Ambient of 65°F to 90°F
Run Time, % @ 65°F 30 to 55
Run Time, % @ 90°F 55 to 95
02'(/67$7,&35(6685(6#36,*
55°F 70°F )
29/28/26 Single Speed 34.8 48.3 60.3
22/23/29 Variable Speed 25.0 35.9 45.3
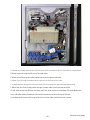
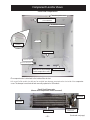
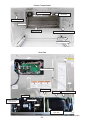
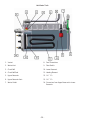
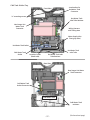
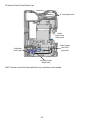
FF LIGHT
SWITCH
DC HINGE
CONNECTOR
FF LED
LIGHT
FF LIGHT
SWITCH
FF LED Light
(on some
models)
FF SENSOR
AMBIENT
SENSOR
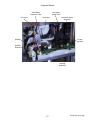
ICEMAKER FAN
WATER VALVE
3 WAY VALVE
COMPRESSOR
CONDENSOR FAN
COMP. POWER CORD
(in Machine Compartment)
EVAP DEFROST HEATER
EVAP DEFROST HEATER
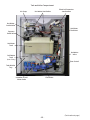
FZ LIGHT SWITCH
MAIN PCB
FF LED
LIGHT
HUMIDITY
SENSOR
EVAP FAN
FZ SENSOR
EVAP SENSOR
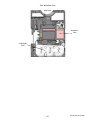
(in Rear)
VACUUM PANEL
LEFT WALL
AC HINGE
CONNECTOR
WARNING
Electrical Shock Hazard
Death or serious injury can result from failure to follow
these instructions.
Service by a qualified service technician only.
Disconnect power before servicing this product.
Reconnect all grounding devices after service.
Replace all parts and panels before operating.

– 10 –
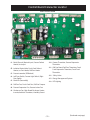
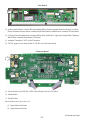
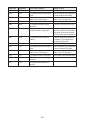
Café Hot Water Door Components
• 'RRU&RQWURO%RDUG: 120 VAC and 13.6 DCV inputs with 5 VDC, 6 VDC, 13.6 VDC, 120 VDC and 120 VAC
outputs
• ,FH:DWHUGLVSHQVHUVZLWFK: 13.6 VDC, Normally Closed (NC) – When not activated, Normally Open (NO) –
When activated
• $XJHU0RWRU: 120 VDC, 110 Ohms
• ,FH%R[7KHUPLVWRU9'&.2KPV#Û)
• )ORZ0HWHU: 5 VDC, 17.6K Ohms and 18.6K Ohms
• )UHH]HU/('OLJKWLQJ: 6 VDC. 20K Ohms
• 'LVSHQVHU%RDUG: 13.6 VDC input
6SHDNHU: 8.8 Ohms
• :DWHU9DOYH:
,VRODWLRQ: 120 VAC, 390 Ohms
,FHPDNHU: 120 VAC, 390 Ohms
&ROG:DWHU: 120 VAC, 390 Ohms
+RW:DWHU: 120 VAC, 390 Ohms
.HXULJ: 120 VAC, 390 Ohms
• +RW:DWHU7DQN:
+HDWHU: 120 VAC input, 19 Ohms /
12 Ohms Keurig
7KHUPLVWRUV9'&.2KPV#Û)
)ORDWVZLWFK: 5 VDC, NO - Full, NC - Not full
• ,FHPDNHU: 120 VAC and 5 VDC inputs
0RWRU: 120 VAC, 2.9K Ohms
+HDWHU: 120 VAC, 110 Ohms
- 7KHUPLVWRU9'&.2KPV#Û)
+DOOVVHQVRUV: 0 – 5 VDC
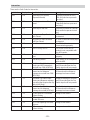
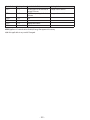
(OHFWULFDO6SHFL¿FDWLRQV
1/8”, 3/16", 5/32” and 1/4” Allen Keys
1/4”, 5/16” and 3/8” Nut drivers, sockets or wrenches
T15, T20 and T27Torx bits
• 'RRU+HDWHUV: 0 – 13.6 VDC
5HFHVV+HDWHU: 146 Ohms
)LOO7XEH+HDWHU: 321 Ohms
$UWLFXODWLQJ0XOOLRQ+HDWHU: 25 Ohms
,FH%R[+HDWHU: 38 Ohms
• .HXULJ&RPSRQHQWV:
9HQW9DOYHV: 13.6 VDC, 118 Ohms
+RW:DWHU2XWOHW9DYOH: 13.6 VDC /
118 Ohms
$LU3XPS: 2 - 9 VDC, 9 Ohms
%UDFNHWDQG0RWRU$VVHPEO\:
1R]]OH0RWRU: 10 - 13 VDC, 9 Ohms
1R]]OH3RVLWLRQ6ZLWFK: (NO)
%UHZHU3RVLWLRQ6ZLWFK: (NO) - When
brewer not inserted
7RROV1HHGHG
Pocket Type straight blade screwdrivers, 2 needed
#2 Phillips screwdriver
127(: All Ohm readings are +/- 10%

– 11 –
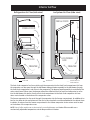
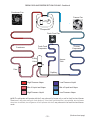
,QWHULRU$LUÀRZ
5HIULJHUDWRU$LU)ORZVLGHYLHZ ,FH6\VWHP$LU)ORZVLGHYLHZ
FRESH FOOD
FREEZER
EVAP FAN
FAN
FRESH FOOD
FREEZER
ICEMAKER
COLD AIR
MIXED AIR
AIR RETURN TO
EVAPORATOR
The fresh food evaporator fan forces air through the evaporator into the fresh food compartment. Air from
the evaporator can also pass through the deli drawer damper/heater assembly to the deli drawer, through
the fresh food compartment, and return to the evaporator. The damper/heater assembly is controlled by the
main control board. When open, the damper allows the chilled air from the fresh food evaporator to move
into the deli drawer. Air returns from the fresh food compartment to the fresh food evaporator via three
return vents located on the bottom of the evaporator cover.
The freezer evaporator fan forces air through the evaporator into the freezer compartment. An additional ice
box fan circulates air into and returns air from the ice box via plastic conduits embedded in the cabinet foam
insulation. Air returns from the freezer compartment to the freezer evaporator via two return vents located
on the bottom of the evaporator cover.
127(0RVW3UR¿OHPRGHOVXVHDQHOHFWURQLFDOO\FRQWUROOHGGDPSHUDQGheater. Other models use a
mechanically adjustable temperature control damper without a heater.

– 12 –
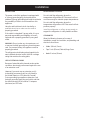
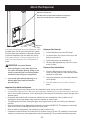
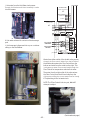
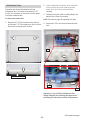
,QVWDOODWLRQ
32:(5&25'
The power cord of this appliance is equipped with
a 3-prong (grounding) plug, that mates with a
standard 3-prong (grounding) wall outlet to minimize
the possibility of electric shock hazard from this
appliance.
Have the wall outlet and circuit checked by a
TXDOL¿HGHOHFWULFLDQWRPDNHVXUHWKHRXWOHWLV
properly grounded.
If the outlet is a standard 2-prong outlet, it is your
personal responsibility and obligation to have it
replaced with a properly grounded 3-prong wall
outlet.
:$51,1*Do not, under any circumstances, cut
or remove the third (ground) prong from the power
cord. For personal safety, this appliance must be
properly grounded.
The refrigerator should always be plugged into its
own individual electrical outlet, that has a voltage
rating that matches the rating plate.
86(2)(;7(16,21&25'6
Because of potential safety hazards under certain
conditions, we strongly recommend against the use
of an extension cord.
However, if you must use an extension cord, it
is absolutely necessary that it be a UL-listed (in
the United States) or a CSA-listed (in Canada),
3-wire grounding-type appliance extension cord
having a grounding-type plug and outlet, and that
the electrical rating of the cord be 15 amperes
(minimum) and 120 volts.
5()5,*(5$725/2&$7,21
Do not install the refrigerator where the
temperature will go below 60°F because it will not
run often enough to maintain proper temperatures.
Do not install the refrigerator where the
temperature will go above 100°F because it will not
perform properly.
,QVWDOOWKHUHIULJHUDWRURQDÀRRUVWURQJHQRXJKWR
support the refrigerator in a fully loaded condition.
&/($5$1&(6
Allow the following clearances for ease of
installation, proper air circulation, and plumbing and
electrical connections.
• 6LGHV: 1/8 inch (3 mm)
• 7RS: 1 inch (25 mm) Cabinet/Hinge Cover
• %DFN: 2 inches (50 mm)

– 13 –
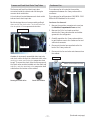
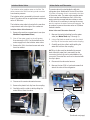
)UHVK)RRG'RRUDQG)UHH]HU'UDZHU
+DQGOHV
)UHVK)RRG'RRUDQG)UHH]HU'UDZHU+DQGOHV
5HPRYDO
The handle design varies based on models, however,
the installation is the same.
6WDLQOHVV6WHHODQG3ODVWLF:
Loosen the set screws with an 1/8 in. Allen wrench
and remove the handle.
127( If the handle mounting fasteners need to be
adjusted or removed, use a 1/4 in. Allen wrench.
MOUNTING
F
ASTENERS
)UHVK)RRG'RRU+DQGOH
)UHH]HU'UDZHU+DQGOH
MOUNTING
F
ASTENERS
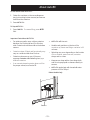
)UHH]HU'UDZHU%LQDQG%DVNHW
)UHH]HU'UDZHU%LQDQG%DVNHW5HPRYDO
1. Open the freezer drawer, then lift and remove
the freezer drawer.
2. Remove the freezer drawer bin by pushing the
plastic tab on either the left or right side to
release the bin hinge pin.
3. Remove freezer basket by lifting up the rear of
the basket and moving basket rearward until
the front of the basket can be rotated upward
and out.

– 14 –
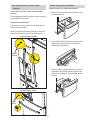
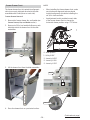
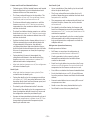
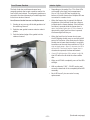
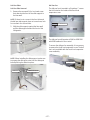
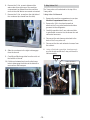
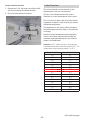
127(
• When installing the freezer drawer front, make
sure the drawer alignment tabs are placed
inside the alignment slots before installing the
six 3/8 in. hex head bolts.
• An adjustment knob is provided on each side
of the freezer drawer front to change the
horizontal drawer position using a T-27 driver.
The freezer drawer front is inserted into alignment
slots (one on each side) and attached to the slide
assemblies with 6 bolts (three on each side).
)UHH]HU'UDZHU5HPRYDO
1. Remove the freezer drawer, bin, and basket (see
)UHH]HU'UDZHU%LQDQG%DVNHW section).
2. Remove six 3/8 in. hex head bolts (three on each
side) that attach the drawer front to the slide
assemblies.
3. Lift the drawer front from the slide assemblies.
4. Place the drawer front on a protected surface.
)UHH]HU'UDZHU)URQW
L
I
F
T
Knob
Slot
Tab
Set Screw
0 - Initial position
1 - Lift by 0.050”
-1 - Lower by 0.050”
-2 - Lower by 0.100
-3 - Lower by 0.150”
(Continued next page)

– 15 –
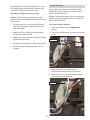
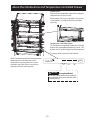
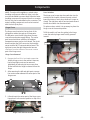
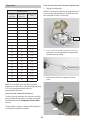
After installation of the freezer drawer front, check
for uniform gaps (top and bottom of right and left
hand side). The gap should be 0.6 inches.
$GMXVWLQJWKH)UHH]HU'UDZHU)URQW*DSV
&DXWLRQ The 6 mounting screws (three on each
side) are NOT interchangeable with the center or top
hinge screws.
1. Loosen the six 3/8 in. hex head bolts (three on
each side) that attach the drawer front to the
slide assemblies.
2. Adjust the 3/32 in. Allen set screw clockwise if
the gap at the top is too big.
3. Adjust the set screw counterclockwise if the gap
at the bottom is too big.
4. Tighten the 3 screws on each side (right and left).
5. Recheck the gaps and repeat steps 1 to 4, if
required.
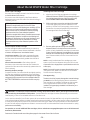
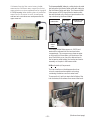
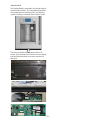
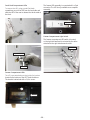
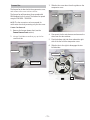
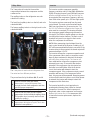
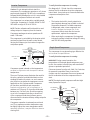
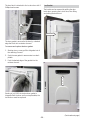
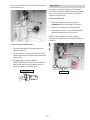
)UHVK)RRG'RRUV
The procedure to remove the right and left fresh
food doors is similar. There are no wires or water
lines on the right side door.
&DXWLRQTo prevent damage or injury, securely tape
the door shut with masking tape or have a second
person support the door.
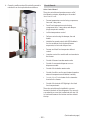
/HIW)UHVK)RRG'RRU5HPRYDO
1. Remove the hinge cover (see Hinge Cover
section).
2. Disconnect both electrical connectors at the top
cover.
3. Remove the 1/4 in. hex head screw to
disconnect the ground wire from the hinge.
4. Remove the 1/4 in. hex head screw to remove
the strain relief from the hinge.
'LVFRQQHFW
5HPRYH
(Continued next page)

– 16 –
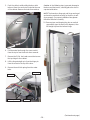
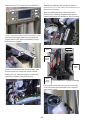
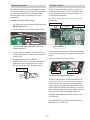
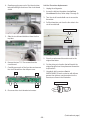
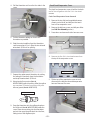
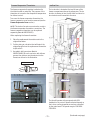
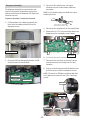
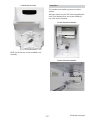
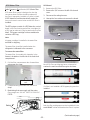
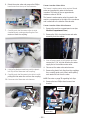
5. Push the collar in while pulling the door inlet
tube out from the connector located at the rear
of the cabinet. Remove the tube from retainer.
6. Pull the water line through the case conduit
from the top to free the line for door removal.
7. Remove the 3/8 in. hex head screws that secure
the top hinge to the cabinet.
8. Lift the hinge straight up to free the hinge pin
from the recess in the top of the door.
9. Remove the anti-kink spring from the water
tube.
(Continued next page)
Retainer
Connector
Water Line
3/8" Hinge Bolts
Hinge Pin
Tube Spring
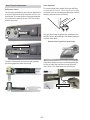
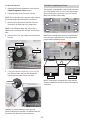
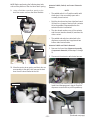
&DXWLRQ: In the following step, to prevent damage to
the door and electronics, carefully place the door in
a protected location.
127( The lower door hinge pin and hinge are keyed
and must be matched correctly for the door to self-
close properly. For proper installation later, please
follow the directions carefully.
10. Remove tape, and keeping the door as vertical
as possible, open the door to 90 degrees+, then
lift straight up from the bottom hinge.
L
I
F
T

– 17 –
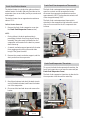
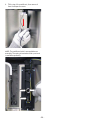
/HIW)UHVK)RRG'RRU,QVWDOODWLRQ
127( To close correctly to the cabinet, the hinge
pin must be properly aligned with the lower hinge.
1. With the left side door at 90 degrees+ to the
front of the case, lower the refrigerator door
onto the center hinge. Ensure that the door and
hinge align correctly.
2. Rotate the door closed and make sure the pin
on top of the articulating mullion engages
the guide located at the top of the fresh food
compartment.
3. Install the top hinge, water line, strain relief,
ground wire, and connect the wire harnesses.
Install the hinge cover.
If the door will not close after reinstalling, it will
be necessary to remove and turn the door upside
down, and check the alignment mark and arrow.
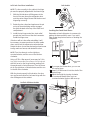
Rotate the door-closure mechanism hex head screw
to align mark and arrow, and reinstall the door.
127(Turn the closer pin on the right door
counterclockwise, and the one on the left door
clockwise.
Using a 5/32 in. Allen wrench (some may be 1/4 in.
KH[DOLJQWKHSDUDOOHOÀDWVXUIDFHVRIWKHKLQJHSLQ
with the arrow on the hinge bushing, making sure
the purple mark is facing the arrow. Turn the closer
pin on the right door counterclockwise and the one
on the left door clockwise.
With the pin set properly in this location, the door
can now be remounted on the lower hinge with the
door 90 degrees to the cabinet.
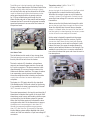
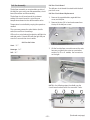
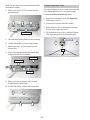
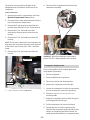
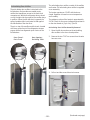
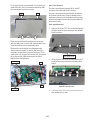
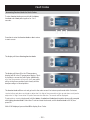
3UR¿OH*($GRUD0RGHOV
&DIH0RGHOV
Remember a level refrigerator is necessary for
getting the doors perfectly even. If you need
help, review the previous section on leveling the
refrigerator.
If you open the freezer door, you can see
the center hinge.
Insert 1/4” Allen wrench into the shaft of the
center hinge.
Adjust the height by turning clockwise
or counterclockwise. When you turn
counterclockwise, the door will move up.
A
B
When
the left
door is
lower than
the right
door.
When
the left
door is
higher than
the right
door.
Adjustment
point
C
RAISE
/HYHOLQJWKH)UHVK)RRG'RRUV

– 18 –
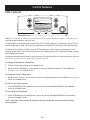
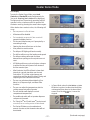
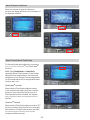
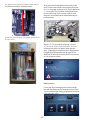
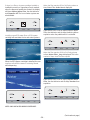
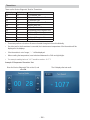
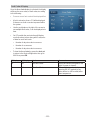
&RQWURO)HDWXUHV
Temperature Express Modes Settings
Water
Lock
Controls
Precise
Fill
Hot
Water
Light
Water Crushed Cubed
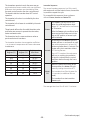
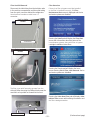
127(7KHUHIULJHUDWRULVVKLSSHGZLWKSURWHFWLYH¿OPFRYHULQJWKHWHPSHUDWXUHFRQWUROV,IWKLV¿OPZDVQRW
removed during installation, remove it now.
The temperature controls are preset in the factory at 37°F for the refrigerator compartment, and 0°F for the
freezer compartment. Allow 24 hours for the temperature to stabilize to the preset recommended settings.
The temperature controls can display both the SET temperature as well as the actual temperature in the
refrigerator and freezer. The actual temperature may vary slightly from the SET temperature based on usage
and operating environment.
For optimal temperature performance, we recommend to avoid placing food or other items directly at the air
ÀRZYHQWVRUWKHIUHVKIRRGDLUWRZHUWKXVEORFNLQJWKHDLUÀRZ
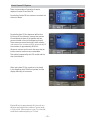
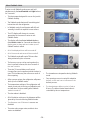
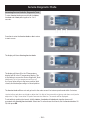
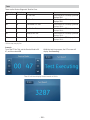
7R&KDQJHWKH5HIULJHUDWRU7HPSHUDWXUH
1. Touch the Temperature button on the +20( screen.
2. Below the word “Refrigerator”, use the arrows to select the desired temperature. Press '21( when
¿QLVKHGWRUHWXUQWRWKH+20( screen.
7R&KDQJHWKH)UHH]HU7HPSHUDWXUH
1. Below the word “Freezer”, use the arrows to select the desired temperature. Press '21(ZKHQ¿QLVKHGWR
return to the +20( screen.
7R7XUQ2))WKH&RROLQJ6\VWHP
1. Access 6(77,1*6 from the +20( screen. Page over and tap &22/,1*6<67(021. Press '21( to
return to the +20( screen.
7R7XUQ21WKH&RROLQJ6\VWHP
1. Access 6(77,1*6 from the +20( screen. Page over and tap &22/,1*6<67(02)). Press '21( to
return to the +20( screen.
127(7XUQLQJWKHFRROLQJV\VWHPRȹVWRSVWKHFRROLQJWRUHIULJHUDWRUEXWLWGRHVQRWVKXWRȹWKH
HOHFWULFDOSRZHU
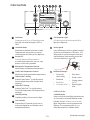
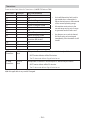
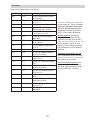
&DIH&RQWUROV

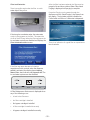
– 19 –
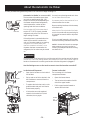
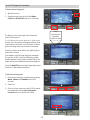
W
LFNWRXSORDGSHUVRQDO
DWRU/&'VFUHHQ
F
UHHQSURPSWVWRORDG
86%&RYHU
(Continued next page)
Temperature Express Modes Settings
Water
Lock
Controls
Precise
Fill
Hot
Water
Light
Water Crushed Cubed
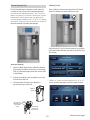
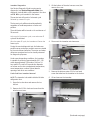
1
+RW:DWHU /(''LVSHQVHU/LJKW
'LVSHQVHVXSWRR]RI¿OWHUHGKRWZDWHU
from the user selected range of 90°F to
185°F.
/('OLJKWLQJWKDWFDQEHWXUQHGRQRȺWR
light your dispenser.
+RW:DWHU.QRE
3KRWR8SORDG
Illuminates to indicate hot water is ready.
Dispenses with two motions: a counter-
clockwise twist and then push to dispense.
Insert USB memory stick to upload personal
photos to the refrigerator LCD screen. LCD
will provide on screen prompts to load and
view slideshow. Make sure the photos are
in the root directory in your USB.
3UHFLVH)LOO
3UHFLVHO\GLVSHQVHV¿OWHUHGZDWHULQ
accurate measurements in ounces, cups,
quarts, or liters using a paddle.
5HIULJHUDWRU7HPSHUDWXUH&RQWURO
Adjust freezer compartment temperature.
)UHVK)RRG7HPSHUDWXUH&RQWURO
$GGLWLRQDO6HWWLQJV
Adjust fresh food compartment temperature • Connected
Home ready
• Slideshow
• 5HVHW¿OWHU
• ,FHPDNHURQRȺ
• Door alarm
• Sound control
• Cooling system
2Q2Ⱥ
• Metric/English
units
7XUER)UHH]H6HWWLQJ
Activate TurboFreeze™ to quickly restore
freezer temperatures after frequent door
openings.
7XUER&RRO6HWWLQJ
Activate TurboCool™ to quickly restore
fresh food temperature after frequent door
openings.
Additional Modes:
• 6DEEDWK0RGH
Press and hold lock and light simultaneously
for 3 seconds to enter/exit Sabbath mode.
Activate 6DEEDWK0RGHWRWXUQRȺLQWHULRU
lights, temperature control and advanced
features. The compressor will run on a
timed defrost when in Sabbath mode.
+XPLGLW\6HWWLQJ
Humidity setting can be normal or high.
/RFN&RQWUROV
Press and hold 3 seconds to lock out ice
and water dispenser and all feature and
temperature buttons.
2
3
4
5
6
7
8
9
10
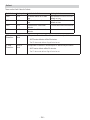
&DIH&RQWUROV

– 20 –
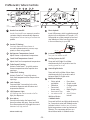
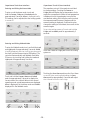
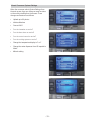
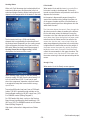
1
+DQGV)UHH$XWR¿OO 3KRWR8SORDG
+DQGVIUHH$XWR¿OOXVHVsensors to monitor
container heigh to automatically dispense
¿OWHUHGZDWHUZLWKRXWKDYLQJWRDFWLYDWHWKH
paddle.
Insert USB memory stick to upload personal
photos to the refrigerator LCD screen. LCD
will provide on screen prompts to load and
view slideshow. Make sure the photos are
in the root directory in your USB.
3UHFLVH)LOO6HWWLQJ
3UHFLVHO\GLVSHQVHV¿OWHUHGZDWHULQ
accurate measurements in ounces, cups,
quarts, or liters using paddle.
5HIULJHUDWRU7HPSHUDWXUH&RQWURO ,FH0DNHU6HWWLQJ
Adjust freezer compartment temperature. 7XUQ\RXULFHPDNHUVRQRȺ
)UHVK)RRG7HPSHUDWXUH&RQWURO &RROLQJ6\VWHP2Q2ȹ
Adjust fresh food compartment temperature Press and hold Fridge & Ice Maker
simultaneously for 3 seconds to turn the
FRROLQJV\VWHPRQRURȺ
7XUER)UHH]H6HWWLQJ
Activate TurboFreeze™ to quickly restore
freezer temperatures after frequent door
openings.
0HWULF(QJOLVK8QLWV
Press and hold Ice Maker & door alarm
simultaneously for 3 seconds to switch
between Metric & English units.
7XUER&RRO6HWWLQJ
Activate TurboCool™ to quickly restore
fresh food temperature after frequent door
openings.
$GGLWLRQDO6HWWLQJV
• Photo upload
and delete
• Slideshow
• Connected
Home ready
• 5HVHWZDWHU¿OWHU
• ,FHPDNHURQRȺ
• Door alarm
• Sound control
• Cooling system
2Q2Ⱥ
• Metric/English
units
• $XWR¿OOYLGHR
tutorial
/RFN&RQWUROV
Press and hold 3 seconds to lock out ice
and water dispenser and all feature and
temperature buttons.
/(''LVSHQVHU/LJKW
/('OLJKWLQJWKDWFDQEHWXUQHGRQRȺWR
light your dispenser.
'RRU$ODUP
Sounds to alert when the freezer food
doors have been left open. Press and hold
Door Alarm pad and it will toggle the sound
EHWZHHQORZKLJKDQGRȺ
6HOHFW0RGHOV2QO\
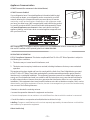
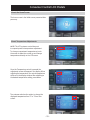
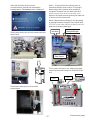
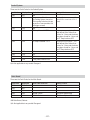
3UR¿OH*($GRUD&RQWUROV
Cubed
Express Mode
Settings
Precise Fill
Control
Lock
Light
Auto Fill
Water
Crushed
Cubed
Temperature
W
LFNWRXSORDGSHUVRQDO
DWRU/&'VFUHHQ
F
UHHQSURPSWVWRORDG
86%&RYHU
Additional Modes:
• 6DEEDWK0RGH
Press and hold lock and light simultaneously
for 3 seconds to enter/exit Sabbath mode.
Activate 6DEEDWK0RGHWRWXUQRȺLQWHULRU
lights, temperature control and advanced
features. The compressor will run on a
timed defrost when in Sabbath mode.
La page charge ...
La page charge ...
La page charge ...
La page charge ...
La page charge ...
La page charge ...
La page charge ...
La page charge ...
La page charge ...
La page charge ...
La page charge ...
La page charge ...
La page charge ...
La page charge ...
La page charge ...
La page charge ...
La page charge ...
La page charge ...
La page charge ...
La page charge ...
La page charge ...
La page charge ...
La page charge ...
La page charge ...
La page charge ...
La page charge ...
La page charge ...
La page charge ...
La page charge ...
La page charge ...
La page charge ...
La page charge ...
La page charge ...
La page charge ...
La page charge ...
La page charge ...
La page charge ...
La page charge ...
La page charge ...
La page charge ...
La page charge ...
La page charge ...
La page charge ...
La page charge ...
La page charge ...
La page charge ...
La page charge ...
La page charge ...
La page charge ...
La page charge ...
La page charge ...
La page charge ...
La page charge ...
La page charge ...
La page charge ...
La page charge ...
La page charge ...
La page charge ...
La page charge ...
La page charge ...
La page charge ...
La page charge ...
La page charge ...
La page charge ...
La page charge ...
La page charge ...
La page charge ...
La page charge ...
La page charge ...
La page charge ...
La page charge ...
La page charge ...
La page charge ...
La page charge ...
La page charge ...
La page charge ...
La page charge ...
La page charge ...
La page charge ...
La page charge ...
La page charge ...
La page charge ...
La page charge ...
La page charge ...
La page charge ...
La page charge ...
La page charge ...
La page charge ...
La page charge ...
La page charge ...
La page charge ...
La page charge ...
La page charge ...
La page charge ...
La page charge ...
La page charge ...
La page charge ...
La page charge ...
La page charge ...
La page charge ...
La page charge ...
La page charge ...
La page charge ...
La page charge ...
La page charge ...
La page charge ...
La page charge ...
La page charge ...
-
 1
1
-
 2
2
-
 3
3
-
 4
4
-
 5
5
-
 6
6
-
 7
7
-
 8
8
-
 9
9
-
 10
10
-
 11
11
-
 12
12
-
 13
13
-
 14
14
-
 15
15
-
 16
16
-
 17
17
-
 18
18
-
 19
19
-
 20
20
-
 21
21
-
 22
22
-
 23
23
-
 24
24
-
 25
25
-
 26
26
-
 27
27
-
 28
28
-
 29
29
-
 30
30
-
 31
31
-
 32
32
-
 33
33
-
 34
34
-
 35
35
-
 36
36
-
 37
37
-
 38
38
-
 39
39
-
 40
40
-
 41
41
-
 42
42
-
 43
43
-
 44
44
-
 45
45
-
 46
46
-
 47
47
-
 48
48
-
 49
49
-
 50
50
-
 51
51
-
 52
52
-
 53
53
-
 54
54
-
 55
55
-
 56
56
-
 57
57
-
 58
58
-
 59
59
-
 60
60
-
 61
61
-
 62
62
-
 63
63
-
 64
64
-
 65
65
-
 66
66
-
 67
67
-
 68
68
-
 69
69
-
 70
70
-
 71
71
-
 72
72
-
 73
73
-
 74
74
-
 75
75
-
 76
76
-
 77
77
-
 78
78
-
 79
79
-
 80
80
-
 81
81
-
 82
82
-
 83
83
-
 84
84
-
 85
85
-
 86
86
-
 87
87
-
 88
88
-
 89
89
-
 90
90
-
 91
91
-
 92
92
-
 93
93
-
 94
94
-
 95
95
-
 96
96
-
 97
97
-
 98
98
-
 99
99
-
 100
100
-
 101
101
-
 102
102
-
 103
103
-
 104
104
-
 105
105
-
 106
106
-
 107
107
-
 108
108
-
 109
109
-
 110
110
-
 111
111
-
 112
112
-
 113
113
-
 114
114
-
 115
115
-
 116
116
-
 117
117
-
 118
118
-
 119
119
-
 120
120
-
 121
121
-
 122
122
-
 123
123
-
 124
124
-
 125
125
-
 126
126
-
 127
127
-
 128
128


GEAppliances PFE28RSH Technical Service Manual
- Catégorie
- Frigos
- Taper
- Technical Service Manual
dans d''autres langues
- English: GEAppliances PFE28RSH
Autres documents
-
 GE Profile Series PWE23KYNFS Le manuel du propriétaire
-
GE PSB42YSRSS Le manuel du propriétaire
-
GE CSB48WP2RS1 Le manuel du propriétaire
-
GE CSB48YP2NS1 Le manuel du propriétaire
-
Avanti RIM49U3SIS Manuel utilisateur
-
GE FUF21QRRWW Le manuel du propriétaire
-
LG Electronics LFXS28566D Mode d'emploi
-
GE 18 Serie Le manuel du propriétaire
-
GE CCP06BP3PD1 Le manuel du propriétaire
-
