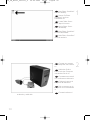
Philips PBDV1640G/35 Manuel utilisateur
- Catégorie
- Lecteurs de disques optiques
- Taper
- Manuel utilisateur

• Einbau dieses Laufwerks in den PC
Verwendung der Software mit diesem Laufwerk
• Comment installer cet appareil dans l’ordinateur ?
Comment utiliser les logiciels de cet appareil ?
• Come installare questa unità sul PC
Come usare il software con questa unità
• Hoe installeer ik dit station in mijn PC?
Hoe gebruik ik de programma's?
• ¿Cómo instalar esta unidad en su ordenador?
¿Cómo utilizar el software con esta unidad?
How to install this drive in your PC?
How to use the software with this drive?
For Internal ReWriters
using
Nero 6
Version 1.0
9305 125 2473.3
How_TO_Nero6_Versie1_0 20-02-2004 08:05 Pagina 1

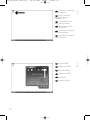
Contents - Inhalt - Table des matières - Indice - Inhoud - Índice
2
Installation How to install this drive in my computer? 5
Video How to capture video from a digital DV-camcorder? 19
How to make a video disc from video files which are
on the hard disk or a disc? 29
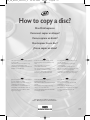
Copy How to copy a disc? 37
Data How to make a Data disc? 43
Music How to make an Audio disc? 51
Warranty How to find warranty information? 59
Installation Einbau dieses Laufwerks in den Computer 5
Video Videos von einem digitalen DV-Camcorder aufnehmen 19
Wie erstellt man eine Video Disk von Video-Dateien,
die sich auf der Festplatte oder einer Disk befinden? 29
Kopieren Eine Disk kopieren 37
Daten Eine Daten-Disk erstellen 43
Musik Erstellen einer Audio-Disk 51
Garantie Wie findet man Garantie-Informationen? 59
Installation Comment installer ce lecteur dans l’ordinateur? 5
Vidéo Comment acquérir les images vidéo d’une caméra
numérique DV ? 19
Comment créer un disque vidéo à partir de fichiers
vidéo enregistrés sur le disque dur ou sur un disque ? 29
Copie Comment copier un disque? 37
Données Comment créer un disque de données ? 43
Musique Comment créer un disque audio ? 51
Garantie Comment trouver les informations relatives à la garantie? 59
UK
D
F
How_TO_Nero6_Versie1_0 20-02-2004 08:05 Pagina 2
La page charge ...
La page charge ...

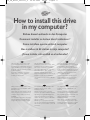
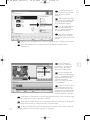
How to install this drive
in my computer?
Einbau dieses Laufwerks in den Computer
Comment installer ce lecteur dans l’ordinateur ?
Come installare questa unità sul computer
Hoe installeer ik dit station in mijn computer?
¿Cómo instalar esta unidad en el ordenador?
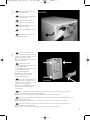
The next pages show how to install
your new DVD-ReWriter in the PC.
Since there are many brands and types
of PC's available, the next photographs
show only examples on how your drive
could be installed.
For specific information on your PC,
please refer to your PC manual or
contact your local dealer.
Auf den nächsten Seiten wird
beschrieben, wie Sie Ihren neuen DVD-
ReWriter in den PC einbauen können.
Da es viele verschiedene PC-Marken
und –Typen gibt, zeigen die folgenden
Fotos nur Beispiele dafür, wie Ihr
Laufwerk eingebaut werden kann.
Für spezielle Informationen zu Ihrem PC
beachten Sie bitte Ihr PC-Handbuch,
oder wenden Sie sich an Ihren Händler
vor Ort.
Les pages qui suivent illustrent la
procédure d’installation de votre nouveau
DVD-ReWriter dans l’ordinateur.
Il existe un grand nombre de marques
et de modèles d’ordinateurs. Les photos
suivantes ne sont présentées qu’à titre
d’illustration de la procédure à suivre
pour installer l’appareil.
Pour des informations spécifiques sur
votre ordinateur, reportez-vous à son
mode d’emploi ou contactez votre
revendeur.
Nelle prossime pagine verranno date
informazioni su come installare DVD-
ReWriter sul PC.
Poiché esistono molte marche e tipi di
PC, le prossime foto mostreranno solo
esempi di come l'unità possa essere
installata.
Per informazioni specifiche sul proprio
PC, fare riferimento al manuale PC o
rivolgersi al proprio rivenditore locale.
De volgende pagina's beschrijven het
installeren van de nieuwe DVD-
ReWriter in uw PC.
Omdat er vele soorten en merken
computers zijn, zullen de hierna volgende
afbeeldingen hoogstwaarschijnlijk niet
exact overeenkomen met uw eigen
situatie. Ze dienen slechts ter illustratie
van het installeren.
Raadpleeg voor specifieke informatie
over uw eigen computer de handleiding
van uw PC, of neem contact op met uw
leverancier.
Las páginas siguientes muestran cómo
instalar su nueva regrabadora en el
DVD-PC.
Puesto que hay muchas marcas y tipos
de ordenadores personales disponibles,
las fotografías siguientes muestran sólo
algunos ejemplos de cómo podría
instalarse la unidad.
Para obtener información específica
sobre su ordenador personal, por favor
consulte el manual de su PC o póngase
en contacto con su distribuidor local.
UK D F
I NL E
5
How_TO_Nero6_Versie1_0 20-02-2004 08:05 Pagina 5

6
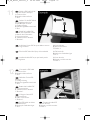
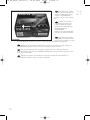
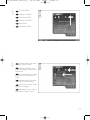
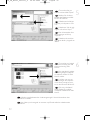
Tu rn your computer off.
Schalten Sie Ihren
Computer aus.
Éteignez l’ordinateur.
Spegnere il computer.
Schakel de computer uit.
Apague el ordenador.
Touch a unpainted
metal part (eg. your heating or
an unpainted part of your
computer case) to avoid any
damage to your computer by
electrostatic discharge.
Berühren Sie ein
unbemaltes Metallteil (z.B. Ihre
Heizung oder ein nicht
bemaltes Teil Ihres Computer-
gehäuses), um zu vermeiden,
dass Ihr Computer durch
elektrische Entladung
beschädigt wird.
Touchez une partie
métallique non peinte (p.ex.le
radiateur ou une partie nue
du capot de votre ordinateur)
pour éviter tout risque de décharge électrostatique qu endommagerait l’ordinateur.
Toccare una parte di metallo non verniciata (ad es. il riscaldamento o una parte
non verniciata del telaio del computer) per evitare di danneggiare il computer con
scariche elettrostatiche.
Om uw te computer beschermen tegen elektrostatische ontladingen, moet u altijd
eerst een ongeverfd metalen deel aanraken (bijv. een verwarmingsbuis of het
computerframe) om uzelf te ontladen.
Toque alguna parte metálica sin pintar (por ejemplo: su calefacción o alguna parte
sin pintar de la carcasa del ordenador) para evitar producir daños al ordenador por
descargas electrostáticas.
UK
D
F
I
NL
E
2
1
UK
D
F
I
NL
E
How_TO_Nero6_Versie1_0 20-02-2004 08:05 Pagina 6

Disconnect the power
cable from the PC.
Ziehen Sie das Netzkabel
vom Computer ab.
Débranchez le câble
d’alimentation de l’ordinateur.
Disconnettere il cavo di
alimentazione dal PC.
Trek de netstekker uit de
PC.
Desconecte el cable de
alimentación del PC.
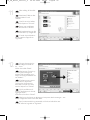
Open your computer.
You may have to unleash screws
which are mostly located at the
back of your computer.
➤ See your computer manual
for more details
Öffnen Sie Ihren
Computer. Eventuell müssen Sie
hierzu Schrauben
herausdrehen, die sich meistens
an der Rückseite Ihres
Computers befinden.
➤ Weitere Informationen
hierzu finden Sie in Ihrem
Computerhandbuch.
Ouvrez l’ordinateur. Pour
cela, il peut être nécessaire de
desserrer une ou plusieurs vis à
l’arrière de l’ordinateur.
➤ Pour plus de détail, reportez-
vous au mode d’emploi de
l’ordinateur.
Aprire il computer. È possibile che si dovranno svitare delle viti che in genere si
trovano sul pannello posteriore del computer.
➤ Per ulteriori informazioni fare riferimento al manuale del computer.
Maak uw computer open. Meestal moet u de schroeven aan de achterkant van uw
computer losschroeven.
➤ Raadpleeg de handleiding van uw PC voor details over het openen van de PC
Abra el ordenador. Tendrá que quitar los tornillos que suelen ir colocados en la
parte posterior del ordenador.
➤ Consulte el manual del ordenador donde econtrará más detalles
4
3
7
UK
D
F
I
NL
E
UK
D
F
I
NL
E
How_TO_Nero6_Versie1_0 20-02-2004 08:05 Pagina 7

8
Ta ke off the cover of the
computer.
Nehmen Sie die
Abdeckung des Computers ab.
Retirez le capot de
l’ordinateur.
Togliere il coperchio del
computer.
Verwijder de kast van
de computer.
Quite la carcasa del
ordenador.
5
UK
D
F
I
NL
E
If you have no other or
you replace an old drive, you
will have to choose the
MASTER setting.
Wenn Sie kein anderes
haben oder ein altes Laufwerk
austauschen, müssen Sie die
Einstellung MASTER wählen.
Si vous n’en avez pas
d’autre ou si vous remplacez
un ancien lecteur, vous devez
choisir le mode maître
(MASTER).
Se non si dispone di
altre unità, o se è stata
sostituita un'unità esistente,
impostare l'unità su MASTER.
Hebt u geen ander station of vervangt u een bestaand station, dan moet u de
instelling MASTER kiezen.
Si no dispone de otra unidad o está sustituyendo una antigua, deberá configurarla
como MASTER.
6
D
F
I
NL
E
UK
How_TO_Nero6_Versie1_0 20-02-2004 08:05 Pagina 8

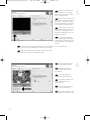
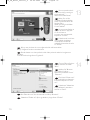
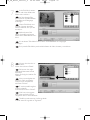
9
These are the
connections (on the back of
your drive) you will have to use
for connecting the drive to the
computer.
Das sind die Anschlüsse
(an der Rückseite Ihres
Laufwerks), die Sie für den
Anschluss Ihres Laufwerks an
den Computer verwenden
müssen.
Ce sont les connecteurs
(à l’arrière de votre appareil)
que vous devrez utiliser pour
raccorder l’unité à l’ordinateur.
Queste sono le connessioni (sul retro dell'unità) che dovranno essere utilizzate
per collegare l'unità al computer.
Dit zijn de aansluitingen (op de achterkant van het station) die u gebruikt om het
station op de computer aan te sluiten.
Estas son las conexiones (en la parte posterior de la unidad) que tendrá que
utilizar para desconectar la unidad del ordenador.
If you add a drive, the new
drive will be SLAVE.
Wenn Sie ein Laufwerk
hinzufügen, wird das neue
Laufwerk der SLAVE sein.
Si vous ajoutez un lecteur,
le nouveau doit être configuré
en mode esclave (SLAVE).
Aggiungendo un'unità, è
necessario impostarla su SLAVE.
Als u dit nieuwe station als
extra station toevoegt, kies dan
de instelling SLAVE.
Cuando añada una nueva unidad, se configurará como SLAVE.
UK
D
F
NL
E
UK
D
F
I
NL
E
I
8
7
How_TO_Nero6_Versie1_0 20-02-2004 08:05 Pagina 9

Put the drive into your
computer.
Schieben Sie das
Laufwerk in Ihren Computer.
Montez l’appareil dans
l’ordinateur.
Mettere l'unità nel
computer.
Schuif het station in uw
computer.
Ponga la unidad en el
ordenador.
Choose master or slave
for the jumper, as chosen in
steps 6 or 7.
Wählen Sie für den
Jumper Master oder Slave,
gemäß der Beschreibung in
Schritt 6 oder 7.
Placez le cavalier sur la
position maître ou esclave
selon l’option choisie aux
étapes 6 et 7.
Impostare il cavallotto
su master o slave, secondo la
configurazione specificata ai
passi 6 o 7.
Stel de jumper in op MASTER of op SLAVE, afhankelijk van de informatie in de
stappen 6 en 7.
Elija la configuración del puente en master o slave, como se explicó en el
paso 6 o 7.
10
10
9
UK
D
F
NL
E
UK
D
F
I
NL
E
I
How_TO_Nero6_Versie1_0 20-02-2004 08:05 Pagina 10

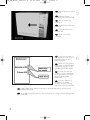
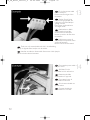
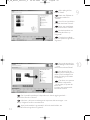
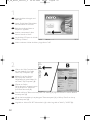
Find the IDE-cable which
may look like this example:
A: Coloured line.
B: Notch and closed hole.
C: Pin1.
Suchen Sie das IDE-Kabel,
das möglicherweise wie in
diesem Beispiel aussieht:
A: Farbige Leitung.
B: Kerbe und geschlossenes Loch.
C: Pin1.
Identifiez le câble IDE.
Celui-ci doit ressembler à celui
présenté dans l’illustration :
A : Ligne de couleur
B : Encoche et trou bouché
C : Broche 1
Individuare il cavo IDE, che potrebbe mostrare A: Linea colorata.
questi segni distintivi: B:Tacca e foro chiuso.
C: Piedino 1.
Zoek de IDE-kabel die lijkt op dit voorbeeld: A: Gekleurde lijn.
B: Nokje plus ontbrekend gat.
C: Pin 1.
Localice el cable IDE, cuya apariencia puede A: Línea de color.
ser la siguiente: B: Muesca y orificio cerrado.
C: Patilla 1.
UK
D
F
I
NL
E
Connect the IDE cable
A: Coloured line.
B: Notch and closed hole.
C: Pin1.
Schließen Sie das IDE-
Kabel an.
A: Farbige Leitung.
B: Kerbe und geschlossenes Loch.
C: Pin1.
Raccordez le câble IDE
A : Ligne de couleur
B : Encoche et trou bouché
C : Broche 1
Collegare il cavo IDE
A: Linea colorata.
B:Tacca e foro chiuso.
C: Piedino 1.
De IDE-kabel aansluiten
A: Gekleurde lijn.
B: Nokje plus ontbrekend gat.
C: Pin 1.
12
11
11
UK
D
F
I
NL
E
Conecte el cable IDE
A: Línea de color.
B: Muesca y orificio cerrado.
C: Patilla 1.
How_TO_Nero6_Versie1_0 20-02-2004 08:05 Pagina 11
La page charge ...

Secure the drive with the
screws (if possible on both
sides).
Befestigen Sie das
Laufwerk mit den Schrauben
(wenn möglich an beiden
Seiten).
Fixez l’appareil à l’aide des
vis (si possible des deux côtés).
Fissare l'unità con le viti
(se possibile su entrambi i lati).
Schroef het station vast
(zo mogelijk aan beide zijden).
Asegure la unidad con los
tornillos (si es posible en ambos
lados).
Put the cover you took
off in step 5 back on.
Setzen Sie die in Schritt 5
abgenommene Abdeckung
wieder auf.
Replacez le capot que
vous avez retiré à l’étape 5.
Rimettere il coperchio
tolto al punto 5.
Plaats de in stap 5
verwijderde kast weer terug.
Vuelva a instalar la carcasa
que quitó en el paso 5.
16
15
13
UK
D
F
I
N
E
UK
D
F
I
NL
E
How_TO_Nero6_Versie1_0 20-02-2004 08:05 Pagina 13

Restart your computer.
Starten Sie Ihren
Computer neu.
Allumez l’ordinateur.
Riavviare il computer.
Start uw computer
opnieuw op.
Reinicie el ordenador.
14
Put the screws (if there
were any) back in. Plug the
power cable back in. If you
disconnected other cables,
put these back in too.
Drehen Sie die Schrau-
ben (wenn da welche waren)
wieder ein. Stecken Sie das
Netzkabel wieder ein.Wenn
Sie weitere Kabel abgezogen
haben, stecken Sie diese
ebenfalls wieder ein.
Resserrez la ou les vis,
le cas échéant. Rebranchez le
cordon d’alimentation. Si vous
avez débranché d’autres
câbles,rebranchez-les égale-
ment.
Riavvitare le viti (se c'erano) al loro posto.Riconnettere il cavo di alimentazione.
Se sono stati staccati anche altri cavi, riconnetterli.
Draai (zo nodig) de schroeven weer vast.Sluit de netstekker weer aan.
Sluit ook de overige kabels weer aan, als u die had losgemaakt.
Ponga los tornillos (si los tenía puestos) nuevamente en su lugar. Vuelva a conectar
el cable de alimentación.Si ha desconectado otros cables, vuélvalos a conectar en su lugar.
18
17
UK
D
F
I
NL
E
UK
D
F
I
NL
E
How_TO_Nero6_Versie1_0 20-02-2004 08:05 Pagina 14

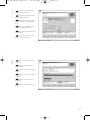
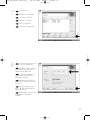
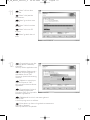
Choose "Install Suite".
Wählen Sie "Install Suite".
auf dem Bildschirm.
Choisissez "Install Suite".
Selezionare "Install Suite".
Selecteer "Install Suite".
Elija "Install Suite".
Insert the Nero disc
when Windows is loaded.
Legen Sie die Nero CD
ein, wenn Windows geladen ist.
Insérez le disque Nero
une fois que Windows a démar-
ré.
Inserire il disco Nero do-
po il caricamento di Windows.
Plaats de Nero-disc nadat
Windows is gestart.
Coloque el disco de Ne-
ro cuando se inicie Windows.
UK
D
I
NL
E
UK
D
F
I
NL
E
20
19
15
F
How_TO_Nero6_Versie1_0 20-02-2004 08:05 Pagina 15

16
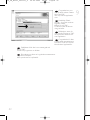
Ta ke the box in which
your drive came, and find the
model number. On this exa-
mple it is "DVDRW228".
Note it here for later referen-
ce.
Suchen Sie auf dem
Verpackungskarton für Ihr
Laufwerk nach der Model-
lnummer. In diesem Beispiel
lautet die Nummer
"DVDRW228".
Notieren Sie sich die Modell-
nummer für spätere Zwecke.
Recherchez le numéro
du modèle sur la boîte du lec-
teur. Dans cet exemple, il s’agit
de "DVDRW228". Notez-le ici pour le retrouver ultérieurement si nécessaire.
Ricercare sulla confezione dell'unità il numero di modello. In questo esempio è
"DVDRW228".Annotarlo qui per averlo a portata di mano in futuro.
Op de verpakking waarin uw station is geleverd vindt u het typenummer.
In dit voorbeeld is dat nummer "DVDRW228". Noteer het hier, zodat u het later indien
nodig bij de hand hebt.
Localice el número de modelo en la caja de la unidad. En este ejemplo es
"DVDRW228".Anótelo aquí para futura referencia.
UK
D
I
NL
E
21
F
How_TO_Nero6_Versie1_0 20-02-2004 08:05 Pagina 16

At the end, you will need to reboot your computer.
Congratulations. Your Philips drive is now ready for use. How to use it and what software
applications you need to perform your tasks,is described in the next chapters of this
User Manual.
Zum Abschluss müssen Sie Ihren Computer neu booten.
Gratulation. Ihr Philips-Laufwerk ist jetzt einsatzbereit.Wie Sie es benutzen und welche
Software Sie für Ihre Aufgaben benötigen wird im nächsten Kapitel des
Benutzerhandbuchs beschrieben.
Une fois la procédure terminée, vous devez réinitialiser votre ordinateur.
Félicitations ! Vous pouvez maintenant utiliser votre graveur Philips.Les chapitres suivants
de ce mode d’emploi décrivent les différentes opérations que vous pouvez
réaliser ainsi que les applications que vous pouvez utiliser avec votre graveur.
Al termine, riavviare il computer.
Congratulazioni. L'unità Philips ora è pronta all'uso. Nei prossimi capitoli di questo
Manuale utente verranno descritte le applicazioni necessarie per l'esecuzione dei
compiti e come usarle.
Ten slotte moet u de computer opnieuw opstarten.
Gefeliciteerd! Het Philips-station is nu klaar voor gebruik. Hoe u het station kunt
gebruiken en welke programma's u voor welke toepassing gebruikt, staat beschreven in
de hierna volgende hoofdstukken van de gebruikershandleiding.
Al finalizar, deberá reiniciar el ordenador.
Felicitaciones. Su unidad Philips ahora está preparada para ser utilizada. La forma de
utilización y las aplicaciones de software que necesita para llevar a cabo las distintas
operaciones se describen en los siguientes capítulos de este Manual de usuario.
UK
D
F
I
NL
E
22
17
How_TO_Nero6_Versie1_0 20-02-2004 08:05 Pagina 17
La page charge ...

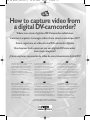
19
How to capture video from
a digital DV-camcorder?
Videos von einem digitalen DV-Camcorder aufnehmen
Comment acquérir les images vidéo d’une caméra numérique DV ?
Come registrare un video da una DV-camcorder digitale
Hoe kopieer ik de opnames van een digitale DV-camcorder
naar mijn computer?
¿Cómo capturar secuencias de vídeo de una videocámara digital DV?
This manual shows an example on how
to capture video from a digital
DV-camcorder which is connected via
FireWire (IEEE1394) to the computer.
This product is for personal use only.
Unauthorized duplication and
distribution of copyrighted materials is a
violation of copyright law.
In diesem Handbuch wird an einem
Beispiel gezeigt, wie ein Video von
einem digitalen DV-Camcorder
aufgenommen wird, der über FireWire
(IEEE1394) an den Computer
angeschlossen ist. Dieses Produkt ist
nur für den persönlichen Gebrauch.
Die ungenehmigte Vervielfältigung und
der Vertrieb von urheberrechtlich
geschützten Materialien stellt eine
Verletzung des Urheberrechts dar.
Ce manuel illustre la procédure
d’acquisition d’images vidéo à partir
d’une caméra numérique DV connectée
à l’ordinateur par le biais d’un port
FireWire (IEEE1394).Ce produit est à
usage personnel exclusivement. Toute
duplication et diffusion non autorisée de
matières soumises au droit d’auteur et
de copie (copyright) constituent une
violation de la loi sur les droits d’auteur
et de copie (copyright).
Questo manuale mostra un esempio di
come registrare un video da una
DV-camcorder digitale connessa al
computer via FireWire (IEEE1394).
Questo prodotto è destinato ad un uso
esclusivamente personale.
La duplicazione e la distribuzione di
materiali protetti dal diritto d'autore
rappresentano una violazione della
legge sul copyright.
Deze handleiding beschrijft het
kopiëren van opnames gemaakt met
een digitale DV-camcorder naar de
computer via een FireWire-aansluiting
(IEEE1394). Dit product is alleen
bedoeld voor eigen gebruik. Het zonder
toestemming vermenigvuldigen en
verspreiden van auteursrechtelijk be-
schermd materiaal is wettelijk verboden.
Este manual muestra un ejemplo que
explica cómo capturar una secuencia
de vídeo de una videocámara digital DV
conectada al ordenador mediante el
puerto FireWire (IEEE1394).
Este producto es para uso personal
exclusivamente. La duplicación y
distribución no autorizada de
materiales con copyright es una
violación de las leyes del copyright.
UK D F
I NL E
The application software used here is:
Nero Vision Express from Ahead Software
19
How_TO_Nero6_Versie1_0 20-02-2004 08:05 Pagina 19
La page charge ...
La page charge ...

22
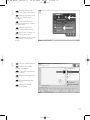
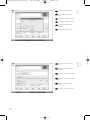
You can use these but-
tons to control your DV-ca-
mera. Press the "record" but-
ton to record video.
Diese Tasten können Sie
benutzen,um Ihre DV-Kamera
zu steuern. Drücken Sie die
Taste "Aufnehmen", um Video-
informationen aufzunehmen.
Ces boutons vous per-
mettent de commander votre
caméra DV. Appuyez sur le
bouton "Enregistrer" pour en-
registrer la vidéo.
E' possibile utilizzare
questi pulsanti per controllare
la camera-DV. Premere il pul-
sante "Registra" per registrare
il video.
U kunt deze knoppen gebruiken voor het bedienen van uw DV-camera.
Druk op de knop "Opnemen" om video op te nemen.
Estos botones permiten controlar la cámara DV.
Pulse el botón "Grabar" para grabar vídeo.
UK
D
F
I
NL
E
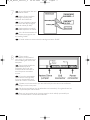
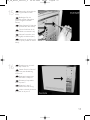
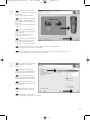
During capturing, you
will see the progress here.
Während der Auf-
nahme sehen Sie hier den
Fortschritt.
La progression de
l’acquisition est affichée ici.
Durante la cattura qui
viene visualizzata la sua
progressione.
Tijdens het opnemen
ziet u hier de voortgang.
Durante la captura, verá
el progreso de la misma aquí.
UK
D
F
I
NL
E
6
5
How_TO_Nero6_Versie1_0 20-02-2004 08:05 Pagina 22

23
When all video sequen-
ces are captured, click "Next".
Wenn alle Videosequen-
zen aufgenommen sind,klicken
Sie auf "Weiter".
Une fois l’acquisition de
toutes les séquences vidéo ter-
minée, cliquez sur "Suivant".
Dopo aver catturato tutte
le sequenze video, fare clic su
"Avanti".
Na het opnemen van alle
videofragmenten klikt u op
"Volgende".
Una vez capturadas las
secuencias de vídeo,haga clic en
"Siguiente".
UK
D
F
I
NL
E
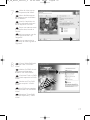
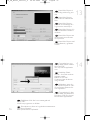
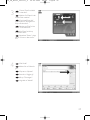
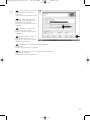
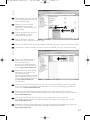
Choose "Make DVD with
captured video" and "DVD-
Video".
Wählen Sie "DVD mit auf-
genommenen Videodaten
erstellen" und "DVD-Video".
Choisissez "Créer un DVD
avec la vidéo capturée" et "DVD-
Vidéo".
Selezionare "Crea DVD
con video acquisito" e "DVD-
Video".
Kies "DVD met vastgeleg-
de video maken" en dan "DVD-
Video".
Seleccione "Crear DVD
con vídeo capturado" y "DVD-
Vídeo".
UK
D
F
I
NL
8
7
E
How_TO_Nero6_Versie1_0 20-02-2004 08:05 Pagina 23

24
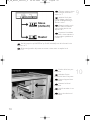
The captured movies
are shown here.You can edit
them by choosing "Edit
Movie".
Hier werden die aufge-
nommenen Filme gezeigt. Sie
können sie editieren, indem
Sie "Edit Movie" wählen.
Les séquences disponi-
bles sont répertoriées ici.
Vous pouvez les monter en
choisissant "Edit Movie".
Qui sono visualizzati i
filmati catturati. E' possibile
modificarli selezionando "Edit
Movie".
Hier ziet u de vastgelegde films. U kunt die bewerken door "Edit Movie" te kiezen.
Los vídeos capturados se muestran aquí. Puede editarlos seleccionando
"Edit Movie".
UK
D
F
I
NL
E
In the Edit Movie
screen, you can add transi-
tions, texts, … and you can
trim the recorded video.
When done, click "Next".
Auf der Anzeige Edit
Movie können Sie Übergänge,
Texte, … hinzufügen und die
aufgezeichneten Videoinfor-
mationen schneiden.
Wenn Sie fertig sind, klicken
Sie auf "Weiter".
L’écran Edit Movie vous
permet d'ajouter des transi-
tions, du texte, etc., ainsi que
de couper les enregistrements
effectués. Lorsque vous avez
terminé, cliquez sur "Suivant".
Nello schermo Edit Movie, è possibile aggiungere transizioni, testi ... ed anche taglia-
re il video registrato.Al termine, fare clic su "Avanti".
In het scherm "Edit Movie" kunt u overgangen, tekst enz. toevoegen en de opgeno-
men video verfraaien. Klik op "Volgende" zodra u tevreden bent.
En la pantalla Edit Movie puede añadir transiciones, textos, etc., así como recortar
el vídeo grabado. Cuando termine, haga clic en "Siguiente".
UK
D
F
I
NL
E
10
9
How_TO_Nero6_Versie1_0 20-02-2004 08:05 Pagina 24

25
After editing all files, click
"Next".
Nach dem Editieren aller
Dateien klicken Sie auf
"Weiter".
Une fois tous les fichiers
modifiés, cliquez sur "Suivant".
Dopo aver modificato
tutti i file, fare clic su "Avanti".
Na het bewerken van alle
bestanden klikt u op "Volgende".
Cuando haya editado to-
dos los archivos, haga clic en
"Siguiente".
UK
D
F
I
E
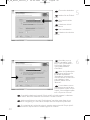
You can change the lay-
out, the background, add tit-
les,… here.
When done, click "Next".
Hier können Sie das Lay-
out und den Hintergrund
ändern,Titel hinzufügen, usw.
Wenn Sie fertig sind, klicken Sie
auf "Weiter".
Cet écran vous permet
de modifier la disposition,
l'arrière-plan, d'ajouter des
titres, etc. Lorsque vous avez
terminé, cliquez sur "Suivant".
Qui è possibile modi-
ficare la disposizione, lo sfondo,
aggiungere titoli....
Al termine, fare clic su "Avanti".
Hier kunt u de layout en achtergrond aanpassen, titels toevoegen ... enz.
Klik op "Volgende" zodra u tevreden bent.
Aquí puede cambiar la presentación, el fondo, añadir títulos, etc.
Cuando termine, haga clic en "Siguiente".
UK
D
F
I
NL
E
12
11
NL
How_TO_Nero6_Versie1_0 20-02-2004 08:05 Pagina 25

26
You can preview the fi-
nished movie by pressing on
the thumbnails.
When done, click "Next".
Wenn Sie auf die
Thumbnail-Symbole klicken,
sehen Sie eine Vorschau des
fertigen Films.
Wenn Sie fertig sind, klicken
Sie auf "Weiter".
Vous pouvez afficher un
aperçu du film en appuyant
sur les miniatures.
Lorsque vous avez terminé,
cliquez sur "Suivant".
Selezionando le miniatu-
re è possibile visualizzare
un'anteprima del filmato
realizzato.Al termine, fare clic
su "Avanti".
Klik op een miniatuur als u een afgeronde film wilt beoordelen.
Klik op "Volgende" zodra u tevreden bent.
Puede obtener una vista preliminar del vídeo pulsando sobre las imágenes en
miniatura.
Cuando termine, haga clic en "Siguiente".
UK
D
F
I
NL
E
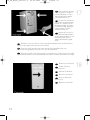
Choose "Burn to", choo-
se your recorder and click
"Burn".
Wählen Sie "Brennen
auf", wählen Sie Ihren
Recorder und klicken Sie auf
"Brennen".
Choisissez "Graver vers"
puis le périphérique d’enregis-
trement et cliquez sur "Gra-
ver".
Selezionare "Masterizza
Su", specificare il recorder e
fare clic su "Scrivi".
Kies "Branden naar", kies de recorder en klik op "Branden".
Seleccione "Grabar en", elija su grabadora y haga clic en "Grabar".
UK
D
F
I
NL
E
14
13
How_TO_Nero6_Versie1_0 20-02-2004 08:05 Pagina 26
La page charge ...
La page charge ...
La page charge ...
La page charge ...
La page charge ...
La page charge ...
La page charge ...
La page charge ...
La page charge ...
La page charge ...
La page charge ...
La page charge ...
La page charge ...
La page charge ...
La page charge ...
La page charge ...
La page charge ...
La page charge ...
La page charge ...
La page charge ...
La page charge ...
La page charge ...
La page charge ...
La page charge ...
La page charge ...
La page charge ...
La page charge ...
La page charge ...
La page charge ...
La page charge ...
La page charge ...
La page charge ...
La page charge ...
La page charge ...
La page charge ...
La page charge ...
La page charge ...
La page charge ...
-
 1
1
-
 2
2
-
 3
3
-
 4
4
-
 5
5
-
 6
6
-
 7
7
-
 8
8
-
 9
9
-
 10
10
-
 11
11
-
 12
12
-
 13
13
-
 14
14
-
 15
15
-
 16
16
-
 17
17
-
 18
18
-
 19
19
-
 20
20
-
 21
21
-
 22
22
-
 23
23
-
 24
24
-
 25
25
-
 26
26
-
 27
27
-
 28
28
-
 29
29
-
 30
30
-
 31
31
-
 32
32
-
 33
33
-
 34
34
-
 35
35
-
 36
36
-
 37
37
-
 38
38
-
 39
39
-
 40
40
-
 41
41
-
 42
42
-
 43
43
-
 44
44
-
 45
45
-
 46
46
-
 47
47
-
 48
48
-
 49
49
-
 50
50
-
 51
51
-
 52
52
-
 53
53
-
 54
54
-
 55
55
-
 56
56
-
 57
57
-
 58
58
-
 59
59
-
 60
60
-
 61
61
-
 62
62
-
 63
63
-
 64
64


Philips PBDV1640G/35 Manuel utilisateur
- Catégorie
- Lecteurs de disques optiques
- Taper
- Manuel utilisateur
dans d''autres langues
- italiano: Philips PBDV1640G/35 Manuale utente
- English: Philips PBDV1640G/35 User manual
- español: Philips PBDV1640G/35 Manual de usuario
- Deutsch: Philips PBDV1640G/35 Benutzerhandbuch
- Nederlands: Philips PBDV1640G/35 Handleiding
Documents connexes
-
Philips Computer Drive DVDRW228 Manuel utilisateur
-
Philips DVDRW416K-P00 Le manuel du propriétaire
-
-
Philips DVDR16LSK/00 Manuel utilisateur
-
-
Philips PBCO1610G Manuel utilisateur
-
Philips SPD2200FM/00 Manuel utilisateur
-
-
-


