Dynex DX-NUSB Manuel utilisateur
- Catégorie
- La mise en réseau
- Taper
- Manuel utilisateur

Wireless N USB Adapter
Adaptateur USB sans l N
Adaptador USB inalámbrico N
DX-NUSB
QUICK INSTALL GUIDE
Guide d’installation rapide • Guía de instalación rápida
PM01443 08-1447
3
Connect to a network
Connexion à un réseau
Conexión a una red
1 Select your network from the Available Networks list, then click Connect. If you do not have security
enabled, you will connect to your network automatically. If you do have security enabled, go to
Step 2 below.
Note: Only click Connect once. The connection process will begin even though the button appears
unselected.
Note: If the Dynex Wireless Networking Utility did not open automatically, double-click the Wireless
Utility icon in the system tray near the clock.
2 A. If you have security enabled and you have a Dynex wireless router, you will be prompted to enter
a password
OR
B. If you have security enabled and you do not have a Dynex wireless router, the Connect to a secure
network screen opens. Enter the encryption key you created when you set up your wireless router,
then click Connect. The computer will connect to the network and the Dynex Wireless Networking
Utility will display the connection status.
Windows Vista® users: Connect to a wireless network through the Network and Sharing Center,
accessible through your computer’s Control Panel.
1 Sélectionner un réseau dans la liste des réseaux disponibles (Available Networks), puis cliquer sur
Connect (Connecter). Si la sécurité est désactivée, la connexion au réseau se fera automatique-
ment. Si la sécurité est activée, aller à l’étape 2 ci-après.
Remarque: Ne cliquer qu’une fois sur Connect (Connecter). Le processus de connexion
commencera même si le bouton semble ne pas être sélectionné.
Remarque: Si l'utilitaire de réseau sans l de Dynex (Dynex Wireless Networking Utility) ne s'ache
pas automatiquement, double-cliquer sur l'icône Wireless Utility (Utilitaire sans l) dans la barre
d'état système près de l'horloge
2 A. Si la sécurité est activée, avec un routeur sans l Dynex, il sera demandé à l’utilisateur de saisir un
mot de passe
OU
B.Si la sécurité est activée, sans routeur sans l Dynex, la fenêtre Connect to a secure network
(Connexion à un réseau sécurisé) s’ache. Saisir la clé de cryptage qui a été créée lors de la
conguration du routeur sans l, puis cliquer sur Connect (Connecter). L’ordinateur se connectera
au réseau et l'utilitaire de réseaux sans l de Dynex (Dynex Wireless Networking Utility) achera l’état
de la connexion.
Utilisateurs de Windows Vista
MD
: Se connecter à un réseau sans l en utilisant le Centre réseau et
partage (Network and Sharing Center), dans le Panneau de conguration (Control Panel).
1 Seleccione su red de la lista Available Networks (Redes disponibles) y haga clic en Connect
(Conectar). Si no tiene la seguridad activada, conectará a la red automáticamente. Si tiene la
seguridad activada, vaya al paso 2 a continuación.
Nota: Haga clic en Connect (Conectar) una sola vez. El proceso de conexión comenzará, mismo si el
botón aparece no estar seleccionado.
Nota: Si la aplicación Dynex Wireless Networking Utility (Aplicación de redes inalámbricas de Dynex)
no aparece automáticamente, haga doble clic en el icono de la aplicación inalámbrica (Wireless
Utility) en la bandeja del sistema junto al reloj.
2 A. Si tiene la seguridad activada y tiene un enrutador inalámbrico Dynex, se le pedirá la contraseña
O
B. Si tiene la seguridad activada y no tiene un enrutador inalámbrico Dynex, aparecerá la ventana
Connect to a secure network (Conectarse a una red segura). Ingrese la clave de codicación que creó
cuando conguró su enrutador inalámbrico, y luego haga clic en Connect (Conectar). La computa-
dora se conectará a la red y la aplicación Dynex Wireless Networking Utility (Aplicación de redes
inalámbricas de Dynex) mostrará el estado de la conexión.
Usuarios de Windows Vista®: Conéctese a la red inalámbrica por medio del Network and Sharing
Center (Centro de redes y de recursos compartidos), accesible a través del panel de control (Control
Panel) de su computadora.
1
2B

1
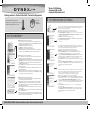
Wireless N USB adapter with stand
Adaptateur réseau USB sans l N avec support
Adaptador USB inalámbrico N con base
2
QUICK INSTALL GUIDE • Guide d’installation rapide • Guía de instalación rápida
Wireless N USB Adapter
Adaptateur USB sans l N
Adaptador USB inalámbrico N
Package contents • Contenu de la boîte • Contenido del paquete
Dynex CD
CD Dynex
CD de Dynex
Insert CD and install software
Insérer le CD et installer l’application
Inserte el CD e instale el software
Important: Install the software before inserting the adapter.
1 Insert the Dynex CD into your computer’s CD drive. The Dynex Wireless Card Installer screen opens.
Note: If the Dynex Wireless Card Installer screen does not appear, click My Computer, then double-click
the CD drive where the installation CD has been placed.
2 Click Next. The InstallShield Wizard Welcome dialog box opens.
3 Click Next. The Choose Destination Location dialog box opens.
4 Click Next. The Please plug in your USB Adapter now dialog box opens.
Note: If at any time during the install a warning appears that the software has not passed Windows®
logo testing, it is safe to click Continue anyway. This software is designed to run on Windows.
Important: Installer le logiciel avant d’insérer l’adaptateur.
1 Insérer le CD Dynex dans le lecteur CD de l’ordinateur. La fenêtre de l’application d'installation de la
carte sans l Dynex (Dynex Wireless Card Installer) s'ache.
Remarque: Si la fenêtre de l'application d'installation de la carte sans l Dynex ne s'ache pas, cliquer
sur My Computer (Poste de travail), puis double-cliquer sur le lecteur où le CD d'installation a été inséré.
2 Cliquer sur Next (Suivant). La boîte de dialogue d’accueil de l’Assistant d’installation InstallShield
(InstallShield Wizard Welcome) s’ache.
3 Cliquer sur Next (Suivant). La boîte de dialogue de Sélection de l'emplacement de destination (Choose
Destination Location) s’ache.
4 Cliquer sur Next (Suivant). La fenêtre Please plug in your USB Adapter now (Veuillez insérer maintenant
votre adaptateur USB) s'ache.
Remarque: Si pendant l'installation un avertissement s'ache indiquant que l'application n'a pas été
validée lors du test permettant d'obtenir le logo Windows
MD
, cliquer sur Continue anyway (Continuer).
Cette application est conçue pour fonctionner sous Windows.
Importante: Instale el software antes de insertar el adaptador.
1 Inserte el CD Dynex en la unidad de CD de su computadora. Aparecerá la pantalla del Dynex Wireless
Card Installer (Instalador de la tarjeta inalámbrica de Dynex).
Nota: Si la pantalla del Instalador de la tarjeta inalámbrica de Dynex no aparece, haga clic en My
Computer (Mi PC) y luego haga doble clic en la unidad de CD donde colocó el CD de instalación.
2 Haga clic en Next (Siguiente). Aparecerá el cuadro de diálogo InstallShield Wizard Welcome (Pantalla de
bienvenida del asistente de InstallShield).
3 Haga clic en Next (Siguiente). Aparecerá el cuadro de diálogo Choose Destination Location (Elegir la
ubicación de destino).
4 Haga clic en Next (Siguiente). Aparecerá el cuadro de diálogo Please plug in your USB Adapter now (Favor
conecte su adaptador USB ahora).
Nota: Si en cualquier momento durante la instalación aparece una advertencia de que el software no
ha pasado la vericación de logotipo de Windows® aseguró hacer clic en Continue anyway (Continuar).
Este software está diseñado para ejecutarse en Windows.
Connect adapter to computer and run utility
Connecter l’adaptateur à l’ordinateur et exécuter l’utilitaire
Conecte el adaptador a la computadora y ejecute la aplicación
1 If you need to use the included stand, insert the adapter into the stand, then connect the stand’s
cable to a USB port on your computer (USB ports on keyboards and monitors don’t always
supply power). Place the stand on your desk.
OR, connect the adapter directly into a USB port on your computer.
Note: If your system did not prompt you to insert your adapter, do so now.
2 Click No, not at this time, then click Next. The Found New Hardware Wizard Install screen opens.
3 Click Install the software automatically (Recommended), then click Next. The Completing the
Found New Hardware Wizard opens.
4 Click Finish. The Setup has Finished installing screen opens.
5 Click Yes, I want to restart my computer now, then click Finish. Your computer restarts and
the Dynex Wireless Networking Utility opens.
~continued on back
1 En cas d’utilisation du support fourni, insérer l'adaptateur dans le support, puis connecter le
câble du support à un port USB de l'ordinateur (les ports USB des claviers et moniteurs ne sont
pas toujours une source d'alimentation). Placer le support sur le bureau.
OU, connecter l’adaptateur directement à un port USB de l’ordinateur.
Remarque: Si le système n’invite pas à insérer l'adaptateur le faire maintenant.
2 Cliquer sur No, not this time (Non, pas cette fois), puis sur Next (Suivant). La fenêtre de
l’Assistant Ajout de nouveau matériel détecté (Found New Hardware Wizard) s’ache.
3 Cliquer sur Install the software automatically (Recommended) (Installer le logiciel automa-
tiquement [recommandé]), puis sur Next (Suivant). La fenêtre de Fin de l'Assistant Ajout de
nouveau matériel détecté (Completing the Found New Hardware Wizard) s’ache.
4 Cliquer sur Finish (Terminer). La fenêtre Setup has nished installing (L'installation est terminée)
s'ache.
5 Cliquer sur Yes, I want to restart my computer now, (Oui, je veux redémarrer l’ordinateur
maintenant), puis sur Finish (Terminer). L'ordinateur redémarre et l'utilitaire de réseaux sans l
de Dynex (Dynex Wireless Networking Utility) s'ache.
- suite au verso
1 Si necesita usar la base suministrada, inserte el adaptador en la base, luego conecte el cable de
la base en un puerto USB de la computadora (en general, los puertos USB de los teclados y
monitores no son una fuente de alimentación). Coloque la base en su escritorio.
O, conecte el adaptador directamente en un puerto USB de su computadora.
Nota: Si su sistema no le pidió que insertara su adaptador, hágalo ahora.
2 Haga clic en No, not this time (No por el momento) y luego en Next (Siguiente). Aparecerá la
pantalla de instalación Found New Hardware Wizard (Asistente para hardware nuevo encontrado).
3 Haga clic en Install the software automatically (Recommended) (Instalar el software
automáticamente [Recomendado]), luego haga clic en Next (Siguiente). Aparecerá la ventana de
Completing the Found New Hardware Wizard (Finalización del Asistente para hardware nuevo
encontrado).
4 Haga clic en Finish. Aparecerá la pantalla Setup has nished installing (La conguración ha
terminado de instalar).
5 Haga clic en Yes, I want to restart my computer now (Sí, deseo reiniciar el equipo ahora) y
luego en Finish (Finalizar). Su computadora reiniciará y aparecerá la ventana Dynex Wireless
Networking Utility (Aplicación para redes inalámbricas de Dynex).
- continúa al reverso
or
ou
o
1
-
 1
1
-
 2
2


Dynex DX-NUSB Manuel utilisateur
- Catégorie
- La mise en réseau
- Taper
- Manuel utilisateur
dans d''autres langues
- English: Dynex DX-NUSB User manual
- español: Dynex DX-NUSB Manual de usuario
Documents connexes
-
Dynex DX-BUSB Manuel utilisateur
-
-
-
-
-
-
-
-
-