
BLODGETT COMBI
www.blodgett.com
44 Lakeside Avenue, Burlington, Vermont 05401 USA Telephone (800) 331Ć5842, (802) 860Ć3700 Fax: (802)864Ć0183
PN60740 Rev B (2/11)
E 2010 - G.S. Blodgett Corporation
BCMĆ61, BCMĆ101, BCMĆ102 and BCMĆ202
INSTALLATION - OPERATION - MAINTENANCE
BCMĆ61, BCMĆ101, BCMĆ102 et BCMĆ202
MANUEL D'INSTALLATION - FONCTIONNEMENT - ENTRETIEN

A PERSONAL WORD FROM BLODGETT COMBI
QUELQUES MOTS DE BLODGETT COMBI
Congratulations on your purchase of a BLODGETT Combi appliance. We
firmly believe that your choice has been a wise one, and trust you will reĆ
ceive many years of excellent service from your new Combi.
You will find that cooking with Combi appliances saves time, labor and
extensive cleaning of both the kitchen and the unit.
With Combi appliances the quality, taste, consistency, and look of your
food are improved, thus endorsing the policy to which we've always adĆ
hered: For Better Cooking!"
Once you've had a chance to use your Combi, please tell us, your dealer
and colleagues about any creative and interesting applications you have
discovered; exchange ideas with other users. Be sure to advise us or
your dealer immediately should any mechanical or technical problems
be encountered (...we're here to help!) and above all Enjoy Cooking the
BLODGETT Combi Way!
For information on cooking, please refer to our separate cooking guide.
Toutes nos félicitations sur votre achat d'appareil de Blodgett Combi.
Nous croyons fermement que votre choix est un choix raisonnable et
nous sommes certains que vous obtiendrez de nombreuses années
d'excellent service de votre nouveau four multiĆusages.
Vous allez découvrir que la cuisson dans les appareils Combi économise
le temps, le travail et le degré de nettoyage de l'appareil aussi bien que
de la cuisine.
Avec les appareil de Combi, la qualité, le goût, la consistence et l'apparĆ
ence des aliments sont améliorés, s'accordant, de ce fait, avec notre
politique "Pour une meilleure cuisson !"
Une fois que vous aurez eu la chance d'utiliser notre Combi, informez
nous, votre concessionnaire et vos collègues, de toutes les applications
nouvelles et intéressantes que vous avez découvertes ; échangez vos
idées avec d'autres utilisateurs. N'hésitez pas à nous prévenir, ou votre
concessionnaire, de tout problème mécanique ou technique que vous
pourriez rencontrer (... nous sommes ici pour vous aider) et parĆdessus
tout RégalezĆvous à cuisiner à la façon BLODGETT Combi!
Pour obtenir de plus amples informations sur l'art culinaire, veuillez conĆ
sulter notre livre de cuisine séparé.

IMPORTANT
FOR YOUR SAFETY
Do not store or use gasoline or other flammable vapors or liquids in the vicinity
of this or any other appliance.
AVERTISSEMENT
Ne pas entreposer ni utiliser de l'essence ni d'autres vapeurs ou liquides inflamĆ
mables dans le voisinage de cet appariel, ni de tout autre appareil.
WARNING: IMPROPER INSTALLATION, ADJUSTMENT, ALTERATION, SERVICE OR
MAINTENANCE CAN CAUSE PROPERTY DAMAGE, INJURY OR DEATH. READ THE
INSTALLATION, OPERATING AND MAINTENANCE INSTRUCTIONS THOROUGHLY
BEFORE INSTALLING OR SERVICING THIS EQUIPMENT
AVERTISSEMENT: UNE INSTALLATION, UN AJUSTEMENT, UNE ALTÉRATION, UN
SERVICE OU UN ENTRETIEN NON CONFORME AUX NORMES PEUT CAUSER DES
DOMMAGES À LA PROPRIÉTE, DES BLESSURES OU LA MORT. LISEZ ATTENTIVEĆ
MENT LES DIRECTIVES D'INSTALLATION, D'OPÉRATION ET D'ENTRETIEN AVANT
DE FAIRE L'INSTALLATION OU L'ENTRETIEN DE CET ÉQUIPEMENT.
The information contained in this manual is important for the proper installation,
use, and maintenance of this oven. Adherence to these procedures and instrucĆ
tions will result in satisfactory baking results and long, trouble free service.
Please read this manual carefully and retain it for future reference.
Les informations données dans le présent manuel sont importantes pour installer,
utiliser et entretenir correctement ce four. Le respect de ces instructions et procéĆ
dures permettra d'obtenir de bons résultats de cuisson et une longue durée de serĆ
vice sans problèmes. Veuillez lire le présent manuel et le conserver pour pouvoir
vous y reporter à l'avenir.
Errors: Descriptive, typographic or pictorial errors are subject to correction. SpecificaĆ
tions are subject to change without notice.
Erreurs:Les erreurs de description, de typographie ou d'illustration font l'objet de
corrections. Les caractéristiques sont sujettes à modifications sans préavis.

Your Service Agency's Address:
Adresse de votre agence de service:
Model/Modèl:
Serial Number/Numéro de série:
Your appliance was installed by/
Installateur de votre four:
Your oven's installation was checked by/
Contrôleur de l'installation de votre four:

Table of Contents/Table des Matières
Introduction
The Blodgett CombiĆOven/Steamer 2. . . . .
Description of the CombiĆOven/Steamer 3.
Installation
Agency Approvals 4. . . . . . . . . . . . . . . . . . . .
Utility Specifications 5. . . . . . . . . . . . . . . . . . .
Unpacking the Oven 6. . . . . . . . . . . . . . . . . .
Oven Location and Leveling 7. . . . . . . . . . . .
Plumbing Connections 8. . . . . . . . . . . . . . . .
Electrical Connection and Ventilation 9. . . .
Final Check Lists 10. . . . . . . . . . . . . . . . . . . . .
Operation
Manual Control Description 11. . . . . . . . . . . .
Manual Cooking 12. . . . . . . . . . . . . . . . . . . . . .
Manual Cooking 12. . . . . . . . . . . . . . . . . . . .
Core Probe Cooking 12. . . . . . . . . . . . . . . . .
Programmed Cooking 13. . . . . . . . . . . . . . . . .
Programming the Control 13. . . . . . . . . . . .
Cooking with a Program 13. . . . . . . . . . . . .
Cooking Tips 14. . . . . . . . . . . . . . . . . . . . . . . . .
Maintenance
Cleaning & Preventative Maintenance 15. . .
Introduction
The Blodgett CombiĆOven/Steamer 18. . . . .
Description du fourĆétuveur Combi 19. . . . . .
Installation
Certifications 20. . . . . . . . . . . . . . . . . . . . . . . . .
Caractéristiques techniques relatives
aux services publics 21. . . . . . . . . . . . . . . . . .
Déballage du four 22. . . . . . . . . . . . . . . . . . . .
Choix de l'emplacement et nivellement
du four 23. . . . . . . . . . . . . . . . . . . . . . . . . . . . . .
Robinetterie 24. . . . . . . . . . . . . . . . . . . . . . . . . .
Raccordement à l'électricité et Ventilation 25
Liste de vérification finale 26. . . . . . . . . . . . . .
Fonctionnement
Description de la commande manuelle 27. .
Cuisson manuelle 28. . . . . . . . . . . . . . . . . . . .
Cuisson manuelle 28. . . . . . . . . . . . . . . . . . .
Cuisson à la sonde 29. . . . . . . . . . . . . . . . . .
Cuisson programmée 30. . . . . . . . . . . . . . . . .
Programmation de la commande 30. . . . . .
Cuisson selon un programme 31. . . . . . . .
Trucs et suggestions en matière
de cuisson 32. . . . . . . . . . . . . . . . . . . . . . . . . . .
Entretien
Nettoyage et entretien préventif 33. . . . . . . .

Introduction
2
The Blodgett CombiĆOven/Steamer
The Blodgett CombiĆOven/Steamer offers a comĆ
pletely new method of cooking. With the Oven/
Steamer you have the choice of two cooking proĆ
cesses: Steam and Hot Air, either...
D Separately
D Combined, or
D In Sequence
And for easy operation you can choose from three
primary cooking modes:
In the Steam mode you can:
steam reheat reconstitute
stew thaw simmer
blanch preserve braise
poach
In the Hot Air mode you can:
roast bake
grill gratinate
broil
In the two Combi modes you can:
defrost roast rethermalize
reheat bake forced steaming
There are four additional specialized modes to
help you make the most of your time:
Retherm - for perfect reheating
Proofing - Proof and bake all in the same oven
Preheat - in this mode the oven will preheat to
575_F (300_C) for 15 minutes. The oven will then
automatically lower to 480_F (249_C) to protect
the advanced electronic components.
Cool Down - allows the oven cavity to cool down
rapidly with the door opened
You āācan also āāuse āātwo āāor āthree functions in seĆ
quence during one cooking process. We call this:
D combiĆsteaming
D combiĆroasting
D combiĆbaking
The combination of circulating hot air and steam
in the space saving, high performance CombiĆ
Oven/Steamer leads to improvements in the folĆ
lowing areas:
D increased productivity in the kitchen
D a reduction in capital expenditures for multiple
equipment replacement
D a wider range of menu choices
D a simplified cleaning process
The work process is simplified since products are
prepared on or in steam table āpans āand trays.
Food can be cooked, stored, and transported with
āthe āsame āāpans. āSmall āamounts of product can be
processed efficiently; preĆcooked and conveĆ
nience foods can be reheated within minutes.
āMany frozen foods can be processed without preĆ
thawing. This flexibility in preparation reduces the
need for kettles and steam tables since there is no
need for large amounts of food to be kept warm for
long periods of time.
Today the improvement of food quality is more imĆ
portant than ever. Vegetables are cooked in the
Blodgett CombiĆOven/Steamer without water at
the optimal temperature of just under 212_F
(100_C), maintaining valuable vitamins, minerals,
nutrients and trace elements. Cooking meat in the
Combi results in less shrinkage and a firmer, juicier
product. The Blodgett CombiĆOven/Steamer is
being used more and more for baking. Steam and
Hot āAir āmodes āmake āit āa āgeneral āpurpose baking
appliance.

Introduction
3
Description of the CombiĆOven/Steamer
ABOUT THE OVEN/STEAMER
Blodgett CombiĆOven/Steamers are quality proĆ
duced using highĆgrade stainless steel with first
class workmanship.
The multiple speed fan, which is guarded against
accidental finger contact, is driven by a quiet and
powerful motor. The condenser draws out excess
steam from the appliance. Condensation and
waste water, which result during steaming and
cleaning, are continuously drained.
The use of high quality insulation impedes excesĆ
sive heat radiation and saves energy.
The high performance fresh steam generator with
its control system makes it possible to enjoy all of
the advantages of a high quality steamer at the
flick of a switch. Fresh steam enters the oven cavĆ
ity without pressure and is circulated at high
speed. This process enables quick and gentle
cooking and ensures high quality food while proĆ
viding convenient working methods. The steam
generator is completely automatic and protected
from running dry.
OVEN/STEAMER OPERATION
The practical oven door, with a viewing window,
has a wide swing radius and handle which can be
operated easily, even with wet or greasy hands.
Ease of operation is guaranteed through the simĆ
ple to use control. With graphical symbols and
storage for 10 product recipes the BCM is easy for
even inexperienced kitchen staff to operate.
Cleaning is kept to a minimum thanks to the autoĆ
matic Combi Wash system.

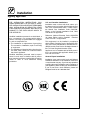
Installation
4
Agency Approvals
THE INSTALLATION INSTRUCTIONS CONĆ
TAINED HEREIN ARE FOR THE USE OF QUALIĆ
FIED INSTALLATION AND SERVICE PERSONNEL
ONLY. INSTALLATION OR SERVICE BY OTHER
THAN QUALIFIED PERSONNEL MAY RESULT IN
DAMAGE TO THE OVEN AND/OR INJURY TO
THE OPERATOR.
Qualified installation personnel are individuals, a
firm, a corporation, or a company which either in
person or through a representative are engaged
in, and are responsible for:
D The installation or replacement of gas piping.
The connection, installation, repair or servicing
of equipment.
D The installation of electrical wiring from the elecĆ
tric meter, main control box or service outlet to
the electric appliance.
Qualified installation personnel must be experiĆ
enced in such work, be familiar with all precauĆ
tions required and have complied with all requireĆ
ments of state or local authorities having
jurisdiction.
U.S. and Canadian Installations
Installation must conform with local codes, or in
the absence of local codes, with the National Fuel
Gas Code, NFPA54/ANSI Z223.1-Latest Edition,
the Natural Gas Installation Code CAN/CGAĆ
B149.1 or the Propane Installation Code, CAN/
CGAĆB149.2 as applicable.
Reference: National Electrical Code, ANSI/NFPA
70-Latest Edition and/or Canadian Electrical
Code CSA C22.1 as applicable.
This equipment is to be installed in compliance
with the Basic Plumbing Code of the Building OffiĆ
cials and Code Administrators International Inc.
(BOCA) and the Food Service Sanitation Manual of
the Food and Drug Administration (FDA).
Appliance is to be installed with backflow prevenĆ
tion in accordance with applicable federal, provĆ
ince and local codes.
General Export Installations
Installation must conform with Local and National
installation standards. Local installation codes and/
or requirements may vary. If you have any questions
regarding the proper installation and/or operation of
your appliance, please contact your local distributor.
If you do not have a local distributor, please call
Blodgett Combi at 0011Ć802Ć860Ć3700.

Installation
5
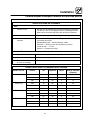
Utility Specifications
PLUMBING SPECIFICATIONS
WATER
Water Pressure 36.26 PSI (250 kPa, 2.5 bar) during Combi Wash
21.76 PSI (150 kPa, 1.5 bar) when Combi Wash is not active
87 PSI (600 kPa, 6 bar) maximum
Water Connection 3/4" garden hose cold water
Minimum Requirements TDS - less than 100 parts per million
Total Hardness - 80Ć120 parts per million
Chlorides - less than 30 parts per million
pH Factor - 7.0Ć8.0
Chlorine - 0 parts per million
DRAINAGE
Drain Type Atmospheric Vented Drain
Drain Connection 2.00" (50.8mm) Copper
Avg Water Drain Temp. Approximately 140_F (60_C)
ELECTRICAL RATINGS
Model Voltage kW Hz Phase Max Load (amps)
BCMĆ61E
208 9 60 3 26
240 9 60 3 26
480 9 60 3 13
BCMĆ101E
208 18 60 3 52
240 18 60 3 52
480 18 60 3 25
BCMĆ102E
240 27 60 3 80
240 27 60 3 80
480 27 60 3 36
BCMĆ202E
240 60 60 3 175
240 60 60 3 175
480 60 60 3 80

Installation
6
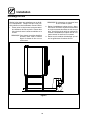
Unpacking the Oven
The oven is best handled while still in its wrapping.
Wherever possible, use a rolling lift.
1. Roll the lift under the lower cross tube of the
stand Place a couple of wooden blocks beĆ
tween the cross tube and the lift.
NOTE: To achieve the best possible balance,
roll the lift from the front of the oven or
from the motor side.
NOTE: If necessary, the oven can also be
lifted off the stand.
2. Remove the original packaging from the oven.
Do not remove the vinyl that covers the stainĆ
less steel surface until the oven has been
installed. Once the vinyl has been removed,
the surfaces are vulnerable to sharp objects
such as tools.
3. Remove all packaging material that secures
the racks in the oven chamber.
Figure 1

Installation
7
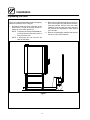
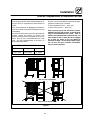
Oven Location and Leveling
The well planned and proper placement of your
oven will result in long term operator convenience
and satisfactory performance.
Certain minimum clearances must be maintained
between the oven and any combustible or nonĆ
combustible construction.
Strong sources of heat such as hotplates, tilting
frying pans, deep fat fryers, etc. should not be
placed near the oven, especially near its right side.
An optional side heat shield is available.
MINIMUM REQUIRED CLEARANCES
Right Side Left Side Back
2.75" (7cm) 2.75" (7cm) 2" (5cm)
In addition, the following clearances are recomĆ
mended for servicing.
D Oven body sides - 12" (30cm)
D Oven body back - 12" (30cm)
To ensure that the oven functions correctly
when installed, it should be placed upright and
level (horizontally). This is measured at the
front and side edge of the roof. The oven can be
levelled using the adjusting screws on the
stand or on the legs of table models. The height
of the oven should also be adjusted to fit the
trolley for rack.
CORRECT INSTALLATION
INCORRECT INSTALLATION
Figure 2

Installation
8
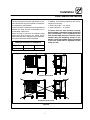
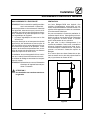
Plumbing Connections
WATER CONNECTION
Blodgett BCM ovens have one or two water conĆ
nections. In the case of two water connections, the
following applies:
D 1 connection for raw water for the condensation
jet (cold water). The connection is located on
the back.
D 1 connection for the steam generator and the
Combi Wash jet in the oven chamber. Must
meet the requirements applying to water supĆ
plied to household appliances; however, hot
water with a temperature not exceeding 120°F
(49°C) can be used. The connection is located
at the front.
To facilitate cleaning and servicing, the oven
should be connected with an approved flexible
3/4" hose. Permanent installations should be fitted
with a stopĆtap and a nonĆreturn valve.
If the feeder is connected to the water distribution
system with a flexible hose, this hose should be VA
approved.
Before connecting the oven to water, flush the
tubes thoroughly. Connect the oven.
WARNING!!
If the water temperature exceeds 70°F
(21°C), problems with regard to Combi
Optima calibration and cooling of the
oven may occur.
Ovens with a steam generator must not be
connected to a reversed osmosis plant,
as this may cause problems with the readĆ
ing of the water level in the steam generaĆ
tor.
The water connection must be carried out
by an authorised plumber in accordance
with existing local codes.
Clogged up water filters and dirt in the soĆ
lenoid valves are not covered by the warĆ
ranty.
DRAIN CONNECTION
Blodgett ovens are equipped with a drain system
that removes surplus water from the oven chamĆ
ber. This may be condensed water from the prodĆ
ucts, or it may occur when the oven chamber is
cooled down with cold water, or when the oven
chamber is cleaned.
WARNING!!
Connection must be carried out by an auĆ
thorised plumber, to an open or closed
drain. The drain must never end directly
beneath the oven.
The drain must be of stainless steel or an equally
temperatureĆresistant material, have a diameter of
at least 2" (49 mm) and a fall of at least 3° or 5%.
Figure 3

Installation
9
Electrical Connection and Ventilation
ELECTRICAL CONNECTION
NOTE: Electrical connections must be performed
by a qualified installer only.
Before making any electrical connections to these
appliances, check that the power supply is adeĆ
quate for the voltage, amperage, and phase reĆ
quirements stated on the rating name plate
mounted on the appliance.
1. The rating plate is located on the right side of
the oven.
An approved plug outlet or a safety cutout must be
located close to the oven so that the oven can be
disconnected during installation and repair. The
safety cutout must be able to cut off all poles with
a total distance of break of at least 3 mm.
All appliances must be installed in accordance
with Local or National Electrical codes.
The wiring diagram is located in the motor
compartment.
NOTE: Disconnect the power supply to the apĆ
pliance before servicing.
WARNING!!
Improper installation may invalidate your
warranty.
VENTILATION
Blodgett BCM ovens are equipped with an open/
direct exhaust system that removes surplus huĆ
midity from the oven chamber. The exhaust sysĆ
tem has an electrically operated damper.
The ventilation motor can be controlled directly
from the oven. This means that the ventilation
starts when a program is started and runs for 10
minutes after the program is completed.
The exhaust tube can be connected to a ventilaĆ
tion system. In that case, a special extraction funĆ
nel is fitted to avoid suction directly from the oven
chamber. This extraction funnel can be ordered
from Blodgett.
If an extraction hood is installed in the ceiling
above the oven, it should project 20" (50 cm) over
the front of the oven.
Figure 4

Installation
10
Final Check Lists
WARNING!!
Final check list must be performed by a
qualified installer only.
OVEN EXTERIOR
j Check that the oven has not been damaged
in transit (dents, scratches, etc.)
j Check/adjust the height and check that the
oven is placed level (horizontally)
j Check/adjust oven door
CONNECTIONS
j Check for correct water connection
j Turn on water supply
j Check for leaks
j Turn off water supply
j Check and clean dirt filter
j Turn on water supply again
j Check hand shower
j Check for correct electrical connection
j Check connection to drip tray
j Check for correct mounting of drip tray
j Check for correct fall of hose from drip tray,
and check for leaks
j Check for correct exhaust and drain connecĆ
tion
j Clean the oven
j Apply steel oil
OVEN INTERIOR
j Check that filter housing is mounted correctly
j Check interior light
j Clean the oven
CONTROL
j Check and adjust, if necessary, each of the
preset values
j Heat up the oven at 480° F (249°C) for approxĆ
imately 5 minutes.

Operation
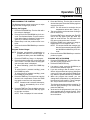
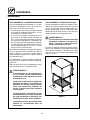
11
Manual Control Description
1. MAIN POWER SWITCH - controls power to
the oven
2. TEMPERATURE KEY - press to set the cook
temperature
3. TIME KEY - press to set the cook time
4. PROBE KEY - press to activate core probe
5. PROGRAM KEY - press access and program
product recipes. Control stores up to 10 recĆ
ipe programs with 3 cooking stages each.
6. STAGE KEY - use to enter stage information
during product programming
7. ALARM KEY - press to silence alarms
8. HOT AIR KEY - press to select Hot Air mode
9. COMBI KEY - press to select Combi 1, Combi
2 or Retherm mode
10. STEAM KEY - press to select Steam mode
11. VENT KEY - press to open or close the vent
12. FAN KEY - press to change the fan speed.
The fan is reversible with 9 speeds for optiĆ
mum baking and roasting results
13. SELECTION DIAL - turn to enter data into
control
14. START/STOP KEY - press to begin or cancel
a cook cycle
1
2
3
4
5
6
7
8
9
10
11
12
13
14
Figure 5

Operation
12
Manual Cooking
MANUAL COOKING
1. Press the desired mode key on the right side
of the control. The LED next to the key lights
and the mode name is displayed.
To select Reheating, press the COMBI key
once.
To select Combi 1 (30Ć40% humidity), press
the COMBIi key twice.
To select Combi 2 (60Ć80% humidity), press
the COMBI key three times.
2. Press the TEMP key. Turn the dial to enter the
desired cook temperature. Press the TEMP
key again to save the cook temperature.
NOTE: If steam mode is selected, the temperĆ
ature is automatically set to 212_F
(100_C).
3. Press the TIME key. Turn the dial to enter the
desired cook time. Press the TIME key again
to save the cook time.
For continuous cooking, turn the dial until the
display reads --:--. Continuous manual
cooking allows the oven to run continuously at
the set temperature in the set cooking mode.
NOTE: Time is displayed in hours:minutes.
4. Press the FAN key. Turn the dial to enter the
desired fan speed. Press the FAN key again to
save the fan speed.
NOTE: The fan cannot be set below 50% at
temperatures above 390_F (200_C)
5. The vent position can be set when cooking in
Hot Air mode only.
Press the VENT key to open the vent. The LED
next to the key lights. Press the VENT key
again to close the vent. The LED next to the
key goes out when the vent is closed.
6. Press the START/STOP key to begin the cook
cycle.
7. If you are cooking in Hot Air mode, it is posĆ
sible to inject moisture at any time during the
cook cycle. Press and hold the STEAM mode
key. Steam is injected until the key is released.
8. At the end of the cook cycle, an alarm sounds
and the display flashes. Push the START/
STOP key or open the door to silence the
alarm.
NOTE: The alarm will not sound during a conĆ
tinuous manual cook.
CORE PROBE COOKING
1. Follow the instructions for Manual Cooking to
set the mode, cook temperature, fan speed
and vent position.
2. Press the CORE PROBE key. Turn the dial to
enter the desired product core temperature.
Press the CORE PROBE key again to save the
core temperature.
NOTE: When the CORE PROBE key is seĆ
lected the cook time automatically
changes to --:--.
3. Insert the probe into the product.
The core temperature probe has several meaĆ
suring points on its tip. The computer calcuĆ
lates an average temperature thus ensuring
that the core temperature is 100% correct.
The probe should be inserted vertically in the
thickest part of the product.
When preparing products of different sizes,
insert the sensor in the smallest product and
then move it to a larger product when the core
temperature alarm sounds.
4. Load the product and close the door. Plus the
core probe into the oven.
5. Press the START/STOP key to begin the cook
cycle.
6. When the product has reached the core temĆ
perature the alarm sounds. Push the START/
STOP key or open the door to silence the
alarm.

Operation
13
Programmed Cooking
PROGRAMMING THE CONTROL
The Blodgett manual control stores up to 10 recipe
programs with 3 stages per product.
Naming the Program
1. Press the PROGRAM key. Turn the dial until a
free recipe is displayed.
2. Press and hold the PROGRAM key for 5 secĆ
onds. The first letter flashes. Turn the knob unĆ
til the desired letter is displayed. Press the proĆ
gram key to advance to the next digit.
3. Repeat step 2 until the product name is enĆ
tered.
4. Press and hold the PROGRAM key to save the
name.
Program Product Stages
NOTE: Blodgett recommends programming a
preheat with alarm for the first stage. To
program an alarm, press the ALARM key.
1. Press the STAGE key. Stage 1 is displayed.
2. Press the desired mode key on the right side
of the control. The LED next to the key lights
and the mode name is displayed.
To select Reheating, press the COMBI key
once.
To select Combi 1 (30Ć40% humidity), press
the COMBIi key twice.
To select Combi 2 (60Ć80% humidity), press
the COMBI key three times.
3. Press the TEMP key. Turn the dial to enter the
desired cook temperature. Press the TEMP
key again to save the cook temperature.
NOTE: If steam mode is selected, the temperĆ
ature is automatically set to 212_F
(100_C).
4. Press the TIME key. Turn the dial to enter the
desired cook time. Press the TIME key again
to save the cook time.
NOTE: Time is displayed in hours:minutes.
5. Press the FAN key. Turn the dial to enter the
desired fan speed. Press the FAN key again to
save the fan speed.
NOTE: The fan cannot be set below 50% at
temperatures above 390_F (200_C)
6. The vent position can be set when cooking in
Hot Air mode only.
Press the VENT key to open the vent. The LED
next to the key lights. Press the VENT key
again to close the vent. The LED next to the
key goes out when the vent is closed.
7. Press the STAGE key to advance to stage 2.
Repeat steps 2Ć7 for stages 2 and 3.
NOTE: For recipes shorter than 3 stages, deĆ
lete the current step by pressing STEP
and ALARM simultaneously for 2 secĆ
onds.
8. Press and hold the PROGRAM key to save the
product program.
COOKING WITH A PROGRAM
1. Press the PROGRAM key. Turn the dial to disĆ
play the product recipe name.
2. Press the START/STOP key.
3. If an alarm is used, press the ALARM key to
turn the alarm between steps off.
4. If you are cooking in Hot Air mode, it is posĆ
sible to inject moisture at any time during the
cook cycle. Press and hold the STEAM mode
key. Steam is injected until the key is released.
5. When the program has started, you can
change time, temperature, core temperatureĆ
fan speed and vent position. These changes
will only be active in the current run.
The display shows the total time remaining. To
view the time remaining in the current step,
press the TIME key.
6. At the end of the programmed cook cycle, an
alarm sounds and the display flashes. Push
the START/STOP key or open the door to siĆ
lence the alarm.

Operation
14
Cooking Tips
PREHEAT
485Ć575_F (250Ć300_ C)
Blodgett recommends always preheating the
oven before cooking.
Preheat is used to heat an empty oven. To set the
preheat mode, select the Hot Air key and enter a
temperature above 485°C (250°C). PREHEAT is
displayed. The time can be set to maximum of 15
minutes. The timer will not begin the countdown
until the desired preheat temperature has been
reached.
NOTE: Continuous operation is not available in
preheat.
HOT AIR MODE
85Ć485_F (30Ć250_C)
D The hot air operating mode can be used for
roasting, grilling, baking and gratinating.
D Blodgett recommends that you keep the vent
open when roasting products at very high temĆ
peratures
D It is possible to roast breaded products such as
breaded fish and breaded pork chops. For maxĆ
imum effect, use enameled cast iron pans or siliĆ
coneĆcoated baking sheets.
COMBI MODES
85Ć485_F (30Ć250_C)
D COMBI 1 is recommended for the roasting of all
kinds of meat cuts. The pores of the meat close
quickly, which prevents the juice from leaving
the meat. For long roast times at 175Ć265°F
(80Ć130°C), COMBI STEAMING 1 helps reduce
shrinkage.
D COMBI 2 is recommended for roasts that
should be wellĆdone, and if you want to use the
juice for gravy. At temperatures higher than
335°F (170°C), the crust of the meat becomes
nice and brown.
RETHERM MODE
85Ć355_F (30Ć180_C)
D Retherm is a very gentle process and therefore
very suitable for reheating.
D Use a core temperature probe to reach the perĆ
fect end temperature.
D For the reheating of sousĆvide products, etc.,
follow the product reheating recommendations.
SousĆvide products should not be covered.
STEAM MODE
85Ć250_F (30Ć120_C)
D Blodgett recommends preĆsteaming the oven
for 8 minutes before loading product.
D Steaming at 212°F (100°C is recommended for
all kinds of hard vegetables, rice and pasta.
D Low temperature steaming at 85Ć211°F
(70Ć80°C) is recommended for fish.
D Forced steaming at 250°F (120°C) is an aggresĆ
sive and very rapid process, which should be
used with care.

Maintenance
15
Cleaning & Preventative Maintenance
DAILY CLEANING
Daily cleaning of your Combi oven is essential for
sanitation, and to ensure against operational diffiĆ
culties.
Cleaning the Exterior
1. The exterior of the appliance may be cleaned
and kept in good condition with a light oil. SatĆ
urate a cloth and wipe the appliance when it
is cold; wipe dry with a clean cloth.
WARNING!!
DO NOT spray the outside of the appliance
with water or clean with a water jet. CleanĆ
ing with a water jet can impregnate chloĆ
rides into the stainless steel, causing the
onset of corrosion.
Cleaning the Interior
NOTE: DO NOT use corrosive cleaners not inĆ
tended for oven cleaning on your Combi
oven.
Blodgett recommends the following products
for cleaning and rinsing of your Blodgett ComĆ
bi oven. If you choose to use products other
than what Blodgett recommends, please have
your suppler send us the MSDS sheet on the
proposed alternate so we can ensure it meets
our standards. Non approved products can
cause harm to your unit and can potentially
void your warranty.
Recommended oven cleaners:
Johnson Diversey Suma Nova LĆ6
Four, 1 gallon (3.78 litre) containers
Product code 57252280
One, 5 gallon (18.9 litre) container
Product code 57252100
Recommended Rinse Aid:
Johnson Diversey Suma Maro A8.8
Four, 1 gallon (3.78 litre) containers
Product code 57270280
One, 5 gallon (18.9 litre) container
Product code 57270100
1. Open the oven door.
2. Use the attached spray hose, located beneath
the control, to clean the front drip tray. Water
will run to the drain in the oven cavity.
Run the CombiWash automatic cleaning cycle
as follows:
1. Check that the oven cleaner and rinse agent
containers are both full.
2. Press the PROGRAM key. Turn the dial until
COMBIWASH is displayed.
3. CombiWash features four different cleaning
cycles. Press the STAGE key to select the deĆ
sired cleaning cycle.
Cycle 1 (44 minutes)
Cycle 2 (1 hour)
Cycle 3 (1 hour, 49 minutes)
Cycle 4 (2 hours, 38 minutes)
NOTE: Use cycle 1 or 2 after steaming and
roasting at low temperatures. Use
cycle 3 or 4 after steaming and roastĆ
ing at high temperatures.
4. Press the Start/Stop key to initiate the clean
cycle.
5. If the cavity temperature is above 175_F
(80_C), the oven will automatically enter cool
down. When the cavity is below 175_F (80_C)
the CombiWash cycle begins.
6. The control counts down the time remaining
in the wash cycle.
7. When the wash cycle is over, the oven autoĆ
matically switches to an energy saving standĆ
by mode.

Maintenance
16
Cleaning & Preventative Maintenance
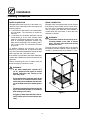
WEEKLY CLEANING
In addition to the daily cleaning, it is necessasry to
clean the control filter and behind the fan guard on
a weekly basis. This is necessary for proper funcĆ
tioning of the oven. Scale will build up on the fan
and heat source leading to a less efficient oven.
Cleaning the Control Filter
The control filter is located below the control
compartment, in front of the spray hose.
1. To remove, pull down on the black knob on the
left of the filter.
2. Clean the filter with soap and water.
3. Reinstall the filter. Press up on the filter until the
back of the knob is inserted into the hole in the
bottom of the oven.
4. Push up on the center of the knob to expand
the back of the knob securing the filter.
Cleaning Behind the Fan Guard
1. Loosen the two screws and on the fan guard
(or baffle).
2. Swing the baffle forward.
3. Thoroughly spray cleaner onto the fan and
heat source. Place the oven in the steam
mode for approximately 10 minutes.
4. After ten minutes, rinse the cleaner off. Return
the fan guard to the closed position. Rotate
the two screws to secure the fan guard.
PREVENTIVE MAINTENANCE
The best preventive maintenance measures are
āthe āāāproper āāinitial āāinstallation āāof āāthe equipment and
a program for cleaning the appliance routinely.
The Oven/Steamer requires no lubrication. ConĆ
tact the factory, the factory representative or a loĆ
cal Blodgett Combi service company to perform
maintenance and repairs should they be required.
Deliming
The control keeps track of boiler usage between
descaling. When the oven has reached 95% of the
time the control warns the operator that the oven
needs to be delimed.
Deliming the Oven
1. Be sure the container delivering the deliming
agent to the appliance is full. Be sure to use a
nonĆdiluted deliming agent such as "Lime
Away" by EcoĆLabs or "Lime Out", by US
Chemical.
2. Press the PROGRAM key. Turn the dial until
DELIMING is displayed.
3. Press the START/STOP key.
4. The remainder of the process is automatic.
The control displays the deliming steps as
they occur.
La page est en cours de chargement...
La page est en cours de chargement...
La page est en cours de chargement...
La page est en cours de chargement...
La page est en cours de chargement...
La page est en cours de chargement...
La page est en cours de chargement...
La page est en cours de chargement...
La page est en cours de chargement...
La page est en cours de chargement...
La page est en cours de chargement...
La page est en cours de chargement...
La page est en cours de chargement...
La page est en cours de chargement...
La page est en cours de chargement...
La page est en cours de chargement...
La page est en cours de chargement...
La page est en cours de chargement...
La page est en cours de chargement...
-
 1
1
-
 2
2
-
 3
3
-
 4
4
-
 5
5
-
 6
6
-
 7
7
-
 8
8
-
 9
9
-
 10
10
-
 11
11
-
 12
12
-
 13
13
-
 14
14
-
 15
15
-
 16
16
-
 17
17
-
 18
18
-
 19
19
-
 20
20
-
 21
21
-
 22
22
-
 23
23
-
 24
24
-
 25
25
-
 26
26
-
 27
27
-
 28
28
-
 29
29
-
 30
30
-
 31
31
-
 32
32
-
 33
33
-
 34
34
-
 35
35
-
 36
36
-
 37
37
-
 38
38
-
 39
39


Blodgett BCM-101 Mode d'emploi
- Catégorie
- Fours
- Taper
- Mode d'emploi
dans d''autres langues
Documents connexes
-
Blodgett BLCM-102G Mode d'emploi
-
Blodgett BC -20G Mode d'emploi
-
Blodgett COS-6 Mode d'emploi
-
-
Blodgett BCX -14G Mode d'emploi
-
-
-
-
-