
Revised 01-2019
Revised 01-2019
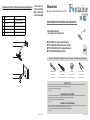
Flange
Shower Arm
Showerhead
Handle Assembly
O-RING
5L0C1150CP/AP/HA/HBW0
3
4
2 5P0027600CP/AP/HA/HBW0
5
Part No.DescriptionNO.
5R0R0175PL
XXXXXXXXXX
1
5F0011600CP/AP/HA/HBW0A0
1
2
3
4
5
MFF-CHAS-CP
MFF-CHAS-BN
MFF-CHAS-ORB
MFF-CHAS-MB
Replacement Parts / Pièces de rechange / Repuestos
Cinta selladora para rosca
Ruban pour tuyau
Pipe Tape
Destornillador cruciforme
Tournevis Phillips
Phillips ScrewdriverAdjustable Wrench Groove join pliers
Clé à molette Pince multiprise
Llave ajustable Pinzas ajustables
Tools You Will Need / Outils dont vous aurez besoin / Herramientas necesarias
SAFETY TIPS
• If you use soldering for the installation of the faucet, the seats, cartridges and washers will have to be removed
before using flame. Otherwise, warranty will be void on those parts.
• Cover your drain to avoid losing parts.
• 0℃~55℃.
CONSIGNES DE SÉCURITÉ
• Si vous posez le robinet par brasage, il est essentiel de retirer les sièges, les cartouches et les rondelles avant
d’appliquer la flamme, faute de quoi la garantie sur ces pièces sera annulée.
• Couvrez le drain pour ne pas perdre des pièces.
• 0℃~55℃.
CONSEJOS DE SEGURIDAD
• En el caso de utilizar soldadura para instalar el grifo, remueva los asientos, cartuchos y arandelas antes de usar la
llama. De lo contrario, se anulará la garantía para esos componentes.
• Tape la boca del desagüe para prevenir la pérdida de piezas pequeñas.
• 0℃~55℃.
Chatelet
Single-Handle Shower Only Trim
Installation/Installation/Instalación
CUSTOMER SERVICE
TOLL-FREE 1-877-482-5422
MFF-CHAS-CP (Polished Chrome)
MFF-CHAS-BN (PVD Brushed Nickel)
MFF-CHAS-ORB (Oil Rubbed Bronze)
MFF-CHAS-MB (Matte Black)

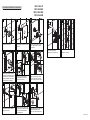
Thread the shower head
clockwise onto the shower arm.
10
1
Remove the mud guard.
Carefully slide the escutcheon onto
the valve.
2
Place handle assembly on valve
and rotate clockwise to secure
escutcheon.
Re-install the trimmed stem and
nipple on the valve.
Carefully slide the escutcheon onto
the valve and place handle assembly
on valve and rotate clockwise to
secure escutcheon.
9
If handle assembly will not secure
escutcheon to the wall, measure and
note the distance ‘XX’(the distance
between the bottom of the handle
assembly and the escutcheon)
Unscrew the handle assembly
anti-clockwise from valve and
remove the escutcheon.
5 6
Cut stem and nipple the amount
noted in step # 4. (Never cut the
stem and nipple while still on the
valve. This may damage the valve.)
Apply teflon tape to the shower arm
and thread clockwise onto the
nipple. Then slide the flange down.
4
b
}
7
a
8
b
Thread Teflon Tape
3
a
Revised 01-2019 Revised 01-2019
Installation completed.
11
MFF-CHAS-CP
MFF-CHAS-BN
MFF-CHAS-ORB
MFF-CHAS-MB
Installation/Installation/Instalación
-
 1
1
-
 2
2


Fontaine by Italia MFF-CHATS-BN Guide d'installation
- Taper
- Guide d'installation
- Ce manuel convient également à
dans d''autres langues
Documents connexes
-
Fontaine by Italia MFF-PNC1-ORB Guide d'installation
-
Fontaine by Italia MFF-CHAC1-CP Guide d'installation
-
Fontaine by Italia MFF-HVS-CP Guide d'installation
-
-
-
-
-
-
-