Euroclean Edge 12 Mode d'emploi
- Catégorie
- Aspirateurs
- Taper
- Mode d'emploi
La page est en cours de chargement...

TABLE OF CONTENTS
Important safety instructions 3
Grounding instructions 4
Thermal vacuum motor protector 4
Know your machine 5
Assembly instructions 6
Operating instructions 6
Brush adjustment 7
Maintenance 8 - 9
Changing the brush roller 10
Parts list 11-12
Warranty 11-12
RECORD THE MODEL AND
SERIAL NUMBER OF YOUR
MACHINE AND KEEP FOR
FUTURE REFERENCE.
MODEL NUMBER______________
SERIAL NUMBER______________
INDICE
Norme di sicurezza 3
Protettore Termico del motore
aspirante 4
Conoscere la vostra macchina 5
Messa in funzione 6
Istruzioni per il funzionamento 6
Regolazione spazzola 7
Manutenzione 8 - 9
Sostituzione del rullo 10
Lista ricambi 11-12
Garanzia 11-12
REGISTRATE IL MODELLO E IL
NUMERO DI SERIE DELLA VS
MACCHINA E CUSTODITE PER
FUTURE REFERENZE.
MODELLO_____________________
NUMERO DI SERIE_____________
INHALTSVERZEICHNIS
Zur besonderen Beachtung 3
Thermoschutz des Saugmotors 4
Ihre Maschine kennenlernen 5
Die Maschine in Betrieb setzen 6
Bedienung der Maschine 6
Saugbürsten- Höhenverstellung 7
Wartung 8 - 9
Auswechseln der Bürste 10
Ersatzteilliste 11-12
Garantie 11-12
SCHREIBEN SIE SICH HIER DIE
SERIENNUMMER UND DEN
MODELLTYP AUF.
MODELLTYP_____________________
SERIENNUMMER_________________
INDEX
Consignes des sécurité 3
Protecteur Thermique du moteur
aspirant 4
Pour connaître votre machine 5
Montage 6
Mise en service de la machine 6
Réglage de la brosse 7
Entretien 8 - 9
Changement du rouleau 10
Liste pièces de rechange 11-12
Garantie 11-12
MARQUER CI-DESSOUS LE MODÈLE
ET LE NUMÉRO DE SÉRIE ET LE
GARDER COMME RÉFÉRENCE.
MODÈLE_________________________
NUMÉRO DE SERIE________________
INDICE
Instrucciones importantes de
seguridad 3
Protector Termo proteccion motor
aspirante 4
Conozca su máquina 5
Instrucciones para el montaje 6
Instrucciones de funcionamiento 6
Regulación del cepillo 7
Mantenimiento 8 - 9
Substitución del rodillo 10
Lista recambios 11 - 12
Garantía 11-12
RECUERDE EL MODELO Y EL N°
DE SERIE DE SU MÁQUINA,
GUÁRDELO COMO REFERENCIA
PARA EL FUTURO.
MODELO________________________
N° SERIE_____________________
SPECIFICATIONS
DATI TECNICI TECHNISCHE DATEN
CARACTERISTIQUES TECHNIQUES CARACTERÍSTICAS TÉCNICAS
Model Edge 12
Voltage V/Hz 120/60
Rated Power W 850
Protection Class (electrical) I
Sound Pressure Level db
(A)
/20
µ
Pa 69
Total Weight lbs / Kg 15 / 6.8
Vibrations at the Hand Controls m/s
2
<2.5 m/s
2
APPROVALS - APPROVAZIONI - BILLIGUNG
APPROBATIONS - APROVACIONES
U.S.A. and Canada
ETL
WIRING DIAGRAMS
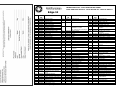
Pos Ref. N° Qty Description
1 56704325 1 Main Switch
3 56704323 1 Vacuum sensor with
light
4 56703972 1 Terminal Block
3 poles
5 56704337 1 Vacuum Motor
6 56704353 1 Circuit Board
7 56704382 1 Speed Sensor
8 56704412 1 Terminal Block
5 poles
V 120/60
Class I
This machine is not intended
for use with hazardous
materials. Doing so may expose
people to serious health risks.
56015112
WARNING

WHEN USING AN ELECTRICAL
APPLIANCE, BASIC PRECAUTIONS
SHOULD ALWAYS BE FOLLOWED,
INCLUDING THE FOLLOWING
IMPORTANT SAFETY
INSTRUCTIONS
Read these operating instructions
carefully
•
Do not use on any wet surface.
•
Always disconnect the plug when
the machine is not in use and before
doing any maintenance or cleaning
of the machine.
•
The plug should not be subjected to
undue stress by pulling on the power
supply cable.
•
Do not leave the machine unattended
when it is on and don’t allow the
machine to be used as a toy.
•
Do not use where there are
unsupervised young children.
•
Always keep hands, hair, feet and
clothes away when the machine is on.
•
Do not vacuum over electrical cord, it
becomes damaged and creates an
electrical hazard. If the machine
appears to be faulty, do not use it.
Return it to your authorized dealer for
service.
•
Do not suck up matches, ash or
cigarettes that are still burning
•
Do not suck up infiammable liquid
materials or any other liquid material.
•
Avoid vacuuming hard or sharp
objects or damage may result.
•
Use the machine only for what it is
meant for, and as described in the
instructions.
•
Do not switch on again a machine
which seems to be faulty.
•
Use and keep this machine in a dry
environment and at a temperatures
between+5°C
÷
+35°C (+41°F
÷
+95°F)
•
Do not expose to the sun and UV rays
QUANDO SI USANO APPARECCHI
ELETTRICI, DEVONO ESSERE SEGUITE
NORMALI PRECAUZIONI,
INCLUSE LE SEGUENTI
NORME DI SICUREZZA
Leggere attentamente il manuale di
istruzioni
•
Non usare la macchina su superfici
bagnate.
•
Staccare sempre la spina dalla presa di
corrente quando l’apparecchio non è in
uso o prima di eseguire regolazioni o
manutenzioni.
•
Non tirare mai il cavo di alimentazione, o
l’apparecchio stesso, per staccare la spina
dalla presa di corrente.
•
Non lasciare mai incustodito l’apparecchio
acceso e non permettere che venga usato
come un giocattolo.
•
Sorvegliare in continuazione se
l’apparecchio è adoperato da bambini o
vicino a bambini.
•
Mantenere sempre mani, piedi, capelli e
indumenti lontani dalle spazzole in
movimento.
•
Non passare l’apparecchio sul cavo
elettrico, per evitare di danneggiare
l’isolamento.
•
Non aspirare fiammiferi, cenere e
mozziconi di sigarette accesi.
•
Non aspirare liquidi infiammabili e liquidi
in genere.
•
Evitare di aspirare oggetti duri o taglienti
per non danneggiare il sacco raccogli
polvere e l’apparecchio stesso.
•
Usare l’apparecchio solo per gli usi per i
quali è destinato, come descritto nelle
istruzioni.
•
Non riaccendere un apparecchio che
sembri difettoso.
•
Usare e conservare l'apparecchio
all'interno di ambienti asciutti e ad una
temperatura da +5°C
÷
+35°C (+41°F
÷
+95°F)
•
Non esporre l’apparecchio ai raggi solari e
UV
WENN MAN ELEKTRISCHE GERÄTE
BENÜTZT SOLLTE MAN GEWISSE
VORSICHTMASSNAHMEN
BEACHTEN, EINSCHLIEßLICH
DER FOLGENDEN
ZUR BESONDEREN
BEACHTUNG
Lesen Sie die ganze Gebrauchsanweisung
vor dem Gebrauch durch
•
Die Maschine nicht auf nassen
Oberflächen benützen
•
Den Stecker immer aus der Steckdose
ziehen wenn das Gerät nicht in
Funktion ist sowie vor jeder
Wartungsarbeit .
•
Um die Gefahr eines elektrischen
Schlages zu vermeiden, darf das Gerät
keiner Feuchtigkeit ausgesetzt werden.
•
Dieses Gerät ist kein Spielzeug! Es darf
nicht in die Hände von Kinder gelangen.
Bitte große Aufmerksamkeit bei der
Arbeit in der Nähe von Kindern.
•
Gebrauchsanweisung und Warnungen
des Herstellers beachten. Nur
zugelassenes Zubehör verwenden.
•
Gerät nie bei beschädigtem Netzkabel
benutzen. Gerät zum Service Center
bringen wenn es nicht richtig
funktioniert, heruntergefallen ist oder
dem Regen ausgesetzt wurde.
•
Gerät nie am Kabel tragen oder ziehen.
Das Kabel sollte nicht in Türen
eingeklemmt oder über scharfkantige
Gegenstände gezogen werden. Gerät nie
über das Kabel rollen. Kabel weit von
heissen Oberflächen fernhalten.
•
Das Kabel stets am Stecker und niemals
am Kabel selbst aus der Steckdose
ziehen.
•
Haare, Kleider, Finger weit von den
Öffnungen und sich bewegenden Teilen
des Gerätes fernhalten.
•
Zigaretten, Zündhölzer, heisse Asche
und andere rauchenden oder brennenden
Gegenstände nicht aufsaugen.
•
Vor dem Ausziehen des Kabels alle
Bedienungselemente ausschalten.
•
Das Aufsaugen von scharfkantigen oder
harten Gegenständen vermeiden.
•
Gerät an einem trockenen Ort benützen
und aufbewahren, Temperatur zwischen
+5°C
÷
+35°C (+41°F
÷
+95°F)
•
Gerät nicht Sonnenstrahlen und UV-
Strahlen aussetzen
QUAND ON UTILISE DES APPAREILS
ELECTRIQUES ON DOIT SUIVRE DES
RÈGLES FONDAMENTALES
Y COMPRISES LES SUIVANTES
CONSIGNES DE SECURITE
Lire attentivement le mode d’emploi
•
Ne pas utiliser la machine sur les sols
mouillés
•
Débrancher toujours la prise après
l’utilisation ou avant d’entreprendre tout
travail d’entretien.
•
Ne jamais tirer par le câble d’alimentation ,
ni par l’appareil pour débrancher la prise.
•
Surveiller toujours l’appareil s’il est en
marche et faire attention qu’il ne soit pas
utiliser comme un jouet.
•
Surveiller toujours l’appareil au cas ou il est
utilisé par un enfant et près des enfants.
•
Garder toujours loin des brosses en
mouvement, mains, pieds, cheveux,
vêtements.
•
Ne pas passer l’appareil par dessus le câble
électrique, pour éviter d’abîmer l’isolement.
•
Ne pas aspirer les allumettes, les cendres et
mégots allumés.
•
Ne pas aspirer de liquides inflammables et
tout liquide en général.
•
Eviter d’aspirer tout objet dur ou tranchant
pour ne pas abîmer le sac à poussière ou
l’appareil.
•
L’utilisation de l’appareil doit être celle
indiquée dans le mode d’emploi.
•
Ne jamais remettre en marche un appareil
qui semble défectueux.
•
Utiliser et garder l’appareil dans un endroit
sec et à une température de +5°C
÷
+35°C
(+41°F
÷
+95°F)
•
Ne pas exposer l’appareil aux rayons solaires
e UV
CUANDO SE USAN APARATOS
ELÉCTRICOS DEBEN TOMARSE
NORMALES PRECAUCIONES
INCLUIDAS LAS SIGUIENTES”
INSTRUCCIONES DE SEGURIDAD
INSTRUCCIONES DE
SEGURIDAD
Lea Atentamente el manual de
instrucciones
•
No usar la máquina sobre
superficies mojadas.
•
Desconecte siempre el enchufe
cuando no use la máquina y antes
de hacer una reparación
cualquiera.
•
Nunca tire por medio del cable de
alimentación o de la máquina para
desenchufar.
•
No descuide la máquina y no
permita que se use como un juguete.
•
Siempre hay que vigilar a la
máquina si la usan los niños o
cerca de niños.
•
Mantener siempre las manos, pies,
pelo y ropa lejos de los cepillos en
movimiento.
•
No aspire sobre el cable eléctrico,
puede causar daños al aislamiento
del hilo.
•
No aspire cerillas, ceniza ó
cigarrillos que estén todavía
encendidos.
•
No aspire materiales, líquido
inflamable o ningún otro material
líquido.
•
No aspire materiales cortantes para
no estropear la bolsa que recoge el
polvo u la máquina.
•
Use la máquina para lo que se le
indica y como se le describe en las
instrucciones.
•
No encienda de nuevo la máquina si
está defectuosa
•
Use y guarde el aparato en lugares
secos y con temperatura entre +5°C
÷
+35°C (+41°F
÷
+95°F)
•
No exponga el aparato a los rayos
solares y UV.
3

FOR U.S.A. and CANADA COMMERCIAL MARKET ONLY
Connect to a properly grounded outlet only. See grounding instructions.
GROUNDING INSTRUCTIONS IN COMMERCIAL SITUATIONS
WARNING
This machine must be properly grounded to protect the operator from electrical shock, in a
commercial environment, in accordance with safety regulations. Read the safety instructions
below before operating the machine.
120 V machines have this kind of three-prong plug
at the end of a three-wire electrical cord.
The grounding pin on this plug grounds the
machine when it is plugged into a three prong
outlet.
A grounding adapter must be installed as
shown here if only two-prong outlets are
available.
The outlet box must be grounded and the
grounding tab (or wire) on the adapter must
be installed under the head of screw in the
center of the outlet cover.
120 Volt plugs are available at most
hardware stores.
Grounding adapters are not approved for use in
Canada
•
Replace the plug if the grounding pin is damaged or broken.
•
The green or (green/yellow) wire in the cord is the grounding wire.
•
When replacing a plug, this wire must be attached to the grounding pin only.
•
Extension cords connected to this machine should be 12 gauge, three-wire
cords with three-prong plugs and outlets. Do not use extension cord more than 50 feet
(15 m.) long.
IMPORTANT
Thermal vacuum motor protector.
The vacuum motor is equipped with a safety thermal protector. Should the vacuum become overloaded
by vacuuming with the bag full, or vacuuming with very dirty filters, or if the vacuum should have a
clog, the thermal protector will protect the motor from overheating by shutting the motor down
automatically. In this case, switch off the vacuum, disconnect the plug and check the bag, check the
filters and also check for signs of clogging(see page 9). After the problem is corrected you may resume
vacuuming.
IMPORTANTE
Protettore termo/amperometrico del motore aspirante
Il motore aspirante è provvisto di un termico di sicurezza. In caso di: sovraccarico (aspirare tappeti a pelo
alto con regolazione troppo bassa), lavorare con sacco pieno, lavorare con microfiltro/Hepa filtro
eccessivamente sporchi, il protettore termico può intervenire per proteggere il motore da eccessivo
surriscaldamento. Spegnere la macchina, staccare la spina e controllare: il sacco, il microfiltro/ Hepa filtro
ed eventuali ostruzioni (pag. 9).
WICHTIG
Thermo/Amperemeterschutz des Saugmotors
Der Saugmotor ist mit einem Sicherheitstemperaturbegrenzer ausgestattet. Bei : Überlastung, (Saugen von
Teppichen mit hohem Floor mit der niedrigsten Einstellung), Saugen mit vollem Beutel, mit sehr
schmutzigem Mikrofilter oder Hepa Filter greift der Schutz ein um eine Überheizung des Motors zu
vermeiden. Schalten Sie die Maschine ab, ziehen Sie den Netzstecker aus der Steckerdose und
kontrollieren Sie den Papierbeutel, den Mikrofilter/Hepa Filter und eventuelle Verstopfungen (auf Seite 9).
IMPORTANT
Protecteur thermo/ampèremétrique pour le moteur aspirant.
Le moteur aspirant est pourvu d’un système thermique de sécurité. En cas de: surcharge (aspirer les tapis à
poil haut avec une régulation trop basse), aspirer quand le sac est plein, aspirer avec le microfiltre/Hepa
filtre trop sales, le thermo-protecteur intervient pour protéger le moteur d’une excessive surchauffe.
Débrancher la machine et débrancher la prise de courant et contrôler: le sac à poussière, le microfiltre/le
filtre Hepa et les obstructions éventuelles (page 9).
IMPORTANTE
Protector termo/amperimétrico del motor aspirador
El motor aspirador tiene un protector térmico de seguridad. En caso de sobrecargo (aspirar alfombras de
pelo alto con regulación demasiado baja), trabajar con bolsa llena, trabajar con microfiltro /Hepa filtro
excesivamente sucios, el protector térmico puede intervenir para proteger el motor de excesivo
sobrecalentamiento.
Apagar la máquina, desenchufar y controlar: la bolsa, el microfiltro/ Hepa filtro y eventuales obstrucciones
(pág.9).
Technical improvements
Kent-Euroclean reserves the right to make technical improvements and modifications without prior notice.
For this reason, the appliance can deviate in details from the leaflet information.
Migliorie tecniche
Kent-Euroclean si riserva il diritto di apportare delle migliorie tecniche e delle modifiche senza preavviso.
In tal caso alcuni dettagli potranno non risultare conformi alle informazioni riportate sulla documentazione
tecnica.
Technische Verbesserungen
Kent-Euroclean behält sich technische Verbesserungen im Rahmen der Modellpflege vor.
Daher kann das Gerät in Details von Prospektangaben abweichen.
Perfectionnements techniques
Kent-Euroclean se réserve le droit de procéder à des perfectionnements techniques dans le cadre de la
gestion de ses modèles. Certains détails de la machine peuvent ainsi différer des donnés indiquées dans les
prospectus.
Mejoras técnicas
Kent-Euroclean se reserva el derecho a hacer cualquier modificación y arreglo técnico sin previo aviso. Por
esta razón, los detalles acerca de la maquina podrían resultar diferentes de las informaciones indicadas en el
manual de información.
4

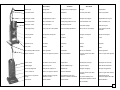
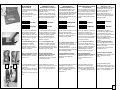
KNOW YOUR MACHINE
Handle grip
Cord strain relief
Telescopic handle
4 to 1 stretch hose
Telescopic wand
Paper bag storage
Carrying handle
Crevice tool
Upholstery tool
Foot pedal
Non marking rubber wheels
Upper cord hook
Power switch
Full bag light
Brush adjusting knob
Lower cord hook
Side cover for easy brush
change
Side wheels
CONOSCI LA TUA
MACCHINA
Impugnatura
Gancio passacavo
Impugnatura telescopica
Tubo estensibile 4 a 1
Tubo telescopico
Vano porta sacco di ricambio
Impugnatura di trasporto
Lancia
Bocchetta
Pedalino
Ruote gommate
Gancio avvolgicavo superiore
Interruttore di accensione
Spia sacco pieno
Manopola di regolazione
Gancio avvolgicavo inferiore
Sportello laterale per rapida
sostituzione rullo
Ruotine laterali
LERNEN SIE IHRE MASCHINE
KENNEN
Handgriff mit Gummipfropfen
Kabelhaken
Teleskopischer Griff
Verlängerungsschlauch 4 zu 1
Teleskopisches Rohr
Raum für Ersatzpapierbeutel
Traggriff
Flachdüse
Polsterdüse
Pedal
Gummiräder
Oberer Kabelhaken
Hauptschalter
Staubbeutelfüllanzeige
Einstellknopf
Unterer Kabelhaken
Seitenabdeckung für einen
einfachen Austausch der Bürste
Seitliche Räder
POUR CONNAITRE VOTRE
MACHINE
Poignée
Crochet porte-câble
Poignée teléscopîque
Tube extensible 4 à 1
Tube télescopîque
Bac porte-sac de rechange
Poignée de transport
Lance
Suceur
Pédale
Roues caoutchoutées
Crochet enrouleur de câble
supérieur
Interrupteur principal
Voyant sac plein
Poignée de réglage
Crochet enrouleur de câble
inférieur
Couvercle latéral pour le
changement rapide du rouleau
Roues latérales
CONOZCA SU MÁQUINA
Empuñadura
Gancho pasacable
Empuñadura telescópica
Tubo extensible 4 a 1
Tubo telescópico
Vano para la bolsa de
recambio
Manija de transporte
Lanza
Boquilla
Pedal
Ruedas gomadas
Gancho sujeta cable superior
Interruptor de encender
Indicador de bolsa llena
Manopla de regulación
Gancho sujeta cable inferior
Tapa lateral para la
sustitución rápida del rodillo
Ruedas laterales
5

0 1
ASSEMBLY INSTRUCTIONS
Insert the chrome handle into the
hole in the top of the switch
housing. Push down until the
button snaps into the proper
position
Wind the electrical cord around the
cord hook on the handle and the
swing out cord hook on the back of
the machine.
To release the cord, rotate the
lower cord hook and remove the
cord.
OPERATING
INSTRUCTIONS
Switch on the machine by pushing
the green power switch,
0 is OFF
1 is ON
depress the foot pedal (by foot)
and move the vacuum body into
working position.
ISTRUZIONI PER LA MESSA IN
FUNZIONE
Inserire il tubo cromato nell’apposita
sede e premere fino a quando il
pulsante scatta nell’apposita sede.
Avvolgere il cavo tra i ganci
avvolgicavo superiore e inferiore
situati nel retro della macchina.
Per sganciare il cavo dagli appositi
agganci, ruotate il gancio avvolgicavo
inferiore.
ISTRUZIONI PER IL
FUNZIONAMENTO
Accendere la macchina schiacciando
l'interruttore di accensione,
0 è SPENTO
1 è ACCESO
premere il pedalino di sgancio ed
inclinare la macchina in posizione di
lavoro.
MONTAGE
Führungsstange in die Öffnung des
Saugaggregats einsetzen und
hinunterdrücken bis der Aretierknopf
einschnappt.
Das Kabel zwischen dem oberen und
dem unteren Kabelhaken, die sich auf
der Rückseite der Maschine befinden,
aufrollen.
Das aufgewickelte Netzkabel kann
schnell vom Haken gelöst werden,
indem der untere Kabelhaken gedreht
wird.
BEDIENUNG DER MASCHINE
Klippschalter einschalten
0 ist AUS
1 ist EIN
und die Führungsstange durch Drücken
des Fusspedals entrasten und in
Arbeitsposition bringen.
MONTAGE
Introduire le tube chromé dans son
logement et appuyer jusqu’à ce que
le bouton se bloque.
Enrouler le câble d’alimentation aux
crochets supérieurs et inférieurs qui
se trouvent derrière la machine.
Pour décrocher le câble des crochets,
il suffit de tourner le crochet
enrouleur de câble inférieur.
MISE EN SERVICE DE LA
MACHINE
Allumer l’aspirateur appuyant sur
l’interrupteur principal
0 est ÉTEINT
1 est ALLUMÉ
Appuyer sur la pédale et incliner la
machine en position de travail.
INSTRUCCIONES PARA EL
MONTAJE
Introduzca el tubo
cromado dentro
del hueco y empuje hacia abajo hasta
que el botón se encaje en el hueco.
Enrolle el cable alrededor del gancho
superior e inferior situados detrás de
la máquina.
Para soltar el cable de los ganchos,
hay que girar el gancho pasacable
inferior.
INSTRUCCIONES PARA EL
FUNCIONAMENTO
Encender la máquina apretando el
interruptor
0 está APAGADO
1 está ENCENDIDO
apretar el pedal e inclinar la máquina
en posición de trabajo.
6

BRUSH HEIGHT
ADJUSTEMENT
Your carpet cleaner has 4 wheels,
two rear wheels and two adjustable
front wheels.
Based on your carpet pile,
use the adjusting knob (see photo),
to lift or lower the base.
Low Pile
Deep Pile
In case of area rugs with fringed
ends the machine must be used
from the center to the outside.
For the best result on wall to wall
carpet follow the natural weave of
the carpet to obtain a consistent
surface apperance.
If the
brush roll should stop
(due
to running over something
large,such as a sock, or rug
fringes) the elctronic overload
control will switch off the motor
leaving the red light on.
In this case shut off the vacuum
,
unplug the machine
, inspect the
brush roll and remove any debris
using the wand.
On board attachments are provided
for above the floor vacuuming
requirements.
Lift the wand first "1" then pull it
out past the wand clip on the right
"2".
Slide accessory onto the end of the
wand.
DISPOSITIVO PER
REGOLARE L’ALTEZZA
Il Vs battitappeto è provvisto di 4
ruote, due posteriori e due anteriori
regolabili in altezza.
In base all'altezza del pelo del Vs.
tappeto o moquette, per mezzo della
manopola di regolazione indicata in
figura, alzate o abbassate la base.
Pelo basso
Pelo alto
In caso di tappeti con frange bisogna
procedere dall’interno verso l’esterno.
Con tappeti a tinta unita o moquette
con trame che tendono a formare
strisce, è consigliabile seguire la
direzione del pelo per ottenere una
superficie omogenea.
In caso di
bloccaggio del rullo
(passando sopra qualcosa di grande
tipo stracci o frange), interviene il
controllo elettronico del sovraccarico
che spegne automaticamente il motore
lasciando la spia rossa accesa.
Spegnere immediatamente
l'apparecchio, staccare la spina
dalla presa di corrente
e poi
controllare la zona rullo ed eliminare
la causa del bloccaggio.
Il vostro battitappeto è anche un
aspirapolvere per la pulizia aerea ed è
dotato di utili accessori. Estrarre il
tubo "1" e poi sganciarlo di lato "2".
SAUGBÜRSTEN
HÖHENVERSTELLUNG
Ihre Teppichklopfmaschine ist mit 4
Räder ausgestattet (2 hinten und 2
vorne) die in der Höhe regulierbar sind.
Gemäß der Haarhöhe Ihres Teppichs
oder Teppichbodens heben oder
senken Sie den Bürstfuß mit dem im
Bild gezeigten Griff.
Niedriges Ha
Hohes Haar
Teppiche mit Fransen sollten von innen
nach aussen gesaugt werden.
Unifarbige oder tieffloorige Teppiche
solten immer in Richtung des Floors
(im Strich) gesaugt werden.
Falls die
Bürstenwalze blockiert
(weil
Sie über etwas Grosses wie einen
Socken oder ein Tuch gefahren sind)
schaltet die elektronische
Überlastungskontrolle ein, welche den
Motor automatisch abstellt während die
rote Kontrolllampe anbleibt.
Maschine abstellen und Stecker
herausziehen,
danach Bürstenwalze
kontrollieren und säubern falls
erforderlich.
Ihre Teppichklopfmaschine ist auch ein
Staubsauger für die allgemeine
Reinigung und ist mit nützlichem
Zubehör ausgestattet. Das Rohr leicht
heben „1“ und dann seitlich
herausziehen „2“.
DISPOSITIF RÉGLAGE DE
LA HAUTEUR
Votre aspiro-batteur est pourvu de 4
roues, 2 postérieures et 2 antérieures,
elles peuvent être réglées en hauteur.
Selon la hauteur du poil des vos tapis
ou moquettes, lever ou baisser la
poignée de réglage indiquée dans le
schéma.
Poil bas
Poil haut
Sur les tapis à franges, il faut passer
l’aspirateur de l’intérieur vers
l’extérieur. Sur les tapis à teinte unie
ou à trames qui on la tendance à
laisser des rayures, il est conseillé de
suivre le sens du poil afin d’obtenir
une surface homogène.
En cas de
blocage du rouleau
, (si
l’on passe sur quelque chose de
grand comme un chiffon ou sur des
franges), le contrôle électronique de
surcharge intervient en éteignant
automatiquement le moteur et
laissant le voyant rouge allumé.
Eteindre immédiatement
l’appareil, débrancher la prise de
courant
et contrôler la zone du
rouleau et éliminer la cause du
blocage.
Votre aspiro-batteur est aussi un
aspirateur pour le nettoyage des
hauteurs et est équipé de plusieurs
accessoires utiles . Extraire le tube
« 1 » et ensuite le décrocher du côté
« 2 ».
DISPOSITIVO DE
REGULACIÓN DE LA ALTURA
Su aspiradora tiene 4 ruedas, dos
posteriores y dos anteriores, cuya
altura se puede regular.
Según la altura del pelo de su
alfombra levante o baje la base por
medio de la manopla de regulación
indicada en la figura.
Pelo bajo
Pelo alto
Con alfombras con franjas se
proceda del interno hacia el externo.
Con una alfombra lisa ó cuyos
tejidos tienen una tendencia a formar
líneas, es aconsejable seguir la
dirección del material para conseguir
un aspecto consistente en la
superficie.
En caso de
bloqueo del rodillo
(si
pasen sobre algo grande como los
trapos o franjas) interviene el control
electrónico que apaga
automaticamente el motor dejando
encendida la luz roja.
Apague en seguida la máquina,
desenchufe
y luego controle la zona
rodillo y elimine la causa del
bloqueo.
Su aspiradora batidora puede
transformarse también en aspiradora
para la limpieza de las alturas con los
accesorios útiles disponibles. Extraer
el tubo “1” y sacarlo del lado “2”.
7
1
2

CAUTION !
ALWAYS DISCONNECT THE
POWER CORD BEFORE
PERFORMING ANY
MACHINE MAINTENANCE.
CHANGING THE PAPER
FILTER BAG
Gently lift the latch on the front of
the bag housing cover and remove
it. Remove the full dust bag by
carefully removing the cardboard
from the safety latch and slide the
bag towards you. Seal the used
paper bag using the cardboard tab
to cover the opening.
Install a new paper bag by sliding
the opening over the tube and with
your fingers, press the vertical
cardboard until it touches the ribs
of the bag housing.
Hook the top cardboard to the red
safety latch (directions for
installing a new bag are also
printed on the bags themselves).
Replace the paper bag when the
red full bag light is on, or if you
notice the performance of the
machine decline.
Never operate the machine
without an original
Kent/Euroclean paper bag.
VACUUM INLET FILTER
This filter protects the vacuum
motor from damage due to spilled
paper bags. It provides for the 3
rd
stage of filtration.
Clean the filter
every third time that the paper
bag is changed.
Remove filter from grill and wash
out in warm water.
Let the filter dry "completely"
before putting back into the
machine. Never operate the
machine without the inlet filter.
ATTENZIONE!
STACCARE SEMPRE LA SPINA
DALLA PRESA DI CORRENTE
PRIMA DI ESEGUIRE
QUALSIASI MANUTENZIONE.
SOSTITUZIONE DEL SACCO
FILTRO
Aprire lo sportello tirando
leggermente il gancio sportello.
Sfilare il sacco di carta seguendo
all’inverso le istruzioni di montaggio
stampate sui nuovi sacchi filtro
Sigillare il sacco per mezzo del
cartoncino di chiusura.
Inserire il nuovo sacco nel tubo fino a
che il cartoncino verticale tocchi le
nervature del contenitore sacco.
Agganciare poi il cartoncino superiore
all'apposito gancio reggi sacco di
sicurezza rosso (istruzioni sono anche
stampate sui sacchi filtro).
Il sacco si sostituisce ogni qual volta si
accende la spia rossa o se notate una
riduzione delle prestazioni della Vs.
macchina.
Non usare mai l’apparecchio senza
un sacco filtro originale all’interno
Kent/Euroclean.
FILTRO PROTEZIONE MOTORE
Questo filtro protegge il motore da
eventuali danni provocati da
fuoriuscite del sacco e consente il 3°
stadio di filtraggio.
Pulire il filtro
ogni 3° cambio del sacco
.
Togliere il filtro dalla griglia e lavarlo
con acqua tiepida.
Lasciare asciugare completamente
il filtro prima di inserirlo
nuovamente nella macchina.
Non utilizzare la macchina senza il
filtro protezione motore.
ACHTUNG!
DEN NETZKABEL IMMER AUS
DER STECKDOSE ZIEHEN,
WENN DIE MASCHINE
WEGGERÄUMT ODER
GEWARTET WIRD.
DEN FILTERBEUTEL ERSETZEN
Den Deckel öffnet man durch leichtes
Drücken der Taste an der oberen
Kante. Den vollen Staubsack am
verstärkten Ende oben anfassen, nach
unten ziehen, entfernen und gut
verschliessen.
Den neuen Staubsack im Rohr
einsetzen und den oberen Karton mit
den Fingern bis zur Rückwand
schieben.
Danach wird der obere Karton im
roten Beutelhalter eingeklemmt (die
Installationsanweisungen sind auch auf
den Filterbeuteln angegeben) Den
Staubsack jedesmal ersetzrn, sobald die
rote Lampe aufleuchtet oder wenn die
Leistung der Maschine nachlässt.
Gerät nie ohne einen originalen
Staubbe Kent/Euroclean utel
benutzen.
INNERER FILTER
Dieser Filter schützt den Motor vor
eventuellen Staubpartikeln aus dem
Staubbeutel und stellt die 3.
Filtrierungsstufe dar.
Nach jedem
dritten Staubbeutelwechsel sollte der
Luftfilter gereinigt werden.
Luftfilter mit Halterung
herausziehen,
Schaumstoffeinsatz mit lauwarmem
Wasser
auswaschen, vollkommen
trocknen lassen und wiedereinsetzen.
Die Maschine nie ohne Filter
benutzen.
ATTENTION!
DÉBRANCHER TOUJOURS LA
PRISE DE COURANT AVANT
D’EFFECTUER TOUTE SORTE
D’ENTRETIEN
CHANGEMENT DU SAC
FILTRE
Ouvrir le couvercle en tirant
légèrement le crochet.
Ôter le sac en papier en suivant au
contraire les instructions de montage
indiquées sur les nouveaux sacs
filtre. Refermer le sac a l’aide du
carton de fermeture.
Remettre un nouveau sac dans le
tube jusqu’à ce que le carton vertical
touche les nervures du bac contenant
le sac.
Accrocher le carton supérieur au
crochet rouge qui soutient le sac de
sureté (les instructions sont indiquées
aussi sur les sacs filtre).
Le sac doit être remplacé chaque fois
que le voyant rouge s’allume ou si
vous remarquez une réduction de
performance de votre machine.
Ne jamais utiliser la machine sans
un sac filtre original
Kent/Euroclean à l’intérieur.
FILTRE PROTECTION DU
MOTEUR
Ce filtre protège le moteur contre les
dégâts provoqués par toute fuite du
sac et permet le 3° stade de filtrage.
Nettoyer le filtre au 3° changement
du sac.
Enlever le filtre de la grille e le laver
à l’eau tiède.
Le laisser sécher complètement
avant de le replacer dans la
machine.
N’utiliser jamais la machine sans
le filtre protégeant le moteur.
¡ATENCIÓN!
DESCONECTE SIEMPRE EL
CABLE ANTES DE LLEVAR A
CABO CUALQUIER
MANTENIMIENTO.
SUSTITUCIÓN DE LA BOLSA
FILTRO
Abrir la tapa tirando ligeramente por
medio del gancho
Quite la bolsa de papel siguiendo al
contrario las instrucciones
imprimidas sobre las nuevas bolsas
filtro. Cerrar la bolsa por medio del
cartón de cerradura.
Inserte una nueva bolsa en el tubo
hasta que el cartón toque las
nervaduras del contenedor de la
bolsa.
Luego enganchar el cartón superior
al gancho rojo que sirve para la bolsa
de seguridad (las instrucciones están
imprimidas sobre las bolsas filtro).
Hay que substituir la bolsa cada vez
que se enciende la luz roja y si notan
una reducción de las prestaciones de
su máquina.
Nunca use la máquina sin la bolsa
filtro original de en el int
Kent/Euroclean erno.
FILTRO PROTECCIÓN MOTOR
Este filtro protege el motor de los
daños casuales que pudieran
provocar salidas desde la bolsa de
papel, y permite la 3ª fase de
filtración
. Cada 3 cambios de bolsa
se debe limpiar este filtro
.
Quitar el filtro de la rejilla y
limpiarlo en agua templada.
Secar el filtro completamente antes
de ponerlo de nuevo en la
máquina. Nunca use la máquina
sin este filtro de protección del
motor.
8

CHANGING THE EXHAUST
FILTER
The electrostatic exhaust filter
catches any particles that may
escape from the filter bag, vacuum
inlet filter, or lower motor filter.
The electrostatic exhaust filter is
located just below the inlet filter.
Replace the filter every forth time
you change the bag (more often in
very dusty environments). To
replace the electrostatic filter follow
these directions (this is most easily
accomplished with the vacuum
standing upright at your eye level):
Release the grill and replace the
exhaust filter with a new original
Kent/Euroclean filter (when you put
the grill into place, with one hand
hold the filter while the other insert
the grill). Lie filter and grill flat
and snap the red latch of the
vacuum to the gray tab of the
exhaust grill.
Never operate the vacu
Kent/Euroclean
um without the
original Exhaust Filter in place.
HEPA FILTER
The Hepa filter is available as an
option.
This special filter assures 99.97%
filtration efficiency at 0.3 micron
for the ultimate in air filtration in
the most critical applications.
Change the Hepa filter every 8 bags
or more often if it's used in a very
dusty environment. If the paper bag
should break, the Hepa filter must
also be replaced.
CLOGGING
In case of clog (which could be the
problem if your bag full light is on
yet your bag is not full) check the
following locations: remove the bag
and check the internal tube, look
through the stretch hose, check the
telescopic wand and throat tube that
holds the wand, look over the whole
brush roll area. Remove any debris
that may be obstructing these areas
and causing the clog.
SOSTITUZIONE MICROFILTRO
USCITA ARIA
Il filtro elettrostatico blocca le
microparticelle che gli altri filtri non
riescono a trattenere ed evita la
fuoriuscita di micropolvere di carbone
prodotta dal motore.
Il microfiltro è situato nella zona sotto
Il filtro protezione motore.
Sostituire il microfiltro ogni 4
a
sostituzione del sacco di carta (più
spesso in applicazioni molto
polverose). Per sostituire il
microfiltro, seguite le seguenti
instruzioni (questo risulta più facile se
mettete il battitappeto all'altezza dei
Vs. occhi):
1. Sganciare la griglia e sostituire
il microfiltro con uno nuovo originale
Kent/Euroclean facendo attenzione ad
applicarlo nella corretta posizione.
(quando si rimonta la griglia, con
l'altra mano trattenere il microfiltro in
posizione). Appoggiare il microfiltro e
la griglia al piano ed agganciare la
griglia all'apposito gancio rosso di
sicurezza.
Attenzione
.
Non usare mai la
macchina senza il microfiltro
elettrostatico originale
Kent/Euroclean.
FILTRO HEPA
Il filtro Hepa è disponibile come
opzional.
Questo speciale filtro assicura
un’efficienza filtrante del 99,97% a
0,3 micron ed è adatto alle più critiche
applicazioni. Sostituire il filtro Hepa
massimo ogni 8 sacchi filtro, più
spesso se si usa l'apparecchio in
ambienti molto polverosi. In caso di
rottura del sacco filtro, anche il filtro
hepa deve essere sostituito.
OSTRUZIONI
In caso di ostruzioni, è semplice
controllare l'intero circuito di
aspirazione: togliere il sacco e
controllare che il tubo interno sia
libero, poi il tubo flex, il tubo rigido e
la base dalla zona rullo al tubo
convogliatore.
Rimuovere qualsiasi detrito che ha
causato l'ostruzione e riassemblare
correttamente.
AUSTAUSCHEN DES
ELEKTROSTATISCHEN
AUSLAßFILTERS
Zweck dieses Filters ist es, Staub, der
durch die anderen Filtrierungsstufen
gelangt, aufzufangen. Der Filter
befindet sich direkt unter dem
Schutzfilter des Motors und sollte nach
jedem vierten Wechsel des
Staubbeutels ersetzt werden, häufiger
bei sehr staubigen Reinigungs-
anwendungen. Um den Filter zu
ersetzen, beachten Sie die folgenden
Anweisungen (dies erscheint viel
einfacher, wenn sich der Bürstsauger
auf Ihrer Augenhöhe befindet):
1. Filterdeckelklinke drücken und
Auslaßfilterdeckel entfernen.
Filter aus der Halterung
herausnehmen und mit einen
neuen Filter ers Kent/Euroclean
etzen.
Filterdeckel zurückstellen.
(Bei der Zurückstellung des
Filterdeckels, halten Sie den
Filter mit einer Hand). Das Gitter
und den Mikrofilter auf die
Fläche legen und am rotem
Sicherheitshaken einhängen.
Achtung: Gerät nie ohne einen
originalen elektrostatischen
Kent/Euroclean Filter benutzen.
HEPA FILTER
Der Hepa Filter ist als optional
erhältlich. Dieser spezielle Filter hat
eine Filtrierleistungsfähigkeit von
99,97 % zu 0,3 Mikron und ist für die
kritischsten Anwendungen geeignet.
Sollte der Papierfilterbeutel reißen,
muß auch der Hepa-Filter gewechselt
werden. Der Hepa-Filter sollte immer
nach 8 Papierfilterbeuteln erneuert
werden, häufiger wenn in sehr
staubigen Räumen gesaugt wird.
VERSTOPFUNG
Falls Ihre Maschine verstopft sein
sollte, ist es einfach die ganze
Saugschaltung zu kontrollieren:
Nehmen Sie den Papierbeutel ab und
kontrollieren Sie ob das innere Rohr,
der Saugschlauch, das teleskopische
Verlängerungsrohr und die
Bürstenwalze verstopft sind. Die
Verstopfungsursache beheben und alle
Teile wieder zusammensetzen.
REMPLACEMENT DU FILTRE
ELECTROSTATIQUE
Ce filtre retient les particules fines
qui s’échappent des autres filtres
ainsi que les poussières de charbon
produites par le moteur
Le microfiltre est situé dans la zone
sous le filtre protection du moteur.
Remplacer ce filtre tous les 4
changements de sac en papier , (plus
souvent dans des conditions de
nettoyage particulièrement
poussiéreuses). Pour changer le
microfiltre, suivre les instructions
(cela apparaît plus facile si vous
mettez votre aspirateur à la hauteur
de vos yeux).
1. Enlever la grille et remplacer le
microfiltre avec un filtre
nouveau et original en faisa
Kent/Euroclean nt attention à le
remettre dans la juste position.
(quand on remonte la grille,
tenir de l’autre main le
microfiltre). Poser le
microfiltre et la grille à sa place
et accrocher la grille grâce au
crochet de sécurité.
Attention. Ne jamais utiliser la
machine sans que le filtre
électrostatique original soit en
Kent/Euroclean
place.
HEPA FILTER
Le filtre Hepa est disponible en
option.
Ce filtre spécial assure une efficacité
filtrante de 99,97% à 0,3 microns et
est adapté aux applications les plus
critiques. Remplacer le filtre Hepa au
maximum tous les 8 sacs filtre, plus
souvent si l’appareil est utilisé dans
des endroits avec beaucoup de
poussière. En cas de rupture du sac
filtre, le filtre Hepa doit aussi être
remplacé.
OBSTRUCTIONS
En cas d’obstruction de la machine,
il est simple de contrôler tout le
circuit d’aspiration: enlever le sac et
contrôler que le tube interne soit
libre, ensuite le tube flex, le tube
rigide et la base de la zone du
rouleau au tube extensible.
Enlever les détritus qui ont causés
l’obstruction et rassembler
correctement.
SUSTITUCIÓN DEL FILTRO
ELECTROSTATICO
El filtro electrostático coge cualquier
micropartícula que pueda escapar de
otros filtros, también el micropolvo
producido por el motor.
El microfiltro está situado en la zona
debajo del filtro de protección del
motor.
Substituir el microfiltro cada 4 bolsas
de papel que use (si usa la aspiradora
en lugares muy polvorientos debe
cambiarse más a menudo). Para
sustituir el filtro electrostático (eso
parece más fácil si ponen la
aspiradora a la altura de sus ojos):
1. Extraiga la rejilla y susbtituye el
microfiltro con un nuevo filtro
en su lug Kent/Euroclean ar,
teniendo cuidado en montarlo
correctamente. (Al montar otra
vez la rejilla soportar el
microfiltro en posicion con la
otra mano). Ponga el
microfiltro y la rejilla en su
lugar y enganche la rejilla al
gancho rojo de seguridad.
¡Atención! Nunca debe de utilizar
el aparato sin un filtro
electrostático original
Kent/Euroclean.
FILTRO HEPA
El filtro Hepa está disponible como
opcional
Este filtro especial asegura un
filtrado eficiente del 99,97% a 0,3
micrones y se adapta a las
aplicaciones más críticas.
Hay que substituir el filtro Hepa
como máximo cada 8 bolsas filtro y
más en lugares muy polvorientos. En
caso de rotura de la bolsa, hay que
substituir también el filtro Hepa.
OBSTRUCCIONES
En caso de obstrucciones, es facil
controlar el circuito entero de
aspiración: quitar la bolsa y controlar
que el tubo interno esté libre , luego
el tubo flex, el rígido y la base de la
zona rodillo al tubo extensible.
Quitar los detritos que causaron la
obstrucción y montar de nuevo
correctamente.
9

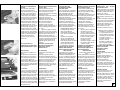
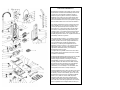
CHANGING THE BRUSH
ROLLER
1. Standing behind the vacuum
lay it on the left side.
2. Slide the side cover upwards
off the end of the base
housing (reuse this piece
after inserting the new
brush).
3.
Grasp the bristles of the
brush roll from the bottom of
the vacuum pull it up and
slide it out the right side of
the housing (you will reuse
the metal brush support on
the new brush roll also).
4. Look inside the brush roll for
the end that has a hexagon
shape cut out. This is also the
end that will have a white dot
on the outside of the brush
roll. Put this end in first. Line
up the white dot with a flat
portion of the drive.
5. Make sure the brush roll goes
all the way down over the
drive. Look to see that none
of the brush bristles are
caught between the metal
support and the brush ( the
metal support will not fit
properly if there are any
brush bristless sticking up
and out of the end, it will
also damage the bristles of
your brush roll)
6.
Reassemble the metal brush
support and then the side
cover.
SOSTITUZIONE DEL RULLO
1. Stendere l’apparecchio sul lato
sinistro.
2. Togliere il coperchio laterale dal
vano portaspazzola.
3. Estrarre il rullo afferrandolo per
le setole assieme al supporto
rullo dall’estremità della
spazzola (supporto che verrà
riutilizzato con la nuova
spazzola).
4. Inserire prima l’estremità della
spazzola con l’apertura
esagonale dell’apposito vano,
facendo combaciare una faccia
piana del trascinatore esagonale
con il punto bianco del rullo,
assicurandosi che scorra fino in
fondo raggiungendo il supporto
di trasmissione.
5. Assicurarsi che il rullo sia
posizionato correttamente e che
le setole laterali siano all’interno
del supporto in metallo (il
supporto in metallo non entrerà
correttamente se ci sono ancora
setole fuoriposto e inoltre
danneggerà le setole del vostro
rullo).
6. Rimontare il supporto rullo e poi
inserire lo sportello laterale.
AUSWECHSELN DER BÜRSTE
1. Legen Sie die Maschine so hin,
daß sie auf der linken Seite liegt.
2. Schieben Sie die Seiten-
abdeckung aus dem
Bürstengehäuse.
3. Lösen Sie die Rolle mit der
Halterung, indem Sie sie an den
Borsten halten, vorsichtig vom
Ende der Bürste (Halterung wird
bei der neuen Bürste wieder
verwendet).
4. Schieben Sie die Bürste mit der
sechseckigen Öffnung voran in
das Gehäuse. Der Bezugspunkt
(Photo) besteht darin, eine flache
Seite des Mitnehmers mit dem
weißen Punkt der Rolle in Über-
einstimmung zu bringen.
Vergewissern Sie sich, daß die
Bürste bis ganz nach unten an die
Getriebshalterung geschoben ist.
5. Sicherstellen, daß die Rolle
richtig eingefügt worden ist und
die Seitenborsten sich alle auf
der Innenseite der Aluminium-
halterung befinden (die Halterung
lässt sich nicht gut schliessen falls
noch Borsten herausschauen und
zudem werden die Borsten der
Rolle beschädigt)
6. Bürstenhalterung wieder
aufmontieren und
Seitenabdeckung zuschieben
CHANGEMENT DE BROSSE
1. Coucher la machine sur le côté
gauche.
2. Faire coulisser le couvercle
latéral hors du boîtier de la
brosse.
3. Extraire délicatement le support
du rouleau par l’extrémité de la
brosse (le support sera réutiliser
avec la nouvelle brosse).
4. Introduire d’abord l’extrémité
de la brosse avec l’ouverture
hexagonale dans le boîtier, le
point référence (photo) consiste
à faire coincider un côté plein
du dispositif de traction avec le
point blanc de rouleau, en
vérifiant qu’elle soit bien
enfoncée jusqu’au bout du
support de transmission.
5. Faire attention à ce que le
rouleau soit bien en place et
que les poils latéraux soient à
l’intérieur du support en métal.
(le support en métal n’entrera
pas correctement si les poils ne
sont pas bien en place et en
outre, il abîmera les poils de
votre rouleau).
6. Remplacer le support du
rouleau et insérer le couvercle
latéral.
SUSTITUCIÓN DEL RODILLO
1. Poner la máquina sobre el lado
izquierdo.
2. Quitar la porta lateral del hueco
del cepillo.
3. Sacar el soporte del rodillo de la
extremidad del cepillo (el
soporte será reutilizado para el
cepillo nuevo).
4. Introducir antes en su lugar la
extremidad del cepillo con la
abertura hexagonal, haciendo
encajar una cara llana del
dispositivo de tracción con el
punto blanco sobre el cepillo
(foto), asegurándose de que se
inserte completamente en el
soporte de transmisión.
5. Asegúrese de que el rodillo esté
bien instalado en su lugar y que
las cerdas laterales estén
internamente al soporte
metálico.(el soporte metálico
no entrará correctamente si la
cerdas no están bien puestas y
además irán a estropear las
cerdas del rodillo).
6. Montar el soporte del rodillo y
luego insertar la porta lateral.
10
La page est en cours de chargement...
La page est en cours de chargement...
-
 1
1
-
 2
2
-
 3
3
-
 4
4
-
 5
5
-
 6
6
-
 7
7
-
 8
8
-
 9
9
-
 10
10
-
 11
11
-
 12
12


Euroclean Edge 12 Mode d'emploi
- Catégorie
- Aspirateurs
- Taper
- Mode d'emploi
dans d''autres langues
- italiano: Euroclean Edge 12 Istruzioni per l'uso
- English: Euroclean Edge 12 Operating instructions
- español: Euroclean Edge 12 Instrucciones de operación
- Deutsch: Euroclean Edge 12 Bedienungsanleitung
Autres documents
-
Prochem Dynamic 380E & 450E Le manuel du propriétaire
-
-
Bissell BGU1800T Manuel utilisateur
-
 Lindhaus activa eso 30-38 Manuel utilisateur
-
Nilfisk Business Le manuel du propriétaire
-
Hoover ST 200 F Le manuel du propriétaire
-
-
Hoover ATHYSS REVERTER Le manuel du propriétaire
-
 Nilfisk-Advance America GU 355 Manuel utilisateur
-
Ferm LBM1008 - FLB 2500 Le manuel du propriétaire

