Maytag 5MSF25N4BA00 Manuel utilisateur
- Catégorie
- Frigos
- Taper
- Manuel utilisateur
Ce manuel convient également à

SIDE BY SIDE
REFRIGERATOR
Table of Contents .......................................... 2
REFRIGERADOR
DE DOS PUERTAS
[ndice ....................................................... 15
RI_FRIGI_RATEUR
COTE A COTE
Table des mati£res ....................................... 29
W10583333B

TABLE OF CONTENTS
REFRIGERATOR SAFETY ........................................................................... 2
Proper Disposal of Your Old Refrigerator ................................................. 3
INSTALLATION INSTRUCTIONS ............................................................... 3
Unpack the Refrigerator ........................................................................... 3
Door Removal, Leveling and Alignment ................................................... 4
Handle Installation and Removal .............................................................. 6
Location Requirements ............................................................................. 7
Electrical Requirements ............................................................................ 7
Water Supply Requirements ..................................................................... 8
Connect Water Supply .............................................................................. 8
REFRIGERATOR USE ............................................................................... 10
Using the Controls .................................................................................. 10
Crisper Humidity Control ........................................................................ 10
REFRIGERATOR CARE ............................................................................ 11
Cleaning .................................................................................................. 11
Lights ...................................................................................................... 11
Vacation and Moving Care ..................................................................... 11
PROBLEM SOLVER .................................................................................. 12
ASSISTANCE OR SERVICE ...................................................................... 14
REFRIGERATOR SAFETY
Your safety and the safety of others are very important.
We have provided many important safety messages in this manual and on your appliance. Always read and obey all safety
messages.
This is the safety alert symbol.
This symbol alerts you to potential hazards that can kill or hurt you and others.
All safety messages will follow the safety alert symbol and either the word "DANGER" or "WARNING."
These words mean:
You can be killed or seriously injured if you don't immediately
follow instructions.
You can be killed or seriously injured if you don't follow
instructions.
All safety messages will tell you what the potential hazard is, tell you how to reduce the chance of injury, and tell you what can
happen if the instructions are not followed.
IMPORTANT SAFETY INSTRUCTIONS
WARNING: To reduce the risk of fire, electric shock, or injury when using your refrigerator, follow these basic precautions:
[] Plug into a grounded (earthed) outlet.
[] Do not remove ground prong.
[] Do not use an adapter.
[] Do not use an extension cord.
[] Disconnect power before servicing.
[] Replace all parts and panels before operating.
[] Remove doors from your old refrigerator.
[] Use nonflammable cleaner.
[] Keep flammable materials and vapors, such as gasoline,
away from refrigerator.
[] Use two or more people to move and install refrigerator.
[] Disconnect power before installing ice maker (on ice maker
kit ready models only).
[] A qualified service technician must install the water line and
ice maker.
[] This appliance is not intended for use by persons (including
children) with reduced physical, sensory or mental
capabilities, or lack of experience and knowledge, unless
they have been given supervision or instruction concerning
use of the appliance by a person responsible for their
safety.
[] Children should be supervised to ensure that they do not
play with the appliance.
[] This appliance is intended to be used in household and
similar applications such as: staff kitchen areas in shops,
offices and other working environments; farm houses and
by clients in hotels, motels and other residential type
environments; bed and breakfast type environments; and
catering and similar non-retail applications.
[] If the power supply cord is damaged, it must be replaced
by the manufacturer or its service agent or a similarly
qualified person in order to avoid a hazard.
[] Use a sturdy glass when dispensing ice (on some models).
SAVE THESE INSTRUCTIONS
2

Proper Disposal of
Your Old Refrigerator
Suffocation Hazard
Remove doors from your old refrigerator.
Failure to do so can result in death or brain damage.
IMPORTANT: Child entrapment and suffocation are not problems
of the past. Junked or abandoned refrigerators are still dangerous
- even if they will sit for "just a few days." Ifyou are getting rid of
your old refrigerator, please follow these instructions to help
prevent accidents.
Before You Throw Away Your Old Refrigerator or Freezer:
• Takeoff the doors.
• Leave the shelves in place so that children may not easily
climb inside.
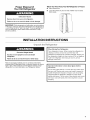
INSTALLATION INSTRUCTIONS
Unpack the Refdge ato
Excessive Weight Hazard
Use two or more people to move and install
refrigerator.
Failure to do so can result in back or other injury.
When Moving Your Refrigerator:
Your refrigerator is heavy. When moving the refrigerator for
cleaning or service, be sure to cover the floor with
cardboard or hardboard to avoid floor damage. Always pull
the refrigerator straight out when moving it. Do not wiggle or
"walk" the refrigerator when trying to move it, as floor
damage could occur.
Remove packaging materials. Do not use sharp instruments,
rubbing alcohol, flammable fluids, or abrasive cleaners to remove
tape or glue. These products can damage the surface of your
refrigerator. For more information, see "Refrigerator Safety."
important information to know about glass shelves
and covers:
Do not clean glass shelves or covers with warm water when
they are cold. Shelves and covers may break if exposed to
sudden temperature changes or impact, such as bumping.
Tempered glass is designed to shatter into many small,
pebble-size pieces. This is normal. Glass shelves and covers
are heavy. Use both hands when removing them to avoid
dropping.

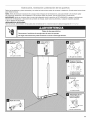
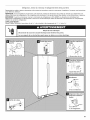
Door Bemova 0 Leveling and A ignment
Gather the required tools and parts and read all instructions before starting installation. Save these instructions for future reference.
NOTE: Before moving your product into your home, measure the doorway of your home to see whether you need to remove the
refrigerator and freezer doors. If door removal is necessary, see the instructions below.
IMPORTANT: Before you begin, turn the refrigerator control OFF or turn cooling off. Unplug refrigerator or disconnect power. Remove
food and any adjustable door or utility bins from doors.
TOOLS NEEDED:
Bubble level; flat-blade screwdriver; %e" wrench; 1/4",1/2",and %e" hex-head socket wrenches
Electrical Shock Hazard
Disconnect power before removing doors.
Failure to do so can result in death or electrical shock.
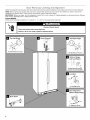
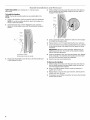
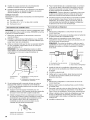
Top Left Hinge
A. DoNot Remove Screws.
Base Grille
Door Removal
Top Right Hinge
A. Do NotRemove Screws.
Bottom Hinges
(Left and Right)
Do Not Remove Screw A
(present on some models)
Leveling
F Raise
A. Leveling Screw
Door Alignment
(Bottom Right Hinge)
J
A'__' Raise
Lower _ "_ i_
A. Alignment Screw

Remove the Doors
Electrical Shock Hazard
Disconnect power before removing doors.
Failure to do so can result in death or electrical shock.
1=
2.
3.
4.
5.
6.
7=
8.
g.
Unplug refrigerator or disconnect power.
Open both doors. On models with a water filter in the base
grille, also open the water filter cover door. It is not necessary
to remove the water filter itself.
Remove the base grille by pulling up on the bottom outside
corners. See Graphic 1.
Close both doors and keep them closed until you are ready to
lift them free from the cabinet.
Use a %6" hex-head socket wrench to remove the top left
hinge as shown. See Graphic 2.
IMPORTANT: Do not remove either screw A.
Lift freezer door straight up off bottom hinge. See Graphic 3.
IMPORTANT: Rest the door on its side on a soft, clean
surface, such as a towel, blanket or piece of cardboard. This
will help avoid damaging the door.
Remove top right hinge as shown. See Graphic 4.
IMPORTANT: Do not remove either screw A.
Lift the refrigerator door straight up off bottom hinge.
IMPORTANT: Rest the door on its side on a soft, clean
surface, such as a towel, blanket or piece of cardboard. This
will help avoid damaging the door.
It may not be necessary to remove the bottom hinges to move
the refrigerator through a doorway. Both bottom hinges have
similar construction.
• If necessary, disassemble the hinges as shown. See
Graphic 5.
IMPORTANT: To aid in door alignment and closing, there
is a shim located between the hinge and the cabinet.
When the hinge is removed, the shim may fall out of
place. If this occurs, set the shim aside so it can be put
back in place when the hinge is reconnected later.
Replace the Doors and Hinges
1. Replace both bottom hinges, if removed. Make sure the shim
is between the hinge and cabinet. Tighten screws.
NOTE: Provide additional support for the doors while the top
hinges are being replaced. Do not depend on the door magnets to
hold the doors in place while you are working.
2. Align and replace the top left hinge as shown. See Graphic 2.
Tighten screws.
3. Replace the refrigerator door by lifting the door onto the
bottom right hinge.
4. Align and replace the top right hinge as shown. See Graphic 4.
Tighten screws.
5. Replace any adjustable door or utility bins.
6. Plug into a grounded 3 prong outlet.
Leveling and Door Closing
Your refrigerator has two front adjustable rollers -- one on the
right and one on the left. If your refrigerator seems unsteady or if
you want the doors to close more easily, adjust the refrigerator's
tilt using the instructions below:
1. Move the refrigerator into its final location.
2. Remove the base grille to locate the two leveling screws,
which are part of the front roller assemblies on each side.
See Graphic 6.
NOTE: Having someone push against the top of the refrigerator
takes some weight off the leveling screws and rollers. This makes
it easier to adjust the screws.
3. Use a 1/2"hex-head socket wrench to adjust the leveling
screws. Turn the leveling screw to the right to raise that side of
the refrigerator or turn the leveling screw to the left to lower
that side. It may take several turns of the leveling screws to
adjust the tilt of the refrigerator. See Graphic 6.
4. Open both doors again and check that they close as easily as
you like. If not, tilt the refrigerator slightly more to the rear by
turning both leveling screws to the right. It may take several
more turns, and you should turn both leveling screws the
same amount.
5. Use a bubble level to check the leveling of the refrigerator.
NOTE: Whenever you need to move the refrigerator, turn the
leveling feet to the right until they are no longer touching the
ground. This will allow the refrigerator to roll more easily.
Door Alignment
A refrigerator that is not level from side-to-side may appear to
have doors that are not properly aligned. If the doors appear this
way, use the instructions in the previous section to check the
leveling.
The doors are designed to be slightly different heights when the
refrigerator is empty, in order to account for the weight of food
that will be placed on the doors. If the doors are still not aligned
after checking the leveling and loading the refrigerator with food,
follow the steps below to adjust the door alignment.
1. Locate the alignment screw on the bottom hinge of the
refrigerator door. See Graphic 7.
2. Use a 5/16"wrench to turn the screw. To raise the refrigerator
door, turn the screw to the right. To lower the door, turn the
screw to the left.
3. Check that the doors are even at the top and bottom. If
necessary, continue to turn the alignment screw until the
doors are aligned.
4. Replace the base grille.
NOTE: Be sure to refasten the Tech Sheet behind the base grille.

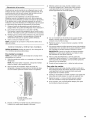
Handle nstaHation and Remova
PARTS INCLUDED: Door handles (2), 1/8"hex key, spare
setscrew(s)
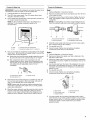
To Install the Handles:
NOTE: The handle mounting setscrews are preinstalled in the
handle.
1. Remove the handles, which are packed inside the refrigerator.
NOTE: To avoid scratching the finish, place the handles on a
towel or other soft surface.
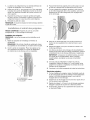
2. Open the freezer door. On the refrigerator door, place the
handle on the shoulder screws with the setscrews facing the
freezer.
4. While holding the handle, insert the short end of the hex key
into the upper hole and slightly rotate the hex key until it is
engaged in the setscrew.
3.
}B
A. Shoulder screws
B. Setscrews inside the handle
Firmly push the handle toward the door until the handle base
is flush against the door.
5.
6.
7.
8.
9.
To
1.
2.
3.
4.
Using a clockwise motion, tighten the setscrew until it begins
to contact the shoulder screw.
Repeat steps 4 and 5 to begin fastening the lower setscrew.
Once both setscrews have been partially tightened as outlined
in the previous steps, fully tighten both the upper and lower
setscrews.
IMPORTANT: When the screws feel tight, tighten them an
additional quarter-turn. The handle is not properly installed
without this extra tightening.
Open the refrigerator door and close the freezer door. Repeat
steps 2 through 7 to install the other handle onto the freezer
door with the setscrews facing the refrigerator.
Save the hex key and all instructions.
Remove the Handles:
While holding the handle, insert the short end of the hex key
into the lower setscrew hole and slightly rotate the hex key
until it is engaged in the setscrew.
Using a counterclockwise motion, loosen the setscrew a
quarter-turn at a time.
Repeat steps 1 and 2 for the upper setscrew. Gently pull the
handle away from the door.
If necessary, use a Phillips screwdriver to remove the shoulder
screws from the door.
6

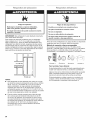
Location Requirements
Explosion Hazard
Keep flammable materials and vapors, such as
gasoline, away from refrigerator.
Failure to do so can result in death, explosion, or fire.
IMPORTANT: This refrigerator is designed for indoor household
use only.
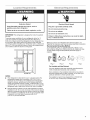
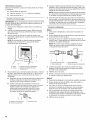
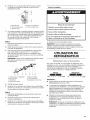
To ensure proper ventilation for your refrigerator, allow for 1/2"
(1.27 cm) of space on each side and at the top. Allow for 2"
(5.08 cm) of space behind the refrigerator. If your refrigerator has
an ice maker, allow extra space at the back for the water line
connections. When installing your refrigerator next to a fixed wall,
leave a 2" (5.08 cm) minimum space on each side (depending on
your model) to allow the doors to swing open.
V2" (1.27
__J
J
2" (5.08 cm)i
NOTES:
This refrigerator is intended for use in a location where the
temperature ranges from a minimum of 55°F (13°C) to a
maximum of 110°F (43°C). The preferred room temperature
range for optimum performance, which reduces electricity
usage and provides superior cooling, is between 60°F (15°C)
and 90°F (32°C). It is recommended that you do not install the
refrigerator near a heat source, such as an oven or radiator.
Normal minimum cabinet cut-out width required for product
installation is 36" (91.44 cm). However, if the product is placed
against an extended wall and the ability to remove the crisper
pans is desired, an additional 18" (45.72 cm) of cabinet width
is required, so a total cabinet opening width of 54"
(137.16 cm)is recommended.
E ect ica Requirements
Electrical Shock Hazard
Plug into a grounded (earthed) outlet.
Do not remove ground prong.
Do not use an adapter.
Do not use an extension cord.
Failure to follow these instructions can result in death,
fire, or electrical shock.
Before you move your refrigerator into its final location, it is
important to make sure you have the proper electrical connection:
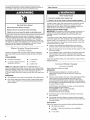
Recommended Grounding Method
A 115 Volt 60 Hz. (Plug 1), 220/240 Volt 50 Hz. (Plugs 2 or 3),
220 Volt 60 Hz. (Plug 3), or 230/240 Volt 50 Hz. (Plug 4) AC only
10-amp fused and grounded (earthed) electrical supply is
required.
Plug 1 Plug2 Plug 3 Plug 4
For Australia and New Zealand:
Your new appliance has been especially manufactured to
meet all Australian Standards and Conditions.
Some notations in the installation instructions may refer to
electrical requirements in other countries, so we draw your
particular attention to these specific notes.
Your appliance needs to be plugged into a 230/240 Volt
50 Hz. AC only 10-amp (Plug 4) earthed outlet.

Itisrecommendedthataseparatecircuitservingonlyyour
refrigeratorbeprovided.Useanoutletthatcannotbeturnedoff
byaswitchorpullchain.Donotuseanextensioncord.
Electrical Shock Hazard
Disconnect power before servicing.
Replace all parts and panels before operating.
Failure to do so can result in death or electrical shock.
NOTE: Before performing any type of installation, cleaning, or
removing a light bulb, turn the control, (Thermostat, Refrigerator
or Freezer Control depending on the model) to OFF and then
disconnect the refrigerator from the electrical source. When you
are finished, reconnect the refrigerator to the electrical source and
reset the control (Thermostat, Refrigerator or Freezer Control
depending on the model) to the desired setting.
Water Supp)y Requirements
(onsome imode s)
Gather the required tools and parts before starting installation.
Read and follow the instructions provided with any tools listed
here.
TOOLS NEEDED:
• Flat-blade screwdriver • 1/4"Nut driver
• 7/le"and 1/2"Open-end or two • 1/4"Drill bit
adjustable wrenches
• Cordless drill
NOTE: Your refrigerator dealer has a kit available with a 1/4"
(6.35 mm) saddle-type shutoff valve, a union, and copper tubing.
Before purchasing, make sure a saddle-type valve complies with
your local plumbing codes. Do not use a piercing-type or 34e"
(4.76 mm) saddle valve which reduces water flow and clogs more
easily.
IM PORTANI"."
• All installations must meet local plumbing code requirements.
• Use copper tubing and check for leaks. Install copper tubing
only in areas where the household temperatures will remain
above freezing.
Water Pressure
Water Quality Hazard
Connect to potable water supply only.
Failure to do so can result in serious health problems.
A potable water supply with water pressure of between 30 and
120 psi (207 and 827 kPa) is required to operate the water
dispenser and/or ice maker. If you have questions about your
water pressure, call a licensed, qualified plumber.
Reverse Osmosis Water Supply
IMPORTANT: The pressure of the water supply coming out of a
reverse osmosis system going to the water inlet valve of the
refrigerator needs to be between 30 and 120 psi (207 and
827 kPa).
If a reverse osmosis water filtration system is connected to your
cold water supply, the water pressure to the reverse osmosis
system needs to be a minimum of 40 to 60 psi (276 to 414 kPa).
If the water pressure to the reverse osmosis system is less than
40 to 60 psi (276 to 414 kPa):
• Check to see whether the sediment filter in the reverse
osmosis system is blocked. Replace the filter if necessary.
• Allow the storage tank on the reverse osmosis system to refill
after heavy usage.
If your refrigerator has a water filter, it may further reduce the
water pressure when used in conjunction with a reverse
osmosis system. Remove the water filter. See "Water Filtration
System."
If you have questions about your water pressure, call a licensed,
qualified plumber.
Connect Water Supp)y
(onsome mode s}
Read all directions before you begin.
IMPORTANT:
• Plumbing shall be installed in accordance with the
International Plumbing Code and any local codes and
ordinances.
The gray water tubing on the back of the refrigerator (which is
used to connect to the household water line) is a PEX
(cross-linked polyethylene) tube. Copper and PEX tubing
connections from the household water line to the refrigerator
are acceptable, and will help avoid off-taste or odor in your ice
or water. Check for leaks.
If PEX tubing is used instead of copper, we recommend the
following Whirlpool Part Numbers:
W10505928RP (7 ft [2.14 m] jacketed PEX),
8212547RP (5 ft [1.52 m] PEX), or
W10267701 RP (25 ft [7.62 m] PEX).
Install tubing only in areas where temperatures will remain
above freezing.
For Australia and New Zealand: Ifwater pressure exceeds
599 kPa (87 psi), a pressure-limiting device must be fitted by a
licensed plumber.
Tools needed:
Gather the required tools and parts before starting installation.
• Flat-blade screwdriver
• 7/le"and 1/2"open-end wrenches or two adjustable
wrenches
• 1/4"nut driver
8

Connect to Water Line Connect to Refrigerator
IMPORTANT: Ifyou turn the refrigerator on before the water line is
connected, turn the ice maker (on some models) OFE
1. Unplug refrigerator or disconnect power.
2. Turn OFF main water supply. Turn ON nearest faucet long
enough to clear line of water.
3. Use a quarter-turn shutoff valve or the equivalent, served by a
1/2"copper household supply line.
NOTE: To allow sufficient water flow to the refrigerator, a
minimum 1/2"size copper household supply line is
recommended.
Style 1
1. Unplug refrigerator or disconnect power.
2. Remove and discard the short, black plastic part from the end
of the water line inlet.
3.
Thread the nut onto the end of the tubing. Tighten the nut by
hand. Then tighten it with a wrench two more turns. Do not
overtighten.
NOTE: To avoid rattling, be sure the copper tubing does not
touch the cabinet's side wall or other parts inside the cabinet.
4=
5=
6.
D
A. Bulb
B. Nut
A
B
C
C. Copper tubing (to refrigerator)
D. Household supply line (V2"minimum)
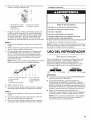
Now you are ready to connect the copper tubing to the shutoff
valve. Use 1/4"(6.35 mm) OD soft copper tubing to connect the
shutoff valve and the refrigerator.
• Ensure that you have the proper length needed for the job.
Be sure both ends of the copper tubing are cut square.
Slip compression sleeve and compression nut onto
copper tubing as shown. Insert end of tubing into outlet
end squarely as far as it will go. Screw compression nut
onto outlet end with adjustable wrench. Do not
overtighten.
C. Copper tubingA. Compression sleeve
B. Compression nut
Place the free end of the tubing into a container or sink, and
turn on main water supply to flush out tubing until water is
clear. Turn off shutoff valve on the water pipe.
NOTE: Always drain the water line before making the final
connection to the inlet of the water valve, to avoid possible
water valve malfunction.
Bend the copper tubing to meet the water line inlet, which is
located on the back of the refrigerator cabinet as shown.
Leave a coil of copper tubing to allow the refrigerator to be
pulled out of the cabinet or away from the wall for service.
A B C O
A. Household water line C. Ferrule (purchased)
B. Nut (purchased) D. Refrigerator water tubing
4=
5.
6.
Install the water supply tube clamp around the water supply
line to reduce strain on the coupling.
Turn shutoff valve ON.
Check for leaks. Tighten any connections (including
connections at the valve) or nuts that leak.
Style 2
1. Unplug refrigerator or disconnect power.
2. Remove and discard the plastic part that is attached to the
inlet of the water valve.
3.
4=
5.
6.
Attach the copper tube to the valve inlet using a compression
nut and sleeve as shown. Tighten the compression nut. Do not
overtighten.
Use the tube clamp on the back of the refrigerator to secure
the tubing to the refrigerator as shown. This will help avoid
damage to the tubing when the refrigerator is pushed back
against the wall.
Turn shutoff valve ON.
Check for leaks. Tighten any connections (including
connections at the valve) or nuts that leak.
.4t
....................A
ii-B
D
E
A. Tube clamp
B. Tube clamp screw
C. Copper tubing
D. Compression nut
E. Valve inlet
7=
On some models, the ice maker is equipped with a built-in
water strainer. If your water conditions require a second water
strainer, install it in the 1/4"(6.35 mm) water line at either tube
connection. Obtain a water strainer from your nearest
appliance dealer.

Style 3
1. Unplug refrigerator or disconnect power.
2. Remove and discard the black nylon plug from the gray water
tube on the rear of the refrigerator.
3. If the gray water tube supplied with the refrigerator is not long
enough, a V4"x 1/4"(6.35 mm x 6.35 mm) coupling is needed in
order to connect the water tubing to an existing household
water line. Thread the provided nut onto the coupling on the
end of the copper tubing.
NOTE: Tighten the nut by hand. Then tighten it with a wrench
two more turns. Do not overtighten.
A B C D E F G
A. Refrigerator water tubing
B. Nut (provided)
C. Bulb
D. Coupling (purchased)
E. Ferrule (purchased)
F Nut (purchased)
G. Household water line
4. Turn shutoff valve ON.
5. Check for leaks. Tighten any nuts or connections (including
connections at the valve) that leak.
Style 4
1. Unplug refrigerator or disconnect power.
2. Connect the supplied hose to the water valve outlet on the
back of the refrigerator.
3. Check for leaks. Tighten any nuts or connections (including
connections at the valve) that leak.
Complete the Installation
Electrical Shock Hazard
Plug into a grounded (earthed) outlet.
Do not remove ground prong.
Do not use an adapter.
Do not use an extension cord.
Failure to follow these instructions can result in death,
fire, or electrical shock.
1. Plug into a grounded (earthed) outlet.
NOTE: On models with an ice maker, allow 24 hours to produce
the first batch of ice. Allow 3 days to completely fill ice container.
REFRIGERATOR USE
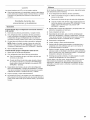
Usin 9 the Controls
For your convenience, your refrigerator controls are preset at the
factory. When you first install your refrigerator, make sure that the
controls are still preset. The Refrigerator Control and the Freezer
Control should both be set to the "mid-settings."
Freezer Refrigerator
C
cold 1 2 ,= 3 4 colder off 1 2 A 3 4 colder
IMPORTANT:
• Your product will not cool when the REFRIGERATOR Control
is set to OFF.
The Refrigerator Control adjusts the refrigerator compartment
temperature. The Freezer Control adjusts the freezer
compartment temperature. Settings to the left of the
mid-setting make the temperature less cold. Settings to the
right of the mid-setting make the temperature colder.
Wait 24 hours before you put food into the refrigerator. If you
add food before the refrigerator has cooled completely, your
food may spoil.
NOTE: Adjusting the Refrigerator and Freezer Controls to a
higher (colder) than recommended setting will not cool the
compartments any faster.
Adjusting Controls
Give the refrigerator time to cool down completely before adding
food. It is best to wait 24 hours before you put food into the
refrigerator.
The settings indicated in the previous section should be correct
for normal household refrigerator usage. The controls are set
correctly when milk or juice is as cold as you like and when ice
cream is firm.
• Slide the control one setting to the right to make the
compartment colder.
• Slide the control one setting to the left to make it less cold.
• Toturn the cooling system off, slide the Refrigerator Control to
the OFF position.
If you need to adjust temperatures in the refrigerator or freezer,
use the settings listed in the chart below as a guide. Wait at least
24 hours between adjustments.
CONDITION/REASON: ADJUSTMENT:
REFRIGERATOR too warm REFRIGERATOR Control
one setting higher
FREEZER too warm/ FREEZER Control
too little ice one setting higher
REFRIGERATOR too cold REFRIGERATOR Control
one setting lower
FREEZER too cold FREEZER Control
one setting lower
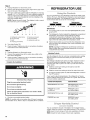
Crisper Humidity Contro
{o_ some mode_s}
You can control the amount of humidity in the moisture-sealed
crisper. Adjust the control to any setting between LOW and HIGH.
LOW (open) for best storage of fruits and vegetables with skins.
HIGH (closed) for best storage of fresh, leafy vegetables.
10

REFRIGERATOR CARE
Explosion Hazard
Use nonflammable cleaner.
Failure to do so can result in death, explosion, or fire.
Both the refrigerator and freezer sections defrost automatically.
However, clean both sections about once a month to avoid
buildup of odors. Wipe up spills immediately.
IMPORTANT: Because air circulates between both sections, any
odors formed in one section will transfer to the other. You must
thoroughly clean both sections to eliminate odors. To avoid odor
transfer and drying out of food, wrap or cover foods tightly.
To Clean Your Refrigerator:
NOTE: Do not use abrasive or harsh cleaners such as window
sprays, scouring cleansers, flammable fluids, cleaning waxes,
concentrated detergents, bleaches or cleansers containing
petroleum products on plastic parts, interior and door liners or
gaskets. Do not use paper towels, scouring pads, or other harsh
cleaning tools.
1. Unplug refrigerator or disconnect power.
2. Hand wash, rinse, and dry removable parts and interior
surfaces thoroughly. Use a clean sponge or soft cloth and a
mild detergent in warm water.
3. Wash stainless steel and painted metal exteriors with a clean
sponge or soft cloth and a mild detergent in warm water.
4. There is no need for routine condenser cleaning in normal
home operating environments. If the environment is
particularly greasy or dusty, or there is significant pet traffic in
the home, the condenser should be cleaned every 2 to
3 months to ensure maximum efficiency.
If you need to clean the condenser:
Remove the base grille. See the "Door Removal"
instructions, either in the User Instructions or the
Installation Instructions and Owner's Manual, or in the
separate instruction sheet provided with your refrigerator.
• Use a vacuum cleaner with a soft brush to clean the grille,
the open areas behind the grille and the front surface area
of the condenser.
• Replace the base grille when finished.
5. Plug in refrigerator or reconnect power.
The interior lights are LEDs that cannot be changed.
• If the interior lights do not illuminate when either door is
opened, call for assistance or service. See either the front
cover or the Warranty for contact information.
Vacation and Moving Oar÷
Vacations
If You Choose to Leave Refrigerator On While You Are Away:
1. Use up any perishables and freeze other items.
2. If your refrigerator has an automatic ice maker and is
connected to the household water supply, turn off the water
supply to the refrigerator. Property damage can occur if the
water supply is not turned off.
3. If you have an automatic ice maker, turn off the ice maker.
NOTE: Depending on your model, raise the wire shutoff arm to
OFF (up) position or press the switch to OFF (right).
4. Empty the ice bin.
If You Choose to Turn Refrigerator Off Before You Leave:
1. Remove all food from the refrigerator.
2. If your refrigerator has an automatic ice maker:
• Turn off the water supply to the ice maker at least one day
ahead of time.
• When the last load of ice drops, raise the wire shutoff arm
to the OFF (up) position or move the switch to the OFF
(right) setting.
3. Depending on the model, turn the Refrigerator Control to OFF
or turn cooling off. See "Using the Controls" in the User
Instructions, User Guide, or Use & Care Guide.
4. Clean, wipe, and dry thoroughly.
5. Tape rubber or wood blocks to the tops of both doors to prop
them open far enough for air to get in. This stops odor and
mold from building up.
Moving
When you are moving your refrigerator to a new home, follow
these steps to prepare it for the move.
1. If your refrigerator has an automatic ice maker:
• Turn off the water supply to the ice maker at least one day
ahead of time.
• Disconnect the water line from the back of the refrigerator.
• When the last load of ice drops, raise the wire shutoff arm
to the OFF (up) position or move the switch to the OFF
(right) setting.
2. Remove all food from the refrigerator and pack all frozen food
in dry ice.
3. Empty the ice bin.
4. Depending on the model, turn the Refrigerator Control to OFF
or turn cooling off. See "Using the Controls" in the User
Instructions, User Guide, or Use & Care Guide.
5. Unplug refrigerator.
6. Clean, wipe, and dry thoroughly.
7. Take out all removable parts, wrap them well, and tape them
together so they don't shift and rattle during the move.
8. Depending on the model, raise the front of the refrigerator so it
rolls more easily OR screw in the leveling legs so they don't
scrape the floor. See "Adjust the Doors" or "Door Removal,
Leveling and Alignment."
9. Tape the doors closed and tape the power cord to the back of
the refrigerator.
When you get to your new home, put everything back and refer to
the Installation Instructions for preparation instructions. Also, if
your refrigerator has an automatic ice maker, remember to
reconnect the water supply to the refrigerator.
11

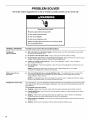
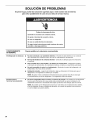
PROBLEM SOLVER
First try the solutions suggested here or visit our website to possibly avoid the cost of a service call.
Electrical Shock Hazard
Plug into a grounded 3 prong outlet.
Do not remove ground prong.
Do not use an adapter.
Do not use an extension cord.
Failure to follow these instructions can result in death,
fire, or electrical shock.
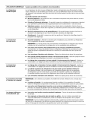
GENERAL OPERATION Possible Causes and/or Recommended Solutions
Refrigerator
will not operate
Not connected to an electrical supply - Plug the power cord into a grounded 3 prong outlet.
Do not use an extension cord.
• No power to the electrical outlet - Plug in a lamp to see ifthe outlet is working.
• Household fuse has blown or circuit breaker has tripped - Replace the fuse or reset the circuit
breaker. If the problem continues, contact a licensed electrician.
• Control or cooling is not turned on - Turn on the refrigerator control, or turn cooling on.
See "Using the Controls."
• New installation - Following installation, allow 24 hours for the refrigerator and freezer to cool
completely.
NOTE: Adjusting the temperature control(s) to the coldest setting will not cool either
compartment (refrigerator or freezer) more quickly.
Motor seems to run
too much
Your new refrigerator has an energy-efficient motor - The refrigerator may run longer than
you're used to, because the compressor and fans operate at lower speeds that are more
energy-efficient. This is normal.
NOTE: Your refrigerator may run even longer if the room is warm, a large load of food is added,
the doors are opened often, or if a door has been left open.
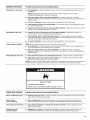
Refrigerator seems noisy The compressor in your new refrigerator regulates temperature more efficiently and uses less energy
than older models. During various stages of operation, you may hear normal operating sounds that
are unfamiliar.
The following noises are normal:
• Popping - Heard when the inside walls contract/expand, especially during initial cooldown.
• Pulsating/Whirring - Heard when the fans/compressor adjust to optimize performance during
normal operation.
• Rattling - Heard when water passes through the water line, or due to the flow of refrigerant.
Rattling may also come from items placed on top of the refrigerator.
• Water running or gurgling - Heard when ice melts during the defrost cycle and water runs into
the drain pan.
• Sizzling - Heard when water drips onto the heater during the defrost cycle.
12

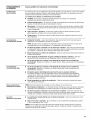
GENERAL OPERATION Possible Causes and/or Recommended Solutions
Temperature is too warm • New installation - Following installation, allow 24 hours for the refrigerator and freezer to cool
completely.
NOTE: Adjusting the temperature control(s) to the coldest setting will not cool either
compartment (refrigerator or freezer) more quickly.
Doors are opened often or not closed completely - This allows warm air to enter the
refrigerator. Minimize door openings, keep the doors fully closed, and make sure both doors are
properly sealed.
Air vents are blocked - Remove items that are immediately in front of the vents.
Large amount of warm food recently added - Allow several hours for the refrigerator to return
to its normal temperature.
Controls are not set correctly for the surrounding conditions - Adjust the controls to a colder
setting. Check the temperature again in 24 hours.
Temperature is too cold Controls are not set correctly for the surrounding conditions - Adjust the controls to a
warmer setting. Check the temperature again in 24 hours.
Top refrigerator shelf is colder than lower shelves - On some models, air from the freezer
enters the refrigerator compartment through vents near the top refrigerator shelf. As a result, the
top shelf can be slightly colder than lower shelves.
• Air vents are blocked - Remove items that are immediately in front of the vents.
Interior moisture buildup NOTE: Some moisture buildup is normal. Clean with a soft dry cloth.
• Room is humid - A humid environment contributes to moisture buildup. Use the refrigerator only
in an indoor location, with as little humidity as possible.
• Doors are opened often or not closed completely - This allows humid air to enter the
refrigerator. Minimize door openings, keep the doors fully closed, and make sure both doors are
properly sealed.
Interior lights do not work • Doors have been open for an extended period of time - Close the doors to reset the lights.
• Light bulb is loose in the socket or has burned out - On models with incandescent interior
light bulbs, tighten or replace the bulb. See "Lights."
NOTE: On models with LED lights, call for assistance or service if the interior lights do not illuminate
when either door is opened. See either the front cover or the Warranty for contact information.
Explosion Hazard
Use nonflammable cleaner.
Failure to do so can result in death, explosion, or fire.
DOORS AND LEVELING Possible Causes and/or Recommended Solutions
Doors are difficult to open • Gaskets are dirty or sticky - Clean the gaskets and contact surfaces with mild soap and warm
water. Rinse and dry with a soft cloth.
Doors will not • Door is blocked open - Move food packages away from the door. Make sure all bins and
close completely shelves are in their correct positions. Make sure all packaging materials have been removed.
Doors appear to be uneven • Doors need to be aligned, or refrigerator needs to be leveled - See the leveling and door
alignment instructions.
Refrigerator rocks
and is not stable
• Refrigerator is not level - To stabilize the refrigerator, remove the base grille and lower the
leveling feet until they touch the floor. See the leveling and door alignment instructions.
13

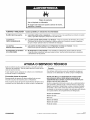
ASSISTANCE OR SERVICE
Before calling for assistance or service, please check
"Troubleshooting" or "Problem Solver." It may save you the cost
of a service call.
If you still need help, contact the dealer from whom you
purchased the refrigerator.
Warranty
Contact the dealer from whom you purchased the refrigerator for
warranty information.
If you need replacement parts
Look for quality replacement parts whenever you need a
replacement part for your refrigerator.
To locate factory specified replacement parts in your area, contact
the dealer from whom you purchased your refrigerator.
Keep this book and your sales slip together for future
reference. You must provide proof of purchase or installation
date for in-warranty service.
Write down the following information about your appliance to help
you obtain assistance or service if you ever need it. You will need
to know your complete model number and serial number. You can
find this information on the model and serial number label, located
on the inside wall of the refrigerator compartment.
Dealer name
Serial number
Address
Phone number
Model number
Purchase date
9/13
W10583333B _/TM@2013. All rights reserved. Printed in Mexico

|NDICE
SEGURIDAD DEL REFRIGERADOR ..................................................... 15
C6mo deshacerse adecuadamente de su refrigerador viejo .............. 16
INSTRUOCIONES DE INSTALACION ................................................... 16
Desempaque el refrigerador ............................................................... 16
Extracci6n, nivelaci6n y alineaci6n de las puertas ............................. 17
C6mo instalar y retirar las manijas ...................................................... 19
Requisitos de ubicaci6n ...................................................................... 20
Requisitos electricos ........................................................................... 20
Requisitos del suministro de agua ...................................................... 21
Conexi6n del suministro de agua ....................................................... 21
USO DEL REFRIGERADOR ................................................................... 23
Uso de los oontroles ............................................................................ 23
Control de humedad del caj6n para verduras ..................................... 24
CUIDADO DEL REFRIGERADOR .......................................................... 24
Limpieza .............................................................................................. 24
Luces ................................................................................................... 25
Cuidado durante las vacaciones y mudanzas ..................................... 25
SOLUCION DE PROBLEMAS ................................................................ 26
AYUDA O SERVIOlO TI_ONIOO ............................................................. 28
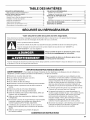
SEGURIDAD DEL REFRIGERADOR
Su seguridad y la seguridad de los demos es rnuy irnportante.
Hemos incluido muchos mensajes importantes de seguridad en este manual yen su electrodomestico. Lea y obedezca
siempre todos los mensajes de seguridad.
t_ste es el simbolo de advertencia de seguridad.
Este sfmbolo le llama la atenci6n sobre peligros potenciales que pueden ocasionar la muerte o una lesi6n
a usted y a los demas.
Todos los mensajes de seguridad iran a continuaci6n del simbolo de advertencia de seguridad y de la palabra
"PELIGRO" o "ADVERTENCIA". Estas palabras significan:
Si no sigue las instrucciones de inmediato, usted puede
motif o sufrir una lesibn grave.
Si no sigue las instrucciones, usted puede motif o sufrir
una lesibn grave.
Todos los mensajes de seguridad le diran el peligro potencial, le diran c6mo reducir las posibilidades de sufrir una lesi6n y Io
que puede suceder si no se siguen las instrucciones.
INSTRUCCIONES IMPORTANTES DE SEGURIDAD
ADVERTENCIA: Para reducir el riesgo de incendio, descarga electrica, o lesiones personales al usar su refrigerador
siga estas precauciones basicas:
[] Enchufe en un contacto con conexi6n a tierra.
[] No quite el terminal de conexi6n a tierra.
[] No use un adaptador.
[] No use un cable electrico de extensi6n.
[] Desconecte el suministro de energia antes de darle servicio.
[] Vuelva a colocar todas las piezas y paneles antes de
ponerlo a funcionar.
[] Retire las puertas de su refrigerador viejo.
[] Use un limpiador no inflamable.
[] Mantenga los materiales y vapores inflamables, tales como
gasolina, alejados del refrigerador.
[] Use dos o mas personas para mover e instalar el refrigerador.
[] Desconecte el suministro de energia antes de instalar
la fabrica de hielo (solamente en aquellos modelos que
incluyen el juego listo de la fabrica de hielo).
[] La linea de agua y la fabrica de hielo deben set instaladas por
un tecnico de servicio calificado.
[] Use un vaso resistente para recibir hielo del despachador
(en algunos modelos).
[] Este aparato no ha sido dise_ado para ser usado por
personas (incluidos ni_os) con capacidad fisica, sensorial o
mental reducida, o con falta de experiencia y conocimiento,
a menos que Io hagan bajo supervisi6n o siguiendo las
instrucciones relativas al uso del aparato, a cargo de una
persona responsable de su seguridad.
[] Los ni_os deberan estar bajo supervisi6n para asegurarse
de que no jueguen con el electrodomestico.
[] Este aparato ha sido dise_ado para utilizarse en un entorno
domestico yen aplicaciones similares tales como: Areas
de cocina para el personal en tiendas, oficinas y otros
ambientes laborales; alquerias y huespedes de hoteles,
moteles y otros ambientes de tipo residencial; ambientes
similares a pensiones u hoteles que ofrecen desayuno;
servicios de comida y aplicaciones similares que no sean
de venta al por menor.
[] Si se ha da_ado el cable de suministro de energia,
debera set reemplazado por el fabricante, el agente de
servicio o una persona similarmente calificada con el fin
de evitar riesgos.
GUARDE ESTAS INSTRUCCIONES
15

Cbmo deshacerse adecuadamente
de su refrigerador viejo
Peligro de asfixia
Retire las puertas de su refrigerador viejo.
No seguir esta instrucci6n puede ocasionar la muerte
o daho al cerebro.
IMPORTANTE: El atrapamiento y asfixia de ni_os no es un
problema del pasado. Los refrigeradores tirados o abandonados
son un peligro, aQn si van a quedar ahi "por unos pocos dias".
Si Ud. esta por deshacerse de su refrigerador viejo, por favor
siga las instrucciones que se dan a continuacion para prevenir
accidentes.
Antes de tirar su viejo refrigerador o congelador:
• Saque las puertas.
• Deje los estantes en su lugar asi los ni_os no pueden
meterse adentro con facilidad.
INSTRUCCIONES DE INSTALACION
©esempaque ef ige ado
Peligro de peso excesivo
Use dos o m&s personas para mover e instalar el
refrigerador.
No seguir esta instruccibn puede ocasionar una lesibn
en la espalda u otro tipo de lesiones.
Quite los materiales de empaque. No use instrumentos filosos,
alcohol para fricciones, liquidos inflamables o productos de
limpieza abrasivos para eliminar los restos de cinta o goma.
Estos productos pueden da_ar la superficie de su refrigerador.
Para m_s informacion, vea "Seguridad del refrigerador".
Cuando mueva su refrigerador:
Su refrigerador es pesado. Cuando mueva el refrigerador
para la limpieza o para darle servicio, cerci6rese de cubrir
el piso con cart6n o madera para evitar dados en el mismo.
AI mover el refrigerador, tire siempre directamente hacia
afuera. No menee el refrigerador de lado a lado ni Io haga
"caminar" cuando trate de moverlo ya que podria dadar
el suelo.
Informaci6n importante para saber acerca de los
estantes y tapas de vidrio:
No limpie los estantes y tapas de vidrio con agua caliente
mientras esten frios. Los estantes y tapas pueden romperse
si se exponen a cambios bruscos de temperatura o a
impactos, como seria un golpe brusco. El vidrio templado
se ha dise5ado para hacerse a5icos. Esto es normal. Los
estantes y tapas de vidrio son muy pesados. Use ambas
manos al sacarlos para evitar que se caigan.
16

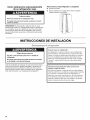
Ext acci6n0 nive aci6n y a ineaci6n de pue as
ReSna las herramientas y piezas necesarias y lea todas las instrucciones antes de comenzar la instalacion. Guarde estas instrucciones
para referencia futura.
NOTA: Antes de introducir el producto en su hogar, mida el espacio de la entrada de su casa para decidir si es necesario quitar
las puertas del refrigerador y del congelador. 8i es necesario quitar las puertas, yea las instrucciones a continuacion.
IMPORTANTE: Antes de comenzar, gire el control del refrigerador hacia la posicion de OFF (APAGADO) o apague el enfriamiento.
Desenchufe el refrigerador o desconecte el suministro de energia. Quite todos los alimentos y cualquier recipiente ajustable
o de uso general de las puertas.
HERRAMIENTAS NECESARIAS:
Nivel de burbuja, destornillador de hoja plana, Ilave de tuercas de %6", Ilaves de tubo de cabeza hexagonal de 1/4"1/2"y %6".
Peligro de descarga el_ctrica
Desconecte el suministro de energia antes de sacar las puertas.
No seguir esta instrucci6n puede ocasionar la muerte o descarga el_ctrica.
Bisagra superior
izquierda
A. No quite los tomillos
Rejilla de la base
C6mo quitar la
puerta
Bisagra superior
detecha
A. No quite los tornillos
Bisagras inferiores
(Izquierda y Derecha)
No quite el tornillo A--
(se encuentra presente
en algunos modelos)
Nivelaci6n
Bajar j_ \_ Levantar
A. Tornillo nivelador
Alineamiento de las
puertas (Bisagra
inferior derecha)
A _ Levantar
A,Tomillo de alineamiento
17

Cbmo quitar las puertas
Peligro de descarga el_cttica
Desconecte el suministto de enetg/a antes de sacar
las puertas.
No seguir esta instrucci6n puede ocasionar la muerte
o descarga el_ctrica.
1. Desenchufe el refrigerador o desconecte el suministro de
energia.
2. Abra ambas puertas. En modelos con el filtro de agua en la
rejilla de la base, tambien abra la tapa de la cubierta del filtro de
agua. No es necesario quitar completamente el filtro de agua.
3. Quite la rejilla de la base tirando de los extremos exteriores
de la parte inferior hacia arriba. Vea la Ilustracidn 1.
4. Cierre ambas puertas y mantengalas cerradas hasta que
este listo para separarlas de la carcasa.
5. Use una Ilave de tubo de cabeza hexagonal de _e"
para quitar la bisagra superior izquierda, como se muestra.
Vea la Ilustracidn 2.
IMPORTANTE" No quite ninguno de los tornillos A.
6. Levante la puerta del congelador directamente de la bisagra
inferior. Vea la Ilustracidn 3.
IMPORTANTE" Coloque la puerta de costado sobre una
superficie suave y limpia, como puede ser una toalla, frazada o
pieza de carton. Esto ayudarA a evitar que se da_e la puerta.
7. Quite la bisagra superior derecha, como se muestra. Vea la
Ilustracidn 4.
IMPORTANTE" No quite ninguno de los tornillos A.
8. Levante la puerta del refrigerador directamente de la bisagra
inferior.
IMPORTANTE" Coloque la puerta de costado sobre una
superficie suave y limpia, como puede ser una toalla, frazada o
pieza de carton. Esto ayudarA a evitar que se da_e la puerta.
9. Quiza no sea necesario quitar las bisagras inferiores para
pasar el refrigerador por una puerta. Ambas bisagras
inferiores tienen la misma construccion.
• Si es necesario, desensamble las bisagras como se
muestra. Vea la Ilustracidn 5.
IMPORTANTE: Para ayudar en el alineamiento y el cierre
de la puerta, hay una calza ubicada entre la bisagra y la
carcasa. Cuando se saque la bisagra, es posible que la
calza se salga fuera de su lugar. Si esto ocurre, deje la
calza a un lado para poder colocarla nuevamente en su
lugar cuando se vuelva a colocar la bisagra m_s tarde.
Cbmo volver a poner las puertas y las bisagras en su lugar
1. Si las quito, vuelva a colocar ambas bisagras inferiores.
AsegOrese de que la calza este entre la bisagra y la carcasa.
Apriete los tornillos.
NOTA" Disponga de un soporte adicional para las puertas
mientras vuelve a colocar las bisagras superiores. No se confie
en que los imanes de las puertas van a sostener las puertas en
su lugar mientras trabaja.
2. Alinee y vuelva a colocar la bisagra superior izquierda como
se muestra. Vea la Ilustracidn 2. Apriete los tornillos.
3. Vuelva a colocar la puerta del refrigerador, encajandola sobre
la bisagra inferior derecha.
4. Alinee y vuelva a colocar la bisagra superior derecha como
se muestra. Vea la Ilustracidn 4. Apriete los tornillos.
5. Vuelva a colocar cualquier recipiente ajustable o de uso
general de las puertas.
6. Conecte a un contacto de pared de conexion a tierra de
3 terminales.
Nivelacibn y cierre de la puerta
Su refrigerador tiene dos rodillos frontales regulables -- uno a la
derecha y otro a la izquierda. Si su refrigerador parece inestable o
usted quiere que las puertas se cierren con mayor facilidad,
ajuste la inclinacion del refrigerador usando las instrucciones
siguientes:
1. Mueva el refrigerador hacia su ubicacion final.
2. Saque la rejilla de la base para ubicar los dos tornillos
niveladores, que son parte de los ensamblajes de los rodillos
frontales a cada lado. Vea la Ilustracidn 6.
NOTA" Para simplificar el ajuste de los tornillos, haga que alguien
empuje la parte superior del refrigerador, Io cual quita el peso de
los tornillos reguladores y los rodillos. Esto facilita el ajuste de los
tornillos.
3. Use una Ilave de tubo de cabeza hexagonal de 1/2"para
ajustar los tornillos niveladores. Gire el tornillo regulador
hacia la derecha para levantar ese lado del refrigerador
o gire el tornillo regulador hacia la izquierda para bajar
ese lado. Puede precisar darle varias vueltas a los tornillos
reguladores para ajustar la inclinacion del refrigerador.
Vea la Ilustracidn 6.
4. Abra ambas puertas nuevamente y verifique que se cierran
con la facilidad que usted desea. De Io contrario, incline el
refrigerador ligeramente mas hacia la parte posterior, girando
ambos tornillos reguladores hacia la derecha. Puede tomar
varias vueltas mas, y usted debera girar ambos tornillos
reguladores la misma cantidad de veces.
5. Use un nivel de burbuja para verificar la nivelacion del
refrigerador.
NOTA" Cada vez que necesite mover el refrigerador, gire las
patas niveladoras hacia la derecha hasta que no toquen el piso.
Esto permitirA que el refrigerador ruede con m_s facilidad.
18

4=
Alineamiento de las puertas
Puede parecer que las puertas de un refrigerador que no este
nivelado de lado a lado no esten alineadas debidamente. Si las
puertas parecen estar de esta manera, siga las instrucciones
de la seccion previa para verificar la nivelacion.
Las puertas han sido dise_adas con alturas ligeramente
diferentes cuando el refrigerador esta vacio, para compensar
por el peso de los alimentos que seran colocados en las puertas.
Si las puertas aQn no estan alineadas despu6s de verificar la
nivelacion y de poner alimentos en el refrigerador, siga los pasos
a continuacion para regular el alineamiento de las puertas.
1. Ubique el tornillo de alineamiento que esta ubicado en la
bisagra inferior de la puerta del refrigerador. Vea la Ilustracidn 7.
2. Use una Ilave de tuercas de %6" para girar el tornillo.
Para levantar la puerta del refrigerador, gire el tornillo hacia la
derecha. Para bajar la puerta, gire el tornillo hacia la izquierda.
3. Verifique que las puertas esten niveladas en la parte superior
e inferior. Si es necesario, continQe girando el tornillo de
alineamiento hasta que las puertas queden alineadas.
4. Vuelva a colocar la rejilla de la base.
NOTA: Cerciorese de que repone la Hoja tecnica detr_s de la
rejilla de la base.
C6mo insta ar y etira manijas
PIEZAS INCLUlDAS: Manijas de puerta (2), Ilave hexagonal de
1/8"y tornillo(s) opresor(es) adicional(es)
Para instalar las manijas:
NOTA: Los tornillos opresores de montaje de la manija vienen
preinstalados en la misma.
1. Quite las manijas que estan en un paquete en el interior del
refrigerador.
NOTA: Para evitar da_ar el acabado, coloque las manijas
sobre una toalla u otra superficie suave.
2. Abra la puerta del congelador. Sobre la puerta del
refrigerador, coloque la manija sobre los tornillos de tope,
con los tornillos opresores mirando hacia el congelador.
Mientras sostiene la manija, inserte el extremo corto
de la Ilave hexagonal en L dentro del orificio superior
y gire ligeramente la Ilave hexagonal en L hasta que
quede enganchada en el tornillo opresor.
7
5. Con un movimiento en el sentido de las agujas del reloj,
apriete el tornillo opresor hasta que comience a hacer
contacto con el tornillo de tope.
6. Repita los pasos 4 y 5 para comenzar a sujetar el tornillo
opresor inferior.
7. Una vez que ambos tornillos opresores hayan sido apretados
parcialmente como se indico en los pasos anteriores, apriete
por completo los tornillos opresores superior e inferior.
IMPORTANTE" Cuando los tornillos se sientan ajustados,
aprietelos un cuarto de giro adicional. La manija no esta
bien instalada sin este ajuste adicional.
8. Abra la puerta del refrigerador y cierre la puerta del
congelador. Repita los pasos 2 a 7 para instalar la otra manija
sobre la puerta del congelador, con los tornillos opresores
mirando hacia el refrigerador.
9. Guarde la Ilave hexagonal en L y todas las instrucciones.
Para quitar las manijas:
1. Mientras sostiene la manija, inserte el extremo corto de la
Ilave hexagonal dentro del orificio del tornillo opresor inferior
y gire ligeramente la Ilave hexagonal hasta que quede
enganchada en el tornillo opresor.
2. Usando un movimiento en sentido contrario alas agujas del
reloj, afloje el tornillo opresor un cuarto de vuelta por vez.
3. Repita los pasos 1 y 2 para el tornillo opresor superior.
Jale con suavidad la manija para quitarla de la puerta.
4. Si es necesario, use un destornillador Phillips para quitar
los tornillos de tope de la puerta.
3.
A. Tornillos de tope
B. Tornillos opresores dentro
de la manija
Empuje con firmeza la manija hacia la puerta hasta que
la base de la manija quede pegada a la puerta.
19

Requisites de ubioaoi6n
Peligro de explosi6n
Mantenga los materiales y vapores inflamables,
tales como gasolina, alejados del refrigerador.
No seguir esta instrucci6n puede ocasionar la muerte,
explosi6n o incendio.
IMPORTANTE: Este refrigerador ha sido disefiado Onicamente
para usarse dentro del hogar.
Para asegurar la adecuada ventilacion para su refrigerador,
deje un espacio de 1/2"(1,27 cm) a cada lado y por encima.
Deje un espacio de 2" (5,08 cm) detras del refrigerador. Si su
refrigerador tiene fabrica de hielo, asegOrese que hay espacio
adicional atras para las conexiones de la linea de agua. Si Ud.
instala el refrigerador proximo a una pared fija, deje un espacio
minimo de 2" (5,08 cm) a cada lado (dependiendo del modelo)
para permitir que las puertas se abran bien.
//
/,
//
ii!
/
2" (5,08 crn}
I
1/2"(1,27
II --
NOTAS:
• Este refrigerador ha sido disefiado para usarse en un lugar
en donde los rangos de temperatura varien entre un minimo
de 55 °F (13 °C) y un maximo de 110 °F (43 °C). Para un
optimo rendimiento, el rango preferido de temperatura
ambiente (que reduce el uso de electricidad y provee un
enfriamiento superior) es entre 60 °F (15 °C) y 90 °F (32 °C).
No se recomienda instalar el refrigerador cerca de una fuente
de calor, como puede ser un horno o un radiador.
• El ancho minimo normal necesario para el Area de corte
de la carcasa para la instalacion del producto es de 36"
(91,44 cm). Sin embargo, si el producto se coloca contra
una pared extendida y se desea tener espacio para quitar
los cajones para verduras, se necesitara un ancho adicional
en el armario de 18" (45,72 cm), de manera que se
recomienda que el ancho total de abertura del armario
sea de 54" (137,16 cm).
Requisites e 6ctdcos
Peligro de descarga el6ctrica
Enchufe en un contacto con cone×i6n a tierra.
No quite el terminal de conexi6n a tierra.
No use un adaptador.
No use un cable el6ctrico de extensi6n.
No seguir estas instrucciones puede ocasionar la
muerte, incendio o descarga el_ctrica.
Antes de mover el refrigerador asu ubicacion final, es importante
asegurarse que tiene la conexion electrica adecuada:
M_todo de conexi6n a tierra recomendado
Se necesita un suministro electrico de 115 Voltios, 60 Hz
(enchufe 1), 220/240 Voltios, 50 Hz (enchufes 2 6 3), 220 Voltios,
60 Hz (enchufe 3), o 230/240 Voltios, 50 Hz (enchufe 4) de
CA solamente y con fusibles de 10 amperios, conectado a tierra.
Enchufe 1 Enchufe 2 Enchufe 3 Enchufe 4
Para Australia y Nueva Zelanda:
Su electrodomestico ha sido fabricado especialmente para
cumplir con todas las normas y condiciones australianas.
Algunas notas en las instrucciones de instalacion se pueden
referir a requisitos electricos de otros paises, asi que le
Ilamamos la atencion hacia dichas notas en particular.
El electrodomestico se debe conectar a un contacto con
conexion a tierra de 230/240 Voltios, 50 Hz, 10 amperios
de CA solamente y conectado a tierra (enchufe 4).
20
La page est en cours de chargement...
La page est en cours de chargement...
La page est en cours de chargement...
La page est en cours de chargement...
La page est en cours de chargement...
La page est en cours de chargement...
La page est en cours de chargement...
La page est en cours de chargement...
La page est en cours de chargement...
La page est en cours de chargement...
La page est en cours de chargement...
La page est en cours de chargement...
La page est en cours de chargement...
La page est en cours de chargement...
La page est en cours de chargement...
La page est en cours de chargement...
La page est en cours de chargement...
La page est en cours de chargement...
La page est en cours de chargement...
La page est en cours de chargement...
La page est en cours de chargement...
La page est en cours de chargement...
-
 1
1
-
 2
2
-
 3
3
-
 4
4
-
 5
5
-
 6
6
-
 7
7
-
 8
8
-
 9
9
-
 10
10
-
 11
11
-
 12
12
-
 13
13
-
 14
14
-
 15
15
-
 16
16
-
 17
17
-
 18
18
-
 19
19
-
 20
20
-
 21
21
-
 22
22
-
 23
23
-
 24
24
-
 25
25
-
 26
26
-
 27
27
-
 28
28
-
 29
29
-
 30
30
-
 31
31
-
 32
32
-
 33
33
-
 34
34
-
 35
35
-
 36
36
-
 37
37
-
 38
38
-
 39
39
-
 40
40
-
 41
41
-
 42
42


Maytag 5MSF25N4BA00 Manuel utilisateur
- Catégorie
- Frigos
- Taper
- Manuel utilisateur
- Ce manuel convient également à
dans d''autres langues
- English: Maytag 5MSF25N4BA00 User manual
- español: Maytag 5MSF25N4BA00 Manual de usuario