Arctic Aire DDR050BECCDB Le manuel du propriétaire
- Catégorie
- Déshumidificateurs
- Taper
- Le manuel du propriétaire
Ce manuel convient également à

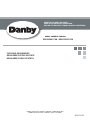
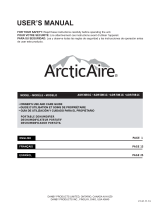
OWNER’S USE AND CARE GUIDE
GUIDE D’UTILISATION ET D'ENTRETIEN
GUÍA DE UTILIZACIÓN Y CUIDADO PARA EL PROPIETARIO
MODEL • MODÈLE • MODELO
DANBY PRODUCTS LIMITED, ONTARIO, CANADA N1H 6Z9
DANBY PRODUCTS INC., FINDLAY, OHIO, USA 45840
2016.12.09
DDR050BECCDB / DDR070BECCDB
PORTABLE DEHUMIDIFIER
DESHUMIDIFICATEUR PORTATIF
DESHUMIDIFICADOR PORTÁTIL

TO OBTAIN WARRANTY SERVICE YOU MUST PROVIDE A VALID PROOF OF
PURCHASE. PLEASE STAPLE YOUR RECEIPT TO THIS PAGE FOR FUTURE
REFERENCE.
POUR OBTENIR LE SERVICE SUR GARANTIE, VOUS DEVEZ FOURNIR UNE
PREUVE D’ACHAT VALIDE. VEUILLEZ AGRAFER VOTRE REÇU À CETTE PAGE
POUR RÉFÉRENCE FUTURE.
PARA OBTENER SERVICIO DE GARANTÍA, DEBE PROVEER UN RECIBO ORIG-
INAL. POR FAVOR ENGRAPE SU RECIBO A ÉSTA PÁGINA EN CASO QUE
NECESITE HACER UN RECLAMO.
This product is factory equipped with a power supply cord that has a three-pronged grounded plug.
It must be plugged into a mating grounding type receptacle in accordance with the National Electri-
cal Code and applicable local codes and ordinances. If the circuit does not have a grounding type
receptacle, it is the responsibility and obligation of the customer to exchange the existing receptacle
in accordance with the National Electrical Code and applicable local codes and ordinances. The third
ground prong should not, under any circumstances, be cut or removed. Never use the cord, the plug
or the appliance when they show any sign of damage. Do not use your appliance with an extension
cord unless it has been checked and tested by a qualifi ed electrician or electrical supplier. Improp-
er connection of the grounding plug can result in risk of fi re, electric shock and/or injury to persons
associated with the appliance. Check with a qualifi ed service representative if in doubt that the appli-
ance is properly grounded.
IMPORTANT - GROUNDING METHOD
Ce produit arrive d’origine avec un cordon d’alimentation équipé d’une prise à trois fi ches. Il doit
être branché dans une prise avec une fi che de mise à la terre en conformité avec le Code national de
l’électricité et les codes et règles locaux applicables. Si la prise murale n’a pas de mise à la terre, il
est de la responsabilité et l’obligation du client de changer la prise existante pour la rendre conforme
au Code national de l’électricité et aux codes et règles locaux applicables. La fi che de mise à la
terre ne doit pas, en aucune circonstance, être coupée ou retirée. Si vous apercevez des signes de
dommage, n’utilisez jamais le cordon d’alimentation, la prise ou l’appareil. N’utilisez jamais l’appareil
avec une rallonge sauf si elle a été vérifi ée et testée par un électricien qualifi é ou un fournisseur de
matériel électrique. Une fi che de mise à la terre mal branchée peut entraîner un risque d’incendie, de
choc électrique ou de blessures aux personnes qui utilisent l’appareil. Si vous n’êtes pas certain que
l’appareil est correctement mis à la terre, consultez un préposé du service qualifi é.
IMPORTANT - MÉTHODE POUR LA MISE À LA TERRE
Este producto viene equipado con un cable eléctrico que tiene un enchufe de tres patas conexión a tierra.
Este debe colocarse en una toma de corriente con conexión a tierra de acuerdo con el Código nacional de
electricidad y códigos y ordenanzas locales correspondientes. Si el circuito no cuenta con una toma de
corriente con conexión a tierra, es responsabilidad y obligación del cliente sustituir la toma de corriente actual
de acuerdo con el Código nacional de electricidad u códigos u ordenanzas locales correspondientes. Bajo
ninguna cicunstancia se debe cortar o eliminar la tercera pata de conexión a tierra. Nunca utilice el cable, el
enchufe o el artefacto cuando muestre un signo de daño visible. No utilice el artefacto con una extensión salvo
que un proveedor eléctrico o electricista califi cado la inspeccione y la pruebe. El conectar indebidamente el
enchufe de conexión a tierra puede crear riesgos de incendio, descarga eléctrica y/o oscasionar lesiones a
las personas que usen el aparato. Si tiene dudas sobre la debida conexión a tierra del aparato, consulte un
representante de servicios califi cado.
IMPORTANTE- MÉTODO DE CONEXIÓN A TIERRA

PORTABLE DEHUMIDIFIER
Owner’s Use and Care Guide .................................................1-12
• Welcome
• Important Safety Information
• Features
• Installation Instructions
• Operation Instructions
• Care and Maintenance
• Troubleshooting
• Warranty
DÉSHUMIDIFICATEUR PORTATIF
Guide d’utilisation et d’entretien..............................................13-24
• Bienvenue
• Consignes de sécurité importantes
• Caractéristiques
• Consignes d’installation
• Consignes d’utilisation
• Soins et entretien
• Dépannage
• Garantie
DESHUMIDIFICADOR PORTÁTIL
Guía del utilización y cuidado para el propietario...................25-36
• Bienvenido
• Instrucciones de seguridad importantes
• Instrucciones d’instalación
• Características
• Instrucciones operadoras
• Cuidado y maintenimiento
• Solucion sugerida
• Garantía
CONTENTS / TABLE DES MATIÈRES / ÍNDICE
Model • Modèle • Modelo
DDR050BECCDB / DDR070BECCDB
Read and follow all safety rules and operating instructions before fi rst
use of this product.
Veuillez lire attentivement les consignes de sécurité et les instructions
d’utilisation avant l’utilisation initiale de ce produit.
Lea y siga todas las reglas de seguridad y las instrucciones de op-
eración antes de usar este producto por primera vez.

1
Welcome
Welcome to the Danby family. We are proud of our quality products, and we believe in dependable service. We suggest
that you read this Owner’s Manual before plugging in your new appliance as it contains important operational information,
safety information, troubleshooting and maintenance tips to ensure the reliability and longevity of your appliance.
Visit www.Danby.com to access self-service tools, FAQs and much more. For additional assistance call 1-800-263-2629.
Note the information below; you will need this information to obtain service under warranty.
To receive service, you must provide the original receipt.
Model Number:
Serial Number:
Date of Purchase:
NEED HELP?
Before you call for service, here are a few things you can do to help
us serve you better:
Read this Owner’s Use and Care Guide:
It contains instructions to help you use and maintain your
appliance properly.
If you received a damaged appliance:
Immediately contact the retailer (or builder) that sold you the
appliance.
Save time and money:
Check the Troubleshooting section at the end of the guide before call-
ing. This section helps you solve common problems that may occur.
If you do need service, you can relax, knowing help is only a phone
call away.
1-800-26-
(1-800-263-2629)

Important Safety Information
READ AND FOLLOW ALL SAFETY INSTRUCTIONS
2
NOTE
The WARNING instructions issued in this manual are not meant to cover all possible conditions and
situations that may occur. Person(s) installing, maintaining, or operating the appliance must exercise
caution and care. Failure to install, maintain, and/or operate the equipment according to the manu-
facturer’s instructions may result in conditions which can produce personal injury and damage to your
unit and/or property damage. Contact your dealer, service agent, and/or the manufacturer about any
problems or conditions you do not fully understand.
For Danby Consumer Service call (1-800-263-2629).
To reduce the risk of fi re, electric shock, or personal injury, all wiring and grounding must conform with
the latest edition of Local and National Electrical codes.
• It is the customer’s responsibility to have the wiring and fuses checked by a qualifi ed electrician to
make sure adequate electrical power is available.
• This appliance is designed to operate on an effectively grounded, separately branched, polarized,
3-wire, 120 Volt 60 Hertz (alternating current) circuit protected by a 15 ampere fuse, equivalent fuse
or circuit breaker. The three-prong grounding plug on the power cord should be plugged directly into
the aforementioned receptacle rated 110/120 V.A.C.
• Do not connect the dehumidifi er to a multiple socket outlet that is also being used for other electrical
appliances.
FOR YOUR SAFETY: To reduce the risk of fi re or explosion, do not store or use gasoline or
other fl ammable vapors or liquids in the vicinity of this or any other appliance.
ELECTRICAL REQUIREMENTS
Improper connection of the equipment-grounding conductor can result in a risk of electrical shock.
Check with a qualifi ed electrician or serviceperson if you are in doubt as to whether your appliance
outlets are properly grounded.
• This appliance must be grounded. In the event of malfunction or breakdown, grounding will reduce
the risk of electrical shock by providing a path of least resistance for electrical current. This appliance
is equipped with a cord that has an equipment-grounding conductor and 3 prong grounding plug. The
plug must be connected into an outlet that is properly installed and grounded in accordance with all
local codes and ordinances.
• Do not modify the plug provided with this appliance. If it will not fi t the outlet, have a proper outlet
installed by a qualifi ed electrician.
• If the household electrical supply does not meet the above specifi cations, or if you are not sure
your home has an effective ground, have a qualifi ed electrician or your local electrical utility company
check it and correct any problems.
SAVE THESE INSTRUCTIONS
GROUNDING INSTRUCTIONS

Important Safety Information
READ AND FOLLOW ALL SAFETY INSTRUCTIONS
SAVE THESE INSTRUCTIONS
3
SAFETY PRECAUTIONS
When using this dehumidifi er, always follow basic safety precautions, including the following:
• Use this appliance only for its intended purpose as described in this Owner’s Manual.
• This dehumidifi er must be properly installed and grounded as described in this manual before it is
used.
• Never operate this dehumidifi er in an area that is likely to accumulate standing water. If this condi-
tion develops, for your safety disconnect the power supply before stepping into the water.
• Never unplug your dehumidifi er by pulling on the power cord. Always grip the plug fi rmly and pull
straight out from the receptacle.
• Replace immediately all electric service cords that have become frayed or otherwise damaged. A
damaged power supply cord must be replaced with a new power supply cord obtained from the
manufacturer and not repaired. Do not use a cord that shows cracks or abrasion damage along its
length or at either the plug or connector end.
• If the receptacle does not match the plug, the receptacle must be changed out by a qualifi ed elec-
trician.
• Turn the dehumidifi er OFF and unplug it before cleaning.
• For your safety, do not store or use combustible materials, gasoline or other fl ammable vapors or
liquids in the vicinity of this or any other appliance.
• All dehumidifi ers contain refrigerants, which under federal law must be removed prior to product
disposal. If you are disposing of a product with refrigerants, check with the company handling dis-
posal about what to do.
• Check for local regulatory compliance regarding the approved and safe disposal of this appliance.
• Do not use outdoors.
• This dehumidifi er is intended for indoor residential applications only. This dehumidifi er should not
be used for commercial or industrial applications.

Installation Instructions
• Soft touch (Electronic) Control Key Pads
• Auto-Sensing Humidity Control
• Adjustable Humidity Settings (35% - 85%)
• 2 Fan Speed Settings (Turbo/Normal)
• Delay Start Protection (Compressor)
• Auto-Defrost (De-Icer)
• Full Bucket Indicator Light
• Easy Roll Castors (4)
• Front Mounted Water Tank (Removable)
• Direct Drain Option (Hose not included)
• Quiet Operation
• Removable Air Filter
LOCATION
FEATURES
4
• Select a suitable location, making sure you have easy access to an electrical outlet
• Make sure there are no obstructions restricting airfl ow through the front air intake grill. Maintain a
minimum clearance of at least 20 cm (8”) between adjacent walls and the back of the unit, to allow
for proper air circulation and maximum effi ciency. To achieve maximum operating effi ciency from
your dehumidifi er, the recommended (room ambient) operating temperatures should be between
5°C (41°F) and 35°C (95°F).
• To maintain effi ciency, the dehumidifi er must be operated in an enclosed area. Keep all doors and
windows closed.
• Do not use this unit outdoors. This dehumidifer is intended for indoor residential applications only.
This dehumidifi er should not be used for commercial or industrial applications.
• Place the dehumidifi er on a smooth, level fl oor strong enough to support the unit with a full bucket
of water.
• Place the unit where it has access to an electrical outlet.
• This unit has 4 castors which can move freely. Do not force castors to move over carpet, and re-
frain from moving the unit with water in the bucket (the unit may tip over and spill water).
• Protect wood fl oors from possible spillage or scratches when moving unit.
• Remove accessories and store them in a safe place.

Operating Instructions
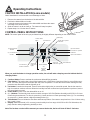
NOTE: The control panel of the unit you purchased may be slightly different depending on the model number.
When you push the button to change operation modes, the unit will make a beeping sound to indicate that it is
changing modes.
1. Continue Button: Press to activate the continuous dehumidifying operation.
2. Filter Button: This product has a check fi lter feature that is a reminder to clean the air fi lter for more effi cient oper-
ation. The check fi lter light will illuminate after 250 hours of operation. To reset this function after cleaning the fi lter,
press the reset fi lter button and the light will go off.
3. Fan button: Controls the fan speed. Press to select either high (turbo) or normal fan speed. Set the fan control to
high for maximum moisture removal. When the humidity has been reduced and quiet operation is preferred, set the
fan control back to normal.
4. Power Button: Press to turn the dehumidifi er on or off.
5. (+ / -) Buttons: The humidity level can be set within a range of 35% RH (Relative Humidity) to 85% RH in 5% incre-
ments using these buttons. For drier air, press the (-) button and set to a lower percentage value (%). For more damp
air, press the (+) button and set a higher percentage value (%).
6. Timer Button: Press to initiate the auto-start and auto-stop feature. Set a start or stop time from 0.0 to 24 hours using
the (+) and (-) keys.
7. Display: Shows the actual (± 5% accuracy) room humidity level in a range of 30% RH to 90% RH. Otherwise, dis-
plays selection when programming humidity or timer.
Note: The fan does not shut off the moment you remove the bucket, the fan will shut off after 2-3 minutes.
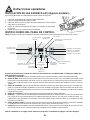
CONTROL PANEL INSTRUCTIONS
CASTOR INSTALLATION (some models)
Castor installation is recommended to avoid damage to fl oors.
1. Remove the castors from the bucket of the dehumidifi er.
2. Position the dehumidifi er on its side.
3. Locate the arrow on the bottom of the dehumidifi er and insert the castor
according to the arrow direction.
4. Slide the castor in as far as it will go. The castor will snap into place.
5. Repeat steps 1 to 4 for the other 3 castors.
5
(1) Continuous
mode
(2) Reset filter
button
Check filter
light
Bucket full
Continuous
mode indicator
(5)
Up and
down
buttons
Auto defrost
Normal fan speed
indicator
Turbo fan speed
indicator
(3) Fan button
(4) Power button
(6)
Timer button
(7)Display
Auto on
indicator
light
Auto off
indicator light

Operating Instructions
INDICATOR LIGHT FUNCTIONS
TIMER FUNCTIONS
Follow these steps to program the Auto-on or Auto-off feature using the control panel:
Auto-off:
1. When the unit is on, and the TIMER button is pressed, the timer off indicator light illuminates to indicate that the auto-
off program is initiated.
2. Press or hold the UP or DOWN button to change the ‘Auto’ time by 0.5 hour increments, up to 10 hours (then at 1 hour
increments up to 24 hours). The unit control will count down the time remaining until start.
3. Within 5 seconds of setting auto-off time, press the TIMER button again to complete the auto-off program.
Auto-on:
4. When the unit is off, and the TIMER button is pressed, the auto-on program is initiated. Set the auto-on time as in step
2 above. Within 5 seconds of setting auto-on time, press the TIMER button again to complete the auto-on program.
NOTE: When the auto-on and auto-off times are set, within the same program sequence, TIMER ON OFF indicator lights
illuminate indicating that both ON and OFF times are now programmed.
NOTE: Turning the unit ON or OFF at any time, changing the on/off timer setting to 0.0, and a P2 error code will cancel the
Auto-on/off functions.
WATER TANK OPERATION
The water tank holds accumulated condensed water and, by means of a safety switch, controls both the water level and
operation of the dehumidifi cation process.
When the water tank is full and/or accidentally displaced inside the cabinet, the fl oat switch actuator (inside the tank)
breaks contact with the safety switch. This condition results in the immediate shut down of the compressor and fan motor
system, preventing moisture from being condensed.
Note: On some models, the fan will continue to run for approximately 2-3 minutes after the unit has stopped and
the bucket has been removed. As a result, water may drip from the tray onto the base of the unit, and then onto
the fl oor. Please ensure that you protect your wood and carpet from such leakage.
IMPORTANT
Never tamper with or attempt to defeat the water level (safety) fl oat switch system. Proper installation
of the water tank is crucial in maintaining reliable dehumidifi er operation.
6
AS - Humidity sensor error -- Unplug the unit and plug it back in. If error repeats, call for service.
ES - Temperature sensor error -- Unplug the unit and plug it back in. If error repeats, call for service.
P2 - Bucket is full or the bucket is not in correct position -- Empty the bucket and/or adjust it to the proper position.
EC - Please ensure that the room ambient temperature matches the recommended operating temperature for the unit,
5°C (41°F) - 35°C (95°F). If the temperature is within this range, call for service.
ERROR CODES
Note: Depending on the humidity conditions of the surrounding environment, the dehumidifi er may not start automatically
when the “on/off” button is pressed (see dehumidifying mode instructions for details).
Memory Setting: Each time the unit is disconnected / re-connected and/or in the event of a power failure, the electronic
circuit board automatically defaults to the last program setting that was used. After the unit has stopped, it may take sev-
eral minutes before operating conditions resume.
Auto-restart: If the unit shuts off unexpectedly due to a power outage, it will restart with the previous function settings
automatically when the power resumes.
Bucket Full Indicator Light: When the bucket is full and/or incorrectly positioned inside the cabinet, the bucket full light
will turn on and remain on until the bucket is emptied and/or correctly re-positioned. This condition will result in the imme-
diate shut down of the dehumidifying system (both compressor and fan motor operation are terminated). This is a safety
feature. When the bucket is emptied and/or correctly re-positioned, the dehumidifi er will resume operation automatically.
NOTE: It may take several minutes before operating conditions resume.
Auto-defrost: When frost builds on the evaporator coils, the compressor will cycle off and the fan will continue to run until
the frost disappears.

Operating Instructions
7
DEHUMIDIFYING
Dehumidifying is a means of removing moisture from the air. A dehumidifi er will help to protect your home and valued
possessions from damage due to swelling caused by moisture in the air. Essentially a dehumidifi er removes moisture from
air as moist air passes over a dehumidifying (evaporator) coil. Moisture is condensed on the evaporator coil, drained, and
collected inside an internal (removable) water tank located at the front of the unit. The exhausted air being returned into
the room environment is elevated several degrees causing the surrounding air temperature to increase (slightly). This
process also contributes to lowering the relative humidity of the surrounding air.
Note: For optimal performance, ensure that the unit is set at least 10% lower than the relative humidity level. It is normal
for the humidity to vary by 5% above or below the set humidity. It is recommended that in normal conditions, the humidity
be set at 40-45%.
DEHUMIDIFYING MODE INSTRUCTIONS
When the unit is fi rst connected to the electrical outlet, the (green) power light will not light up until the “on/off” button is
pressed. When the “on/off” button is pressed, the power light turns on and the dehumidifi er automatically defaults to:
Display: Current ambient room humidity (RH%)
Humidity Setting: 40% RH
Fan Speed: High.
Note: Depending on humidity conditions of the surrounding environment, the dehumidifi er may not start automatically
under the default setting (this is an indication that the humidity level of the surrounding environment is lower than the
“default” setting of 40% RH). Therefore, it may be necessary to scroll through each of the different dehumidifi er settings
35%-55% until the “humidistat” (sensor) recognizes conditions that will allow the unit to operate.
Dehumidifying Mode Selection:
1. The unit enters dehumidify mode when the ON/OFF button is pressed.
2a. Press the + / - buttons to select a desired RH operating value (35%-85%).
OR
2b. Press the continuous button. When continuous mode is selected, the humidistat (sensor) will be by-passed and the
compressor will operate non-stop regardless of humidity conditions.
Fan Speed Selection:
3. You can choose a fan speed (normal/turbo) using the keypad. The speed you select is identifi ed by the (illuminated)
indicator light located directly above the selection made.

Your dehumidifi er features a removable Air Filter. This fi lter is located at the front of the unit (behind the air intake grill)
directly above the water tank compartment. The air fi lter plays an important role in helping to reduce (minimize) dust/
dirt particles from the surrounding environment. A blocked/clogged air fi lter reduces air intake, impacting negatively on
operating effi ciency. To maintain maximum operating effi ciency, the fi lter must be checked and cleaned regularly (every 2
weeks). More frequent cleaning may be required depending upon indoor air quality.
IMPORTANT: Never operate the unit without the air fi lter in place.
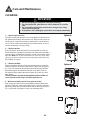
AIR FILTER REMOVAL:
1. There are two options depending on your model. Option A: Grasp the fi lter handle, and pull the fi lter out. The fi lter will
slide out easily (Fig. 2). Option B: Remove the bucket and pull the fi lter downwards.
2. Clean the fi lter thoroughly using a vacuum cleaner or wash using lukewarm water and mild detergent. Dry thoroughly
before re-installing.
3. To re-install the air fi lter, slide the fi lter back inside the tracks and push inward.
4. Press the reset fi lter button.
AIR FILTER
8
Operating Instructions
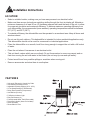
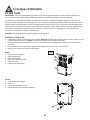
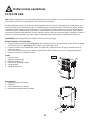
Front:
1. Control Panel
2. Air Intake Grill
3. Air Outlet Grill
4. Air Filter (behind the grill)
5. Water Bucket
6. Handle (both sides)
Back:
1. Drain Hose Outlet
2. Castor
3. Power Cord and Plug
4. Band (used only when storing
unit)
Note: All the pictures in the manual are for explanatory purposes only. The actual shape of the unit you purchased may be
slightly different, but the operation and functions are the same.
Fig.2

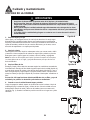
There are two ways to remove collected water:
1. Use the bucket
When the unit is off and the bucket is full, the unit will beep 8 times, the
bucket full indicator light will fl ash, and the digital display shows P2.
When the unit is on and the bucket is full, the compressor turns off and
the fan turns off after drying the water off the condenser for 30 seconds.
The unit will then beep 8 times and the bucket full indicator light will
fl ash, and the digital display shows P2.
To empty the full bucket, slowly pull out the bucket. Grip the left and
right handles securely, and carefully pull it straight out so water does
not spill. Do not put the tank on the fl oor because the bottom of the
bucket is uneven. Otherwise the bucket will fall and cause water to spill.
Discard the water and return the bucket to the unit. The bucket must
be placed and properly positioned for the dehumidifi er to operate. The
machine will restart when the bucket is restored in its correct position.
Note: When you remove the bucket, do not touch any parts inside of
the unit. Doing so may damage the product. Be sure to push the bucket
gently all the way into the unit. Banging the bucket against anything or
failing to push it in securely may cause the unit not to operate. When
you remove the bucket, if there is some water inside the unit you must
dry it. The power button fl ashes when the bucket is not properly in
place.
2. Continuous draining:
Water can be automatically emptied into a fl oor drain by attaching the
unit to an ID ≥ 5/16” water hose with a OD:M=1 male threaded end (not
included, a standard garden hose works well). Install the drain hose
onto the adaptor A (see B1). The adaptor is found in the accessory bag
located in the bucket. Remove the plastic cover from the back drain
outlet of the unit and set it aside. Remove the bucket, then insert the
drain hose through the drain outlet of the unit and securely press it into
the connector on the front of the unit (see B2 and B3).
Tighten the adaptor A and the unit by using two screws (found in the
bucket). Install the female threaded end of the water hose into the adap-
tor A (see B4), then lead the water hose to the fl oor drain or a suitable
drainage facility. Make sure the hose is secure so there are no leaks. Di-
rect the hose toward the drain, making sure that there are no kinks that
will stop the water from fl owing. Place the end of the hose into the drain
and make sure the end of the hose is level or declining to let the water
fl ow smoothly. Place the bucket back in the unit and make sure that it is
located correctly. Select the desired humidity setting and fan speed on
the unit for continuous draining to start.
Accessories (for continuous drain):
Drain hose (1 pc) Adaptor A (1 pc) Screw (2 pc)
Operating Instructions
REMOVING COLLECTED WATER
A1. Pull the bucket out a little
A2. Hold both sides of the bucket with
even strength, and pull it out from the
unit. Pour the water out.
B1.
B2.
B3.
B4.
Drain hose
Adaptor A
Plastic cover
Drain hose
subassembly
Connector
Drain hose
Water hose
Female thread
end
9

Care and Maintenance
IMPORTANT
1. Be sure to unplug the unit before cleaning or servicing.
2. Do not use gasoline, paint thinner or other chemicals to clean the
unit.
3. Do not wash the unit directly under a tap or using a hose. It may
cause electrical damage.
4. If the power cord is damaged, contact the service depot immediately.
CLEANING
10
1. Clean the grill and case
Use water and a mild detergent. Do not use bleach or abrasives. Do
not splash water directly onto the main unit. Doing so may cause an
electric shock, cause the insulation to deteriorate, or cause the unit
to rust. The air intake and outlet grills become dirty easily, so use a
vacuum attachment or brush to clean.
2. Clean the bucket
Every few weeks, clean the bucket to prevent growth of mold, mil-
dew and bacteria. Partially fi ll the bucket with clean water and add a
small amount of mild detergent. Swish it around in the bucket, empty
and rinse. Note: Do not use a dishwasher to clean the bucket. After
cleaning, the bucket must be placed and properly positioned for the
dehumidifi er to operate.
3. Clean the air fi lter
Remove and clean the fi lter every two weeks based on normal op-
erating conditions. Remove the fi lter from the top of the unit (option
A), or you can choose to remove the bucket and then pull the fi lter
downwards (option B). Wash the fi lter with clean water, then dry.
Re-install the fi lter, replace the bucket (option B). Press the “reset
fi lter” button.
Caution: DO NOT operate the dehumidifi er without a fi lter be-
cause dirt and lint will clog it and affect performance.
4. When not using the unit for long periods of time
After turning the unit off, wait one day before emptying the bucket.
Clean the main unit, water bucket and air fi lter. Cover the unit with a
plastic bag. Wrap the cord and bundle it with the band (as shown in
Fig. 3). Store the unit upright in a dry, well ventilated place.
Option A
Option B
Fig.3

Troubleshooting
Tel: 1-800-26 - (1-800-263-2629)
PROBLEM POSSIBLE CAUSE SOLUTION
Dehumidifi er does
not start
• The dehumidifi er is unplugged
• The fuse is blown/circuit break-
er is tripped
• Dehumidifi er has reached its
preset level or bucket is full
• Bucket is not in the proper
position
• Power failure
• Make sure the plug is pushed completely into the outlet
• Check the house fuse/circuit breaker box and replace
the fuse or reset the breaker
• The unit turns off automatically when either condition
occurs. Change to a lower setting or empty the bucket
and replace properly
• The bucket must be in place and securely seated for the
unit to operate.
• There is a protective time delay (up to 3 minutes) to
prevent tripping of the compressor overload. For this
reason, the unit may not start normally for 3 minutes
after it is turned back on.
Dehumidifi er does
not dry the air as it
should
• Did not allow enough time to
remove the moisture
• Airfl ow is restricted
• Dirty fi lter
• The humidity control may not
be set low enough
• Doors and windows may not
be closed tightly
• Clothes dryer may be blowing
moisture-laden air into the
room
• Room temperature is too low
• When fi rst installed, allow at least 24 hours to maintain
the desired dryness
• Make sure there are no curtains, blinds or furniture
blocking the front or back of the dehumidifi er. See the
“Location” section.
• See the “Air fi lter” section
• For drier air, press the - button and set to a lower per-
cent value (%)
• Check that all doors, windows and other openings are
securely closed
• Install the dehumidifi er away from the dryer. The dryer
should be vented to the outside.
• Moisture removal is best at higher room temperatures.
Lower room temperatures will reduce the moisture
removal rate. Modes are designed to be operated at
temperatures above 5°C (41°F)
Dehumidifi er runs
too much but does
not collect water
• Need to reset controller • Set to 40% RH. Allow bucket to fi ll and then empty buck-
et. Adjust controller to desired % RH.
Dehumidifer runs
too much collects
water
• Area to be dehumidifed is too
large
• Doors and windows are open
• The capacity of your dehumidifi er may not be adequate
• Close all doors and windows
Frost appears on
the coils
• Unit has been recently turned
on, or room temperature is
below 5°C (41°F)
• This is normal. Frost will usually disappear within 60
minutes. See the “Defrost” section
Controls cannot be
set
• The compressor will turn off
and the fan will automatically
continue to run for approx. 3
minutes at a fi xed setting
• This is normal. Wait approximately 3 minutes and set
the fan as desired.
Fan noise • Air is moving through the de-
humidifi
er
• This is normal
Water on fl oor • Hose connection may be loose
• Bucket used to collect water,
but the hose is attached
• Check the hose connection. See “Continuous Drain”
section
• Disconnect the hose if using the bucket to collect water,
see “Continuous Drain” section.
11

LIMITED IN-HOME APPLIANCE WARRANTY
This quality product is warranted to be free from manufacturer’s defects in material and workmanship, provided that the unit is used under the normal operating
conditions intended by the manufacturer.
This warranty is available only to the person to whom the unit was originally sold by Danby Products Limited (Canada) or Danby Products Inc. (U.S.A.) (hereafter
“Danby”) or by an authorized distributor of Danby, and is non-transferable.
TERMS OF WARRANTY
Plastic parts, are warranted for thirty (30) days only from purchase date, with no extensions provided.
First Year
During the rst twelve (12) months, any functional parts of this product found to be defective, will be repaired or replaced, at warrantor’s
option, at no charge to the ORIGINAL purchaser.
To obtain
Danby reserves the right to limit the boundaries of “In Home Service” to the proximity of an Authorized Service Depot. Any app liance
Service
requiring service outside the limited boundaries of “In Home Service” , it will be the consumer’s responsibility to transport the appliance (at
their own expense) to the original retailer (point of purchase) or a service depot for repair. See “Boundaries of In Home Serv ice” below.
Contact your dealer from whom your unit was purchased, or contact your nearest authorized Danby service depot, where service
must be performed by a qualied service technician.
If service is performed on the units by anyone other than an authorized service depot, or the unit is used for commercial appli cation, all
obligations of Danby under this warranty shall be void.
Boundaries of
If the appliance is installed in a location that is 100 kilometers (62 miles) or more from the nearest service center your unit must be
In Home Service
delivered to the nearest authorized Danby Service Depot, as service must only be performed by a technician qualied and certif ied for
warranty service by Danby. Transportation charges to and from the service location are not protected by this warranty and are t he
responsibility of the purchaser.
Nothing within this warranty shall imply that Danby will be responsible or liable for any spoilage or damage to food or other c ontents of this appliance, whether due
to any defect of the appliance, or its use, whether proper or improper.
EXCLUSIONS
Save as herein provided, Danby, there are no other warranties, conditions, representations or guarantees, express or implied, m ade or intended by Danby or its
authorized distributors and all other warranties, conditions, representations or guarantees, including any warranties, conditio ns, representations or guarantees
under any Sale of Goods Act or like legislation or statue is hereby expressly excluded. Save as herein provided, Danby shall no t be responsible for any damages
to persons or property, including the unit itself, howsoever caused or any consequential damages arising from the malfunction o f the unit and by the purchase of
the unit, the purchaser does hereby agree to indemnify and hold harmless Danby from any claim for damages to persons or propert y caused by the unit.
GENERAL PROVISIONS
No warranty or insurance herein contained or set out shall apply when damage or repair is caused by any of the following:
1) Power failure.
2) Damage in transit or when moving the appliance.
3) Improper power supply such as low voltage, defective house wiring or inadequate fuses.
4) Accident, alteration, abuse or misuse of the appliance such as inadequate air circulation in the room or abnormal operating con ditions
(extremely high or low room temperature).
5) Use for commercial or industrial purposes (ie. If the appliance is not installed in a domestic residence).
6) Fire, water damage, theft, war, riot, hostility, acts of God such as hurricanes, oods etc.
7) Service calls resulting in customer education.
8) Improper Installation (ie. Building-in of a free standing appliance or using an appliance outdoors that is not approved for out door application).
Proof of purchase date will be required for warranty claims; so, please retain bills of sale. In the event warranty service is required, present this document to our
AUTHORIZED SERVICE DEPOT.
Danby Products Limited
PO Box 1778, Guelph, Ontario, Canada N1H 6Z9
Telephone: (519) 837-0920 FAX: (519) 837-0449
Danby Products Inc.
PO Box 669, Findlay, Ohio, U.S.A. 45840
Telephone: (419) 425-8627 FAX: (419) 425-8629
04/09
1-800-263-2629
Warranty Service
In-home
If the appliance is installed in a location that is 100 kilometers (62 miles) or more from the nearest
service center your unit must be delivered to the nearest authorized Danby Service Depot, as service
must only be performed by a technician qualified and certified for warranty service by Danby. Transpor-
tation charges to and from the service location are not protected by this warranty and are the responsi-
bility of the purchaser.
During the first twenty four (24) months, any functional parts of this product found to be defective, will be
repaired or replaced, at warrantor’s option, at no charge to the ORIGINAL purchaser.
Danby reserves the right to limit the boundaries of “In Home Service” to the proximity of an Authorized
Service Depot. Any appliance requiring service outside the limited boundaries of “In Home Service” ,it
will be the consumer’s responsibility to transport the appliance (at their own expense) to the original
retailer (point of purchase) or a service depot for repair. See “Boundaries of In Home Service” below.
Contact your dealer from whom your unit was purchased, or contact your nearest authorized Danby
service depot, where service must be performed by a qualified service technician. If service is performed
on the units by anyone other than an authorized service depot, or the unit is used for commercial
application, all obligations of Danby under this warranty shall be void.
First 24 months
To obtain
service
Boundaries of
in-home service
LIMITED CARRY-IN APPLIANCE WARRANTY
This quality product is warranted to be free from manufacturer’s defects in material and workmanship, provided that the unit is
used under the normal operating conditions intended by the manufacturer.
This warranty is available only to the person to whom the unit was originally sold by Danby Products Limited (Canada) or
Danby Products Inc. (U.S.A.) (hereafter “Danby”) or by an authorized distributor of Danby, and is non-transferable.
TERMS OF WARRANTY
Plastic parts, are warranted for thirty (30) days only from purchase date, with no extensions provided.
Nothing within this warranty shall imply that Danby will be responsible or liable for any spoilage or damage to food or other
contents of this appliance, whether due to any defect of the appliance, or its use, whether proper or improper.
EXCLUSIONS
Save as herein provided, by Danby, there are no other warranties, conditions, representations or guarantees, express or
implied, made or intended by Danby or its authorized distributors and all other warranties, conditions, representations or
guarantees, including any warranties, conditions, representations or guarantees under any Sale of Goods Act or like legislation
or statute is hereby expressly excluded. Save as herein provided, Danby shall not be responsible for any damages to persons
or property, including the unit itself, howsoever caused or any consequential damages arising from the malfunction of the unit
and by the purchase of the unit, the purchaser does hereby agree to indemnify and hold harmless Danby from any claim for
damages to persons or property caused by the unit.
GENERAL PROVISIONS
No warranty or insurance herein contained or set out shall apply when damage or repair is caused by any of the following:
1) Power failure.
2) Damage in transit or when moving the appliance.
3) Improper power supply such as low voltage, defective house wiring or inadequate fuses.
4) Accident, alteration, abuse or misuse of the appliance such as inadequate air circulation in the room or abnormal operating
conditions (extremely high or low room temperature).
5) Use for commercial or industrial purposes (ie. If the appliance is not installed in a domestic residence).
6) Fire, water damage, theft, war, riot, hostility, acts of God such as hurricanes, floods etc.
7) Service calls resulting in customer education.
8) Improper Installation (ie. Building-in of a free standing appliance or using an appliance outdoors that is not approved for
outdoor application). Proof of purchase date will be required for warranty claims; so, please retain bills of sale. In the event
warranty service is required, present this document to our AUTHORIZED SERVICE DEPOT.
Warranty Service
Carry-In
Danby Products Limited
PO Box 1778, Guelph, Ontario, Canada N1H 6Z9
Telephone: (519) 837-0920 FAX: (519) 837-0449
Danby Products Inc.
PO Box 669, Findlay, Ohio, U.S.A. 45840
Telephone: (419) 425-8627 FAX: (419) 425-8629
1-800-263-2629
07/14

13
Bienvenue
Bienvenue dans la famille Danby. Nous sommes fiers de la qualité de nos produits et nous croyons en le service fiable.
Nous vous suggérons de lire ce manuel d’utilisation avant de brancher vontre nouvel appareil car il contient des informations
importantes sur l’utilisation, la sécurité, le dépannage at la maintenance, afin d’assurer la fiabilité at la longévité de votre
appareil. Visitez www.Danby.com pour accéder aux outils d’autoservice, aux FAQ et bien plus encore. Pour obtenir de l’aide
supplémentaire, composez le 1-800-263-2629.
Veuillez noter les informations ci-dessous; ces renseignements seront nécessaires si votre appareil a besoin
d’entretien ou pour les demandes de renseignements généraux. Pour bénéficier d’une opération de mainte-
nance ou de dépannage, le reçu original sera exigé.
Numéro de modèle :
Numéro de serie :
Date d’achat :
BESOIN D’ASSISTANCE ?
Veuillez trouver quelques conseils avant de faire appel à nos
services, cela nous aidera à mieux vous servir :
Lisez ce guide :
Il comprend des instructions pour l’utilisation et l’entretien
adapté de votre appareil.
Si votre nouvel appareil est endommagé :
Contactez immédiatement le revendeur (ou le fabricant).
Gagnez du temps et de l’argent :
Avant de faire appel à nos services, consultez à nouveau
la section « Dépannage ». Cette section vous aidera à
résoudre des problèmes courants.
Si une réparation est nécessaire, ne vous inquiétez pas, la
solution est au bout du fil.
1-800-26-
(1-800-263-2629)

14
Consignes de sécurité importantes
LISEZ TOUTE L’INFORMATION DE SÉCURITÉ AVANT UTILISATION
REMARQUE
Les consignes d'AVERTISSEMENT publiées dans ce manuel ne sont pas supposées couvrir toutes les conditions et situ-
ations éventuelles qui peuvent se produire. La ou les personnes qui installent, entretiennent ou utilisent l’appareil doivent
faire preuve de précaution et de prudence. Si vous n’installez pas, n’entretenez pas ou n’utilisez pas l’appareil conformé-
ment aux instructions du fabricant, il peut se produire des situations présentant des risques de blessures corporelles, de
dommages à l’unité ou autres dommages matériels. Communiquez avec votre concessionnaire, votre représentant ou le
fabricant en cas de problèmes ou de conditions que vous ne comprenez pas bien. Pour parler au service à la clientèle
de Danby, composez le (1-800-263-2629).
Afi n de réduire le risque d'incendie, de choc électrique ou de blessures, tout le câblage et toute la mise à la masse
doivent se conformer à la dernière édition des codes d'électricité locaux et nationaux.
• Il incombe au client de faire vérifi er le câblage et les fusibles par un électricien qualifi é pour s'assurer que l'alimentation
électrique disponible est appropriée.
• Cet appareil est conçu pour fonctionner avec un circuit bien mis à la masse, à branchement séparé, polarisé, à trois fi ls
de 120 volts et 60 hertz (courant alternatif). Ce circuit doit être protégé par un fusible de 15 ampères, un fusible équivalent
ou un coupe-circuit. La fi che à trois broches mise à la masse sur le cordon d'alimentation doit être branchée directement
dans la prise susmentionnée de puissance nominale 110/120 V (c.a.).
• Ne branchez pas le déshumidifi cateur à une prise femelle multiple qui sera également utilisée pour d'autres appareils
électriques.
POUR VOTRE SÉCURITÉ : Afi n de réduire le risque d'incendie ou d'explosion, n'entreposez pas ou n'utilisez pas
d'essence ou d'autres vapeurs ou de liquides infl ammables à proximité de cet appareil.
ALIMENTATION
ÉLECTRIQUE
Le mauvais branchement d'un conducteur mis à la masse d'équipement peut résulter dans un risque de choc électrique.
Vérifi ez avec un électricien ou un technicien qualifi é si vous n'êtes pas certain que les prises de vos appareils sont bien
mises à la masse.
Cet appareil doit être mis à la masse. En cas de mauvais fonctionnement ou de panne, la mise à la masse réduira le
risque de choc électrique en offrant un circuit avec le moins de résistance au courant électrique. Cet appareil est équipé
d'un cordon électrique avec un conducteur et une fi che à trois broches mis à la masse. La fi che doit être branchée dans
une prise bien installée et mise à la masse conformément aux codes et ordonnances locaux.
• Ne modifi ez pas la fi che livrée avec cet appareil. Si elle ne s'adapte pas à la prise, faites installer une prise adéquate par
un technicien qualifi é.
• Si l'alimentation électrique de votre maison ne satisfait pas aux spécifi cations susmentionnées ou si vous n'êtes
pas certain que votre maison a une mise à la terre effi cace, demandez à un technicien qualifi é ou à une compagnie
d'électricité de le vérifi er et de rectifi er tous les problèmes.
GARDEZ CES INSTRUCTIONS
MISE À LA TERRE
CONSIGNES

Consignes de sécurité importantes
LISEZ TOUTE L’INFORMATION DE SÉCURITÉ AVANT UTILISATION
15
MESURES DE SÉCURITÉ
Lors de l’utilisation de ce déshumidifi cateur, suivez toujours les mesures de sécurité de base, y compris les suivantes :
• N’utilisez cet appareil qu’aux fi ns pour lesquelles il est conçu, tel que décrit dans ce guide d’utilisation.
• Ce déshumidifi cateur doit être installé et mis à la terre correctement, tel que décrit dans ce guide, avant d’être utilisé.
• Ne faites jamais fonctionner ce déshumidifi cateur à un endroit où de l’eau stagnante est susceptible de s’accumuler.
Dans une telle situation, pour votre sécurité, débranchez l’alimentation avant de marcher dans l’eau.
• Ne débranchez jamais votre déshumidifi cateur en tirant sur le cordon d’alimentation. Tenez toujours la fi che fermement
et tirez bien droit pour la retirer de la prise.
• Remplacez immédiatement tous les cordons d’alimentation effi lochés ou qui présentent d’autres dommages. Un
cordon d’alimentation endommagé doit être remplacé par un nouveau cordon obtenu auprès du fabricant; il ne doit
pas être réparé. N’utilisez pas un cordon qui présente des fi ssures ou des dommages causés par l’abrasion, soit sur le
cordon lui-même, soit à l’extrémité de la fi che ou du raccord.
• Si la prise ne correspond pas à la fi che, la prise doit être changée par un électricien qualifi é.
• Éteignez le déshumidifi cateur et débranchez-le avant de le nettoyer.
• Pour votre sécurité, n’entreposez et n’utilisez pas de matières combustibles, d’essence ou d’autres liquides ou vapeurs
infl ammables à proximité de cet appareil ou de tout autre appareil.
• Tous les déshumidifi cateurs contiennent des fl uides frigorigènes qui, en vertu des lois fédérales, doivent être enlevés
avant que le produit soit mis au rebut. Si vous vous débarrassez d’un produit contenant des fl uides frigorigènes,
demandez conseil à l’entreprise qui s’occupe de la mise au rebut pour connaître la marche à suivre. Vérifi ez le respect
des réglementations locales concernant la mise au rebut approuvée et sécurisée de cet appareil.
• N’utilisez pas cet appareil à l’extérieur.
• Le déshumidifi cateur est uniquement conçu pour des utilisations résidentielles à l’intérieur. Ce déshumidifi cateur ne doit
pas servir à des utilisations commerciales ou industrielles.
GARDEZ CES INSTRUCTIONS

Consignes d’utilisation
• Clavier de commande tactile (éléctronique)
• Auto-détection de l’hygrométrie ambiante
• Réglage selon l’hygrométrie ambiante (35%-85%)
• Ventilateur à 2 vitesses (turbo/normal)
• Mise en marche temporisée- protection (compresseur)
• Auto-Dégivrage
• Indicateur de réservoir plein
• Roulettes pour déplacement facile (4)
• Réservoir d’eau frontal (amovible)
• Option de drainage direct (tuyau non compris)
• Fonctionnement silencieux
• Filtre à air amovible
• Choisissez un emplacement approprié et assurez-vous d’avoir accès à une prise électrique (évitez d’utiliser des rallong-
es électriques).
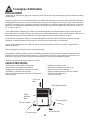
• Assurez-vous qu’il n’y a aucun obstacle limitant la circulation d’air passant par la grille frontale d’entrée d’air. Maintenez
un dégagement minimal d’au moins 20 centimètres (8 po) entre les murs adjacents et le dos de l’unité, afi n de permettre
une bonne circulation d’air et une effi cience optimale. Afi n d’obtenir un rendement opérationnel optimal pour votre déshu-
midifi cateur, les températures (ambiantes de la pièce) de fonctionnement recommandées devraient s’élever à entre 5 °C
(41 °F) et 35 °C (95 °F).
• Il est important de se rappeler que l’effi cience d’un déshumidifi cateur sera affectée/infl uencée par le taux auquel on
laisse infi ltrer de l’air nouveau et humide (humidité) dans le même espace/la même zone. Afi n de maintenir l’effi cience, le
déshumidifi cateur doit fonctionner dans une zone close. Gardez toutes les portes et fenêtres fermées.
• N’utilisez pas cet appareil à l’extérieur. Ce déshumidifi cateur ne doit être utilisé qu’à l’intérieur à des fi ns d’usage
résidentiel. Ce déshumidifi cateur ne doit pas être utilisé à des fi ns commerciales ou industrielles.
• Mettez le déshumidifi cateur sur un plancher lisse à niveau suffi samment robuste pour soutenir l’appareil avec un
réservoir d’eau plein.
• Placez l’appareil où vous avez accès à une prise électrique
• Cet appareil a quatre roulettes qui peuvent se déplacer librement. Ne forcez pas les roulettes à se déplacer sur la
moquette et évitez de déplacer l’appareil lorsqu’il y a de l’eau dans le réservoir (il peut basculer et renverser l’eau).
Protégez les sols en bois contre les risques de déversements ou de rayures en déplaçant l’appareil.
• Enlevez d’accessoires et rangez-le dans un lieu sûr.
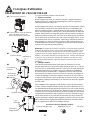
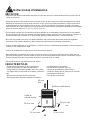
EMPLACEMENT
CARACTÉRISTIQUES
16
40 cm ou
plus
Grille de sortie d'air
Grille
d'entrée
d'air
20 cm ou plus
20 cm ou plus
20 cm ou plus
20 cm ou plus

Consignes d’utilisation
17
*REMARQUE : Le panneau de commande de l’appareil que vous avez acheté peut être légèrement différent en fonction
du numéro de modèle.
Lorsque vous poussez sur le bouton pour modifi er les modes de fonctionnement, l’appareil émettra un signal
sonore pour indiquer un changement de modes.
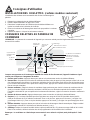
1. Bouton mode continu : Appuyez dessus pour activer le fonctionnement continu du déshumidifi cateur.
2. Bouton fi ltre : Ce produit a une fonction de vérifi cation du fi ltre à titre de rappel qu’il faut nettoyer le fi ltre à air en vue
d’un fonctionnement plus effi cace. Le témoin de vérifi cation du fi ltre s’illuminera après 250 heures de fonctionnement.
Pour remettre cette fonction à zéro après avoir nettoyé le fi ltre, appuyez sur le bouton de remise à zéro de la fonction
fi ltre et le témoin s’éteindra.
3. Bouton ventilateur : Régule la vitesse du ventilateur. Appuyez dessus pour choisir la vitesse du ventilateur élevée
(turbo) ou normale. Réglez la vitesse du ventilateur à élevée pour une élimination optimale de l’humidité. Lorsque
l’humidité a été réduite et que vous préférez le fonctionnement silencieux, réglez à nouveau la vitesse du ventilateur à
nornal.
4. Bouton de mise en marche : Appuyez dessus pour mettre en marche ou éteindre le déshumidifi cateur.
5. Boutons (+ / -) : Le niveau d’humidité pour être réglé dans une marge de 35% d’HR (humidité relative) à 85%
d’HR par incréments de 5% à l’aide de ces boutons. Pour un air plus sec, appuyez sur le bouton (-) et réglez à un
pourcentage inférieur (%). Pour un air plus humide, appuyez sur le bouton (+) et réglez à un pourcentage plus élevé
(%).
6. Bouton minuterie : Appuyez dessus pour activer la fonction de démarrage et d’arrêt automatiques. Réglez un délai
de démarrage et d’arrêt de 0 à 24 heures à l’aide des touches (+) et (-).
7. Affi chage : Indique le niveau d’humidité réel de la pièce (exactitude de ± 5%) dans une marge d’HR de 30% à 90%.
Dans le cas contraire, affi che la sélection lors de la programmation de l’humidité ou de la minuterie.
Remarque : Le ventilateur ne s’éteindra pas au moment où vous retirez le récipient, mais plutôt après 2-3 min-
utes.
CONSIGNES RELATIVES AU PANNEAU DE
COMMANDE
INSTALLATION DES ROULETTES (certains modèles seulement)
L’Installation des roulettes est recommandée afi n d’éviter d’endommager le
plancher.
1. Dégager les roulettes du bac du déshumidifi cateur.
2. Placer le déshumidifi cateur en appui sur le côté.
3. Déterminer l’emplacement de la fl èche au bas du déshumidifi cateur et
insérer la roulette selon la direction de la fl èche.
4. Enfoncer la roulette en la faisant glisser aussi loin que possible. La roulette
s’emboîte.
5. Répéter les étapes 1 à 4 pour les trois autres roulettes.
(1) Mode
continu
(2) Bouton de
réinitialisation
du filtre
Témoin de
vérification
du filtre
Témoin de
réservoir
plein
Témoin de
vérification
du filtre
(5)
Boutons
haut et bas
Dégivrage automatique
Indicateur de vitesse
normale du ventilateur
Indicateur de vitesse
du ventilateur turbo
(3) Bouton du ventilateur
(4) Bouton
d’alimentation
(6)
Bouton
minuterie
(7) Affichage
Témoin
indicateur
de
démarrage
automatique
Témoin
d’arrêt
automatique
La page charge ...
La page charge ...
La page charge ...
La page charge ...
La page charge ...
La page charge ...
La page charge ...
La page charge ...
La page charge ...
La page charge ...
La page charge ...
La page charge ...
La page charge ...
La page charge ...
La page charge ...
La page charge ...
La page charge ...
La page charge ...
La page charge ...
La page charge ...
-
 1
1
-
 2
2
-
 3
3
-
 4
4
-
 5
5
-
 6
6
-
 7
7
-
 8
8
-
 9
9
-
 10
10
-
 11
11
-
 12
12
-
 13
13
-
 14
14
-
 15
15
-
 16
16
-
 17
17
-
 18
18
-
 19
19
-
 20
20
-
 21
21
-
 22
22
-
 23
23
-
 24
24
-
 25
25
-
 26
26
-
 27
27
-
 28
28
-
 29
29
-
 30
30
-
 31
31
-
 32
32
-
 33
33
-
 34
34
-
 35
35
-
 36
36
-
 37
37
-
 38
38
-
 39
39
-
 40
40


Arctic Aire DDR050BECCDB Le manuel du propriétaire
- Catégorie
- Déshumidificateurs
- Taper
- Le manuel du propriétaire
- Ce manuel convient également à
dans d''autres langues
Autres documents
-
Danby DDR30B2GDB Mode d'emploi
-
 Arctic Aire by Danby ADR50B1G Mode d'emploi
-
-
-
-
-
Danby Premiere DDR30B3WP Le manuel du propriétaire
-
-
-
