
English EN
Español ES
Français FR
Deutsch DE
Nederlands NL
Quick Reference Guide
Model ID: CPRACK
Scan the QR code to
access the product page
and warranty terms.
CP RACKCP RACK

1
EN
QUICK REFERENCE GUIDE
CP Rack QRG Rev. 1
Safety Notes
These Safety Notes include important information about installation, use, and maintenance of the CP Rack.
What is Included
Symbols
•DO NOT:
• Leave outdoors in locations with extreme environmental conditions. This includes, but is not limited to:
• Exposure to a marine/saline environment (within 3 miles of a saltwater body of water).
• Locations where normal temperatures exceed the temperature ranges in this manual.
• Locations that are prone to flooding or being buried in snow.
• Other areas where the product will be subject to extreme radiation or caustic substances.
• In the event of a serious operating problem, stop using immediately.
•CPRack
• Cover
• Quick Reference Guide
Symbol Meaning
Critical installation, configuration, or operation information. Not following these instructions may
make the product not work, cause damage to the product, or cause harm to the operator.
Important installation or configuration information. The product may not function correctly if this
information is not used.
Useful information.

EN
2
CP Rack QRG Rev. 1
QUICK REFERENCE GUIDE
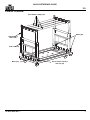
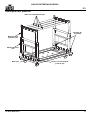
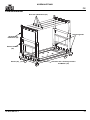
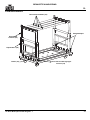
Product Overview
Adjustable H
frame (x2)
Tube with 2 clamps (x4)
Base (x8)
Safety pin
Screw with 2 washers
and nut (x4)
Side rails (x2)

3
EN
QUICK REFERENCE GUIDE
CP Rack QRG Rev. 1
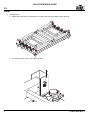
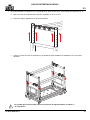
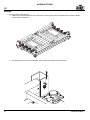
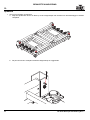
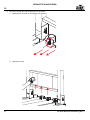
Setup
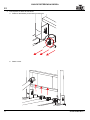
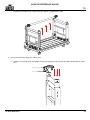
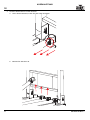
1. To begin setup:
a. Raise each side rail of the CP Rack by removing the pins at the base of each side rail.
b. To remove the pin, remove the safety clip first.

EN
4
CP Rack QRG Rev. 1
QUICK REFERENCE GUIDE
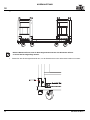
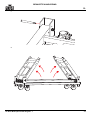
c.
d.

5
EN
QUICK REFERENCE GUIDE
CP Rack QRG Rev. 1
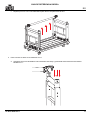
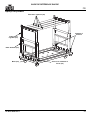
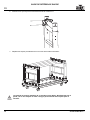
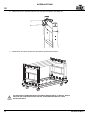
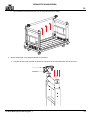
e.
f. Insert the pin to lock the side rail into upright position.
It is possible to remove both of the H frames from the CP Rack. The H frames may
then be hung from a truss.

EN
6
CP Rack QRG Rev. 1
QUICK REFERENCE GUIDE
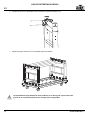
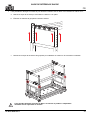
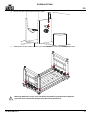
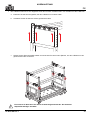
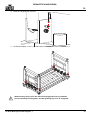
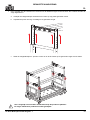
g. Insert the safety clip into the pin.
h. Repeat steps 1-f and 1-g with all bases to lock the side rails.
Warning! Ensure that all attachment points are fully tightened. Failure to do so may
cause safety hazards!

7
EN
QUICK REFERENCE GUIDE
CP Rack QRG Rev. 1
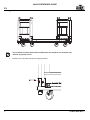
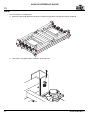
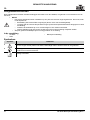
2. To detach the tubes from bases:
a. Release the clamp by depressing the switch.
b. Remove the tube.

EN
8
CP Rack QRG Rev. 1
QUICK REFERENCE GUIDE
c. Repeat the process with the other clamp to release the tube completely.
3. To connect the tube(s) to the H frames:
a. Ensure that the clamp is facing down and press the clamp onto the horizontal bar of the H frame.

9
EN
QUICK REFERENCE GUIDE
CP Rack QRG Rev. 1
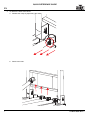
b. Ensure that the clamp is firmly attached to the H frame.
c. Repeat the previous steps with any other desired tubes:
The maximum load capacity for this product is 1,000 lbs. Do not exceed this weight,
as failure to do so may cause safety hazards.

EN
10
CP Rack QRG Rev. 1
QUICK REFERENCE GUIDE
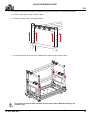
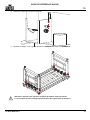
4. It is possible to extend the H frames to double the height of the CP Rack. To extend the H frames:
a. Remove safety clips locking H frame in place.
b. Extend or lower the pin to the desired height.
c. Re-insert the safety clips and pins to stabilize the H frames at the desired height.
It is possible to stack another CP Rack on top of this product. Maximum stacking is 2
products high.

11
ES
GUÍA DE REFERENCIA RÁPIDA
CP Rack GRR Rev. 1
Notas de seguridad
Estas notas de seguridad incluyen información importante sobre la instalación, el uso y el mantenimiento del CP Rack.
Qué se incluye
Simbolos
• NO HACER:
• Instalar permanentemente en el exterior en lugares con condiciones ambientales extremas. Esto incluye,
pero no se limita a:
• Exposición a un entorno marino/salino (a menos de 3 millas de una masa de agua salada).
• Lugares donde las temperaturas normales superan los rangos de temperatura de este manual.
• Lugares propensos a las inundaciones o a quedar enterrados en la nieve.
• Otras zonas en las que el producto esté sometido a radiaciones extremas o a sustancias cáusticas.
• En caso de un problema grave de funcionamiento, deje de usarlo inmediatamente.
•CPRack
•Cobre
• Guía de referencia rápida
Símbolo Significado
Instalación, configuración o información sobre funcionamiento crítica. Hacer caso omiso de esta
información puede hacer que el producto no funcione, que se averíe, o causar daños al usuario.
Instalación o información de configuración importante. El producto puede no funcionar
correctamente si esta información no se usa.
Información útil.

ES
12
CP Rack GRR Rev. 1
GUÍA DE REFERENCIA RÁPIDA
Descripción del producto
Bastidor en H
ajustable (x2)
Tubo con 2 abrazaderas (x4)
Base (x8)
Pasador de
seguridad
Tornillo con 2 arandelas
y tuerca (x4)
Barras laterales
(x2)

13
ES
GUÍA DE REFERENCIA RÁPIDA
CP Rack GRR Rev. 1
Montaje
1. Para comenzar el montaje:
a. Levante cada barra lateral del CP Rack retirando los pasadores de la base de cada barra lateral.
b. Para extraer el pasador, retire primero el clip de seguridad.

ES
14
CP Rack GRR Rev. 1
GUÍA DE REFERENCIA RÁPIDA
c.
d.

15
ES
GUÍA DE REFERENCIA RÁPIDA
CP Rack GRR Rev. 1
e.
f. Inserte el pasador para bloquear la barra lateral en posición vertical.
Es posible retirar los dos bastidores en H del CP Rack. Después los bastidores en H
pueden colgarse de un armazón.

ES
16
CP Rack GRR Rev. 1
GUÍA DE REFERENCIA RÁPIDA
g. Inserte el clip de seguridad en el pasador.
h. Repita los pasos 1-f y 1-g con todas las bases para bloquear las barras laterales.
¡Advertencia! Asegúrese de que todos los puntos de fijación estén completamente
apretados. Si no lo hace, puede provocar riesgos para la seguridad.

17
ES
GUÍA DE REFERENCIA RÁPIDA
CP Rack GRR Rev. 1
2. Para separar los tubos de las bases:
a. Suelte la abrazadera presionando el interruptor.
b. Retire el tubo.

ES
18
CP Rack GRR Rev. 1
GUÍA DE REFERENCIA RÁPIDA
c. Repita el proceso con la otra abrazadera para liberar completamente el tubo.
3. Para conectar los tubos a los bastidores en H:
a. Asegúrese de que la abrazadera esté orientada hacia abajo y presiónela sobre la barra horizontal del
bastidor en H.

19
ES
GUÍA DE REFERENCIA RÁPIDA
CP Rack GRR Rev. 1
b. Asegúrese de que la abrazadera esté firmemente sujeta al bastidor en H.
c. Repita los pasos anteriores con los demás tubos que desee:
La capacidad de carga máxima de este producto es de 450 kg. No supere este peso,
ya que de lo contrario puede provocar riesgos para la seguridad.
La page est en cours de chargement...
La page est en cours de chargement...
La page est en cours de chargement...
La page est en cours de chargement...
La page est en cours de chargement...
La page est en cours de chargement...
La page est en cours de chargement...
La page est en cours de chargement...
La page est en cours de chargement...
La page est en cours de chargement...
La page est en cours de chargement...
La page est en cours de chargement...
La page est en cours de chargement...
La page est en cours de chargement...
La page est en cours de chargement...
La page est en cours de chargement...
La page est en cours de chargement...
La page est en cours de chargement...
La page est en cours de chargement...
La page est en cours de chargement...
La page est en cours de chargement...
La page est en cours de chargement...
La page est en cours de chargement...
La page est en cours de chargement...
La page est en cours de chargement...
La page est en cours de chargement...
La page est en cours de chargement...
La page est en cours de chargement...
La page est en cours de chargement...
La page est en cours de chargement...
La page est en cours de chargement...
La page est en cours de chargement...
-
 1
1
-
 2
2
-
 3
3
-
 4
4
-
 5
5
-
 6
6
-
 7
7
-
 8
8
-
 9
9
-
 10
10
-
 11
11
-
 12
12
-
 13
13
-
 14
14
-
 15
15
-
 16
16
-
 17
17
-
 18
18
-
 19
19
-
 20
20
-
 21
21
-
 22
22
-
 23
23
-
 24
24
-
 25
25
-
 26
26
-
 27
27
-
 28
28
-
 29
29
-
 30
30
-
 31
31
-
 32
32
-
 33
33
-
 34
34
-
 35
35
-
 36
36
-
 37
37
-
 38
38
-
 39
39
-
 40
40
-
 41
41
-
 42
42
-
 43
43
-
 44
44
-
 45
45
-
 46
46
-
 47
47
-
 48
48
-
 49
49
-
 50
50
-
 51
51
-
 52
52


Chauvet CP Rack Guide de référence
- Taper
- Guide de référence
- Ce manuel convient également à
dans d''autres langues
- English: Chauvet CP Rack Reference guide
- español: Chauvet CP Rack Guia de referencia
- Deutsch: Chauvet CP Rack Referenzhandbuch
- Nederlands: Chauvet CP Rack Referentie gids