NewAge Products 65010 Guide d'installation
- Taper
- Guide d'installation

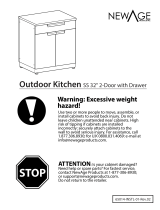
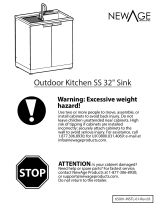
Use two or more people to move, assemble or install cabinets and locker to avoid back injury.
Do not leave children unattended near cabinets. High risk of tipping if cabinets are installed
incorrectly: securely attach cabinets to the wall to avoid serious injury.
For assistance, call 1.877.306.8930; for UK 0800.031.4069; e-mail at info@newageproducts.com
STOP
Use two or more people to move, assemble, or
install cabinets to avoid back injury. Do not
leave children unattended near cabinets. High
risk of tipping if cabinets are installed
incorrectly: securely attach cabinets to the
wall to avoid serious injury. For assistance, call
1.877.306.8930; for U.K 0800.031.4069: e-mail at
info@newageproducts.com.
ATTENTION: Is your cabinet damaged?
Need help or spare parts? For fastest service,
contact NewAge Products at 1-877-306-8930;
or suppor[email protected].
Do not return to the retailer.
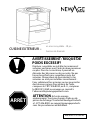
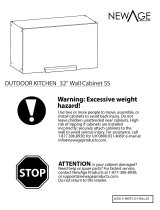
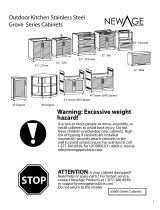
Warning: Excessive weight
hazard!
Outdoor Kitchen SS 28" Kamado Cabinet
65010-INSTL-01-Rev.03

56” Worktop. Fits over 1 Cabinet
& Fridge nook.
88” Worktop. Fits over 2 Cabinets
& Fridge nook.
64” Worktop. Fits over 2 Cabinets
96” Worktop. Fits over 3 Cabinets
WorktopsWeight
Capacity
100 lbs.
300 lbs.
75
lbs.
28” - KAMADO Cabinet
Max 475 lbs.
2

Unpacking
• Begin by placing the package on a protected at surface.
• Remove all cardboard, foam packaging material and clear plastic bags.
• Dispose / recycle all packaging materials.
• Verify all the contents in the box and gather the required tools. See “Parts” and “Tools Needed” in the list below.
KAMADO
Cabinet
Parts Supplied
Hex Bolt ( M6 x 50mm)
4
Shelf Clips
4
Hex Nuts (M6)
4
Handle Bolts (M4 x 25mm)
2
Levelers
4
Aluminum Plated Handles
Adapter Ring 18” Diameter
Adapter Ring 16” Diameter
Drilling Template
1
Wood Screws
6
Tapcon Screws
6
Anti Tipping Brackets
2
1 X Adapter ring 16”
Hex Bolt
1 x Drilling Template
(M x 50mm)
4 x Shelf Clips
1 X Adapter ring 18”
2 x Anti Tipping Brackets
6 x Tapcon
Screws
6 x Wood
Screws
Handle
4 X Hex Nut
Bolt (M4 x
4 x Levelers
(M
)
1 Handle
mm)
3

Limited Warranty:
All products must be installed, operated, and maintained in accordance with the instructions included with
the products. If a product is properly installed, operated, and maintained fails to meet the below limited
warranty, NewAge Products, Inc (“NewAge”) will replace the defective product or parts.
Subject to the limitations and disclaimers set forth below or in other product documentation, NewAge
warrants to the initial customer that (1) product nishes will be free from defects for three years following
purchase, (2) drawer slides will be free from defects for two years following purchase, and (3) the overall
structural integrity of the product (not including nishes or drawer slides) will be free from defects for ten
years following purchase.
Customer must pay for shipping costs associated with any replacement product or parts. This limited
warranty is limited to product replacement only. In no event will NewAge be liable for special, indirect, or
consequential damages.
This limited warranty is available to the initial purchaser only and is not transferable. Proof of purchase and
additional information regarding the defect may be required at NewAge’s discretion. The warranty is made
only to products sold in the continental United States, Canada, and the United Kingdom.
ALL OTHER WARRANTIES DISCLAIMED:
ALL OTHER WARRANTIES ARE DISCLAIMED TO THE MAXIMUM EXTENT PERMITTED BY APPLICABLE LAW.
WITHOUT LIMITING THE GENERALITY OF THE FORGOING, NEWAGE EXPRESSLY DISCLAIMS ANY IMPLIED
WARRANTIES OF MERCHANTABILITY OR FITNESS FOR A PARTICULAR PURPOSE.
NEWAGE PRODUCTS INC. WILL NOT PAY FOR:
1. Service calls or labor costs.
2. Products damaged by accident, misuse, abuse, re, ood, improper installation, acts of God, neglect,
corrosion, improper maintenance or cleaning, modi cation, mishandling or not following
care instructions.
3. Products damaged by improperly loading beyond the speci ed maximum weight capacity outlined
in the instructions provided with the product.
4. Defects results from use in excess of normal residential use.
5. Cosmetic damage that occurs after customer purchasing the product, including scratches, dings,
dents, corrosion, or stains in the material that does not a ect the structural or functional capability
of the product.
6. Loss of product contents.
4

OTHER NOTES TO CONSUMER:
Discoloration due to the high heat, for example beside a grill, is a trait of stainless steel and is not covered.
Surface rust resulting from acid rain or environmental chemicals are not covered. (Please see maintenance
information to combat surface rust). NewAge outdoor powder coated nishes are designed to withstand
weathering and are UV stable.
The 304 stainless steel material used in the construction of NewAge Outdoor Kitchen Cabinets is highly rust
resistant, however, chlorine in the air from swimming pools or the salt from sea air may cause surface rust
to appear and even create some pitting corrosion if left on the product. We strongly recommend a suitable
maintenance tested product. We suggest cleaning all stainless steel surfaces at least every two weeks to
keep your cabinets in prime condition. The chemical reaction from salt is easy to prevent however it is more
di cult when left on the surface.
Additional product information is available at
http://www.newageproducts.com/outdoor-kitchen-limited-warranty
Tools Needed
1 x #2 Phillips Bit
1 x Tape Measure
1 x Flashlight
1 x 24” Level
1 x 10mm socket 1 x Socket wrench
1 x Cordless Power Drill
1 x Adjustable wrench
1 x 10mm Open end wrench
1 x #2 Phillips head
screwdriver
5

Right Side
Left Side
Slide In
Slide Out
Align Rails
Inserting Drawers.
Removing Drawers.
Installing the Drawers
6

Installing the Handles
Parts Needed.
Align handle to holes on doors
or drawers.
Screw in bolts.
1
2
3
Handles Handle Bolts
(M4 x 25mm)
7

8
Adjusting The Levelers
Flip over Cabinet to reveal bottom
2
3
4 Flip over Cabinet to Check for Level
Level Cabinet and repeat steps
1-3 if required.
Raise Height
Lower Height
5
Parts Needed.
4 x Height-Adjustable
Levelers
1
Align levelers with nuts in corner
brackets
.
Rotate leveler clockwise to lower
height / tighten. Rotate leveler counter
clockwise to raise height / loosen.

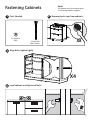
Fastening Cabinets
Note:
All drawers must be removed prior
to fastening cabinets together.
Align bolts, tighten lightly.
Level cabinets and tighten all bolts.
X4
1
2
X8
Remove plastic caps from cabinets.
3
4
Parts Needed.
4 X Hex Bolt
(M6 x 50mm)
4 X Hex Nut
(M6)
9

Rotate cabinet until all 4 casters are
resting on the ground
1
Remove 8 - M4 x 25 bolts in locations
with phillips screw driver accessed through
holes in kick.
Remove Kick and store with hardware for
2
future conguration considerations.
3
4
Place caster plate over 4 rivet nuts in
4 corner locations install /tighten 16 x 1/4” x 1/2”
bolts. Can be installed with socket or Phillips
drive.
Installing Casters (Sold Separately)
1
2
3
4
5
6
7
8
10

Installing the KAMADO anti tip brackets
1
Determine the location of your cabinet
Place template on oor mark holes
Drill with appropriate
drill bit for floor type
2
Once both brackets are attached to the
oor with 6 fasteners slide cabinet from
the back to engage brackets with the levelers
3
Fasten anti tip brackets on to oor
4
using the appropriate driver bit
3
Both Levelers should now be
captured by bracket
6
Next step install Kamado into cabinet
5
F
r
o
n
t
o
f
K
amad
o
11

Installing the KAMADO into the cabinet
5
Protect surface with cloth or cardboard
Up to 3 people will be required to lift
up and place your Kamado into cabinet
Rotate handle until it is parallel with
front of cabinet
1
Measure From Base of Kamado to
bottom of lid bracket at rear of unit.
GROUND
0 in. 1 2 3 4 5 6 7 8 9 10 11 12
2 3 4 5 6 7 8 9 10 11 12
2 3
4
5 6
7
8 9 10
11
12 2
3
4 5 6 7 8 9
10
11
12
0 cm. 1 2 3 4 5 6 7 8 9 10 11 12 13 14 15 16 17 18 19 20 21 22 23
24
25 26 27 28 29
30
5 6 7 8
9
10 11 12 13 14
15
16 17 18 19 20
21
22 23 24 25 26
27
28 29 30
5 6 7 8
9
10 11 12 13 14
15
16 17 18 19 20
21
22 23 24 25 26
27
28 29 305 6
7
8 9 10 11 12
13
14 15 16 17 18
19
20 21 22 23 24
25
26 27 28 29 30
Adjust shelf height to dimension from
2
step 1, test rings for t, slide up for t.
18”
16”
4
Select the diameter ring according
3
to Kamado size and test from step 2
16” Kamado
3
18” Kamado
21” Kamado
1
2

Care and Maintenance of your Stainless Steel Cabinets
Perform Regular Maintenance
OXIDIZATION Removal
List of common conditions that cause corrosion or
discoloration of stainless steel and should be avoided:
Wash regularly with clean fresh water, mild detergent and a micro ber cloth.
After washing rinse in clean water and wipe the surface dry with your cloth remembering to go
with the grain on brushed stainless steel.
Generally you should wash your stainless steel every three months. Coastal areas or next to a
chlorine pool more frequently every 2 weeks.
Do not use abrasive cleaners or a scouring pad of any type as they will cause excessive wear and
dull the nish.
Stainless steel nishes in coastal environments may show tea staining if not washed regularly.
We recommend Hopes “Perfect Stainless” as a cleaner with a micro ber cloth.
For better protection use a thin coating of protectant on the surface. We do not recommend using
this coating for food prep areas.
If you have oxidation there are a few steps to take to bring your stainless steel cabinets back
to “as new” condition.
Apply clean water with a cleaning sponge and rub gently in the direction of the grain. If the
mark won’t shift, it may be necessary to use a stainless steel cleaner, in which case apply the
cleaner and rub gently. After cleaning it is important to rinse the stainless steel with clean
fresh water and bu with a soft cloth. Remember to always rub with the grain, NEVER across
as you will ruin the nish, and the stainless can lose its shine. If you must use a scourer, use
a plastic scrub pad with no metal content.
1. Chloride containing cleansers – this includes bleach and any cleaners containing bleach
2. Muriatic acid (hydrochloric acid) – commonly used to clean up after tile/concrete installation
3. Concentrated soap residue – chemical additives will cause discoloration and some dried soaps
actually look like rust
4. Water with high iron content – can leave a rusty residue, especially if allowed to drip continuously
5. Contact with iron materials – including steel wool, iron residue/dust from installation or cleaning of
other steel products
6. Trapped moisture between the product and cover – rubber mats, metal cans or cleaner cans-
Allow cabinets to completely dry before covering.
7. Salts – contain chlorides
8. Extreme Heat by Flame
9. Do not permit citrus or tomato juice to remain on stainless steel surfaces.
10. No abrasive cleaners, steel wool pads, or abrasive cloths as they will scratch the finish.
1
3

Avertissement : Risque de poids excessif!
Déplacer, assembler ou installer les armoires et armoires-vestiaires avec l'aide de deux personnes ou plus.
Dans le cas contraire, il pourrait en découler des blessures au dos ou autre. Ne pas laisser les enfants sans surveillance
près des armoires. Risque élevé de basculement si les armoires ne sont pas installées correctement : Fixer solidement les
armoires au mur pour éviter des blessures graves.Pour obtenir de l’aide, composer le 1.877.306.8930; au R.-U.,
composer le 0800.031.4069; ou envoyer un courriel à l’adresse inf[email protected].
ARRÊT
ATTENTION: Est votre armoire
endommagée? Avez vous besoin d’aide ou de
pièces de rechange? Contactez NewAge Products
a 1-877-306-8930; ou support@newageproducts.
com. Ne pas retourner au détaillant.
Déplacer, assembler ou installer les armoires et
armoires-vestiaires avec l’aide de deux personnes
ou plus. Dans le cas contraire, il pourrait en
découler des blessures au dos ou autre. Ne pas
laisser les enfants sans surveillance près des
armoires. Risque élevé de basculement si les
armoires ne sont pas installées correctement :
Fixer solidement les armoires au mur pour éviter
des blessures graves.Pour obtenir de l’aide,
composer le 1.877.306.8930; au R.-U., composer
le 0800.031.4069; ou envoyer un courriel à
l’adresse [email protected]om.
AVERTISSEMENT: RISQUE DE
POIDS EXCESSIF!
65010INSTL-01-Rev.03
CUISINE EXTÉRIEUR –
en acier inoxydable - 28 po -
Armoire de Kamado

Déballage
• Pour commencer, posez l’emballage sur une surface plane protégée.
• Enlevez tous les matériaux d’emballage en carton et en mousse, ainsi que les sacs de plastique transparent.
• Jetez ou recyclez tous les matériaux d’emballage.
• Véri ez tout le contenu de la boîte et assemblez tous les outils requis. Voir les rubriques intitulées « Pièces fournies »
et « Outils requis » ci-dessous.
Pièces fournies
Armoire à
Kamado
Boulons à tête hexagonale ( M6x 50mm)
4
Écrous hexagonaux (M6)
4
2
1
Le Niveleur
4
Taquets pour étagères
4
le gabarit de perçage fourni
1
anti-basculement équerres
2
vis à bois.
6
vis de style Tapcon
6
1 x l’anneaux
metallique 16 po.
1 x poignée en
aluminium
1 x
le gabarit de
perçage fourni
1 x l’anneaux
metallique 18 po.
4 x
Taquets pour
étagères
2 x anti-basculement équerres
4 x boulons à tête
hexagonale
(M6 x 50mm)
6 x vis de
6 x vis à
4 x écrous
hex-agonaux
(M6)
2 x gérer
boulons (M4 x
style
Bois
mm)
Tapcon
4 x Le Niveleur
1
5

GARANTIE LIMITÉE:
Tous les produits doivent être installés, utilisés et entretenus conformément aux directives qui les accompagnent.
Si un produit ayant été correctement installé, utilisé et entretenu ne répond pas aux conditions de la garantie
limitée ci-dessous, NewAge Products, Inc. (« NewAge ») remplacera les pièces ou le produit défectueux.
NEWAGE PRODUCTS INC. NE PAIERA PAS LES FRAIS ASSOCIÉS AUX CIRCONSTANCES SUIVANTES :
LES AUTRES GARANTIES QUELLES QU’ELLES SOIENT SONT EXCLUES DANS TOUTE LA MESURE PERMISE PAR
LES LOIS APPLICABLES. SANS RESTREINDRE LE CARACTÈRE GÉNÉRAL DE CE QUI PRÉCÈDE, NEWAGE EXCLUT
EXPRESSÉMENT TOUTE GARANTIE IMPLICITE DE QUALITÉ MARCHANDE OU DE CONVENANCE PRÉCISE.
EXCLUSION DE TOUTE AUTRE GARANTIE
Sous réserve des limitations et des exclusions énoncées ci-dessous ou dans la documentation d’un autre produit,
NewAge garantit à l’acheteur initial que (1) les surfaces du produit seront exemptes de défaut pendant trois ans
après la date d’achat, (2) les glissières de tiroir seront exemptes de défaut pendant deux ans après la date d’achat,
et (3) l’intégrité structurale générale du produit (à l’exception des surfaces et des glissières de tiroir) sera exempte
de défaut pendant dix ans après la date d’achat.
Le client devra payer les coûts d’expédition associés au remplacement du produit ou des pièces. La présente
garantie limitée vise uniquement le remplacement du produit. NewAge ne saurait en aucune circonstance être
tenue responsable de dommages particuliers, indirects ou consécutifs.
La présente garantie limitée est o erte à l’acheteur initial seulement, et n’est pas transférable. NewAge pourra, à
sa discrétion exclusive, exiger la présentation de la preuve d’achat et de renseignements supplémentaires con-
cernant la défectuosité. La garantie vise uniquement les produits vendus sur le territoire continental des États-
Unis, au Canada et au Royaume-Uni.
1. Les visites de réparateur ou les frais de main-d’œuvre;
2. Les produits endommagés par accident, mésusage, mauvais traitement, incendie, inondation, installation
incorrecte, catastrophe naturelle, négligence, corrosion, entretien ou nettoyage incorrects, modi cation,
manipulation sans précaution ou non-respect des directives d’entretien;
3. Les produits endommagés par une charge supérieure à la capacité de poids maximale énoncée dans les
directives qui accompagnent le produit;
4. Les défectuosités résultant d’une utilisation excessive par rapport à l’utilisation résidentielle normale;
5. Les dommages esthétiques survenus après l’achat du produit, y compris les égratignures, les creux, les
bosses, la corrosion ou les taches qui ne modi ent en rien l’intégrité structurale
ou les fonctions du produit;
6. Les pertes de contenu du produit.
16

AUTRES REMARQUES ADRESSÉES AU CONSOMMATEUR :
L’altération de couleur causée par la chaleur élevée, par exemple près du gril, est une caractéristique de l’acier
inoxydable et n’est pas couverte par la garantie. La rouille super cielle résultant des pluies acides ou de la
présence de substances chimiques dans l’environnement n’est pas couverte. (Se reporter aux renseignements
concernant l’entretien pour éviter la rouille super cielle.) Les surfaces extérieures dotées d’un revêtement en
poudre de NewAge sont conçues pour résister aux intempéries et être stables aux UV.
Le matériau d’acier inoxydable 304 qui est utilisé dans la fabrication des armoires de cuisine extérieure NewAge
est très résistant à la rouille, mais le chlore de piscine qui est présent dans l’air ou le sel présent dans l’air marin
peut faire rouiller la surface; si cette rouille reste assez longtemps sur le produit, elle peut même causer de la
corrosion par piqûres. Nous recommandons vivement l’emploi d’un produit d’entretien approprié à cet usage.
Nous suggérons de nettoyer toutes les surfaces en acier inoxydable au moins toutes les deux semaines pour
garder vos armoires en excellent état. La réaction chimique causée par le sel est facile à prévenir, mais elle sera
plus di cile à éliminer si elle reste sur la surface pendant un certain temps.
IDes renseignements complémentaires sur le produit sont accessibles sur le site :
http://www.newageproducts.com/outdoor-kitchen-limited-warranty/
Outils requis
1 x #2 Phillips Bit
1 x ruban à mesurer
1 x lampe de poche
1 x niveau de 24 po
1 x douille de 10mm 1 x clé à douille
1 x perceuse-tournevis sans
1 x clé à molette
1 x clé à fourche de 10mm
1 x #2 Phillips head
screwdriver
1
7

Right Side
Left Side
Slide In
Slide Out
Align Rails
Insertion des tiroirs
Retrait des tiroirs
Installation des tiroirs
Côté droit
Retirez le tiroir
Retirez le tiroir
Côté gauche
Alignez les coulisses
18

Installation des poignées
Pièces requises.
Align handle to holes on doors
or drawers.
Serrer la vis.
1
2
3
poignées en
aluminium
boulon de la
poignée M4
x 25
mm
1
9

20
Nivellement de l’amoire
Faites basculer pour accéder
4
˜ otte et vériÿez son niveau
5
Vériÿer le niveau latéral
Raise Height
Lower Height
Faites basculer pour accéder
Pièces requises
4 x Niveau Ajuster
2
Aligner les niveleurs avec les
écrous dans les cornières.
1
Tournez dans le sens horaire pour
soulever le niveleur. Tournez dans le
3
sens horaire pour hauteur du niveleur
La page est en cours de chargement...
La page est en cours de chargement...
La page est en cours de chargement...
La page est en cours de chargement...
La page est en cours de chargement...
-
 1
1
-
 2
2
-
 3
3
-
 4
4
-
 5
5
-
 6
6
-
 7
7
-
 8
8
-
 9
9
-
 10
10
-
 11
11
-
 12
12
-
 13
13
-
 14
14
-
 15
15
-
 16
16
-
 17
17
-
 18
18
-
 19
19
-
 20
20
-
 21
21
-
 22
22
-
 23
23
-
 24
24
-
 25
25


NewAge Products 65010 Guide d'installation
- Taper
- Guide d'installation
dans d''autres langues
Documents connexes
-
NewAge Products 65210 Mode d'emploi
-
 NewAge Products 65410 Guide d'installation
-
 NewAge Products 65013 Guide d'installation
-
NewAge Products 66054 Manuel utilisateur
-
 NewAge Products 66655 Mode d'emploi
-
 NewAge Products 66456 Guide d'installation
-
NewAge Products 65271 Mode d'emploi
-
 NewAge Products 65014 Guide d'installation
-
 NewAge Products 65001 Guide d'installation
-
NewAge Products 65202 Guide d'installation


