
EN
ES
IT
FR
NL
DE
www.laerdal.com
Laerdal Suction Unit
Serres
User Guide
LSU Serres Cat.no 78 00 30


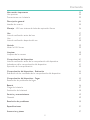
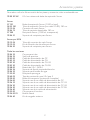
Contents
3
Important Information 4
Intended Use 4
Battery Cautions 5
Overview 6
User Interface 7
Assembly - LSU Serres Suction Bag System 8
Use 9
Before Use Checklist 9
Use 9
After Use Checklist 10
Emptying 11
Empty LSU Serres 11
Cleaning 12
Clean the Cabinet 12
Device Test 13
Before Device Test Checklist 13
Device Test Indicators 13
Run the Test 14
Device Test - Evaluation 16
Evaluation of Device Test Results 16
Device Test - Leakages 17
Troubleshooting for Leakages 17
Battery 18
Charging 19
Replace the Battery 20
Service and Maintenance 21
Warranty 21
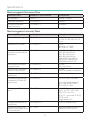
Troubleshooting 22
Specications 23
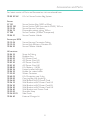
Accessories and Parts 29

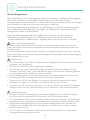
Important Information
4
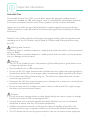
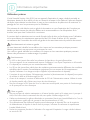
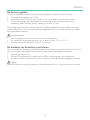
Intended Use
The Laerdal Suction Unit (LSU) is a portable, electrically powered, medical suction
equipment intended for field and transport use. It is intended for intermittent operation
to remove secretions, blood or vomit from a patient´s airway to allow ventilation.
Higher vacuum levels are generally selected for oropharyngeal suctioning, and lower
vacuum levels are usually selected for tracheal suctioning and the suctioning of children
and infants.
Read this User Guide carefully, and become thoroughly familiar with the operation and
maintenance of the LSU before using it. Read all Cautions and Warnings before using
the LSU.
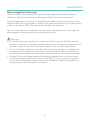
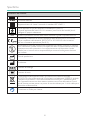
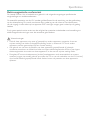
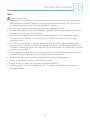
Warnings and Cautions
A Warning states a condition, hazard, or unsafe practice that can result in serious personal
injury or death.
A Caution states a condition, hazard, or unsafe practice that can result in minor personal
injury or damage to the product.
Warnings
• The LSU is not suitable for use in the presence of flammable liquids or gases; there can be
a danger of explosion or fire.
• Not intended for use in MRI environments.
• Do not use the LSU under environmental conditions that are outside the ranges specified in
Specifications section. This can endanger safety and adversely affect operation of the device.
• Do not block the Exhaust Outlet during use. This will lead to reduced flow and can also
cause damage to the LSU.
• Disconnect the LSU from external power prior to cleaning. Use a minimum amount of liquid
to prevent any electrical shock hazard.
• Do not immerse the LSU or allow it to stand in water or other liquids. This might damage
the device, and cause electrical hazard.
Cautions
• Do not pump any cleaning solution or other liquids through the vacuum pump, i.e. through
the Vacuum Connector. This can damage the LSU.
• Use only parts and accessories supplied by Laerdal Medical or one of our authorised
distributors to ensure that the LSU operates satisfactorily.
• Overflow of suctioned material can damage the device. If overflow of liquid from the
Canister into the pump is suspected, contact your local Laerdal Medical representative.
• The LSU should only be used by persons trained in the use of medical suction equipment.

Important Information
5
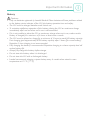
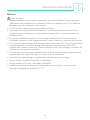
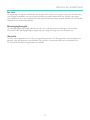
Battery
Cautions
• Only use batteries approved by Laerdal Medical. Other batteries will have problems related
to the battery status indicator of the LSU, the battery operation time and safety.
• The LSU must be charged between each clinical use.
• To maintain satisfactory operation of the battery, placing the LSU on continuous charge
immediately after use and when not in use is recommended.
• If it is not possible to place the LSU on continuous charge when not in use, make sure the
battery is charged for a minimum of 4 hours at least once a month.
• The LSU must be placed on charge for a minimum of 4 hours to reach full battery capacity.
Fast charging gives approximately 80% battery capacity after 3 hours (for a new battery).
Repetitive 3 hour charging is not recommended.
• Fully charging the battery is recommended. Repetitive charging to a lower capacity level will
reduce battery life.
• Always fully charge the battery before storage.
• Do not store the battery when it is discharged.
• Do not store the LSU with a discharged battery.
• Laerdal recommends charging a spare battery every 6 months when stored in room
temperature at 25 °C (77 °F).

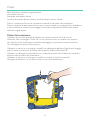
Overview
6
Vacuum Inlet
Serres Vacuum Connector
Canister
Battery Door
Release Arm
Canister Holder
Holder for
Suction Tubing
Suction Tube
Serres Suction
Bag with filter
Patient Inlet
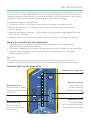
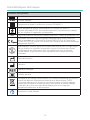
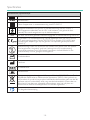
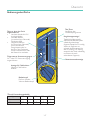
User Interface
Quick
Reference

Overview
7
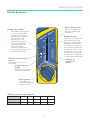
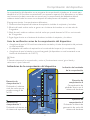
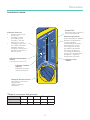
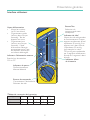
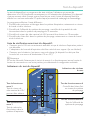
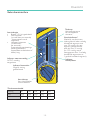
User Interface
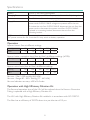
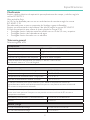
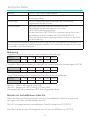
*Pressure conversion chart
mmHg 80 120 200 350 500
kPa 10.6 16.0 26.6 46.6 66.5
mBar 107 160 267 467 667
Test Button
Run the Device
Test program
Vacuum Indicator*
Actual vacuum level
during operation.
Each fully lit segment
represents 50 mmHg. If a
segment has a dim light,
this represents 25 mmHg
(e.g 125 mmHg is shown
by 2 fully lit and 1 dimly
lit segments).
Battery Status
Indicator
Operating Knob
On/Off switch
Vacuum selector
Failure Mode Indicator
Possible malfunction
detected
External Power Indicator
AC or DC power
connected
Power On Indicator
• Continuously lit - LSU is
switched on.
• Rapid flash (approx.
twice per second) -
Device Test in progress.
• Slow flash (approx.
once per second) -
Automatic power save
mode activated; Device
Test interrupted or
battery discharged.

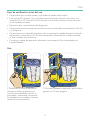
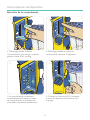
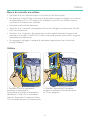
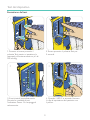
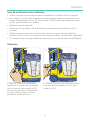
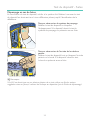
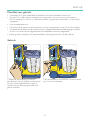
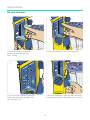
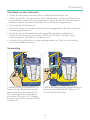
Assembly - LSU Serres Suction Bag System
1 2
3 4
8
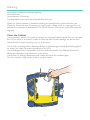
Note
Turn the operating knob to 500+ mmHg. Block the Patient Inlet with your thumb and
simultaneously push the lid down. The lid is properly installed when vacuum has reached
500 mmHg. Release the Patient Inlet and make sure that the bag is fully inflated.
CLICK
A
BC
D

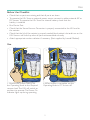
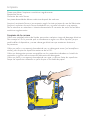
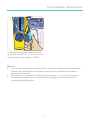
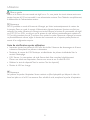
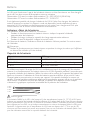
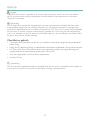
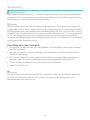
Use
1
2
2. When suction is complete, set the
Operating Knob to “0” to turn off.
1. Unwind the Suction Tubing. Set
the Operating Knob to the required
vacuum level. The LSU will switch on
and start to operate. The Power On
Indicator lights up during operating.
9
Before Use Checklist
• Check that no parts are missing and that all parts are clean.
• To operate the LSU from an external power source, connect to either external AC or
DC power. To operate the LSU from the internal battery, check that the
battery is installed.
• Run Device Test.
• Check that the Serres Vacuum Connector is properly connected to the LSU and to
the canister.
• Check that the lid of the canister is properly sealed: block patient inlet and turn on the
LSU. Vacuum will build up when all parts are assembled correctly.
• Attach appropriate suction catheter if necessary. (Not supplied by Laerdal Medical).
Use

Use
10
Caution
Even if the Operating Knob is set to “0”, voltage is present on some of the internal circuitry
when the LSU is connected to external power. Disconnect from the mains to fully remove
power.
Note
The LSU has an automatic power save mode which switches the pump motor off. While in
this mode, the Power On Indicator will flash slowly (approx. once per second). Power save
mode is activated when the Operating Knob is set to 200, 350 or 500+ mmHg and the
actual vacuum level has been continuously higher than 120 mmHg for more than 2 minutes.
To exit power save mode and revert to normal operation, set the Operating Knob to any other
position and then go back to required setting.
After Use Checklist
• Inspect all parts of the LSU for damage and excessive wear. Replace parts if necessary.
• Clean the LSU cabinet. Clean and disinfect reusable parts. See Cleaning section.
• LSU Serres: The Serres Vacuum Connector should be replaced regularly. Place an
unopened Serres Suction Tube on the side of the LSU.
• Perform Device Test. See Device Test section.
• Place the LSU on charge.
Note
The Serres Suction Bag system contains a hydrophilic filter that shuts off the vacuum if the
canister is full or the LSU tips over. To restore the vacuum, replace the Suction bag.

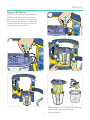
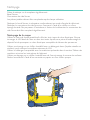
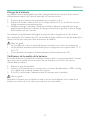
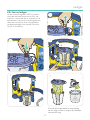
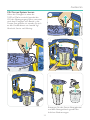
Emptying
A
BC
3
4
2
5
1
11
Safely dispose of the Serres Suction bag
and suction tube according to
local protocols.
Empty LSU Serres
When liquid reaches approximately
1000 ml, the LSU will not suction
any more. If overflow of liquid from
the bag into the pump is suspected,
contact Laerdal Service. See Service
and Maintenance section.

Cleaning
12
Parts to be cleaned or replaced regularly:
Serres Canister
Serres Vacuum Connector
The disposable parts must be replaced after each use.
Clean the Serres canister if needed according to manufacturer’s instructions for use.
Clean the Serres Vacuum Connector by wiping with a damp cloth or a sponge. Do not
autoclave or attempt to disassemble. The Serres Vacuum Connector should be replaced
regularly.
Clean the Cabinet
Use a minimum amount of liquid to prevent any electrical shock hazard. Do not immerse
the LSU or allow it to stand in water or other liquids. This can damage the device, and
cause electrical shock resulting in injury to persons.
Use a cloth or sponge that is dampened with a mild detergent (hand dishwashing liquid
or similar) to clean the external surfaces of the LSU.
Use a detergent that is compatible with the materials listed in the Material Chart, and
follow the detergent manufacturer´s instructions.
Use a cloth or sponge dampened with water and wipe the surfaces again.
Dry the surfaces using a clean cloth or a paper towel.

Device Test
13
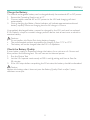
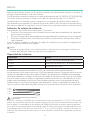
The Device Test is a user initiated test program to identify whether the LSU operates
satisfactorily or if it needs service. If the device is not in frequent use (i.e. less than once
a month), the Device Test should be performed both on a monthly basis and after each
Cleaning and Assembly process.
The program runs 4 different tests:
1. Occlusions - Blockages in the Suction System, including canister and tubing.
2. Vacuum efficacy - How much vacuum builds up in the Pump System within 3 seconds.
3. Maximum vacuum level - The maximum achievable vacuum level of the
LSU within 10 seconds.
4. Leakages - Air leakages in the Pump System, including canister and tubing.
Before Device Test Checklist:
• Ensure the LSU is correctly assembled and the Patient Suction Tubing is unwound.
• The Suction Catheter Adapter is removed from its holder (if applicable).
• Ensure the battery is not being charged (the device is not connected to
AC/DC power source).
Note
If you need to interrupt the test and revert to normal operation, turn the Operating Knob to
another position and then select the required setting.
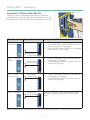
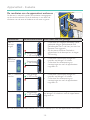
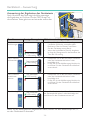
Running Test 1
Testing for occlusions in
the Suction System
Running Test 3
Testing the maximum
achievable vacuum level
of the LSU
Running Test 2
Testing the vacuum build-up
efficacy of the Pump System
Running Test 4
Testing for air leakages in the
Pump System
Test result indication
Device Test Indicators

Device Test
1
3
2
4
1
3
2
4
14
Run the Test
1. Press and hold the Test Button
while turning the Operating Knob to
500+ mmHg.
2. Hold the Test Button in for 2 seconds.
3. The test will start immediately.
During test mode, the Power On
Indicator will flash rapidly.
4. When LED 2 lights up, block the Patient
Suction Tubing with your thumb.

Device Test
5
15
Notes
• If the tubing is not blocked within 2 minutes, the test will be interrupted.During
interrupted device test, the Power On Indicator will flash slowly.
• To restart the test, set the Operating Knob to “0” and start over again.
• To evaluate test results, do not tun off the LSU after running Device Test.
5. Keep the tubing blocked while LED 2,
3 and 4 light up. Release the tubing when
LED 1 lights up again.

Device Test - Evaluation
16
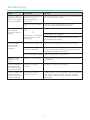
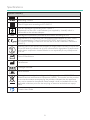
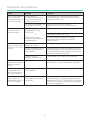
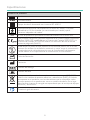
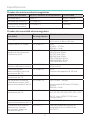
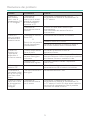
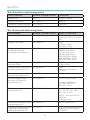
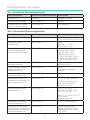
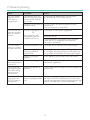
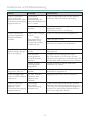
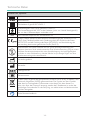
Test No. Test result indication Action if test failed
Test 1 -
Occlusions • Check possible blockages (e.g. twisted tub-
ing, blocked filter, blocked filter in the liner)
and run the Device. Test again.
• If the High Efficiency Filtration Kit is installed
the pass limit is 150mmHg.
Test 2 – Vacuum
efficacy • Check Connectors, Tubes and Canister Lid
for leakage* or damage.
• Check exhaust outlet for occlusion and run
the Device Test again.
Test 3 – Maxi-
mum vacuum • Check Connectors, Tubes and Canister Lid
for leakage* or damage.
• Check exhaust outlet for occlusion and run
the Device Test again.
Test 4 - Leakages Check Connectors, Tubes and Canister Lid for
leakage* or damage and run the Device Test
again.
After evaluating the test results turn the Operating Knob to “0” to exit the Device Test.
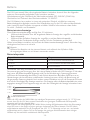
Evaluation of Device Test Results
After the test is completed, the Vacuum Indicator
will display the results. Press the Test Button to scroll
through the results of each test to display the results.
Test Passed
<100 mmHg
Test Passed
>300 mmHg
Test Passed
>500 mmHg
Test Passed
>450 mmHg

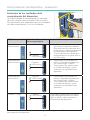
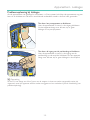
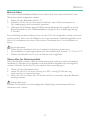
Device Test - Leakages
1
3
2
2
17
Troubleshooting for Leakages
If the device test has failed, check whether the system is leaking. Run the Device Test
again blocking different parts in turn, until you find the failure.
Test by blocking the Pump System
Run the Device Test whilst blocking the outlet. If
the device passes the test, there are no leakages in
the Pump System.
Test by blocking the Patient Tubing Inlet
Run the Device Test whilst blocking the Patient Tubing
inlet on the Canister. If the device passes the test,
there are no leakages in the Canister.
Note
If the LSU does not pass one or more of the steps in this test after suggested actions are
taken, the device might need to be returned for service (see the Troubleshooting guide).

Battery
18
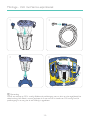
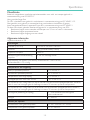
The LSU can be operated from the internal battery, and can be operated or charged
from one of the following external power sources:
AC mains when used with the AC Power Cord: 100-240 VAC (50/60 Hz).
DC mains when used with the DC Power Cord: 12-28 VDC.
The LSU battery can also be charged in an optional External Battery Charger. A Wall
Bracket to hold the LSU during operation and (optional) charging is available separately.
See Accessories and Parts for more information.
Battery Status Indicator
This Battery Status Indicator has 3 functions:
• During operation from internal battery: indicates approximate remaining battery
capacity.
• During charging: indicates approximate achieved battery capacity.
• During device testing: indicates which device test is in progress.
If no battery is installed, the battery status indicator will be fully lit for approx. 5 sec. until
it is turned off.
Note
During operation from internal battery and during charging, the displayed values must only
be used as indications.
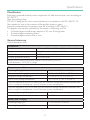
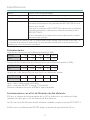
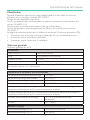
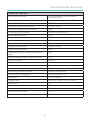
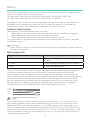
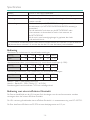
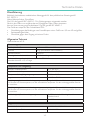
Battery Capacity
Capacity Output
< 75% The LEDs will be lit sequentially
75 - 80% 3rd LEDs lit and 4th flashing
> 80% 4 LEDs lit
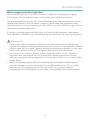
Immediately after turning the LSU on or switching from external power to internal
battery operation, all 4 LEDs will flash for 5 seconds before the remaining battery
capacity is displayed. Due to the nature of voltage based battery capacity measurement,
the battery status indication may differ from unit to unit. Each battery may vary in voltage
versus remaining capacity, thus allowing for variability in the reading. Other outside
variables such as temperature may also affect accuracy. The indicator is targeted to show
battery capacity as indicated below. The graph shows how the accuracy of the indication
can vary.
4 LEDs
3 LEDs
2 LEDs
1 LED
time
Caution
If the LSU or the NiMH battery has been stored at low temperatures (< 12 °C / < 54 °F),
the LSU may indicate lower remaining battery capacity than actual when first switched on.
This is due to the nature of NiMH batteries. The battery indicator may flash on one
LED, which normally indicates Battery Low. The LED may continue to flash until the LSU
temperature is above 12 °C / 54 °F and the LSU is switched off and on again. The low
battery indication in this instance is not a correct indication of the residual battery capacity.

Battery
19
Charge the Battery
The internal rechargeable battery can be charged directly from external AC or DC power.
1. Ensure the Operating Knob is set to “0”.
2. Connect either external AC or DC power to the LSU and charging will start
automatically.
3. During charging, the Battery Status Indicator will indicate approximate achieved
battery capacity. Minimum charging time for full charge is 4 hours.
A completely discharged battery cannot be charged by the LSU and must be replaced.
If LSU battery is kept on constant charge, perform device test at least once a month to
exercise battery.
Cautions
• Do not perform the Device Test during battery charging.
• The recommended ambient temperature for charging is from 15°C to 25°C.
• The battery will not be charged when the LSU is in operation.
Check the Battery Quality
If poor battery quality is suspected, charge the battery for a minimum of 4 hours and
then perform the following test. Do not connect to external power.
1. Run the Device Test.
2. Let the LSU operate continuously at 500+ mmHg setting and free air flow for
20 minutes.
3. If the LSU stops before completing the 20 minutes, the battery should be discarded.
Caution
Replace the battery when it does not pass the Battery Quality Check or after 3 years,
whichever comes first.

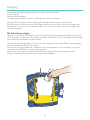
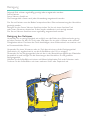
Battery
12
3 4
5 6
20
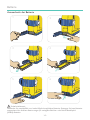
Caution
Use only batteries recommended by Laerdal Medical. When you discard the battery, dispose of
safely in accordance with local protocols for Nickel Metal Hydride (NiMH) batteries.
Replace the Battery
CLICK
CLICK
La page est en cours de chargement...
La page est en cours de chargement...
La page est en cours de chargement...
La page est en cours de chargement...
La page est en cours de chargement...
La page est en cours de chargement...
La page est en cours de chargement...
La page est en cours de chargement...
La page est en cours de chargement...
La page est en cours de chargement...
La page est en cours de chargement...
La page est en cours de chargement...
La page est en cours de chargement...
La page est en cours de chargement...
La page est en cours de chargement...
La page est en cours de chargement...
La page est en cours de chargement...
La page est en cours de chargement...
La page est en cours de chargement...
La page est en cours de chargement...
La page est en cours de chargement...
La page est en cours de chargement...
La page est en cours de chargement...
La page est en cours de chargement...
La page est en cours de chargement...
La page est en cours de chargement...
La page est en cours de chargement...
La page est en cours de chargement...
La page est en cours de chargement...
La page est en cours de chargement...
La page est en cours de chargement...
La page est en cours de chargement...
La page est en cours de chargement...
La page est en cours de chargement...
La page est en cours de chargement...
La page est en cours de chargement...
La page est en cours de chargement...
La page est en cours de chargement...
La page est en cours de chargement...
La page est en cours de chargement...
La page est en cours de chargement...
La page est en cours de chargement...
La page est en cours de chargement...
La page est en cours de chargement...
La page est en cours de chargement...
La page est en cours de chargement...
La page est en cours de chargement...
La page est en cours de chargement...
La page est en cours de chargement...
La page est en cours de chargement...
La page est en cours de chargement...
La page est en cours de chargement...
La page est en cours de chargement...
La page est en cours de chargement...
La page est en cours de chargement...
La page est en cours de chargement...
La page est en cours de chargement...
La page est en cours de chargement...
La page est en cours de chargement...
La page est en cours de chargement...
La page est en cours de chargement...
La page est en cours de chargement...
La page est en cours de chargement...
La page est en cours de chargement...
La page est en cours de chargement...
La page est en cours de chargement...
La page est en cours de chargement...
La page est en cours de chargement...
La page est en cours de chargement...
La page est en cours de chargement...
La page est en cours de chargement...
La page est en cours de chargement...
La page est en cours de chargement...
La page est en cours de chargement...
La page est en cours de chargement...
La page est en cours de chargement...
La page est en cours de chargement...
La page est en cours de chargement...
La page est en cours de chargement...
La page est en cours de chargement...
La page est en cours de chargement...
La page est en cours de chargement...
La page est en cours de chargement...
La page est en cours de chargement...
La page est en cours de chargement...
La page est en cours de chargement...
La page est en cours de chargement...
La page est en cours de chargement...
La page est en cours de chargement...
La page est en cours de chargement...
La page est en cours de chargement...
La page est en cours de chargement...
La page est en cours de chargement...
La page est en cours de chargement...
La page est en cours de chargement...
La page est en cours de chargement...
La page est en cours de chargement...
La page est en cours de chargement...
La page est en cours de chargement...
La page est en cours de chargement...
La page est en cours de chargement...
La page est en cours de chargement...
La page est en cours de chargement...
La page est en cours de chargement...
La page est en cours de chargement...
La page est en cours de chargement...
La page est en cours de chargement...
La page est en cours de chargement...
La page est en cours de chargement...
La page est en cours de chargement...
La page est en cours de chargement...
La page est en cours de chargement...
La page est en cours de chargement...
La page est en cours de chargement...
La page est en cours de chargement...
La page est en cours de chargement...
La page est en cours de chargement...
La page est en cours de chargement...
La page est en cours de chargement...
La page est en cours de chargement...
La page est en cours de chargement...
La page est en cours de chargement...
La page est en cours de chargement...
La page est en cours de chargement...
La page est en cours de chargement...
La page est en cours de chargement...
La page est en cours de chargement...
La page est en cours de chargement...
La page est en cours de chargement...
La page est en cours de chargement...
La page est en cours de chargement...
La page est en cours de chargement...
La page est en cours de chargement...
La page est en cours de chargement...
La page est en cours de chargement...
La page est en cours de chargement...
La page est en cours de chargement...
La page est en cours de chargement...
La page est en cours de chargement...
La page est en cours de chargement...
La page est en cours de chargement...
La page est en cours de chargement...
La page est en cours de chargement...
La page est en cours de chargement...
La page est en cours de chargement...
La page est en cours de chargement...
La page est en cours de chargement...
La page est en cours de chargement...
La page est en cours de chargement...
La page est en cours de chargement...
La page est en cours de chargement...
La page est en cours de chargement...
-
 1
1
-
 2
2
-
 3
3
-
 4
4
-
 5
5
-
 6
6
-
 7
7
-
 8
8
-
 9
9
-
 10
10
-
 11
11
-
 12
12
-
 13
13
-
 14
14
-
 15
15
-
 16
16
-
 17
17
-
 18
18
-
 19
19
-
 20
20
-
 21
21
-
 22
22
-
 23
23
-
 24
24
-
 25
25
-
 26
26
-
 27
27
-
 28
28
-
 29
29
-
 30
30
-
 31
31
-
 32
32
-
 33
33
-
 34
34
-
 35
35
-
 36
36
-
 37
37
-
 38
38
-
 39
39
-
 40
40
-
 41
41
-
 42
42
-
 43
43
-
 44
44
-
 45
45
-
 46
46
-
 47
47
-
 48
48
-
 49
49
-
 50
50
-
 51
51
-
 52
52
-
 53
53
-
 54
54
-
 55
55
-
 56
56
-
 57
57
-
 58
58
-
 59
59
-
 60
60
-
 61
61
-
 62
62
-
 63
63
-
 64
64
-
 65
65
-
 66
66
-
 67
67
-
 68
68
-
 69
69
-
 70
70
-
 71
71
-
 72
72
-
 73
73
-
 74
74
-
 75
75
-
 76
76
-
 77
77
-
 78
78
-
 79
79
-
 80
80
-
 81
81
-
 82
82
-
 83
83
-
 84
84
-
 85
85
-
 86
86
-
 87
87
-
 88
88
-
 89
89
-
 90
90
-
 91
91
-
 92
92
-
 93
93
-
 94
94
-
 95
95
-
 96
96
-
 97
97
-
 98
98
-
 99
99
-
 100
100
-
 101
101
-
 102
102
-
 103
103
-
 104
104
-
 105
105
-
 106
106
-
 107
107
-
 108
108
-
 109
109
-
 110
110
-
 111
111
-
 112
112
-
 113
113
-
 114
114
-
 115
115
-
 116
116
-
 117
117
-
 118
118
-
 119
119
-
 120
120
-
 121
121
-
 122
122
-
 123
123
-
 124
124
-
 125
125
-
 126
126
-
 127
127
-
 128
128
-
 129
129
-
 130
130
-
 131
131
-
 132
132
-
 133
133
-
 134
134
-
 135
135
-
 136
136
-
 137
137
-
 138
138
-
 139
139
-
 140
140
-
 141
141
-
 142
142
-
 143
143
-
 144
144
-
 145
145
-
 146
146
-
 147
147
-
 148
148
-
 149
149
-
 150
150
-
 151
151
-
 152
152
-
 153
153
-
 154
154
-
 155
155
-
 156
156
-
 157
157
-
 158
158
-
 159
159
-
 160
160
-
 161
161
-
 162
162
-
 163
163
-
 164
164
-
 165
165
-
 166
166
-
 167
167
-
 168
168
-
 169
169
-
 170
170
-
 171
171
-
 172
172


dans d''autres langues
- italiano: laerdal suction unit Guida utente
- español: laerdal suction unit Guía del usuario
- Deutsch: laerdal suction unit Benutzerhandbuch
- Nederlands: laerdal suction unit Gebruikershandleiding
Documents connexes
Autres documents
-
Toshiba TCB-BT1UPE Manuel utilisateur
-
KYOCERA PF-410 Le manuel du propriétaire
-
Gima 28237 Le manuel du propriétaire
-
KYOCERA DU-410 Le manuel du propriétaire
-
Tannoy SUPERTWEETER-GO Guide de démarrage rapide
-
Chauvet Scorpion GBC Manuel utilisateur
-
White Mountain Hearth Stone River Ceramic Fiber Log Set (LSU_SF) Le manuel du propriétaire
-
Chauvet GBC 2.0 Manuel utilisateur
-
LG 39LB580V Le manuel du propriétaire
-
Dell DR4100 Mode d'emploi