LG 60LB650V Le manuel du propriétaire

Catégorie
Téléviseurs LED
Taper
Le manuel du propriétaire

Ce manuel convient également à

Drawn Approved
Signature
Danbi.Park Jongok.kim
MMM/DD/YYYY
Mar/03/2014 Mar/03/2014
LB67-Z LG MFL68027013
FP LB670V (1403-REV00)
:LGEAK :LGEKR :LGERS
:LGEAZ :LGEMA :LGESY
:LGEEG :LGEMX :LGETH
:LGEIL :LGEND :LGEVN
:LGEIN :LGERA :LGEWR
:LGEAS
Checked
Mar/03/2014
Mira.Woo
:Part number
1. Model Description
Printing specification
Printed in Mexico
Printed in Poland
Printed in Kazakhstan
Printed in Brazil
:5. Language
:6. Number of pages
:Model name
:2nd, 3rd Suffix
:Brand name
:Product name
:1. Trim size (Format)
2. Printing colors
: • Cover
: • Inside
Printed in Korea
: • Inside
:4. Bindery
(Revision number)
2. Printing Specification
Rev. Number
136
148 mm x 210 mm (A5)
1 Color (Black)
1 Color (Black)
Uncoated, wood-free paper 150 g/
Uncoated, wood-free paper 60 g/
Perfect binding
ENG/FRE/ARA (3)
3. Origin Notification
4. Changes
Printed in Mexico
Printed in Egypt
Printed in India
Printed in Algeria
3. Stock (Paper)
: • Cover
Printed in Indonesia
Printed in Russia
Printed in Poland
Signature
Change Contents
ECO Number
N
O
T
E
“This part contains Eco-hazardous substances (Pb, Cd, Hg, Cr6+, PBB, PBDE, etc.) within LG standard level,
Details should be followed Eco-SCM management standard[LG(56)-A-2524].
Especially, Part should be followed and controlled the following specification.
(1) Eco-hazardous substances test report should be submitted when Part certification test and First Mass Production.
(2) Especially, Don’t use or contain lead(Pb) and cadmium(Cd) in ink.
Printed in China
Printed in China
Printed in Thailand
Printed in Vietnam
1
10
9
8
7
6
5
4
3
2
Front
(Eng)
P/No. A-2 A-27 Blank
Front Back
(Eng)
2 31
Front Back
(Fre)
2 31
Back Front
(Ara)
31 2
Back
B-1 B-2 B-8 Blank Blank Blank
136 pages
:Total pages
:Part number
MFL68027013
Pagination sheet
www.lg.com
LED TV
*
Please read this manual carefully before operating your set and retain
it for future reference.
* LG LED TV applies LCD
screen with LED backlights.
LB63** LB69** LB87**
LB65** LB72**
LB67** LB73**
LB68** LB86**
OWNER’S MANUAL
Click! User Guide
P/NO : MFL68027013(1403-REV00)
Printed in Korea
*MFL68027013*
A-2
TABLE OF CONTENTS
COMMON
TABLE OF CONTENTS
A-3 SETTING UP THE TV
A-3 Attaching the stand
A-8 Attaching the Sound Bar Supporter
A-9 Tidying cables
A-11 MAKING CONNECTIONS
A-11 Antenna connection
A-12 Satellite dish connection
A-12 HDMI connection
A-14 - ARC (Audio Return Channel)
A-14 DVI to HDMI connection
A-16 Component connection
A-17 Composite connection
A-19 MHL connection
A-20 Audio connection
A-20 - Digital optical audio connection
A-21 USB connection
A-22 CI module connection
A-23 Headphone connection
A-24 Euro Scart connection
LANGUAGE
LANGUAGE LIST
English
Français
COMMON
B-1 SPECIFICATIONS
A-3
SETTING UP THE TV
SETTING UP THE TV
Image shown may differ from your TV.
Attaching the stand
LB63**-ZA, 32/39/42/47/50/55LB65**-ZA
B stand base
A stand base
1
2
1
1 Attach the stand to the TV using the upper
mounting hole on the back of the TV.
2 Attach the stand to the TV using the lower
connection on the back of the TV.
2
4EA
M4 x L14
M4 x L20
(Only 32LB65**-
ZA)
70LB65**-ZA, LB67**, LB68**, LB69**, LB73**-ZA
B stand Assy
A stand Assy
1
2
1
Stand Body
Stand Base
1 Attach the stand to the TV using the upper
mounting hole on the back of the TV.
2 Attach the stand to the TV using the lower
connection on the back of the TV.
A-4
SETTING UP THE TV
2
4EA
M4 x L14
LB63**-ZL, LB65**-ZK
2
1
A stand base
B stand base
2
1
1
1 Attach the stand to the TV using the upper
mounting hole on the back of the TV.
2 Attach the stand to the TV using the lower
connection on the back of the TV.
2
2
1
2
1
4EA
M4 x L14
M4 x L20
(Only
32LB65**-
ZK)
32/39LB65**-ZE/ZN
1
Stand Body
Stand Base
4EA
M4 x L20
1
A-5
SETTING UP THE TV
2
3
2EA
M4 x L20
42/47/50/55/60LB65**-ZE/ZN
1
Stand Body
Stand Base
4EA
M4 x L20
1
2
A-6
SETTING UP THE TV
3
4EA
M4 x L14
LB72**, LB73**-ZD/ZE
1
A Stand
Supporter
B Stand
Supporter
Stand Front
2
4EA
M4 x L10
1
2
3
1 Attach the stand to the TV using the upper
mounting hole on the back of the TV.
2 Attach the stand to the TV using the lower
connection on the back of the TV.
4
4EA
M4 x L14
A-7
SETTING UP THE TV
LB86**, LB87**
1
Sound Bar
4EA
M4 x L14
Stand Assy Right
Stand Assy Left
2
3
4EA
M4 x L14
4
Screw Cover
A-8
SETTING UP THE TV
CAUTION
y
When attaching the stand to the TV
set, place the screen facing down on a
cushioned table or flat surface to protect
the screen from scratches.
y
Make sure that the screws are inserted
correctly and fastened securely. (If they
are not fastened securely enough, the TV
may tilt forward after being installed.)
Do not use too much force and over
tighten the screws; otherwise screw may
be damaged and not tighten correctly.
NOTE
y
Remove the stand before installing the
TV on a wall mount by performing the
stand attachment in reverse.
y
The Screw Cover will protect the opening
from accumulating dust and dirty.
y
The Rubber will protect the opening from
accumulating dust and dirt. When
installing the wall mounting bracket, use
the Rubber. (Only LB65**-ZE/ZN)
Rubber
Attaching the Sound Bar
Supporter
(In case of mounting on a wall)
LB86**, LB87**
1
Sound Bar
4EA
M4 x L14
Sound Bar Supporter Right
Sound Bar Supporter Left
2
A-9
SETTING UP THE TV
3
4EA
M4 x L14
4
Screw Cover
CAUTION
y
When attaching the sound bar supporter
to the TV set, place the screen facing
down on a cushioned table or flat surface
to protect the screen from scratches.
y
Make sure that the screws are inserted
correctly and fastened securely. (If they
are not fastened securely enough, the TV
may tilt forward after being installed.)
Do not use too much force and over
tighten the screws; otherwise screw may
be damaged and not tighten correctly.
y
The sound bar supporter only uses for
wall mounting.
NOTE
y
Remove the sound bar supporter before
installing the stand by performing the
stand attachment in reverse.
y
The Screw Cover will protect the opening
from accumulating dust and dirty.
Tidying cables
Image shown may differ from your TV.
1 Gather and bind the cables with the Cable
Holder. (Depending on model)
2 Fix the Cable Management rmly to the TV.
(Only 32LB65**-ZA)
Cable Management
A-10
SETTING UP THE TV
(Only LB63**-ZA, 39/42/47/50/55/60LB65**-ZA,
LB67**, LB68**, LB69**, LB73**-ZA)
Cable Holder
Cable Management
(Only 32LB65**-ZK)
Cable Management
(Only LB63**-ZL, 39/42/47/50/55/60/70LB65**-
ZK/ZL)
Cable Holder
Cable Management
(Only LB65**-ZE/ZN)
Cable Holder
(Only 70LB65**)
Cable Holder
Cable Management
(Only LB72**, LB73**-ZD/ZE)
Cable Holder
Cable Management
(Only LB86**, LB87**)
Cable Holder
Cable Management
CAUTION
y
Do not move the TV by holding the cable
holders, as the cable holders may break,
and injuries and damage to the TV may
occur.
A-11
MAKING CONNECTIONS
MAKING CONNECTIONS
This section on MAKING CONNECTIONS mainly
uses diagrams for the LB67** models.
Antenna connection
ANTENNA /
CABLE IN
(*Not Provided)
English
Connect the TV to a wall antenna socket with an
RF cable (75 Ω).
NOTE
y
Use a signal splitter to use more than 2
TVs.
y
If the image quality is poor, install a signal
amplifier properly to improve the image
quality.
y
If the image quality is poor with an
antenna connected, try to realign the
antenna in the correct direction.
y
An antenna cable and converter are not
supplied.
y
Supported DTV Audio: MPEG, Dolby
Digital, Dolby Digital Plus, HE-AAC
Français
Connectez la TV à une prise d’antenne murale
avec un câble RF (75 Ω).
REMARQUE
y
Utilisez un séparateur de signaux pour
utiliser plus de deux téléviseurs.
y
Si la qualité d’image est mauvaise,
installez correctement un amplificateur
de signaux pour l’améliorer.
y
Si vous utilisez une antenne et que la
qualité d’image est mauvaise, essayez
de réaligner l’antenne dans la bonne
direction.
y
Le câble et le convertisseur d’antenne ne
sont pas fournis.
y
Technologies audio TNT prises en
charge : MPEG, Dolby Digital, Dolby
Digital Plus, HE-AAC
A-12
MAKING CONNECTIONS
Satellite dish connection
(Only satellite models)
LNB
Satellite IN
13/18V
700mA Max
(*Not Provided)
English
Connect the TV to a satellite dish to a satellite
socket with a satellite RF cable (75 ).
Français
Connectez la TV à une parabole satellite ou à
une prise satellite à l’aide d’un câble satellite RF
(75 ).
HDMI connection
(Only LB86**, LB87**)
HDMI
DVD / Blu-Ray / HD Cable
Box / HD STB / PC
(*Not Provided)
A-13
MAKING CONNECTIONS
(Only LB63**, LB65**, LB67**, LB68**, LB69**,
LB72**, LB73**)
HDMI
(*Not Provided)
DVD / Blu-Ray / HD Cable
Box / HD STB / PC
English
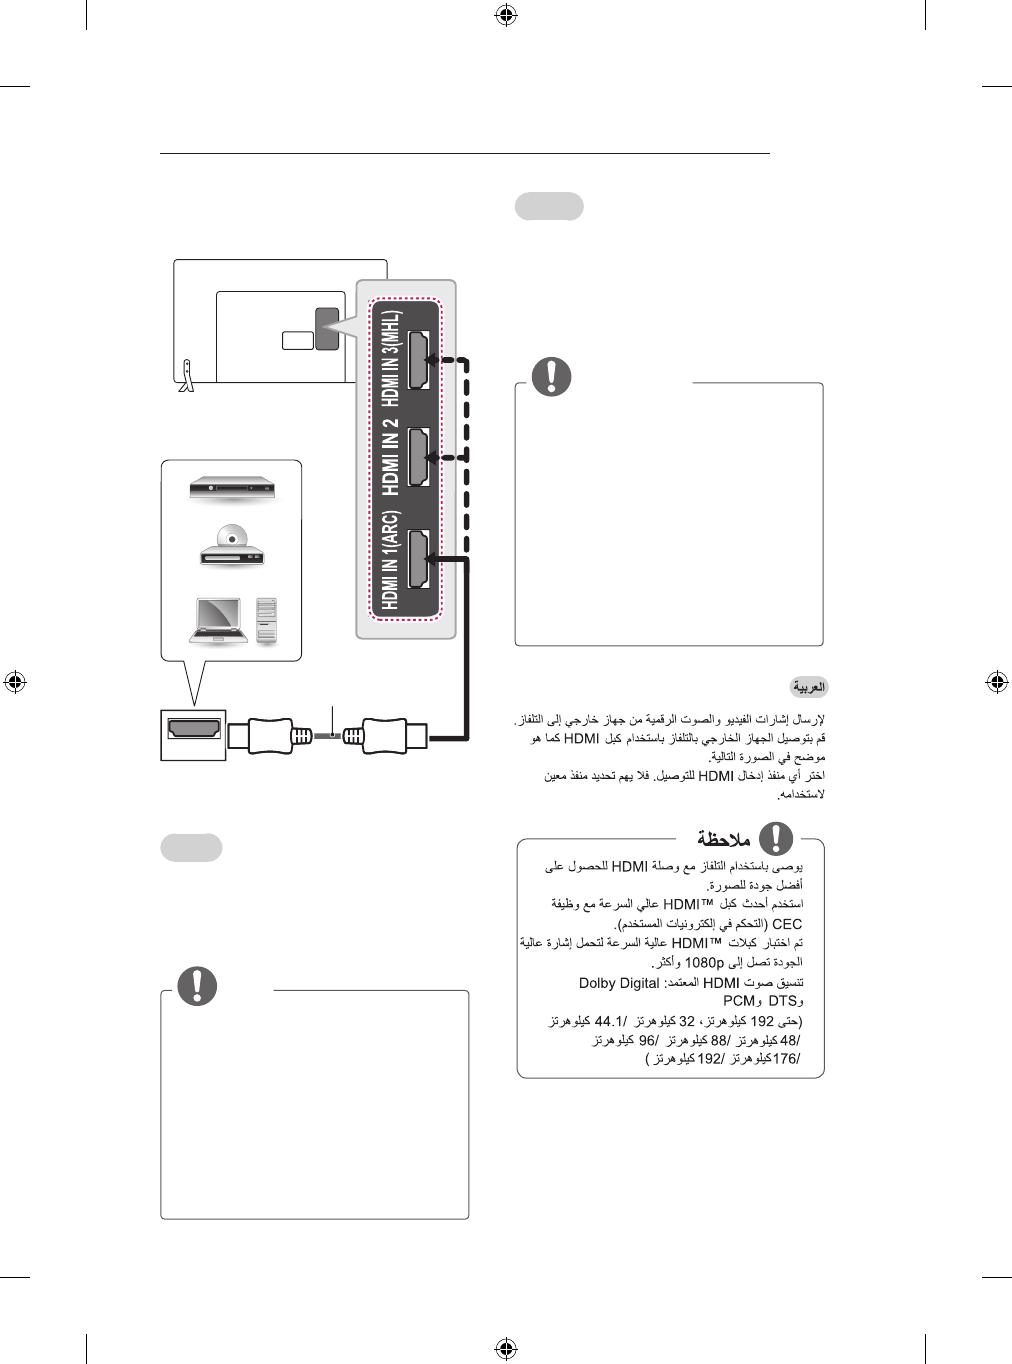
Transmits the digital video and audio signals from
an external device to the TV. Connect the external
device and the TV with the HDMI cable as shown.
Choose any HDMI input port to connect. It does
not matter which port you use.
NOTE
y
It is recommended to use the TV with
the HDMI connection for the best image
quality.
y
Use the latest High Speed HDMI™ Cable
with CEC (Customer Electronics Control)
function.
y
High Speed HDMI™ Cables are tested to
carry an HD signal up to 1080p and higher.
y
Supported HDMI Audio format : Dolby
Digital, DTS, PCM (Up to 192 KHz, 32KHz
/44.1KHz/48KHz/88KHz/96KHz/176KHz/1
92KHz)
Français
Permet de transmettre les signaux vidéo et audio
numériques d’un périphérique externe vers la TV.
Connectez le périphérique externe et la TV avec
le câble HDMI comme indiqué sur l’illustration
suivante.
Choisissez un port d’entrée HDMI pour établir la
connexion. Peu importe le port que vous utilisez.
REMARQUE
y
Pour obtenir une meilleure qualité
d’image, il est recommandé d’utiliser la
TV avec une connexion HDMI.
y
Utilisez le tout nouveau câble haut débit
HDMI™ avec la fonction CEC (contrôles
électroniques client).
y
Les câbles HDMI™ haut débit sont testés
pour transporter un signal HD de 1080p
ou supérieur.
y
Formats audio HDMI pris en charge :
Dolby Digital, DTS, PCM (jusqu’à
192 KHz, 32KHz/44,1KHz/48KHz/88KHz/
96KHz/176KHz/192KHz)
A-14
MAKING CONNECTIONS
ARC (Audio Return Channel)
English
y
An external audio device that supports
SIMPLINK and ARC must be connected
using HDMI IN 1 (ARC) or HDMI/DVI IN 1
(ARC) port.
y
When connected with a high-speed
HDMI cable, the external audio device
that supports ARC outputs optical SPDIF
without additional optical audio cable and
supports the SIMPLINK function.
Français
y
Un périphérique audio externe prenant
en charge SIMPLINK et ARC doit être
connecté à l’aide du port HDMI IN 1 (ARC)
ou HDMI/DVI IN 1 (ARC).
y
Si vous reliez un câble HDMI haut débit,
le périphérique audio externe qui prend en
charge les sorties ARC, prend également
en charge la sortie optique SPDIF sans
câble audio optique supplémentaire, ainsi
que la fonction SIMPLINK.
y
y
DVI to HDMI connection
(Only LB86**, LB87**)
DVD / Blu-Ray / HD Cable Box / HD STB / PC
(*Not Provided)
YELLOW
A-15
MAKING CONNECTIONS
(Only LB63**, LB65**, LB67**, LB68**, LB69**,
LB72**, LB73**)
DVI OUT
AUDIO OUT
DVD / Blu-Ray / HD Cable Box / HD STB / PC
RED
WHITE
(*Not Provided)
English
Transmits the digital video signal from an external
device to the TV. Connect the external device and
the TV with the DVI-HDMI cable as shown. To
transmit an audio signal, connect an audio cable.
Choose any HDMI input port to connect. It does
not matter which port you use.
NOTE
y
Depending on the graphics card, DOS
mode may not work if a HDMI to DVI Cable
is in use.
y
When using the HDMI/DVI cable, only
Single link is supported.
Français
Permet de transmettre les signaux vidéo d’un
périphérique externe vers la TV. Connectez le
périphérique externe et la TV avec le câble DVI-
HDMI comme indiqué sur l’illustration suivante.
Pour émettre un signal audio, raccordez un câble
audio.
Choisissez un port d’entrée HDMI pour établir la
connexion. Peu importe le port que vous utilisez.
REMARQUE
y
Selon la carte graphique, le mode DOS
peut ne pas fonctionner si vous utilisez
un câble pour établir la connexion HDMI-
DVI.
y
Lors de l’utilisation du câble HDMI/DVI,
seule une liaison unique peut être prise
en charge.
A-16
MAKING CONNECTIONS
Component connection
(Only LB86**, LB87**)
AUDIO
VIDEO
L R
IN
COMPONENT
B
AUDIO
AV2
PR
VIDEO
P Y
RED
WHITE
RED
GREEN
BLUE
(*Not
Provided)
YELLOW
DVD / Blu-Ray / HD Cable Box
GREEN
(Use the
component gender
cable provided.)
YELLOW
(Use the composite
gender cable
provided.)
RED
WHITE
RED
GREEN
BLUE
RED
WHITE
RED
GREEN
BLUE
(Only LB63**, LB65**, LB67**, LB68**, LB69**,
LB72**, LB73**)
AUDIO
VIDEO
L R
RED
WHITE
RED
GREEN
BLUE
DVD / Blu-Ray / HD Cable Box
(*Not
Provided)
RED
WHITE
RED
GREEN
BLUE
English
Transmits analog video and audio signals from an
external device to the TV. Connect the external
device and the TV with a component cable as
shown.
NOTE
y
If cables are not installed correctly, it
could cause this image to display in black
and white or with distorted colours.
A-17
MAKING CONNECTIONS
Français
Permet de transmettre les signaux audio et vidéo
analogiques d’un périphérique externe vers la
TV. Connectez le périphérique externe et la TV
avec un câble composante comme indiqué sur
l’illustration suivante.
REMARQUE
y
Si les câbles sont mal installés, l’image
peut s’afficher en noir et blanc ou avec
des couleurs de mauvaise qualité.
y
Composite connection
(Only LB86**, LB87**)
VIDEO
MONO
( )
AUDIOL R
IN
COMPONENT
B
AUDIO
AV2
P
R
VIDEO
P Y
RED
WHITE
YELLOW
RED
WHITE
YELLOW
RED
WHITE
YELLOW
YELLOW
(Use the composite
gender cable
provided.)
DVD / Blu-Ray / HD
Cable Box / VCR
(*Not
Provided)
A-18
MAKING CONNECTIONS
(Only LB63**, LB65**, LB67**, LB68**, LB69**,
LB72**, LB73**)
VIDEO
MONO
( )
AUDIOL R
WHITE
YELLOW
YELLOW
WHITE
(*Not Provided)
DVD/ Blu-Ray / HD Cable Box / VCR
RED
RED
English
Transmits analog video and audio signals from an
external device to the TV. Connect the external
device and the TV with the composite cable as
shown.
Français
Permet de transmettre les signaux audio et vidéo
analogiques d’un périphérique externe vers la
TV. Connectez le périphérique externe et la TV
avec le câble composite comme indiqué sur
l’illustration suivante.
  • Page 1 1
  • Page 2 2
  • Page 3 3
  • Page 4 4
  • Page 5 5
  • Page 6 6
  • Page 7 7
  • Page 8 8
  • Page 9 9
  • Page 10 10
  • Page 11 11
  • Page 12 12
  • Page 13 13
  • Page 14 14
  • Page 15 15
  • Page 16 16
  • Page 17 17
  • Page 18 18
  • Page 19 19
  • Page 20 20
  • Page 21 21
  • Page 22 22
  • Page 23 23
  • Page 24 24
  • Page 25 25
  • Page 26 26
  • Page 27 27
  • Page 28 28
  • Page 29 29
  • Page 30 30
  • Page 31 31
  • Page 32 32
  • Page 33 33
  • Page 34 34
  • Page 35 35
  • Page 36 36
  • Page 37 37
  • Page 38 38
  • Page 39 39
  • Page 40 40
  • Page 41 41
  • Page 42 42
  • Page 43 43
  • Page 44 44
  • Page 45 45
  • Page 46 46
  • Page 47 47
  • Page 48 48
  • Page 49 49
  • Page 50 50
  • Page 51 51
  • Page 52 52
  • Page 53 53
  • Page 54 54
  • Page 55 55
  • Page 56 56
  • Page 57 57
  • Page 58 58
  • Page 59 59
  • Page 60 60
  • Page 61 61
  • Page 62 62
  • Page 63 63
  • Page 64 64
  • Page 65 65
  • Page 66 66
  • Page 67 67
  • Page 68 68
  • Page 69 69
  • Page 70 70
  • Page 71 71
  • Page 72 72
  • Page 73 73
  • Page 74 74
  • Page 75 75
  • Page 76 76
  • Page 77 77
  • Page 78 78
  • Page 79 79
  • Page 80 80
  • Page 81 81
  • Page 82 82
  • Page 83 83
  • Page 84 84
  • Page 85 85
  • Page 86 86
  • Page 87 87
  • Page 88 88
  • Page 89 89
  • Page 90 90
  • Page 91 91
  • Page 92 92
  • Page 93 93
  • Page 94 94
  • Page 95 95
  • Page 96 96
  • Page 97 97
  • Page 98 98
  • Page 99 99
  • Page 100 100
  • Page 101 101
  • Page 102 102
  • Page 103 103
  • Page 104 104
  • Page 105 105
  • Page 106 106
  • Page 107 107
  • Page 108 108
  • Page 109 109
  • Page 110 110
  • Page 111 111
  • Page 112 112
  • Page 113 113
  • Page 114 114
  • Page 115 115
  • Page 116 116
  • Page 117 117
  • Page 118 118
  • Page 119 119
  • Page 120 120
  • Page 121 121
  • Page 122 122
  • Page 123 123
  • Page 124 124
  • Page 125 125
  • Page 126 126
  • Page 127 127
  • Page 128 128
  • Page 129 129
  • Page 130 130
  • Page 131 131
  • Page 132 132
  • Page 133 133
  • Page 134 134
  • Page 135 135
  • Page 136 136
  • Page 137 137
  • Page 138 138

LG 60LB650V Le manuel du propriétaire

Catégorie
Téléviseurs LED
Taper
Le manuel du propriétaire
Ce manuel convient également à

dans d''autres langues