Summit SEH6624C Manuel utilisateur
- Catégorie
- Hottes
- Taper
- Manuel utilisateur
Ce manuel convient également à

7
0
Manual for the Installation, use and maintenance
of stainless steel kitchen range hoods
Manual de instalación, uso y mantenimiento
de campanas de acero inoxidable
Manuel d’installation, d’utilisation et d’entretien
des hottes de cuisine en acier inoxydable
Models / Modelos / Modèles:
SEH1530C, SEIH1536CV3, SEIH4636CV4,
SEH15360C, SEH1548C, SEIH3536C
ENGLISH: page 1
ESPAÑOL: página 17
FRANÇAIS: page 22
FELIX STORCH, INC.
770 Garrison Avenue
Bronx, New York 10474
www.summitappliance.com

1
EN
STAINLESS STEEL KITCHEN RANGE
H
O
O
D
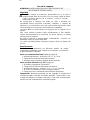
SAFETY WARNINGS
a. This product is designed for domestic use.
b. Electric input for the device must be 120 Volt, 60 Hz.
c. This product must be connected to a grounded electrical source.
d. All of the electrical installation must be done by a qualified electrician.
Installations done by unqualified persons may result in poor performance,
failure of the device, and accidents.
e. If the lights in your device have been on for a long time, do not touch
them. They are hot enough to burn your hands.
f. Kitchen hoods are designed for cooking in domestic residences. There is
a risk of failure if they are used for other purposes, and this will void the
warranty.
g. Comply with local codes and regulations related to discharging air. (This
warning does not apply to hoods with no stack).
h. Do not cook flammable foods below the hood.
i. Start the hood after placing pots or pans on your cooking surface.
Otherwise, high temperatures may result in deformation of parts of the
hood.
j. Do not leave hot oil on the cooking surface. Pots that contain hot oil can
ignite, causing fires.
k. When frying foods, be watchful of curtains. They may catch fire.
l. Change the filters regularly. Oily residues could become fire risks.
m. When replacing filters, always use the same type of filter as the original.
Substitutes may be unsuitable.
n. Do not use the device without a filter. Do not remove filters while the
device is working.
o. If there is ignition or sparking, cut off the electric power to the device.
(Turn off the switch.)
p. If the device is not cleaned regularly, built-up grime and dirt could cause a
fire.
q. When you make the stack installation for your hood, use 150 mm (5.9")
diameter pipes. The stack installation must be as short and with as few
bends as possible.

2
r. Keep the packing materials away from children, as these materials could
be dangerous to them.
s. Ensure that children do not play with the device. Do not let little children
use the device.
t. If there is a fire, cut off the power to the hood and cooking devices and
cover the flame. Do not use water to extinguish the fire.
READ AND SAVE THESE INSTRUCTIONS
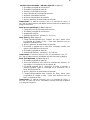
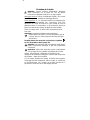
WARNING! TO REDUCE THE RISK OF A RANGE-TOP GREASE FIRE:
a. Never leave surface units unattended at high settings. Boilovers cause
smoking and greasy spillovers that may ignite. Heat oils slowly on low or
medium settings.
b. Always turn hood ON when cooking at high heat or when flambéing food.
c. Clean ventilating fans frequently. Grease should not be allowed to
accumulate on fan or filters.
d. Use proper pan size. Always use cookware appropriate for the size of the
surface element.
WARNING! TO REDUCE THE RISK OF INJURY TO PERSONS IN THE
EVENT OF A RANGE-TOP GREASE FIRE, OBSERVE THE FOLLOWING:
a. SMOTHER FLAMES with a close-fitting lid, cookie sheet or metal tray,
then turn off the burner. BE CAREFUL TO PREVENT BURNS. If the
flames do not go out immediately, EVACUATE AND CALL THE FIRE
DEPARTMENT.
b. NEVER PICK UP A FLAMING PAN – you may be burned.
c. DO NOT USE WATER, including wet dishcloths or towels, to douse the
fire – a violent steam explosion could result.
d. Use an extinguisher ONLY if:
i. You know you have a Class ABC extinguisher, and you already know
how to operate it.
ii. The fire is small and contained in the area where it started.
iii. The fire department is being called.
iv. You can fight the fire with your back to an exit.

3
WARNING! TO REDUCE THE RISK OF FIRE, ELECTRIC SHOCK, OR
OTHER INJURY, OBSERVE THE FOLLOWING:
a. Use this unit only in the manner intended by the manufacturer. If you
have questions, contact the manufacturer.
b. Before servicing or cleaning the unit, switch power off at the service panel
and lock the service-disconnecting means to prevent power from being
switched on accidentally. If the service-disconnecting means cannot be
locked, securely fasten a prominent warning device, such as a tag, to the
service panel.
c. To Reduce The Risk Of Fire Or Electric Shock, Do Not Use This Fan With
Any Solid-State Speed Control Device.
d. TO REDUCE THE RISK OF FIRE, USE ONLY METAL DUCTWORK.
CAUTION:
a. The Fan In This Device Is For General Ventilating Use Only. Do Not Use
To Exhaust Hazardous Or Explosive Materials And Vapors.
b. To reduce the risk of fire and to properly exhaust air, be sure to duct air
outside. Do not vent exhaust air into spaces within wall, ceilings, attics,
crawl spaces or garages.
WARNINGS ABOUT HANDLING AND CARRYING
a. All the materials used in the packaging of your device are suitable for
recycling.
b. Comply with the warning labels on the packs during transportation.
c. Grasp handling grips while carrying your device.

4
A
B
C
D
E
F

7

6
6

7
7

8
8
2
P1
1
3
2 4
1 3
P2
2 4
1 3
1 2 3 4 5 6 7
P3

7
1 2 3 4
P4
1 2 3 4 5
4
P5
1 2 3 4 5
P6

10

11
Dear Customer,
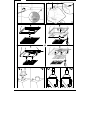
Thank you for buying our range hood. Please follow diagrams on pages
4-7 for proper installation, and carefully read the instructions below for
more on installation, plus information on optimum use and maintenance.
Note: The figures mentioned in this manual are on pages 4 through 10.
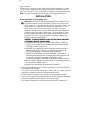
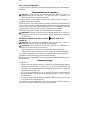
INSTALLATION
Hood installation on walls (pages 4-6)
Warning: Consult local regulations regarding fumes outlets. Do not
connect the hood to a fume, ventilation or hot air duct. Confirm that
room ventilation is appropriate with the local authorities. Make sure
the maximum air extraction flow rate for the appliances in the
room does not exceed 4 Pa (0.04 mbar). The room must have
adequate ventilation if an extractor hood is used simultaneously with
appliances that run on gas or other fuels. The evacuated air must
be extracted through ducts that are used for evacuating fumes from
appliances that run on gas or other fuels. Regulations regarding air
extraction must be complied with.
WARNIN
G – TO REDUCE THE RISK OF FIRE, ELECTRIC SHOCK, OR INJURY
TO PERSONS, OBSERVE THE FOLLOWING:
a) Installation work and electrical wiring must be done by qualified
person(s) in accordance with all applicable codes and standards,
including fire-rated construction.
b) Sufficient air is needed for proper combustion and exhausting of
gases through the flue (chimney) or fuel burning equipment to
prevent back drafting. Follow the heating equipment
manufacturer's guideline and safety standards such as those
published by the National Fire Protection Association (NFPA), and
the American Society for Heating, Refrigeration and Air
Conditioning Engineers (ASHRAE), and the local code authorities.
c) When cutting or drilling into wall or ceiling, do not damage electrical
wiring and other hidden utilities.
d) Ducted fans must always be vented to the outdoors.
Use rigid metal ductwork with a minimum diameter of 120 mm (about 4¾")
to evacuate fumes outside.
The above restrictions do not apply to hoods with no fumes outlet to
outside (recirculation system with activated charcoal filter).
Install the hood in line with the instructions on the template provided.
Use only with range hood cord-connection kits that have been investigated
and found acceptable for use with this model range hood.
The minimum distance to the hood must be at least 65 cm (about 25").

12
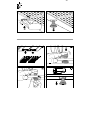
Hood installation on ceiling (page 7)
e before use.
hood.
n
in
um dist
ance from
ws and washers (Fig. 4).
c
4).
ructure using the nuts and washers (Fig.
Warning:
Before connecting the hood: Switch off the electricity supply
voltage and frequency coincide with that
e
device local regulations.
Remove the Styrofoam protective piec
The accessories needed for installation are inside the
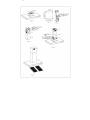
Use the two screws to attach the reducer pipe H to the upper plate
(Fig. 1). Connect the 6” non-flammable pipe to the opening in the ceiling.
Confirm that the ceiling will support the weight of the hood. Drill 4 holes
the ceiling using a 5/6” bit and insert the plugs (Fig. 2).
Adjust the length of the telescopic structure and attach the two pieces with
8 screws and washers. Bear in mind that the minim
working surface to the base of the hood should not be less than 25” (Fig.
3).
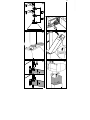
Attach the previously adjusted telescopic structure to the ceiling using 4
scre
Introduce pipe J with the grate on the upper part and attach the telescopi
structure using 2 screws (Fig.
Introduce pipe K and keep it raised (Fig. 5).
Affix the hood to the telescopic st
5).
Lower pipe K and attach it to the hood with 2 screws (Fig. 5)
Connecting the hood to the grid
and check that the supplied
indicated on the appliance nameplate.
ct the hood directly to the electrical grid, protected by a separator
accessible for disconnection, in line with
Conn

13
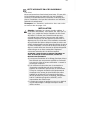
USE OF THE HOOD
WARNING: NOT SUITABLE FOR USE WITH SOLID-STATE SPEED
CONTROLS.
Safety
Warning: The hood may stop working during an electrostatic
discharge (e. g. lightning). This involves no risk of damage. Switch off
the electrical supply to the hood and reconnect after one minute.
Do
not allow the hood to be used by children or persons with reduced
(physical, sensory or mental) capabilities or lack of experience and
knowledge, unless they have been given instruction concerning use of the
appliance by a person responsible for their safety.
Children should be supervised so that they do not play with the appliance.
To avoid the risk of fire, clean the metal filter regularly, be especially
careful with pans containing hot oil and do not flambé food below the hood.
Do not use the hood if it shows signs of damage or imperfection. Contact an
official distributor or authorized dealer.
Accessible parts may heat up when using cooking appliances.
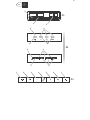
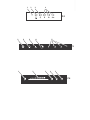
Control Panel
The different control panels are described below. Check the panel model
installed on your hood and see the figure indicated in each case.
Panel with sliding switch (Fig. P1 on page 8)
1. Extractor fan speed - positions: OFF, speed 1, 2 and 3
2. Extractor fan operating control pilot light.
3. Lighting on and off switch.
Panel with electronic button (Fig. P2 on page 8)
1. Lighting on and off.
2. Lighting operating control pilot light.
3. Extractor fan speed - button: speed 1, 2 and 3.
Press the current speed again to switch off the extractor fan.
4. Extractor fan operating speed control pilot light.
Timer:
Keep the chosen speed button pressed down for two seconds until
the display flashes. The extractor fan stops after 15 minutes and the lighting
switches off. To cancel the timer: Press the chosen speed button once.
Four-speed panel - Digital display (Fig. P3 on page 8)
1. Lighting on and off.
2. Extractor fan on and off.
3. Decrease extractor fan speed.
4. Extractor fan speed display panel.

14
5. Increase extractor fan speed.
6. Enable extractor fan turbo speed.
7. Enable and disable extractor fan timer.
Timer: The extractor fan works for 5 minutes at the current speed and
another 5 minutes at each of the lower speeds until it stops and the lighting
switches off.
Five-button panel (Fig. P4 on page 9)
1. Extractor fan operating control pilot light.
2. Lighting on and off.
3. Extractor fan off.
4. Extractor fan speed - button: speed 1, 2 and 3
Touch panel (Fig. P5 on page 9)
1. Filter clean warning display/button. Warning of the need to replace
the filter – press to deactivate once the filter has been cleaned or
replaced.
2. Enable and disable extractor fan timer.
3. Lighting on and off. Keep pressed down to adjust the lighting intensity.
4. Extractor fan on and off.
5. Extractor fan speed - button: speed 1, 2 and 3/4
Timer: The extractor fan works for 5 minutes at the current speed and
another 5 minutes at each of the lower speeds until it stops.
Sliding touch panel (Fig. P6 on page 9)
1. Extractor fan on and off.
2. Sliding touch panel for extractor fan speed control. Also used in
combination with button -3-.
3. Lighting on and off. Press the button and, while it is flashing,
adjust the lighting intensity using the sliding touch panel -2-.
4. Enable and disable extractor fan timer.
5. Clean Filter warning display/button. Warning of the need to replace the
filter – Press to deactivate once the filter has been cleaned or replaced.
Timer: The extractor fan works for 2 minutes at the current speed and
another 2 minutes at each of the lower speeds until it stops and the lighting
switches off.
Warning on the ZEN Model: The front panel automatically extends and
retracts on switching the hood on/off.

15
HOOD MAINTENANCE
Warning: Always switch off the electricity supply before carrying
out maintenance work on the hood. In the event of a fault, contact
an official distributor or authorized dealer.
Exterior
cleaning: Use non-corrosive, liquid detergent and avoid the use
of abrasive cleaning products.
Grease filters: To avoid fires, clean thoroughly once a month or whenever
the display pilot light indicates the need. To do so, remove the filters and
wash with hot water and detergent. If using a dishwasher, position the filters
vertically to prevent solid remains from depositing on them.
Activated charcoal filters: Replace every 3 months.
Importan
t: increase the filter cleaning/replacement frequency if the
hood is used for more than 2 hours a day. Always use genuine filters
from the manufacturer.
Bulb replacement (look for the symbol in the figures on
page 10)
Warning: Do not handle the bulbs until the electricity supply has been
switched off and they have cooled.
Importan
t: Use new bulbs according to the type indicated on the hood
nameplate.
Use bulbs with an aluminum reflector to replace halogen bulbs. Do not use
dichroic bulbs – risk of overheating.
On kitchen hoods equipped with tungsten lamps, the lights should only be
used during operation of the motor. They should not be left on permanently
and used as a light source.

16
LIMITED WARRANTY
SUMMIT Appliance warrants this product to be free from defects in materials and
workmanship for a period of one year from the date of original purchase or delivery. Any
parts determined to be defective will be replaced by SUMMIT at no charge to you. Plastic
parts, liners, and outer cabinets are warranted to be manufactured to commercially
acceptable standards and free from defects at the time of delivery.
This limited warranty does not apply to:
1. Improper installation
2. Customer misuse, negligence or damage
3. Incorrect electrical current
4. Products with serial number altered or removed
5. Products sold or used outside the fifty United States or District of Columbia
6. Commercial or industrial users
7. Damage to this product from accidents, alterations, failure to follow
instructions, fire, floods, earthquakes, war, civil disturbance or Acts of God.
SUMMIT is not liable for consequential or incidental damage.
DISCLAIMER OF IMPLIED WARRANTIES; LIMITATION OF REMEDIES
CUSTOMER'S SOLE AND EXCLUSIVE REMEDY UNDER THIS LIMITED
WARRANTY SHALL BE PRODUCT REPAIR AS PROVIDED HEREIN. IMPLIED
WARRANTIES, INCLUDING WARRANTIES OF MERCHANTABILITY OR
FITNESS FOR A PARTICULAR PURPOSE, ARE LIMITED TO ONE YEAR.
WARRANTOR SHALL NOT BE LIABLE FOR INCIDENTAL OR
CONSEQUENTIAL DAMAGES. SOME STATES DO NOT ALLOW THE
EXCLUSION OR LIMITATION OF INCIDENTAL OR CONSEQUENTIAL
DAMAGES, OR LIMITATIONS ON THE DURATION OF IMPLIED WARRANTIES
OF MERCHANTABILITY OR FITNESS, SO THESE EXCLUSIONS OR
LIMITATIONS MAY NOT APPLY TO YOU. THIS WARRANTY GIVES YOU
SPECIFIC LEGAL RIGHTS AND YOU MAY ALSO HAVE OTHER RIGHTS,
WHICH VARY FROM STATE TO STATE.
FELIX STORCH, INC.
Summit Appliance Division
770 Garrison Avenue
Bronx, New York 10474
www.summitappliance.com
For parts and accessory ordering, troubleshooting and helpful hints, visit:
www.summitappliance.com/support
or call 1-800-932-4267

17
ES
CAMPANA EXTRACTORA DE ACERO INOXIDABLE
Estimado cliente:
Agradecemos la compra de nuestra campana. Por favor, siga los diagramas
en las páginas 4 a 6 para la correcta instalación y lea cuidadosamente las
instrucciones a continuación para más información sobre la instalación,
además de información sobre el uso óptimo y el mantenimiento.
Notas: Las figuras mencionadas en el presente manual están en las páginas
4 a 10.
Atención: Consulte las normas locales sobre salida de humos.
No conecte la campana a un conducto de humo, aireación o aire caliente.
Confirme con la autoridad local que la ventilación del ambiente es
apropiada. Asegúrese que el caudal máximo de extracción de aire
de los aparatos del ambiente no supera 4 Pa (0,04 mbar). Debe estar
prevista una ventilación conveniente de la habitación si se utilizan
simultáneamente una campana extractora de cocina y aparatos
alimentados por gas u otro combustible. El aire evacuado no debe ser
enviado por conductos que se utilicen para evacuar los humos de
aparatos alimentados por gas u otro combustible. Los reglamentos
respecto a la evacuación de aire tienen que ser respetados.
ATENCIÓN - PARA REDUCIR EL RIESGO DE INCENDIOS, DESCARGAS
ELÉCTRICAS O LESIONES PERSONALES, OBSERVE LO SIGUIENTE:
El trabajo de instalación y el cableado eléctrico deben ser realizados
por personal calificado de acuerdo con todos los códigos y normas
aplicables, incluyendo la construcción clasificado por el fuego.
Se necesita suficiente aire para la combustión y descarga adecuadas
de los gases a través del tubo de humos (chimenea) o equipos que
queman combustibles para prevenir retroalimentación. Siga las
directrices del fabricante del equipo de calefacción y las normas de
seguridad tales como los publicados por la National Fire Protection
Association (NFPA) y la Sociedad Americana de Calefacción,
Refrigeración y Aire Acondicionado (ASHRAE) y las autoridades de
los códigos locales.
Al cortar o perforar la pared o el techo, no dañe el cableado eléctrico
ni otros servicios ocultos.
Los ventiladores con conductos siempre deben tener salida al exterior.
Para la evacuación de humos al exterior usar un tubo de metal rígido de
mín. Ø 120 mm.
Las restricciones anteriores no aplican a campanas sin salida de humos al
exterior (sistema de recirculación con filtro de carbón activo).

18
Instalación de la campana en la pared
Instale la campana según las instrucciones de la plantilla provista y las
indicaciones de la fig. 1 a la fig. 16 en las páginas 4 a 6.
Respetar lo indicado por el fabricante del aparato de cocción si la altura
desde la superficie de cocción a la campana (ver la fig. 3) es superior a
la indicada en la plantilla provista.
Use únicamente con los kits para el conexión de cables que han sido
investigados y considerados aceptables para su uso con este modelo de
campana.
La distancia mínima hasta la campana debe ser como mínimo 65 cms.
Instalación de la campana en el techo (página 7)
Retire la pieza protectora de espuma de poliestireno antes de su uso.
Los accesorios necesarios para la instalación se encuentran dentro de la
campana.
Utilice los dos tornillos para fijar el tubo reductor H a la placa superior
(Fig. 1). Conectar la tubería no inflamable de 6" a la abertura en el techo.
Asegúrese de que el techo puede soportar el peso de la campana.
Taladre cuatro agujeros en el techo con una broca de 5/6" y coloque los
tacos (Fig. 2).
Ajuste la longitud de la estructura telescópica y adjunte las dos piezas
con 8 tornillos y arandelas. Tenga en cuenta que la distancia mínima
desde la superficie de trabajo a la base de la campana no debe ser
menor de 25" (Fig. 3).
Fijar la estructura telescópica previamente ajustada al techo con 4
tornillos y arandelas (Fig. 4).
Introducir el tubo J con la rejilla en la parte superior y colocar la estructura
telescópica con 2 tornillos (Fig. 4).
Introducir el tubo K y manténgalo el
evado (Fig. 5).
Fije la campana a la estructura telescópica c on las tuercas y las
arandelas (Fig. 5).
Baje la tubería K y a
djúntelo a la campana con 2 tornillos (Fig. 5)
Conexión de la campana a la red
Atención: Antes de conectar la campana: corte el suministro eléctrico y
compruebe que la tensión y frecuencia suministrada coincide con la
indicada en la placa de características del equipo.
ecte el aparato directamente a la red eléctrica, proCon tegida por un
dispositivo separador accesible para su desconexión, omnipolar, acorde a la
reglamentación local.

19
Uso de la campana
ATENCIÓN:
NO ADECUADA PARA USO CON CONTROLES DE
VELOCIDAD DE ESTADO SÓLIDO.
Seguridad
Atención: Durante una descarga electroestática (p. ej. un rayo) la
campana puede dejar de funcionar. Esto no supone riesgo de daños.
Corte el suministro eléctrico de la campana y vuelva a conectar
transcurrido un minuto.
No permita que la campana sea usada por niños o personas con
capacidades (físicas, sensoriales o mentales) reducidas, o carezcan de
experiencia y/o conocimiento, salvo que hayan recibido instrucciones sobre
el uso del equipo por una persona responsable de su seguridad.
Los niños deben ser supervisados para asegurar que no jueguen con el
aparato.
Para evitar posibles incendios limpie periódicamente el filtro metálico,
controle permanentemente los recipientes con aceite caliente y no flamee
alimentos bajo la campana.
No utilice la campana si presenta daños o desperfectos. Contacte a un
distribuidor oficial o un agente autorizado.
Las partes accesibles pueden calentarse cuando se utiliza con aparatos de
cocción.
Panel de mando
Se describen a continuación los diferentes paneles de mando.
Compruebe el modelo de panel instalado en su campana y vea también
la figura indicada en cada caso.
Panel con conmutador deslizante (fig. P1 en página 8)
1- Velocidad del extractor - posiciones: OFF, 1º, 2º y 3º vel.
2- Testigo de control funcionamiento del extractor.
3- Interruptor para encendido y apagado de la iluminación.
Panel con botón electrónico (fig. P2 en página 8)
1- Encendido y apagado de la iluminación.
2- Testigo de control funcionamiento de la iluminación.
3- Velocidad del extractor - pulsador: 1º, 2º y 3º vel. Pulsando
de nuevo la velocidad en curso se apaga el extractor.
4- Testigo de control velocidad de funcionamiento del extractor.
Temporizador: Mantenga presionado por dos segundos el pulsador de la
velocidad escogida, hasta que el indicador parpadee. Transcurridos 15 min.
se detiene el extractor y se apaga la iluminación. Para anular la temporizador:
presione una vez el pulsador de la velocidad escogida.
La page est en cours de chargement...
La page est en cours de chargement...
La page est en cours de chargement...
La page est en cours de chargement...
La page est en cours de chargement...
La page est en cours de chargement...
La page est en cours de chargement...
La page est en cours de chargement...
La page est en cours de chargement...
-
 1
1
-
 2
2
-
 3
3
-
 4
4
-
 5
5
-
 6
6
-
 7
7
-
 8
8
-
 9
9
-
 10
10
-
 11
11
-
 12
12
-
 13
13
-
 14
14
-
 15
15
-
 16
16
-
 17
17
-
 18
18
-
 19
19
-
 20
20
-
 21
21
-
 22
22
-
 23
23
-
 24
24
-
 25
25
-
 26
26
-
 27
27
-
 28
28
-
 29
29


Summit SEH6624C Manuel utilisateur
- Catégorie
- Hottes
- Taper
- Manuel utilisateur
- Ce manuel convient également à
dans d''autres langues
- English: Summit SEH6624C User manual
- español: Summit SEH6624C Manual de usuario