Netgear MS105 Guide d'installation
- Catégorie
- Commutateurs réseau
- Taper
- Guide d'installation

Installation Guide
Router
June 2022 © NETGEAR, Inc., NETGEAR and the NETGEAR Logo
are trademarks of NETGEAR, Inc. Any non‑NETGEAR
trademarks are used for reference purposes only.
5 port Multi-Gigabit 2.5G Ethernet
Unmanaged Switch
Model MS105
Package contents
• NETGEAR 5‑port Multi‑Gigabit 2.5G Ethernet Unmanaged Switch
• Power adapter
• Wall‑mount installation kit
• Rubber feet
• Installation Guide
1. Register the switch
1. From a computer or mobile device that is connected to the Internet, visit
my.netgear.com.
2. Log in to your NETGEAR account.
NOTE: If you don’t have a free NETGEAR account, you can create one.
The Your Registered Products page displays.
3. Click the REGISTER NEW PRODUCT button.
4. In the SERIAL NUMBER eld, type the serial number of your switch.
The serial number is 13 digits long. It is printed on the switch label.
5. From the PURCHASE DATE menus, select the date that you purchased the switch.
6. Click the REGISTER button.
Your switch is registered to your NETGEAR account.
A conrmation email is sent to your NETGEAR account email address.
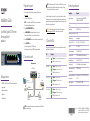
2. Connect the switch
Internet
WA X615 AP
MS105 switch
Sample connections
3. Check the LEDs
When you connect the power adapter to the switch and plug the cable into an electrical
outlet, the LEDs indicate the status:
LED Description
Power LED
Solid green: The switch is powered on and operating normally.
Off. Power is not supplied to the switch.
Both Port LEDs Solid green: 2.5 Gbps link on this port.
Blinking green: 2.5 Gbps activity on this port.
Off. No link is detected on this port.
Left Port LED only Solid green: 1 Gbps link on this port.
Blinking green: 1 Gbps activity on this port.
Off. No link is detected on this port.
Right Port LED only Solid green: 100 Mbps link on this port.
Blinking green: 100 Mbps activity on this port.
Off. No link is detected on this port.
Technical specications
Specication Description
Network interfaces RJ‑45 connectors that support 100BASE‑TX,
1000BASE‑T, and 2.5GBASE‑T
Ports 5
Power adapter 12V @ 1A DC input
Maximum power consumption 7.66W
Hardware security Kensington slot
Dimensions (W x D x H) 6.2 x 4.0 x 1.1 in. (158 x 101 x 27 mm)
Weight 1.1 lb (480 g)
Operating temperature 32 to 104° F (0 to 40° C)
Operating humidity 10 to 90% relative humidity, noncondensing
Storage temperature –4 to 158° F (–20 to 70° C)
Storage humidity 5 to 95% relative humidity, noncondensing
Maximum operating and
storage altitude
10,000 ft. (3,000 m)
Electromagnetic certications
and compliance
EMC class B device, FCC, ISED, CE, RCM, VCCI, BSMI,
CCC, KC
Safety certications CB, CE LVD, BSMI, CCC, RCM
WA X610 AP
Computer
NOTE: Each connected device requires a power adapter because the MS105 switch
does not provide PoE power.
NOTE: All switch ports support 2.5 Gbps, 1 Gbps, and 100 Mbps. You can connect
any device to any switch port. We recommend that you use Category 5e (Cat 5e)
cables or higher‑rated cables for your connections.
WAX630 AP
This switch is designed for indoor use only. If you want to connect it to a device located
outdoors, the outdoor device must be properly grounded and surge protected, and you
must install an Ethernet surge protector inline between the switch and the outdoor device.
Failure to do so can damage the switch.
WARNING: Before connecting this switch to outdoor cables or devices, see
https://kb.netgear.com/000057103 for safety and warranty information.

NETGEAR, Inc.
350 East Plumeria Drive
San Jose, CA 95134, USA
NETGEAR INTERNATIONAL LTD
Floor 1, Building 3
University Technology Centre
Curraheen Road, Cork,
T12EF21, Ireland
Mount the switch on a wall
We recommend that you use the wall‑mount screws that are included. The screws are
0.25 in. (6.5 mm) in diameter, 0.63 in. (16 mm) in length.
1. Locate the two mounting holes on the bottom panel of the switch.
2. Mark and drill two mounting holes in the wall where you want to mount the switch.
The two mounting holes must be 2.95 in. (75 mm) apart, center‑to‑center.
3. Insert the supplied anchors into the wall and tighten the screws with a No. 2 Phillips
screwdriver.
Leave about 0.15 in. (4 mm) of each screw protruding from the wall so that you can
insert the screws into the holes on the bottom panel.
Support and Community
Visit netgear.com/support to get your questions answered and access the latest
downloads.
You can also check out our NETGEAR Community for helpful advice at
community.netgear.com.
Regulatory and Legal
Si ce produit est vendu au Canada, vous pouvez accéder à ce document en français
canadien à https://www.netgear.com/support/download/.
(If this product is sold in Canada, you can access this document in Canadian French at
https://www.netgear.com/support/download/.)
For regulatory compliance information including the EU Declaration of Conformity, visit
https://www.netgear.com/about/regulatory/.
See the regulatory compliance document before connecting the power supply.
For NETGEAR’s Privacy Policy, visit https://www.netgear.com/about/privacy‑policy.
By using this device, you are agreeing to NETGEAR’s Terms and Conditions at
https://www.netgear.com/about/terms‑and‑conditions. If you do not agree, return the
device to your place of purchase within your return period.
Do not use this device outdoors.
Applicable to 6 GHz devices only: Only use the device indoors. The operation of 6 GHz
devices is prohibited on oil platforms, cars, trains, boats, and aircraft, except that operation
of this device is permitted in large aircraft while ying above 10,000 feet. Operation of
transmitters in the 5.925‑7.125 GHz band is prohibited for control of or communications
with unmanned aircraft systems.
-
 1
1
-
 2
2


Netgear MS105 Guide d'installation
- Catégorie
- Commutateurs réseau
- Taper
- Guide d'installation
dans d''autres langues
- English: Netgear MS105 Installation guide
Documents connexes
-
Netgear GS105GE 5-Port Gigabit Switch Guide d'installation
-
Netgear GS324v2 Guide d'installation
-
-
Netgear AGM731F Guide d'installation
-
-
-
-
Netgear GS308P Guide d'installation
-
-
Netgear MK72S Le manuel du propriétaire