inside for Assembly Manual
Check us out!
B347346837COM00SW
122023SW

Haven Nightstand Navy Blue
7346837COM
2
Do NOT return this product!
For missing or broken parts
- Call 1-800-489-3351
Two Adults
recommended
for assembly This product is not intended for commercial use
Keep this Assembly Manual for future reference

li leseedskids.com 3
Helpful Hints
Do NOT return this product!
- Compression dowels are tapped in with a hammer
- Make sure to always face the point on the top of the Cam Lock towards the
outer edge
- Use all the nails provided for the back panel and spread them out equally
- Back Panel must be used to make sure your unit is sturdy
- Do NOT use harsh chemicals or abrasive cleaners on this item
- Never push, pull, or drag your furniture
PEOPLE NEEDED FOR ASSEMBLY: 1-2
ESTIMATED ASSEMBLY TIME: 60 MIN
limited warranty valid in the U.S and Canada.
Call us!
1-800-489-3351
Monday-Friday

li leseedskids.com 4
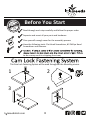
This Cam Lock Fastening System will be used throughout the assembly process.
Read through each step carefully and follow the proper order
Separate and count all your parts and hardware
Give yourself enough room for the assembly process
Have the following tools: Flat Head Screwdriver, #2 Phillips Head
Screwdriver and Hammer
to do so may result in stripping the screw,
1
3
2
4
Before You Start
Quick
Tip
Assembly

5
Before You Start
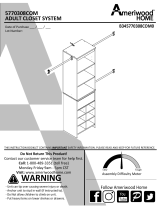
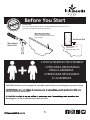
Please Note:
You may need to lightly tap the wood dowels with a hammer into
the holes during your assembly process.
Insert wood dowel completely
into the hole.
CAUTION: Failure to use 2 people for assembly could result in unit damage or personal injury.
unidad o lesiones personales.
dommages à l’unité ou des blessures personnelles.
2 PEOPLE NEEDED FOR ASSEMBLY
2 PERSONAS NECESITADAS
PARA LA ASAMBLEA
2 PERSONNES NÉCESSAIRES
À L’ASSEMBLÉE
Wood Dowel
Actual Size
Quick
Tip
Assembly
Wood Dowel will
extend out
approximately 3/8”.
Not Actual Size

6
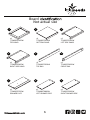
Board
Not actual size
x1
T7346837010SW
TOP PANEL
x1
T7346837020SW
BOTTOM PANEL
x1
T7346837030SW
LEFT SIDE PANEL
x1
T7346837040SW
RIGHT SIDE PANEL
x1
T7346837050SW
TOP RAIL
1
5
2 3
4
x1
T7346837060SW
FRONT RAIL
6
x1
T7346837070SW
DRAWER FACE
7
x1
T7346837080SW
LEFT DRAWER SIDE
8
x1
T7346837090SW
RIGHT DRAWER SIDE
9

7
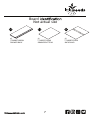
Board
Not actual size
x1
T7346837100SW
DRAWER BACK
x1
T7346837110SW
DRAWER BOTTOM
x1
T7346837120SW
BACK PANEL
10 11 12

8
x14
TSW0001
Cam Bolt
x14
TSW0002
Cam Lock
15-10
x4
TSW0004
DOWEL
M8 X 30
x12
TSW0007
SCREW
CBS 3.5 x 14
x7
TSW0008
SCREW
CBS 4 x 38
x2
TSW3006
HANDLE SCREW
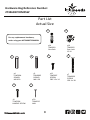
Hardware Bag Reference Number:
27346837COM0SW
Part List
Actual Size
A B
CEF
G
H
x20
TSW0015
NAIL
x2
TSW0005
DOWEL
M6 X 30
D
For any replacement hardware,
order using part #27346837COM0SW

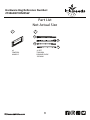
9
x1
TSW3001
HANDLE
x1 SET
TSW1004
DRAWER SLIDE
350 MM
Hardware Bag Reference Number:
27346837COM0SW
Part List
Not Actual Size
IJ
CL
CR
DR
DL

li leseedskids.com 10
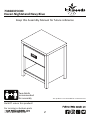
Step 1
x4
x4
Insert cam bolts (A) x 3, cam locks (B) x 2 and wood dowels (C) x 2 to left side panel (3).
Insert cam bolts (A) x 3, cam locks (B) x 2 and wood dowels (C) x 2 to right side panel (4).
C
B
x6
A
4
3
A
B
B
C
C
C
C

li leseedskids.com 11
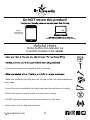
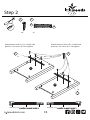
Step 2
x6 x1
E J
CL
CR
4
3
Slide (CL), scre Slide (CR), scre
4
3
CL
CR
Attach drawer slide (J) CL x 3 to left side
panel (3), use screws (E) x 3 to tighten.
Attach drawer slide (J) CR x 3 to left side
panel (4), use screws (E) x 3 to tighten.
J
J
E

li leseedskids.com 12
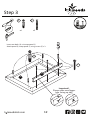
Step 3
Important!,
Please make sure bigger
hole facing up side
5
1
x4
A
x3
E
A
E
Insert cam bolts (A) x 4 to top panel (1).
Attach panel (5) to top panel (1) using screws (F) x 3.

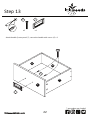
li leseedskids.com 13
Step 4
Insert cam locks (B) x 4 to bottom panel (2).
Insert cam locks (B) x 2 and wood dowels (D) x 2 to front rail (6).
2
6
x6
B
x2
D
B
B
D
D

li leseedskids.com 14
* raw edges are shaded
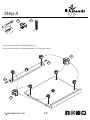
Step 5
Attach bottom panel (2) and front rail (6) to left side panel (3).
Tighten the cam locks clockwise.
2
6
3
UNLOCK
LOCK

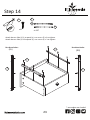
li leseedskids.com 15
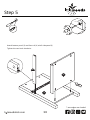
Step 6
Attach right side panel (4) to front rail (6) and bottom panel (2).
Tighten the cam locks clockwise.
4
2
6
UNLOCK
LOCK

li leseedskids.com 16
* raw edges are shaded
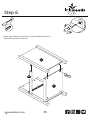
Step 7
With a assistance of second person, carefully turn the unit up right.
Attach top panel (1) to left side panel (3) and right side panel (4).
Tighten the cam locks clockwise.
4
1
3
UNLOCK
LOCK

li leseedskids.com 17
* raw edges are shaded
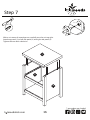
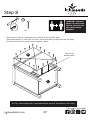
Step 8
Pro Tip : Second person is recomended for ease of assembly on this step
2
12 Allign with
bottom panel
x20
H
With the assistance of a second person, carefully lay the unit face down.
Attach back panel (12) with nails (H) x 20 as shown and nailing straight into the raw edges,.
Distance from corner to corner must be equal as shown.
IMPORTANT ! THE BACK
PANEL IS A STRUCTURAL
PART OF THIS UNIT AND
MUST BE INSTALLED
PROPERLY.

li leseedskids.com 18
* raw edges are shaded
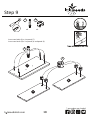
Step 9
Insert cam bolts (A) x 4 to panel (7).
Insert cam locks (B) x 2 to panel (8) and panel (9).
8
7
9
x4
B
x4
A
A
B

li leseedskids.com 19
* raw edges are shaded
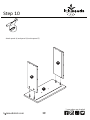
Step 10
Attach panel (8) and panel (9) to the panel (7).
8
7
9

li leseedskids.com 20
* raw edges are shaded
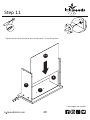
Step 11
Tighten the cam locks clockwise, then insert panel (11) into the groove.
UNLOCK
LOCK
8
7
9
11
La page est en cours de chargement...
La page est en cours de chargement...
La page est en cours de chargement...
La page est en cours de chargement...
La page est en cours de chargement...
La page est en cours de chargement...
La page est en cours de chargement...
La page est en cours de chargement...
La page est en cours de chargement...
La page est en cours de chargement...
La page est en cours de chargement...
La page est en cours de chargement...
La page est en cours de chargement...
-
 1
1
-
 2
2
-
 3
3
-
 4
4
-
 5
5
-
 6
6
-
 7
7
-
 8
8
-
 9
9
-
 10
10
-
 11
11
-
 12
12
-
 13
13
-
 14
14
-
 15
15
-
 16
16
-
 17
17
-
 18
18
-
 19
19
-
 20
20
-
 21
21
-
 22
22
-
 23
23
-
 24
24
-
 25
25
-
 26
26
-
 27
27
-
 28
28
-
 29
29
-
 30
30
-
 31
31
-
 32
32
-
 33
33