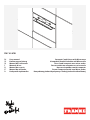
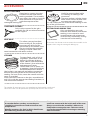
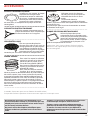
Franke FMY 45 MW Manuel utilisateur
- Catégorie
- Cuisine
- Taper
- Manuel utilisateur

EN User manual Compact Combi Oven with Microwave
DE Bedienungsanleitung Kompakter Kombi-Backofen mit Mikrowelle
FR Manuel de l’utilisateur Four Combi compact avec micro-ondes
IT Manuale d’uso Forno combinato compatto con microonde
ES Manual de usuario Horno microondas combi compacto
PT Manual do utilizador Forno Compacto Combi com Micro-ondas
PL Podręcznik użytkownika Kompaktowy piekarnik połączony z funkcją kuchenki mikrofalowej
FMY 45 MW

EN USER MANUAL �������������������������������������������������������������������������������������������������������������������������������������������������������������������������������� 3
DE BEDIENUNGSANLEITUNG ���������������������������������������������������������������������������������������������������������������������������������������������������������14
FR MANUEL DE L’UTILISATEUR ������������������������������������������������������������������������������������������������������������������������������������������������������ 25
IT MANUALE D’USO ���������������������������������������������������������������������������������������������������������������������������������������������������������������������������36
ES MANUAL DE USUARIO ���������������������������������������������������������������������������������������������������������������������������������������������������������������� 47
PT MANUAL DO UTILIZADOR ��������������������������������������������������������������������������������������������������������������������������������������������������������58
PL PODRĘCZNIK UŻYTKOWNIKA �������������������������������������������������������������������������������������������������������������������������������������������������69
LANGUAGES
Sprachen / Langues / Lingue / Idiomas / Idiomas / Języki

EN
3
TABLE OF CONTENTS
OVERVIEW ���������������������������������������������������������������������������������������������������������������������������������������������������������������������������������� 4
CONTROL PANEL ���������������������������������������������������������������������������������������������������������������������������������������������������������������������� 4
ACCESSORIES ���������������������������������������������������������������������������������������������������������������������������������������������������������������������������� 5
FUNCTIONS �������������������������������������������������������������������������������������������������������������������������������������������������������������������������������6
FIRST TIME USE �������������������������������������������������������������������������������������������������������������������������������������������������������������������������8
DAILY USE ����������������������������������������������������������������������������������������������������������������������������������������������������������������������������������� 8
USEFUL TIPS ���������������������������������������������������������������������������������������������������������������������������������������������������������������������������� 10
COOKING TABLE ��������������������������������������������������������������������������������������������������������������������������������������������������������������������� 11
TESTED RECIPES ��������������������������������������������������������������������������������������������������������������������������������������������������������������������� 12
CLEANING AND MAINTENANCE ���������������������������������������������������������������������������������������������������������������������������������������� 13
TROUBLESHOOTING ������������������������������������������������������������������������������������������������������������������������������������������������������������� 13
SUPPORT ���������������������������������������������������������������������������������������������������������������������������������������������������������������������������������� 13

4
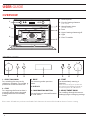
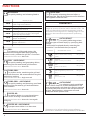
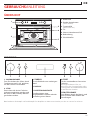
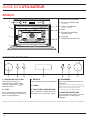
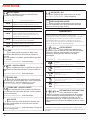
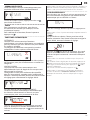
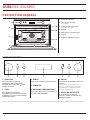
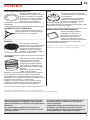
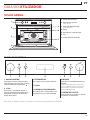
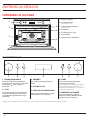
OVERVIEW
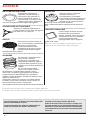
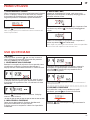
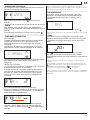
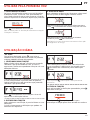
CONTROL PANEL
1. Control panel
2. Circular heating element
(not visible)
3. Identification plate
(do not remove)
4. Door
5. Upper heating element/grill
6. Light
7. Glass Turntable
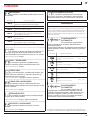
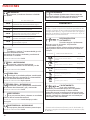
1. SELECTION KNOB
For switching the oven on by
selecting a function� Turn to the
position to switch the oven off�
2. STOP
For stopping the function that is
currently active at any time and
putting the oven into standby
mode�
3. BACK
For returning to the previous
menu�
4. DISPLAY
5. CONFIRMATION BUTTON
For confirming a selected function
or a set value�
6. START
For immediately starting a
function�
With the oven off, press to activate
the microwave cooking function at
maximum power for 30 seconds.
7. ADJUSTMENT KNOB
For scrolling through the menus
and applying or changing settings�
1 7
USER GUIDE
24 5
1
2
4
7
6
5
3
36
Please note: All knobs are push-activated knobs. Push down on the centre of the knob to release it from its seating.

EN
5
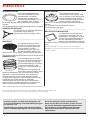
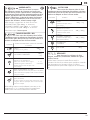
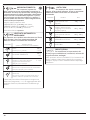
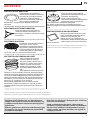
ACCESSORIES
GLASS TURNTABLE
Placed on its support, the glass
turntable can be used with all
cooking methods� The turntable
must always be used as a base for
other containers or accessories,
with the exception of the
rectangular baking tray�
TURNTABLE SUPPORT
Only use the support for the glass
turntable� Do not rest other accessories
on the support�
WIRE RACK
This allows you to place food
closer to the grill, for perfectly
browning your dish and for
optimal hot air circulation� Place
the wire shelf on the turntable,
making sure that it does not
come into contact with other surfaces�
STEAMER
To steam foods such as fish or
vegetables, place these in the
basket (2) and pour drinking
water (100 ml) into the bottom
of the steamer (3) to achieve the
right amount of steam�
To boil foods such as pasta, rice
or potatoes, place these directly
on the bottom of the steamer
(the basket is not required) and add an appropriate
amount of drinking water for the amount you are
cooking� For best results, cover the steamer with the
cover (1) provided�
Always place the steamer on the glass turntable and
only use it with the appropriate cooking functions, or
with microwave functions�
COVER
Useful for covering food while
it is cooking or heating in the
microwave�
The cover reduces splashes, keeps
foods moist and can also be used
to create two cooking levels�
It is not suitable for use in convection cooking or with
any of the grill functions�
RECTANGULAR BAKING TRAY
Only use the baking tray with
functions that allow for convection
cooking; it must never be used
in combination with microwaves�
Insert the tray horizontally, resting
it on the rack in the cooking
compartment�
Please note: You do not need to remove the turntable and its
support when using the rectangular baking tray.
The number of accessories may vary according to which model is purchased.
Other accessories can be purchased separately from the fter-sales Service.
3
2
1
There are a number of accessories available on
the market. Before you buy, ensure they are
suitable for microwave use and resistant to oven
temperatures.
Metallic containers for food or drink should never
be used during microwave cooking.
Always ensure that foods and accessories do not
come into contact with the inside walls of the oven.
Always ensure that the turntable is able to turn
freely before starting the oven. Take care not to
unseat the turntable whilst inserting or removing
other accessories.

6
FUNCTIONS
* Function used as reference for the energy eciency
declaration in accordance with Regulation (EU) No. 65/2014
MICROWAVE
For quickly cooking and reheating food or
drinks�
POWER SUGGESTED USE
900 W Quickly reheating drinks or other foods
with a high water content
750 W Cooking vegetables
650 W Cooking meat and fish
500 W Cooking meaty sauces, or sauces
containing cheese or egg. Finishing off
meat pies or pasta bakes
350 W Slow, gently cooking. Perfect for melting
butter or chocolate
160 W Defrosting frozen foods or softening
butter and cheese
90 W Softening ice cream
GRILL
For browning, grilling and gratins� We
recommend turning the food during cooking�
For best results, preheat the grill for 3-5 minutes�
Recommended accessories: Wire rack
GRILL + MICROWAVE
For quickly cooking and gratinating dishes,
combining the microwave and grill functions�
Recommended accessories: Wire rack
TURBO GRILL
For perfect results, combining the grill and
convection functions� We recommend turning the
food during cooking�
Recommended accessories: High wire rack
TURBO GRILL + MICROWAVE
For quickly cooking and browning your food,
combining the microwave, grill and convection
oven functions�
Recommended accessories: Wire rack
FORCED AIR
For cooking dishes in a way that achieves
similar results to using a conventional oven�
Recommended accessories: Wire rack / rectangular
baking tray
FORCED AIR + MICROWAVE
To prepare oven dishes in a short time�
Recommended accessories: Wire rack
QUICK HEAT
For quickly reheating the oven before a
cooking cycle� Wait for the function to finish before
placing food inside the oven�
COOKASSIST
With the automatic functions, simply select the type and
weight or quantity of food to achieve the best results. The
oven will automatically calculate the optimum settings
and continue to change them as cooking progresses. The
total time does not include preparation or preheating
phases.
AUTO DEFROST
For quickly defrosting various
different types of food simply by specifying their
weight�
Food should be placed directly onto the glass
turntable� Turn the food when prompted�
CATEGORY RECOMMENDED FOODS WEIGHT
MEAT
(mince, cutlets, steaks, roasting
joints)
100 g - 2 kg
POULTRY
(whole chicken, pieces, llets) 100 g - 3 kg
FISH
(whole, steaks, llets) 100 g - 2 kg
VEGETABLES
(mixed vegetables, peas, broccoli,
etc.)
100 g - 2 kg
BREAD
(loaves, buns, rolls) 100 g - 2 kg
AUTO REHEAT
For reheating ready-made food
that is either frozen or at room temperature� The
oven automatically calculates the settings required
to achieve the best results in the shortest amount
of time� Place food on a microwave-safe and
heatproof dinner plate or dish�

EN
7
AUTO STEAM
For steam-cooking foods
such as vegetables or fish, using the steamer
provided� An initial preparation phase automatically
generates steam, bringing the water poured into
the bottom of the steamer to the boil� Timings for
this phase may vary� The oven then proceeds with
steam-cooking the food, according to the time set�
Some indicative cooking times are as follows:
• FRESH VEGETABLES (250-500 g): 4-6 minutes;
• FROZEN VEGETABLES (250-500 g): 5-7 minutes;
• FISH FILLETS (250-500 g): 4-6 minutes.
Required accessory: Steamer
AUTO FORCED AIR + MICROWAVE
For oven-cooking foods quickly and
achieving optimal results� Use cookware that is
suitable for oven cooking and resistant to
microwaves, too�
CATEGORY RECOMMENDED FOODS,
SUGGESTED QUANTITY and TIPS
CHICKEN
(poultry, fish, gratins)
800 g
- 1,5 kg
FROZEN LASAGNA 400 g
- 1 kg
COOKIES
Place on the lightly greased baking
plate. Put the plate in the oven
when prompted.
9 - 12
pcs.
CANNED BREAD DOUGH
For pressure-canned brioche and crescent
dough. Put the baking plate in the oven when
prompted.
FROZEN ROLLS (loaves, buns, rolls)
To be used for ready baked frozen rolls. Put
the baking plate in the oven when prompted.
Preheating required before you start cooking, on programs
3 - 4 - 5. When the correct temperature is reached, the oven
will prompt you to put the food in.
AUTO COOK
For oven-cooking foods quickly and
achieving optimal results� Use cookware that is
suitable for oven cooking and resistant to
microwaves�
CATEGORY FOOD WEIGHT
BAKED POTATOES
(Turn when prompted) 200 g - 1 kg
FRESH VEGETABLES
(Cut uniformly and add 2
to 4 tablespoons of water.
Cover)
200 g - 800 g
FROZEN VEGETABLES
(Turn when prompted.
Cover)
200 g - 800 g
CANNED VEGETABLES 200 g - 600 g
POP CORN 100 g
SETTI SETTINGS
For changing the oven settings
(language, Eco mode, brightness, audible signal
volume, clock)�
Please note: When Eco mode is active, the brightness of
the display will be reduced after a few seconds to save
energy. The display is reactivated automatically whenever
any of the buttons are pressed, etc.

8
DAILY USE
.JET START
With the oven off, press to activate the microwave
cooking function at maximum power (1000W) for 30
seconds�
1. SELECT A FUNCTION
Turn the selection knob until the function you require
is shown on the display: the display will show the icon
for the function and its basic settings�
Where available, to select an item from the menu (the
display will show the first available item), turn the
adjustment knob until the item you require is shown�
Press to confirm your selection: the display will
show the basic settings�
2. SET THE FUNCTION
After having selected the function you require, you
can change its settings�
The display will show the settings that can be
changed in sequence�
With the setting flashing on the display, turn the
adjustment knob to change the setting, then press
to confirm and continue with the settings that follow�
Please note: Pressing allows you to change the previous
setting again.
3. ACTIVATE THE FUNCTION
Once you have applied the settings you require, press
to activate the function�
PRESS
You can press at any time to pause the function
that is currently active�
1. SELECT THE LANGUAGE
You will need to set the language and the time
when you switch on the appliance for the first
time� ENGLISH will scroll along the display: Turn the
adjustment knob to scroll through the list of available
languages and select the one you require�
Press to confirm your selection�
Please note: The language can subsequently be changed
from the “Settings” menu.
2. SET THE TIME
After selecting the language, you will need to set the
current time: The two digits for the hour will flash on
the display�
Turn the adjustment knob to set the correct hour and
press : the minutes will flash on the display�
Turn the adjustment knob to set the minutes and press
to confirm�
Please note: You may need to set the time again following
lengthy power outages.
FIRST TIME USE

EN
9
. SAFETY LOCK
This function is automatically activated to prevent the
oven from being switched on accidentally�
DOOR
Open and close the door, then press to start the
function�
.PAUSE
To pause an active function, for example to stir or turn
the food, simply open the door�
To start it up again, close the door and press �
. AUTOMATIC FUNCTIONS
CATEGORIES
When using certain automatic functions, you will
need to select a category for the food you are cooking
in order to achieve the best results�
The reference category corresponds to the number
indicated at the top right of the display�
g
FOOD
Refer to the table containing descriptions of the
functions for information on all of the categories�
DEGREE OF DONENESS
Most of the automatic functions will prompt you to
select how well done you require the food to be�
The degree of doneness can be altered during
the first 20 seconds of operation after activating
the function: activate the function, then turn the
adjustment knob to select the setting you require�
MID
ACTIONS (STIR OR TURN FOOD)
Certain automatic functions require you to turn or stir
the food, for example, and will pause in order for you
to do so�
TURN
Once the oven has paused cooking, open the door
and carry out the action you are prompted to perform
before closing the door again and pressing to
continue with cooking�
Please note: When using the “Defrost” function, the function
will start again automatically after two minutes, even if you
have not turned or stirred the food.
. RESIDUAL HEAT
In many cases, when food has been cooked, the oven
will activate an automatic cooling process, which will
be indicated on the display�
To view the clock during this process, press �
Please note: Opening the door temporarily interrupts the
process.
. TIMER
When the oven is switched off, the display can be
used as a timer� To activate the function and set the
length of time you require, turn the adjustment knob�
Press to activate the timer: An audible signal will
sound and the display will indicate once the timer has
finished counting down the selected time�
Please note: The timer does not activate any of the cooking
cycles.
To change the time set for the timer, press to pause it,
turn the adjustment knob to set the new time, then press
to restart the count.
To go back to the current time, press again.
Please note: Activating any function (i.e. turning the selection
knob) will cancel the timer count; this is indicated by a
buzzer�
COOL

10
USEFUL TIPS
HOW TO READ THE COOKING TABLE
The table indicates the best functions to use for any
given food�
The cooking times refer to the cooking cycle for the
food inside the oven, excluding the preheating phase
(where required)�
The settings and cooking times are approximate
and depend on the amount of food and the type of
accessory/ies used�
Always cook food for the minimum cooking time
given and check that it is cooked through�
For best results, follow the recommendations in the
cooking table carefully when selecting accessories�
MICROWAVE COOKING TIPS
Microwaves only penetrate food to a certain depth;
you should therefore space the food out as much as
possible when cooking multiple items at the same
time�
Smaller items cook more quickly than larger items: To
ensure uniform cooking, cut food into pieces of equal
size�
Moisture evaporates during the microwave cooking
process: Using a microwave-resistant cover helps to
reduce moisture loss�
When you remove food from a microwave, it will
often continue cooking for some time afterwards� We
therefore recommend always allowing a couple of
minutes of standing time once the cooking cycle has
finished�
It is a good idea to stir food when cooking it in the
microwave, as this brings the more well-cooked parts
at the outside edges towards the middle and vice
versa�
Place thin slices of meat one on top of the other or
overlapping� Thicker slices, such as meat loaf and
sausage, should be placed next to one another�
CLING FILM AND PACKAGING
Remove any twist ties from paper or plastic bags
before placing them in the oven for microwave
cooking�
Plastic film should be scored or perforated with a fork
in order to relieve the pressure and prevent bursting
due to the steam building up during cooking�
LIQUIDS
Liquids may overheat beyond boiling point without
visibly bubbling�
This could cause hot liquids to suddenly boil over�
To prevent this possibility:
� Avoid using containers with narrow necks�
� Stir the liquid before placing the container in the
microwave oven and leave the teaspoon in the
container�
� After heating, stir again before carefully removing
the container from the microwave oven�
FROZEN FOOD
For best results, we recommend defrosting food
directly on the glass turntable� You can also use
a lightweight, microwave-safe plastic container if
needed�
Boiled foods, stews and meat-based sauces will
defrost better if stirred occasionally while defrosting�
Separate food once it starts to defrost: the separated
portions will defrost more quickly�
FOOD FOR INFANTS
When heating food or liquids in a baby bottle or a
baby food jar, always stir and check the temperature
before serving�
This will ensure that the heat is evenly distributed and
avoid the risk of scalding or burns�
Make sure the lid and the teat are removed before
heating�
MEAT AND FISH
To obtain perfect surface browning quickly while
keeping the inside of the meat or fish soft and juicy,
we recommend using the “Grill + MW” function� For
best results, set the microwave power to between 160
and 350 W�

EN
11
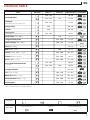
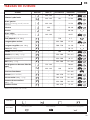
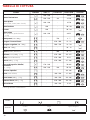
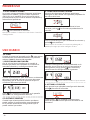
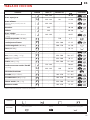
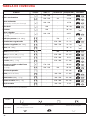
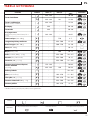
COOKING TABLE
FOOD FUNCTION TEMP. (°C) POWER (W) DURATION (MIN) ACCESSORIES
Leavened cakes 160 - 180 -30-60
160 - 180 90 25-50
Filled pies
(cheesecake, strudel, apple tart) 160 - 190 -35-70
Sponge cakes 160 -30 - 40
Cookies 160 -20 - 30
Savoury pies
(vegetable pie, quiche Lorraine 1 - 1.2 kg) 180 - 190 -40-55
Ready meals (250 - 500 g) -750 4 - 7
Lasagna/baked pasta -350 - 500 15 - 25
Frozen lasagna (500 - 700 g) -500 - 750 14 - 20
Pizza (400 - 500 g) - - 10 - 12
Meat (chops, steak) -500 10 - 15
Poultry (whole, 800 g - 1.5 kg) -350 - 500 30 - 45 *
Chicken (fillets or pieces) -350 - 500 10 -17
Roasts (800 g - 1.2 kg) -350 - 500 25 - 40 *
Roast lamb/Veal/Roast beef
(1.3-1.5 Kg)
170 - 180 -70-80*
160 - 180 160 50-70*
Sausages/kebabs - - 20 - 40 *
Fish (steaks or fillets) -160 - 350 15 - 20 *
Whole sh (800 g - 1.2 kg) -160 - 350 20 - 30 *
Baked potatoes (600 g - 1 kg) -350 - 500 30 - 50 *
Baked apples -160 - 350 15 -25
* Turn the food halfway through cooking.
FUNCTIONS
Forced Air Forced Air + Microwave Grill Grill + Microwave
ACCESSORIES
Heatproof plate/container suitable
for use in microwaves Wire rack Rectangular Baking Tray

12
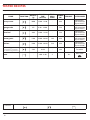
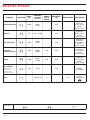
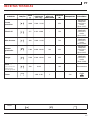
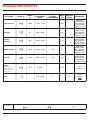
Compiled for the certification authorities in accordance with the standards IEC 60705 and IEC 60350-1.
FOOD FUNCTION WEIGHT
(g)
COOKING
TIME
(min:sec)
TEMP./
GRILL
LEVEL
POWER
(W) PREHEAT. ACCESSORIES
Pastry cream 1000 12:00 - 13:00 -650 -Microwave-
safe container
(Pyrex 3�227)
Sponge cake 475 8:00 - 10:00 -750 -Microwave-
safe container
(Pyrex 3�827)
Meat loaf 900 13:00 - 14:00 -750 -Microwave-
safe container
(Pyrex 3�838)
Potato gratin 110 0 28:00 - 30:00 190 350 -Microwave-
safe container
(Pyrex 3�827)
Chicken 1200 35:00 - 40:00 210 350 -Microwave-
safe container
(Pyrex 3�220)
Defrosting meat
(turn halfway through
the defrosting process) 500 10:30 -160 -Turntable
Toast -4:00 - 6:00 3 - Yes Wire shelf
TESTED RECIPES
FUNCTIONS
Microwave Grill + Microwave Grill

EN
13
INTERIOR AND EXTERIOR SURFACES
• Clean the surfaces with a damp microfibre cloth�
If they are very dirty, add a few drops of pH-neutral
detergent� Finish off with a dry cloth�
• Clean the door glass with a suitable liquid detergent�
• At regular intervals or in case of spills, remove the
turntable and its support to clean the bottom of the
oven, removing all food residue�
• The grill does not need to be cleaned as the intense
heat burns away any dirt: Use this function on a
regular basis�
ACCESSORIES
All accessories are dishwasher safe�
For stubborn dirt, rub gently with a cloth� Always
leave the accessories to cool down before cleaning�
Make sure that the appliance has cooled down
before carrying out any maintenance or cleaning.
Do not use steam cleaners.
Do not use wire wool, abrasive scourers or abrasive/
corrosive cleaning agents, as these could damage
the surfaces of the appliance.
CLEANING AND MAINTENANCE
Problem Possible cause Solution
The oven is not working� Power cut.
Disconnection from the
mains.
Check for the presence of mains electrical power
and whether the oven is connected to the
electricity supply. Turn off the oven and restart it to
see if the fault persists.
The oven makes noises, even
when it is switched off� Cooling fan active. Open the door or wait until the cooling process has
finished.
The display shows the letter
“ERR” followed by a number� Software fault. Contact you nearest Client After-sales Service
Centre and state the number following the letter
“ERR”.
TROUBLESHOOTING
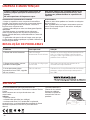
001
In the event of any operation problems, contact a Franke
Technical Service Centre�
Never use the services of unauthorized technicians�
Specify:
- the type of fault
- the appliance model (art�/Code)
- the serial number (S�N�) on the rating plate, located
on the left hand edge of the oven cavity (visible when
the oven door is open)�
When contacting our
Service Centre, please
state the codes provided
on your product's
identification plate�
XXX/XXX
XXXXXXXXXXXX
XXXXXXXXXXXX
SUPPORT

14
INHALT
ÜBERSICHT �������������������������������������������������������������������������������������������������������������������������������������������������������������������������������15
BEDIENFELD ���������������������������������������������������������������������������������������������������������������������������������������������������������������������������� 15
ZUBEHÖRTEILE ����������������������������������������������������������������������������������������������������������������������������������������������������������������������� 16
FUNKTIONEN �������������������������������������������������������������������������������������������������������������������������������������������������������������������������� 17
ERSTER GEBRAUCH ��������������������������������������������������������������������������������������������������������������������������������������������������������������� 19
TÄGLICHER GEBRAUCH �������������������������������������������������������������������������������������������������������������������������������������������������������� 19
HILFREICHE TIPPS ������������������������������������������������������������������������������������������������������������������������������������������������������������������ 21
GARTABELLE ����������������������������������������������������������������������������������������������������������������������������������������������������������������������������22
ERPROBTE REZEPTE ��������������������������������������������������������������������������������������������������������������������������������������������������������������23
REINIGUNG UND PFLEGE �����������������������������������������������������������������������������������������������������������������������������������������������������24
LÖSEN VON PROBLEMEN �����������������������������������������������������������������������������������������������������������������������������������������������������24
SUPPORT ����������������������������������������������������������������������������������������������������������������������������������������������������������������������������������24

DE
15
ÜBERSICHT
BEDIENFELD
1. Bedienfeld
2. Rundes Heizelement
(nicht sichtbar)
3. Typenschild
(nicht entfernen)
4. Tür
5. Oberes Heizelement/Grill
6. Beleuchtung
7. Glasdrehteller
1. AUSWAHLKNOPF
Zum Einschalten des Ofens durch
Funktionsauswahl� Auf drehen,
um den Ofen auszuschalten�
2. STOP
Damit kann die aktive Funktion
jederzeit angehalten werden und
der Ofen in den Standby-Betrieb
geschaltet werden�
3. ZURÜCK
Für die Rückkehr zum vorherigen
Menü�
4. DISPLAY
5. BESTÄTIGUNGSTASTE
Zum Bestätigen einer
ausgewählten Funktion oder der
Einstellung eines Wertes�
6. START
Für den unmittelbaren Start einer
Funktion�
Bei ausgeschaltetem Ofen, zur
Aktivierung des Garvorgangs bei voller
Leistungsstufe der Mikrowellenfunktion
für 30 Sekunden drücken.
7. EINSTELLKNOPF
Zum Blättern durch die Menüs und
zum Einsetzen oder Ändern der
Einstellungen�
1 7
GEBRAUCHSANLEITUNG
24 5
1
2
4
7
6
5
3
36
Bitte beachten: Alle Knöpfe sind Druckknöpfe. Den Knopf bis zur Mitte runter drücken, um ihn aus seinem Sitz zu lösen.

16
ZUBEHÖRTEILE
GLASDREHTELLER
Auf seiner Auflage platziert,
kann der Drehteller bei allen
Garmethoden verwendet
werden� Mit Ausnahme des
rechteckigen Backblechs, muss
der Drehteller stets als Basis
für andere Behälter oder Zubehörteile verwendet
werden�
DREHTELLER AUFLAGE
Die Auflage nur für den Glasdrehteller
verwenden� Keine anderen
Zubehörteile auf die Auflage stellen�
GRILLROST
Ermöglicht die Speise näher
an den Grill zu platzieren, die
Speise wird perfekt gebräunt
und die heiße Luft kann
optimal zirkulieren� Den Rost
auf den Drehteller stellen und
sicherstellen, dass er keine anderen Flächen berührt�
DAMPFEINSATZ
Zum Dämpfen von Fisch oder
Gemüse, die Speise in den Korb
(2) geben und zur Erzeugung
der korrekten Menge an Dampf,
Trinkwasser (100 ml) in den
Boden des Dampfeinsatzes (3)
füllen�
Zum Kochen von Speisen wie
Pasta, Reis oder Kartoffeln, diese
direkt auf den Boden des Dampfeinsatzes stellen
(der Korb ist nicht erforderlich) und Trinkwasser
entsprechend der zu garenden Menge zufügen�
Für optimale Ergebnisse, den Dampfeinsatz mit der
mitgelieferten Abdeckhaube (1) abdecken�
Den Dampfeinsatz immer auf den Glasdrehteller
stellen und ihn mit den geeigneten Garfunktionen
oder mit Mikrowellenfunktionen verwenden�
ABDECKHAUBE
Zum Abdecken der Speise
während des Garvorgangs oder
zum Erwärmen in der Mikrowelle�
Durch die Abdeckung werden
Spritzer reduziert und die Speise
feucht gehalten; außerdem
kann sie zur Erstellung zweier Garstufen verwendet
werden�
Sie ist weder zum Umluftgaren noch für
Grillfunktionen geeignet�
RECHTECKIGES BACKBLECH
Das Backblech ausschließlich für
Funktionen verwenden, die ein
Umluftgaren ermöglichen; es darf
niemals im Kombinationsbetrieb
mit der Mikrowelle verwendet
werden� Das Backblech horizontal
einsetzen, indem es auf den Rost im Garraum gestellt
wird�
Bitte beachten: Bei der Verwendung des rechteckigen
Backblechs müssen der Drehteller und seine Auage nicht
entfernt werden.
Die Anzahl der Zubehörteile kann je nach gekauftem Modell unterschiedlich sein.
Weitere Zubehörteile sind separat über den Kundenservice erhältlich.
3
2
1
Eine Reihe von Zubehörteilen kann käuich
erworben werden. Vor dem Kauf überprüfen, ob
sie für die Verwendung in der Mikrowelle geeignet
und ofenfest sind.
Metallbehälter für Speisen oder Getränke dürfen
niemals zum Mikrowellengaren verwendet werden.
Stets sicherstellen, dass Speisen und Zubehörteile
die Innenseiten des Geräts nicht berühren.
Bevor Sie den Ofen einschalten, prüfen Sie stets,
ob sich der Drehteller ungehindert drehen kann.
Darauf achten, den Drehteller beim Einsetzen
oder Entnehmen anderer Zubehörteile nicht
abzunehmen.

DE
17
FUNKTIONEN
* Die Funktion wird als Bezug für die
Energieezienzerklärung in Übereinstimmung mit der
Verordnung (EU) Nr. 65/2014 verwendet
MIKROWELLE
Zum schnellen Garen und Aufwärmen von
Speisen und Getränken�
LEISTUNGSSTUFE GEBRAUCHSEMPFEHLUNG
900 W Schnelles Aufwärmen von Getränken
oder anderen Speisen mit einem
hohen Wassergehalt
750 W Garen von Gemüse
650 W Garen von Fleisch und Fisch
500 W Garen von Fleischsoßen, käse- oder
eierhaltigen Soßen. Fertiggaren von
Fleischpasteten oder Nudelauauf
350 W Langsames, schonendes Garen. Perfekt
zum Schmelzen von Butter oder
Schokolade
160 W Auftauen tiefgekühlter Speisen oder
Aufweichen von Butter und Käse
90 W Aufweichen von Eiscreme
GRILL
Zum Bräunen, Grillen und Gratinieren� Wir
empfehlen, die Speisen während des Garens zu
wenden�
Für optimale Ergebnisse, den Grill für 3 -5 Minuten
vorheizen�
Empfohlene Zubehörteile: Grillrost
GRILL + MIKROWELLE
Zum schnellen Garen und Gratinieren von
Gerichten durch Kombination der Mikrowellen- und
Grillfunktionen�
Empfohlene Zubehörteile: Grillrost
TURBOGRILL
Für optimale Ergebnisse durch Kombination
der Grill- und Umluftfunktionen� Wir empfehlen, die
Speisen während des Garens zu wenden�
Empfohlene Zubehörteile: Hoher Grillrost
GRILL + HEISSLUFT + MIKROWELLE
Zum schnellen Garen und Bräunen von Speisen
durch Kombination der Mikrowellen-, Grill- und
Umluftfunktionen�
Empfohlene Zubehörteile: Grillrost
HEISSLUFT
Zum Garen von Speisen mit ähnlichen
Ergebnissen eines herkömmlichen Ofens�
Empfohlene Zubehörteile: Grillrost / rechteckiges Backblech
HEISSLUFT + MW
Für die schnelle Zubereitung von Ofengerichten�
Empfohlene Zubehörteile: Grillrost
SCHNELLAUFHEIZEN
Zum Schnellaufheizen des Ofens vor einem
Garzyklus� Das Ende der Funktion abwarten, bevor
die Speise in den Ofen gestellt wird�
COOKASSIST
Bei den Automatikfunktionen einfach die Art und das
Gewicht oder die Menge der Speise auswählen, um beste
Ergebnisse zu erzielen. Der Ofen berechnet automatisch die
optimalen Einstellungen und ändert diese während den
Garprozessen. Die Gesamtzeit schließt nicht die Zubereitung
oder Vorheizphasen ein.
AUTOMATISCHE
AUFTAUFUNKTION
Zum schnellen Auftauen
verschiedener Speisen, einfach durch Angabe ihres
Gewichts�
Die Speise muss direkt auf den Glasdrehteller gestellt
werden� Wenden Sie die Speise nach Auorderung�
KATEGORIE EMPFOHLENE LEBENSMITTEL GEWICHT
FLEISCH
(Gehacktes, Koteletts, Steaks,
Bratenstücke)
100 g – 2 kg
GEFLÜGEL
(ganze Hähnchen,
Hähnchenstücke, Hähnchenlets)
100 g – 3 kg
FISCH
(ganzer Fisch, Fischsteaks,
Fischlets)
100 g – 2 kg
GEMÜSE
(Mischgemüse, Erbsen, Brokkoli
usw.)
100 g – 2 kg
BROT
(Brotlaibe, süße Teilchen oder
Brötchen)
100 g – 2 kg
AUTOMATISCHES AUFWÄRMEN
Zum Aufwärmen von tiefgekühlten
oder raumtemperierten Fertiggerichten� Der Ofen
berechnet automatisch die Einstellungen für die
bestmöglichen Ergebnisse in kürzester Zeit� Geben
Sie das Gargut auf einen mikrowellengeeigneten und
hitzebeständigen Essteller oder in ein entsprechendes
Kochgeschirr�

18
DAMPF-AUTOMATIK
Zum Garen von Speisen mit
Dampf, wie Gemüse oder Fisch, den mitgelieferten
Dampfeinsatz verwenden� Eine anfängliche
Zubereitungsphase erzeugt automatisch Dampf
und bringt das in den Boden des Dampfeinsatzes
gefüllte Wasser zum Sieden� Der Zeitablauf für
diese Phase kann variieren� Dann fährt der Ofen,
entsprechend der eingestellten Zeit, mit dem
Dampfgaren der Speise fort�
Einige Richtgarzeiten sind wie folgt:
• FRISCHES GEMÜSE (250-500 g): 4-6 Minuten;
• TIEFGEFR. GEMÜSE (250 –500 g): 5 – 7 Minuten;
• FISCHFILETS (250-500 g): 4-6 Minuten.
Erforderliches Zubehör: Dampfeinsatz
AUTO HEISSLUFT + MW
Für schnell im Ofen gebackene
Lebensmittel und für beste Ergebnisse� Verwenden
Sie Kochgeschirr, das für die Mikrowelle geeignet
und auch ofenfest ist�
KATEGORIE EMPFOHLENE LEBENSMITTEL,
EMPFOHLENE MENGE und TIPPS
HÄHNCHEN
(Geügel, Fisch, Gratins)
800 g
-1,5 kg
TIEFGEFR. LASAGNE 400 g
- 1 kg
PLÄTZCHEN
Legen Sie die Plätzchen auf das
leicht gefettete Backblech. Stellen
Sie das Blech bei Aufforderung in
den Ofen.
9 - 12
Stück
BROTTEIG IN DOSEN
Für druckkonservierte Brioche- und
Hörnchenteige. Stellen Sie das Backblech bei
Aufforderung in den Ofen.
TIEFGEK. BRÖTCHEN (Leibe, süße Brötchen,
Brötchen)
Geeignet für fertig gebackene tiefgekühlte
Brötchen. Stellen Sie das Backblech bei
Aufforderung in den Ofen.
Vorheizen ist erforderlich, bevor Sie mit den Programmen
3 - 4 - 5 zu garen beginnen. Wenn die richtige Temperatur
erreicht ist, erscheint die Auorderung, die Speise hinein zu
geben.
AUTO COOK
Für schnell im Ofen gebackene
Lebensmittel und für beste Ergebnisse� Verwenden
Sie Kochgeschirr, das für die Mikrowelle geeignet
und ofenfest ist�
KATEGORIE SPEISE GEWICHT
OFENKARTOFFELN
(Drehen, nach
Aufforderung)
200 g - 1 kg
FRISCHES GEMÜSE
(Gleichmäßig schneiden
und 2 bis 4 Esslöffel
Wasser hinzugeben.
Abdeckhaube)
200 g – 800 g
TIEFGEFR. GEMÜSE
(Drehen, nach
Aufforderung.
Abdeckhaube)
200 g – 800 g
GEMÜSE AUS
KONSERVEN 200 g – 600 g
POPCORN 100 g
EINST EINSTELLUNGEN
Zur Änderung der Ofeneinstellungen
(Sprache, Ökomodus, Helligkeit, Lautstärke des
akustischen Signals, Uhr)�
Bitte beachten: Wenn der Ökomodus aktiviert ist, wird die
Helligkeit des Displays nach einigen Sekunden vermindert,
um Energie zu sparen. Das Display wird automatisch
erneut aktiviert, wenn eine beliebige Taste gedrückt wird,
usw.

DE
19
TÄGLICHER GEBRAUCH
.JET START
Bei ausgeschaltetem Ofen, zur Aktivierung
des Garvorgangs bei voller Leistungsstufe der
Mikrowellenfunktion (1000 W) für 30 Sekunden
drücken�
1. AUSWÄHLEN EINER FUNKTION
Den Auswahlknopf drehen, bis die gewünschte
Funktion auf dem Display erscheint: Der Bildschirm
zeigt das Symbol für die Funktion und die
Grundeinstellungen�
Zur Auswahl eines Menüpunkts (der Bildschirm
zeigt den ersten verfügbaren Menüpunkt an), den
Einstellknopf drehen, bis der gewünschte Menüpunkt
erscheint�
Zur Bestätigung der Auswahl drücken Sie : Auf dem
Display erscheinen die Grundeinstellungen�
2. DIE FUNKTION EINSTELLEN
Nach Auswahl der gewünschten Funktion, können Sie
die Einstellungen ändern�
Das Display zeigt die Einstellungen an, die
nacheinander geändert werden können�
Wenn die Einstellung auf dem Display blinkt, den
Einstellknopf drehen, um die Einstellung zu ändern,
dann drücken, um zu Bestätigen und mit den
folgenden Einstellungen fortzufahren�
Bitte beachten: Durch Drücken von können Sie die
vorige Einstellung erneut ändern.
3. DIE FUNKTION AKTIVIEREN
Nachdem die erforderlichen Einstellungen getätigt
wurden, drücken, um die Funktion zu aktivieren�
DRÜCK
Die aktive Funktion kann jederzeit durch Drücken von
angehalten werden�
1. SPRACHE AUSWÄHLEN
Wenn das Gerät zum ersten Mal eingeschaltet
wird, muss die Sprache und die Zeit eingestellt
werden� ENGLISH erscheint auf dem Bildschirm:
Den Einstellknopf drehen, um durch die Liste
der verfügbaren Sprachen zu blättern und die
gewünschte Sprache auszuwählen�
Zur Bestätigung der Auswahl drücken Sie �
Bitte beachten: Die Sprache kann später unter dem
Menüeintrag „Einstellungen“ geändert werden.
2. ZEIT EINSTELLEN
Nach der Auswahl der Sprache muss die aktuelle
Zeit eingestellt werden: Auf dem Display blinken die
beiden Stundenziffern�
Den Einstellknopf drücken, um die korrekte Uhrzeit
einzustellen und drücken: Die Minuten blinken auf
dem Display�
Den Einstellknopf drücken, um die korrekten Minuten
einzustellen und zur Bestätigung drücken�
Bitte beachten: Nach einem längeren Stromausfall muss die
Zeit unter Umständen erneut eingestellt werden.
ERSTER GEBRAUCH

20
. SICHERHEITSSPERRE
Diese Funktion wird automatisch aktiviert, um ein
versehentliches Einschalten des Ofens zu vermeiden�
TÜR
Die Tür öffnen und schließen und anschließend
zum Start der Funktion drücken�
.PAUSE
Zum Unterbrechen einer aktiven Funktion, z�B� zum
Umrühren oder Wenden der Speise, einfach die Tür
öffnen�
Zum Fortsetzen der Funktion, die Tür schließen und
drücken�
.AUTOMATIKFUNKTIONEN
KATEGORIEN
Bei der Verwendung von bestimmten Funktionen
müssen Sie eine Kategorie für die Lebensmittel
auswählen, um beste Ergebnisse zu erzielen�
Die Referenzkategorie entspricht der Nummer auf der
oberen rechten Ecke des Bildschirms�
g
SPEISE
Siehe Tabelle mit Beschreibungen der Funktionen für
Informationen über alle Kategorien�
GARSTUFE
Die meisten der Automatikfunktionen werden Sie
dazu auffordern, auszuwählen, wie gut Sie Ihre Speise
gegart haben möchten�
Die Garstufe kann während der ersten 20 Sekunden
des Betriebs geändert werden: die Funktion
einschalten, dann den Einstellknopf zur Auswahl der
gewünschten Einstellung drehen�
MITTL
AKTIONEN (GARGUT RÜHREN ODER WENDEN)
Bei bestimmten Automatikfunktionen müssen Sie die
Speisen umrühren oder wenden, dafür müssen Sie
den Betrieb anhalten�
WENDE
Sobald der Backofen das Garen anhält, die Tür öffnen
und die aufgeforderte Aktivität durchführen, bevor
Sie die Tür erneut schließen und drücken, um mit
dem Garen fortzufahren�
Bitte beachten: Bei Verwendung der Funktion “Defrost”,
startet die Funktion automatisch nach zwei Minuten, auch
wenn Sie die Speise nicht umgerührt oder gewendet haben.
.RESTWÄRME
In vielen Fällen aktiviert der Ofen nach dem Garen der
Speise einen automatischen Abkühlungsvorgang, der
auf dem Display angezeigt wird�
Zur Anzeige der Uhr während des Vorgangs,
drücken�
Bitte beachten: Ein zeitweiliges Önen der Tür unterbricht
den Vorgang.
. TIMER
Bei ausgeschaltetem Ofen kann das Display als Timer
verwendet werden� Um die Funktion einzuschalten
und die gewünschte Zeit einzustellen, den
Einstellknopf drehen�
zur Aktivierung des Timers drücken: Es ertönt ein
akustisches Signal und eine Anzeige auf dem Display
erscheint, sobald der Timer das Rückzählen der
ausgewählten Zeit beendet hat�
Bitte beachten: Der Timer aktiviert keinen Garzyklus.
Um die eingestellte Zeit für den Timer zu ändern, drücken
Sie , um ihn anzuhalten. Drehen Sie den Einstellknopf,
um die neue Zeit einzustellen, dann drücken Sie , um die
Zählung erneut zu starten.
Zum Zurückkehren auf die aktuelle Uhrzeit drücken Sie
erneut .
Bitte beachten: Die Aktivierung einer beliebigen Funktion
(z. B. Drehen des Auswahlknopfes) löscht die Zählung des
Timers; dies wird durch einen Summer angezeigt.�
KALT
La page est en cours de chargement...
La page est en cours de chargement...
La page est en cours de chargement...
La page est en cours de chargement...
La page est en cours de chargement...
La page est en cours de chargement...
La page est en cours de chargement...
La page est en cours de chargement...
La page est en cours de chargement...
La page est en cours de chargement...
La page est en cours de chargement...
La page est en cours de chargement...
La page est en cours de chargement...
La page est en cours de chargement...
La page est en cours de chargement...
La page est en cours de chargement...
La page est en cours de chargement...
La page est en cours de chargement...
La page est en cours de chargement...
La page est en cours de chargement...
La page est en cours de chargement...
La page est en cours de chargement...
La page est en cours de chargement...
La page est en cours de chargement...
La page est en cours de chargement...
La page est en cours de chargement...
La page est en cours de chargement...
La page est en cours de chargement...
La page est en cours de chargement...
La page est en cours de chargement...
La page est en cours de chargement...
La page est en cours de chargement...
La page est en cours de chargement...
La page est en cours de chargement...
La page est en cours de chargement...
La page est en cours de chargement...
La page est en cours de chargement...
La page est en cours de chargement...
La page est en cours de chargement...
La page est en cours de chargement...
La page est en cours de chargement...
La page est en cours de chargement...
La page est en cours de chargement...
La page est en cours de chargement...
La page est en cours de chargement...
La page est en cours de chargement...
La page est en cours de chargement...
La page est en cours de chargement...
La page est en cours de chargement...
La page est en cours de chargement...
La page est en cours de chargement...
La page est en cours de chargement...
La page est en cours de chargement...
La page est en cours de chargement...
La page est en cours de chargement...
La page est en cours de chargement...
La page est en cours de chargement...
La page est en cours de chargement...
La page est en cours de chargement...
La page est en cours de chargement...
-
 1
1
-
 2
2
-
 3
3
-
 4
4
-
 5
5
-
 6
6
-
 7
7
-
 8
8
-
 9
9
-
 10
10
-
 11
11
-
 12
12
-
 13
13
-
 14
14
-
 15
15
-
 16
16
-
 17
17
-
 18
18
-
 19
19
-
 20
20
-
 21
21
-
 22
22
-
 23
23
-
 24
24
-
 25
25
-
 26
26
-
 27
27
-
 28
28
-
 29
29
-
 30
30
-
 31
31
-
 32
32
-
 33
33
-
 34
34
-
 35
35
-
 36
36
-
 37
37
-
 38
38
-
 39
39
-
 40
40
-
 41
41
-
 42
42
-
 43
43
-
 44
44
-
 45
45
-
 46
46
-
 47
47
-
 48
48
-
 49
49
-
 50
50
-
 51
51
-
 52
52
-
 53
53
-
 54
54
-
 55
55
-
 56
56
-
 57
57
-
 58
58
-
 59
59
-
 60
60
-
 61
61
-
 62
62
-
 63
63
-
 64
64
-
 65
65
-
 66
66
-
 67
67
-
 68
68
-
 69
69
-
 70
70
-
 71
71
-
 72
72
-
 73
73
-
 74
74
-
 75
75
-
 76
76
-
 77
77
-
 78
78
-
 79
79
-
 80
80


Franke FMY 45 MW Manuel utilisateur
- Catégorie
- Cuisine
- Taper
- Manuel utilisateur
dans d''autres langues
- italiano: Franke FMY 45 MW Manuale utente
- español: Franke FMY 45 MW Manual de usuario
- Deutsch: Franke FMY 45 MW Benutzerhandbuch
- português: Franke FMY 45 MW Manual do usuário
- polski: Franke FMY 45 MW Instrukcja obsługi
Autres documents
-
Whirlpool Micro-ondes encastrable MBNA910X 22L Mode d'emploi
-
Whirlpool WMBD5 I4 PT Le manuel du propriétaire
-
IKEA MW V10 S Mode d'emploi
-
Whirlpool FT 439 BL Mode d'emploi
-
-
-
-
-
IKEA MW V01 SA Mode d'emploi
-
Whirlpool AMW508 Le manuel du propriétaire