Lumination FM Series LED 9-Inch Flush Mount Ceiling Fixture Guide d'installation
- Taper
- Guide d'installation

LED.com
© 2023 Current Lighting Solutions, LLC. All rights reserved. Information and specifications subject to change
without notice. All values are design or typical values when measured under laboratory conditions.
Page 1 of 2
(Rev 04/23/23)
IND109-Lumination-FM-Series-LED-9-Inch-Flush-Mount-Ceiling-Fixure-Installation-Guide_R01
Installation Guide
IND109 | 052814
Lumination® LED Luminaire
9-Inch Flush Mount Ceiling Fixture
(FM-Series)
BEFORE YOU BEGIN
Read these instructions completely and carefully.
WARNING/AVERTISSEMENT
This device complies with Part 15 of the FCC Rules. Operation is subject to the following two conditions: (1) This device may not cause
harmful interference, and (2) this device must accept any interference received, including interference that may cause undesired
operation. This Class [A] RFLD complies with the Canadian standard ICES-003. Ce DEFR de la classe [ A ] est conforme à la NMB-003 du
Canada.
Note: This equipment has been tested and found to comply with the limits for a Class A digital device, pursuant to part 15 of the FCC
Rules. These limits are designed to provide reasonable protection against harmful interference when the equipment is operated in a
commercial environment. This equipment generates, uses, and can radiate radio frequency energy and, if not installed and used in
accordance with the instruction manual, may cause harmful interference to radio communications. Operation of this equipment in
a residential area is likely to cause harmful interference in which case the user will be required to correct the interference at his own
expense.
RISK OF ELECTRIC SHOCK
• Turn power o before inspection, installation or
removal.
• Properly ground electrical enclosure.
RISK OF ELECTRIC SHOCK
• Follow all NEC and local codes.
• Use only UL or IEC approved wire for input/
output connections. Minimum size 18 AWG
(0.75mm2).
RISQUES DE DÉCHARGES ÉLECTRIQUES
• Coupez l’alimentation avant d’’inspecter, installer ou déplacer le
luminaire.
• Assurez-vous de correctement mettre à la terre le boîtier
d’alimentation électrique.
RISQUES D’ INCENDIE
• Respectez tous les codes NEC et codes locaux.
• N’utilisez que des ls approuvés par UL pour les entrées/sorties de
connexion. Taille minimum 18 AWG (0.75mm2).
Electrical Requirements
The LED luminaire must be connected to the mains supply
according to its ratings on the product label.
Save These Instructions
Use only in the manner intended by the manufacturer. lf
you have any questions, contact the manufacturer.
Components Supplied
• Wire nuts (2)
• Screws (3)
• Dry wall anchors (3)
• Fixture (1) Grounding Instructions
The grounding and bonding of the overall system shall be done
in accordance to local electric code of the country where the
luminaire is installed.
Prepare Electrical Wiring
Model Input
Voltage
Input
Frequency
Input
Wattage
Input
Current
LED15FMM9-W 95-132V 50/60Hz 15W 0.180A

LED.com
© 2023 Current Lighting Solutions, LLC. All rights reserved. Information and specifications subject to change
without notice. All values are design or typical values when measured under laboratory conditions.
Page 2 of 2
(Rev 04/23/23)
IND109-Lumination-FM-Series-LED-9-Inch-Flush-Mount-Ceiling-Fixure-Installation-Guide_R01
Lumination® (FM- Series) Installation Guide
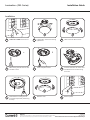
TURN OFF POWER at the source.
1
Installation
If applicable, remove the existing
light xture.
2
Twist to remove xture cover.
3
Mark ceiling around electrical box
and drill 3 holes.
4
Install 3 drywall anchors.
5
Connect white wire to neutral wire
and black wire to live wire using
wire nuts.
6
Screw xture to ceiling. Do not
touch LED Chips while performing
this step.
7
Reattach cover.
8
Restore power.
9
-
 1
1
-
 2
2


Lumination FM Series LED 9-Inch Flush Mount Ceiling Fixture Guide d'installation
- Taper
- Guide d'installation
dans d''autres langues
Documents connexes
-
Lumination LPL Series ISO5 Guide d'installation
-
-
-
-
-
-
-
-
-