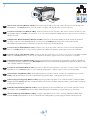
HP LaserJet Pro CP1520 series Le manuel du propriétaire
- Catégorie
- Barebones PC / poste de travail
- Taper
- Le manuel du propriétaire
Ce manuel convient également à
La page charge ...

30% - 70%
17 - 25°C
(62.6 - 77°F)
254 mm
(10 inches)
399 mm
(15.7 inches)
452 mm
(17.8 inches)
18.43 kg
40.64 lb
EN
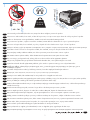
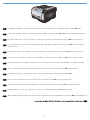
Select a sturdy, well-ventilated, dust-free area, away from direct sunlight to position the product.
FR
Choisissez un endroit stable, bien ventilé, à l’abri de la poussière, non exposé aux rayons directs du soleil pour placer le produit.
DE
Stellen Sie das Gerät an einem gut belüfteten, staubfreien Ort auf einem stabilen Untergrund auf.
IT
Per posizionare il prodotto, scegliere un'area ben ventilata, lontana dalla luce diretta del sole e poco esposta alla polvere.
ES
Seleccione un lugar sólido, bien ventilado, sin polvo y alejado de la luz solar directa en el que colocar el producto.
BG
Изберете стабилно, добре проветрявано и незапрашено място, настрани от пряка слънчева светлина, където да поставите принтера.
CA
El producte s’ha de col·locar en una superfície estable, ben ventilada, sense pols i lluny de la llum del sol directa.
HR
Za postavljanje uređaja odaberite stabilan, čist i dobro prozračen prostor bez izravne sunčeve svjetlosti.
CS
Na umístění zařízení vyberte stabilní, dobře odvětrávané a bezprašné místo mimo přímé sluneční světlo.
NL
Kies een stevige, goed geventileerde, stofvrije plek niet in direct zonlicht om het apparaat te plaatsen.
ET
Valige toote paigutamiseks tugev pind hästi ventileeritud tolmuvabas alas, otsese päikesevalguse eest eemal.
FI
Sijoita laite tukevalle alustalle pölyttömään paikkaan, johon aurinko ei paista suoraan ja jossa on hyvä ilmanvaihto.
EL
Επιλέξτε μια σταθερή, καλά αεριζόμενη επιφάνεια χωρίς σκόνη, η οποία δεν έρχεται σε άμεση επαφή με το ηλιακό φως, για να
τοποθετήσετε το προϊόν.
HU
A készülék elhelyezéséhez szilárd, jól szellőző, pormentes, közvetlen napfénytől elzárt helyet válasszon.
KK
німді берік, жасы желдетілетін, шасыз жне кн сулесі тспейтін жерге орналастырыыз.
LV
Novietojiet ierīci stabilā, labi ventilētā vietā, kur nav putekļu un ko neapspīd tieši saules stari.
LT
Gaminiui padėti pasirinkite tvirtą pagrindą gerai ventiliuojamoje nedulkėtoje vietoje, kuri būtų atokiau nuo tiesioginių saulės spindulių.
NO
Plasser produktet på et stabilt, godt ventilert og støvfritt sted, borte fra direkte sollys.
PL
Wybierz dla urządzenia stabilne miejsce z odpowiednią wentylacją, uniemożliwiającą osiadanie kurzu, z dala od bezpośredniego
światła słonecznego.
PT
Escolha uma área limpa, arejada, resistente e longe da luz solar direta para posicionar o produto.
RO
Pentru a amplasa produsul, alegeţi un loc stabil, bine ventilat şi fără praf, departe de lumina directă a soarelui.
AR
RU
Для установки изделия выберите надежное, хорошо проветриваемое и чистое место вдали от прямых солнечных лучей.
SR
Uređaj postavite na stabilnu podlogu u prostoriji sa dobrom ventilacijom i bez prašine, udaljen od direktne sunčeve svetlosti.
SK
Na umiestnenie zariadenia vyberte pevné, dobre vetrané a bezprašné miesto, ktoré nie je vystavené priamemu slnečnému svetlu.
SL
Izberite trden, dobro prezračen prostor brez prahu, ki ni neposredno izpostavljen soncu, in tja postavite izdelek.
SV
Placera enheten på ett stabilt underlag på en plats utan damm och med god ventilation.
TR
Ürünü yerleştirmek için sağlam, iyi havalandırmalı, tozsuz ve doğrudan güneş ışığı almayan bir alan seçin.
UK
Для розміщення приладу оберіть надійне та чисте місце, яке добре провітрюється та захищене від прямих сонячних променів.

HP L
ase
rJet
EN
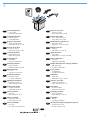
Product Requirements
Power outlet
A-to-B type USB cable
•
•
FR
Exigences du produit
Prise de courant
Câble USB de type A-to-B
•
•
DE
Produktanforderungen
Netzsteckdose
A-to-B USB-Kabel
•
•
IT
Requisiti del prodotto
Presa di alimentazione
Cavo USB di tipo A-to-B
•
•
ES
Requisitos del producto
Toma de alimentación
Cable USB de tipo A a B
•
•
BG
Изискванията за устройството
Мрежов контакт
USB кабел от тип “A към B”
•
•
CA
Requisits del producte
Presa de corrent
Cable USB de tipus A-to-B
•
•
HR
Zahtjevi proizvoda
Utičnica
USB kabel vrste A do B
•
•
CS
Požadavky produktu
Elektrická zásuvka
USB kabel typu AB
•
•
NL
Apparaatvereisten
Stopcontact
USB-kabel van het type A-naar-B
•
•
ET
Tootetingimused
Toiteallikas
A–B tüüpi USB-kaabel
•
•
FI
Laitteen vaatimukset
Pistorasia
A-B-tyypin USB-kaapeli
•
•
EL
Απαιτήσεις προϊόντος
Πρίζα ρεύματος
Καλώδιο USB τύπου A-to-B
•
•
HU
Készülék működtetéséhez szükséges feltételek
Hálózati aljzat
A–B típusú USB-kábel
•
•
KK
нім талаптары
Розетка
A-B тріндегі USB кабелі
•
•
LV
Ierīces prasības
Kontaktligzda
A–B tipa USB kabelis
•
•
LT
Reikalavimai gaminiui
Maitinimo lizdas
A - B tipo USB laidas
•
•
NO
Produktkrav
Strømuttak
USB-kabel av typen A til B
•
•
PL
Wymagania urządzenia
Gniazdko zasilania
Kabel USB typu A-to-B
•
•
PT
Requisitos do produto
Saída de alimentação
Cabo USB do tipo A a B
•
•
RO
Cerinţe pentru produs
Priză de alimentare
Cablu USB de tip A-B
•
•
AR
RU
Требования
Розетка питания
USB-кабель типа A-B
•
•
SR
Zahtevi proizvoda
Utičnica
USB kabl tipa A do B
•
•
SK
Požiadavky produktu
Sieťová zásuvka
Kábel USB typu A do B
•
•
SL
Zahteve za izdelek
Napajalna vtičnica
Kabel USB vrste A–B
•
•
SV
Produktkrav
Eluttag
A-to-B-typ, USB-kabel
•
•
TR
Ürün Gereksinimleri
Güç prizi
İki nokta arası USB kablosu
•
•
UK
Необхідні умови для користування виробом
Електрична розетка
Кабель USB типу A-B
•
•
La page charge ...

21
EN
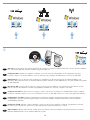
Connect the power cord between the product and a grounded AC outlet, and then turn on the product. Make sure your power
source is adequate for the product voltage rating. The voltage rating is on the product label. The product uses either 00-7 Vac
or 0-0 Vac and 50/60 Hz.
Caution: To prevent damage to the product, use only the power cord that is provided with the product.
Caution: Do not connect the USB now. Wait until the software prompts you.
•
•
•
FR
Reliez le produit à la prise reliée à la terre à l’aide du cordon d’alimentation, puis mettez le produit sous tension. Assurez-vous
que votre source d’alimentation est adaptée à la tension nominale du produit. La tension nominale est indiquée sur l’étiquette du
produit. Le produit fonctionne à une tension de 00 - 7 V CA ou 0 - 0 V CA et 50/60 Hz.
Attention ! Pour éviter tout endommagement du produit, utilisez uniquement le câble fourni avec le produit.
Attention ! Ne branchez pas le câble USB tout de suite. Attendez les instructions du logiciel.
•
•
•
DE
Schließen Sie das Gerät mit einem Netzkabel an einer geerdeten Steckdose an, und schalten Sie das Gerät anschließend ein.
Stellen Sie sicher, dass Ihre Stromquelle für die Betriebsspannung des Geräts geeignet ist. Die Betriebsspannung nden Sie
auf dem Geräteetikett. Das Produkt verwendet entweder 00 – 7 V (AC) oder 0 – 0 V (AC) und 50/60 Hz.
Achtung: Um Schäden am Gerät zu vermeiden, verwenden Sie ausschließlich das Netzkabel, das im Lieferumfang des Geräts
enthalten ist.
Achtung: Schließen Sie das USB-Kabel jetzt noch nicht an. Warten Sie, bis Sie dazu aufgefordert werden.
•
•
•
IT
Collegare il cavo di alimentazione tra il prodotto e la presa CA con messa a terra, quindi accendere il prodotto. Accertarsi che la
fonte di alimentazione sia adeguata all’indicazione della tensione del prodotto. L’indicazione della tensione si trova sull’etichetta
del prodotto. È possibile utilizzare il prodotto con un voltaggio di 00-7 V CA o di 0-0 V CA e a 50/60 Hz.
Attenzione: per evitare danni al prodotto, utilizzare solo il cavo di alimentazione fornito con il prodotto stesso.
Attenzione: non collegare il cavo USB. Attendere la richiesta del software.
•
•
•
ES
Conecte el cable de alimentación al producto y a un enchufe de CA con toma de tierra; a continuación, encienda el producto.
Asegúrese de que la fuente de alimentación es adecuada para el voltaje del producto. La especicación del voltaje se encuentra
en la etiqueta del producto. El producto utiliza 0-7 VCA o 0-0 VCA y 50/60 Hz.
Precaución: Para evitar daños al producto, utilice sólo el cable de alimentación que se proporciona con el mismo.
Precaución:
No conecte aún el cable USB. Espere hasta que el software se lo solicite.
•
•
•
BG
Свържете захранващия кабел между продукта и заземения контакт и след това включете продукта. Проврете дали
захранващият ви източник е подходящ за номиналното напрежение на принтера. Номиналното напрежение е посочено
на етикета на принтера. Устройството използва или 100-127 Vac, или 220-240 Vac и 50/60 Hz.
Внимание: За да избегнете повреда на принтера, използвайте само захранващия кабел, предоставен с него.
Внимание: Не свързвайте сега USB кабела. Изчакайте, докато софтуерът ви подкани.
•
•
•
CA
Connecteu el cable d’alimentació al producte i a un endoll de CA amb presa de terra; a continuació, encengueu el producte.
Assegureu-vos que la font d’energia és adequada per a la tensió nominal del producte. Trobareu la tensió nominal a l’etiqueta
del producte. El producte fa servir 00-7 VCA o 0-0 VCA i 50/60 Hz.
Precaució: Per evitar malmetre el producte, utilitzeu únicament el cable d’alimentació que se subministra amb el producte.
Precaució: Encara no connecteu l’USB. Espereu ns que el programari ho sol·liciti.
•
•
•
La page charge ...
La page charge ...
La page charge ...

5
EN
On the control panel, if prompted, select a language and location for the product. Press OK to accept selections.
FR
Si un message vous y invite, sélectionnez une langue et un lieu pour le produit sur le panneau de commande. Appuyez sur OK pour
conrmer vos choix.
DE
Wählen Sie nach Aufforderung auf dem Bedienfeld eine Sprache und einen Standort für das Gerät aus. Drücken Sie OK, um die
Einstellungen zu übernehmen.
IT
Sul pannello di controllo, se richiesto, selezionare una lingua e un paese per il prodotto. Premere OK per confermare le selezioni.
ES
En el panel de control, si se le solicita, seleccione un idioma y una ubicación para el producto. Pulse OK para aceptar las selecciones.
BG
На контролния панел при подкана изберете език и местоположение за принтера. Натиснете OK, за да приемете избора.
CA
Al tauler de control, si us ho demana, seleccioneu un idioma i la ubicació del producte. Premeu OK per acceptar les seleccions.
HR
Na upravljačkoj ploči, ako se to od vas zatraži, odaberite jezik i lokaciju za uređaj. Pritisnite OK za prihvaćanje odabira.
CS
Pokud jste k tomu vyzváni, na ovládacím panelu zvolte pro produkt jazyk a oblast. Výběr potvrďte stisknutím tlačítka OK.
NL
Selecteer zodra dit wordt gevraagd op het bedieningspaneel een taal en een locatie voor het apparaat. Druk op OK om de selecties
te accepteren.
ET
Kui kuvatakse vastav viip, valige seadme juhtpaneelil keel ja riik. Valikute kinnitamiseks vajutage OK.
FI
Jos ohjauspaneeliin tulee kehote, valitse laitteen kieli ja sijainti. Hyväksy valinnat valitsemalla OK.
EL
Στον πίνακα ελέγχου, εάν σας ζητηθεί, επιλέξτε γλώσσα και περιοχή για το προϊόν. Πατήστε OK για αποδοχή των επιλογών σας.
HU
Ha a rendszer erre kéri, válasszon nyelvet és helyszínt a termékhez a vezérlőpulton. Az OK gombbal fogadja el a kiválasztott elemeket.
KK
Сралса, басару панелінде нім тілін жне орналасан жерін тадаыз. Тадауларды абылдау шін, OK тймесін басыыз.
La page charge ...

6 7
0
6
EN
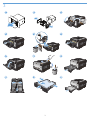
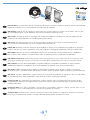
USB setup: Insert the CD into the computer and follow the instructions for software installation and setup. For Mac, click the installation
icon. Connect the USB cable when the installation program prompts you.
FR
Conguration USB : Introduisez le CD dans l'ordinateur et suivez les instructions d'installation et de conguration du logiciel.
Pour Mac, cliquez sur l'icône d'installation. Suivez les instructions du programme d'installation pour connecter le câble USB.
DE
USB-Einrichtung: Legen Sie die CD in den Computer ein, und befolgen Sie die Anweisungen für die Softwareinstallation und
Einrichtung. Bei einem Mac klicken Sie auf das Installationssymbol. Schließen Sie das USB-Kabel an, wenn das Installationsprogramm
Sie dazu auffordert.
IT
Impostazione USB: inserire il CD nel computer e seguire le istruzioni per l'installazione e la congurazione del software. In Mac,
fare clic sull'icona di installazione. Quando il programma di installazione lo richiede, collegare il cavo USB.
ES
Conguración de USB: Introduzca el CD en el equipo y siga las instrucciones que aparecen en pantalla para instalar y congurar
el software. Para Mac, haga clic en el icono de instalación. Conecte el cable USB cuando se lo solicite el programa de instalación.
BG
Конфигуриране чрез USB: Поставете компактдиска в компютъра и следвайте указанията на екрана, за да инсталирате и
конфигурирате софтуера. При Mac щракнете върху иконата за инсталиране. Свържете USB кабела, когато ви подкани
инсталиращата програма.
CA
Conguració del USB: Introduïu el CD a l'ordinador i seguiu les instruccions per instal·lar i congurar el programari. Per al Mac,
feu clic a la icona d'instal·lació. Connecteu el cable USB quan el programa d'instal·lació ho sol·liciti.
HR
USB postavljanje: Umetnite CD u računalo i pratite upute za instalaciju softvera i postavljanje. Za Mac pritisnite ikonu instalacije.
Priključite USB kabel kad to od vas zatraži instalacijski program.
8
La page charge ...
La page charge ...

9
7
EN
Wired network connection (Windows and Mac). Connect the network cable to the product and to the network. Place the CD in the
CD-ROM drive. Click Install (Windows) or the HP installer icon (Mac), and then follow the on-screen instructions.
FR
Connexion réseau laire (sous Windows et Mac) : Reliez le produit au réseau à l'aide du câble réseau. Insérez le CD dans le lecteur
de CD-ROM. Cliquez sur Installer
(sous Windows) ou sur l'icône du programme d'installation HP (sous Mac) et suivez les instructions
afchées à l'écran.
DE
Kabelgebundene Netzwerkverbindung (Windows und Mac). Schließen Sie das Netzwerkkabel an das Gerät und das Netzwerk
an. Legen Sie die CD in das CD-ROM-Laufwerk ein. Klicken Sie auf Installieren (Windows) oder auf das Symbol für das
HP Installationsprogramm (Mac), und befolgen Sie dann die Anweisungen auf dem Bildschirm.
IT
Connessione di rete cablata (Windows e Mac)
. Collegare il cavo di rete al prodotto e alla rete. Inserire il CD nell'unità CD-ROM.
Fare clic su Installa (Windows) o sull'icona del programma di installazione HP (Mac), quindi seguire le istruzioni visualizzate.
ES
Conexión en red con cables (Windows y Mac). Conecte el cable de red al producto y a la red. Coloque el CD en la unidad de CD-ROM.
Haga clic en Instalar (Windows) o en el icono del instalador de HP (Mac) y siga las instrucciones que aparecen en pantalla.
BG
Кабелна мрежова връзка (Windows и Mac). Свържете мрежовия кабел към принтера и към мрежата. Поставете компактдиска
в CD-ROM устройството. Щракнете върху Инсталирай (Windows) или иконата на инсталиращата програма на HP (Mac) и след
това следвайте екранните инструкции.
CA
Connexió de xarxa amb ls (Windows i Mac). Connecteu el cable de xarxa al producte i a la xarxa. Col·loqueu el CD en la unitat del
CD-ROM. Feu clic a Instal·la (Windows) o a la icona d'HP Installer (Mac), i després seguiu les instruccions de la pantalla.
HR
Ožičena mrežna veza (Windows i Mac)
. Mrežni kabel priključite na uređaj i na mrežu. Postavite CD u CD-ROM pogon. Pritisnite
Install (Instaliraj) (Windows) ili ikonu HP-ovog instalacijskog programa (Mac), a zatim pratite upute na zaslonu.
CS
Kabelové připojení k síti (systémy Windows a Mac). Připojte síťový kabel k produktu a k síti. Vložte disk CD do jednotky CD-ROM.
Klikněte na tlačítko Install (Instalovat) (v systému Windows) nebo na ikonu instalační služby HP Installer (v systému Mac) a postupujte
podle pokynů na obrazovce.
NL
Bekabelde netwerkverbinding (Windows en Mac). Sluit het apparaat met de netwerkkabel aan op het netwerk. Plaats de cd in het
cd-romstation. Klik op Installeren (Windows) of het installatiepictogram van HP (Mac) en volg de instructies op het scherm.
ET
Ühendus kaabelvõrgu kaudu (Windows ja Mac). Sisestage võrgukaabel tootesse ja võrku. Sisestage CD-ketas CD-ROM-i draivi.
Klõpsake Install (Installi) (Windows) või ikooni HP Installer (HP installija) (Mac) ja seejärel järgige ekraanile ilmuvaid juhiseid.
La page charge ...
La page charge ...

9
6
Wireless network connection (Windows and Mac). Place the CD in the CD-ROM drive. Click Install (Windows) or the HP installer
icon (Mac), and then follow the on-screen instructions.
Note: Setting up wireless is as easy as inserting the CD, selecting Wireless Setup, and following the on-screen instructions.
EN
Connexion réseau sans l (sous Windows et Mac) : Insérez le CD dans le lecteur. Cliquez sur Installer (sous Windows) ou sur l'icône
du programme d'installation HP (sous Mac) et suivez les instructions afchées à l'écran.
Remarque : pour la conguration sans l, il vous suft d'insérer le CD, de sélectionner Conguration sans l et de suivre les
instructions afchées à l'écran.
FR
Drahtlose Netzwerkverbindung (Windows und Mac). Legen Sie die CD in das CD-ROM-Laufwerk ein. Klicken Sie auf Installieren
(Windows) oder auf das Symbol für das HP Installationsprogramm (Mac), und befolgen Sie dann die Anweisungen auf dem
Bildschirm.
Hinweis: Für die Einrichtung der drahtlosen Netzwerkverbindung müssen Sie einfach die CD einlegen, die Option zur Einrichtung
der drahtlosen Netzwerkverbindung auswählen und die Anweisungen auf dem Bildschirm befolgen.
DE
Connessione di rete wireless (Windows e Mac). Inserire il CD nell'unità CD-ROM. Fare clic su Installa (Windows) o sull'icona del
programma di installazione HP (Mac), quindi seguire le istruzioni visualizzate.
Nota: l'impostazione wireless è semplice, è sufciente inserire il CD, selezionare l'opzione di impostazione wireless e seguire
le istruzioni visualizzate.
IT
Conexión en red inalámbrica (Windows y Mac). Coloque el CD en la unidad de CD. Haga clic en Instalar (Windows) o en el icono
del instalador de HP (Mac) y siga las instrucciones que aparecen en pantalla.
Nota: Congurar la conexión inalámbrica es tan fácil como introducir el CD, seleccionar Conexión inalámbrica y seguir las
instrucciones que aparecen en pantalla.
ES
Безжична мрежова връзка (Windows и Mac). Поставете компактдиска в CD-ROM устройството. Щракнете върху Инсталирай
(Windows) или иконата на инсталиращата програма на HP (Mac) и след това следвайте екранните инструкции.
Забележка: Настройката на безжична мрежа не е по-трудна от поставяне на компактдиска, като изберете Безжична
настройка и следвате екранните инструкции.
BG
Connexió de xarxa sense ls (Windows i Mac). Col·loqueu el CD-ROM en la unitat del CD-ROM. Feu clic a Instal·la (Windows)
o a la icona d'HP Installer (Mac), i després seguiu les instruccions de la pantalla.
Nota: La instal.lació amb una connexió sense ls es tan fàcil com inserir el CD, seleccionar Instal.lació sense ls i seguir les
instruccions de la pantalla.
CA
Bežična mrežna veza (Windows i Mac). Postavite CD u CD-ROM pogon. Pritisnite Install (Instaliraj) (Windows) ili ikonu HP-ovog
instalacijskog programa (Mac), a zatim pratite upute na zaslonu.
Napomena: Bežično postavljanje je jednostavno; umetnite CD, odaberite Wireless Setup (Bežične postavke) i pratite upute na zaslonu.
HR
Bezdrátové připojení k síti (systémy Windows a Mac). Vložte disk CD do jednotky CD-ROM. Klikněte na tlačítko Install (Instalovat)
(v systému Windows) nebo na ikonu instalační služby HP Installer (v systému Mac) a postupujte podle pokynů na obrazovce.
Poznámka: Nastavení bezdrátového připojení je velmi snadné – vložte disk CD do mechaniky, zvolte možnost Wireless Setup
(Nastavení bezdrátového připojení) a postupujte podle pokynů na obrazovce.
CS
Draadloze netwerkverbinding (Windows en Mac). Plaats de cd in het cd-romstation. Klik op Installeren (Windows) of het
installatiepictogram van HP (Mac) en volg de instructies op het scherm.
Opmerking: voor het instellen van een draadloze verbinding hoeft u alleen de cd te plaatsen, Draadloze instellingen te selecteren
en de instructies op het scherm te volgen.
NL
La page charge ...
La page charge ...

Setup is complete. If you did not register your product during software installation, go to www.register.hp.com to register now. The
HP Help and Learn Center and other documentation are on the CD that came with the product or in the HP Program folder on your
computer. The HP Help and Learn Center is a product help tool that provides easy access to product information, HP product Web
support, troubleshooting guidance, and regulatory and safety information.
To print on special paper, set the paper type in the printer driver. See the User Guide in the HP Help and Learn Center or on the CD.
EN
L’installation est terminée. Si vous n'avez pas enregistré votre produit lors de l'installation du logiciel, rendez-vous sur www.register.hp.com
pour le faire dès maintenant. Le centre d'aide et d'apprentissage HP (HP Help and Learn Center) ainsi que d'autres documents se trouvent
sur le CD livré avec le produit ou dans le dossier dédié aux programmes HP sur votre ordinateur. Le centre d'aide et d'apprentissage HP
est un outil d'aide qui fournit un accès facile aux informations sur le produit, à une assistance en ligne pour les produits HP, à un guide de
dépannage et à des informations relatives à la réglementation et à la sécurité.
Pour réaliser des impressions sur un type de papier spécial, dénissez le type de papier dans le pilote d'imprimante. Reportez-vous au
Guide de l'utilisateur disponible dans le centre d'aide et d'apprentissage HP ou sur le CD.
FR
Die Installation ist abgeschlossen. Falls Sie Ihr Produkt während der Installation der Software nicht registriert haben, besuchen Sie
die Website www.register.hp.com, um es jetzt zu registrieren. Das HP Help and Learn Center sowie weitere Dokumentation bendet
sich auf der CD, die dem Gerät beiliegt, oder im HP Programmordner auf Ihrem Computer. Das HP Help and Learn Center ist eine
Produkthilfe für einfachen Zugriff auf Produktinformationen, Web-Support für HP Produkte, Hinweise zur Fehlerbehebung sowie
Zulassungs- und Sicherheitsinformationen.
Für den Druck auf Spezialpapier müssen Sie im Druckertreiber den Papiertyp auswählen. Mehr zu diesem Thema nden Sie im
Benutzerhandbuch im HP Help and Learn Center oder auf der CD.
DE
La congurazione è stata completata. Se durante l'installazione del software non è stata eseguita la registrazione del prodotto,
visitare il sito Web www.register.hp.com per eseguire la registrazione. HP Help and Learn Center e documentazione aggiuntiva sono
disponibili sul CD fornito con il prodotto o nella cartella dei programmi HP sul computer. HP Help and Learn Center è uno strumento
di assistenza che fornisce accesso facilitato alle informazioni sul prodotto, supporto Web ai prodotti HP, guida alla risoluzione dei
problemi e informazioni relative alla sicurezza e alle normative.
Per stampare su carta speciale, impostare il tipo di carta nel driver della stampante. Vedere la Guida per l'utente in HP Help and
Learn Center o sul CD.
IT
La instalación ha terminado. Si no registró el producto durante la instalación del software, vaya a www.register.hp.com para
registrarlo ahora. El centro de ayuda y formación de HP se incluye junto con otra documentación en el CD suministrado con el
producto o en la carpeta de programas HP de su equipo. El centro de ayuda y formación de HP es una herramienta de ayuda para
el producto que permite acceder fácilmente a información del producto, asistencia Web del producto HP, guía para la solución de
problemas e información sobre reglamento y seguridad.
Para imprimir en papel especial, congure el tipo de papel en el controlador de la impresora. Consulte la guía del usuario que
encontrará en el centro de ayuda y formación de HP o en el CD.
ES
Инсталирането е завършено. Ако не сте регистрирали продукта по време на инсталирането на софтуера, отидете на
www.register.hp.com, за да го регистрирате сега. Центърът на HP за помощ и обучение и друга документация се намират на
компактдиска, предоставен с устройството, или в папката HP Program на вашия компютър. Центърът на HP за помощ и обучение
е помощен инструмент за устройството, който предоставя лесен достъп до информация за принтера, уеб поддръжка за продукти
на HP, указания за отстраняване на неизправности, както и нормативна информация и информация за техническата безопасност.
За да печатате на специална хартия, задайте типа на хартията в драйвера на принтера. Вж. ръководството за потребителя
в центъра на HP за помощ и обучение или на компактдиска.
BG
La instal·lació ha nalitzat. Si no heu registrat el producte durant la instal·lació del programari, visiteu www.register.hp.com per
fer-ho ara. L'ajuda i el centre d'aprenentatge d'HP i d’altra informació es troba al CD subministrat amb el producte o a la carpeta
de programes HP del vostre ordinador. L'ajuda i el centre d'aprenentatge d'HP són una utilitat d'ajuda que permet accedir fàcilment
a informació sobre productes, assistència tècnica web de productes HP, guia per a la solució de problemes i informació sobre
normativa i seguretat.
Per imprimir amb paper especial, deniu el tipus de paper al controlador de la impressora. Consulteu el manual d’usuari a la secció
d'ajuda i centre d'aprenentatge d'HP o al CD.
CA
La page charge ...
La page charge ...
La page charge ...

Copyright and License
© 00 Copyright Hewlett-Packard Development Company, L.P.
Reproduction, adaptation or translation without prior written
permission is prohibited, except as allowed under the copyright laws.
The information contained herein is subject to change without notice.
The only warranties for HP products and services are set forth in
the express warranty statements accompanying such products and
services. Nothing herein should be construed as constituting an
additional warranty. HP shall not be liable for technical or editorial
errors or omissions contained herein.
Part number:
CE75-00
Edition , /00
FCC Regulations
This equipment has been tested and found to comply with the
limits for a Class B digital device, pursuant to Part 5 of the FCC
rules. These limits are designed to provide reasonable protection
against harmful interference in a residential installation. This
equipment generates, uses, and can radiate radio-frequency
energy. If this equipment is not installed and used in accordance
with the instructions, it may cause harmful interference to radio
communications. However, there is no guarantee that interference
will not occur in a particular installation. If this equipment does
cause harmful interference to radio or television reception, which
can be determined by turning the equipment off and on, correct the
interference by one or more of the following measures:
• Reorient or relocate the receiving antenna.
• Increase separation between equipment and receiver.
• Connect equipment to an outlet on a circuit different from that to
which the receiver is located.
• Consult your dealer or an experienced radio/TV technician.
Any changes or modications to the product that are not expressly
approved by HP could void the user’s authority to operate this
equipment. Use of a shielded interface cable is required to comply
with the Class B limits of Part 5 of FCC rules. For more regulatory
information, see the electronic user guide. Hewlett-Packard shall not
be liable for any direct, indirect, incidental, consequential, or other
damage alleged in connection with the furnishing or use of this
information.
Trademark Credits
Windows® is a U.S. registered trademark of Microsoft Corporation.
Copyright et licence
© 00 Copyright Hewlett-Packard Development Company, L.P.
La reproduction, l'adaptation ou la traduction, sans autorisation écrite
préalable, sont interdites sauf dans le cadre des lois sur le copyright.
Les informations contenues dans ce document peuvent être modiées
sans préavis.
Les seules garanties pour les produits et services HP sont décrites
dans les déclarations de garantie expresses accompagnant ces
mêmes produits et services. Rien en ceci ne devra être interprété
comme constituant une garantie supplémentaire. HP ne pourra être
tenue pour responsable des erreurs techniques et rédactionnelles ou
des omissions présentes dans ce document.
Référence :
CE75-00
Edition , /00
Réglementations de la FCC
Les tests effectués sur cet équipement ont déterminé qu’il est
conforme aux prescriptions des unités numériques de classe B, telles
que spéciées à l’article 5 des normes de la FCC (Commission
fédérale des communications). Ces limites sont destinées à assurer
une protection sufsante contre les interférences produites dans une
installation résidentielle. Cet équipement génère, utilise et peut émettre
de l’énergie sous forme de fréquences radio. Si ce matériel n'est pas
installé et utilisé conformément aux instructions, il peut causer des
interférences nuisibles aux communications radio. Aucune garantie
n'est néanmoins fournie quant à l'apparition d'interférences dans une
installation particulière. Si cet appareil provoque des interférences
nuisibles (qui peuvent être déterminées en éteignant et rallumant
l'appareil) à des communications radio ou télévision, corrigez ce
problème en appliquant une ou plusieurs des mesures suivantes :
• Réorientez ou déplacez l’antenne de réception.
• Augmentez la distance séparant l’équipement du récepteur.
• Connectez l’équipement à une prise située sur un circuit différent
de celui sur lequel se trouve le récepteur.
• Consultez votre revendeur ou un technicien radio/télévision
expérimenté.
Toute modication apportée au produit sans le consentement de
HP peut se traduire par la révocation du droit d’exploitation de
l’équipement dont jouit l’utilisateur. Un câble d’interface blindé
est requis an de satisfaire aux stipulations de l’article 5 des
réglementations de la FCC sur les appareils de classe B. Pour de
plus amples informations sur les réglementations, reportez-vous
au Guide de l'utilisateur au format électronique. Hewlett-Packard
ne sera en aucun cas tenu responsable des dommages directs,
indirects, accessoires, consécutifs ou autres pouvant résulter de la
mise à disposition de ces informations ou de leur utilisation.
Marques commerciales et déposées
Windows® est une marque déposée aux Etats-Unis
de Microsoft Corporation.
*CE875-90901*
*CE875-90901*
CE75-00
www.hp.com
-
 1
1
-
 2
2
-
 3
3
-
 4
4
-
 5
5
-
 6
6
-
 7
7
-
 8
8
-
 9
9
-
 10
10
-
 11
11
-
 12
12
-
 13
13
-
 14
14
-
 15
15
-
 16
16
-
 17
17
-
 18
18
-
 19
19
-
 20
20
-
 21
21
-
 22
22
-
 23
23
-
 24
24


HP LaserJet Pro CP1520 series Le manuel du propriétaire
- Catégorie
- Barebones PC / poste de travail
- Taper
- Le manuel du propriétaire
- Ce manuel convient également à
dans d''autres langues
- italiano: HP LaserJet Pro CP1520 series Manuale del proprietario
- English: HP LaserJet Pro CP1520 series Owner's manual
- español: HP LaserJet Pro CP1520 series El manual del propietario
- Deutsch: HP LaserJet Pro CP1520 series Bedienungsanleitung
- русский: HP LaserJet Pro CP1520 series Инструкция по применению
- Nederlands: HP LaserJet Pro CP1520 series de handleiding
- português: HP LaserJet Pro CP1520 series Manual do proprietário
- slovenčina: HP LaserJet Pro CP1520 series Návod na obsluhu
- polski: HP LaserJet Pro CP1520 series Instrukcja obsługi
- čeština: HP LaserJet Pro CP1520 series Návod k obsluze
- eesti: HP LaserJet Pro CP1520 series Omaniku manuaal
- svenska: HP LaserJet Pro CP1520 series Bruksanvisning
- Türkçe: HP LaserJet Pro CP1520 series El kitabı
- suomi: HP LaserJet Pro CP1520 series Omistajan opas
- română: HP LaserJet Pro CP1520 series Manualul proprietarului
Documents connexes
-
HP LaserJet Pro CP1525 Color Printer series Guide d'installation
-
HP LaserJet Enterprise 500 MFP M525 Guide d'installation
-
-
-
-
-
-
HP Color LaserJet Enterprise M553 series Guide d'installation
-
-