BIXOLON SRP-330II Guide d'installation
- Catégorie
- Imprimer
- Taper
- Guide d'installation

◈ Information
This installation guide contains quick information required for the product installation.
Please refer to the Software and Documents provided on the Download section of the
BIXOLON Website(http://www.bixolon.com) for more information on how to setup.
1. Manual: User’s Manual, Code Table, Control Commands, Software manuals
2. Driver: Windows Driver, OPOS, JPOS, CUPS(Linux, Mac), VCOM(USB, Ethernet)
3. SDK: UPOS SDK(iOS, Android)
4. Utility: Unified POS Utility, Net Configuration Tool, Android Utility, iOS Utility
We at BIXOLON maintain ongoing efforts to enhance and upgrade the functions and quality
of all our products. In following, product specifications and/or user manual content may be
changed without prior notice.
◈ Components
SRP-330II/332II
Cable cover
Paper Roll
Procuct Installation CDProcuct Installation CD
Procuct Installation CD
CD
Installation Guide
2” Partition USB A-B Cable
AC/DC Adaptor
Power cord
◈ Cable Connection
1. Turn off the printer and peripheral devices.
2. Connect the power cord to the adapter and connect the adapter to the power supply
connector of the printer.
3. Check the type of the interfaces at the back of the printer(Serial, Dual Serial, USB,
Ethernet, Parallel) and connect the interface cable.
4. Connect the drawer kick-out cable to the drawer kick-out connector of the printer.
※ Do not use an adapter that was not supplied with the printer.
◈ Installing Paper Roll
1. Press the Cover-Open button to open the cover.
2. Insert new roll paper in the correct direction.
3. Pull the paper out slightly and close the cover.
※ Note
When closing the cover, press down on the center
of the cover to ensure that the paper is in contact
with the roller.
Printing quality may not be optimum if
recommended paper is not used.
(Refer to the User's Manual.)
◈ Using Control Panel
• POWER LED
The POWER light is on whenever the printer is on.
• ERROR LED
This indicates an error.
• PAPER LED
This light indicates the near end of the paper roll. Install a new paper
roll and the printer will continue printing. When the light blinks, it
indicates the self-test printing standby state or macro execution Standby
state when the macro execution command is used.
• FEED Button
Press the FEED button once to advance paper one line. You can also
hold down the FEED button to feed paper continuously.
◈ Mounting 2” Partition
Hang the partition at the front and press down the rear to mount the 2” partition as shown in
the picture.
※ Caution
After using 2"(58mm) paper roll, do not replace it with 3"(79.5±0.5mm) paper roll.
◈ DIP switch setting
DIP switch setting must be done while the printer is turned off.
Changes during power on are not recognized.
1. Serial / Dual Serial Interface Settings
• DIP Switch 1
Switch Function ON OFF Default
1-1 Auto Cutter Control Disable Enable OFF
1-2 Flow Control XON/XOFF DTR/DSR OFF
1-3 Data Length 7 bits 8 bits OFF
1-4 Parity Check Yes No OFF
1-5 Parity Selection EVEN ODD OFF
1-6
Baud Rate Selection(bps) Refer to the following Table 1
OFF
1-7 ON
1-8 OFF
• Table 1 – Baud Rate(bps) Selection
Transmission Speed 1-6 1-7 1-8 Default
2400 ON OFF OFF
9600
4800 ON OFF ON
9600 OFF ON OFF
19200 OFF OFF OFF
38400 OFF ON ON
57600 OFF OFF ON
115200 ON ON ON
2. Parallel / Ethernet / USB Interface Settings
• DIP Switch 1
Switch Function ON OFF Default
1-1 Auto Cutter Control Disable Enable OFF
1-2 Reserved - - OFF
1-3 Reserved - - OFF
1-4 Reserved - - OFF
1-5 Reserved - - OFF
1-6 Reserved - - OFF
1-7 Reserved - - ON
1-8 Reserved - - OFF
◈ Print Density(Virtual Memory Switch)
Speed
Print Density
Print Density
(Virtual Memory Switch)
Light
Dark
4(High) 1 2 3 4 Level 1
3 5 6 7 8 Level 2
2 9 10 11 12 Level 3
1(Low) 12 13 14 16 Level 4
※ It is recommended to select Unified POS Utility or Self-Test mode to change print
density using the Virtual Memory Switch.
◈ Self-Test
1. Check whether the paper is inserted correctly.
2. Turn on the printer while depressing the Feed button. Self-diagnostics will begin.
3. The printer prints the current status of the printer such as the version of the ROM and DIP
switch setting.
4. The printer prints the current status and stops after printing the following statement.
(PAPER indicator keeps blinking.)
SELF-TEST PRINTING.
SELECT MODES BY PRESSING FEED BUTTON.
Continuous SELF-TEST : Less than 1 second
VMSM Selection : 1second or more
5. Press the FEED button for less than 1 second to perform “Continuous SELF-TEST”.
Hold down the FEED button for 1 second or longer to perform “VMSM Selection”.
1) Self-Test
1-1) If you press the FEED button for less than 1 second, the printer will print in the
preset character type.
1-2) The self-test completes automatically and cuts the paper after printing the following
line.
*** COMPLETED ***
1-3) The printer goes into standby mode when the self-test is complete.
Printer Installation Guide & Safet
y
Guide
KN04-00141A (Rev.1.0)
THERMAL PRINTER SRP-330II/332II
Power cord
Drawer kick-
out cable
Interface cable
(Serial/Dual Serial/Parallel/USB/Ethernet)
Adaptor
Drawer kick-out connector
Power connector
Interface connector

2) Virtual Switch Setting Mode
2-1) When the printer goes into virtual switch-setting mode, the following lines will be
printed.
** VMSM Selection **
0: Exit and reboot printer
1: Print current settings
2: Set Print Density
3: Set Print Speed
4: Set Cutting mode
5: Set External Buzzer after cutting
6: Set Internal Buzzer after cutting
7 or more: None
2-2) Make sure to press the FEED button to perform the above functions.
2-2-1) Step 1: The number indicates the number of times the FEED button needs
to be pressed. Make sure to press it for less than 1 second.
2-2-2) Step 2: Hold down the FEED button for 1 second or longer to enter the
selected item. If there is no selected item in Step 1, select “0: Exit
and reboot printer” to exit.
2-3) When the new settings are applied, hold down the FEED button for 1 second or
longer to save the changes. Cut the paper when the following line is printed.
(If “0: Exit and reboot printer” is not performed, the new settings will not be saved.)
*** COMPLETED ***
6. The settings will take effect after the printer reboots.
※ Note
You can check whether the printer operates normally or not through self-diagnostics. You
can check printing quality, ROM version, and DIP switch settings through self-diagnostics.
◈ WEEE(Waste Electrical and Electric Equipment)
This marking shown on the product or its literature, indicates that is should not be
disposed with other household wastes at the end of its working life, To prevent
possible harm to the environment or human health from uncontrolled waste disposal,
please separate this from other types of wastes and recycle it responsibly to promote
the sustainable reuse of material resources. Household users should contact either the
retailer where they purchased this product, or their local government office, for
details of where and how they can take this item for environmentally safe recycling.
Business users should contact their supplier and check the terms and conditions of
the purchase contract. This product should not be mixed with other commercial
wastes for disposal.
☎ BIXOLON Co., Ltd.
● Website http://www.bixolon.com
● Korea Headquarters
(Add) 7~8F, (Sampyeong-dong), 20, Pangyoyeok-ro241beon-gil,
Bundang-gu, Seongnam-si, Gyeonggi-do, 13494, Korea (ROK)
(Tel.) +82-31-218-5500
● U.S. Office
(Add) BIXOLON America Inc., 3171 Fujita St, Torrance, CA 90505
(Tel.) +1-858 764 4580
● Europe Office
(Add) BIXOLON Europe GmbH, Tiefenbroicher Weg 35 40472 Düsseldorf
(Tel.) +49 (0)211 68 78 54 0
◈ Safety Precautions
In using the present appliance, please keep the following safety regulations in order to
prevent any hazard or material damage.
WARNING
Violating following instructions can cause serious injury or death.
CAUTION
Violating following instructions can cause slight wound or damage the appliance.
Do not use the printer when it is out
of order. This can cause a fire or an
electrocution.
• Switch off and unplug the printer
before calling your dealer.
Do not let water or other foreign objects
in the printer.
• If this happened, switch off and unplug
the printer before calling your dealer.
Use only approved accessories and do not
try to disassemble, repair or remodel it
for yourself.
• Call your dealer when you need these services.
• Do not touch the blade of auto cutter.
Install the printer on the stable surface.
• If the printer falls down, it can be
broken and you can hurt yourself.
Keep the desiccant out of children’s
reach.
• If not, they may eat it.
If you observe a strange smoke, odor or
noise from the printer, unplug it before
taking following measures.
• Switch off the printer and unplug the set from the
mains.
• After the disappearance of the smoke, call your
dealer to repair it.
Do not bend the cable by force or leave it
under any heavy object.
• A damaged cable can cause a fire.
Do not plug in or unplug with your
hands wet.
• You can be electrocuted.
Keep the plastic bag out of children’s
reach.
• If not, a child may put the bag on his head.
Do not pull the cable to unplug.
• This can damage the cable, which is the
origin of a fire or a breakdown of the printer.
You must use only the supplied adapter.
• It is dangerous to use other adapters.
Do not plug several products in one
multi-outlet.
• This can provoke over-heating and a fire.
• If the plug is wet or dirty, dry or wipe it before
usage.
• If the plug does not fit perfectly with the outlet,
do not plug in.
• Be sure to use only standardized multi-outlets.
PROHIBITED
PROHIBITED
PROHIBITED
ONLY SUPPLIED ADAPTER
TO UNPLUG
PROHIBITED
DISASSEMBLIN
G
PROHIBITED
PROHIBITED
PROHIBITED
TO UNPLU
G
PRINTER
PRINTER
PRINTER
PRINTER
DEALER
PRINTE
R
PROHIBITED
PROHIBITED
PROHIBITED

◈ Information
Ce guide d'installation contient des informations brèves nécessaires à l'installation du produit. Veuillez vous
reporter aux logiciel et document disponibles dans la section Download (Télécharger) du site BIXOLON
(http://www.bixolon.com) pour plus d'informations sur les instructions d'installation.
1. Manuel: Manuel de l’utilisateur, Table des codes, Commandes de contrôle, Manuels des logiciels
2. Pilote: Pilote Windows, OPOS, JPOS, CUPS (Linux, Mac), VCOM (USB, Ethernet)
3. SDK: UPOS SDK(iOS, Android)
4. Utilitaire: Utilitaire pour POS unifié, Outil de configuration réseau, Utilitaire pour Android,
Utilitaire pour iOS
Nous, à Bixolon Co., Ltd, nous efforçons à sans cesse améliorer les fonctions et la qualité de nos produits.
Pour cela, les caractéristiques de notre produit ainsi que le contenu du présent manuel peuvent être modifiés
sans avis préalable.
◈ Composants
SRP-330II/332II
Cache câble
Paper Roll
Procuct Installation CDProcuct Installation CD
Procuct Installation CD
CD
Manuel
Partition 2" Câble USB A-B
Adaptateur CA/CC
Cordon d'alimentation
◈ Connexion des câbles
1. Éteindre l'imprimante et les périphériques.
2. Connectez le câble d'alimentation à l'adaptateur puis connectez l'adaptateur au connecteur d'alimentation
de l'imprimante.
3. Vérifiez le type des interfaces à l'arrière de l'imprimante (Série, Double série, USB, Ethernet, Parallèle)
et connectez le câble d'interface.
4. Branchez le câble du tiroir caisse dans le connecteur du tiroir caisse de l'imprimante.
※ Ne pas utiliser d'adaptateur non fourni avec l'imprimante.
◈ Installation du rouleau de papier
1. Appuyez sur le bouton Cover-Open (Ouvrir Capot)
pour ouvrir le capot.
2. Insérez un rouleau de papier neuf, dans le bon sens.
3. Tirez, délicatement, le papier puis fermez le capot.
※ Note
Pour que le papier reste bien sur le rouleau au moment de
fermer le capot, appuyez au centre de celui-ci.
La qualité d'impression peut ne pas être optimale si un
papier autre que celui recommandé est utilisé.
(Se reporter au manuel d'utilisateur.)
◈ Utilisation du panneau de commandes
○ Voyant ALIMENTATION
Le voyant d'ALIMENTATION s'allume dès que l'imprimante est allumée.
○ Voyant ERREUR
Cela indique une erreur.
○ Voyant PAPIER
Ce voyant indique la presque fin du rouleau de papier. Installez un nouveau rouleau
de papier, l'imprimante continuera l'impression. Lorsque le voyant clignote, cela
signifie que l'auto-test est en mode Veille ou que la macro-exécution est en mode
Veille lorsque la commande de la macro-exécution est utilisée.
○ Bouton Alimentation de papier
Appuyez sur le bouton FEED(ALIMENTATION) une fois pour avancer le papier
d'une ligne. Vous pouvez aussi utiliser le bouton FEED(ALIMENTATION) pour
alimenter le papier de manière continue.
◈ Montage de la partition 2"
Accrochez la partition à l'avant puis appuyez sur l'arrière pour monter la partition 2", comme indiqué sur le
schéma.
※ Attention
Après avoir utilisé le rouleau de papier 2"(58↓mm), ne le remplacez pas par un rouleau 3"(79,5±0,5 mm).
Cela pourrait réduire la qualité d'impression.
◈ Paramétrage des commutateurs DIP
Le paramétrage des commutateurs DIP doit être modifié lorsque l'imprimante est éteinte.
Tout changement effectué lorsque l'imprimante est allumée ne sera pas pris en compte.
1. Paramétrages de l'interface en Série / en Série double
• Commutateur DIP 1
Commutateur Fonction ON OFF Défaut
1-1 Commande Coupe Auto Désactiver Activer OFF
1-2 Contrôle de débit XON/XOFF DTR/DSR OFF
1-3 Longueur des données 7-bit 8-bit OFF
1-4 Vérification de la parité Oui Non OFF
1-5 Sélection de la parité PAIR IMPAIR OFF
1-6
Sélection du débit en
bauds(bps)
Reportez-vous au tableau 1 suivant
OFF
1-7 ON
1-8 OFF
• Tableau1 – Sélection du débit en bauds(bps)
Vitesse de transmission 1-6 1-7 1-8 Défaut
2400 ON OFF OFF
9600
4800 ON OFF ON
9600 OFF ON OFF
19200 OFF OFF OFF
38400 OFF ON ON
57600 OFF OFF ON
115200 ON ON ON
2. Paramétrage de l'interface Parallèle / Ethernet / USB
• Commutateur DIP 1
Commutateur Fonction ON OFF Défaut
1-1 Commande Coupe Auto Désactiver Activer OFF
1-2 Réservé - - OFF
1-3 Réservé - - OFF
1-4 Réservé - - OFF
1-5 Réservé - - OFF
1-6 Réservé - - OFF
1-7 Réservé - - ON
1-8 Réservé - - OFF
◈ Densité d’impression(Commutateur de la mémoire virtuelle)
Vitesse
Densité Impression
Densité Impression
(Commutateur de la mémoire virtuelle)
Clair Foncé
4(Elevé) 1 2 3 4 Niveau 1
3 5 6 7 8 Niveau 2
2 9 10 11 12 Niveau 3
1(Faible) 12 13 14 16 Niveau 4
※ Il est recommandé de sélectionner le mode Utilité POS unifiée ou Auto-test pour changer la densité
d'impression, à l'aide du commutateur de la mémoire virtuelle.
◈ Auto-test
1. Vérifiez que le papier est bien installé.
2. Mettez l'imprimante sous tension tout en appuyant sur le bouton FEED (ALIMENTATION).
L'auto-diagnostic commencera.
3. L'imprimante imprime le statut actuel de l'imprimante, comme la version ROM et le paramétrage du
commutateur DIP.
4. L'imprimante imprime le statut actuel et s'arrête après avoir imprimé le message suivant.
(Le voyant PAPIER continue de clignoter.)
SELF-TEST PRINTING.
SELECT MODES BY PRESSING FEED BUTTON.
Continuous SELF-TEST : Less than 1 second
VMSM Selection
: 1second or more
5. Appuyez sur le bouton FEED(ALIMENTATION) moins d'une seconde pour exécuter
« l'AUTO-TEST continu ». Appuyez sur le bouton FEED(ALIMENTATION) plus d'une seconde pour
exécuter la « sélection VMSM ».
1) Auto-test
1-1) Si vous appuyez sur le bouton FEED(ALIMENTATION) moins d'une seconde, l'imprimante
imprimera avec le type de caractère pré-sélectionné.
1-2) L'auto-test s'arrête automatiquement et coupe le papier après avoir imprimé la ligne suivante.
*** COMPLETED ***
1-3) L'imprimante entre en mode Veille une fois l'auto-test terminé.
Guide d'installation de l'imprimante & Guide de sécurité
IMPRIMANTE THERMIQUE SRP-330II/332II
Connecteur du tiroir-caisse
Câble d'alimentation
Adaptateur
Câble d'alimentation
Câble
du tiroir-caisse
Câble d'interface
(Série / Double série / Parallèle / USB / Ethernet)
Connecteur d'interface

2) Mode de paramétrage du commutateur virtuel
2-1) Lorsque l'imprimante entre en mode de paramétrage du commutateur virtuel, les lignes suivantes
seront imprimées.
** VMSM Selection **
0: Exit and reboot printer
1: Print current settings
2: Set Print Density
3: Set Print Speed
4: Set Cutting mode
5: Set External Buzzer after cutting
6: Set Internal Buzzer after cutting
7 or more: None
2-2) Assurez-vous d'appuyer sur le bouton FEED(ALIMENTATION) pour exécuter les
fonctions ci-dessus.
2-2-1) Étape 1: Le chiffre indique le nombre de fois où le bouton FEED(ALIMENTATION)
doit être appuyé. Assurez-vous d'appuyer moins d'une seconde.
2-2-2) Étape 2: Appuyez sur le bouton FEED(ALIMENTATION) plus d'une seconde pour enter
dans la fonction sélectionnée. Si aucune fonction n'est sélectionné à l'étape 1,
sélectionnez « 0 : quitter et redémarrer l'imprimante » pour sortir.
2-3) Lorsque de nouveaux paramétrages sont appliqués, maintenez le bouton FEED
(ALIMENTATION) pendant plus d'une seconde pour enregistrer ces modifications.
Coupez le papier lorsque le message suivant a été imprimé : (Si « 0 : quitter et redémarrer
l'imprimante » n'est pas validé, les nouveaux paramètres ne seront pas enregistrés.
*** COMPLETED ***
6. Le nouveau paramétrage sera pris en compte après le redémarrage de l'imprimante.
※ Note
Vous pouvez vérifier que l'imprimante fonctionne correctement ou pas, grâce à l'auto-diagnostic.
Vous pouvez vérifier la qualité d'impression, la version ROM ainsi que le paramétrage du commutateur
DIP via l'auto-diagnostic.
◈ DEEE (Les déchets d'équipements électriques et électroniques)
Ce symbole indiqué sur le produit et sa documentation indique qu'il ne doit pas être jeté avec les autres
déchets ménagers Par mesure de prévention pour l'environnement et pour la santé humaine, veuillez
séparer ces composants des autres types de déchets et les recycler conformément au principe de
réutilisation des ressources. Les particuliers sont invités à contacter le distributeur leur ayant vendu le
produit ou à se renseigner auprès de leur mairie pour savoir où et comment ils peuvent se débarrasser de
ce produit afin qu'il soit recyclé en respect avec la nature. Les entreprises sont invitées à contacter leurs
fournisseurs et à consulter les conditions de leur contrat de vente.Ce produit ne doit pas être éliminé avec
les autres déchets commerciaux.
☎ BIXOLON Co., Ltd.
● Site Internet http://www.bixolon.co
m
● Siège social en Corée
(Adr.) 7~8F, (Sampyeong-dong), 20, Pangyoyeok-ro241beon-gil,
Bundang-gu, Seongnam-si, Gyeonggi-do, 13494, Korea (ROK)
(Tél.) +82-31-218-5500
● Bureaux aux Etats-Unis
(Adr) BIXOLON America Inc., 3171 Fujita St, Torrance, CA 90505
(Tél.) +1-858 764 4580
● Bureaux en Europe
(Adr) BIXOLON Europe GmbH, Tiefenbroicher Weg 35 40472 Düsseldorf
(Tél.) +49 (0)211 68 78 54 0
◈ Précautions d’Emploi
Lors de l’utilisation du présent produit, respectez les mesures de sécurité
ci-dessous afin d’éviter tout danger ou détérioration du matériel.
AVERTISSEMENT
Le non-respect des instructions suivantes peut entraîner une blessure
grave ou la mort.
ATTENTION
Le non-respect des instructions suivantes peut causer une blessure légère ou une
détérioration de l’appareil.
N’utilisez pas votre imprimante quand elle
est en panne. Cela risque de causer un
incendie ou une électrocution.
• Eteignez et débranchez l’imprimante
avant d’appeler votre revendeur.
Evitez que l’eau ou des objets étrangers
entrent dans l’imprimante.
• Si cela se produit, éteignez et débranchez
l’imprimante avant d’appeler votre
revendeur.
Employez uniquement des accessoires
approuvés et ne démontez, réparez ou
remodelez
• Appelez votre revendeur si vous avez
besoin de ces services.
• Ne pas toucher la lame du massicot.
Installer votre imprimante sur une surface
stable.
• Si votre imprimante tombe, elle peut
tomber en panne et vous risquez de vous
blesser.
Gardez l’absorbeur d’humidité dans un
endroit inaccessible aux enfants.
• Il est dangereux si l’enfant le mange.
Si l’imprimante produit de la fumée, une odeur,
ou un bruit étrange, débranchez la avant de
prendre les mesures ci-dessous.
• Eteignez et débranchez l’imprimante.
• Après la disparition de la fumée, appelez
votre revendeur pour la réparation.
Ne forcez pas la corde à se courber et ne
la faites pas passer sous un objet lourd.
• Une corde abîmée peut provoquer un
incendie.
Ne branchez ou débranchez pas avec les
mains mouillées.
• Vous risquez l’électrocution.
Gardez le sac plastique dans un endroit
inaccessible aux enfants.
• L’enfant risque de mettre ce sac
plastique sur sa tête.
Ne tirez pas sur le câble pour
débrancher la prise.
• Cela risque d’endommager le câble et
peut être à l’origine d’un incendie ou
d’un défaut.
Vous devez utilisez uniquement
l’adaptateur fourni avec l’imprimante.
• L’utilisation d’adaptateurs d’autres
marques peut être dangereux.
Ne branchez pas plusieurs produits
différents dans la même prise.
• Cela peut provoquer un échauffement et une incendie.
• Si la prise est mouillée ou sale, séchez et
nettoyez la avant l’usage.
• Si l’appareil ne s’adapte pas parfaitement à
la prise, ne branchez pas l’appareil.
• En cas d’utilisation d’une multi-prise, celle-ci doit être standard.
INTERDIT
INTERDIT
INTERDIT
UNIQUEMENT
ADAPTATEUR FOURNI
NE PAS
BRANCHER
INTERDIT
DÉMONTER
IMPRIMANTE
INTERDIT
INTERDIT
NE PAS
BRANCHER
IMPRIMANTE
IMPRIMANTE
IMPRIMANTE
MARCHAND
D’IMPRIMEUR
IMPRIMANTE
INTERDIT
INTERDIT
INTERDIT

◈ Información
Esta guía de instalación contiene información breve necesaria para la instalación del producto. Por favor,
consulte el software y documentos facilitados en la sección de descargas del sitio web BIXOLON
(http://www.bixolon.com) para obtener más información sobre cómo configurar.
1. Manual: Manual del Usuario, Tabla de Códigos, Comandos de control, Manuales de Software
2. Controlador: Controlador de Windows, OPOS, JPOS, CUPS(Linux, Mac), VCOM(USB, Ethernet)
3. SDK: UPOS SDK(iOS, Android)
4. Utilidad: Utilidad POS unificada, Herramienta configuración de red, Utilidad Android, Utilidad iOS
En Bixolon Co. Ltd., contribuimos a mejorar las funciones y la calidad del producto permanentemente. Para
hacer esto, las especificaciones de nuestro producto y el contenido del manual pueden modificarse sin previo
aviso.
◈ Componentes
SRP-330II/332II
Tapa de cables
Rollo de papel
Procuct Installation CDProcuct Installation CD
Procuct Installation CD
CD
Manual
Partición de 2” CONEXIÓN USB A-B
Adaptador AC/DC
Cable de alimentación
◈ Conexión del cable
1. Apague la impresora y los dispositivos periféricos.
2. Conecte el cable de energía al adaptador y conecte el adaptador al conector para el suministro energético
de la impresora.
3. Verifique el tipo de interfaz en la parte trasera de la impresora (Serial, Dual Serial, USB, Ethernet,
Paralelo), y conecte el cable de interfaz.
4. Conecte el cable de la gaveta de expulsión al conector de la gaveta de expulsión de la impresora.
※ No utilice un adaptador que no haya sido provisto junto con la impresora.
◈ Instalación de los rollos de papel
1. Presione el botón Open (Abrir) para abrir la tapa.
2. Inserte un nuevo rollo de papel en la dirección correcta.
3. Tire del papel con cuidado y cierre tapa.
※ Nota
Presione el centro de la tapa firmemente al cerrarla, de
modo que el papel se mantenga en contacto con el rodillo.
La calidad de la impresión puede no ser óptima si no se
utiliza el papel recomendado.
(Consulte el Manual del usuario.)
◈ Cómo usar el panel de control
• Encendido (luz indicadora)
La luz de ENCENDIDO se prende cuando la impresora está encendida.
• Error (luz indicadora)
Esto indica un error.
• Papel (luz indicadora)
Esta luz indica que el rollo de papel se está terminando. Instale un nuevo rollo de
papel y la impresora continuará imprimiendo. Cuando la luz titila, se indica un
estado de espera por autoevaluación de impresión o un estado de espera por
ejecución de macro cuando se utiliza el comando de ejecución de macro.
• Alimentación (botón)
Presione una vez el botón de alimentación(FEED) para avanzar el papel una línea.
También puede mantener presionado el botón FEED para alimentar papel
continuamente.
◈ Cómo montar Partición de 2”
Cuelgue la partición en la parte delantera y presione hacia abajo la parte trasera para montar la partición de
2”, como se muestra en la imagen.
※ Precaución
Después de utilizar un rollo de papel de 2"(58mm), no lo reemplace con un rollo de papel de3"(79.5±0.5mm).
Esto puede resultar en una mala calidad de impresión.
◈ Configuraciones de los interruptores DIP
La configuración de los interruptores DIP debe realizarse cuando la impresora está apagada.
No se reconocen los cambios realizados si la impresora está encendida.
1. Configuraciones de interfaz Serial / Serial doble
• Interruptor DIP 1
INT Función ENCENDIDO APAGADO Predeter
m
1-1
Control del cortador
automático
Desactivado Activado APAGADO
1-2 Control de flujo XENCENDIDO/XAPAGADO DTR/DSR APAGADO
1-3 Longitud de datos 7 bits 8 bits APAGADO
1-4 Control de paridad Sí No APAGADO
1-5 Selección de paridad PAR IMPAR APAGADO
1-6
Selección de
velocidad de
transmisión(bps)
Consulte la siguiente tabla 1
APAGADO
1-7 ENCENDIDO
1-8 APAGADO
• Tabla 1 – Selección de velocidad de transmisión(bps)
Velocidad de transmisión 1-6 1-7 1-8 Predeterm
2400 ENCENDIDO APAGADO APAGADO
9600
4800 ENCENDIDO APAGADO ENCENDIDO
9600 APAGADO ENCENDIDO APAGADO
19200 APAGADO APAGADO APAGADO
38400 APAGADO ENCENDIDO ENCENDIDO
57600 APAGADO APAGADO ENCENDIDO
115200 ENCENDIDO ENCENDIDO ENCENDIDO
2. Configuraciones de interfaz Paralela / Ethernet / USB
• Interruptor DIP 1
INT Función ENCENDIDO APAGADO Predeterm
1-1
Control del cortador
automático
Desactivado Activado APAGADO
1-2 Reservado - - APAGADO
1-3 Reservado - - APAGADO
1-4 Reservado - - APAGADO
1-5 Reservado - - APAGADO
1-6 Reservado - - APAGADO
1-7 Reservado - - ENCENDIDO
1-8 Reservado - - APAGADO
◈ Densidad de impresión(Interruptor de memoria virtual)
Velocidad
Densidad de impresión
Densidad de impresión
(Interruptor de memoria virtual)
Claro Oscuro
4(Alto) 1 2 3 4 Nivel 1
3 5 6 7 8 Nivel 2
2 9 10 11 12 Nivel 3
1(Bajo) 12 13 14 16 Nivel 4
※ Se recomienda seleccionar el modo Utilidad POS unificada o de autoevaluación para cambiar la
densidad de impresión con el interruptor de memoria virtual.
◈ Autoevaluación
1. Controle si el papel está insertado correctamente.
2. Encienda la impresora mientras presiona el botón de alimentación(Feed). El autodiagnóstico comenzará.
3. La impresora imprime su estado actual como por ejemplo la versión del ROM y la configuración del
interruptor DIP.
4. La impresora imprime el estado actual y se detiene después de imprimir la siguiente declaración.
(El indicador de PAPEL sigue parpadeando.)
SELF-TEST PRINTING.
SELECT MODES BY PRESSING FEED BUTTON.
Continuous SELF-TEST : Less than 1 second
VMSM Selection
: 1second or more
5. Presione el botón de alimentación durante menos de 1 segundo para efectuar la "AUTOEVALUACIÓN
contínua" Mantenga pulsado el botón FEED por 1 segundo o mas para realizar la "Selección de VMSM".
1) Autoevaluación
1-1) Si pulsa el botón FEED por menos de 1 segundo, la impresora imprimirá en el tipo de carácter
preestablecido.
1-2) La autoevaluación se completa automáticamente y corta el papel después de imprimir la siguiente
línea:
*** COMPLETED ***
1-3) La impresora entra en modo de espera cuando se completa la autoevaluación.
Guía de instalación de la impresora y guía de seguridad
IMPRESORA TÉRMICA SRP-330II/332II
Conector de la gaveta de expulsión
Conector de alimentación
Adaptador
Cable de energía
Cable de la
gaveta de expulsión
Cable de interfaz
(Serial / Dual serial / Paralelo / USB / Ethernet)
Conectorde interfaz

2) Modo de configuacion del interruptor virtual
2-1) Cuando la impresora pasa al modo de configuración del interruptor virtual, las siguientes líneas
se imprimen.
** VMSM Selection **
0: Exit and reboot printer
1: Print current settings
2: Set Print Density
3: Set Print Speed
4: Set Cutting mode
5: Set External Buzzer after cutting
6: Set Internal Buzzer after cutting
7 or more: None
2-2) Asegúrese de pulsar el botón FEED para realizar las funciones anteriores.
2-2-1) Paso 1: El número indica el número de veces que debe presionar el botón FEED.
Asegúrese de presionarlo durante menos de 1 segundo.
2-2-2) Paso 2: Mantenga pulsado el botón FEED por 1 segundo o mas para introducir el elemento
seleccionado. Si no hay ningún elemento seleccionado en el paso 1, seleccione
"0: Salir y reiniciar la impresora "para salir.
2-3) Cuando se aplican los nuevos ajustes, mantenga pulsado el botón FEED durante 1 segundo o
más para guardar los cambios. Corte el papel cuando la siguiente línea se imprime.
(Si “0: Salir y reiniciar la impresora ", la nueva configuración no se guardará.)
*** COMPLETED ***
6. Los cambios tendrán efecto una vez que se reinicie la impresora.
※ NOTA
Mediante el auto-diagnóstico usted puede verificar si la impresora funciona con normalidad o no.
Mediante el autodiagnóstico puede verificar la calidad de la impresión, la versión ROM, y la configuración
del interruptor DIP.
◈ Residuos de Aparatos Eléctricos y Electrónicos (RAEE)
Si esta marca aparece en el producto o en sus folletos, significa que el elemento correspondiente
no debe desecharse con otros residuos del hogar una vez que llegue el final de su vida útil. Para
evitar posibles daños al ambiente o a la salud humana que provengan de la eliminación
descontrolada de desechos, separe este tipo de desecho y recíclelo responsablemente para
fomentar la reutilización sostenible de los recursos materiales. Los usuarios particulares deberían
contactarse con el minorista del lugar donde compraron este producto, o su oficina de gobierno
local, para obtener detalles sobre adónde y cómo pueden llevar este artículo para que sea
reciclado de manera segura para el medioambiente. Los usuarios empresariales pueden
comunicarse con el proveedor o leer los términos y condiciones del contrato de compra. Este
producto no debe mezclarse con otros desechos comercialespara su eliminación.
☎ BIXOLON Co., Ltd.
● Sitio Web http://www.bixolon.com
● Oficinas centrales en Corea
(Dirección) 7~8F, (Sampyeong-dong), 20, Pangyoyeok-ro241beon-gil,
Bundang-gu, Seongnam-si, Gyeonggi-do, 13494, Korea (ROK)
(Tel.) +82-31-218-5500
● Oficina en los EE.UU.
(Dirección) BIXOLON America Inc., 3171 Fujita St, Torrance, CA 90505
(Tel.) +1-858 764 4580
● Oficina en Europa
(Dirección) BIXOLON Europe GmbH, Tiefenbroicher Weg 35 40472 Düsseldorf
(Tel.) +49 (0)211 68 78 54 0
◈ Precausión de Seguridad
Es el contenido para prevenir el riesgo ó el daño material con el uso correcto del producto.
Lo utilize con precausión.
ADVERTENCIA
Al violar los aspectos marcados se posible producir los daños serios ó el
muerte.
PRECAUCIÓN
Al violar los aspectos marcados se posible producir los daños ligeros ó la destrucción del
producto.
No utilice la impresora cuando está fuera
de servicio. Puede originarse incendio o
sacudida eléctrica.
• Apague y desenchufe lla impresora
antes de llamar al distribuidor.
No deje caer agua u otros objetos en la
impresora.
• S esto sucede, apague la impresora,
desconecte de la corriente y llame al
distribuidor.
Use siempre accesorios aprobados y no
intente desmontar, reparar o remodelar
la máquina Vd. mismo.
• Llame al distribuidor cuando necesite
estos servicios.
• No toque la cuchilla del cortador automático.
Instale la impresora sobre una
superficie estable.
• Si se cae, puede romperse o causarle daño.
Mantenga el desecante fuera del alcance
de los niños.
• Peligro de que el niño se lo lleve a la boca.
Si observa humo extraño, olor o ruido de la
impresora, apague antes de proseguir.
• Apague la impresora y desenchufe de la corriente.
• Después de desaparecer el humo, llame al
distribuidor para reparar la máquina.
No doble el cable a la fuerza. No lo deje
debajo de objetos pesados.
• Puede ser causa de incendio.
No enchufe o desenchufe con las manos
húmedas.
• Peligro de sacudida eléctrica.
Guarde la bolsa de plástico fuera del alcance
de los niños.
• Si el niño se pone la bolsa en la cabeza,
es peligroso.
No tire del cable para desenchufar.
• Puede dañarse el cable y provocar
incendio o avería.
Sólo debe utilizarse el adaptador
suministrado.
• Es peligroso utilizar otros adaptadores.
No enchufe varios productos a una misma toma
de corriente al mismo tiempo.
• Puede originar sobre-calentamiento y fuego.
• Si la clavija está húmeda o sucia, séquela o
limpiela antes de usar.
• Si la clavija no ajusta perfectamente en la
toma de corriente, no la enchufe.
• Use siempre enchufes múltiples estandarizados.
PROHIBIDO
PROHIBIDO
PROHIBIDO
SOLO ADAPTADOR SUMINONLY
SUPPLIED ADAPTER
Para
desenchufar
PROHIBIDO
DESMONTAJE
PROHIBIDO
PROHIBIDO
PROHIBIDO
Para
desenchufar
IMPRESORA
IMPRESORA
IMPRESORA
DISTRIBUIDOR
IMPRESORA
PROHIBIDO
PROHIBIDO
PROHIBIDO

◈ Informação
Este guia de instalação rápida contém informações necessárias para a instalação do produto.
Consulte o software e os documentos fornecidos na secção Download do site da BIXOLON
(http://www.bixolon.com) para mais informações sobre como configurar.
1. Manual: Manual do Utilizador, Tabela de Códigos, Comandos de Controlo,
Manuais de Software
2. Driver: Windows Driver, OPOS, JPOS, CUPS(Linux, Mac), VCOM(USB, Ethernet)
3. SDK: UPOS SDK(iOS, Android)
4. Utilitário: Utilitário Unificado POS, Ferramenta de Configuração de Internet,
Utilitário Android, Utilitário iOS
Na Bixolon Co., Ltd. procuramos constantemente a melhoria da qualidade e das funções do
nosso produto. Para tal, as especificações do nosso produto e os conteúdos deste manual
poderão ser alterados sem aviso prévio.
◈ Componentes
SRP-330II/332II
Cabo de cobertura
Rolo de papel
Procuct Installation CDProcuct Installation CD
Procuct Installation CD
CD
Manual
Partição de 2” Cabo USB A-B
Adaptador AC/DC
Cabo de alimentação
◈ Ligação do Cabo
1. Desligue a impressora e periféricos.
2. Ligue o cabo de alimentação ao adaptador e ligue o adaptador ao conector de alimentação
da impressora.
3. Verifique o tipo das interfaces na parte de trás da impressora (Serial, Dual Serial, USB,
Ethernet, Parallel) e ligue o cabo de interface.
4. Ligue o cabo da gaveta ao respetivo conector da impressora.
※ Não utilize um adaptador que não tenha sido fornecido com a impressora.
◈ Instalar o rolo de papel
1. Prima o botão de abertura de tampa para abrir
a tampa.
2. Insira um novo rolo de papel na direcção
correcta.
3. Empurre o papel ligeiramente e feche a tampa.
※ Nota
Segure o centro da tampa com firmeza aquando do
fecha da tampa para que o papel mantenha
contacto com o rolo.
A qualidade de impressão pode não ser otimizada
se o papel recomendado não for utilizado.
(Verifique o Manual do Usuário.)
◈ Utilizar o Painel de Controlo
○ LED DE ALIMENTAÇÃO
A luz POWER acende quando a impressora está ligada.
○ LED DE ALIMENTAÇÃO
Indica um erro.
○ LED DE ALIMENTAÇÃO
Esta luz indica o final próximo do rolo de papel. Instale um novo rolo de
papel e a impressora continuará a imprimir. Quando a luz piscar, indica o
modo de espera de impressão em autoteste ou o modo de espera de
macro-execução quando o comando da macro-execução da é utilizado.
○ Botão DE ALIMENTAÇÃO
Pressione o botão DE ALIMENTAÇÃO uma vez para avançar o papel
uma linha. Pode também manter premido o botão DE ALIMENTAÇÃO
para alimentar o papel continuamente.
◈ Mounting 2” Partition
Pegue a partição pela frente e pressione para baixo a parte traseira para montar a partição de
2”, como mostrado na imagem.
※ Cuidado
Após utilizar o rolo de papel de 2"(58mm), não o substitua por um rolo de papel de
3”(79,5±0,5mm). Isto pode resultar em má qualidade de impressão.
◈ DIP switch setting
As alterações das configurações do Interruptor Dip devem ser feitas quando a impressora
estiver desligada. Quaisquer alterações feitas com a impressora ligada, não serão processadas.
1. Definições do Interface Serial / Dual Serial
• Interruptor DIP 1
Interruptor Função Ligado Desligado Erro
1-1
Controlo do cortador
automático
Desativar Ativar Desligado
1-2 Controlo de fluxo XON/XOFF DTR/DSR Desligado
1-3 Comprimento dos Dados 7-
b
its 8-
b
its Desligado
1-4 Verificação de Paridade Sim Não Desligado
1-5 Selecção de Paridade PAR ÍMPAR Desligado
1-6
Selecção de Taxa Baud (bps) Consulte a seguinte tabela 1
Desligado
1-7 Ligado
1-8 Desligado
• Tabela 1 – Selecção de taxa Baud(bps)
Velocidade de Transmissão 1-6 1-7 1-8 Erro
2400 Ligado Desligado Desligado
9600
4800 Ligado Desligado Ligado
9600 Desligado Ligado Desligado
19200 Desligado Desligado Desligado
38400 Desligado Ligado Ligado
57600 Desligado Desligado Ligado
115200 Ligado Ligado Ligado
2. Definições do Interface Parallel / Ethernet / USB
• Interruptor DIP 1
INT Função Ligado Desligado Erro
1-1
Controlo do cortador
automático
Desativar Ativar Desligado
1-2 Reservado - - Desligado
1-3 Reservado - - Desligado
1-4 Reservado - - Desligado
1-5 Reservado - - Desligado
1-6 Reservado - - Desligado
1-7 Reservado - - Ligado
1-8 Reservado - - Desligado
◈ Densidade de impressão(Interruptor de memória virtual)
Velocidade
Densidade de impressão
Densidade de impressão
(Interruptor de memória virtual)
Clara Escura
4(Alta) 1 2 3 4 Nível 1
3 5 6 7 8 Nível 2
2 9 10 11 12 Nível 3
1(Baixa) 12 13 14 16 Nível 4
※ É recomendado selecionar Unified POS Utility ou o modo de autoteste para alterar a
densidade de impressão utilizando o interruptor de memória virtual.
◈ Auto-teste
1. Verifique se o papel está corretamente inserido.
2. Ligue a impressora enquanto pressiona o botão de alimentação.
O auto-diagnóstico começará.
3. A impressora imprime o estado atual da impressora como a versão do ROM econfiguração
do interruptor DIP.
4. A impressora imprime o estado atual e a impressão para após a seguinte declaração.
(indicador de PAPEL continua a piscar.)
SELF-TEST PRINTING.
SELECT MODES BY PRESSING FEED BUTTON.
Continuous SELF-TEST : Less than 1 second
VMSM Selection
: 1second or more
5. Pressione o botão DE ALIMENTAÇÃO durante menos de 1 segundo para execu tar o
“AUTOTESTE contínuo". Mantenha pressionado o botão de alimentação durante 1
segundo ou mais para realizar a "Seleção VMSM".
1) Autoteste
1-1) Se pressionar o botão DE ALIMENTAÇÃO durante menos de 1 segundo, a
impressora irá imprimir no tipo de caractere predefinido.
1-2) O autoteste é concluído automaticamente e corta o papel após a impressão dalinha
seguinte.
*** COMPLETED ***
1-3) A impressora entra em modo de espera quando o autoteste for concluído.
Guia de Instalação de Impressora & Guia de Segurança
IMPRESSORA TÉRMICA SRP-330II/332II
Conector de abertura da Gaveta
Conector eléctrico
Adaptador
Cabo eléctrico
Cabo de abertura da
gaveta
Cabo de interface
(Serial/Dual Serial/Parallel/USB/Ethernet)
Conector do interfac
e

2) Modo de configuração do interruptor virtual
2-1) Quando a impressora entrar no modo de configuração do interruptor virtual,
as linhas seguintes serão impressas.
** VMSM Selection **
0: Exit and reboot printer
1: Print current settings
2: Set Print Density
3: Set Print Speed
4: Set Cutting mode
5: Set External Buzzer after cutting
6: Set Internal Buzzer after cutting
7 or more: None
2-2) Certifique-se de pressionar o botão DE ALIMENTAÇÃO para executar as funções acima.
2-2-1) Passo 1: O número indica o número de vezes que o botão DE ALIMENTAÇÃO
precisa de ser pressionado. Certifique-se de que o pressiona durante
menos de 1 segundo.
2-2-2) Passo 2: Mantenha pressionado o botão DE ALIMENTAÇÃO durante 1
segundo ou mais para inserir o item selecionado. Se não houver nenhum
item selecionado no Passo 1, selecione "0: Sair e Reiniciar Impressora"
para sair.
2-3) Quando as novas definições forem aplicadas, mantenha pressionado o botão
DE ALIMENTAÇÃO durante 1 segundo ou mais para guardar as alterações.
Corte o papel quando a seguinte linha é impressa.
(Se "0: Sair e Reiniciar Impressora " não for realizado, as novas definições não serão
guardadas.)
*** COMPLETED ***
6. As definições terão efeito depois de a impressora ser reinicializada.
※ NOTA
Pode verificar se a impressora funciona normalmente ou não através do auto-diagnóstico.
Pode verificar a qualidade de impressão, a versão de ROM, e definições do interruptor DIP através
do auto-diagnóstico.
◈ WEEE (Resíduos Eléctricos e Equipamento Eléctrico)
Esta marcação indicada no produto ou na sua literatura, indica que o mesmo não deverá se eliminado
j
untamente com os resíduos domésticos no final da sua vida útil. Para evitar possíveis danos no ambiente
e na saúde humana devido a eliminação descontrolada de resíduos, por favor, separe este dispositivo de
outros tipos de resíduos e recicle-o de forma responsável para promover a reutilização sustentável de
recursos materiais. Os utilizadores domésticos devem contactar o revendedor onde o produto foi adquiri
do ou o departamento governamental local, para obter informações sobre onde e como este produto
pode ser levado para uma reciclagem ambiental em segurança. Os utilizadores comerciais devem
contactar o seu fornecedor e verificar os termos e condições do contrato de aquisição. Este produto não
deverá ser combinado com outro lixo comercial para ser eliminado.
☎ BIXOLON Co., Ltd.
● Website http://www.bixolon.co
m
● Sede na Coreia
(Add) 7~8F, (Sampyeong-dong), 20, Pangyoyeok-ro241beon-gil,
Bundang-gu, Seongnam-si, Gyeonggi-do, 13494, Korea (ROK)
(Tel.) +82-31-218-5500
● Escritório nos EUA
(Add) BIXOLON America Inc., 3171 Fujita St, Torrance, CA 90505
(Tel.) +1-858 764 4580
● Escritório na Europa
(Add) BIXOLON Europe GmbH, Tiefenbroicher Weg 35 40472 Düsseldorf
(Tel.) +49 (0)211 68 78 54 0
◈ Precauções de Segurança
Ao utilizar este equipamento, obedeça às seguintes normas de segurança de forma a evitar
situações de risco ou danos materiais.
AVISO
Violar as instruções seguintes pode causar danos graves ou morte.
ATENÇÃO
Violar as seguintes instruções pode causar danos ou danificar a máquina.
Não utilize a impressora se ela estiver
avariada. Poderá provocar um incêndio
ou ser electrocutado.
• Desactive e desligue a impressora da
corrente antes de contactar o seu revendedor.
Não deixe que água ou outros objectos
estranhos penetrem na impressora.
• Se tal acontecer, desactive-a e desligue-a
da corrente antes de contactar o seu revendedor.
Utilize unicamente acessórios aprovados
e não tente desmontar, reparar ou
remodelar a impressora sozinho.
• Contacte o seu revendedor quando
necessitar destes serviços.
• Não toque na lâmina do cortador.
Instale a impressora numa superfície
estável.
• Se a impressora cair, poderá partir-se e
provocar-lhe ferimentos.
Mantenha o dessecante fora do alcance
de crianças.
• Se não o fizer, poderão ingeri-lo.
Se a impressora emitir um ruído, fumo ou
odor estranho, desligue-a da corrente antes de
tomar as seguintes medidas.
• Desactive a impressora e desligue-a da corrente.
• Quando o fumo se desvanecer, contacte o seu
revendedor para reparação da impressora.
Não dobre o cabo forçando-o nem
coloque sobre ele um objecto pesado.
• Um cabo danificado pode provocar
um incêndio.
Não ligue nem desligue o aparelho da
corrente com as mãos molhadas.
• Se o fizer, poderá ficar electrocutado.
Mantenha o saco de plástico fora do
alcance de crianças.
• Se não o fizer, poderão enfiar o saco
na cabeça.
Não puxe o cabo para o desligar da
corrente.
• Se o fizer, poderá danificar o cabo, o que
poderá originar um incêndio ou avarias da
impressora.
Utilize apenas o adaptador fornecido.
• A utilização de outros adaptadores é
perigosa.
Não ligue vários aparelhos a uma
tomada múltipla.
• A ligação de vários aparelhos a uma tomada múltipla
pode provocar sobreaquecimento e fogo.
• Se a ficha estiver molhada ou suja, seque-a
ou limpe-a antes de a utilizar.
• Se a ficha não encaixar bem na tomada, não a ligue.
• Certifique-se de que utiliza apenas tomadas
múltiplas estandardizadas.
PROIBID
PROIBID
PROIBID
SÓ ADAPTADOR
F
O
R
N
E
C
ID
O
PARA
DESLIGAR
PROIBID
DESMONTAGEM
PROIBIDA
PROIBID
PROIBID
PARA
DESLIGAR
IMPRESSORA
IMPRESSORA
IMPRESSORA
REVENDEDOR
DA IMPRESSORA
IMPRESSORA
PROIBID
PROIBID
PROIBID

◈ 안내
본 설치 안내서는 제품 설치에 필요한 간단한 정보만 기록하고 있습니다.
자세한 설치 안내는 빅솔론 홈페이지(
http://www.bixolon.com)의 다운로드
페이지에서 제공되는 Software 및 Document 를 참고하십시오.
1. 매뉴얼: 사용자 매뉴얼, 코드표, 제어명령, 소프트웨어 매뉴얼
2. 드라이버(Driver): Windows 드라이버, OPOS 드라이버, JPOS 드라이버, CUPS(Linux,
Mac), 가상시리얼포트 드라이버(USB 및 Ethernet 용)
3. 소프트웨어 개발도구(SDK): UPOS SDK(iOS, Android)
4. 유틸리티(Utility): 통합 POS 유틸리티(Unified POS Utility),
네트워크 설정 도구(Net Configuration Tool),
Android 유틸리티(Android Utility), iOS 유틸리티
저희 (주)빅솔론은 제품의 기능과 품질 향상을 위하여 지속적인 개선을 하고 있습니다.
이로 인하여 제품의 사양과 매뉴얼의 내용은 사전 통보 없이 변경될 수 있습니다.
◈ 내용물 확인
SRP-330II/332II
커버 케이블
롤 용지
Procuct Installation CDProcuct Installation CD
Procuct Installation CD
CD
설치 안내서
2”파티션 USB A-B Cable
AC/DC 어댑터
전원코드
◈ 케이블 연결
1. 프린터와 주변 기기의 전원을 끕니다.
2. 전원 코드를 어댑터에 연결하고, 어댑터를 프린터의 전원 커넥터에 연결하십시오.
3. 프린터 뒷면에 있는 인터페이스 종류(시리얼, 듀얼 시리얼, 이더넷, USB,
패러럴)를 확인하시고, 인터페이스 커넥터에 케이블을 연결합니다.
4. 프린터의 드로어 킥아웃 커넥터에 드로어 킥아웃 케이블을 연결합니다.
※ 어댑터는 반드시 공급된 제품만을 사용하십시오.
◈ 롤 용지 설치
1. 커버 열림 레버를 올려 커버를 엽니다.
2. 새로운 롤 용지를 올바른 방향으로
삽입합니다.
3. 약간의 용지를 당긴 다음, 커버를 닫습니다.
※ 참고
커버를 닫을 때에는 용지가 롤러에 밀착되도록
커버의 가운데를 눌러주십시오.
권장용지를 사용하지 않을 경우 인쇄품질이
저하될 수 있습니다.(사용자 매뉴얼 참고)
◈ 조작부 사용
• POWER(전원) LED
전원 표시등은 프린터에 전원이 켜져 있을 경우 켜집니다.
• ERROR(오류) LED
오류가 발생하였을 때 켜집니다.
• PAPER(종이) LED
이 표시등이 켜지면 용지가 거의 다 소모되었거나 용지가
없음을 나타냅니다. 새 용지로 교환하거나 용지를 넣으십시오.
이 표시등이 깜빡 거리면 SELF TEST 대기 상태이거나 매크로
실행 대기중임을 나타냅니다.
• FEED(이송) 버튼
용지 한 라인을 배출하기 위해서는 이송버튼을 한 번
누르십시오. 이송버튼을 계속 누르고 있으면 용지를
연속적으로 배출 할 수 있습니다.
◈ 2”파티션(Partition) 장착
그림과 같이 파티션을 앞쪽부터 걸고 뒤쪽을 눌러 고정하세요.
※ 주의
2”(58mm) 페이퍼 롤을 사용한 후에는 3”(79.5±0.5mm) 페이퍼 롤로 변경하지 마세요.
◈ DIP 스위치 설정
DIP 스위치 설정 변경은 프린터 전원을 끈 상태에서 해야 합니다.
켠 상태에서의 변경은 인식되지 않습니다.
1. 시리얼(Serial) / 듀얼 시리얼(Dual Serial) 인터페이스 설정
• DIP 스위치 1
스위치 기능
ON OFF
기본값
1-1
자동 절단기 제어 기능 해제 기능 동작 OFF
1-2
흐름제어
XON/XOFF DTR/DSR
OFF
1-3
데이터 길이 7비트 8비트 OFF
1-4
패리티 체크여부 체크함 체크안함
OFF
1-5
패리티
EVEN ODD OFF
1-6
전송속도(bps) 아래 표 1 참조
OFF
1-7 ON
1-8 OFF
• 표 1 - 전송속도(bps) 선택
전송속도 1-6 1-7 1-8 기본값
2400 ON OFF OFF
9600
4800 ON OFF ON
9600 OFF ON OFF
19200 OFF OFF OFF
38400 OFF ON ON
57600 OFF OFF ON
115200 ON ON ON
2. 패러럴(Parallel) / Ethernet / USB 인터페이스 설정
• DIP 스위치 1
스위치 기능 ON OFF 기본값
1-1
자동 절단기 제어 기능 해제 기능 동작
OFF
1-2
없음
--
OFF
1-3
없음
- -
OFF
1-4
없음
- -
OFF
1-5
없음
- -
OFF
1-6
없음
--
OFF
1-7
없음
--
ON
1-8
없음
--
OFF
◈ 인쇄 농도(가상 메모리 스위치)
속도
인쇄농도
인쇄 농도
(가상 메모리 스위치)
옅음
짙음
4(고속) 1 2 3 4
Level 1
3 5 6 7 8 Level 2
2 9 10 11 12 Level 3
1(저속) 12 13 14 16
Level 4
※ 가상 메모리 스위치로 인쇄 농도를 변경하기 위해서는 통합 POS 유틸리티
(Unified POS Utility) 또는 자가진단(Self-Test)모드를 사용하시길 바랍니다.
◈ 키친벨 설정
키친벨
가상 메모리 스위치
멜로디 모드
7-3 7-2 7-1
OFF OFF OFF 멜로디 해제
OFF OFF ON
멜로디 1
OFF ON OFF 멜로디 2
OFF ON ON
멜로디 3
ON OFF OFF 멜로디 4
※ 키친벨 기능이 설정되면 커팅 후 멜로디가 자동으로 출력됩니다.
※ 키친벨 기능은 SRP-330II/332IICOSD 모델에서만 지원합니다.
※ 키친벨 기능을 설정하기 위해서는 Unified Utility 또는 가상 스위치 설정 모드를
사용하시기 바랍니다.
◈ 자가 진단(Self-Test)
1. 용지가 정상적으로 설치되어 있는지 확인하십시오.
2. 이송버튼을 누른 상태에서 전원을 켜십시오. 자가 진단이 시작됩니다.
3. 프린터는 ROM 의 버전과 DIP 스위치 설정 상태와 같은 프린터의 현재 상태를
인쇄합니다.
4. 프린터의 현재 상태를 인쇄하고 난 후, 다음과 같은 문구를 인쇄한 후 멈춥니다.
(종이 표시등은 계속 깜빡입니다).
SELF-TEST PRINTING.
다음을 실행하려면 버튼으로 선택하시오.
테스트인쇄 계속 수행 : 버튼을 짧게 누름
메모리 스위치 설정모드 : 버튼을 길게 누름
프린터 설치 안내서 & 안전 가이드
감열식 프린터 SRP-330II/332II
드로어 킥아웃
전원 커넥터
인터페이스 커넥터
어댑터
전원코드
인터페이스 케이블
(시리얼/듀얼 시리얼/패러럴/USB/이더넷)
드로어 킥아웃
케이블

5. “테스트인쇄 계속 수행”을 진행하기 위해서는 이송버튼을 1초 이하로 누르시고,
“메모리 스위치 설정모드”를 진행하기 위해서는 이송버튼을 1초 이상 누르십시오.
1) 자가 진단
1-1) 이송버튼을 1초 이하로 누르면 프린터는 미리 제작된 문자 형식을 인쇄합니다.
1-2) 자가 진단은 자동으로 끝나고 다음과 같은 문구를 인쇄한 후 용지를 절단합니다.
*** 설정 완료 ***
1-3) 프린터는 자가 진단이 끝나면 바로 정상 상태가 됩니다.
2) 가상 메모리 스위치 설정 모드
2-1) 가상 메모리 스위치 관리(VMSM)에 진입하면 다음과 같은 문구를 인쇄 합니다.
** 가상 메모리 스위치 관리(VMSM) **
0: 설정 저장 및 종료
1: 현재 메모리 스위치 정보 인쇄
2: 인쇄농도 설정
3: 인쇄속도 설정
4: 용지절단 모드 설정
5: 외부벨(멜로디) 동작 설정
6: 내부벨 동작 설정
7: 키친벨 설정
8 or more: None
2-2) 위의 기능을 실행하기 위해서는 아래와 같이 이송버튼을 동작시켜 주십시오.
2-2-1) 단계 1: 위의 항목 앞의 숫자는 이송버튼을 누르는 횟수를 의미합니다.
원하는 항목의 숫자 횟수만큼 이송버튼을 1초 이하로 짧게 누르세요
2-2-2) 단계 2: 1 초 이상 버튼을 길게 누르면 선택한 항목으로 진입합니다.
단계 1에서 선택한 항목이 없으면 “0: 설정 저장 및 종료”를 선택하고
취소합니다.
2-3) 기능 변경이 완료되면 변경된 기능을 저장하기 위해 이송버튼을 1초 이상 길게 눌러
주십시오. 다음과 같은 문구를 인쇄 한 후 용지를 절단합니다.
(“ 0: 설정 저장 및 종료” 기능이 실행되지 않으면 설정정보는 프린터에 저장되지 않습니다.)
*** 설정 완료 ***
6. 프린터가 재부팅 하며 변경된 설정 정보가 반영됩니다.
※ 참고
자가 진단을 통해 프린터가 제대로 작동되고 있는지 확인할 수 있습니다.
자가 진단으로 인쇄 품질, ROM 버전, DIP 설정을 확인합니다.
※ 주의
키친벨 기능은 SRP-330II/332IICOSD 모델에서만 지원합니다.
◈ WEEE(Waste Electrical and Electric Equipment)
This marking shown on the product or its literature, indicates that is should not be disposed with
other household wastes at the end of its working life, To prevent possible harm to the
environment or human health from uncontrolled waste disposal, please separate this from other
types of wastes and recycle it responsiblyto promote the sustainable reuse of material resources.
Household users should contact either the retailer where they purchased this product, or their
local government office, for details of where and how they can take this item for environmentally
safe recycling. Business users should contact their supplier and check the terms and conditions
of the purchase contract. This product should notbe mixed with other commercial wastes for
disposal.
☎ BIXOLON Co., Ltd.
● 웹사이트 http://www.bixolon.com
● 한국 본사
(주소) 13494, 경기도 성남시 분당구 판교역로 241 번길 20 (삼평동) 7~8 층
(전화) +82-31-218-5500
● 미주 지사
(주소) BIXOLON America Inc., 3171 Fujita St, Torrance, CA 90505
(전화) +1-858 764 4580
● 유럽 지사
(주소) BIXOLON Europe GmbH, Tiefenbroicher Weg 35 40472 Düsseldorf
(전화) +49 (0)211 68 78 54 0
◈ 안전상의 경고
제품을 올바르게 사용하여 위험이나 물적 손해를 미리 방지하기 위한 내용이므로
반드시 지켜 사용해 주세요.
경고
표시사항 위반시 심각한 상해나 사망이 발생할 가능성이 있습니다.
주의
표시사항 위반시 경미한 상해나 제품손상이 발생할 가능성이 있습니다.
제품을 고장난 상태에서 사용하지
마세요. 화재, 감전의 원인이 됩니다.
• 바로 본체의 전원스위치를 끄고
전원플러그를 콘센트에서 뺀 다음
구입처로 연락해 주세요.
프린터의 본체 내부에 물이나 이물질이
들어가지 않도록 주의하세요.
• 본체 내부에 물이나 이물질이 들어간
경우에는 먼저 프린터 본체의 전원스
위치를 끄고 전원플러그를 콘센트에서
뺀 다음 구입처로 연락해 주세요.
승인된
부품을
사용하
고
함부
로
분해
,
수리, 개조하지 마세요.
• 제품이 손상될 수 있으므로
구입처에 문의하세요.
• 자동 절단기 날은 날카로우므로
손대지 마십시오.
안정된 장소에 설치하세요.
• 넘어지면 제품이 파손되거나 다칠 수
있습니다.
방습제는 어린이의 손에 닿지 않는
곳에 잘 보관하세요.
• 어린이가 방습제를 먹으면 위험합니다.
제품에서
연기가
나거나
이상한
냄새
또는
소리가 나는 등의 이상 발생시는 바로
전원을 끈 후 아래의 조치를 취해 주세요.
• 제품에 이상이 발생시는 바로 프린터 본체의
전원을 끈 다음 반드시 전원 플러그를
콘센트에서 뽑아주세요.
• 연기가 나지 않는 것을 확인하고 구입처로
수리를 의뢰해 주세요.
전원코드를 무리하게 구부리거나 무거운
물건을 눌러 파손되지 않도록 하세요.
• 화재의 원인이 됩니다.
젖은 손으로 전원플러그를 꽂거나
뽑지 마세요.
• 감전의 위험이 있습니다.
비닐팩은 어린이의 손에 닿지 않는
곳에 잘 보관하세요.
• 어린이가 비닐팩을 머리에 쓰면
위험합니다.
전원플러그를 뺄때는 전원코드를
잡아 당기지 마세요.
• 코드가 상처를 입어 화재나 고장의
원인이 됩니다.
어댑터는 공급된 제품만을 사용하세요.
• 다른 어댑터를 사용하면 위험합니다.
한 콘센트에 여러 제품의
전원플러그를 동시에 꽂지 마세요.
• 발열 및 발화되어 위험합니다.
• 전원플러그에서 이물질이나 물기가
묻어있으면 잘 닦아 사용하세요.
• 전원콘센트의 구멍이 헐거울 때는 전원
플러그를 꽂지 마세요.
• 멀티콘센트는 규격제품을 사용하세요.
금지
금지
금지
반드시 공급품만
플러그 금지
금지
분해 금지
금지
금지
플러그 금지
프린터
프린터
프린터
프린터 구입처
프린
터
금지
금지
금지

◈ 指南
本安装指南只记录安装产品所需的简要信息。安装指南详情请参考毕索龙网站
(http∶//www.bixolon.com) 下载页内提供的软件及文件。
1.手册:用户手册、编码表、控制命令、软件手册
2.驱动程序(Driver):Windows 驱动程序、OPOS 驱动程序、JPOS 驱动程序、
CUPS(Linux、Mac)驱动程序、虚拟串行口驱动程序
(USB 及 Ethernet 用)
3.软件开发工具(SDK):UPOS SDK(iOS、Android)
4.实用程序(Utility):整合 POS 实用程序(Unified POS Utility)、
网络安装工具(Net Configuration Tool)、
Android 实用程序(Android Utility)、iOS 实用程序
(株)BIXOLON 不断改善产品的功能和质量。因此,产品的参数和手册的内容可能在不
提前通告的情况下变动。
◈ 确认内容物
SRP-330II/332II
盖罩电缆
纸卷
Procuct Installation CDProcuct Installation CD
Procuct Installation CD
光盘
说明书
2 个分区 USB A-B电缆
AC/DC 适配器
电源线
◈ 连接电缆
1. 关闭打印机和外部设备的电源。
2. 请将电源线连接至适配器,再将适配器连接至打印机的电源连接器。
3. 确认打印机后面的通信种类(串联、 双重串行 、 并行 、USB、 以太网 ),
然后在接口上接入连接器。
4.在打印机背面的 Kick Out 连接口上连接 Kick Out 电缆。
※请只使用提供的适配器。
◈ 安装纸卷
1. 按开启盖罩键打开盖罩。
2. 沿正确的方向插入新纸卷。
3. 将纸张略微拉出一些后关闭盖罩。
※ 参考
关闭盖罩时请按下盖罩的中间部位,使纸卷辊
筒确实被卡住。
不使用推荐纸张可能降低打印质量。
(参考用户手册)
◈ 使用操作部分
• POWER(电源)LED
电源显示灯在打印机源开启时亮起。
• ERROR(错误)LED
发生错误时亮起。
• PAPER(纸张)LED
该显示灯亮起指纸张即将耗尽或缺纸。
请更换新纸卷或者放入纸张。
该显示灯闪烁指处于 SELF TEST 等待状态或者等待执行宏。
• FEED(送纸)按钮
请按一次送纸按钮送纸。按住该按钮可以连续送纸。
◈ 安装 2”分区(Partition)
请如图所示地从前面挂住分区,然后在后面推动使其固定。
※ 注意
使用 2”(58mm)纸卷后请勿变更为 3”(79.5±0.5mm)纸卷。
◈ 设定 DIP 开关
应在打印机电源关闭的状态下变更设定的 DIP 开关。在电源开启状态下变更时,无法识别。
1. 设置串行(Serial)/双重串行(Dual Serial)接口
• DIP 开关 1
开关 功能
ON OFF
基本值
1-1 自动切割机控制 解除功能 功能运行 OFF
1-2
流动控制
XON/XOFF DTR/DSR OFF
1-3 数据长度 7字节 8字节 OFF
1-4
是否核对奇偶 核对 不核对
OFF
1-5
奇偶
EVEN ODD OFF
1-6
传送速度(bps) 参考下表 1
OFF
1-7 O
N
1-8 OFF
• 表 1 – 选择传送速度(bps)
传送速度
1-6 1-7 1-8
基本值
2400 ON OFF OFF
9600
4800 ON OFF ON
9600 OFF ON OFF
19200 OFF OFF OFF
38400 OFF ON ON
57600 OFF OFF ON
115200 ON ON ON
2. 设置并行(Parallel)/以太网/USB 接口
• DIP 开关 1
开关 功能
ON OFF
基本值
1-1
自动切割机控制 解除功能 功能运行
OFF
1-2
无
- -
OFF
1-3
无
- -
OFF
1-4
无
- -
OFF
1-5
无
- -
OFF
1-6
无
- -
OFF
1-7
无
- -
ON
1-8
无
- -
OFF
◈ 打印浓度(虚拟内存开关)
速度
打印浓度
打印浓度(虚拟内存开关)
浅
深
4(高速)
1 2 3
4 Level 1
3 5 6 7 8 Level 2
2 9 10 11 12 Level 3
1(低速)
12 13 14
16 Level 4
※ 用虚拟存储器开关变更打印浓度时,请使用整合 POS 实用程序(Unified POS Utility)
或自检(Self-Test)模式。
◈ 自检(SELF-TEST)
1. 请确认是否正常设置纸张。
2. 请在按下送纸键的状态下开启电源。开始自检。
3. 打印机打印 ROM 的版本与 DIP 开关设定状态相同的打印机的当前状态。
4. 打印机打印当前状态后,打印如下语句并停止打印。(纸张显示灯一直闪烁)。
SELF-TEST PRINTING.
SELECT MODES BY PRESSING FEED BUTTON.
Continuous SELF-TEST : Less than 1 second
VMSM Selection : 1second or more
5. 按下送纸按钮 1 秒以下进行“Continuous SELF-TEST”;按下送纸按钮 1 秒以上进行
“VMSM Selection”。
打印机安装指南书和安全指南
热敏式打印机 SRP-330II/332II
接口连接器
接口电缆
(串行/双重串行/并行/USB/以太网)
抽屉弹出电缆
电缆
电源连接器
抽屉弹出连接器
适配器
电源线

1) 自检
1-1) 按住送纸按钮 1 秒以下时打印机按照预先设定的字符形式打印。
1-2) 自动结束自检后打印如下字句并切割纸张。
*** COMPLETED ***
1-3) 打印机自检结束后立即恢复正常状态。
2) 虚拟存储器开关设置模式
2-1) 进入虚拟内存开关管理(VMSM)时打印如下字句。
** VMSM Selection **
0: Exit and reboot printer
1: Print current settings
2: Set Print Density
3: Set Print Speed
4: Set Cutting mode
5: Set External Buzzer after cutting
6: Set Internal Buzzer after cutting
7 or more: None
2-2) 请如下所示地按送纸按钮执行上述功能。
2-2-1) 第 1 步∶ 上项前面的数字指按下送纸按钮的次数。
请按照所需项目的数字,短暂地按下送纸按钮 1
秒以下。
2-2-2) 第 2 步∶ 按住按钮 1 秒以上进入所选项目。未在第一步中选择项目时,
选择“0:Exit and reboot printer”后取消。
2-3) 功能变更完毕后,为保存变更后的功能,请按住送纸按钮 1 秒以上 。
打印如下字样后切断纸张。
(不执行“0:Exit and reboot printer”功能,打印机不保存设置信息 。)
*** COMPLETED ***
6. 打印机重启时反映变更后的设定信息。
※ 参考
通过自检可以确认打印机是否正常运行。
可以通过自检确认打印质量、ROM 版本、DIP 设置。
◈ WEEE(废弃电子电气设备)
本产品上所示的该标记及文字表明:相应物品在使用完后不应与其它家庭垃圾一起
丢弃。如果不对废物处理进行控制可能会对环境或人类健康造成伤害,为了防止这
种现象发生,请将带有标记的物品与其它种类的废物分开,认真负责地将其回收,
从而促进物质资源的持续再利用。关于在何地以及如何才能以环保方式回收这些物
品的详细步骤,家庭用户应当联系出售该产品的零售商或者当地政府。商业用户应
当联系供应商,并核对采购合同中的条款和条件。本产品不应与其它商业垃圾一起
处理。
☎ BIXOLON Co., Ltd.
● 网址 http://www.bixolon.com
● 韩国总部
(地址) 7~8F,(Sampyeong-dong), 20, Pangyoyeok-ro241beon-gil,
Bundang-gu, Seongnam-si, Gyeonggi-do, 13494, Korea(ROK)
(电话) +82-31-218-5500
● 美洲分公司
(地址) BIXOLON America Inc., 3171 Fujita St, Torrance, CA 90505
(电话) +1-858 764 4580
● 欧洲分公司
(地址) BIXOLON Europe GmbH, Tiefenbroicher Weg 35 40472 Düsseldorf
(电话) +49(0)211 68 78 54 0
◈ 安全预防措施
在使用本产品过程中,请遵守下列安全规程,以免发生人身伤害或设备损坏。
警告
违反以下事项可能会导致严重的伤亡事故。
注意
违反以下事项可能造成轻伤或损坏设备。
操作失灵时,不要使用打印机。这会导
致火灾或者触电。
• 请关机并拔下打印机的插头,然后,
电话联系经销商。
不要将水或者其他物品倒进打印机中。
• 如果发生此类事件,请关机并拔下打
印机的插头。然后,电话联系经销商。
只使用批准的附件,自己不要尝试拆
卸、修理或者改装。
• 如果需要这些服务,请电话联系经销商。
• 请勿触摸自动切纸器的刀片。
将打印机安装在稳定的平面上。
• 如果打印机跌落,可能会摔坏,且造成
人员受伤。
将干燥剂放在小孩拿不到的地方。
• 不然,他们会把它们当作食物。
如果发现打印机不明原因地冒烟、发出气
味或者噪音,请拔下插头,再采取急救措
施。
• 关闭打印机,拔下设备的插头。
• 在烟消失后,电话联系经销商进行维修。
不要用力弯曲连接线,或者将其置于重
物之下。
• 连接线损坏后,可能造成火灾。
不要在手潮湿的时候,插或者拔电源插头。
• 这可能导致触电。
将塑料袋放在小孩拿不到的地方。
• 否则,小孩们会将袋子套在头上。
不要通过拉掉连接线的方式拔插头。
• 这可能损坏连接线,造成火灾或者打
印机故障。
您只能使用本包装中供应的适配器。
• 使用其它适配器十分危险。
不要同
时将
几
个插头插
入
一
个
多孔
电
源
插座中。
• 这会导致过热和火灾。
• 如果插头潮湿或者肮脏,请在使用前烘干或
者擦拭干净。
• 如果插头与电源插座不配套,请不要插上电源。
• 只能使用标准化的多孔电源插座。
禁止
禁止
禁止
必须只用提供
拔下插头
禁止
禁止拆卸
禁止
禁止
拔下插头
打印机
打印机
打印机
打印机
经销商
打印机
禁止
禁止
禁止

◈ Общие сведения
В данном руководстве содержатся сведения по установке продукта. Более подробные инструкции по
установке приведены в ПО и документации, содержащихся в разделе для скачивания на сайте
BIXOLON (http://www.bixolon.com).
1. Руководство: пользователя (по эксплуатации), таблица кодировки, управляющие команды,
по использованию ПО.
2. Драйвера: для Windows, OPOS, JPOS, CUPS (Linux, Mac), VCOM (USB, Ethernet).
3. Инструментальные средства разработки ПО: UPOS SDK (iOS, Android)
4. Утилиты: универсальная утилита для программирования POS-терминалов, утилита для
конфигурирования сети, утилита для программирования под ОС Android, утилита
для программирования под iOS.
Сотрудники компании «Bixolon Co.», Ltd., непрерывно прилагают усилия для совершенствования
функциональных возможностей и качества своей продукции. В этой связи технические
характеристики нашей продукции и содержимое руководств по эксплуатации могут быть изменены
без предварительного уведомления.
◈ Комплект поставки
SRP-330II/332II
Крышка кабеля
Бумажный рулон
Procuct Installation CDProcuct Installation CD
Procuct Installation CD
Компакт-диск
Руководство пользователя
2” Перемычка USB A-B-кабель
Адаптер пост./перем. тока
Сетевой шнур
◈ Подсоединение кабеля
1. Выключите принтер и периферийные устройства.
2. Вставьте разъем сетевого шнура в адаптер, а затем подключите адаптер к сетевому разъему
принтера.
3. Найдите интерфейсные разъемы на задней стенке принтера (последовательный, сдвоенный
последовательный, параллельный, USB и Ethernet) и подключите интерфейсный кабель.
4. Вставьте кабель выталкивателя ящика кассового аппарата в соответствующее
гнездо принтера.
※ Не допускается применять адаптеры, не поставляемые в комплекте с принтером.
◈ Установка бумажного рулона
1. Откройте крышку отсека, нажав на кнопку
открытия.
2. Вставьте новый рулон в указанном направлении.
3. Извлеките небольшой «язычок» бумаги и
закройте крышку.
※ Примечание
Закрывая крышку, надавите на ее середину, чтобы
обеспечить плотное прилегание бумаги к ролику-
протяжчику.
Качество печати может быть неудовлетворительным,
если применяется нерекомендованный тип бумаги.
(см. руководство пользователя)
◈ Панель управления
• СЕТЬ (светодиод)
Светодиод «POWER» загорается каждый раз при включении питания
принтера.
• ОШИБКА (светодиод)
Если горит этот диод, в устройство обнаружило ошибку.
• БУМАГА (светодиод)
Данный светодиод означает приближение конца бумаги. Вставьте новый
бумажный рулон, и принтер продолжить печать. Если этот светодиод мигает,
принтер находится в режиме ожидания
автотестирования или режиме
ожидания при исполнении команды макроса.
• ПОДАЧА (кнопка)
Нажмите кнопку FEED(Подача) один раз, чтобы протянуть бумагу на одну
строку. При удержании кнопки FEED(Подача) бумага будет
протягиваться
непрерывно до тех пор, пока кнопка не будет отпущена.
◈ Установка 2” разделительной перемычки
Поместите 2”-ую разделительную перемычку передним концом, как показано на рисунке, и надавите
на ее задний конец.
※ Осторожно!
Использованный 2-х дюймовый бумажный рулон(диам. 58 мм) не следует заменять
3-х дюймовым(диам. 79,5±0,5 мм). Это может стать причиной плохого качества печати.
◈ Установка микропереключателей
Изменение положения микропереключателей должно осуществляться при выключенном принтере.
Если изменения выполнены при включенном принтере, они не воспринимаются.
1. Настройки последовательного и двухпортового последовательного интерфейса
• микропереключатель DIP Switch 1
П-ль Функция ON (ВКЛ.) OFF (ВЫКЛ.) По умолчанию
1-1
Использование автом.
обрезчика бумаги
Отключить Включить ВЫКЛ.
1-2 Обмен сигналами XON/XOFF DTR/DSR ВЫКЛ.
1-3 Длина данных 7 бит 8 бит ВЫКЛ.
1-4 Контроль четности Да Н-р ВЫКЛ.
1-5 Выбор четности
Ч
ЕТНЫЕ НЕЧЕТНЫЕ ВЫКЛ.
1-6
Выбор скорости в бодах,
бит/сек
См. Табл. 1 ниже
ВЫКЛ.
1-7 ВКЛ.
1-8 ВЫКЛ.
• Табл. 1. Настройка скорости передачи в бодах, бит/сек
Скорость передачи данных 1-6 1-7 1-8 По умолчанию
2400 ВКЛ. ВЫКЛ. ВЫКЛ.
9600
4800 ВКЛ. ВЫКЛ. ВКЛ.
9600 ВЫКЛ. ВКЛ. ВЫКЛ.
19200 ВЫКЛ. ВЫКЛ. ВЫКЛ.
38400 ВЫКЛ. ВКЛ. ВКЛ.
57600 ВЫКЛ. ВЫКЛ. ВКЛ.
115200 ВКЛ. ВКЛ. ВКЛ.
2. Настройки параллельного / Ethernet / USB-интерфейсов
• микропереключатель DIP Switch 1
П-ль Функция ON (ВКЛ.) OFF (ВЫКЛ.) По умолчанию
1-1
Использование автом.
обрезчика бумаги
Отключить Включить ВЫКЛ.
1-2 Зарезервировано - - ВЫКЛ.
1-3 Зарезервировано - - ВЫКЛ.
1-4 Зарезервировано - - ВЫКЛ.
1-5 Зарезервировано - - ВЫКЛ.
1-6 Зарезервировано --ВЫКЛ.
1-7 Зарезервировано - - ВКЛ.
1-8 Зарезервировано - - ВЫКЛ.
◈ Плотность шрифта(Virtual Memory Switch Manager, диспетчер
переключения параметров виртуальной памяти)
Скорость
Плотность шрифта
Плотность шрифта
(диспетчер виртуальной памяти)
Бледная
Полужирная
4(высокая) 1 2 3 4 Уровень 1
3 5 6 7 8 Уровень 2
2 9 10 11 12 Уровень 3
1(низкая) 12 13 14 16 Уровень 4
※ Рекомендуется использовать Унифицированную утилиту для POS-терминалов или
режим австотеестирования для изменения настроек печати при помощи переключателей
виртуальной памяти.
◈ Автотестирование
1. Убедитесь, что бумага вставлена правильно.
2. Включите питание, удерживая нажатой кнопку «ПОДАЧА»(FEED). Начнется автодиагностика.
3. При автодиагностике на печать выводятся текущий статус принтера, в частности, версия ROM и
настройки микропереключателей.
4. Принтер выводит информацию о текущем статусе и прекращает печать после
выведения следующего сообщения.(при этом индикатор «БУМАГА»(PAPER) продолжает
мигать).
SELF-TEST PRINTING.(АВТОТЕСТИРОВАНИЕ ПЕЧАТИ.)
SELECT MODES BY PRESSING FEED BUTTON.(НАЖМИТЕ КНОПКУ «ПОДАЧА».)
Continuous SELF-TEST : Less than 1 second
(Непрерывный режим АВТОТЕСТИОВАНИЯ : менее 1 секунды)
VMSM Selection : 1second or more
(Выбор функции переключения параметров виртуальной памяти : 1 секунда или более)
5. Нажмите кнопку «ПОДАЧА»(FEED) менее чем на 1 секунду, чтобы приступить к режиму
непрерывной автодиагностики «Continuous SELF-TEST». Нажмите и удержите кнопку
«ПОДАЧА»(FEED) не менее 1 секунды, чтобы выполнить выбор параметров виртуальной памяти
VMSM Selection.
1) Автотестирование
1-1) При нажатии на кнопку «ПОДАЧА»(FEED) длительностью менее 1 секунды принтер
выведет на печать текущий тип символов.
1-2) Автотестирование автоматически завершается, и бумага отрезается после того, как принтер
напечатает:
*** COMPLETED ***(*** ЗАВЕРШЕНО ***)
1-3) Принтер переходит в режим ожидания немедленно после завершения автотестирования.
Р
у
ководство по
у
становке принтера
Термографический принтер SRP-330II/332II
Интерфейсный
Кабель
выталкивателя
кабель
Интерфейсный кабель
(последовательный/сдвоенный последовательный/
па
р
аллельный/USB/Ethernet
)
Разъем питания
Разъем д/кабеля выталкивателя ящика кассы
Адаптер
Сетевой шнур

2) Режим настройки виртуальных переключателей памяти
2-1) Как только принтер перейдет в режим настройки виртуальных переключателей памяти,
на печать будут выведены следующие строки.
** VMSM Selection **(** Выбор параметров виртуальной памяти VMSM **)
0: Exit and reboot printer(0: выход и перезагрузка принтера)
1: Print current settings(1: Вывод на печать текущих настроек)
2: Set Print Density(2: Задать плотность шрифта)
3: Set Print Speed(3: Задать скорость печати)
4: Set Cutting mode(4: Задать режим обрезки)
5: Set External Buzzer after cutting(5: Включить внешний зуммер после отрезания)
6: Set Internal Buzzer after cutting(6: включить внутренний зуммер после отрезания)
7 or more: None(7 или больше: Нет)
2-2) Нажмите кнопку «ПОДАЧА»(FEED), чтобы выполнить вышеозначенные функции.
2-2-1) Шаг 1: Цифра означает количество раз, которое необходимо нажать
кнопку «ПОДАЧА»(FEED). Помните, это должны быть короткие
нажатия, длительностью не более 1 секунды.
2-2-2) Шаг 2: Нажмите и удержите кнопку «ПОДАЧА»(FEED) не менее 1
секунды, чтобы выполнить вход в соответствующий режим. Если на
этапе Шага 1 необходимого
режима нет, выберите «0: Exit and reboot
printer»(0: выход и перезагрузка принтера).
2-3) При вводе новых настроек нажмите кнопку «ПОДАЧА»(FEED) и удержите ее
менее одной секунды, чтобы сохранить изменения. Обрежьте бумагу,
как только на печать будет выведена следующая строка:(Если «0: Exit and reboot printer»
(0: выход и перезагрузка принтера)не выполняется, новые настройки не сохраняются).
*** COMPLETED ***(*** ЗАВЕРШЕНО ***)
6. Новые настройки вступают в силу после перезагрузки принтера.
※ Примечание
Автодиагностика позволяет определить, нормально ли функционирует принтер.
С ее помощью можно проверить качество печати, версию ROM и настройки микропереключателей.
◈ WEEE (утилизация отходов электрической промышленности)
При наличии данного символа на устройстве или литературе к нему означает, что данное
устройство следует утилизировать отдельно от бытовых отходов по истечении его срока
службы. С целью ненанесения вреда окружающей среде и здоровью человека ввиду
бесконтрольной утилизации, разделяйте отходы с целью должной их вторичной
переработки. Физическим лицам, использующим устройство для
собственных нужд, следует
обратиться либо в пункт, где было приобретено устройство, либо в соответствующее
учреждение с целью получения сведений о безопасной
утилизации/переработке.Юридическим лицам следует обратиться к поставщику и свериться
с условиями договора купли-продажи. Данное устройство не следует утилизировать вместе с
другими промышленными отходами.
☎
BIXOLON Co., Ltd.
● Сайт http://www.bixolon.com
● Головной офис в Корее
Адрес: 7~8F, (Sampyeong-dong), 20, Pangyoyeok-ro241beon-gil,
Bundang-gu, Seongnam-si, Gyeonggi-do, 13494, Korea (ROK)
Тел.: +82 (31) 218-55-00
● Офис в США
Адрес: BIXOLON America Inc., 3171 Fujita St, Torrance, CA 90505
Тел.: +1 (858) 764-45-80
● Офис в Европе
Адрес: BIXOLON Germany GmbH, Tiefenbroicher Weg, 35, 40472 Düsseldorf
Тел.: +49 (0) (211) 68-78-54 0
◈ Предостережения
Пользуясь данным устройством, чтобы избежать опасности и не причинить ущерб,
соблюдайте, пожалуйста, меры предосторожности.
Внимание
Несоблюдение следующих указаний может стать причиной серьезного
увечья или смерти.
Осторожно
Несоблюдение следующих указаний может стать причиной легкого телесного
повреждения или повреждения аппарата.
Не пытайтесь пользоваться неисправным
принтером. Это может привести к пожару или
поражению электротоком.
• Неисправный принтер выключите,
обесточьте и обратитесь в центр
технического обслуживания.
Не допускайте попадания внутрь
воды или посторонних предметов.
• Если это все же случилось, выключите
принтер, отключите его из розетки и
обратитесь в ремонтную мастерскую.
Пользуйтесь только принадлежностями,
одобренными изготовителем. Не пытайтесь
сами разбирать, ремонтировать или
модифицировать аппарат.
• Обратитесь для этого к дилеру.
• Не прикасайтесь к лезвие
автоматическим резаком.
Установите принтер на устойчивой
поверхности.
• Иначе он может упав, поломаться сам
или поранить вас.
Уберите влагопоглотитель
подальше от детей.
• они могут взять его в рот.
Заметив исходящий от принтера
странный дым, запах или шум,
отключите его вилку из розетки.
• Выключите принтер.
• Дождавшись прекращения дыма, позвоните в
ремонтную мастерскую.
Нельзя сильно перегибать сетевой
шнур, нельзя ставить на него
тяжелые предметы.
• Поврежденный электрошнур может
стать причиной пожара.
Во избежание поражения
электротоком, не беритесь за вилку
сетевого шнура мокрыми руками.
• опасность поражения электротоком.
Уберите полиэтиленовый упаковочный
пакет подальше от детей.
• Иначе ребенок может, играя, надеть
его на голову и задохнуться.
Вынимая вилку из розетки, не
тяните за шнур.
• Этим можно его повредить, что может
привести к возгоранию или к поломке
принтера.
Пользуйтесь только сетевым
адаптером, входящим в комплект
поставки.
• Пользоваться другими адаптерами
опасно.
Не подключайте несколько приборов
к одной многосекционной розетке.
• Это может вызвать перегрев и возгорание.
• Если вилка сетевого шнура мокрая или
запачкана, перед включением в розетку
вытрите ее.
• Если вилка не подходит к розетке, не
вставляйте ее.
• Пользуйтесь только стандартными
многосекционными розетками.
ЗАПРЕЩЕНО
ЗАПРЕЩЕНО
ЗАПРЕЩЕНО
ТОЛЬКО
ПЕРЕХОДНИК ИЗ
КОМПЛЕКТА
ЗАПРЕЩЕНО
РАЗБОРКА
ЗАПРЕЩЕНА
ЗАПРЕЩЕНО
ЗАПРЕ
Щ
ЕНО
ОТКЛЮЧИТЬ
ОТ СЕТИ
Принтер
Принтер
П
р
инте
р
ЗАПРЕЩЕНО
ЗАПРЕЩЕНО
ЗАПРЕЩЕНО
Принтер
РЕМОНТ
ПРИНТЕРА

◈ Information
This installation guide contains quick information required for the product installation.
Please refer to the Software and Documents provided on the Download section of the
BIXOLON Website(http://www.bixolon.com) for more information on how to setup.
1. Manual: User’s Manual, Code Table, Control Commands, Software manuals
2. Driver: Windows Driver, OPOS, JPOS, CUPS(Linux, Mac), VCOM(USB, Ethernet)
3. SDK: UPOS SDK(iOS, Android)
4. Utility: Unified POS Utility, Net Configuration Tool, Android Utility, iOS Utility
We at BIXOLON maintain ongoing efforts to enhance and upgrade the functions and quality
of all our products. In following, product specifications and/or user manual content may be
changed without prior notice.
◈ Components
SRP-330II/332II
Cable cover
Paper Roll
Procuct Installation CDProcuct Installation CD
Procuct Installation CD
CD
Installation Guide
2” Partition USB A-B Cable
AC/DC Adaptor
Power cord
◈ Cable Connection
1. Turn off the printer and peripheral devices.
2. Connect the power cord to the adapter and connect the adapter to the power supply
connector of the printer.
3. Check the type of the interfaces at the back of the printer(Serial, Dual Serial, USB,
Ethernet, Parallel) and connect the interface cable.
4. Connect the drawer kick-out cable to the drawer kick-out connector of the printer.
※ Do not use an adapter that was not supplied with the printer.
◈ Installing Paper Roll
1. Press the Cover-Open button to open the cover.
2. Insert new roll paper in the correct direction.
3. Pull the paper out slightly and close the cover.
※ Note
When closing the cover, press down on the center
of the cover to ensure that the paper is in contact
with the roller.
Printing quality may not be optimum if
recommended paper is not used.
(Refer to the User's Manual.)
◈ Using Control Panel
• POWER LED
The POWER light is on whenever the printer is on.
• ERROR LED
This indicates an error.
• PAPER LED
This light indicates the near end of the paper roll. Install a new paper
roll and the printer will continue printing. When the light blinks, it
indicates the self-test printing standby state or macro execution Standby
state when the macro execution command is used.
• FEED Button
Press the FEED button once to advance paper one line. You can also
hold down the FEED button to feed paper continuously.
◈ Mounting 2” Partition
Hang the partition at the front and press down the rear to mount the 2” partition as shown in
the picture.
※ Caution
After using 2"(58mm) paper roll, do not replace it with 3"(79.5±0.5mm) paper roll.
◈ DIP switch setting
DIP switch setting must be done while the printer is turned off.
Changes during power on are not recognized.
1. Serial / Dual Serial Interface Settings
• DIP Switch 1
Switch Function ON OFF Default
1-1 Auto Cutter Control Disable Enable OFF
1-2 Flow Control XON/XOFF DTR/DSR OFF
1-3 Data Length 7 bits 8 bits OFF
1-4 Parity Check Yes No OFF
1-5 Parity Selection EVEN ODD OFF
1-6
Baud Rate Selection(bps) Refer to the following Table 1
OFF
1-7 ON
1-8 OFF
• Table 1 – Baud Rate(bps) Selection
Transmission Speed 1-6 1-7 1-8 Default
2400 ON OFF OFF
9600
4800 ON OFF ON
9600 OFF ON OFF
19200 OFF OFF OFF
38400 OFF ON ON
57600 OFF OFF ON
115200 ON ON ON
2. Parallel / Ethernet / USB Interface Settings
• DIP Switch 1
Switch Function ON OFF Default
1-1 Auto Cutter Control Disable Enable OFF
1-2 Reserved - - OFF
1-3 Reserved - - OFF
1-4 Reserved - - OFF
1-5 Reserved - - OFF
1-6 Reserved - - OFF
1-7 Reserved - - ON
1-8 Reserved - - OFF
◈ Print Density(Virtual Memory Switch)
Speed
Print Density
Print Density
(Virtual Memory Switch)
Light
Dark
4(High) 1 2 3 4 Level 1
3 5 6 7 8 Level 2
2 9 10 11 12 Level 3
1(Low) 12 13 14 16 Level 4
※ It is recommended to select Unified POS Utility or Self-Test mode to change print
density
using the Virtual Memory Switch.
◈ Self-Test
1. Check whether the paper is inserted correctly.
2. Turn on the printer while depressing the Feed button. Self-diagnostics will begin.
3. The printer prints the current status of the printer such as the version of the ROM and DIP
switch setting.
4. The printer prints the current status and stops after printing the following statement.
(PAPER indicator keeps blinking.)
SELF-TEST PRINTING.
SELECT MODES BY PRESSING FEED BUTTON.
Continuous SELF-TEST : Less than 1 second
VMSM Selection : 1second or more
5. Press the FEED button for less than 1 second to perform “Continuous SELF-TEST”.
Hold down the FEED button for 1 second or longer to perform “VMSM Selection”.
1) Self-Test
1-1) If you press the FEED button for less than 1 second, the printer will print in the
preset character type.
1-2) The self-test completes automatically and cuts the paper after printing the following
line.
*** COMPLETED ***
1-3) The printer goes into standby mode when the self-test is complete.
Printer Installation Guide & Safet
y
Guide
THERMAL PRINTER SRP-330II/332II
Power cord
Drawer kick-
out cable
Interface cable
(Serial/Dual Serial/Parallel/USB/Ethernet)
Adaptor
Drawer kick-out connector
Power connector
Interface connector

2) Virtual Switch Setting Mode
2-1) When the printer goes into virtual switch-setting mode, the following lines will be
printed.
** VMSM Selection **
0: Exit and reboot printer
1: Print current settings
2: Set Print Density
3: Set Print Speed
4: Set Cutting mode
5: Set External Buzzer after cutting
6: Set Internal Buzzer after cutting
7 or more: None
2-2) Make sure to press the FEED button to perform the above functions.
2-2-1) Step 1: The number indicates the number of times the FEED button needs
to be pressed. Make sure to press it for less than 1 second.
2-2-2) Step 2: Hold down the FEED button for 1 second or longer to enter the
selected item. If there is no selected item in Step 1, select “0: Exit
and reboot printer” to exit.
2-3) When the new settings are applied, hold down the FEED button for 1 second or
longer to save the changes. Cut the paper when the following line is printed.
(If “0: Exit and reboot printer” is not performed, the new settings will not be saved.)
*** COMPLETED ***
6. The settings will take effect after the printer reboots.
※ Note
You can check whether the printer operates normally or not through self-diagnostics. You
can check printing quality, ROM version, and DIP switch settings through self-diagnostics.
◈ WEEE(Waste Electrical and Electric Equipment)
This marking shown on the product or its literature, indicates that is should not be
disposed with other household wastes at the end of its working life, To prevent
possible harm to the environment or human health from uncontrolled waste disposal,
please separate this from other types of wastes and recycle it responsibly to promote
the sustainable reuse of material resources. Household users should contact either the
retailer where they purchased this product, or their local government office, for
details of where and how they can take this item for environmentally safe recycling.
Business users should contact their supplier and check the terms and conditions of
the purchase contract. This product should not be mixed with other commercial
wastes for disposal.
☎ BIXOLON Co., Ltd.
● Website http://www.bixolon.com
● Korea Headquarters
(Add) 7~8F, (Sampyeong-dong), 20, Pangyoyeok-ro241beon-gil,
Bundang-gu, Seongnam-si, Gyeonggi-do, 13494, Korea (ROK)
(Tel.) +82-31-218-5500
● U.S. Office
(Add) BIXOLON America Inc., 3171 Fujita St, Torrance, CA 90505
(Tel.) +1-858 764 4580
● Europe Office
(Add) BIXOLON Europe GmbH, Tiefenbroicher Weg 35 40472 Düsseldorf
(Tel.) +49 (0)211 68 78 54 0
◈ Safety Precautions
In using the present appliance, please keep the following safety regulations in order to
prevent any hazard or material damage.
WARNING
Violating following instructions can cause serious injury or death.
CAUTION
Violating following instructions can cause slight wound or damage the appliance.
Do not use the printer when it is out
of order. This can cause a fire or an
electrocution.
• Switch off and unplug the printer
before calling your dealer.
Do not let water or other foreign objects
in the printer.
• If this happened, switch off and unplug
the printer before calling your dealer.
Use only approved accessories and do not
try to disassemble, repair or remodel it
for yourself.
• Call your dealer when you need these services.
• Do not touch the blade of auto cutter.
Install the printer on the stable surface.
• If the printer falls down, it can be
broken and you can hurt yourself.
Keep the desiccant out of children’s
reach.
• If not, they may eat it.
If you observe a strange smoke, odor or
noise from the printer, unplug it before
taking following measures.
• Switch off the printer and unplug the set from the
mains.
• After the disappearance of the smoke, call your
dealer to repair it.
Do not bend the cable by force or leave it
under any heavy object.
• A damaged cable can cause a fire.
Do not plug in or unplug with your
hands wet.
• You can be electrocuted.
Keep the plastic bag out of children’s
reach.
• If not, a child may put the bag on his head.
Do not pull the cable to unplug.
• This can damage the cable, which is the
origin of a fire or a breakdown of the printer.
You must use only the supplied adapter.
• It is dangerous to use other adapters.
Do not plug several products in one
multi-outlet.
• This can provoke over-heating and a fire.
• If the plug is wet or dirty, dry or wipe it before
usage.
• If the plug does not fit perfectly with the outlet,
do not plug in.
• Be sure to use only standardized multi-outlets.
PROHIBITED
PROHIBITED
PROHIBITED
ONLY SUPPLIED ADAPTER
TO UNPLUG
PROHIBITED
DISASSEMBLIN
G
PROHIBITED
PROHIBITED
PROHIBITED
TO UNPLU
G
PRINTER
PRINTER
PRINTER
PRINTER
DEALER
PRINTE
R
PROHIBITED
PROHIBITED
PROHIBITED
-
 1
1
-
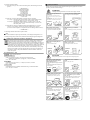 2
2
-
 3
3
-
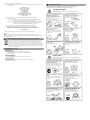 4
4
-
 5
5
-
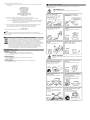 6
6
-
 7
7
-
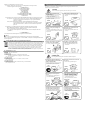 8
8
-
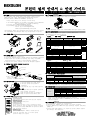 9
9
-
 10
10
-
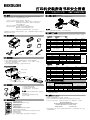 11
11
-
 12
12
-
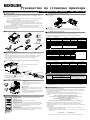 13
13
-
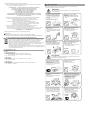 14
14
-
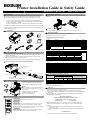 15
15
-
 16
16


BIXOLON SRP-330II Guide d'installation
- Catégorie
- Imprimer
- Taper
- Guide d'installation
dans d''autres langues
- English: BIXOLON SRP-330II Installation guide
- español: BIXOLON SRP-330II Guía de instalación
- português: BIXOLON SRP-330II Guia de instalação
Documents connexes
-
BIXOLON SRP-380 Guide d'installation
-
BIXOLON SRP-350III Guide d'installation
-
BIXOLON SRP-350plusIII Guide d'installation
-
BIXOLON SRP-F310II Guide d'installation
-
BIXOLON SRP-350II Guide d'installation
-
BIXOLON SRP-350IIOBE Guide d'installation
-
BIXOLON SRP-350plusII Guide d'installation
-
BIXOLON SRP-352plusIIA&C Guide d'installation
-
-