
•Drilling Point
•Punto in cui praticare il foro
•Punto de perforación
•Poign de forage
•Bohrpunkt
•Pipe Hole in Piercing Surface Work Position (Left Pipe)
•Foro per il tubo nella superificie Posizione di lavoro(tubo di sinistra)
•Hoyo del tubo en la superficie de la perforación Posición del trabajo(Tubo izquierdo)
•Trou de Tuyau dans la Surface de Perforation Position de Travail(Tuyau á gauche)
•Rohrbohrung auf durchstossoberfläche Arbeitsstellung(Rohr links)
•Product Bottom line
•Linea di fondo del prodotto
•Línea de fondo del producto
•Derniére ligne de produit
•Grundlinie produkt
•Horizontal Setting Line
•Punto per il Fissaggio del livello orizzontale
•Punto de Fijación Horizontal
•Poing de réglage
•Horizontal-Einstellungspunkt
P/No.:3828A20923A
•Drilling Point
•Punto in cui praticare il foro
•Punto de perforación
•Poign de forage
•Bohrpunkt
•Pipe Hole in Piercing Surface Work Position (Right Pipe)
•Foro per il tubo nella superificie Posizione di lavoro(tubo di destra)
•Hoyo del tubo en la superficie de la perforación Posición del trabajo(Tubo derecho)
•Trou de Tuyau dans la Surface de Perforation Position de Travail(Tuyau á droite)
•Rohrbohrung auf durchstossoberfläche Arbeitsstellung(Rohr rechts)
•Product out line
•Prodotto disallineato
•Contorno del producto
•Profil de produit
•Aussenlinie produkt
•Drilling Point
•Punto in cui praticare il foro
•Punto de perforación
•Poign de forage
•Bohrpunkt
•Drilling Point
•Punto in cui praticare
il foro
•Punto de perforación
•Poign de forage
•Bohrpunkt
•Plastic anchors
•Ancoraggi di plastica
•Ancla plástica
•
Attaches en plastique
•Plastikanker
•plastic anchors
•ancoraggi di plastica
•ancla plástica
•attaches en plastique
•Plastikanker
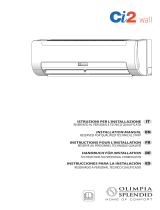
INSTALLATION GUIDE MAP
SAGOMA PER L'INSTALLAZIONE
MAPA GUÍA DE INSTALACIÓN
CARTE EE GUIDE D'INSTALLATION
INSTALLATIONSANLEITUNGSKARTE
INSTALLATION GUIDE MAP
SAGOMA PER L'INSTALLAZIONE
MAPA GUÍA DE INSTALACIÓN
CARTE EE GUIDE D'INSTALLATION
INSTALLATIONSANLEITUNGSKARTE
10mm
INSTALLATION GUIDE MAP
SAGOMA PER L'INSTALLAZIONE
MAPA GUÍA DE INSTALACIÓN
CARTE EE GUIDE D'INSTALLATION
INSTALLATIONSANLEITUNGSKARTE
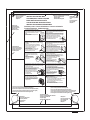
•Installation process •Processo di Installazione •Proceso de la Instalación
•Processus d'Installation •Installationsprozess
•Put an Installation Guide Map on the desired surface.
•Posizionare la sagoma per l'installazione sulla superficie desiderata.
•Ponga la planilla guía de instalación sobre la superficie que desea.
•Mettez la carte de guide d'installation sur la surface
désirée.
•Setzen Sie eine Installationsanleitungkarte auf die
gewünschte Oberfläche.
•Make a hole diameter of 6mm and depth of 30-35mm when drilling a
screw point.
•Praticare un foro del diametro di 60mm e una profonditá di 30-35 con la
punta della vite.
•Haga un hoyo con un diámetro de 60mm y profundidad de
30-35mm al escudriñar un punto de tornillo. (cuatro puntos)
•Faites un trou avec le diamétre de 6mm et la
profondeur de 30-35mm en regardant un
point de vis.(quatre points)
•Bilden Sie eine Bohrung mit Durchmesser von 6mm
und Tiefe von 30-35mm, wenn Sie eine Pore eines
Schraubenpunktes bilden (vier Punkte).
•Drive the four plastic anchors into drilled points.
•Inserire di quattro ancoraggi di plastica nei fori.
•Atornille las cuatro anclas dentro de losf puntos
taladrados.
•Pilotez les attaches antérieurs en
plastique dans les points forés.
•Treiben Sie die vier Plastikanker in
gebohrte Punkte.
•Hang the hole of product at the upper screws. (In this time, Remove the map)
(Falling attention)
•Appendere l'unitá con le viti superiori(a questo punto rimuovere la sagoma)
(attenzione al pericolo di cadute)
•Cuelgue el orificio de la unidad de los tornillos superiores.
(En esta oportunidad, quite la planilla guía) (Cuidef que no caiga)
•Attachez le trou du produit aux vis supérieures.
(Dans ce cas, retirez la carte) (Attention en chute.)
•Hängen Sie die Bohrung des Produktes auf die
oberen Schrauben (in diesem Fall, löschen Sie die
Karte) (falling attention)
(Vorsichtig, damit nicht fällt)
•Check the fixed product with light power.
•Controllare l'unità installata a bassa potenza.
•Compruebe la unidad fijada con energía eléctrica.
•Contrôlez le produit fixé avec la puissance légére.
•Überprüfen Sie mit der Lichtleistung das rtlich
festgelegte Produkt.
•Look at suited horizon by horizontal meter on the horizontal setting line, and
Fix lighty the map by adhesive tape.
•Fissare la linea per il piano necessario utilizzando una livella, fissando la
sagoma con nastro adesivo.
•Mire el horizonte que concuerde con el medidor horizontal sobre la línea de
montaje horizontal y asegure suavem ente la planilla con cinta adhesiva.
•Regardez l'horizon convenu par le métre horizontal sur la ligne de réglage
horizontale et fixez légèrement la carte par le ruban adhésif.
•Betrachten Sie mittels des Horizontzählers auf der horizontalen
Einstellungslinie geeigneten Horizont, und fixieren
Sie leicht mittels Klebstreifens die Karte.
•Refer to No.5 on page 7 when making a hole in the wall.
•Praticare un foro per il tubo di collegamento con diametro di 50mm(bel caso
si pratichi sulla superficie posteriore)Controllare il punto 5 della pagina quando
si pratica un foro nel muro.
•Perfore los partes indicadas para conectar las cañerías con un diámetro de 50mm
(en el caso de perforar la superficie posterior).
Refiérase al No,5 en la página 6 ai hacer un hoyo en la pared.
•Forez la pice de perforation pour le tuyau de liaison comme
diamétre de 50mm(en cas de la surface d'arriére de perforation).
Référez-vous á No.5 á la page 6 en faisant un trou dans le mur.
•Bohren Sie das Durchstossteil für Verbindungsrohr mit Durchmesser
50mm(bei der Oberfläche hinter dem Druchstossteil).
Siehe No.5 auf Seite 6, wenn Sie eine Bohrung an der Wand bilden.
•First, Drive the two points of the upper parts by screws.
(Leave 10mm for hanging product)
•Per prima cosa inserire due punte dei due componenti con le viti.
(Lasciare 10mm di spazio per appendered l'unitá)
•Primero, asegure los dos puntos de la parte de la parte wuperior por
medio de tornillos.(Deje 10mm para colgar el artefacto).
•D'abord, pilotez les deux points des piéces
supérieures par les vis.
(Laissez 10mm pour le produit suspendu)
•Zuerst treiben Sie mittels Schrauben die
zwei Punkte der oberen Teile
(lassen Sie 10mm für hängendes Produkt frei).
•Drive the lower parts after facing the hole of product with Plastic anchors, and fix
completely the upper screws.
•Inserire le due parti inferiori dopo avere presentato gli ancoraggi di plastica con
i fori, e fissare completamented le viti superiori
•Asegure la parte inferior después de enfrentar el orificio de la unidad a
los anclajes plásticos y asegure completamente los tornillos superioresa.
•Pilotez les parties plus inférieures aprés avoir fait face au trou du produit avec
les attaches en plastique, et fixez complétement les
vis supérieures.
•Treiben Sie die unteren Teile, nachdem Sie die
Bohrung des Produktes mit Plastikankern
gegenübergestellt haben, und befestigen Sie
vollständig die oberen Schrauben.
•In case of nothing wrong in the matter, connect the pipe and the wire.
(Installation manual reference)
•Nel caso l'installazione sia riuscita, connettere il tubo ed filo.
(Riferimento nel manuale di installazione)
•En caso de que no gaya nada fallado en el material, conecte la cañería
y los cables. (Referenciasf en el Manual de instalación)
•En cas de rien mal dans la matiére, connectez le tuyau et le fil.
(référence manuelle d'installation)
•Falls von nichts falsch im Stoff, schliessen Sie das Rohr und die
Leitung an (Installationshandbuch sehen).
INSTALLATION GUIDE MAP
SAGOMA PER L'INSTALLAZIONE
MAPA GUÍA DE INSTALACIÓN
CARTE EE GUIDE D'INSTALLATION
INSTALLATIONSANLEITUNGSKARTE
•Horizontal meter
•Livello orizzontale
•Metro horizontal
•Métre horizontal
•Horizontzhler
INSTALLATION GUIDE MAP
SAGOMA PER L'INSTALLAZIONE
MAPA GUÍA DE INSTALACIÓN
CARTE EE GUIDE D'INSTALLATION
INSTALLATIONSANLEITUNGSKARTE
INSTALLATION GUIDE MAP
SAGOMA PER L'INSTALLAZIONE
MAPA GUÍA DE INSTALACIÓN
CARTE EE GUIDE D'INSTALLATION
INSTALLATIONSANLEITUNGSKARTE
•Rear side of product
•Lato posteriore del prodotto
•Parte posterior del producto
•Côt arrire du produit
•Rückseite des Produktes
•Horizontal Setting Line
•Punto per il Fissaggio del livello orizzontale
•Punto de Fijación Horizontal
•Poing de réglage
•Horizontal-Einstellungspunkt
INSTALLATION GUIDE MAP
SAGOMA PER L'INSTALLAZIONE
MAPA GUÍA DE INSTALACIÓN
CARTE EE GUIDE D'INSTALLATION
INSTALLATIONSANLEITUNGSKARTE
500
513
525
-
 1
1

dans d''autres langues
- italiano: LG MA12AH1 Guida d'installazione
- español: LG MA12AH1 Guía de instalación
Documents connexes
Autres documents
-
Gima 22655 Le manuel du propriétaire
-
 Olimpia Splendid Ci2 Wall Series Guide d'installation
-
REOLINK E1-3MP Mode d'emploi
-
Hilti MSP-Solarpark Mode d'emploi
-
Olimpia Splendid Unico Manuel utilisateur
-
 Bobrick B-715 Guide d'installation
-
 Hangar 9 HAN5080 Le manuel du propriétaire
-


