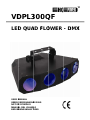
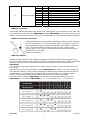
HQ Power VDPL300QF Manuel utilisateur
- Catégorie
- Stroboscopes
- Taper
- Manuel utilisateur

V
D
LE
D
USER
M
GEBRU
NOTIC
E
MANU
A
BEDIE
N
DP
D
Q
M
ANUA
L
IKERS
H
E
D’EM
P
A
L DEL
N
UNGS
A
P
L
3
Q
U
A
L
H
ANDL
E
P
LOI
USUA
R
A
NLEI
T
3
0
0
A
D
F
E
IDIN
G
R
IO
T
UNG
0Q
F
L
O
G
Q
F
O
W
E
E
R
-
D
D
M
X
X

V
D
1
T
o
I
m
e
n
If
T
h
in
t
to
2
•
•
•
•
•
•
•
•
•
•
•
•
3
•
•
•
•
•
D
PL300QF
. Int
r
o
all resid
e
m
portant
e
This
lifec
y
mun
sho
u
n
vironment
a
in doubt,
h
ank you fo
t
o service.
I
the Velle
m
. Saf
e
Damage c
and the d
e
A qualifie
d
Do not sw
Protect th
e
temperat
u
This devic
e
a qualifie
d
Make sur
e
this manu
a
Do not cri
m
if necessa
r
Disconnec
by the plu
Do not lo
o
Keep the
d
top of the
Note that
Mechanic
a
Keep the
d
. Gen
This devic
e
only be u
s
230 VAC/
5
Lighting e
f
their lives
.
Do not sh
a
Select a l
o
Specifica
t
light outp
u
Use an ap
Be
v
elec
t
Kee
p
Unp
l
r
oducti
o
e
nts of th
e
e
nvironm
e
symbol on
y
cle could
h
icipal wast
e
u
ld be retu
r
a
l rules.
contact y
o
r choosing
I
f the devi
c
m
an
®
Ser
v
e
ty Ins
t
aused by
d
e
aler will n
o
d
technicia
n
itch the de
e
device a
g
u
re.
e
falls und
e
d
person ca
e
that the a
a
l.
m
p the po
w
r
y.
t the devic
g only.
o
k directly
a
d
evice awa
y
device.
damage c
a
a
l wear and
d
evice awa
y
eral G
u
e
is design
e
s
ed indoors
5
0 Hz.
f
fects are
n
.
a
ke the de
v
o
cation wh
e
t
ions”), d
u
u
t and any
i
propriate s
v
ery careful
t
roshocks.
p
this devi
c
l
ug the ma
i
o
n
e
Europea
e
ntal info
r
the devic
e
h
arm the e
n
e
; it shoul
d
r
ned to you
o
ur local
w
HQPOWE
R
™
c
e was dam
v
ice and Q
t
ructio
n
d
isregard o
f
o
t accept r
e
n
should in
s
vice on im
m
g
ainst dam
a
e
r protecti
o
rry out the
vailable vo
w
er cord a
n
e from the
a
t the light
y
from spl
a
a
used by u
s
LEDs are
n
y
from chil
d
u
idelin
e
e
d for prof
e
with the i
n
n
ot design
e
v
ice. Avoid
e
re the dev
u
st and mo
i
lluminated
afety cabl
e
during th
e
c
e away fro
i
ns lead be
f
E
N
n Union
r
mation a
b
e
or the pa
c
n
vironmen
t
d
be taken
t
r distribut
o
w
aste dis
p
™
! Please
r
aged in tra
uality Wa
r
n
s
f
certain g
u
e
sponsibili
t
s
tall and s
e
m
ediately
a
a
ge by lea
v
o
n class I.
I
electric c
o
ltage does
n
d protect i
mains to
c
source as
a
shing and
s
er modific
a
n
ot covere
d
d
ren and u
e
s
e
ssional us
n
cluded po
w
e
d for perm
brute forc
e
ice is prot
e
isture. Res
p
surface.
e
to fix the
e
installatio
m rain an
d
f
ore openi
n
2
N
GLI
S
b
out this
p
c
kage indic
a
t
. Do not d
t
o a specia
o
r or to a l
o
p
osal aut
h
r
ead the m
a
nsit, don't
r
ranty on
t
u
idelines in
t
y for any
e
e
rvice this
d
a
fter it has
v
ing it swit
c
I
t is theref
o
o
nnection.
not excee
d
t against d
c
lean it or
w
sensitive p
dripping li
q
a
tions to t
h
d
by warra
n
nauthorise
e on stage
,
w
er adapt
e
anent ope
r
e
when ins
t
e
cted again
p
ect a mini
device (e.
g
n: touchin
g
d
moisture.
n
g the hou
s
S
H
p
roduct
a
tes that d
ispose of t
h
lized comp
a
o
cal recycli
n
h
orities.
a
nual thoro
install or u
s
t
he final pa
this manu
a
e
nsuing de
f
d
evice.
been expo
c
hed off un
o
re essenti
a
d
the volta
g
amage. Ha
w
hen it is n
eople may
q
uids. Nev
e
h
e device i
s
n
ty.
d users.
,
in discos,
e
r connecte
r
ation: reg
u
t
alling or o
p
st extrem
e
mum dista
n
g
. VDLSC7
g
live wire
s
s
ing.
isposal of
t
h
e unit (or
a
ny for rec
n
g service.
ughly befo
r
s
e it and c
o
ges of this
a
l is not co
v
f
ects or pr
o
sed to cha
n
til it has r
e
a
l that the
g
e stated i
n
ve an aut
h
ot in use.
H
go into ep
i
e
r put obje
c
s
not cover
e
theatres,
e
d to an alt
e
u
lar operat
i
p
erating th
e
heat (see
n
ce of 0.5
m
or VDLSC
8
s
can caus
e
t
he device
a
batteries)
a
ycling. Thi
s
Respect t
h
r
e bringing
o
ntact your
manual.
v
ered by t
h
o
blems.
n
ges in te
m
e
ached roo
m
device be
e
n
the speci
f
h
orised dea
H
andle the
i
leptic seiz
u
c
ts filled w
i
e
d by the
w
e
tc. The V
D
e
rnating cu
i
on breaks
e device.
“Technic
a
m
between
8).
e
life-threa
t
HQPOW
E
a
fter its
a
s unsorte
d
s
device
h
e local
this device
dealer. Re
f
h
e warrant
y
m
perature.
m
e
arthed. H
a
f
ications of
ler replace
power cor
d
u
re if they
d
i
th liquid o
n
w
arranty.
D
P should
rrent of m
a
will prolon
g
a
l
the device
t
ening
E
R™
d
f
er
y
a
ve
it
d
d
o.
n
a
x.
g
’s

VDPL300QF HQPOWER™
3
• Familiarise yourself with the functions of the device before actually using it. Do not allow
operation by unqualified people. Any damage that may occur will most probably be due to
unprofessional use of the device.
• Use the original packaging if the device is to be transported.
• All modifications of the device are forbidden for safety reasons.
• Only use the device for its intended purpose. All other uses may lead to short circuits, burns,
electroshocks, crash, etc. Using the device in an unauthorised way will void the warranty.
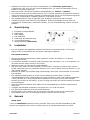
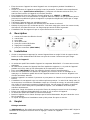
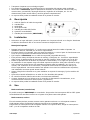
4. Description
1. safety chain fixation ring
2. DMX input
3. DMX output
4. DIP switches
5. IEC cord input/fuse
6. sensitivity adjustment knob
7. controller input (VDPL300RC)
5. Installation
• Choose a suitable mounting spot. Mount the fixture in the desired angle using the included
bracket. Connect the IEC power cord to the mains. Disconnect after use.
Mounting the Device
• Have the device installed by a qualified person, respecting EN 60598-2-17 and all other applicable
norms.
• The carrying construction must be able to support 10 times the weight of the device for 1 hour
without deforming.
• The installation must always be secured with a secondary attachment e.g. a safety cable.
• Never stand directly below the device when it is being mounted, removed or serviced. Have a
qualified technician check the device once a year and once before you bring it into service.
• Install the device in a location with few passers-by that is inaccessible to unauthorised persons.
• Overhead mounting requires extensive experience: calculating workload limits, determining the
installation material to be used… Have the material and the device itself checked regularly. Do not
attempt to install the device yourself if you lack these qualifications as improper installation may
result in injuries.
• Adjust the desired inclination angle via the mounting bracket and tighten the bracket screws.
• Make sure there is no flammable material within a 0.5 m radius of the device.
• Have a qualified electrician carry out the electric connection.
• Connect the device to the mains with the power plug. Do not connect it to a dimming pack.
• The installation has to be approved by an expert before the device is taken into service.
6. Use
Stand-Alone Operation
Your VDPL300QF can be used without controller. Set all DIP switches to OFF. Adjust the sensitivity
of the internal microphone through the adjustment knob on the back panel.
Master/Slave Operation
The master/slave mode enables you to connect several fixtures to one single master fixture. All
slave fixtures will work synchronously with the master fixture.
Set all DIP switches on the master unit to OFF; set DIP switches 1 and 10 on each slave fixture to
ON.

VDPL300QF HQPOWER™
4
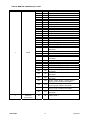
Detailed DMX512 Values per Channel
channel function from to description
1 Mode
0 10 Off
11 16 Group 1 white on
17 22 Group 2 white on
23 28 Group 3 white on
29 34 Group 1 red on
35 40 Group 2 red on
46 46 Group 3 red on
47 52 Group 1 green on
53 58 Group 2 green on
59 64 Group 3 green on
65 70 Group 1 blue on
71 76 Group 2 blue on
77 82 Group 3 blue on
83 88 All white on
89 94 All red on
95 100 All green on
101 106 All blue on
107 112 All red and green on
113 118 All red and blue on
119 124 All green and blue on
125 130 All red, green and blue on
131 136 All red and white on
137 142 All green and white on
143 148 All blue and white on
149 154 Group 1 of blue and all white on
155 160 Group 2 of blue and red on
161 166 Group 3 of blue and all green on
167 172 Group 1 of blue and group 3 of red on
173 178 Group 2 of blue and group 2 of red on
179 184 Group 3 of blue and group 1 of red on
185 190 Group 1 of green and group 3 of white on
191 196 Group 2 of green and group 2 of white on
197 202 Group 3 of green and group 1 of white on
203 208
Group 1 of blue, group 3 of green, group
1 of red and group 3 of white on
209 214
Group 2 of blue, group 2 of green, group
2 of red and group 2 of white on
215 220
Group 3 of blue, group 1 of green, group
3 of red and group 1 of white on
221 255 All red, green, blue and white on
2
Lens 2
group/colour
selection
25 49 As per channel 1
3
Lens 3
group/colour
selection
50 74 As per channel 1
4
Lens 4
group/colour
selection
75 99 As per channel 1
5 Shutter
0 10 Off
11 255 Strobe effect from slow to fast

VDPL300QF HQPOWER™
5
6 Built-in programs
0 10 No function
11 36 Program 1
37 62 Program 2
63 88 Program 3
89 114 Program 4
115 130 Program 5
131 156 Program 6
157 182 Program 7
183 208 Program 8
209 250 Random all programs
251 255 Sound to light mode
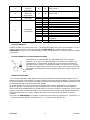
DMX512 Connection
Connect the provided XLR cable to the female 3-pin XLR output of your controller and the other side
to the male 3-pin XLR input of the VDPL300QF. Multiple VDPL300QFs can be linked through serial
linking. The linking cable should be a two-core screened cable with XLR input and output connectors.
DMX512 Chain with Termination
A DMX terminator is recommended for installations where the DMX cable has
to run a long distance or is in an electrically noisy environment (e.g. discos).
The terminator prevents corruption of the digital control signal by electrical
noise. The DMX terminator is simply an XLR plug with a 120Ω resistor
between pins 2 and 3, which is then plugged into the XLR output socket of
the last device in the chain.
Please see illustration.
DMX Start Address
All DMX-controlled devices need a digital start address so that the correct device responds to the
signals. This start address is the channel number from which the device starts to “listen” to the DMX
controller. Enter the correct number and read it from the display located on the base of the
VDPL300QF.
You can use the same starting address for a whole group of devices or enter an individual one for
every device.
When all devices have the same address, all the VDPL300QFs will “listen” to the control signal on
one particular channel. In other words: changing the settings of one channel will affect all devices
simultaneously. If you set different addresses, each device will “listen” to a separate channel
number. Changing the settings of one channel will only affect the device in question.
In the case of the 6-channel VDPL300QF, you will have to set the start address of the first
VDPL300QF to 1, the second VDPL300QF to 7 (1 + 6), the third to 13 (7 + 6) and so on.

VDPL300QF HQPOWER™
6
7. Cleaning and Maintenance
1. All screws should be tightened and free of corrosion.
2. The housing, visible parts, mounting supports and the installation location (e.g. ceiling,
suspension, trussing) should not be deformed, modified or tampered with e.g. do not drill extra
holes in mounting supports, do not change the location of the connections.
3. Moving mechanic parts must not show any signs of wear and tear.
4. The electric power supply cables must not show any damage. Have a qualified technician
maintain the device.
5. Disconnect the device from the mains prior to maintenance activities.
6. Wipe the device regularly with a moist, lint-free cloth. Do not use alcohol or solvents.
7. There are no user-serviceable parts.
8. Contact your dealer for spare parts if necessary.
8. Technical Specifications
Power Supply max. 230 VAC/50 Hz
Power Consumption 30 W
Fuse F1A, 250 VAC (5 x 20 mm) (order code FF1N)
Dimensions 470 x 295 x 95 mm
Total Weight 5.5 kg
Max. Ambient Temperature 45°C
Max. Housing Temperature 50°C
DMX Channels 6
DMX512 Connection 3-pin XLR
LEDs 228 (each lens: 12 x red, 18 x green, 18 x blue, 9 x white)
Use this device with original accessories only. Velleman Components nv cannot be held
responsible in the event of damage or injury resulted from (incorrect) use of this device.
For more info concerning this product, please visit our website www.hqpower.com. The
information in this manual is subject to change without prior notice.
© COPYRIGHT NOTICE
This manual is copyrighted. The copyright to this manual is owned by Velleman Components
nv. All worldwide rights reserved. No part of this manual may be copied, reproduced, translated or
reduced to any electronic medium or otherwise without the prior written consent of the copyright
holder.

V
D
1
A
a
B
e
H
e
D
a
h
e
R
a
2
•
•
•
•
•
•
•
•
•
•
•
•
3
•
•
•
D
PL300QF
. Inl
e
a
n alle in
g
e
langrijke
Dit
s
wor
d
eve
n
ges
p
naa
r
e
bt u vrag
a
nk u voor
e
t toestel b
e
a
adpleeg d
e
. Veil
De garant
en uw de
a
rechtstree
Laat dit t
o
Om besch
a
blootgest
e
gekomen
i
Dit toeste
l
geschoold
e
De beschi
k
handleidi
n
De voedin
kabel plaa
Trek de st
het niet g
e
Kijk niet r
e
van epile
p
Houd dit t
o
gevuld m
e
Schade d
o
garantie.
De leds e
n
Houd dit t
o
. Al
ge
Dit toeste
l
enkel bin
n
van maxi
m
Lichteffec
t
langer me
Schud het
toestel.
Wee
s
elek
t
Bes
c
Ver
z
te o
p
e
idin
g
g
ezetenen
milieu-in
f
s
ymbool o
p
d
t weggew
o
n
tuele batt
e
p
ecialiseer
d
r
een lokaa
en, conta
c
uw aanko
o
e
schadigd
t
e
Vellema
n
i
g
heid
s
ie geldt ni
e
a
ler zal de
v
ks verban
d
o
estel insta
l
a
diging te
v
e
ld aan te
m
i
s.
l
valt onde
r
e
technicu
s
k
bare nets
p
n
g.
gskabel m
a
tsen.
ekker uit h
e
bruikt.
e
chtstreek
s
p
sie.
o
estel uit
d
e
t vloeistof
o
or wijzigin
g
n
mechanis
o
estel uit
d
e
mene
l
is ontwor
p
n
enshuis g
e
m
um 230
V
t
en zijn nie
t
egaan.
toestel ni
e
s
voorzicht
i
t
roshocks t
e
c
herm dit t
o
z
eker u erv
a
p
enen.
van de E
u
f
ormatie
b
p
het toest
e
o
rpen, dit
t
e
rijen) nie
t
d
bedrijf te
r
l recyclag
e
c
teer dan
o
p! Lees de
z
t
ijdens het
n
®
servic
e
s
instru
c
e
t voor sch
a
v
erantwoo
r
d
mee hou
d
l
leren en o
n
v
ermijden,
m
peratuurs
c
r
bescherm
s
moet de
e
p
anning m
a
a
g niet om
g
et stopcon
t
s
in de lich
t
d
e buurt va
op het toe
s
g
en die de
che schad
e
d
e buurt va
richtli
jn
p
en voor p
r
e
bruiken d
o
V
AC/50 Hz.
t
ontworpe
e
t dooreen.
i
g bij de in
s
e
vermijde
n
o
estel tege
a
n dat het
NE
D
u
ropese U
n
b
etreffen
d
e
l of de ver
t
oestel sch
a
t
bij het ge
w
r
echtkome
n
e
punt bren
g
de plaats
e
z
e handlei
d
transport,
e
- en kwal
c
ties
a
de door h
e
r
delijkheid
a
d
en.
n
derhoude
n
zet u het
t
c
hommelin
g
ingsklasse
e
lektrische
a
g niet hog
g
eplooid of
t
act (trek
n
t
bron. De li
n opspatte
s
tel.
gebruiker
e
vallen nie
n kinderen
n
en
r
ofessione
e
o
or de mee
g
n voor con
Vermijd b
r
s
tallatie: r
a
n
.
n regen en
toestel nie
t
7
D
ERL
A
n
ie
d
e dit pro
d
pakking g
e
a
de kan to
e
w
one huis
h
n
voor rec
y
g
en. Respe
c
e
lijke aut
o
d
ing grondi
installeer
h
iteitsgara
e
t negeren
a
fwijzen v
o
n
door een
t
oestel bes
t
g
en. Wach
t
I, wat wil
z
aansluitin
g
er zijn dan
beschadig
d
n
iet aan de
chtbron ka
nde en dru
heeft aang
t onder de
en onbev
o
e
l gebruik
o
g
eleverde
a
tinue werk
r
ute krach
t
a
ak geen k
a
vochtighe
i
t
aangeslo
t
A
NDS
d
uct
e
eft aan da
t
e
brengen a
h
oudelijke
a
y
clage. U
m
c
teer de pl
a
o
riteiten
b
g voor u h
e
h
et dan nie
ntie achte
r
van bepaa
o
or defecte
n
geschoold
e
t
niet aan
o
t
tot het to
e
z
eggen dat
g
verzorge
n
de spanni
n
d
zijn. Laa
t
kabel!) vo
n bij gevo
e
ppelende
v
ebracht aa
garantie.
o
egden.
o
p podia, in
a
dapter aa
n
ing: regel
m
t
tijdens de
a
bels aan
d
i
d.
t
en is op e
e
t
, als het n
a
an het mili
a
fval; het
m
m
oet dit toe
s
a
atselijke
m
b
etreffen
d
e
t toestel i
n
t en raadpl
r
aan deze
h
lde richtlij
n
n
of proble
e
technicu
s
o
nmiddellij
k
e
stel op ka
het toest
e
n
.
n
g in de s
p
t
uw deale
r
ordat u he
t
e
lige mens
e
v
loeistoffen
n het toest
disco's, e
n
n
te sluiten
m
atige ond
e
installatie
d
ie onder s
t
e
n stroomb
a
zijn leve
n
eu. Gooi d
i
m
oet bij ee
n
s
tel naar u
w
m
ilieuwetg
e
d
e de ver
w
n
gebruik
n
l
eeg uw de
a
h
andleidin
g
n
en in dez
e
men die hi
e
s
.
k
nadat he
t
mertempe
r
e
l geaard
m
p
ecificaties
r
zo nodig
e
t
toestel re
e
n leiden t
o
. Plaats ge
e
el vallen n
i
n
z. U mag
d
op een wi
s
e
rbrekinge
n
en de bedi
t
room staa
n
ron alvore
n
HQPOW
E
n
scyclus
i
t toestel (
e
n
w
verdeler
e
ving.
w
ijdering.
n
eemt. We
r
a
ler.
g
.
e
handleidi
n
e
r
t
werd
r
atuur
m
oet zijn. E
e
achteraan
d
e
en nieuwe
inigt en al
s
o
t een aan
v
e
n objecte
n
i
et onder d
e
d
it toestel
s
selspanni
n
n
doen ze
ening van
n
om dodel
n
s het
E
R™
e
n
of
r
d
n
g
e
n
d
e
s
u
v
al
n
e
n
g
dit
ijke

VDPL300QF HQPOWER™
8
• Installeer het toestel weg van extreme temperaturen (zie ‘Technische specificaties’),
vochtigheid en stof. Zorg voor een minimumafstand van 0,5 m tussen de lichtuitgang van het
toestel en het belichte oppervlak.
• Maak het toestel vast met een geschikte veiligheidskabel (bv. VDLSC7 of VDLSC8).
• Leer eerst de functies van het toestel kennen voor u het gaat gebruiken. Ongeschoolde personen
mogen dit toestel niet gebruiken. Meestal is beschadiging het gevolg van onprofessioneel gebruik.
• Gebruik de oorspronkelijke verpakking wanneer u het toestel vervoert.
• Om veiligheidsredenen mag de gebruiker geen wijzigingen aanbrengen aan het toestel.
• Gebruik het toestel enkel waarvoor het gemaakt is. Andere toepassingen kunnen leiden tot
kortsluitingen, brandwonden, elektrische schokken, enz. Bij onoordeelkundig gebruik vervalt de
garantie.
4. Omschrijving
1. bevestiging veiligheidskabel
2. DMX-ingang
3. DMX-uitgang
4. DIP-schakelaar
5. aansluiting IEC-kabel/zekering
6. gevoeligheidsregeling
7. ingang controller (VDPL300RC)
5. Installatie
• Kies een geschikte montageplaats. Monteer het toestel in de gewenste hoek via de beugel.
Koppel de IEC-voedingskabel aan het lichtnet. Ontkoppel na gebruik.
Het toestel monteren
• Laat een geschoolde technicus dit toestel installeren conform EN 60598-2-17 en andere
toepasselijke normen.
• De constructie waaraan het toestel wordt bevestigd, moet gedurende 1 uur 10 x het gewicht van
dit toestel kunnen dragen zonder te vervormen.
• Maak het toestel ook vast met een veiligheidskabel.
• Sta nooit recht onder het toestel wanneer u het monteert, verwijdert of schoonveegt. Laat het
toestel controleren door een geschoolde technicus voor u het in gebruik neemt en laat het 1 x per
jaar volledig nakijken.
• Installeer dit toestel op een plaats waar niemand langs moet lopen, kan neerzitten of het toestel
kan aanraken.
• Een degelijke praktijkervaring is vereist voor de plaatsing van dit toestel. U moet de
maximumbelasting van de draagconstructie kunnen berekenen, weten welk constructiemateriaal
u kunt gebruiken en u moet het gebruikte materiaal en het toestel af en toe laten nakijken.
Monteer het toestel niet zelf indien u er geen ervaring mee heeft. Een slechte montage kan leiden
tot verwondingen.
• Regel de gewenste invalshoek door middel van de montagebeugel en draai de regelschroeven
stevig aan.
• Verwijder alle brandbaar materiaal in een straal van 0,5 m rond het toestel.
• Een geschoolde elektricien moet het toestel aansluiten.
• Sluit het toestel via de stekker aan op het lichtnet. Sluit het niet aan op een dimmerpack.
• De installatie moet voor het eerste gebruik gekeurd worden door een expert.
6. Gebruik
Stand-alone
U kunt uw VDPL300QF aansturen zonder controller. Zet hiervoor alle DIP-schakelaars op OFF.
Regel de gevoeligheid van de interne microfoon bij met de regelknop achteraan het toestel.

VDPL300QF HQPOWER™
9
Master-slave
Met de master-slavemodus kunt u meerdere toestellen aan een enkel mastertoestel aansluiten. Alle
slavetoestellen functioneren dan synchroon met het mastertoestel.
Zet alle DIP-schakelaars van het mastertoestel op OFF; zet DIP-schakelaars 1 en 10 van de
slavetoestellen op ON.
Gedetailleerde DMX512-waarden per kanaal
kanaal functie van tot omschrijving
1 Modus
0 10 Uitgeschakeld
11 16 Groep 1 wit ingeschakeld
17 22 Groep 2 wit ingeschakeld
23 28 Groep 3 wit ingeschakeld
29 34 Groep 1 rood ingeschakeld
35 40 Groep 2 rood ingeschakeld
46 46 Groep 3 rood ingeschakeld
47 52 Groep 1 groen ingeschakeld
53 58 Groep 2 groen ingeschakeld
59 64 Groep 3 groen ingeschakeld
65 70 Groep 1 blauw ingeschakeld
71 76 Groep 2 blauw ingeschakeld
77 82 Groep 3 blauw ingeschakeld
83 88 Alle witte ingeschakeld
89 94 Alle rode ingeschakeld
95 100 Alle groene ingeschakeld
101 106 Alle blauwe ingeschakeld
107 112 Alle rode en groene ingeschakeld
113 118 Alle rode en blauwe ingeschakeld
119 124 Alle groene en blauwe ingeschakeld
125 130 Alle rode, groene en blauwe ingeschakeld
131 136 Alle rode en witte ingeschakeld
137 142 Alle groene en witte ingeschakeld
143 148 Alle blauwe en witte ingeschakeld
149 154 Groep 1 blauw en alle witte ingeschakeld
155 160 Groep 2 blauw en alle rode ingeschakeld
161 166 Groep 3 blauw en alle groene
ingeschakeld
167 172 Groep 1 blauw en groep 3 rood
ingeschakeld
173 178 Groep 2 blauw en groep 2 rood
ingeschakeld
179 184 Groep 3 blauw en groep 1 rood
ingeschakeld
185 190
Groep 1 groen en groep 3 wit
ingeschakeld
191 196
Groep 2 groen en groep 2 wit
ingeschakeld
197 202
Groep 3 groen en groep 1 wit
ingeschakeld
203 208
Groep 1 blauw en groep 3 groen en
groep 1 rood en groep 3 wit ingeschakeld
209 214
Groep 2 blauw en groep 2 groen en
groep 2 rood en groep 2 wit ingeschakeld
215 220
Groep 3 blauw en groep 1 groen en
groep 3 rood en groep 1 wit ingeschakeld
221 255 All rode, groene en blauwe ingeschakeld

VDPL300QF HQPOWER™
10
2
Lens 2 selectie
groep/kleur
25 49 Zoals kanaal 1
3
Lens 3 selectie
groep/kleur
50 74 Zoals kanaal 1
4
Lens 4 selectie
groep/kleur
75 99 Zoals kanaal 1
5 Sluiter
0 10 Uitgeschakeld
11 255 Stroboscoop van traag naar snel
6
Ingebouwde
programma’s
0 10 Geen functie
11 36 Programma 1
37 62 Programma 2
63 88 Programma 3
89 114 Programma 4
115 130 Programma 5
131 156 Programma 6
157 182 Programma 7
183 208 Programma 8
209 250 Alle programma’s willekeurig
251 255 Muzieksturing
DMX512-aansluiting
Sluit de meegeleverde XLR-kabel aan de vrouwelijke 3-pin XLR-uitgang van de controller en de
andere kant van de mannelijke 3-pin XLR-ingang van de VDPL300QF. U kunt verscheidene
VDPL300QF’s aan elkaar koppelen met behulp van een seriële koppeling. Gebruik daarvoor een 2-
aderige afgeschermde kabel met XLR ingang- en uitgangsaansluitingen.
DMX512-keten met eindweerstand
Een DMX eindweerstand is aanbevolen als de DMX-kabel vrij lang is of wordt
gebruikt in een omgeving met veel elektrische ruis (bv. een discotheek). De
eindweerstand voorkomt corruptie van het digitale controlesignaal door
elektrische ruis. De DMX eindweerstand is niets meer dan een XLR-stekker
met een weerstand van 120 Ω van pin 2 naar 3. Deze XLR-stekker wordt dan
aangesloten op de XLR-uitgang van het laatste toestel in de reeks. Zie de
illustratie links.
DMX Start Address
Alle DMX-gestuurde toestellen hebben een digitaal startadres nodig, zodat het juiste toestel reageert
op de signalen. Dit digitale startadres is het kanaalnummer van waarop het toestel ‘luistert’ naar het
signaal van de DMX controller. Geef het correcte nummer in en lees het af op de display onderaan
uw VDPL300QF.
U kunt één enkel startadres gebruiken voor een groep toestellen of u kunt per toestel een nieuw
startadres ingeven.
Wanneer u één enkel startadres instelt, zullen alle toestellen ‘luisteren’ naar hetzelfde kanaal. Met
andere woorden: wanneer u de instellingen voor 1 kanaal verandert, zullen alle toestellen er tegelijk
op reageren.
Wanneer u verschillende adressen instelt, dan luistert elk toestel naar een ander kanaal. Met andere
woorden: wanneer u de instellingen van een kanaal verandert, zal enkel het toestel op dat kanaal
reageren.
In het geval van de 6-kanaals VDPL300QF, zult u het startadres van het eerste toestel op 1
moeten instellen, van het tweede toestel op 7 (1 + 6), van het derde op 13 (7 + 6), enz.

VDPL300QF HQPOWER™
11
7. Reiniging en onderhoud
1. Alle gebruikte schroeven moeten goed zijn aangespannen en mogen geen sporen van roest
vertonen.
2. De behuizing, de lenzen, de montagebeugels en de montageplaats (bv. het plafond of het
gebinte) mogen niet vervormd zijn of aangepast worden (geen extra gaten in montagebeugels,
aansluitingen niet verplaatsen, enz.)
3. Mechanisch bewegende delen mogen geen sporen van slijtage vertonen en mogen niet
onregelmatig bewegen.
4. De voedingskabels mogen niet beschadigd zijn. Laat het toestel onderhouden door een
geschoolde technicus.
5. Ontkoppel het toestel van het lichtnet voor u aan onderhoudswerkzaamheden begint.
6. Maak het toestel geregeld schoon met een vochtige, niet pluizende doek. Gebruik geen alcohol of
solvent.
7. De gebruiker mag geen onderdelen vervangen.
8. Bestel eventuele reserveonderdelen bij uw dealer.
8. Technische specificaties
Voeding max. 230 VAC/50 Hz
Verbruik 30 W
Zekering F1A, 250 VAC (5 x 20 mm) (ordercode FF1N)
Afmetingen 470 x 295 x 95 mm
Gewicht 5.5 kg
Max. omgevingstemperatuur 45°C
Max. temperatuur behuizing 50°C
DMX-kanalen 6
DMX512-aansluiting 3-pin XLR
Leds 228 st. (voor elke lens: 12 x rood, 18 x groen, 18 x blauw,
9 x wit)
Gebruik dit toestel enkel met originele accessoires. Velleman Components nv is niet
aansprakelijk voor schade of kwetsuren bij (verkeerd) gebruik van dit toestel. Voor meer
informatie over dit product, zie www.hqpower.com. De informatie in deze handleiding kan
te allen tijde worden gewijzigd zonder voorafgaande kennisgeving.
© AUTEURSRECHT
Velleman Components nv heeft het auteursrecht voor deze handleiding.
Alle wereldwijde rechten voorbehouden. Het is niet toegestaan om deze handleiding of gedeelten
ervan over te nemen, te kopiëren, te vertalen, te bewerken en op te slaan op een elektronisch
medium zonder voorafgaande schriftelijke toestemming van de rechthebbende.

V
D
1
A
u
D
e
pr
o
E
n
N
o
se
co
ce
2
•
•
•
•
•
•
•
•
•
•
•
•
3
•
•
D
PL300QF
. Int
r
u
x réside
n
e
s inform
a
Ce
s
peu
t
pile
s
trai
t
un
s
o
tection d
e
n
cas de q
u
o
us vous r
e
rvice de l’
a
nsulter vo
t
tte notice.
. Pre
s
La garanti
notice et
v
résultent.
Confier l’i
n
Ne pas br
a
dommage
s
l’utiliser.
Cet appar
e
terre. Un
t
La tensio
n
cette noti
c
Le câble d
renouvele
r
Débranch
e
non pas le
Ne pas re
g
certains g
e
Tenir l’ap
p
un liquide
Les dom
m
la garanti
e
Les DEL e
t
Garder vo
t
. Dir
e
Cet appar
e
Employer
max. 230
Un effet l
u
prolonger
o
Ê
tre
élec
t
Prot
é
Déb
r
r
oducti
o
n
ts de l'U
n
a
tions en
v
s
ymbole su
t
polluer l'
e
s
éventuell
e
t
era l’appa
r
s
ervice de
r
e
l’environn
u
estions,
c
e
mercions
d
a
ppareil. Si
t
re revend
e
s
cripti
o
e ne s’appl
v
otre reven
n
stallation
e
a
ncher l’ap
s
, attendr
e
e
il ressort
à
t
echnicien
q
n
réseau ne
c
e.
’alimentati
o
r
le câble
d
e
r l’appareil
câble.
g
arder direc
t
e
ns.
p
areil à l’éc
sur l’appa
r
m
ages occa
s
e
.
t
l’usure m
é
t
re VDP h
o
e
ctives
e
il a été d
é
cet appare
VCA/50 H
z
u
mineux n’
e
o
nt sa vie.
prudent lo
t
rochocs m
é
ger l’appa
r
ancher le
c
o
n
n
ion euro
p
v
ironnem
e
r l'appareil
e
nvironne
m
e
s) parmi l
e
r
eil en que
s
r
ecyclage l
o
ement.
c
ontacter
d
e votre ac
h
l’appareil
a
e
ur. Se réf
é
o
ns de
s
ique pas a
u
deur décli
n
e
t l’entreti
e
pareil aprè
s
e
jusqu’à c
e
à
la classe
q
ualifié doi
t
peut pas
d
o
n ne peut
d
’alimentati
s’il n’est pa
s
t
ement la s
o
art d’éclab
o
r
eil.
s
ionnés pa
r
é
canique n
o
rs de la p
o
g
énér
a
é
veloppé p
o
il à l’intéri
e
z
.
e
st pas co
n
rs de l’inst
a
ortels.
reil contre
c
âble d'ali
m
F
R
p
éenne
e
ntales im
p
ou l'embal
m
ent. Ne pa
e
s déchets
s
tion. Renv
o
o
cal. Il con
v
les autor
i
h
at ! Lire l
a
a
été endo
m
é
rer à la G
a
s
écurit
é
u
x domma
g
n
era toute
r
e
n à un pe
r
s
expositio
e
que l’app
a
de protecti
t
établir la
d
épasser la
pas être r
e
on si néce
s
s
utilisé ou
o
urce lumin
o
ussures e
t
r
des modi
f
e tombent
o
rtée de pe
a
les
o
ur usage
p
e
ur et avec
n
çu pour u
n
a
llation : t
o
la pluie et
m
entation
a
12
R
ANÇ
A
p
ortantes
lage indiq
u
s jeter un
a
municipau
o
yer les éq
v
ient de re
s
i
tés local
e
a
présente
m
magé pe
n
a
rantie de
é
g
es surven
r
esponsabi
l
r
sonnel qu
a
n à des va
r
a
reil ait att
e
on I, ce q
u
connexion
tension m
e
plissé ou
e
s
saire.
pour le net
t
euse com
m
t
de jailliss
e
f
ications à l
pas sous l
a
rsonnes n
o
p
rofessionn
l’adaptate
u
n
e opératio
n
o
ucher un
c
l’humidité.
a
vant d'ou
v
A
IS
concerna
u
e que l’éli
m
a
ppareil él
e
x non suje
t
uipements
s
pecter la
r
e
s pour éli
notice atte
n
dant le tr
a
service e
t
us en négli
l
ité pour le
s
a
lifié.
r
iations de
e
int la tem
p
u
i implique
électrique.
entionnée
d
e
ndommag
t
oyer. Tirer
m
e ceci peut
e
ments. N
e
’appareil p
a
a
garantie.
o
n qualifiée
s
el dans de
s
u
r connect
é
n
continue.
c
âble sous
t
v
rir le boîti
e
nt ce pro
d
m
ination d’
e
ctrique ou
t
s au tri sé
usagés à
v
r
églementa
mination.
ntivement
a
nsport, ne
t
de quali
t
geant cert
a
s
problèm
e
températu
r
p
érature a
m
que l’appa
r
d
ans les s
p
é. Deman
d
la fiche pou
entraîner d
e
jamais pl
a
a
r le client
,
s
et de jeu
s
discothèq
é
à une so
u
Des paus
e
t
ension pe
u
e
r.
d
uit
un apparei
électroniq
u
lecti
f
; une
v
otre fourn
a
tion locale
avant la m
pas l’insta
t
é Vellem
a
a
ines direc
t
e
s et les dé
f
r
e. Afin d’é
m
biante a
v
r
eil doit êt
r
p
écification
s
d
er à votre
r débranch
e
es crises d’
é
a
cer d’obje
,
ne tombe
nes enfant
s
ues, des t
h
u
rce de co
u
e
s régulièr
e
u
t causer d
HQPOW
E
l en fin de
v
u
e (et des
déchèteri
e
isseur ou
à
relative à
l
ise en
ller et
a
n
®
en fin
d
t
ives de ce
t
f
auts qui e
n
viter des
ant de
e mis à la
s
à la fin d
e
revendeur
e
r l'appareil
é
pilepsie ch
t contenan
nt pas sou
s
s
.
h
éâtres, et
c
u
rant CA d
e
e
s
es
E
R™
v
ie
e
à
l
a
d
e
t
te
n
e
de
;
ez
t
s
c
.
e

VDPL300QF HQPOWER™
13
• Éviter de secouer l’appareil et traiter l’appareil avec circonspection pendant l’installation et
l’opération.
• Choisir un endroit où l’appareil est protégé contre la poussière, l’humidité et des températures
extrêmes (voir « Spécifications techniques »). Respecter une distance minimum de 0,5 m
entre la sortie lumière de l’appareil et la surface illuminée.
• Fixer l’appareil à l’aide d’un câble de sécurité adéquat (p.ex. VDLSC7 ou VDLSC8).
• Se familiariser avec le fonctionnement de l’appareil avant de l’utiliser. Ne pas permettre pas aux
personnes non qualifiées d’opérer cet appareil. La plupart des dégâts sont causés par un usage
non professionnel.
• Transporter l’appareil dans son emballage originel.
• Toute modification de l’appareil est interdite pour des raisons de sécurité.
• N’utiliser le projecteur qu’à sa fonction prévue. Tout autre usage peut causer des courts-circuits,
des brûlures, des électrochocs etc. Un usage impropre annule d'office la garantie.
• L’installation doit être approuvée par un expert avant sa mise en service
4. Description
1. anneau de fixation du câble de sécurité
2. entrée DMX
3. sortie DMX
4. interrupteurs DIP
5. prise pour cordon IEC/fusible
6. réglage de la sensibilité
7. prise pour contrôleur (VDPL300RC)
5. Installation
• Choisir un emplacement approprié et monter l’appareil dans un angle à l’aide du support inclus.
Insérer le cordon d’alimentation IEC dans une prise de courant. Déconnecter après usage.
Montage de l’appareil
• Un technicien qualifié doit installer l’appareil en respectant EN 60598-2-17 et toute autre norme
applicable.
• La construction portante de l’appareil doit être capable de supporter 10 x le poids de l’appareil
pendant une heure, sans qu’une déformation de la construction en résulte.
• Fixer votre VDPL300QF à l’aide d’un câble de sécurité (sécurité supplémentaire).
• Éviter de vous positionner en dessous de l’appareil pour l’enlever ou lors du montage ou du
nettoyage. Un technicien qualifié doit réviser l’appareil avant la mise en service. Organiser une
révision minutieuse annuelle.
• Installer l’appareil à un endroit où personne ne peut passer ou s’asseoir et où personne ne peut le
toucher.
• L’installation de cet appareil exige une solide expérience pratique : le calcul de la charge max. de
la construction, les matériaux d’installation requis etc. De temps en temps, un technicien qualifié
doit vérifier la construction portante et l’appareil même. Ne pas essayer d’installer cet appareil
vous-même si vous n’avez pas les qualifications requises ; une installation incorrecte peut
entraîner des blessures.
• Déterminer l’angle d’inclinaison au moyen de l’étrier de montage et serrer les vis de montage.
• Enlever tout matériau inflammable dans un rayon de 0,5 m autour de l’appareil.
• Un électricien qualifié doit établir la connexion électrique.
• Brancher l’appareil sur le réseau électrique par la fiche d’alimentation. Ne pas le brancher sur un
bloc de puissance.
• Un expert doit approuver l’installation avant qu’elle puisse être prise en service.
6. Emploi
Pilotage autonome
Le VDPL300QF peut être piloté sans contrôleur. Placer tous les interrupteurs DIP sur OFF. Régler la
sensibilité du microphone interne à l’aide du réglage à l’arrière de l’appareil.

VDPL300QF HQPOWER™
14
Pilotage maître/esclave
Le mode maître/esclave permet la connexion de plusieurs appareils esclaves à un seul appareil
maître. Chaque appareil esclave fonctionnera synchroniquement à l’appareil maître.
Placer tous les interrupteurs DIP de l’appareil maître sur OFF ; placer les interrupteurs DIP 1 et 10
des appareils esclaves sur ON.
Valeurs DMX512 détaillées par canal
canal fonction de à description
1 Mode
0 10 Éteint
11 16 Groupe 1 blanc allumé
17 22 Groupe 2 blanc allumé
23 28 Groupe 3 blanc allumé
29 34 Groupe 1 rouge allumé
35 40 Groupe 2 rouge allumé
46 46 Groupe 3 rouge allumé
47 52 Groupe 1 vert allumé
53 58 Groupe 2 vert allumé
59 64 Groupe 3 vert allumé
65 70 Groupe 1 bleu allumé
71 76 Groupe 2 bleu allumé
77 82 Groupe 3 bleu allumé
83 88 Tous les blancs allumés
89 94 Tous les rouges allumés
95 100 Tous les verts allumés
101 106 Tous les bleus allumés
107 112 Tous les rouges et verts allumés
113 118 Tous les rouges et bleus allumés
119 124 Tous les verts et bleus allumés
125 130 Tous les rouges, verts et bleus allumés
131 136 Tous les rouges et blancs allumés
137 142 Tous les verts et blancs allumés
143 148 Tous les bleus et blancs allumés
149 154 Groupe 1 bleu et tous les blancs allumés
155 160 Groupe 2 bleu et tous les rouges allumés
161 166 Groupe 3 bleu et tous les verts allumés
167 172 Groupe 1 bleu et groupe 3 rouge allumés
173 178 Groupe 2 bleu et groupe 2 rouge allumés
179 184 Groupe 3 bleu et groupe 1 rouge allumés
185 190 Groupe 1 vert et groupe 3 blanc allumés
191 196 Groupe 2 vert et groupe 2 blanc allumés
197 202 Groupe 3 vert et groupe 1 blanc allumés
203 208
Groupe 1 bleu, groupe 3 vert, groupe 1
rouge et groupe 3 blancs allumés
209 214
Groupe 2 bleu, groupe 2 vert, groupe 2
rouge et groupe 2 blanc allumés
215 220
Groupe 3 bleu, groupe 1 vert, groupe 3
rouge et groupe 1 blancs allumés
221 255
Tous les rouges, verts, bleus et blancs
allumés
2
Objectif 2
sélection
groupe/couleur
25 49 Comme canal 1

VDPL300QF HQPOWER™
15
3
Objectif 3
sélection
groupe/couleur
50 74 Comme canal 1
4
Objectif 4
sélection
groupe/couleur
75 99 Comme canal 1
5 Obturateur
0 10 Éteint
11 255 Stroboscope de lent à rapide
6
Programmes
intégrés
0 10 Pas de fonction
11 36 Programme 1
37 62 Programme 2
63 88 Programme 3
89 114 Programme 4
115 130 Programme 5
131 156 Programme 6
157 182 Programme 7
183 208 Programme 8
209 250 Exécution aléatoire de tous les
programmes
251 255 Pilotage par le son
Connexion DMX512
Connecter le câble à fiche XLR inclus à la sortie XLR femelle à 3 broches de votre contrôleur et
l’autre fiche XLR mâle à 3 broches à l’entrée du VDPL300QF. Il est possible de relier plusieurs
VDPL300QF à partir d’une connexion sérielle. Utiliser un câble de connexion blindé à 2 conducteurs
avec des connecteurs d’entrée et de sortie XLR.
Connexion DMX512 avec résistance de terminaison
Une résistance de terminaison DMX est à recommander si le câble DMX doit
couvrir une grande distance ou s’il est utilisé dans un environnement avec
beaucoup de bruit électrique (p.ex. une discothèque). La résistance de
terminaison prévient la corruption du signal de contrôle numérique par le
bruit électrique. La résistance de terminaison DMX n’est rien d’autre qu’une
fiche XLR avec une résistance de 120 Ω de broche 2 vers broche 3 (voir
illustration à gauche). Cette fiche XLR est connectée à la sortie XLR du
dernier appareil de la série.
Adresse de départ DMX
Tous les appareils pilotés par un signal DMX demandent une adresse de départ DMX pour assurer
que les appareils corrects réagissent sur les signaux de contrôle. Cette adresse de départ numérique
indique le numéro de canal sur lequel l’appareil écoute le contrôleur DMX. Déterminer cette adresse
avec les interrupteurs DIP au dos de l’appareil.
Vous avez le choix entre une seule adresse de départ pour toute une série d’appareils ou une
adresse de départ par appareil. Dans le cas d’une seule adresse, tous les appareils « écouteront »
les mêmes signaux, sur un seul canal. Tous les appareils seront donc influencés lorsque vous
changez les réglages d’un seul canal. Avec des adresses de départ individuelles, chaque appareil
« écoutera » son propre canal. Par conséquent, un ajustement des réglages d’un canal n’influence
que l'appareil sur ce canal.
Pour le VDPL300QF à 6 canaux, l’adresse de départ du premier appareil est 1, du deuxième 7 (1 +
6), du troisième 13 (7 + 6), etc.

VDPL300QF HQPOWER™
16
7. Nettoyage et entretien
1. Serrer les écrous et les vis et vérifier qu’ils ne rouillent pas.
2. Le boîtier, les lentilles, les supports de montage et la construction portante ne peuvent pas être
déformés, adaptés ou bricolés p.ex. pas de trous additionnels dans un support, ne pas déplacer
les connexions, etc.
3. Les parties mécaniques mobiles ne peuvent pas être usées ou bouger de manière irrégulière.
4. Les câbles d'alimentation ne peuvent pas être endommagés. Un technicien qualifié doit entretenir
l’appareil.
5. Débrancher l’appareil avant de le nettoyer.
6. Essuyer l’appareil régulièrement avec un chiffon humide non pelucheux. Éviter l’usage d’alcool et
de solvants.
7. Il n’y a aucune pièce maintenable par l’utilisateur.
8. Commander des pièces de rechange éventuelles chez votre revendeur.
8. Spécifications techniques
Alimentation max. 230 VAC/50 Hz
Consommation 30 W
Fusible F1A, 250 VAC (5 x 20 mm) (réf. FF1N)
Dimensions 470 x 295 x 95 mm
Poids 5.5 kg
Température ambiante max. 45°C
Température max. du boîtier 50°C
Canaux DMX 6
Connexion DMX512 XLR 3 broches
DEL 228 (pour chaque objectif : 12 x rouge, 18 x vert, 18 x bleu,
9 x blanc)
N’employer cet appareil qu’avec des accessoires d’origine. SA Velleman Components ne
sera aucunement responsable de dommages ou lésions survenus à un usage (incorrect)
de cet appareil. Pour plus d’information concernant cet article, visitez notre site web
www.hqpower.com. Toutes les informations présentées dans cette notice peuvent être
modifiées sans notification préalable.
© DROITS D’AUTEUR
SA Velleman Components est l’ayant droit des droits d’auteur pour cette notice.
Tous droits mondiaux réservés. Toute reproduction, traduction, copie ou diffusion, intégrale ou
partielle, du contenu de cette notice par quelque procédé ou sur tout support électronique que se
soit est interdite sans l’accord préalable écrit de l’ayant droit.

V
D
1
A
I
m
m
e
Si
¡G
d
e
co
u
s
2
•
•
•
•
•
•
•
•
•
•
•
•
3
•
•
•
•
•
•
D
PL300QF
. Int
r
los ciuda
d
m
portante
s
Este
s
podrí
basu
r
su di
s
e
dio ambie
tiene du
d
racias por
e
usarlo. Si
n su distri
b
s
uario.
. Ins
t
Los daños
garantía y
La instala
c
No conect
e
que el ap
a
Este apar
a
puesto a t
Asegúres
e
No aplast
e
superficie
Desconec
t
limpiarlo.
T
No mire d
i
No expon
g
p.ej. un fl
o
Los daños
El desgas
t
Mantenga
. Nor
Este apar
a
permitido
50Hz.
No ha sid
o
prolongar
No agite
e
Seleccion
e
temperat
u
la salida d
Fije el ap
a
Familiaríc
e
aparato.
L
Cuid
cabl
e
No
e
Des
c
r
oducci
ó
d
anos de l
s
informa
c
s
ímbolo en
an dañar e
r
a domésti
c
s
tribuidor
o
nte.
d
as, conta
c
haber com
el aparato
b
uidor. Véa
t
ruccio
n
causados
su distrib
u
c
ión y el m
a
e
el aparat
o
a
rato llegu
e
a
to perten
e
ierra. La c
o
e
de que la
e
el cable d
afilada. Si
t
e siempre
T
ire siemp
r
i
rectament
e
g
a el apara
t
o
rero, en e
causados
t
e mecánic
o
el VDPL3
0
mas
ge
a
to ha sido
para el us
o
o
diseñado
la vida del
e
l aparato.
E
e
un lugar
d
u
ras extre
m
e luz y el
á
a
rato con u
n
e
se con el
f
L
a mayoría
ado duran
t
e
s con un
v
e
xponga es
t
c
onecte el
c
ó
n
a Unión E
u
c
iones so
b
este apar
a
l medio a
m
c
a; debe ir
o
a la unid
a
c
te con la
s
prado el V
D
ha sufrido
se la Gara
n
es de
s
por descui
d
u
idor no se
r
a
ntenimie
n
o
si ha est
a
e
a la temp
e
e
ce a la cla
s
o
nexión el
é
tensión de
e alimenta
es necesa
r
el aparato
r
e del ench
e
a la fuen
t
t
o a ningú
n
l aparato.
por modifi
c
o
y los LED
0
0QF lejos
e
nerale
s
diseñado
p
o
en interio
para un u
s
aparato.
E
vite usar
e
d
e montaj
e
m
as (véase
á
rea ilumin
a
n
cable de
f
uncionami
e
de los dañ
o
t
e la instal
a
v
olta
j
e
p
eli
g
t
e equipo
a
c
able de al
i
E
S
u
ropea
b
re el me
d
a
to o el em
m
biente. N
o
a una em
p
a
d de recicl
a
s
autorid
a
D
PL300Q
F
algún dañ
o
ntía de se
s
e
g
uri
d
d
o de las i
n
r
á respons
a
n
to deben
s
a
do expue
s
e
ratura a
m
s
e de prot
e
é
ctrica deb
e
red no se
a
ción y prot
r
io, pida a
s
si no va a
ufe para d
e
t
e de luz.
E
n
tipo de s
a
c
aciones n
o
s no están
del alcanc
e
s
p
ara uso p
r
res y coné
c
s
o ininterru
e
xcesiva f
u
e
donde el
a
« Especifi
a
da.
seguridad
a
e
nto del a
p
o
s son cau
s
a
ción: pue
d
g
roso.
a
lluvia ni h
i
mentación
17
S
PAÑ
O
d
io ambie
n
balaje indi
c
o
tire este
a
p
resa espe
c
a
je local.
R
a
des local
e
F
! Lea aten
t
o
en el tra
n
rvicio y c
a
d
ad
n
struccione
s
a
ble de nin
s
er realizad
s
to a grand
m
biente.
e
cción I, po
e
llevarla a
a
mayor qu
éjalo contr
a
s
u distribui
d
usarlo dur
a
e
sconectar
E
sto puede
a
lpicadura
o
o
autorizad
a
cubiertos
p
e
de perso
n
r
ofesional
e
c
telo a una
mpido. Int
r
u
erza dura
n
a
parato no
caciones
»
a
decuado
(
p
arato. Sól
o
s
ados por
u
d
e sufrir un
umedad.
de la red
a
O
L
n
te conce
r
c
a que, si
t
a
parato (ni
c
ializada e
n
R
espete las
e
s para re
t
amente la
n
sporte no
a
lidad Vel
l
s
de seguri
gún daño
u
o
s por per
s
es cambio
s
r lo tanto,
cabo un t
é
e la tensió
n
a
posibles
d
d
or reempl
a
nte un lar
g
el cable d
e
causar un
a
o
goteo. N
u
a
s, no está
p
or la gara
n
n
as no cap
a
e
n una disc
o
fuente de
r
oduzca fr
e
n
te la instal
esté expu
e
»
). Respet
e
(
p.ej. VDL
S
o
personas
u
n uso ina
d
a peligros
a
a
ntes de a
b
r
niente a
e
t
ira las mu
e
las pilas, s
n
reciclaje.
leyes local
siduos.
s instrucci
o
lo instale
y
l
eman
®
al
dad de est
e
u
otros pro
b
s
onal espe
c
s
de tempe
r
es esencial
é
cnico cuali
f
n
indicada
e
d
años cau
s
azar el ca
b
g
o período
e
red, nunc
a
taque epil
é
u
nca pong
a
n cubierto
s
n
tía.
a
citadas y
o
teca, un t
e
corriente
C
e
cuenteme
n
ación y la
r
e
sto a polv
o
e
una dista
S
C7 o VDL
S
cualificada
d
ecuado.
a
descarga
b
rir la caja.
e
ste prod
u
e
stras inse
r
i las hubie
r
Devuelva
e
es en rela
c
o
nes del m
a
y
póngase
e
final de es
t
e
manual i
n
b
lemas res
c
ializado.
ratura. Es
p
que el ap
a
f
icado.
e
n las esp
e
s
ados por a
b
le de alim
e
de tiempo
a del propi
é
ptico.
a
un objeto
s
por la ga
r
niños.
e
atro, etc.
C
A de máx.
n
te una pa
u
r
eparación
.
o
, humeda
d
ncia de mí
n
S
C8).
s pueden
m
eléctrica al
HQPOW
E
u
cto
r
vibles,
r
a) en la
e
ste aparat
o
c
ión con el
a
nual ante
s
e
n contact
o
t
e manual
d
n
validarán
ultantes.
p
ere hasta
a
rato esté
e
cificacione
lgún tipo d
e
ntación.
o antes de
o cable.
con líquid
o
r
antía.
Sólo está
230VCA /
u
sa para
.
d
y
n
. 0.5m en
t
m
anejar es
t
tocar los
E
R™
o
a
s
o
d
el
su
s.
e
o
,
t
re
t
e

VDPL300QF HQPOWER™
18
• Transporte el aparato en su embalaje original.
• Por razones de seguridad, las modificaciones no autorizadas del aparato están prohibidas.
• Utilice sólo el VDPL300QF para las aplicaciones descritas en este manual a fin de evitar p.ej.
cortocircuitos, quemaduras, descargas eléctricas, explosión de la lámpara, etc. Un uso
desautorizado puede causar daños y anula la garantía completamente
• Un experto debe probar la instalación antes de la puesta en marcha.
4. Descripción
1. anillo de fijación del cable de seguridad
2. entrada DMX
3. salida DMX
4. interruptores DIP
5. entrada para cable IEC/fusible
6. ajuste de la sensibilidad
7. entrada para controlador (VDPL300RC)
5. Instalación
• Seleccione un lugar adecuado y monte el aparato con el soporte incluido en un ángulo. Introduzca
el cable de alimentación IEC en una toma. Desconecte después del uso.
Montaje del aparato
• Respete la directiva EN 60598-2-17 y toda norma nacional antes de instalar el aparato. La
instalación debe ser realizada por un técnico especializado.
• El soporte donde irá el aparato, debe ser capaz de sostener 10 veces el peso de éste durante una
hora, sin que se produzca una deformación de dicho soporte.
• Fije siempre el VDPL300QF con un cable de seguridad (seguridad adicional).
• Evite ponerse debajo del aparato durante el montaje, la limpieza, etc. Un técnico especializado
debe revisar el aparato antes de la puesta en marcha. Después, debe revisarlo una vez al año.
• Instale el aparato fuera del alcance de personas no autorizadas y en un lugar con poca gente.
• La instalación de este aparato exige una sólida experiencia práctica: debe poder calcular la carga
máx. del soporte, debe conocer los materiales necesarios para la instalación, etc. De vez en
cuando, una verificación de la estructura y del aparato mismo debe ser llevada a cabo por un
técnico especializado. No intente instalar este aparato si no tiene las cualificaciones requeridas;
una instalación incorrecta puede causar lesiones.
• Ajuste el ángulo de inclinación a su gusto mediante un soporte de montaje y fije los tornillos del
soporte.
• Quite todo material inflamable en un radio de 0.5m alrededor del aparato.
• La conexión eléctrica debe llevarla a cabo un electricista cualificado.
• Conecte el aparato a la red eléctrica con la conexión de alimentación. Normalmente, no se
conectan efectos luminosos a dimmer packs (reguladores).
• Un experto debe probar la instalación antes de la puesta en marcha.
6. Uso
Modo autónomo (stand-alone)
Es posible manejar el VDPL300QF sin controlador. Ponga todos los interruptores DIP en OFF. Ajuste
la sensibilidad del micrófono interno con el ajuste de la parte trasera del aparato.
Modo maestro/esclavo
El modo maestro/esclavo permite conectar varios aparatos esclavos a un solo aparato maestro.
Cada aparato esclavo funcionará de manera sincrónica con el aparato maestro.
Ponga todos los interruptores DIP del aparato maestro en la posición OFF; Ponga los interruptores
DIP 1 y 10 de los aparatos esclavos en ON.

VDPL300QF HQPOWER™
19
Valores DMX512 detallados por canal
canal función de a descripción
1 Modo
0 10 Desactivado
11 16 Grupo 1 blanco activado
17 22 Grupo 2 blanco activado
23 28 Grupo 3 blanco activado
29 34 Grupo 1 rojo activado
35 40 Grupo 2 rojo activado
46 46 Grupo 3 rojo activado
47 52 Grupo 1 verde activado
53 58 Grupo 2 verde activado
59 64 Grupo 3 verde activado
65 70 Grupo 1 azul activado
71 76 Grupo 2 azul activado
77 82 Grupo 3 azul activado
83 88 Todos los blancos activados
89 94 Todos los rojos activados
95 100 Todos los verdes activados
101 106 Todos los azules activados
107 112 Todos los rojos y verdes activados
113 118 Todos los rojos y azules activados
119 124 Todos los verdes y azules activados
125 130 Todos los rojos, verdes y azules
activados
131 136 Todos los rojos y blancos activados
137 142 Todos los verdes y blancos activados
143 148 Todos los azules y blancos activados
149 154 Grupo 1 azul y todos los blancos
activados
155 160 Grupo 2 azul y todos los rojos activados
161 166 Grupo 3 azul y todos los verdes activados
167 172 Grupo 1 azul y grupo 3 rojo activados
173 178 Grupo 2 azul y grupo 2 rojo activados
179 184 Grupo 3 azul y grupo 1 rojo activados
185 190
Grupo 1 verde y grupo 3 blanco
activados
191 196
Grupo 2 verde et grupo 2 blanco
activados
197 202
Grupo 3 verde y grupo 1 blanco
activados
203 208
Grupo 1 azul, grupo 3 verde, grupo 1
rojo y grupo 3 blancos activados
209 214
Grupo 2 azul, grupo 2 verde, grupo 2
rojo et grupo 2 blanco activados
215 220
Grupo 3 azul, grupo 1 verde, grupo 3
rojo y grupo 1 blancos activados
221 255
Todos los rojos, verdes, azules y blancos
activados
2
Óptica 2
selección
grupo/color
25 49 Como canal 1

VDPL300QF HQPOWER™
20
3
Óptica 3
selección
grupo/color
50 74 Como canal 1
4
Óptica 4
selección
grupo/color
75 99 Como canal 1
5 Obturador
0 10 Desactivado
11 255 Estroboscopio de lente a rápido
6
Programas
incorporados
0 10 Sin función
11 36 Programa 1
37 62 Programa 2
63 88 Programa 3
89 114 Programa 4
115 130 Programa 5
131 156 Programa 6
157 182 Programa 7
183 208 Programa 8
209 250 Ejecución aleatoria de todos los
programas
251 255 Control por la música
Conexión DMX512
Conecte el cable con conector XLR (incl.) a la salida XLR hembra de 3 polos del controlador y el otro
conector XLR macho de 3 polos a la entrada del VDPL300QF. Es posible conectar varios
VDPL300QF en serie. Use un cable blindado de doble hilo conductor con conectores XLR de entrada
y de salida.
Conexión DMX-512 con una terminación DMX
Se recomienda una terminación si el cable DMX debe cubrir una gran
distancia o si se usa en un medio ambiente con mucho ruido eléctrico (ej.
una discoteca). La terminación impide que el ruido eléctrico corrompa la
señal de control numérico. La terminación DMX no es más que un conector
XLR con una resistencia de 120Ω de polo 2 a polo 3. Este conector XLR está
conectado a la salida XLR del último aparato de la serie. Véase la figura a la
izquierda.
Dirección inicial DMX
Si se usa una señal DMX, cada aparato tiene su propia dirección inicial DMX para asegurar que los
aparatos reaccionen a las señales de control correctas. Esta dirección inicial digital es el primer canal
en el cual el aparato reaccionará a las señales DMX del controlador DMX. Determine esta función con
los interruptores DIP de la parte trasera del aparato.
Es posible elegir entre una sola dirección inicial para toda una serie de aparatos o una dirección
inicial por aparato. Con una sola dirección inicial para una serie de aparatos, todos los aparatos
reaccionarán sincronizadamente a la misma señal. Por lo tanto, cambiar los ajustes de un solo canal
afecta a los ajustes de todos los canales. Con varias direcciones iniciales, cada aparato reaccionará
independientemente. Por lo tanto, cambiar los ajustes de un solo canal sólo afecta al canal en
cuestión.
En el caso del VDPL300QF de 6 canales, la dirección inicial del primer aparato es 1. Introduzca 7 (1
+ 6) para el segundo aparato, introduzca 13 (7 + 6) para el tercer aparato, etc.
La page est en cours de chargement...
La page est en cours de chargement...
La page est en cours de chargement...
La page est en cours de chargement...
La page est en cours de chargement...
La page est en cours de chargement...
La page est en cours de chargement...
La page est en cours de chargement...
-
 1
1
-
 2
2
-
 3
3
-
 4
4
-
 5
5
-
 6
6
-
 7
7
-
 8
8
-
 9
9
-
 10
10
-
 11
11
-
 12
12
-
 13
13
-
 14
14
-
 15
15
-
 16
16
-
 17
17
-
 18
18
-
 19
19
-
 20
20
-
 21
21
-
 22
22
-
 23
23
-
 24
24
-
 25
25
-
 26
26
-
 27
27
-
 28
28


HQ Power VDPL300QF Manuel utilisateur
- Catégorie
- Stroboscopes
- Taper
- Manuel utilisateur
dans d''autres langues
- English: HQ Power VDPL300QF User manual
- español: HQ Power VDPL300QF Manual de usuario
- Deutsch: HQ Power VDPL300QF Benutzerhandbuch
- Nederlands: HQ Power VDPL300QF Handleiding
Documents connexes
-
HQ Power VDPL1000ST Manuel utilisateur
-
 HQ Power VDPL121RGB Manuel utilisateur
-
 HQ Power VDLL300TS Manuel utilisateur
-
HQ Power VDPLPS36BP Manuel utilisateur
-
 HQ Power VDPL300MF Manuel utilisateur
-
HQ Power Astar II spécification
-
HQ Power LED QUAD FLOWER spécification
-
HQ Power LED FLOWER BATTEN Manuel utilisateur
-
HQ Power FLOODLIGHT spécification
-
 HQ Power VDPL300D Manuel utilisateur


