Haier QHE16HYPFS Le manuel du propriétaire
- Catégorie
- Réfrigérateurs combinés
- Taper
- Le manuel du propriétaire

Installation and User Manual
Instructions d’installation et
Guide de l’utilisateur
Instrucciones de instalación y
Manual del usuario
QHE16HYPFS
4 Door Bottom Mount Refrigerator
Réfrigérateur à quatre portes monté par le bas
Refrigerador de 4 Puertas con Montaje Inferior
49-1000557 Rev. 0
12-20 GEA

2 49-1000557 Rev. 0

49-1000557 Rev. 0 3
TABLE OF CONTENTS
ENGLISH
1
REFRIGERATOR SAFETY ...........................................................................................4
Proper Disposal of Your Old Refrigerated Appliance .................................................................... 5
PARTS AND FEATURES .............................................................................................6
INSTALLATION REQUIREMENTS ....................................................................................7
Location Requirements .............................................................................................. 7
Connecting Electricity ............................................................................................... 7
INSTALLATION INSTRUCTIONS ....................................................................................8
Unpacking Refrigerator ............................................................................................... 8
Leveling Refrigerator ................................................................................................. 8
Proper Air Circulation ................................................................................................. 8
Door Alignment ...................................................................................................... 9
Opening and Closing Doors ........................................................................................... 9
REFRIGERATOR USE ..............................................................................................10
Controls ............................................................................................................10
Features ............................................................................................................12
Freezer ..............................................................................................................12
REFRIGERATOR CARE ............................................................................................13
Cleaning ............................................................................................................13
Lights ...............................................................................................................13
Vacation and Moving ................................................................................................13
Reinstalling/Using Refrigerator Again .................................................................................14
ACCESSORY .....................................................................................................15
Icemaker Installation ................................................................................................15
TROUBLESHOOTING ............................................................................................ 19
LIMITED WARRANTY .............................................................................................21
RECORD KEEPING ...............................................................................................22

4 49-1000557 Rev. 0
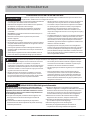
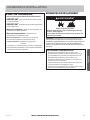
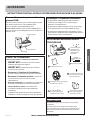
REFRIGERATOR SAFETY
ENGLISH
CAUTION
To reduce the risk of injury when using your refrigerator, follow these basic safety precautions.
¿ Do not clean glass shelves or covers with warm water
when they are cold. Glass shelves and covers may
break if exposed to sudden temperature changes or
impact, such as bumping or dropping. Tempered glass is
designed to shatter into many small pieces if it breaks.
¿ Keep fingers out of the “pinch point” areas; clearances
between the doors and between the doors and cabinet
are necessarily small. Be careful closing doors when
children are in the area.
¿ Do not touch the cold surfaces in the freezer
compartment when hands are damp or wet, skin may
stick to these extremely cold surfaces.
¿ Do not refreeze frozen foods which have thawed
completely.
¿ In refrigerators with automatic ice makers, avoid contact
with the moving parts of the ejector mechanism, or
with the heating element that releases the cubes. Do
not place fingers or hands on the automatic ice making
mechanism while the refrigerator is plugged in.
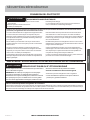
IMPORTANT SAFETY INSTRUCTIONS
WARNING
To reduce the risk of fire, explosion, electric shock, or injury when using your refrigerator, follow these
basic safety precautions:
¿ This refrigerator must be properly installed and located
in accordance with the Installation Instructions before it
is used.
¿ Unplug the refrigerator before making repairs, replacing
a light bulb, or cleaning.
NOTE: Power to the refrigerator cannot be disconnected
by any setting on the control panel.
NOTE: Repairs must be performed by a qualified Service
Professional.
¿ Replace all parts and panels before operating.
¿ Do not use an extension cord.
¿ Do not store or use gasoline or other flammable vapors
and liquids in the vicinity of this or any other appliance.
¿ Do not store explosive substances such as aerosol cans
with a flammable propellant in this appliance.
¿ To prevent suffocation and entrapment hazards to
children, remove the fresh food and freezer doors from
any refrigerator before disposing of it or discontinuing
its use.
¿ To avoid serious injury or death, children should not
stand on, or play in or with the appliance.
¿ Children and persons with reduced physical, sensory or
mental capabilities or lack of experience and knowledge
can use this appliance only if they are supervised or have
been given instructions on safe use and understand the
hazards involved.
¿ This appliance is intended to be used in household and
similar applications such as: staff kitchen areas in shops,
offices and other working environments; farm houses;
by clients in hotels, motels, bed & breakfast and other
residential environments; catering and similar non-retail
applications.
¿ Do not apply harsh cleaners to the refrigerator. Certain
cleaners will damage plastic which may cause parts such
as the door or door handles to detach unexpectedly. See
the Care and Cleaning section in your Owner’s Manual
for detailed instructions.
WARNING
EXPLOSION HAZARD Flammable Refrigerant
This appliance contains isobutane refrigerant, R600a, a natural
gas with high environmental compatibility. However, it is also
combustible. Adhere to the warnings below to reduce the risk
of injury or property damage.
1. When handling, installing and operating the appliance, care
should be taken to avoid damage to the refrigerant tubing.
2.
Service shall only be performed by authorized service personnel.
Use only manufacturer-authorized service parts.
3. Dispose of refrigerator in accordance with Federal and Local
Regulations. Flammable refrigerant and insulation material
used require special disposal procedures. Contact your local
authorities for the environmentally safe disposal of your
refrigerator.
4. Keep ventilation openings in the appliance enclosures or in the
built-in structure clear of obstruction.
5. Do not use mechanical devices or other means to accelerate
the defrosting process.
6. Do not damage refrigerant circuit.
7. Do not use electrical appliances inside the food storage
compartment of the appliance.
READ AND SAVE THESE INSTRUCTIONS

49-1000557 Rev. 0 5
REFRIGERATOR SAFETY
PROPER DISPOSAL OF YOUR OLD REFRIGERATOR
WARNING
SUFFOCATION AND ENTRAPMENT HAZARD
Failure to follow these disposal instructions can result in death or serious injury
IMPORTANT: Child entrapment and suffocation are not
problems of the past. Junked or abandoned refrigerators
are still dangerous even if they will sit for “just a few days.” If
you are getting rid of your old refrigerator, please follow the
instructions below to help prevent accidents.
Before You Throw Away Your Old Appliance
¿ Take off the Refrigerator and Freezer doors.
¿ Leave the shelves in place so that children may not easily
climb inside.
Refrigerant and Foam Disposal:
Dispose of appliance in accordance with Federal and Local Regulations. Flammable refrigerant and insulation material used
require special disposal procedures. Contact your local authorities for the environmentally safe disposal of your appliance.
ENGLISH
Do not, under any circumstances, cut or remove the third (ground) prong from the power cord. For personal safety, this appliance
must be properly grounded.
The power cord of this appliance is equipped with a 3-prong
(grounding) plug which mates with a standard 3-prong
(grounding) wall outlet to minimize the possibility of electric
shock hazard from this appliance.
Have the wall outlet and circuit checked by a qualified electrician
to make sure the outlet is properly grounded.
Where a standard 2-prong wall outlet is encountered, it is your
personal responsibility and obligation to have it replaced with a
properly grounded 3-prong wall outlet. Do not use an adapter.
The refrigerator should always be plugged into its own individual
electrical outlet which has a voltage rating that matches the
rating plate.
A 115 Volt AC, 60 Hz, 15- or 20-amp fused, grounded electrical
supply is required. This provides the best performance and also
prevents overloading house wiring circuits which could cause a
fire hazard from overheated wires.
Never unplug your refrigerator by pulling on the power cord.
Always grip plug firmly and pull straight out from the outlet.
Immediately discontinue use of a damaged supply cord. If
the supply cord is damaged, it must be replaced by a qualified
service professional with an authorized service part from the
manufacturer.
When moving the refrigerator away from the wall, be careful not
to roll over or damage the power cord.
CONNECTING ELECTRICITY
WARNING
ELECTRICAL SHOCK HAZARD
Plug into a grounded 3-prong outlet
Do not remove the ground prong
Do not use an adapter
Do not use an extension cord.
Failure to follow these instructions can result in death,
fire, or electrical shock.
READ AND SAVE THESE INSTRUCTIONS

6 49-1000557 Rev. 0
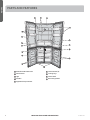
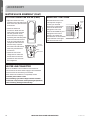
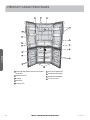
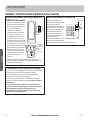
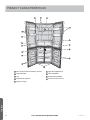
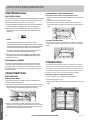
A
Model/Serial Number Plate
B
Glass Shelves
C
Light
D
Door Bin
E
Vegetable/Crisper Drawer
F
Freezer Drawer (6)
G
Leveling Legs
H
Freezer Shelf
I
Articulating Mullion
A C
E
D
I
H
G
D
PARTS AND FEATURES
ENGLISH
B
E
F
D
F
F
D
F
READ AND SAVE THESE INSTRUCTIONS

49-1000557 Rev. 0 7
ENGLISH
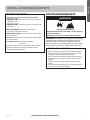
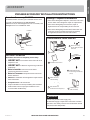
INSTALLATION REQUIREMENTS
WARNING
LOCATION REQUIREMENTS
IMPORTANT: This refrigerator is designed for freestanding
installation only. It should not be recessed or built-in an
enclosed cabinet. To ensure your refrigerator works at
optimum efficiency, you should install it in a location where
there is proper air circulation, and electrical connections.
Explosion and Fire Hazard
Keep flammable materials and vapors, such as gasoline,
away from appliance.
Failure to do so can result in death, explosion or fire.
LOCATION REQUIREMENTS
• Do not install the refrigerator where the temperature
will go below 55°F (13°C) because it will not run often
enough to maintain proper temperatures.
• Do not install the refrigerator where the temperature
will go above 110°F (43°C) because it will not perform
properly.
• Install it on a floor strong enough to support it fully
loaded.
• Do not install the refrigerator in a location exposed to
water (rain, etc.) or direct sunlight.
BEFORE YOU BEGIN
Read these instructions completely and carefully.
•
I MPORTANT – Save these instructions for local
inspector’s use.
•
IMPORTANT – Observe all governing codes and
ordinances.
•
Note to Installer – Be sure to leave these
instructions with the Consumer.
•
Note to Consumer – Keep these instructions for
future reference.
• Skill level – Installation of this appliance requires basic
mechanical skills.
• Completion time–Refrigerator Installation
15 minutes
• Proper installation is the responsibility of the installer.
• Product failure due to improper installation is not
covered under the Warranty.
READ AND SAVE THESE INSTRUCTIONS

8 49-1000557 Rev. 0
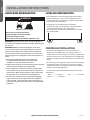
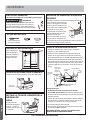
UNPACKING REFRIGERATOR
INSTALLATION INSTRUCTIONS
ENGLISH
IMPORTANT: Handle with care when moving refrigerator to
avoid either damaging the refrigerant tubing or increasing the
risk of a leak.
IMPORTANT: When moving the refrigerator, never tilt it
more than a 45° angle. This could damage the compressor
and the sealed system. If the refrigerator has been placed
in a horizontal position for any period of time, wait 24 hours
before plugging in the refrigerator to allow the refrigerant to
settle.
1. Remove all packaging material. This includes the
corrugated base and all adhesive tape holding the
refrigerator accessories inside and outside.
2. Inspect and remove any remains of packing, tape or printed
materials before powering on the refrigerator.
3. If your refrigerator comes with smooth or stainless steel
doors, please remove the clear film before turning it on for
the first time. When removing the film, do not pull the film
straight down as this could result in misaligned doors.
4. It is normal for the freezer door to be positioned slightly
higher than the top of the cabinet when the refrigerator
is first installed. This positioning is done at the factory to
ensure a proper gasket seal once the door is weighted with
food items.
WARNING
Explosion and Fire Hazard
Do not puncture refrigerant tubing.
Follow handling instructions carefully.
Flammable refrigerant used.
Failure to do so can result in death, explosion or fire.
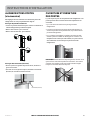
LEVELING REFRIGERATOR
• Your refrigerator has two leveling legs that are located
in the front bottom corners of your refrigerator. After
properly placing your refrigerator under its final position,
you can level your refrigerator.
• Leveling legs can be adjusted by turning them
clockwise to raise your refrigerator or by turning them
counterclockwise to lower your refrigerator.
The refrigerator door will close easier when the leveling
legs are extended.
PROPER AIR CIRCULATION
• To ensure your refrigerator works at the maximum
efficiency it was designed for, you should install it in a
location where there is proper air circulation, plumbing and
electrical connections. Your refrigerator is not designed to
òóèõä÷èìñ÷èðóèõä÷øõèöåèïòú%%ȚϤ!#ȚÌ¥òõäåòùè!! ȚÏ
¤$#ȚÌ¥
• Do not install your refrigerator in any location not properly
insulated or heated, e.g. garage, etc. Keep out of direct
sunlight and away from heating sources such as radiators,
heaters, and cooking appliances.
• The following are recommended clearances around the
refrigerator:
Sides……………0” (0 mm) Top...........,......1” (25 mm)
Back..................2” (50mm)
LowerRaise
READ AND SAVE THESE INSTRUCTIONS

49-1000557 Rev. 0 9
INSTALLATION INSTRUCTIONS
ENGLISH
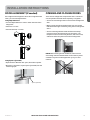
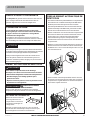
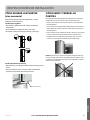
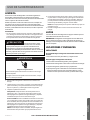
DOOR ALIGNMENT (If needed)
If the edges of the refrigerator doors do not align with each
other, you can make adjustments:
Using Adjustable Foot
• Turn the adjustable foot to raise or lower that side of the
refrigerator.
• Clockwise - to raise
• Counterclockwise - to lower
Using Spacers (provided)
• Open the door. With the door open, lift the door upward.
• By hand or using pliers, clip the spacer (provided) onto the
center hinge pin.
OPENING AND CLOSING DOORS
There are two refrigerator compartment doors. The doors
can be opened and closed either separately or together.
• There is an articulating mullion on the left-hand refrigerator
door.
• When closing the left-hand refrigerator door, the mullion
folds behind the right-hand door joining the two refrigerator
doors.
• There is a heating element inside the frame that helps
prevent moisture from developing on the mullion. The
temperature of the surface may be warm, which is normal,
and will not affect the performance of the refrigerator.
NOTE: Before closing the left-hand door, make sure the
articulating mullion is folded inward. If the mullion is pulled
outward it may become damaged when you try to close
the door.
Spacer (provided)
READ AND SAVE THESE INSTRUCTIONS

10 49-1000557 Rev. 0
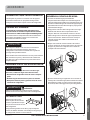
ENGLISH
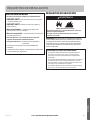
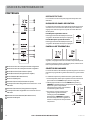
CONTROLS
A
Refrigerator Temperature Control Button
B
Freezer Temperature Control Button
C
Quick Cool Button
D
Quick Freeze Button
E
Sabbath Button
F
Lock Button
G
Quick Cool Indicator
H
Refrigerator Temperature Displayed in °F Indicator
I
Quick Freeze Indicator
J
Freezer Temperature Displayed in °F Indicator
K
Sabbath Mode Indicator
L
Lock Indicator
REFRIGERATOR USE
A
G
I
H
J
B
C
G
D
I
E
K
F
L
TOUCH PADS
The controls are touch pads, which respond when lightly
touched.
CONTROL PANEL LOCK
The control panel is automatically locked after 30 seconds
of nonuse. To change any settings the control panel must be
unlocked.
To Unlock the Control Panel:
Press and hold LOCK for 3 seconds. The
Lock indicator will turn OFF.
To Lock the Control Panel:
Press and hold LOCK for 3 seconds. The
Lock indicator will turn on.
TEMPERATURE DISPLAY
When no buttons or doors are operated for 30 seconds, all the
ÕÎÍöòñçìöóïäüóäñèï÷øõñòģ
When a button is pressed or a door opened, the LEDs on
display panel illuminate.
UNITS SELECT
The Units Select feature allows you to choose between
displaying the set temperature in either degrees Fahrenheit
(°F) or degrees Celsius (°C).
The default temperature unit is degrees Fahrenheit.
1. If locked, unlock the control panel by pressing and holding
LOCK for 3 seconds.
2. Press and hold FRIDGE and FREEZER
at the same time for 3 seconds. °C
will appear next to the temperature
display to indicate that the unit has
been changed to degrees Celsius.
3. To return to displaying the set
temperature in degrees Fahrenheit,
press and hold FRIDGE and FREEZER
at the same time for 3 seconds.
The °C will disappear from the
Temperature display.
READ AND SAVE THESE INSTRUCTIONS

49-1000557 Rev. 0 11
QUICK COOL
The Quick Cool feature accelerates the cooling of fresh food
and protects the foods already stored from undesirable
warming.
1. If locked, unlock the control panel by pressing and holding
LOCK for 3 seconds.
2. Press the Quick Cool button. The Quick
Cool indicators will illuminate.
#Ûèóèä÷ö÷èóö!äñç"÷òðäñøäïïü÷øõñòģ
the Quick Cool feature.
NOTE: ÚøìæîÌòòïúìïïäø÷òðä÷ìæäïïü÷øõñòģäé÷èõ#ëòøõö
QUICK FREEZE
The Quick Freeze function accelerates the freezing of fresh
food and protects frozen food from undesirable warming. If
you need to freeze a large amount of food, it is recommended
to select the Quick Freeze feature a few hours in advance.
1. If locked, unlock the control panel by pressing and holding
LOCK for 3 seconds.
2. Press the Quick Freeze button. The Quick
Freeze indicators will illuminate.
#Ûèóèä÷ö÷èóö!äñç"÷òðäñøäïïü÷øõñòģ
the Quick Freeze feature.
NOTE: ÚøìæîÏõèèýèúìïïäø÷òðä÷ìæäïïü÷øõñòģäé÷èõ
50 hours.
ENGLISH
REFRIGERATOR USE
CONTROLS (Cont.)
TEMPERATURE CONTROLS
The temperature range for the refrigerator compartment
is 34°F to 42°F (1°C to 6°C). The temperature range for the
freezer compartment is -6°F to 6°F (-21°C to -14°C).
The refrigerator compartment is preset to the recommended
temperature of 37°F (3°C) and the freezer compartment is
preset to the recommended temperature of 0°F (-18°C).
àëèñ÷ëèõèéõìêèõä÷òõìöĤõö÷óïøêêèçìñ÷ëèçìöóïäüúìïïöëòú
the recommended temperature settings.
IMPORTANT:
• The recommended setting should be correct for normal
household refrigerator use.
¬àëèñ÷ëèõèéõìêèõä÷òõìöĤõö÷÷øõñèçòñì÷ðäü÷äîèøó÷ò!"
hours to cool to the preset temperatures. Wait 24 hours for
your refrigerator to cool completely before adding food. If
you add food before the refrigerator has cooled completely,
your food may spoil.
• If the temperature is too warm or too cold in the refrigerator
òõéõèèýèõĤõö÷æëèæî÷ëèäìõùèñ÷ö÷òåèöøõè÷ëèüäõèñò÷
blocked before adjusting the controls.
Adjusting Controls
Îûæèó÷úëèñĤõö÷÷øõñìñêòñ÷ëèõèéõìêèõä÷òõçòñò÷äçíøö÷
either temperature more than one degree at a time. Wait 24
hours between adjustments for the temperature to stabilize.
NOTE: The temperature cannot be adjusted if any other
control function such as Quick Freeze, Quick Cool or Sabbath
Mode is activated, or the Control Panel is locked. The
corresponding indicator will illuminate and a tone will sound.
To Adjust the Refrigerator Temperature:
1. If locked, unlock the control panel by pressing and holding
LOCK for 3 seconds.
2. Press Fridge to adjust the temperature.
NOTE: The temperature decreases by one
degree and a tone sounds with each press
of the button.
After 5 seconds have passed with no
button being pressed the temperature
öè÷÷ìñêæòñĤõðöäø÷òðä÷ìæäïïü
To Adjust the Freezer Temperature:
1. If locked, unlock the control panel by pressing and holding
LOCK for 3 seconds.
2. Press the Freezer button to adjust the temperature.
NOTE: The temperature decreases by one
degree and a tone sounds with each press
of the button.
After 5 seconds have passed with no button
being pressed the temperature setting
æòñĤõðöäø÷òðä÷ìæäïïü
READ AND SAVE THESE INSTRUCTIONS

12 49-1000557 Rev. 0
ENGLISH
CONTROLS (Cont.)
SABBATH
The Sabbath function is designed for those whose religious
òåöèõùäñæèöõèôøìõè÷øõñìñêòģ÷ëèïìêë÷öÊïïìñ÷èõìòõïìêë÷ö
and alarms will be disabled.
1. If locked, unlock the control panel by pressing and holding
LOCK for 3 seconds.
2. Press and hold SABBATH for 3 seconds until the Sabbath
indicator illuminates.
NOTES:
• All alert tones and lights are deactivated.
• If Quick Cool and/or Quick Freeze was on, Sabbath mode
÷øõñöòģ÷ëèöèéèä÷øõèöäø÷òðä÷ìæäïïü
• The Control Panel will remain unlocked while in Sabbath
mode.
3. To deselect Sabbath mode, press and hold SABBATH for 3
seconds.
DOOR ALARM
When the refrigerator door is open for more than 3 minutes,
the Door Open alarm will sound. The alarm can be silenced
by closing the door. If the door is left open for longer than 7
minutes, the light inside the refrigerator will automatically
öúì÷æëòģ
FEATURES
REFRIGERATOR
ADJUSTABLE SHELVES
Ýëèëèìêë÷òé÷ëèöëèïùèöæäñåèäçíøö÷èç÷òĤ÷üòøõö÷òõäêè
needs.
1. To remove a shelf, lift up on both the front and back edge
to disengage the shelf hooks from the shelf supports along
the refrigerator wall and pull it out.
2. To reinstall a shelf, rest the shelf on both the front and rear
supports. Push the shelf toward the rear of the refrigerator
until the back of the shelf hooks around the rear shelf
supports.
REMOVABLE DOOR BINS
To Remove and Replace a Door Bin:
1. Place hands on both sides of the bin and lift upward.
2. Pull the door bin out.
3. Replace the door bin by inserting it above the support and
pressing down to snap into place.
CRISPER DRAWERS
These drawers can be used for storing vegetables and fruit.
To remove, pull the drawer straight out.
FREEZER
There are 6 drawers in the freezer compartment. The top and
middle drawers can be removed to turn the bottom drawer
cover into a shelf to store tall items.
If installing an ice maker into this unit, the top left drawer is
used as an ice storage bin.
To Remove/Replace Freezer Drawer:
1. Pull out drawer to maximum extension.
2. Lift up to remove the drawer.
3. Reverse steps 1 and 2 to replace the drawer.
REFRIGERATOR USE
READ AND SAVE THESE INSTRUCTIONS

49-1000557 Rev. 0 13
ENGLISH
REFRIGERATOR USE
CLEANING
Both the refrigerator and freezer sections defrost
automatically. However, clean both sections about once a
month to avoid buildup of odors. Wipe up spills immediately.
Because air circulates between both sections, any odors
formed in one section will transfer to the other. You must
thoroughly clean both sections to eliminate odors. To avoid
odor transfer and drying out of food, wrap or cover foods
tightly.
IMPORTANT:
• Do not use harsh chemicals, ammonia, chlorine bleach,
concentrated detergent, solvents, abrasives or metal
scouring pads to clean your product inside or out. They
can damage and/or discolor the refrigerator finish.
4. Clean the door seals every 3 months. Wash the joints with
a clean sponge or soft cloth and a mild detergent diluted
in lukewarm water. Rinse thoroughly and dry well. Applying
a little petroleum jelly to the joints on the hinge side will
ðäìñ÷äìñ÷ëèĥèûìåìïì÷üòé÷ëèíòìñ÷äñçèñöøõèäêòòçöèäï
NOTE: The cleanliness of the gaskets will ensure a
better seal.
5. Plug in the refrigerator or reconnect the power source.
LIGHTS
Ýëèìñ÷èõìòõïìêë÷öòé÷ëèõèéõìêèõä÷òõ÷øõñòģúëèñ÷ëèçòòõö
are open for more than 7 minutes.
IMPORTANT: Your refrigerator is equipped with LED lighting.
These lights are designed to last for the life of your refriger-
ator. However, if the lights stop operating, please contact a
ôøäïìĤèç÷èæëñìæìäñéòõõèóïäæèðèñ÷
VACATION AND MOVING
VACATION
If You Choose to Leave the Refrigerator On While You’re
Away:
1. Use up any perishables and freeze other items.
ÒéâòøÌëòòöè÷òÝøõñØģ÷ëèÛèéõìêèõä÷òõËèéòõèâòø
Leave:
1. Remove all food from the refrigerator and freezer.
2. Unplug refrigerator or disconnect power.
3. Clean refrigerator, wipe it, and dry well.
4. Tape rubber or wood blocks to the tops of both doors to
prop them open far enough for air to get in. This stops odor
and mold from building up.
1. Unplug refrigerator or disconnect power.
2. Using a clean sponge or soft cloth and a mild detergent
dissolved in warm water, wash removable parts and the
interior surfaces. Rinse well and dry thoroughly.
3. Clean the exterior surfaces.
Painted metal: Wash painted metal exteriors with a
clean, soft cloth or sponge and a mild detergent in warm
water. Rinse surfaces with clean, warm water and dry
immediately to avoid water spots.
Stainless steel: Stainless steel is corrosion resistant
and not corrosion-proof. To help avoid corrosion of
your stainless steel, wash stainless steel surfaces with a
clean, soft cloth or sponge and a mild detergent in warm
water. Rinse surfaces with clean, warm water and dry
immediately to avoid water spots.
NOTE: When cleaning stainless steel, always wipe in the
direction of the grain to avoid cross-grain scratching.
WARNING
Electrical Shock Hazard
Unplug your appliance or disconnect power before cleaning.
Failure to do so can result in death, electric shock or
personal injury.
CAUTION
Do not clean glass shelves or covers
with warm water when they are cold. Shelves and covers
may break if exposed to sudden temperature changes or
impact, such as bumping. Tempered glass is designed to
shatter into many small, pebble-size pieces. This is normal.
Glass shelves and covers are heavy. Use both hands when
removing them to avoid dropping.
READ AND SAVE THESE INSTRUCTIONS

14 49-1000557 Rev. 0
REFRIGERATOR CARE
REINSTALLING/USING
REFRIGERATOR AGAIN
If the refrigerator has been placed in a horizontal or tilted
position for any period of time wait 2 to 5 hours before
plugging it in to allow the oil to settle into the compressor.
1. Clean refrigerator. See “Cleaning.”
2. Place refrigerator in desired location and level. See
“Installation Instructions.”
3. Plug into a grounded 3 prong outlet.
ENGLISH
VACATION AND MOVING (Cont.)
MOVING
IMPORTANT: Handle with care when moving refrigerator to
avoid either damaging the refrigerant tubing or increasing the
risk of a leak.
When you are moving your refrigerator to a new home, follow
these steps to prepare it for the move.
1. Remove all food from the refrigerator and pack all frozen
food in dry ice.
2. Unplug refrigerator.
3. Clean, wipe, and dry thoroughly.
4. Take out all removable parts, wrap them well, and tape
them together so they don’t shift and rattle during the
move.
%Ûäìöè÷ëèïèùèïìñêïèêööò÷ëèüçòñđ÷öæõäóè÷ëèĥòòõÜèè
“Leveling.”
6. Tape the doors closed and tape the power cord to the back
of the refrigerator. When you get to your new home, put
everything back and refer to the “Installation Instructions”
section for preparation instructions.
Excessive Weight Hazard
Use two or more people to move and install refrigerator.
Failure to do so can result in back or other injury.
WARNING
READ AND SAVE THESE INSTRUCTIONS

49-1000557 Rev. 0 15
ENGLISH
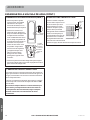
ACCESSORY
ICEMAKER ACCESSORY INSTALLATION INSTRUCTIONS
BEFORE YOU BEGIN
Read these instructions completely and carefully.
• IMPORTANT – Save these instructions for local
inspector’s use.
• IMPORTANT – Observe all governing codes and
ordinances.
• Note to Installer – Be sure to leave these
instructions with the Consumer.
• Note to Consumer – Keep these instructions for
future reference.
• Skill level – Installation of this appliance requires basic
mechanical skills.
• Completion time – 20–60 minutes
• Proper installation is the responsibility of the installer.
• Product failure due to improper installation is not
covered under the Warranty.
Icemaker Accessory Kit IM4D:
An IM4D icemaker accessory kit is available at extra cost.
To order, call GE Appliances at 800.GECARES
(800.432.2737) or visit GEAppliances.com. In Canada, visit
GEAppliances.ca or call 800.561.3344.
ON
OFF
Icemaker
Feeler Arm
Power
Switch
ITEMS NEEDED FROM IM4D KIT
Damage – Shipment/Installation
¿ If the unit is damaged in shipment, return the unit to the
store in which it was bought for repair or replacement.
¿ If the unit is damaged by the customer, repair or
replacement is the responsibility of the customer.
¿ If the unit is damaged by the installer (if other than the
customer), repair or replacement must be made by
arrangement between customer and installer.
Installation Instructions
2
Hex-Head Screw
for Water Line Clamp (3/4”)*
5
Water Valve and
Tube Assembly
3
Icemaker
1
Installation
Instructions
Water Line Clamp
(strain relief), for house
water line
6
10
Phillips Head Screws,
for mounting icemaker (2)
(7/8”)*
Warranty Label
7
ICEMAKER
WARRANTY VERIFICATION
Date Installed
Dealer
13
Icemaker Fill Cup
(side-mounted)
WARNING
Connect to potable water supply only.
A cold water supply is required for automatic icemaker
operation. The water pressure must be between 40 and
120 psi (275-827 kilopascals)
READ AND SAVE THESE INSTRUCTIONS

16 49-1000557 Rev. 0
ACCESSORY
ENGLISH
YOU WILL NEED
BEFORE YOU BEGIN
Read these instructions completely and carefully.
WARNING
ELECTRICAL
SHOCK HAZARD To eliminate the risk of
electric shock or injury during installation,
you must first unplug the refrigerator before
proceeding.
Flat blade and Phillips
screwdrivers
Pliers
Sharp knife
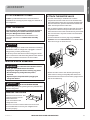
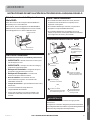
PREPARE THE REFRIGERATOR
Inside of the
freezer, remove
the cover for the
icemaker power
supply socket.
SET POWER SWITCH TO OFF
Set the icemaker power switch to OFF.
Power
Switch
(Appearance may vary)
INSTALL THE ICEMAKER FILL CUP
Install the icemaker
fill cup (13) into the
icemaker as shown.
Cover for
icemaker
socket
PLUG IN THE ICEMAKER
Plug the icemaker power cord into the socket making sure
the prongs and holes are matched. Press the plug firmly
into the socket. Lock the plug in
place by clipping the restraints
into each side of the plug. Make
sure the restraints click into
place. Make sure the power cord
is still in the hook on back of the
icemaker.
Hook
MOUNT THE ICEMAKER
• For easy installation, remove the top and middle left
freezer drawer
• Drive both mounting screws halfway into screw holes
on the support bracket of the left side upper wall in the
freezer. Lift the icemaker so the fill tube assembly fits in
the fill cup opening. Hang the icemaker on the screws
and on the L-shaped tab in front of the supporting
bracket.
Make sure:
• The power cord is still firmly in the socket.
• The fill tube assembly extends into the fill cup opening
at the back of the icemaker.
• The icemaker mounting screws should be located in
the uppermost position of the mounting slots on the
icemaker bracket.
• The icemaker is level.
• The icemaker power switch is in the OFF position.
SECURELY TIGHTEN THE ICEMAKER MOUNTING
SCREWS.
Mounting
screws
L-shaped
tab
Fill cup
Fill tube
Icemaker
support
bracket
READ AND SAVE THESE INSTRUCTIONS

49-1000557 Rev. 0 17
ENGLISH
ACCESSORY
ATTACH WARRANTY LABEL
A label is provided with this kit to record the date of
installation for warranty purposes. Apply it to the back of
the refrigerator.
KEEP THE MANUAL
The warranty for the icemaker is printed in the manual
that came with your icemaker kit. Keep this manual
with your Refrigerator Owner’s Manual.
The icemaker installation inside the freezer is now
complete. Continue to the Water Valve Assembly
section.
CAUTION
Do not place fingers or hands in the automatic icemaking
mechanism while the refrigerator is plugged in. This will
help protect you from possible injury.
It will also prevent interference with moving parts of the
ejector mechanism and the heating element that releases
the cubes, located on the bottom of the icemaker.
WATER VALVE ASSEMBLY
REMOVE THE COVER
Remove the access cover. This
requires removing screws
which attach the
cover to the back of the
refrigerator case.
Be sure to save the screws as the access cover must
be reinstalled later to ensure your refrigerator will
function properly.
WARNING
To reduce the risk of death or electric
shock, you must follow these instructions:
¿ Unplug the refrigerator before removing any panels.
¿ Do not damage any wiring while the panel is
removed.
¿ Replace all parts and panels before plugging the
refrigerator back in.
WARNING
ELECTRIC SHOCK HAZARD
Attach tubing clamp using existing hole only. DO NOT drill
into the refrigerator.
ATTACH THE WATER VALVE
¿ Connect water tube pre-installed in the machine
compartment to water valve. Do not use the water tube
that came with the water valve. To remove the water tube
from the water valve, push the white washer towards the
water valve and pull out the water tube.
¿ Pull out the black water tube from right side of machine
compartment. Remove the tape from the end. Insert
the water tube to the water valve all the way to the mark
0.5” from the end. Loop and tuck the rest of tube back
to compartment.
¿ Locate the female connector plug. Plug the female
connector onto the male terminals on the water valve.
Either wire can go on either terminal.
¿ Fasten the water valve to the cabinet by driving the
water valve mounting screw (phillips flat head screw
included with this manual in the accessory bag) into the
hole in the cabinet leg.
READ AND SAVE THESE INSTRUCTIONS

18 49-1000557 Rev. 0
ACCESSORY
ENGLISH
WATER VALVE ASSEMBLY ·ÌØ×ݸ
ATTACH THE WATER VALVE (Cont.)
¿ Open the outlet box cover,
located on the right side of the
back of the unit, with flat head
screw driver.
¿ Check the water line
connection. Make sure the
water tube is fully inserted
into the grommet. If not,
loosen the hose clamp by
squeezing the ends with pliers
and insert the tube as far as
it can go. Then release the
clamp ends and make sure
that the clamp captures
the water tube. Otherwise,
water may leak from this
connection.
¿ Check the rear of the
refrigerator to make sure
the fill tube has not been
pushed out of the back of
the refrigerator.
WATER LINE CONNECTED
Refer to the Water Line Installation Instructions for
connection to the home water supply in the installation
instructions that came with your icemaker.
After water line installation is completed, set the
icemaker power switch to ON.
The icemaking cycle will not begin until the icemaker
and freezer compartment reach operating temperature,
then icemaking will begin automatically.
REINSTALL THE COVER
Reinstall the access cover.
This requires using the
screws you removed
previously to reattach the
cover to the back of the
refrigerator case. This
must be reinstalled for your
refrigerator to function
properly. The water line
should come out at the water
tube relief slot at the right
side of the access cover.
Water
Line
Fill tube
grommet
Clamp
Water tube
Outlet Box
READ AND SAVE THESE INSTRUCTIONS

49-1000557 Rev. 0 19
ENGLISH
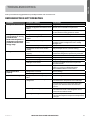
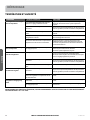
PROBLEM POSSIBLE CAUSE(S) SOLUTION
Refrigerator does not run. Refrigerator is unplugged. Plug into a grounded 3 prong outlet.
Ëõèäîèõìö÷õìóóèçòõ÷øõñèçòģ¦Ïøöèìö
blown.
Reset / Turn on breaker or replace fuse.
Refrigerator is in defrost mode. Wait approximately 40 minutes for defrost cycle
to end, and the cooling system to restart.
Refrigerator compress or
runs frequently or for long
periods of time.
NOTE: This refrigerator is
designed to run for longer
periods of time at a lower
energy usage.
Ûèéõìêèõä÷òõìöĤõö÷óïøêêèçìñ Allow 12 hours for the refrigerator to cool down.
Warm food or large amounts of food
added.
This is normal.
Door is left open, or refrigerator is not
level.
Ensure that door is not being held open by
an Item. Level the refrigerator. See “Leveling
Refrigerator.”
Hot weather or frequent openings This is normal.
Temperature control set to coldest
setting.
Adjust temperature to a warmer setting.
Refrigerator has an odor. Food is not sealed or packaged
properly.
Reseal packaging. Place an opened box of baking
soda in the refrigerator, replace every 3 months.
Interior needs to be cleaned. Clean the interior. See “Cleaning.“
Food stored too long. Dispose of spoiled food.
Light does not come on. Refrigerator is unplugged. Plug into a grounded 3 prong outlet.
LED light is burned out. Ìòñ÷äæ÷äôøäïìĤèç÷èæëñìæìäñ÷òõèóïäæè÷ëè
burned out LED.
Sabbath Mode is activated. Lights are disabled in Sabbath mode. To turn on
ïìêë÷öüòøðøö÷÷øõñòģÜäååä÷ëÖòçè
See “Sabbath Mode” for instructions.
Doors do not close
properly.
Refrigerator is not level. See “Leveling.“
Something is obstructing door closure. Check for and remove obstructions.
Vibration or rattling Ûèéõìêèõä÷òõìöñò÷õèö÷ìñêĤõðïüòñ
ĥòòõ
See “Leveling.“
Normal Sounds Ò÷öòøñçöïìîèúä÷èõìöĥòúìñêéõòð÷ëè
refrigerator.
Ûèéõìêèõäñ÷ĥòúìñêìñ÷ëèïìñèöúìïïðäîè÷ëìö
sound when the compressor starts and stops.
The refrigerator has an automatic defrosting
system. The defrosted water will make this
sound.
Humming or buzzing sounds The compressor and fans for cold air circulation
can make this sound. If the refrigerator is not
level, the sound will be louder.
Cracking or clicking sounds The interior parts will make this sound as they
contract and expand in response to temperature
changes.
TROUBLESHOOTING
First try the solutions suggested here to possibly avoid the cost of a service call.
REFRIGERATOR IS NOT OPERATING
READ AND SAVE THESE INSTRUCTIONS

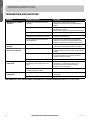
TEMPERATURE AND MOISTURE
PROBLEM POSSIBLE CAUSE(S) SOLUTION
Refrigerator or freezer is
too warm.
Temperature control is not set low
enough.
Adjust the compartment to a colder
setting;allow 12 hours for the temperature to
adjust.
Door opened frequently or left ajar. Limit door openings to maintain the internal
temperature. / Check
that an item is not preventing door from closing.
Warm food added recently. Allow time for food and refrigerator to cool.
The space between the back of the
refrigerator and the wall is too close.
Allow 2” (5 cm) space between the back of the
refrigerator and the wall.
Items against rear interior wall are
åïòæîìñêäìõĥòú
Store items only inside the trim of the glass
shelves; don’t place items against sides of the
compartments or directly in front of any vents.
Refrigerator or freezer is
too cold.
Temperature control is set too low. Adjust temperature in the compartment to the
next warmer setting; allow 24 hours to adjust.
Moisture on exterior/
interior of refrigerator
High humidity This is normal during times of high humidity. Dry
surface and adjust temperature to slightly colder
setting.
Door opened frequently or left ajar. Keep door closed. Check that a package is
not preventing door from closing. Level the
refrigerator. See “Leveling.”
Open container of liquid in refrigerator Cover or seal container.
Frost or ice crystals on
frozen food
Freezer door left open or opened
frequently, or the refrigerator is not
level.
Limit door openings to maintain the internal
temperature. / Check that an item is not
preventing door from closing. Level the
refrigerator. See “Leveling.”
Items blocking freezer air vents are
óõèùèñ÷ìñêóõòóèõäìõĥòú
Move items away from rear wall.
Food freezing in
refrigerator
Items placed too close to the air vents. Move items away from back and top of the
refrigerator.
Temperature control set too cold. Adjust the temperature to a less cold setting.
FOR MORE HELP, VISIT HAIERAMERICA.COM OR CALL THE CONSUMER HELP LINE AT 1-877-337-3639.
20 49-1000557 Rev. 0
ENGLISH
TROUBLESHOOTING
READ AND SAVE THESE INSTRUCTIONS
La page charge ...
La page charge ...
La page charge ...
La page charge ...
La page charge ...
La page charge ...
La page charge ...
La page charge ...
La page charge ...
La page charge ...
La page charge ...
La page charge ...
La page charge ...
La page charge ...
La page charge ...
La page charge ...
La page charge ...
La page charge ...
La page charge ...
La page charge ...
La page charge ...
La page charge ...
La page charge ...
La page charge ...
La page charge ...
La page charge ...
La page charge ...
La page charge ...
La page charge ...
La page charge ...
La page charge ...
La page charge ...
La page charge ...
La page charge ...
La page charge ...
La page charge ...
La page charge ...
La page charge ...
La page charge ...
La page charge ...
La page charge ...
La page charge ...
La page charge ...
La page charge ...
-
 1
1
-
 2
2
-
 3
3
-
 4
4
-
 5
5
-
 6
6
-
 7
7
-
 8
8
-
 9
9
-
 10
10
-
 11
11
-
 12
12
-
 13
13
-
 14
14
-
 15
15
-
 16
16
-
 17
17
-
 18
18
-
 19
19
-
 20
20
-
 21
21
-
 22
22
-
 23
23
-
 24
24
-
 25
25
-
 26
26
-
 27
27
-
 28
28
-
 29
29
-
 30
30
-
 31
31
-
 32
32
-
 33
33
-
 34
34
-
 35
35
-
 36
36
-
 37
37
-
 38
38
-
 39
39
-
 40
40
-
 41
41
-
 42
42
-
 43
43
-
 44
44
-
 45
45
-
 46
46
-
 47
47
-
 48
48
-
 49
49
-
 50
50
-
 51
51
-
 52
52
-
 53
53
-
 54
54
-
 55
55
-
 56
56
-
 57
57
-
 58
58
-
 59
59
-
 60
60
-
 61
61
-
 62
62
-
 63
63
-
 64
64


Haier QHE16HYPFS Le manuel du propriétaire
- Catégorie
- Réfrigérateurs combinés
- Taper
- Le manuel du propriétaire
dans d''autres langues
- italiano: Haier QHE16HYPFS Manuale del proprietario
- English: Haier QHE16HYPFS Owner's manual
- español: Haier QHE16HYPFS El manual del propietario
- dansk: Haier QHE16HYPFS Brugervejledning
Documents connexes
-
Haier HRQ16N3BGS Manuel utilisateur
-
-
-
-
-
-
-
-
-