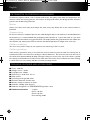
Krups XP602050 Manuel utilisateur
- Catégorie
- Cafetières
- Taper
- Manuel utilisateur
Ce manuel convient également à

www.krups.com
8080011600-02
English . . . . . . . . . . . . . . . . . . p. 5
Français . . . . . . . . . . . . . . . . . p. 27
Español . . . . . . . . . . . . . . . . . p. 49
Réalisation : Espace Graphique
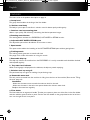
c
b
d
a
n
m
h1
h2
h4
h5
h3
j
l
f
g
h
i
e
k
n
p
s
q
o
r
d3
d2
d1
t
XP6025
EN
FR
ES
WWW.KRUPS.COM
KR_ESPRESSO_XP6025_NAFTA_8080011600-02 03/07/12 17:48 PageC1

3
1
2
3
1
2
LOCK
LOCK
LOCK
LOCK
LOCK
LOCK
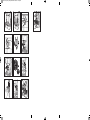
fig. 1 fig. 2
fig. 3
fig. 4 fig. 6
fig. 12
fig. 7
fig. 5
fig. 9
fig. 8
fig. 10
fig. 11
LO
CK
fig. 13
KR_ESPRESSO_XP6025_NAFTA_8080011600-02 03/07/12 17:48 PageC4

CONTENTS
IMPORTANT WARNINGS.............................................................................................................................p. 6
INFORMATION ON PREPARING AN ESPRESSO...............................................................................p. 8
TECHNICAL FEATURES AND ACCESSORIES ....................................................................................p. 8
PRODUCT DESCRIPTION...........................................................................................................................p. 9
MAIN FUNCTIONS..........................................................................................................................................p. 9
FEATURES .........................................................................................................................................................p. 10
CONTROL PANEL FEATURES ...................................................................................................................p. 11
BEFORE FIRST USE ......................................................................................................................................p. 12
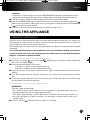
USING THE APPLIANCE
1. ESPRESSO PREPARATION...................................................................................................................p. 13
2. HOT WATER FUNCTION ........................................................................................................................p. 16
3. STEAM FUNCTION ...................................................................................................................................p. 16
4. DESCALING.................................................................................................................................................p. 17
5. SAFETY AND VISUAL WARNINGS ......................................................................................................p. 19
6. AUTOMATIC STANDBY ............................................................................................................................p. 19
7 CLEANING AND MAINTENANCE .........................................................................................................p. 20
8. TROUBLESHOOTING GUIDE...............................................................................................................p. 22
RECYCLING......................................................................................................................................................p. 23
MANUFACTURER’S WARRANTY...............................................................................................................p. 24
English
5
KR_ESPRESSO_XP6025_NAFTA_8080011600-02 03/07/12 17:49 Page5

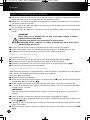
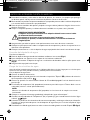
IMPORTANT WARNINGS
When using an electrical appliance, basic safety instructions must always be observed to
reduce the risks of fire, electric shock and injury, in particular the following:
1. Read the instructions for use in full before using for the first time.
2. Do not touch hot surfaces. Use the handles or buttons.
3. To protect from fires, electric shocks and injuries, do not immerse the power cord,
plugs or the machine in water or any other liquid.
4. This machine is not designed for use by children.
5. Children should be closely supervised when the electrical appliance is used in their
proximity. Store away from the reach of children.
6. This appliance is not intended for use by people (including children) without prior
experience or knowledge with the machine, unless they are supervised or have been
given instructions on how to use the appliance by a person responsible for their
safety.
7. Children must be supervised to ensure that they do not play with the appliance.
8. Any contact with hot surfaces, hot water or steam can cause burns. Take care.
9. Take care when the steam spout is used as steam can cause burns.
10. Disconnect the appliance from the wall socket if it is not used for a few days and
before cleaning. Let the appliance cool down before installing or removing
accessories and before cleaning or storing.
11. All appliances are subject to strict quality controls. Practical tests are conducted on
randomly selected appliances, which may explain small marks or coffee remains in
the appliance before first use.
12. Do not use an electrical appliance whose power cord or plug is damaged, when the
appliance is not functioning correctly or is damaged in any way whatsoever. Return
all faulty appliances to the Krups Service Center as soon as possible so that it can
be inspected, adjusted or repaired.
13. To reduce the risk of injury, do not leave the cord hanging over the table or counter,
where it can be pulled on by a child or trip someone.
14. The cord must not hang over the table or counter or come into contact with hot
surfaces.
15. Never pour cold water in the tank immediately after a brew cycle. Let the appliance
cool down between preparations.
16. Do not open the lid during coffee production.
GENERAL SAFETY RECOMMENDATIONS
n The use of accessory attachments not recommended by Krups may result in fire, electric
shock or injury to persons.
n Never immerse the appliance in water or any other liquid.
n Never operate the appliance with wet hands.
n Never place the appliance near to or on a source of heat and avoid the cord from
touching hot surfaces.
n Never use the appliance outdoors.
English
6
KR_ESPRESSO_XP6025_NAFTA_8080011600-02 03/07/12 17:49 Page6

n Ensure that the mains voltage corresponds to that marked on the appliance’s name
plate.
n To prevent excessive load on the electricity network, do not connect other high
consumption appliances on the same circuit.
n Check that the power cord is in perfect condition before each use.
n Never pull the power cord or the appliance itself to disconnect the appliance.
n Never leave the appliance unsupervised when connected.
n If the power cord should become damaged, it must be replaced by a professional from
an Approved Service Center to avoid any danger.
n In the event of a fault or malfunction, do not try to repair the appliance yourself, leave
this to a professional from an Approved Service Center.
n This appliance has been designed for domestic use only. Any misuse of the appliance
cancels the guarantee and could release the manufacturer from any liability.
n Do not use appliance for other than intended use.
n To disconnect, stop the appliance with the button, then remove plug from wall outlet.
SAVE THESE INSTRUCTIONS
NOTE
This appliance is designed for domestic use only. Any maintenance other than
cleaning and normal upkeep of the appliance by the owner should be performed by
Krups approved personnel only. Visit our website www.krupsusa.com in the USA
or www.krups.ca in Canada, or contact customer services for your nearest service
center. To reduce risks of fire and electric shock, do not dismantle the base of the
appliance. All repairs should be performed by Krups approved personnel only.
INSTRUCTIONS FOR A SHORT POWER CORD
A. A short power supply cord is provided to reduce risk resulting from becoming
entangled in or tripping over a longer cord. The use of an extension lead is not
recommended with this appliance.
B. If an extension lead is absolutely necessary, it may be used if care is exercised
in their use.
1) The extension lead must have at least the same rating as that of the machine.
2) The extension lead must not hang over the table or counter where it could be
pulled by a child or trip someone.
C. This appliance is equipped with a polarized plug (one blade is wider than the
other). To reduce the risk of electric shock, there is only one way to insert the
plug into the socket. If it does not fully fit into the socket, reverse the plug. If it
still does not fit, contact a qualified electrician. Under no circumstances should
the plug be changed.
In order to improve its products, Krups reserves the right to modify specifications without
prior notice.
English
7
KR_ESPRESSO_XP6025_NAFTA_8080011600-02 03/07/12 17:49 Page7

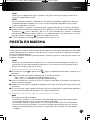
INFORMATION ON PREPARING AN ESPRESSO
To obtain an espresso which is rich in aromas and creamy, the quality of the water, the temperature, the
variety of coffee, the roasting process, the fineness of the ground coffee, the dosage and the extraction
pressure are all determining elements.
Water
Always use clean fresh water and change the water every day. Water with a low mineral content is
preferred.
Temperature
For the first coffee or if multiple espressos are made during the day or if the machine is turned off between
each espresso, it is recommended that you dispense the equivalent of 1 cup of hot water as if you were
making a coffee but without using ground coffee. This helps preheat the group head, the filter holder, the
filter and the cup, allowing the coffee to maintain the ideal temperature for longer once in the cup.
Coffee roasting
You can use any coffee variety for your espresso; the main thing is that it is fresh.
Coffee grinding
If the coffee is ground too finely, it will cause too much resistance to the hot water flow causing this to
overheat and “burn” the coffee, thus lending it a distinct bitterness. Too much resistance will also cause
the coffee to be dispensed drop by drop causing the foam not to form in the cup. If the coffee is ground
too coarsely it will provide no resistance to the water flow. The infusion time is therefore too short resulting
in coffee that is not very creamy and does not release enough aromas.
TECHNICAL FEATURES AND ACCESSORIES
n Power: 1250 W
n Voltage: 120 V ~ 60 Hz
n Pump pressure: 19 bars
n Dimensions: L:10.6 H:12 W: 10
n Steel surface
n Pre-wetting of the ground coffee
n Electronic detection of water level
n Memory storage of 2 doses of coffee
n Automatic standby (after 30 mins)
n Reduction in brightness of TEMPERATURE light after 1 hour
n Product accessories: - 1 spoon
- One 1 cup filter
- One 2 cup filter
- One cleaning needle
English
8
KR_ESPRESSO_XP6025_NAFTA_8080011600-02 03/07/12 17:49 Page8

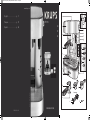
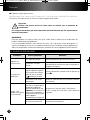
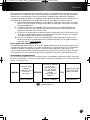
PRODUCT DESCRIPTION
MAIN FUNCTIONS
n An unbeatable espresso:
- 19 bar high pressure pump
- Pre-wetting of the ground coffee
- Filters with pressurization chamber for increased crema
n Impeccable water:
- Thermo block heating unit for an ideal constant temperature
n Complete freedom of use:
- Compatible with ground coffee and all paper pods, both soft and compact
n Ease of use:
- 2 doses of espresso that are easy to program
- Water tank that can be accessed from the front
n Sophisticated design:
- 100% solid stainless steel cover
- Filter holder with professional dispensing spout
n Safety and comfort:
- EMPTY TANK detection with automatic pump stop
- Automatic standby when device is not used for more than 30 minutes
English
9
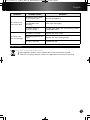
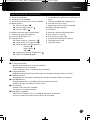
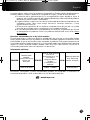
a Group head
b Stainless steel body
c Stainless steel cup warming plate
d Rotating control button
d1 : PENDING setting :
●
d2 : HOT WATER function
d3 : STEAM function
e Adjustable HOT WATER/STEAM nozzle
f Spout nozzle
g Frothing nozzle
h Control panel
h1 : Pre-programmed 1 cup espresso button
h2 : Pre-programmed 2 cup espresso button
h3 : TEMPERATURE SELECTION button
- Espresso
- Hot water
- Steam
h4 : TEMPERATURE light:
h5 : START/STOP button
i Removable water drip tray
j Stainless steel tray cover
k Tray water level indicator
l Stainless steel cup rest grill
m Removable water tank
n Filter holder
o Filter holder dispensing spout
p 1 cup espresso filter
q 2 cup espresso filter
r Espresso dosing spoon
s Ground coffee press
t Cleaning needle
KR_ESPRESSO_XP6025_NAFTA_8080011600-02 03/07/12 17:49 Page9

FEATURES
The letters refer to the product description on page 9.
a. Group head
The group head enables the locking of the filter holder.
b. Stainless steel body
The body of your espresso machine is stainless steel for better quality and longevity.
c. Stainless steel cup warming plate
Warms cups quickly and efficiently, maintaining the ideal temperature longer.
d. Rotating control button
The rotating button activates the EXPRESSO, HOT WATER or STEAM function.
e. Adjustable HOT WATER/STEAM spout
The adjustable spout allows distribution of hot water or steam.
f. Spout nozzle
The spout nozzle enables the handling of the HOT WATER/STEAM spout without getting burnt.
g. Frothing nozzle
The frothing nozzle generates a smooth milk froth.
See page 15 for further information on using this nozzle.
i. Removable drip tray
The drip tray collects the overflow from the ESPRESSO. It is easily removable and should be checked
and emptied regularly.
k. Tray water level indicator
When a red signage is displayed on the indicator, the drip tray needs emptying.
l. Stainless steel cup rest grill
The perforated cup rest grill has markings for positioning cups.
m. Removable water tank
The tank can be removed from the machine for filling from the front of the machine (See section "Filling
the tank" page 12).
Comments:
- Make sure the water never exceeds the maximum level for the tank.
- Make sure the water in the tank never passes below the minimum water level.
Readjust the water level regularly.
n. Filter holder
The filter holder has an ergonomic handle. To make your espresso, place one of the filters in the filter holder
and then add the ground coffee or pods. Position the filter holder on the group head to the far left then
turn it to the right to lock it into place.
English
10
KR_ESPRESSO_XP6025_NAFTA_8080011600-02 03/07/12 17:49 Page10

p. 1 cup espresso filter
The cup size is identified on the bottom of the filter by the marking . This filter allows you to prepare 1
cup of espresso using ground coffee, a compact paper pod or a soft paper pod.
q. 2 cup espresso filter
The cup size is identified on the bottom of the filter by the marking . This filter allows you to prepare
2 cups of espresso using ground coffee. It cannot be used with 2 pods at the same time.
r. Espresso dosing spoon
Well-leveled, it allows you to measure the quantity of coffee required for a good espresso.
s Ground coffee press
The ground coffee press allows you to carefully tamp the coffee in the filter.
CONTROL PANEL FEATURES
The letters refer to the product description on page 9.
h1. Pre-programmed 1 cup espresso button:
This button allows you to program a quantity of coffee corresponding to 1 cup (approximately 50 ml in a
pre-set dose, approximately 150 ml as a maximum dose) depending on the quantity pre-programmed.
Coffee production is stopped automatically after the pre-programmed amount has been dispensed.
h2. Pre-programmed 2 cup espresso button:
This button allows you to program a quantity of coffee corresponding to 2 cups (approximately 100 ml in
a pre-set dose, approximately 250 ml as a maximum dose) depending on the quantity pre-programmed.
Coffee production is stopped automatically after the pre-programmed amount has been dispensed.
IMPORTANT
It is an intermittent button (automatic return).
h3. TEMPERATURE SELECTION button: ,,
For the water to remain at an ideal temperature for making your preparations, the TEMPERATURE
SELECTION button must be positioned to the left for espressos or hot water and to the right for
steam .
h4. TEMPERATURE light:
This light indicates:
a) Light flashes = the espresso, hot water or steam mode is in progress
- Light is solid = the espresso, hot water or steam mode is ready to dispense
b) That the tank is empty (flashes quickly)
c) That the rotating control button should be set to PENDING (
●) during heating of your appliance
(flashes quickly)
h5. START/STOP button
Turn the button to the right (I) to turn the machine on – (the TEMPERATURE light (h4) comes on right
away) and to the left (O) to switch off.
English
11
KR_ESPRESSO_XP6025_NAFTA_8080011600-02 03/07/12 17:49 Page11

BEFORE FIRST USE
n Open the machine and remove all the plastic bags, boxes and papers protecting the different parts.
Never leave the plastic bags in reach of children.
n Also remove any self-adhesive labels that may be on the product cover or any other information leaflets.
n Remove detachable parts and clean in warm soapy water. Do the same with the other accessories.
n Wipe the appliance body and stainless steel tray cover using a soft wet cloth.
IMPORTANT
Any action performed on the machine must be done with the power cord
disconnected. Never place parts or accessories in the dishwasher.
Never immerse the appliance, power cord or plug in any liquid.
n Ensure that all parts are completely dry before re-assembling:
n Place the cup rest grill on the water drip tray and slide into the housing.
n Reposition the water tank by pushing it backwards towards the edge of the machine.
Filling the water tank
To fill the tank:
n Remove the water tank by pulling it forwards using the central handle (fig.1).
n Fill the tank with fresh water without exceeding the maximum water level.
n Return the tank into its housing by sliding it along the cup rest grill (fig.2).
n Ensure that you have pushed it right to the end.
Draining and priming of the water circuit
Before using the machine for the first time it is imperative that you allow the water to circulate through all
of the appliance’s circuits to remove any possible air and for the pump to be activated.
With the water tank full:
n Connect the power cord.
n Check that the rotating control button is set to PENDING (●) and that the TEMPERATURE
SELECTION button (h3) is at .
n Switch the machine on by turning the START/STOP button to the right to the (I) setting.
n The TEMPERATURE light (h4) flashes slowly to indicate that the thermo block is heating up.
(Approximately 1 minute).
IMPORTANT
While the TEMPERATURE light (h4) flashes, none of the machine’s functions can be used.
n Place a sufficiently large enough container under the HOT WATER/STEAM spout.
n When the TEMPERATURE light (h4) goes off, turn the rotating control button to the HOT WATER
function (fig.3).
n The pump starts working at a steady rate and the hot water flows through the spout. Proceed with the
rinsing by circulating 1/4 of the full tank of fresh water through the spout.
n Stop the flow of water by simply returning the control button to PENDING (
●) (fig.4).
NOTE
A little steam may be released from the water tank. This is completely normal.
English
12
KR_ESPRESSO_XP6025_NAFTA_8080011600-02 03/07/12 17:49 Page12

Important
If water does not flow through the nozzle, the TEMPERATURE light flashes quickly and the pump
stops (pump not started). Refer to the section “Safety and visual warnings” and follow Scenario 1.
n Empty the container and place under the group head without using the filter holder.
n When the TEMPERATURE light (h4) goes off, briefly turn the Espresso Pre-programmed 2 cup
button to the right and let the Start other cycles of rinsing process through espresso PROGRAMME
2 until the tank has been emptied.
n The water circuit has now been drained and your machine is ready for use.
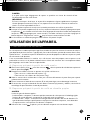
USING THE APPLIANCE
1. ESPRESSO PREPARATION
Espresso coffee is obtained by passing pressurized hot water through coffee grounds. The quality of the
taste depends on several factors: the type of coffee, the fineness of the ground coffee, the quantity of
ground coffee in the filter and the quality of the water…
The XP6025 espresso machine allows you to prepare a delicious espresso from ground coffee or a paper
coffee pod.
It is recommended that you turn the machine on 10 to 15 minutes before making your espresso
and pre-heat the cups on the cup warming plate. Your coffee will stay at the ideal temperature
longer in a cup that has been preheated.
A. Espresso made from ground coffee
n Choose the 1 cup filter or the 2 cup filter depending on the quantity of coffee required and
place in the filter holder. (fig.5).
n Fill the dosing spoon taking care to level it:
- 1-cup filter = 1 spoon of coffee (approximately 7 g)
- 2-cup filter = 2 spoons of coffee (approximately 14 g)
n Empty the contents of the spoon into the filter then gently shake to distribute the ground coffee
uniformly.
n Press down the ground coffee using the coffee press. If the coffee seems too light, press the coffee
more.
n If necessary, wipe the edge of the filter to remove any ground coffee that may be stuck and thus help
the filter holder lock into the Group head.
B. Espresso made from paper pods
IMPORTANT
There are 2 types of paper pods:
- The "compact" pod = special espresso coffee packaged in a rigid pod (approx. 45 mm in
diameter) composed of 7 g of compacted ground coffee.
- "Soft" pod = pod measuring in general 55 to 60 mm in diameter. Since this type of pod is not
specifically designed for espresso machines, you will obtain a weaker espresso than with a
“compact” pod.
n Use the 1 cup filter and insert either a compact or a soft pod.
English
13
KR_ESPRESSO_XP6025_NAFTA_8080011600-02 03/07/12 17:49 Page13

Important
Do not use the 2 cup filter with paper pods.
n Since the shape of the paper pods can differ from one brand to another, take care to center the pod in
the filter and push gently so that the sides fit.
IMPORTANT
If necessary, fold the sides of the paper pod inside the filter to prevent it from overhanging. This
will ensure that coffee will not leak outside the filter holder and prevent any damage.
C. Espresso function
Preparing the machine
n Check the water level in the tank and fill if necessary. (fig.1).
n Check that the rotating control button is set to PENDING (●) and that the TEMPERATURE
SELECTION button (h3) is at ESPRESSO/HOT WATER .
n Switch the machine on by turning the START/STOP button (h5) to the (I) setting.
n The TEMPERATURE light (h4) flashes.
IMPORTANT
While the TEMPERATURE light (h4) flashes, none of the machine’s functions can be used.
n Insert the filter holder into the group head by aligning the handle with the marking "INSERTION" and
lock by moving the filter holder from left to right (fig.6).
n Firmly lock the filter holder into place and make sure it is properly inserted by pushing it to the right as
far as it will go.
n Place 1 or 2 cups (as necessary) on the cup rest grill and check that it/they are correctly positioned
under the filter holder’s dispensing spout, using the cup positioning marks (fig.7).
Coffee preparation
n Wait until the TEMPERATURE light (h4) stops flashing, therefore indicating that the appliance has
reached the optimum temperature for making an espresso coffee. Your appliance is now ready for use.
n Push briefly espresso button or to the right to activate the ESPRESSO function. The pump
operates briefly to pre-wet the ground coffee and then stops for a few seconds and starts again to
dispense the coffee.
IMPORTANT
This pre-wetting process ensures even greater release of the aromas.
n When the volume of coffee has been reached, the appliance stops automatically.
IMPORTANT
By default, the volume of coffee for "1 cup" is 50 ml; for "2 cups" it is 100 ml.
n Wait a few seconds until the surplus of water in the thermo block has been drained (until the “suction
noise” has stopped).
NOTE
A little steam may be released from the water tank. This is completely normal.
n Remove the cup(s) then unlock the filter holder by turning it from right to left until it can be released
from the Group head.
n Drink the espresso immediately, so that its aromas and thick cream can be enjoyed to the full.
English
14
KR_ESPRESSO_XP6025_NAFTA_8080011600-02 03/07/12 17:49 Page14

Cleaning the filter and filter holder
n Empty the filter using a small spoon or carefully tapping it against a surface so that any waste can be
collected.
n Remove the filter.
Important
The metal parts on the filter holder and filter are very hot.
n Rinse the filter and filter holder under hot water and dry.
D. Pre-programmed settings
The stainless steel XP6025 automatic espresso machine allows you to pre-program 2 volumes of
espresso coffee very simply.
IMPORTANT
Two volumes of coffee can be programmed by default into your machine:
- Pre-program 1 (1 cup): 50 ml approximately
- Pre-program 2 (2 cups): 100 ml approximately
Programming 1 espresso cup
To pre-program the preparation of 1 espresso cup to your taste, follow the steps for preparing an espresso
(See section "Espresso function" page 18).
n Place the cup on the cup rest grill.
n When the TEMPERATURE light (h4) stops flashing, briefly press the Pre-programmed 1 cup espresso
button to the right and hold in this position. The espresso will begin to dispense.
n When the desired volume of coffee is reached, release the button. The dispensing of coffee is stopped
immediately and the personalized setting is stored in the memory.
Programming 2 cups of espresso
The steps are identical to those for programming 1 cup. Simply place 2 cups on the cup rest grill and
activate the Pre-programmed 2 cup espresso button rather than the Pre-programmed 1 cup button
.
IMPORTANT
The maximum volume that can be programmed for 1 cup is 150 ml; for 2 cups it is 250 ml
approximately.
n The programmed settings can be changed at any time by following the same procedure.
IMPORTANT
You can serve yourself from the espresso machine manually by interrupting the dispensing of coffee
at any time. To do so, briefly activate the espresso button or the previously activated button.
English
15
KR_ESPRESSO_XP6025_NAFTA_8080011600-02 03/07/12 17:49 Page15

2. HOT WATER FUNCTION
The production of hot water is ideal for preparing tea, infusions or pre-heating a container.
n Check the water level in the tank. (fig.1).
n Make sure that the frothing nozzle is securely fitted to the adjustable spout.
n Check that the rotating control button is set to PENDING (●) and that the TEMPERATURE
SELECTION button (h3) is at ESPRESSO/HOT WATER .
n Switch the machine on by turning the START/STOP (h5) button to the right to the (I) setting.
n The TEMPERATURE light (h4) flashes.
n Wait until the TEMPERATURE light (h4) stops flashing.
n Place a cup or bowl under the adjustable spout and make sure it is correctly positioned.
n Turn the control button to HOT WATER (fig.3). The hot water flows through the spout.
n When the required quantity of water is reached, turn the rotating control button to PENDING (
●) to
stop the flow of hot water (fig.4).
n The pump stops immediately and the spout circuit is closed.
IMPORTANT
It is possible that some steam may be released from the water tank. This is completely normal.
n You can now use the water collected to prepare your hot drink.
3. STEAM FUNCTION
Steam production is ideal for making the milk froth used in milk drinks (cappuccino, latte machiatto, hot
chocolate, etc.).
n Check the water level in the tank.
n Make sure that the frothing nozzle is securely fitted to the adjustable spout.
n Check that the rotating control button is set to PENDING (●).
n Switch the machine on by turning the START/STOP (h5) button to the right to the (I) setting.
n The TEMPERATURE light (h4) flashes.
IMPORTANT
If the rotating control button (d) is not at PENDING (●), the TEMPERATURE light (h4) flashes
quickly and heating does not occur.
n Turn the TEMPERATURE SELECTION button (h3) to STEAM .
n Wait until the TEMPERATURE light (h4) stops flashing.
n Place a container or empty cup under the spout.
n Open the spout circuit by turning the control button to STEAM to release any remaining water
that may be in the circuit (fig.3).
n Turn the control button back to the left to PENDING (
●) (fig.4).
n Pour the milk into a container and plunge the frothing spout into the container without touching the
bottom to pevent blocking the steam flow.
Advice
For a better result, use refrigerated milk, a cold stainless steel container and measure approximately
20 to 30 ml of milk per drink.
n Wait until the TEMPERATURE light (h4) stops flashing.
n Turn the control button back to STEAM (fig.3).
English
16
KR_ESPRESSO_XP6025_NAFTA_8080011600-02 03/07/12 17:49 Page16

IMPORTANT
You will then hear an intermittent noise which is the pump jump starting. This is completely normal
and necessary for the steam production. A little steam may be released from the water tank. This
is completely normal.
IMPORTANT
To prevent blocking the flow of steam, the spout should not touch the bottom of the container.
n As soon as the milk begins to move, slowly return the frothing nozzle back to the surface with a circular
motion. Plunge the spout into the container once again this time with an increasing circular movement.
n Do this several times until the milk turns into a thick and creamy froth
n When the required quantity of milk is reached, close the spout circuit by turning the control button to
PENDING (
●) (fig.4).
IMPORTANT
It is possible that some steam may be released from the water tank. This is completely normal.
n You can now remove the container from the spout.
Important
- Following the production of steam, the spout and its frothing nozzle are
extremely hot. Be careful of the risk of accidental burns.
- It is strongly recommended that the spout and frothing nozzle is cleaned
every time milky froth is made (See section "Cleaning and maintenance"
page 20). This operation prevents any risk of spreading micro bacteria.
Important
To change to the ESPRESSO function after the production of steam, it is
imperative that hot water is passesd through the spout (See "Hot water
function" page 16) to force the temperature of the thermo block to fall. The
ESPRESSO function will remain blocked if this operation is not performed
first.
4. DESCALING
Reminder: The guarantee does not cover faulty appliances on which descaling was not performed
regularly.
Important
Regular descaling is recommended, on average every 2 months, (hard water with 3
to 4 espresso/day). For less frequent use (1 to 2 espresso/day), descaling should
be performed every 3 months.
English
17
KR_ESPRESSO_XP6025_NAFTA_8080011600-02 03/07/12 17:49 Page17

Descaling of the ESPRESSO circuit
This operation is performed with the filter holder removed.
n Empty the water tank completely.
n Pour 500 ml of water into the tank with a packet of Espresso anti-scale agent available in stores or
250 ml of white vinegar mixed with 250 ml of water.
n Place a large container under the Group head
n Turn the machine on, check that the control button is set to PENDING (
●) and that the
TEMPERATURE SELECTION button (h3) is at ESPRESSO/HOT WATER . Wait until the
TEMPERATURE light (h4) stops flashing.
a) Activate the pump using the Pre-programmed 1 cup espresso button or the Pre-programmed
2 cup button to dispense approximately 50 ml in the container then stop the pump by
releasing the button used.
Important
By doing this, the personal setting for the volume of espresso linked to the
button used is changed.
Remember to reset this when you make your next espresso.
b) Immediately turn the START/STOP (h5) button to "O" to switch off the machine (this must be
done before the suction noise so draining is triggered).
c) Let the solution rest for approximately 10 minutes in the case of the anti-scale agent (and 20
minutes for the vinegar mixture) to let the liquid act in the heating unit and at the entrance to
the Group head.
n Repeat steps a) to c) twice.
Descaling of the SPOUT circuit
The descaling of the SPOUT circuit is very similar to that of the ESPRESSO circuit.
n Place the container under the adjustable spout and position correctly.
n Turn the machine on, check that the control button is set to PENDING (
●) and that the
TEMPERATURE SELECTION button (h3) is at ESPRESSO/HOT WATER .
n Wait until the TEMPERATURE light (h4) stops flashing.
n Turn the rotating control button to the right to select the HOT WATER function (fig.3).
n Let the antiscale agent flow through the spout for a maximum of 20 seconds.
n Stop the flow by turning the rotating control button to PENDING (
●) (fig.4).
n Immediately switch off the machine by turning the START/STOP (h5) button to"O".
n Let the solution rest for the same length of time as for the ESPRESSO circuit.
n During this time, remove the remainder of the anti-scale agent contained in the tank and rinse thoroughly
with fresh water.
Rinsing of circuits
n Fill the tank with fresh water up to the maximum water level.
n Turn the machine on and wait until the TEMPERATURE light (h4) stops flashing.
n Get a large container to collect the water.
n Start rinsing by circulating a full tank of fresh water as follows:
- 3/4 of the tank through the ESPRESSO circuit
- 1/4 of the tank through the SPOUT circuit
English
18
KR_ESPRESSO_XP6025_NAFTA_8080011600-02 03/07/12 17:49 Page18

IMPORTANT
Once you have let the equivalent of a tank of fresh water circulate through the 2 circuits you can
be sure that there is no anti-scale agent left in the tank nor any residue taste resulting from its use.
5. SAFETY AND VISUAL WARNINGS
The control buttons on the XP6025 include a general safety device that prevents confirmation of any
operation if the correct temperature has not been reached:
- While the TEMPERATURE light (h4) flashes, none of the buttons (except START/STOP) can be used.
Important
The machine is also equipped with visual warnings advising of any misuse of your
machine.
Scenario 1: detection of a fault in the water tank
In ESPRESSO or HOT WATER mode, when the TEMPERATURE light (h4) flashes quickly and the pump
stops, your machine has detected that the water in the tank is at the minimum level and warns you that the
tank is close to empty.
In this case:
1. Turn the rotating control button to the PENDING position (
●) (if not already at this setting).
2. Switch the machine off by turning the START/STOP button (h5) to the (0) setting.
3. Empty the remaining water in the tank and re-fill then re-position correctly (fig.2).
4. Switch the machine on again by turning the START/STOP button (h5) to the (I) setting.
5. Wait until the TEMPERATURE light (h4) stops flashing.
6. Let the water run through the HOT WATER/STEAM spout (fig.3) for approximately 20 seconds
(See section "Hot water function" page 16).
Note:
If the pump has not started completely, the TEMPERATURE light (h4) will flash again (quickly or
normally).
In this case, switch the machine off again. Wait a few seconds then turn it on again and restart. It
may be that you have to repeat these operations 2 or 3 times for the pump to be completely
operational again.
Scenario 2: rotating selector incorrectly positioned
If the TEMPERATURE light (h4) flashes quickly when your turn your machine on, this means that the
rotating control button (d) is not set to PENDING (
●) and that the thermo block cannot be heated.
In this case, turn the control button to PENDING (●) (fig.4).
6. AUTOMATIC STANDBY
For safety and energy saving reasons, the XP6025 espresso machine is equipped with automatic standby:
n Your machine will automatically switch to standby when it has not been used for more than 30 minutes.
The TEMPERATURE light (h4) will remain lit but less bright. The main electricity supply to your machine
(thermo block heating included) is interrupted.
n To restart the machine, turn the START/STOP button to 0. Wait a few seconds and switch the machine
back on by turning the START/STOP button to (I).
English
19
KR_ESPRESSO_XP6025_NAFTA_8080011600-02 03/07/12 17:49 Page19

7. CLEANING AND MAINTENANCE
To ensure that your KRUPS Espresso Machine works for many years, we advise you to perform regular
maintenance.
Important
- Before any cleaning, disconnect the machine’s power cord and ensure that the
machine is cold.
- None of the machine’s parts can be put in the dishwasher.
Regular cleaning of filters and filter holder
n After each use, clean the filter and the filter holder under warm water.
n Regularly check that the sieves at the bottom of the filters are not blocked. If necessary, use a fine
needle (not supplied) to unblock the holes. You can also wipe the upper surface of the sieves using a
synthetic brush and run the filters under warm water to remove any dirt.
Clean the filters thoroughly
If you notice a problem dispensing coffee, it may be that the filter is blocked. In this case, clean thoroughly:
n Using a cross recess unscrew the central screw.
n Remove the stainless steel sieve.(fig.9).
n Clean all the parts in warm water.
n Hold to the light to check that there is no residue blocking the holes. If so, clean more thoroughly taking
care to remove any particles using a synthetic brush or a fine needle.
Important
Ensure that the different parts are dry before assembling:
place the sieve in the filter and tighten the screw.
Cleaning the Group head
n The base of the group head must be cleaned regularly using a non-abrasive cloth soaked in water. This is
to remove all remaining coffee grounds from the sieve and in the filter holder housing system.
n Residual coffee grounds can also get blocked in the group head’s peripheral cylinder. In this case, this can
be removed using a small fine object which is not pointed or a toothpick.
IMPORTANT
You are advised to operate your machine regularly with the filter holder in place but without coffee,
to remove any coffee remains.
Cleaning the adjustable spout and frothing nozzle
It is highy recommended that you clean the spout and frothing nozzle after each time you froth milk.
Important
Ensure that the spout and its nozzle have cooled down before performing any
maintenance.
n Remove the frothing nozzle from the spout by turning it fully then pull the part to release (fig.9).
n Dip the frothing nozzle in very hot water to ensure that any milk residue is completely removed.
IMPORTANT
If any of the milk froth has dried up around the frothing nozzle, dip it in a container of water overnight
to soften the residue.
English
20
KR_ESPRESSO_XP6025_NAFTA_8080011600-02 03/07/12 17:49 Page20

n Clean the outside of the plastic tube of the nozzle with hot water.
n If necessary, unblock the internal steam duct by inserting the needle supplied (t) into the nozzle hole and
running some hot water or steam through the plastic tube (See sections "Hot water function" page 15
or "Steam function" page 15).
n Ensure that all parts are completely dry.
n We also recommend that you use this needle to unblock the holes in the filters and the small hole at
the top of the detachable metal steam foam nozzle (fig 10).
n Carefully fit the special cappuccino nozzle by positioning the pins in the holes and rotating them anti-
clockwise until they lock into place (fig.11).
IMPORTANT
These operations are essential to prevent any risk of spreading micro bacteria.
Cleaning the water tank
n Remove and clean the water tank every day. Rinse with clear water and re-position ensuring that it is
correctly lodged in its housing.
n If a layer of limescale should form on the tank walls, descale using a mixture of water and white vinegar.
Leave to rest for 1 hour.
n Wipe with a non-abrasive sponge and rinse thoroughly.
Cleaning the cup rest grill
n Remove the cup rest grill by moving it upwards. (fig.12).
n Wash with warm soapy water.
n Rinse and dry carefully.
Cleaning the water drip tray
n Remove the water drip tray by sliding it forwards (fig.13).
n Remove the cup rest grill (fig.12).
n Clean under warm water and dry thoroughly.
IMPORTANT
The water level indicator can be removed and re-attached using the clips.
n Clean the stainless steel cover using a non-abrasive slightly damp cloth. Dry.
n Re-assemble the tray .
n Reposition the cup rest grill.
Cleaning the appliance body, the cup warming plate
These parts of the appliance are cleaned using a non-abrasive and slightly wet cloth.
Important
Take care not to allow water on the control panel.
Any other servicing should be performed by an authorized service representative.
Important
Do not pour an espresso into a cup that is cold. This will cause the temperature of the espresso to
cool too quickly. It is recommended that you turn on your machine 10 to 15 minutes before making
the espresso and rest the cups on the cup warming plate. It heats up quickly and reaches a
temperature that is sufficiently high enough to heat the cups quickly and efficiently.
English
21
KR_ESPRESSO_XP6025_NAFTA_8080011600-02 03/07/12 17:49 Page21

English
22
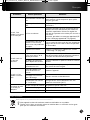
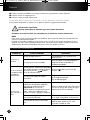
8. TROUBLESHOOTING GUIDE
Problems Probable causes Solutions
The appliance does
not work.
The power supply has been
cut off.
Check that there is current at the socket.
The machine is not on.
Activate the START/STOP button and check that
the temperature light is flashing.
The heating unit
does not heat up.
The TEMPERATURE light
flashes quickly as the
rotating control button (d) is
set to during heating.
Turn the rotating control button to PENDING
(●).
The machine is on
automatic standby.
Exit standby mode by activating the
START/STOP button.
Coffee, hot water or
steam is not
dispensed.
The water tank is empty
(this is indicated by the rapid
flashing of the
TEMPERATURE light (h4).)
Important: if it becomes
empty during operation, the
pump becomes very noisy.
Stop the function
immediately or switch the
machine off.
Fill the water tank. See the “Draining the water
circuit” paragraph to restart the pump.
The water tank is not
positioned correctly.
Remove the tank and reposition it correctly.
The coffee is ground too
finely.
Check your grind setting on your grinder and
readjust it to a coarser grind.
There is too much coffee in
the filter.
Use the quantity indicated in the instructions.
The filter is blocked.
Dip the filter in soapy water to clean it; gently scrub
to remove superficial dirt. Use a fine needle to re-
move any dirt, limescale and rinse under clear water.
If necessary, perform more thorough cleaning (See
section “Clean the filters thoroughly" on page 20).
The heating unit is still too
hot following steam
production.
It is imperative that you let the hot water flow
through the spout to lower the temperature
of the thermo block.
The appliance has
limescale.
Completely descale the appliance (See section
“Descaling” on page 17).
The coffee flows
through the panels
on the filter holder.
The filter holder is not
securely attached to the
Group head.
Tighten the filter holder to the Group head.
Locking of the filter holder will get easier after the
first uses.
The edges of the paper
pods overlap the filter.
Center the pod and fold the edges inside the
filter.
The joint for the Group
head is worn.
Get a professional from an Approved Service
Center to replace the joint.
KR_ESPRESSO_XP6025_NAFTA_8080011600-02 03/07/12 17:49 Page22
La page est en cours de chargement...
La page est en cours de chargement...
La page est en cours de chargement...
La page est en cours de chargement...
La page est en cours de chargement...
La page est en cours de chargement...
La page est en cours de chargement...
La page est en cours de chargement...
La page est en cours de chargement...
La page est en cours de chargement...
La page est en cours de chargement...
La page est en cours de chargement...
La page est en cours de chargement...
La page est en cours de chargement...
La page est en cours de chargement...
La page est en cours de chargement...
La page est en cours de chargement...
La page est en cours de chargement...
La page est en cours de chargement...
La page est en cours de chargement...
La page est en cours de chargement...
La page est en cours de chargement...
La page est en cours de chargement...
La page est en cours de chargement...
La page est en cours de chargement...
La page est en cours de chargement...
La page est en cours de chargement...
La page est en cours de chargement...
La page est en cours de chargement...
La page est en cours de chargement...
La page est en cours de chargement...
La page est en cours de chargement...
La page est en cours de chargement...
La page est en cours de chargement...
La page est en cours de chargement...
La page est en cours de chargement...
La page est en cours de chargement...
La page est en cours de chargement...
La page est en cours de chargement...
La page est en cours de chargement...
La page est en cours de chargement...
La page est en cours de chargement...
La page est en cours de chargement...
La page est en cours de chargement...
La page est en cours de chargement...
La page est en cours de chargement...
La page est en cours de chargement...
-
 1
1
-
 2
2
-
 3
3
-
 4
4
-
 5
5
-
 6
6
-
 7
7
-
 8
8
-
 9
9
-
 10
10
-
 11
11
-
 12
12
-
 13
13
-
 14
14
-
 15
15
-
 16
16
-
 17
17
-
 18
18
-
 19
19
-
 20
20
-
 21
21
-
 22
22
-
 23
23
-
 24
24
-
 25
25
-
 26
26
-
 27
27
-
 28
28
-
 29
29
-
 30
30
-
 31
31
-
 32
32
-
 33
33
-
 34
34
-
 35
35
-
 36
36
-
 37
37
-
 38
38
-
 39
39
-
 40
40
-
 41
41
-
 42
42
-
 43
43
-
 44
44
-
 45
45
-
 46
46
-
 47
47
-
 48
48
-
 49
49
-
 50
50
-
 51
51
-
 52
52
-
 53
53
-
 54
54
-
 55
55
-
 56
56
-
 57
57
-
 58
58
-
 59
59
-
 60
60
-
 61
61
-
 62
62
-
 63
63
-
 64
64
-
 65
65
-
 66
66
-
 67
67


Krups XP602050 Manuel utilisateur
- Catégorie
- Cafetières
- Taper
- Manuel utilisateur
- Ce manuel convient également à
dans d''autres langues
- English: Krups XP602050 User manual
- español: Krups XP602050 Manual de usuario
