
SKINANDE
GB
DE
FR
IT


ENGLISH 4
DEUTSCH 20
FRANÇAIS 37
ITALIANO 60

Contents
Safety instructions 4
Product description 6
Control panel 6
Programmes 7
Options 7
Before first use 8
Daily use 10
Hints and tips 12
Care and cleaning 13
Troubleshooting 14
Technical information 16
Environment concerns 17
IKEA GUARANTEE 17
Subject to change without notice.
Safety instructions
Before the installation and use of the appli-
ance, carefully read the supplied instruc-
tions. The manufacturer is not responsible if
an incorrect installation and use causes inju-
ries and damages. Always keep the instruc-
tions with the appliance for future reference.
Only a qualified service engineer can repair
this appliance. Use only original spare
parts.
To prevent injury and damage to the appli-
ance, do not try to repair the appliance. Al-
ways contact the After Sales Service.
Children and vulnerable people safety
Warning! Risk of suffocation, injury or
permanent disability.
• Do not let persons, children included, with
reduced physical sensory, reduced men-
tal functions or lack of experience and
knowledge use the appliance. They must
have supervision or instruction for the op-
eration of the appliance by a person who
is responsible for their safety. Do not let
children play with the appliance.
• Keep all packaging away from children.
• Keep all detergents away from children.
• Keep children and pets away from the
appliance door when it is open.
Installation
• Remove all the packaging.
• Do not install or use a damaged appli-
ance.
• Do not install or use the appliance where
the temperature is less than 0 °C.
• Obey the installation instruction supplied
with the appliance.
• Make sure that the appliance is installed
below and adjacent to safe structures.
Water connection
• Make sure not to cause damage to the
water hoses.
• Before you connect the appliance to new
pipes or pipes not used for a long time,
let the water flow until it is clean.
• The first time you use the appliance,
make sure that there is no leakage.
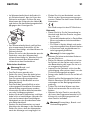
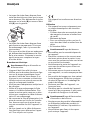
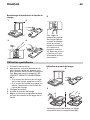
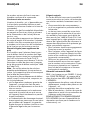
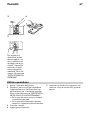
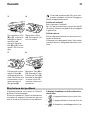
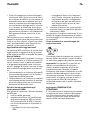
• The water inlet hose has a safety valve
that prevents the hose to loosen. To dis-
connect the hose, press the lever (B) and
turn the fastener (A) counterclockwise.
A
B
• The water inlet hose has an external
transparent sheath. If the hose is dam-
aged, the water in the hose becomes
dark.
• If the water inlet hose is damaged, imme-
diately disconnect the mains plug from
the mains socket. Contact the service to
replace the water inlet hose.
ENGLISH 4

Electrical connection
Warning! Risk of fire and electrical
shock.
• The appliance must be earthed.
• Make sure that the electrical information
on the rating plate agrees with the power
supply. If not, contact an electrician.
• Always use a correctly installed shock-
proof socket.
• Do not use multi-plug adapters and ex-
tension cables.
• Make sure not to cause damage to the
mains plug and to the mains cable. Con-
tact the service or an electrician to
change a damaged mains cable.
• Connect the mains plug to the mains
socket only at the end of the installation.
Make sure that there is access to the
mains plug after the installation.
• Do not pull the mains cable to disconnect
the appliance. Always pull the mains
plug.
•
This appliance complies with the E.E.C.
Directives.
Use
• This appliance is intended to be used in
household and similar applications such
as:
– Staff kitchen areas in shops, offices and
other working environments
–Farm houses
– By clients in hotels, motels and other
residential type environments
– Bed and breakfast type environments.
Warning! Risk of injury.
• Do not change the specification of this
appliance.
• Put knives and cutlery with sharp points in
the cutlery basket with the points down or
in a horizontal position.
• Do not keep the appliance door open
without supervision to prevent to fall on it.
• Do not sit or stand on the open door.
• Dishwasher detergents are dangerous.
Obey the safety instructions on the deter-
gent packaging.
• Do not drink and play with the water in
the appliance.
• Do not remove the dishes from the appli-
ance until the programme is completed.
There can be detergent on the dishes.
Warning! Risk of electrical shock, fire
or burns.
• Do not put flammable products or items
that are wet with flammable products in,
near or on the appliance.
• Do not use water spray and steam to
clean the appliance.
• The appliance can release hot steam if
you open the door while a programme
operates.
Disposal
Warning! Risk of injury or suffocation.
• Disconnect the appliance from the mains
supply.
• Cut off the mains cable and dispose of it.
• Remove the door catch to prevent chil-
dren and pets to get closed in the appli-
ance.
ENGLISH 5

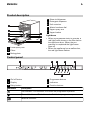
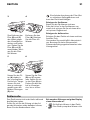
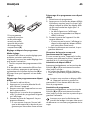
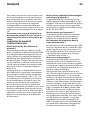
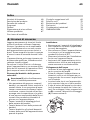
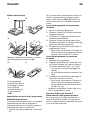
Product description
2
1
2
3
4
9
8
6
7
5
1
Lower spray arm
2
Filters
3
Rating plate
4
Rinse aid dispenser
5
Detergent dispenser
6
Salt container
7
Water hardness dial
8
Upper spray arm
9
Upper basket
Light beam
• When a programme starts to operate, a
red light beam shows on the floor below
the appliance door. When the pro-
gramme is completed the light beam
goes off.
• When the appliance has a malfunction,
the red light beam flashes.
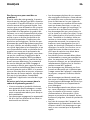
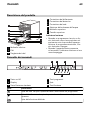
Control panel
1 2 4
6
53
A B C DE
1
On/off button
2
Display
3
Delay button
4
Programme buttons
5
Indicators
6
Function buttons
Indicators Description
Salt indicator. This indicator is off while the programme operates.
Rinse aid indicator. This indicator is off while the programme operates.
Multitab indicator.
ENGLISH 6

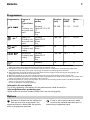
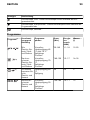
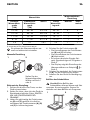
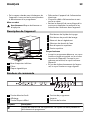
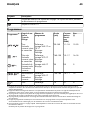
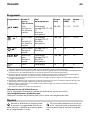
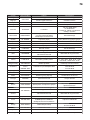
Programmes
Programme
1)
Degree of
soil
Type of load
Programme
phases
Duration
(min)
Energy
(kWh)
Water
(l)
2)
All
Crockery, cut-
lery, pots and
pans
Prewash
Wash 45 °C or 70
°C
Rinses
Dry
90-140 1.1-1.8 12-23
3)
Heavy soil
Crockery, cut-
lery, pots and
pans
Prewash
Wash 70 °C
Rinses
Dry
140-150 1.5-1.7 16-18
4)
Fresh soil
Crockery and
cutlery
Wash 60 °C
Rinse
30 0.9 9
5)
Normal soil
Crockery and
cutlery
Prewash
Wash 50 °C
Rinses
Dry
150-160 1.0-1.1 12
6)
All Prewash 12 0,1 4
1) The pressure and the temperature of the water, the variations of the mains supply, the options and the quantity of
dishes can change the programme duration and the consumption values.
2) The appliance senses the degree of soil and the quantity of items in the baskets. It automatically adjusts the
temperature and quantity of the water, the energy consumption and the programme duration.
3) This programme has a high temperature rinsing phase for better hygiene results. During the rinsing phase, the
temperature stays at 70 °C for 10 to 14 minutes.
4) With this programme you can wash a load with fresh soil. It gives good washing results in a short time.
5) This is the standard programme for test institutes. With this programme you have the most efficient use of water and
energy consumption for crockery and cutlery with normal soil.
6) Use this programme to quickly rinse the dishes. This prevents the remaining food to bond on the dishes and bad
odours to come out from the appliance.
Do not use detergent with this programme.
Information for test institutes
For all the necessary information for test performance. send an email to:
info.test@dishwasher-production.com
Write down the product number (PNC) that is on the rating plate.
Options
Activate or deactivate the options be-
fore the start of a programme. You
cannot activate or deactivate the options
while a programme operates.
If one or more options are set, make
sure that the related indicators are on
before the programme starts.
ENGLISH 7

Multitab
Activate this option only when you use the
combi detergent tablets.
This option deactivates the flow of rinse aid
and salt. The related indicators are off.
The programme duration can increase.
1. Press the on/off button to activate the
appliance. Make sure that the appli-
ance is in setting mode. Refer to ‘SET-
TING AND STARTING A PROGRAMME'.
2. Press and hold function buttons (D) and
(E) at the same time until the multitab in-
dicator comes on.
The option stays on until you deactivate it.
• Press and hold function buttons (D) and
(E) at the same time until the multitab in-
dicator goes off.
If you stop to use the combi detergent
tablets, before you start to use separately
detergent, rinse aid and dishwasher salt,
do these steps:
1. Deactivate the multitab option.
2. Set the water softener to the highest lev-
el.
3. Make sure that the salt container and
the rinse aid dispenser are full.
4. Start the shortest programme with a
rinsing phase, without detergent and
without dishes.
5. Adjust the water softener to the water
hardness in your area.
6. Adjust the released quantity of rinse aid.
Acoustic signals
The acoustic signals operate in these condi-
tions:
• The programme is completed.
• The level of the water softener is adjusted
electronically.
• The appliance has a malfunction.
Factory setting: on. You can deactivate
the acoustic signals.
Deactivating the acoustic signals
1. Press the on/off button to activate the
appliance. Make sure that the appli-
ance is in setting mode. Refer to ‘SET-
TING AND STARTING A PROGRAMME’.
2. Press and hold function buttons (B) and
(C) at the same time until the indicators
of function buttons (A), (B) and (C) flash.
3. Press function button (C),
• The indicators of function buttons (A)
and (B) go off.
• The indicator of function button (C)
continues to flash.
• The display shows the setting of the
acoustic signals.
On
Off
4. Press function button (C) to change the
setting.
5. Deactivate the appliance to confirm.
Before first use
1. Make sure that the set level of the water
softener agrees with the water hardness
in your area. If not, adjust the water
softener. Contact your local water au-
thority to know the water hardness in
your area.
2. Fill the salt container.
3. Fill the rinse aid dispenser.
4. Open the water tap.
5. Processing residues can stay in the ap-
pliance. Start a programme to remove
them. Do not use detergent and do not
load the baskets.
If you use the combi detergent tablets,
activate the multitab option.
ENGLISH 8

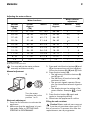
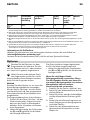
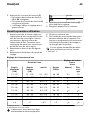
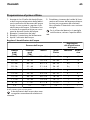
Adjusting the water softener
Water hardness
Water softener
adjustment
German
degrees
(°dH)
French
degrees
(°fH)
mmol/l Clarke
degrees
Manual Elec-
tronic
51 - 70 91 - 125 9.1 - 12.5 64 - 88
2
1)
10
43 - 50 76 - 90 7.6 - 9.0 53 - 63
2
1)
9
37 - 42 65 - 75 6.5 - 7.5 46 - 52
2
1)
8
29 - 36 51 - 64 5.1 - 6.4 36 - 45
2
1)
7
23 - 28 40 - 50 4.0 - 5.0 28 - 35
2
1)
6
19 - 22 33 - 39 3.3 - 3.9 23 - 27
2
1)
5
1)
15 - 18 26 - 32 2.6 - 3.2 18 - 22 1 4
11 - 14 19 - 25 1.9 - 2.5 13 - 17 1 3
4 - 10 7 - 18 0.7 - 1.8 5 - 12 1 2
< 4 < 7 < 0.7 < 5
1
2)
1
2)
1) Factory position.
2) Do not use salt at this level.
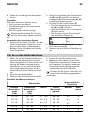
You must adjust the water softener
manually and electronically.
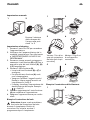
Manual adjustment
1
2
Turn the water
hardness dial to the
position 1 or 2.
Electronic adjustment
1. Press the on/off button to activate the
appliance.
2. Make sure that the appliance is in set-
ting mode. Refer to ‘SETTING AND
STARTING A PROGRAMME’.
3. Press and hold function buttons (B) and
(C) at the same time until the indicators
of function buttons (A), (B) and (C) flash.
4. Press function button (A).
• The indicators of function buttons (B)
and (C) go off.
• The indicator of function button (A)
continues to flash.
• The acoustic signals operate. Exam-
ple: five intermittent acoustic signals =
level 5.
• The display shows the setting of the
water softener. Example:
= level
5.
5. Press function button (A) again and
again to change the setting.
6. Deactivate the appliance to confirm.
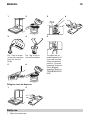
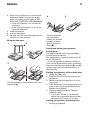
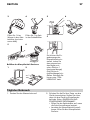
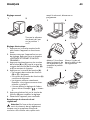
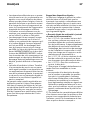
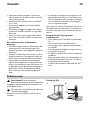
Filling the salt container
Caution! Water and salt can come out
from the salt container when you fill it.
Risk of corrosion. To prevent this, after the
replenishment, start a programme.
ENGLISH 9

1 2
3
Put 1 litre of water
in the salt container
(only for the first
time).
4
Put 1 kg of salt in
the salt container.
5
6
Filling the rinse aid dispenser
1
2
3 4
5
To adjust the re-
leased quantity of
rinse aid, turn the
selector between
position 1 (lowest
quantity) and posi-
tion 6 (highest
quantity). Refer to
‘TROUBLESHOOT-
ING’.
Daily use
1. Open the water tap.
ENGLISH 10

2. Press the on/off button to activate the
appliance. Make sure that the appli-
ance is in setting mode. Refer to ’SET-
TING AND STARTING A PROGRAMME’.
• If the salt indicator is on, fill the salt
container.
• If the rinse aid indicator is on, fill the
rinse aid dispenser.
3. Load the baskets.
4. Add the detergent.
5. Set and start the correct programme for
the type of load and soil.
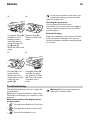
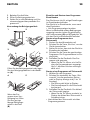
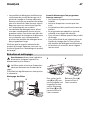
Using the detergent
1
2
3
A A
Put the detergent or the tablet in the com-
partment (A).
4
B
If the programme
has a prewash
phase, put a small
quantity of deter-
gent in compart-
ment (B).
5
Setting and starting a programme
Setting mode
The appliance must be in setting mode to
accept some operations.
The appliance is in setting mode when, af-
ter the activation:
• All the programme indicators come on.
If the control panel shows other conditions,
press and hold function buttons (B) and (C)
at the same time until the appliance is in
setting mode.
Starting a programme without delay start
1. Open the water tap.
2. Press the on/off button to activate the
appliance.
3. Make sure that the appliance is in set-
ting mode.
4. Press the button of the programme you
want to set. The programme duration
flashes in the display.
5. Close the appliance door. The pro-
gramme starts.
• If you open the door, the display
shows the programme duration that
decreases with steps of 1 minute.
Starting a programme with delay start
1. Set the programme.
ENGLISH 11

2. Press the delay button again and again
until the display shows the delay time
you want to set (from 1 to 19 hours).
• The delay time flashes in the display.
• The delay indicator is on.
3. Close the appliance door. The count-
down starts.
• If you open the door, the display
shows the countdown of the delay
start that decreases with steps of 1
hours.
• When the countdown is completed, the
programme starts.
Opening the door while the appliance
operates
If you open the door, the appliance stops.
When you close the door, the appliance
continues from the point of interruption.
Cancelling the delay start
Press and hold function buttons (B) and (C)
at the same time until:
•The delay indicator goes off.
• All the programme indicators come on.
When you cancel a delay start, the ap-
pliance goes back to setting mode.
You have to set the programme again.
Cancelling the programme
Press and hold function buttons (B) and (C)
at the same time until all the programme in-
dicators come on.
Make sure that there is detergent in
the detergent dispenser before you
start a new programme.
At the end of the programme
When the programme is completed, an in-
termittent acoustic signal operates and the
display shows 0.
1. Press the on/off button to deactivate the
appliance.
2. Close the water tap.
• If you do not deactivate the appliance,
after 3 minutes from the end of the pro-
gramme:
– All indicators go off
– The display shows 1 horizontal status
bar.
• This helps to decrease the energy con-
sumption.
Press one of the buttons (not the on/off
button), the display and the indicators
come on again.
• Let the dishes become cold before
you remove them from the appli-
ance. Hot dishes can be easily dam-
aged.
• First remove the items from the lower
basket, then from the upper basket.
• There can be water on the sides and
on the door of the appliance. Stain-
less steel becomes cool more quickly
than the dishes.
Hints and tips
The water softener
Hard water contains a high quantity of min-
erals that can cause damage to the appli-
ance and bad washing results. The water
softener neutralises these minerals.
The dishwasher salt keeps the water soften-
er clean and in good conditions. It is impor-
tant to set the right level of the water soft-
ener. This makes sure that the water soften-
er uses the correct quantity of dishwasher
salt and water.
Loading the baskets
Refer to the supplied leaflet with ex-
amples of the load of the baskets.
• Only use the appliance to wash items
that are dishwasher-safe.
• Do not put in the appliance items made
of wood, horn, aluminium, pewter and
copper.
ENGLISH 12

• Do not put in the appliance items that
can absorb water (sponges, household
cloths).
• Remove remaining food from the items.
• To remove easily remaining burned food,
soak pots and pans in water before you
put them in the appliance.
• Put hollow items (cups, glasses and pans)
with the opening down.
• Make sure that cutlery and dishes do not
bond together. Mix spoons with other
cutlery.
• Make sure that glasses do not touch oth-
er glasses.
• Put the small items in the cutlery basket.
• Put the light items in the upper basket.
Make sure that they do not move.
• Make sure that the spray arms can move
freely before you start a programme.
Using salt, rinse aid and detergent
• Only use salt, rinse aid and detergent for
dishwasher. Other products can cause
damage to the appliance.
• The rinse aid helps, during the last rinsing
phase, to dry the dishes without streaks
and stains.
• Combi detergent tablets contain deter-
gent, rinse aid and other added agents.
Be sure that these tablets are applicable
to the water hardness in your area. Refer
to the instructions on the packaging of the
products.
• Detergent tablets do not fully dissolve
with short programmes. To prevent deter-
gent residues on the tableware, we rec-
ommend that you use the tablets with
long programmes.
Do not use more than the correct quantity of
detergent. Refer to the instructions on the
detergent packaging.
Before starting a programme
Make sure that:
• The filters are clean and correctly instal-
led.
• The spray arms are not clogged.
• The position of the items in the baskets is
correct.
• The programme is applicable for the type
of load and for the degree of soil.
• The correct quantity of detergent is used.
• There is dishwasher salt and rinse aid
(unless you use combi detergent tablets).
• The cap of the salt container is tight.
Care and cleaning
Warning! Before maintenance,
deactivate the appliance and
disconnect the mains plug from the mains
socket.
Dirty filters and clogged spray arms
decrease the washing results.
Make a check regularly and, if necessary,
clean them.
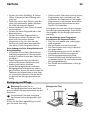
Cleaning the filters
1
2
A
C
B
ENGLISH 13

3
1
2
To remove filters (B)
and (C), turn the
handle counter-
clockwise and re-
move. Pull apart fil-
ter (B) and (C).
Wash the filters with
water.
4
A
Remove filter (A).
Wash the filter with
water.
5
A
D
Put filter (A) to its
initial position.
Make sure that it
assembles correctly
under the two
guides (D).
6
2
1
Assemble filters (B)
and (C). Put them
into position in filter
(A). Turn the handle
clockwise until it
locks.
An incorrect position of the filters can
cause bad washing results and dam-
age to the appliance.
Cleaning the spray arms
Do not remove the spray arms.
If the holes in the spray arms are clogged,
remove remaining parts of soil with a thin
pointed object.
External cleaning
Clean the appliance with a moist soft cloth.
Only use neutral detergents. Do not use
abrasive products, abrasive cleaning pads
or solvents.
Troubleshooting
The appliance does not start or it stops dur-
ing operation.
Before you contact the Service, refer to the
information that follows for a solution to the
problem.
With some problems, the display shows
an alarm code:
•
- The appliance does not fill with wa-
ter.
•
- The appliance does not drain the
water.
•
- The anti-flood device is on.
Warning! Deactivate the appliance
before you do the checks.
ENGLISH 14

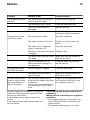
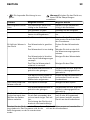
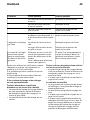
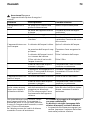
Problem Possible cause Possible solution
The programme does
not start.
The mains plug is not connec-
ted in the mains socket.
Connect the mains plug.
The appliance door is open. Close the appliance door.
The fuse in the fuse box is
damaged.
Replace the fuse.
The delay start is set. Cancel the delay start or wait
for the end of the countdown.
The appliance does
not fill with water.
The water tap is closed. Open the water tap.
The water pressure is too low. Contact your local water au-
thority.
The water tap is clogged or
there is limescale on it.
Clean the water tap.
The filter in the water inlet hose
is clogged.
Clean the filter.
The water inlet hose has a kink
or a bend.
Make sure that the position of
the hose is correct.
The anti-flood device is on.
There are water leakages in
the appliance.
Close the water tap and con-
tact the service.
The appliance does
not drain the water.
The sink spigot is clogged. Clean the sink spigot.
The water drain hose has a
kink or a bend.
Make sure that the position of
the hose is correct.
The salt indicator con-
tinues to stay on after
the replenishment of
the salt container.
This can occur when you are
using salt that needs more time
to dissolve.
There is no unwanted effect on
the performance of the appli-
ance.
If after 3 or 4 programmes, the
salt indicator continues to stay
on, contact the service.
After the checks are completed, activate the
appliance. The programme continues from
the point of interruption.
If the problem occurs again, contact the
service.
If the display shows other alarm codes, con-
tact the service.
If the washing and drying results are not
satisfactory
Whitish streaks or bluish layers on glasses
and dishes
• The released quantity of rinse aid is too
much. Adjust the rinse aid selector to a
lower position.
• The quantity of detergent is too much.
ENGLISH 15

Stains and dry water drops on glasses
and dishes
• The released quantity of rinse aid is not
sufficient. Adjust the rinse aid selector to
a higher position.
• The quality of the detergent can be the
cause.
Dishes are wet
• The programme is without a drying
phase or with a low temperature drying
phase.
• The rinse aid dispenser is empty.
• The quality of the rinse aid can be the
cause.
• The quality of the combi detergent tab-
lets can be the cause. Try a different
brand or activate the rinse aid dispenser
and use rinse aid together with the combi
detergent tablets.
Refer to ‘HINTS AND TIPS’ for other
possible causes.
Activating the rinse aid dispenser with the
multitab function activated
1. Press the on/off button to activate the
appliance. Make sure that the appli-
ance is in setting mode, refer to ‘SET-
TING AND STARTING A PROGRAMME'.
2. Press and hold function buttons (B) and
(C) at the same time until the indicators
of function buttons (A), (B) and (C) start
to flash.
3. Press function button (B).
• The indicators of function buttons (A)
and (C) go off.
• The indicator of function button (B)
continues to flash.
• The display shows the setting of the
rinse aid dispenser.
Off
On
4. Press function button (B) to change the
setting.
5. Deactivate the appliance to confirm the
setting.
6. Adjust the released quantity of rinse aid.
7. Fill the rinse aid dispenser.
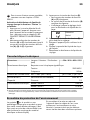
Technical information
Dimensions Width / Height / Depth (mm) 596 / 818 - 898 / 555
Electrical connection Refer to the rating plate.
Voltage 220-240 V
Frequency 50 Hz
Water supply pressure Min. / max. (bar / MPa) (0.5 / 0.05 ) / (8 / 0.8 )
Water supply
1)
Cold water or hot water
2)
max. 60 °C
Capacity Place settings 12
Power consumption Left-on mode 0.99 W
Off-mode 0.10 W
1) Connect the water inlet hose to a water tap with a 3/4'' thread.
2) If the hot water comes from alternative sources of energy, (e.g. solar panels, aeolian energy), use the hot water
supply to decrease energy consumption.
ENGLISH 16

Environment concerns
The symbol on the product or on its
packaging indicates that this product may
not be treated as household waste. Instead
it should be taken to the appropriate
collection point for the recycling of electrical
and electronic equipment. By ensuring this
product is disposed of correctly, you will
help prevent potential negative
consequences for the environment and
human health, which could otherwise be
caused by inappropriate waste handling of
this product. For more detailed information
about recycling of this product, please
contact your local council, your household
waste disposal service or the shop where
you purchased the product.
• Discard correctly the packaging material.
Recycle the materials with the symbol
.
IKEA GUARANTEE
How long is the IKEA guarantee valid?
This guarantee is valid for five (5) years
from the original date of purchase of Your
appliance at IKEA, unless the appliance is
named LAGAN in which case two (2) years
of guarantee apply. The original sales re-
ceipt is required as proof of purchase. If
service work is carried out under guarantee,
this will not extend the guarantee period for
the appliance,
Which appliances are not covered by the
IKEA five (5) years guarantee?
The range of appliances named LAGAN
and all appliances purchased in IKEA be-
fore 1st of August 2007
Who will execute the service?
IKEA service provider will provide the serv-
ice through its own service operations or
authorized service partner network.
What does this guarantee cover?
The guarantee covers faults of the appli-
ance, which have been caused by faulty
construction or material faults from the date
of purchase from IKEA. This guarantee ap-
plies to domestic use only. The exceptions
are specified under the headline “What is
not covered under this guarantee?” Within
the guarantee period, the costs to remedy
the fault e.g. repairs, parts, labour and trav-
el will be covered, provided that the appli-
ance is accessible for repair without special
expenditure. On these conditions the EU
guidelines (Nr. 99/44/EG) and the respec-
tive local regulations are applicable. Re-
placed parts become the property of IKEA.
What will IKEA do to correct the problem?
IKEA appointed service provider will exam-
ine the product and decide, at its sole dis-
cretion, if it is covered under this guarantee.
If considered covered, IKEA service provider
or its authorized service partner through its
own service operations, will then, at its sole
discretion, either repair the defective prod-
uct or replace it with the same or a compa-
rable product.
What is not covered under this
guarantee?
• Normal wear and tear.
ENGLISH 17

• Deliberate or negligent damage, dam-
age caused by failure to observe operat-
ing instructions, incorrect installation or by
connection to the wrong voltage, dam-
age caused by chemical or electro-chem-
ical reaction, rust, corrosion or water
damage including but not limited to dam-
age caused by excessive lime in the wa-
ter supply, damage caused by abnormal
environmental conditions.
• Consumable parts including batteries
and lamps.
• Non-functional and decorative parts
which do not affect normal use of the ap-
pliance, including any scratches and pos-
sible color differences.
• Accidental damage caused by foreign
objects or substances and cleaning or un-
blocking of filters, drainage systems or
soap drawers.
• Damage to the following parts: ceramic
glass, accessories, crockery and cutlery
baskets, feed and drainage pipes, seals,
lamps and lamp covers, screens, knobs,
casings and parts of casings. Unless such
damages can be proved to have been
caused by production faults.
• Cases where no fault could be found dur-
ing a technician’s visit.
• Repairs not carried out by our appointed
service providers and/or an authorized
service contractual partner or where non-
original parts have been used.
• Repairs caused by installation which is
faulty or not according to specification.
• The use of the appliance in a non-domes-
tic environment i.e. professional use.
• Transportation damages. If a customer
transports the product to their home or
other address, IKEA is not liable for any
damage that may occur during transport.
However, if IKEA delivers the product to
the customer's delivery address, then
damage to the product that occurs during
this delivery will be covered by this guar-
antee.
• Cost for carrying out the initial installation
of the IKEA appliance. However, if an
IKEA service provider or its authorized
service partner repairs or replaces the
appliance under the terms of this guaran-
tee, the service provider or its authorized
service partner will re-install the repaired
appliance or install the replacement, if
necessary.
This restriction do not apply to fault-free
work carried out by a qualified specialist
using our original parts in order to adapt
the appliance to the technical safety specifi-
cations of another EU country.
How country law applies
The IKEA guarantee gives You specific legal
rights, which covers or exceed local de-
mands. However these conditions do not
limit in any way consumer rights described
in the local legislation
Area of validity
For appliances which are purchased in one
EU country and taken to another EU coun-
try, the services will be provided in the
framework of the guarantee conditions nor-
mal in the new country. An obligation to
carry out services in the framework of the
guarantee exists only if the appliance com-
plies and is installed in accordance with:
• the technical specifications of the country
in which the guarantee claim is made;
• the Assembly Instructions and User Man-
ual Safety Information;
The dedicated After Sales Service for
IKEA appliances:
Please do not hesitate to contact IKEA After
Sales Service to:
1. make a service request under this guar-
antee;
2. ask for clarification on installation of the
IKEA appliance in the dedicated IKEA
kitchen furniture. The service won’t pro-
vide clarifications related to:
– the overall IKEA kitchen installation;
– connections to electricity (if machine
comes without plug and cable), to
water and to gas since they have to
be executed by an authorized serv-
ice engineer.
ENGLISH 18

3. ask for clarification on user manual con-
tents and specifications of the IKEA ap-
pliance.
To ensure that we provide you with the best
assistance, please read carefully the As-
sembly Instructions and/or the User Manual
section of this booklet before contacting us.
How to reach us if You need our service
Please refer to the last page of this manual
for the full list of IKEA appointed contacts
and relative national phone numbers.
Important! In order to provide You with a
quicker service, we recommend that You
use the specific phone numbers listed at the
end of this manual. Always refer to the
numbers listed in the booklet of the specific
appliance You need an assistance for.
Before calling us, assure that You have to
hand the IKEA article number (8 digit code)
for the appliance of which you need our
assistance.
Important! SAVE THE SALES RECEIPT! It is
Your proof of purchase and required for the
guarantee to apply. Note that the receipt
reports also the IKEA article name and
number (8 digit code) for each of the
appliances you have purchased.
Do You need extra help?
For any additional questions not related to
After Sales of your appliances, please con-
tact our nearest IKEA store call centre. We
recommend you read the appliance docu-
mentation carefully before contacting us.
ENGLISH 19

Inhalt
Sicherheitshinweise 20
Gerätebeschreibung 22
Bedienfeld 22
Programme 23
Optionen 24
Vor der ersten Inbetriebnahme 25
Täglicher Gebrauch 27
Tipps und Hinweise 29
Reinigung und Pflege 30
Fehlersuche 31
Technische Daten 33
Umwelttipps 34
IKEA GARANTIE 34
Änderungen vorbehalten.
Sicherheitshinweise
Lesen Sie die mitgelieferte Anleitung sorg-
fältig vor der Montage und dem ersten Ge-
brauch des Geräts durch. Der Hersteller ist
nicht dafür verantwortlich, wenn eine fehler-
hafte Montage oder Verwendung Verlet-
zungen oder Schäden verursacht. Bewah-
ren Sie die Anleitung zusammen mit dem
Gerät für den zukünftigen Gebrauch auf.
Das Gerät darf nur von qualifizierten Kun-
dendiensttechnikern repariert werden. Ver-
wenden Sie nur Originalersatzteile.
Versuchen Sie nicht, das Gerät selbst zu re-
parieren. Dies könnte zu Verletzungen und
zur Beschädigung des Geräts führen. Wen-
den Sie sich immer an den Kundendienst.
Sicherheit von Kindern und
schutzbedürftigen Personen
Warnung! Erstickungs- und
Verletzungsgefahr oder Gefahr einer
dauerhaften Behinderung.
• Lassen Sie keine Personen (einschließlich
Kinder) mit eingeschränkten physischen,
sensorischen oder geistigen Fähigkeiten,
mangelnder Erfahrung oder mangelndem
Wissen dieses Gerät benutzen. Solche
Personen müssen von einer Person beauf-
sichtigt oder bei der Bedienung des Ge-
räts angeleitet werden, die für ihre Si-
cherheit verantwortlich ist. Lassen Sie Kin-
der nicht mit dem Gerät spielen.
• Halten Sie das Verpackungsmaterial von
Kindern fern.
• Halten Sie alle Reinigungsmittel von Kin-
dern fern.
• Halten Sie Kinder und Haustiere vom ge-
öffneten Gerät fern.
Montage
• Entfernen Sie das Verpackungsmaterial.
• Stellen Sie ein beschädigtes Gerät nicht
auf und benutzen Sie es nicht.
• Stellen Sie das Gerät nicht an einem Ort
auf, an dem die Temperatur unter 0 °C
absinken kann, und benutzen Sie das Ge-
rät nicht, wenn die Temperatur unter 0 °C
absinken könnte.
• Halten Sie sich an die mitgelieferte Mon-
tageanleitung.
• Stellen Sie sicher, dass das Gerät unter
und an angrenzenden sicheren Konstruk-
tionen montiert ist.
Wasseranschluss
• Achten Sie darauf, die Wasserschläuche
nicht zu beschädigen.
• Bevor Sie neue oder lange Zeit nicht be-
nutzte Schläuche an das Gerät anschlie-
ßen, lassen Sie Wasser durch die Schläu-
che fließen, bis es sauber austritt.
• Achten Sie darauf, dass beim ersten Ge-
brauch des Geräts keine Undichtheiten
vorhanden sind.
DEUTSCH 20
La page charge ...
La page charge ...
La page charge ...
La page charge ...
La page charge ...
La page charge ...
La page charge ...
La page charge ...
La page charge ...
La page charge ...
La page charge ...
La page charge ...
La page charge ...
La page charge ...
La page charge ...
La page charge ...
La page charge ...
La page charge ...
La page charge ...
La page charge ...
La page charge ...
La page charge ...
La page charge ...
La page charge ...
La page charge ...
La page charge ...
La page charge ...
La page charge ...
La page charge ...
La page charge ...
La page charge ...
La page charge ...
La page charge ...
La page charge ...
La page charge ...
La page charge ...
La page charge ...
La page charge ...
La page charge ...
La page charge ...
La page charge ...
La page charge ...
La page charge ...
La page charge ...
La page charge ...
La page charge ...
La page charge ...
La page charge ...
La page charge ...
La page charge ...
La page charge ...
La page charge ...
La page charge ...
La page charge ...
La page charge ...
La page charge ...
La page charge ...
La page charge ...
La page charge ...
La page charge ...
-
 1
1
-
 2
2
-
 3
3
-
 4
4
-
 5
5
-
 6
6
-
 7
7
-
 8
8
-
 9
9
-
 10
10
-
 11
11
-
 12
12
-
 13
13
-
 14
14
-
 15
15
-
 16
16
-
 17
17
-
 18
18
-
 19
19
-
 20
20
-
 21
21
-
 22
22
-
 23
23
-
 24
24
-
 25
25
-
 26
26
-
 27
27
-
 28
28
-
 29
29
-
 30
30
-
 31
31
-
 32
32
-
 33
33
-
 34
34
-
 35
35
-
 36
36
-
 37
37
-
 38
38
-
 39
39
-
 40
40
-
 41
41
-
 42
42
-
 43
43
-
 44
44
-
 45
45
-
 46
46
-
 47
47
-
 48
48
-
 49
49
-
 50
50
-
 51
51
-
 52
52
-
 53
53
-
 54
54
-
 55
55
-
 56
56
-
 57
57
-
 58
58
-
 59
59
-
 60
60
-
 61
61
-
 62
62
-
 63
63
-
 64
64
-
 65
65
-
 66
66
-
 67
67
-
 68
68
-
 69
69
-
 70
70
-
 71
71
-
 72
72
-
 73
73
-
 74
74
-
 75
75
-
 76
76
-
 77
77
-
 78
78
-
 79
79
-
 80
80


dans d''autres langues
- italiano: IKEA SKINANDE Manuale utente
- English: IKEA SKINANDE User manual
- Deutsch: IKEA SKINANDE Benutzerhandbuch
Documents connexes
-
IKEA SKINANDE Manuel utilisateur
-
IKEA RENGÖRA Manuel utilisateur
-
-
-
-
-
-
-
-