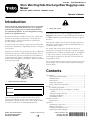
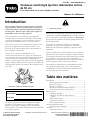
Toro 50cm Mulching/Side Discharge/Rear Bagging Lawn Mower Manuel utilisateur
- Catégorie
- Tondeuses à gazon
- Taper
- Manuel utilisateur

FormNo.3376-748-ASMRevA
50cmMulching/SideDischarge/RearBaggingLawn
Mower
ModelNo.29643—SerialNo.313000001andUp
Operator'sManual
Introduction
Thisrotary-blade,walk-behindlawnmowerisintended
tobeusedbyresidentialhomeowners.Itisdesigned
primarilyforcuttinggrassonwell-maintainedlawns
onresidentialproperties.Itisnotdesignedforcutting
brushorforagriculturaluses.
Readthisinformationcarefullytolearnhowtooperateand
maintainyourproductproperlyandtoavoidinjuryand
productdamage.Youareresponsibleforoperatingthe
productproperlyandsafely.
YoumaycontactTorodirectlyatwww.Toro.comforproduct
andaccessoryinformation,helpndingadealer,ortoregister
yourproduct.
Wheneveryouneedservice,genuineToroparts,oradditional
information,contactanAuthorizedServiceDealerorToro
CustomerServiceandhavethemodelandserialnumbersof
yourproductready.Figure1identiesthelocationofthe
modelandserialnumbersontheproduct.Writethenumbers
inthespaceprovided.
Figure1
1.Modelandserialnumberplate
ModelNo.
SerialNo.
Thismanualidentiespotentialhazardsandhassafety
messagesidentiedbythesafetyalertsymbol(Figure2),
whichsignalsahazardthatmaycauseseriousinjuryordeath
ifyoudonotfollowtherecommendedprecautions.
Figure2
1.Safetyalertsymbol
Thismanualusestwowordstohighlightinformation.
Importantcallsattentiontospecialmechanicalinformation
andNoteemphasizesgeneralinformationworthyofspecial
attention.
ThisproductcomplieswithallrelevantEuropeandirectives.
Fordetails,seetheseparateproductspecicDeclarationof
Conformity(DOC)sheet.
Formodelswithstatedenginehorsepower,thegross
horsepoweroftheenginewaslaboratoryratedbytheengine
manufacturerinaccordancewithSAEJ1940.Ascongured
tomeetsafety,emission,andoperatingrequirements,the
actualenginehorsepoweronthisclassoflawnmowerwill
besignicantlylower.
Donottamperwiththeenginecontrolsoralterthegovernor
speed;doingsomaycreateanunsafeconditionresultingin
personalinjury.
Contents
Introduction..................................................................1
GeneralLawnMowerSafety.....................................2
SoundPressure.......................................................3
SoundPower..........................................................3
Hand-ArmVibration...............................................3
SafetyandInstructionalDecals.................................4
Setup............................................................................5
1UnfoldingtheHandle............................................5
2InstallingtheRecoil-starterRopeintheRope
Guide.................................................................5
3FillingtheEnginewithOil......................................5
4ChargingtheBattery..............................................6
5InstallingtheFuse.................................................6
ProductOverview..........................................................7
Specications.........................................................7
Operation.....................................................................7
Attachments/Accessories.........................................7
FillingtheFuelTank................................................7
CheckingtheEngineOilLevel..................................8
AdjustingtheCuttingHeight....................................8
©2012—TheToro®Company
8111LyndaleAvenueSouth
Bloomington,MN55420
Registeratwww.Toro.com.
OriginalInstructions(EN)
PrintedintheUSA
AllRightsReserved
*3376-748-ASM*A

StartingtheEngine..................................................8
UsingtheSelf-propelDrive.......................................9
StoppingtheEngine................................................9
MulchingtheClippings............................................9
BaggingtheClippings..............................................9
DischargingtheClippings........................................10
OperatingTips......................................................10
Maintenance.................................................................12
RecommendedMaintenanceSchedule(s)......................12
PreparingforMaintenance.......................................12
ServicingtheAirCleaner.........................................12
ChangingtheEngineOil.........................................13
ChargingtheBattery...............................................13
ReplacingtheFuse..................................................14
ReplacingtheBlade................................................14
AdjustingtheSelf-propelDriveCable........................15
CleaningtheMower................................................15
Storage........................................................................16
PreparingtheMowerforStorage..............................16
FoldingtheHandle.................................................16
RemovingtheMowerfromStorage...........................16
Troubleshooting...........................................................17
Safety
Improperlyusingormaintainingthemowercanresult
ininjury.Toreducethepotentialforinjury,complywith
thesesafetyinstructions.
Torodesignedandtestedthismowerforreasonablysafe
service;however,failuretocomplywiththefollowing
instructionsmayresultinpersonalinjury.
Toensuremaximumsafety,bestperformance,and
togainknowledgeoftheproduct,itisessentialthat
youandanyotheroperatorofthemowerreadand
understandthecontentsofthismanualbeforethe
engineiseverstarted.Payparticularattentiontothe
safetyalertsymbol(Figure2)whichmeansCaution,
Warning,orDanger—“personalsafetyinstruction.”
Readandunderstandtheinstructionbecauseithasto
dowithsafety.Failuretocomplywiththeinstruction
mayresultinpersonalinjury.
GeneralLawnMowerSafety
ThefollowinginstructionshavebeenadaptedfromEN836.
Thiscuttingmachineiscapableofamputatinghandsandfeet
andthrowingobjects.Failuretoobservethefollowingsafety
instructionscouldresultinseriousinjuryordeath.
Training
•Readtheinstructionscarefully.Befamiliarwiththe
controlsandtheproperuseoftheequipment.
•Neverallowchildrenorpeopleunfamiliarwiththese
instructionstousethemower.Localregulationscan
restricttheageoftheoperator.
•Keepinmindthattheoperatororuserisresponsiblefor
accidentsorhazardsoccurringtootherpeopleortheir
property.
•Understandexplanationsforallpictogramsusedonthe
mowerorintheinstructions.
Gasoline
WARNING
Gasolineishighlyammable.Takethefollowing
precautions.
•Storefuelincontainersspecicallydesignedfor
thispurpose.
•Refueloutdoorsonlyanddonotsmokewhile
refueling.
•Addfuelbeforestartingtheengine.Never
removethecapofthefueltankoraddgasoline
whiletheengineisrunningorwhentheengine
ishot.
•Ifgasolineisspilled,donotattempttostartthe
enginebutmovethemachineawayfromthe
areaofspillageandavoidcreatinganysourceof
ignitionuntilgasolinevaporshavedissipated.
•Replaceallfueltankandcontainercapssecurely.
Preparation
•Whilemowing,alwayswearsubstantialfootwearandlong
trousers.Donotoperatethemachinewhenbarefootor
wearingopensandals.
•Thoroughlyinspecttheareawherethemachineistobe
used,andremoveallstones,sticks,wires,bones,and
otherforeignobjects.
•Beforeusing,alwaysvisuallyinspecttoseethatguardsand
safetydevices,suchasdeectorsand/orgrasscatchers,
areinplaceandworkingcorrectly.
•Beforeusing,alwaysvisuallyinspecttoseethatthe
blades,bladebolts,andcutterassemblyarenotwornor
damaged.Replacewornordamagedbladesandboltsin
setstopreservebalance.
Starting
Starttheenginecarefully,accordingtoinstructionsandwith
feetwellawayfromtheblade(s)andnotinfrontofthe
dischargechute.
Operation
•Nevermowwhilepeople,especiallychildren,orpetsare
nearby.
•Mowonlyindaylightoringoodarticiallight.
2

•Stayalertforholesintheterrainandotherhiddenhazards.
•Donotputhandsorfeetnearorunderrotatingparts.
Keepclearofthedischargeopeningatalltimes.
•Neverpickuporcarrythemachinewhiletheengineis
running.
•Useextremecautionwhenreversingorpullingthemower
towardsyou.
•Walk;neverrun.
•Slopes:
–Donotmowonexcessivelysteepslopes.
–Exerciseextremecautionwhenonslopes.
–Mowacrossthefaceofslopes,neverupanddown,
andexerciseextremecautionwhenchangingdirection
onslopes.
–Alwaysbesureofyourfootingonslopes.
•Reducespeedonslopesandinsharpturnstoprevent
overturningorlossofcontrol.
•Stopthebladeifthemachinehastobetiltedfor
transportationwhencrossingsurfacesotherthangrass
andwhentransportingthemachine.
•Donotoperatetheengineinaconnedspacewhere
dangerouscarbonmonoxidefumescancollect.
•Stoptheengine
–wheneveryouleavethemachine.
–beforerefueling.
–beforeremovingthegrasscatcher.
–beforemakingheightadjustmentunlessadjustment
canbemadefromtheoperator'sposition.
•Stoptheengineanddisconnectthesparkplugwire
–beforeclearingblockagesoruncloggingchute.
–beforechecking,cleaning,orservicingthemachine.
–afterstrikingaforeignobject,inspectthemachine
fordamageandmakerepairsbeforerestartingand
operatingthemachine.
–ifthemachinestartstovibrateabnormally(check
immediately).
•Lightningcancausesevereinjuryordeath.Ifyousee
lightningorhearthunderinthearea,donotoperatethe
machine;seekshelter.
•Watchoutfortrafcwhencrossingornearroadways.
MaintenanceandStorage
•Keepallnuts,bolts,andscrewstighttobesurethe
machineisinsafeworkingcondition.
•Donotusepressurecleaningequipmentonthemachine.
•Neverstorethemachinewithgasolineinthetankand
insideabuildingwherefumescanreachanopename
orspark.
•Allowtheenginetocoolbeforestoringinanyenclosure.
•Toreducetheriskofre,keeptheengine,silencer,
batterycompartment,andgasolinestorageareafreeof
grass,leaves,orexcessivegrease.
•Checkgrasscatchercomponentsandthedischargeguard
frequentlyandreplacewithmanufacturer'srecommended
parts,whennecessary.
•Replacewornordamagedpartsforsafety.
•Replacefaultysilencers.
•Ifthefueltankhastobedrained,dothisoutdoors.
•Donotchangetheenginegovernorsettingsoroverspeed
theengine.Operatinganengineatexcessivespeedcan
increasethehazardofpersonalinjury.
•Onmultibladedmachines,usecaution,asrotatingone
blademaycauseotherstorotate.
•Becarefulduringadjustmentofthemowertoprevent
entrapmentofthengersbetweenmovingbladesand
xedpartsofthemower.
•Toensurethebestperformanceandsafety,
purchaseonlygenuineTororeplacementpartsand
accessories.Donotuse
willt
partsandaccessories;
theymaycauseasafetyhazard.
SoundPressure
Thismachinehasasoundpressurelevelattheoperator’s
earof88dBA,whichincludesanUncertaintyValue(K)of
1dBA.Thesoundpressurelevelwasdeterminedaccording
totheproceduresoutlinedinEN836.
SoundPower
Thismachinehasaguaranteedsoundpowerlevelof98dBA,
whichincludesanUncertaintyValue(K)of1dBA.Thesound
powerlevelwasdeterminedaccordingtotheprocedures
outlinedinISO11094.
Hand-ArmVibration
Measuredvibrationlevelforthelefthand=3.9m/s
2
Measuredvibrationlevelfortherighthand=4.4m/s
2
UncertaintyValue(K)=2.2m/s
2
Themeasuredvaluesweredeterminedaccordingtothe
proceduresoutlinedinEN836.
3

SafetyandInstructional
Decals
Important:Safetyandinstructiondecalsarelocated
nearareasofpotentialdanger.Replacedamageddecals.
Manufacturer'sMark
1.Indicatesthebladeisidentiedasapartfromtheoriginal
machinemanufacturer.
112-8760
1.Thrownobjecthazard—keepbystandersasafedistance
fromthemachine.
2.Cutting/dismembermentofhandorfoot—stayawayfrom
movingparts.
117-4143
1.Warning—readtheOperator'sManual.
2.Thrownobjecthazard—keepbystandersasafedistance
fromthemachine.
3.Cutting/dismembermenthazardofhandorfoot,mower
blade—disconnectthesparkplugwireandreadthe
instructionsbeforeservicingorperformingmaintenance.
4.Cutting/dismembermenthazardofhandorfoot,mower
blade—stayawayfrommovingpartsandkeepallguards
andshieldsinplace.
5.Cutting/dismembermenthazardofhandorfoot,mower
blade—donotmowupanddownslopes,onlymowacross;
stopthemowerandengine,pickupdebrisbeforeoperating;
lookbehindanddownwhenreversing.
4

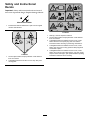
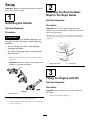
Setup
Important:Removeanddiscardtheprotectiveplastic
sheetthatcoverstheengine.
1
UnfoldingtheHandle
NoPartsRequired
Procedure
WARNING
Foldingorunfoldingthehandleimproperlycan
damagethecables,causinganunsafeoperating
condition.
•Donotdamagethecableswhenfoldingor
unfoldingthehandle.
•Ifacableisdamaged,contactanAuthorized
ServiceDealer.
1.Removethehandleknobsfromthemowerhousing
(Figure3).
Important:Routethecablestotheoutsideofthe
handleasyouinstallthehandle.
G020133
Figure3
1.Handleknob(2)
2.Movethehandletotheoperatingposition.
3.Installandtightenthehandleknobsthatyouremoved
instep1(Figure3).
2
InstallingtheRecoil-starter
RopeintheRopeGuide
NoPartsRequired
Procedure
Important:Tostarttheenginesafelyandeasily
wheneveryouusethemachine,installtherecoil-starter
ropeintheropeguide.
Holdtheblade-controlbartotheupperhandleandpullthe
recoil-starterropethroughtheropeguideonthehandle
(Figure4).
Figure4
1.Recoil-starterrope2.Ropeguide
3
FillingtheEnginewithOil
NoPartsRequired
Procedure
Important:Themachinedoesnotcomewithoilin
theengine.
1.Removethedipstick(Figure5).
5

G020008
Figure5
2.Slowlypouroilintotheoil-llholeuntiltheoillevel
reachestheFulllineonthedipstick(Figure5).Donot
overll.(Max.ll:0.59l(20oz.),type:10W-30or
SAE30detergentoilwithanAPIserviceclassication
ofSJorhigher.)
Note:Eachtimeyouchecktheoillevel,removethe
dipstickandwipeitclean,insertitintotheoilller
neck(butdonotscrewitin),thenremoveitagainand
checkthelevel(Figure5).
Note:Ifyouoverlltheengine,poursomeoiloutof
it;refertoChangingtheEngineOil(page13).
3.Installthedipsticksecurely.
Important:
Changetheengineoilaftertherst
5operatinghours
;changeitevery50hoursor
yearlythereafter,whichevercomesrst.Referto
ChangingtheEngineOil(page13).
4
ChargingtheBattery
NoPartsRequired
Procedure
RefertoChargingtheBattery(page13).
5
InstallingtheFuse
NoPartsRequired
Procedure
RefertoReplacingtheFuse(page14).
6

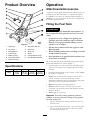
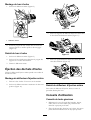
ProductOverview
G020142
1
2
3
5
4
6
7
8
9
10
11
12
13
Figure6
1.Sparkplug8.Self-propeldrivebar
2.Aircleaner9.Ignitionkey
3.Oilll/Dipstick10.Grassbag
4.Fueltankcap11.Battery
5.Batterycharger
12.Cuttingheightlevers(4)
6.Recoilstarthandle
13.Reardischargedeector
7.Bladecontrolbar
Specications
ModelWeightLengthWidthHeight
2964333kg
(73lbs)
145cm
(57inches)
56cm
(22inches)
99cm
(39inches)
Operation
Attachments/Accessories
AselectionofToroapprovedattachmentsandaccessoriesare
availableforusewiththemachinetoenhanceandexpand
itscapabilities.ContactyourAuthorizedServiceDealeror
Distributororgotowww.Toro.comforalistofallapproved
attachmentsandaccessories.
FillingtheFuelTank
DANGER
Gasolineisextremelyammableandexplosive.A
reorexplosionfromgasolinecanburnyouand
others.
•Topreventastaticchargefromignitingthe
gasoline,placethecontainerand/ormachine
directlyonthegroundbeforelling,notina
vehicleoronanobject.
•Fillthetankoutdoorswhentheengineiscold.
Wipeupspills.
•Donothandlegasolinewhensmokingoraround
anopenameorsparks.
•Storegasolineinanapprovedfuelcontainer,out
ofthereachofchildren.
Fillthefueltankwithfreshunleadedregulargasolinefroma
majorname-brandservicestation(Figure7).
•Forbestresults,useonlyclean,fresh,unleadedgasoline
withanoctaneratingof87orhigher((R+M)/2rating
method).
•Oxygenatedfuelwithupto10%ethanolor15%MTBE
byvolumeisacceptable.
•Donotuseethanolblendsofgasoline,suchasE15
orE85,withmorethan10%ethanolbyvolume.
Performanceproblemsand/orenginedamagemayresult,
whichmaynotbecoveredunderwarranty.
•Donotusegasolinecontainingmethanol.
•Donotstorefueleitherinthefueltankorinfuel
containersoverthewinterunlessfuelstabilizerhasbeen
addedtothefuel.
•Donotaddoiltogasoline.
Important:Toreducestartingproblems,addfuel
stabilizertothefuelallseason,mixingitwithgasoline
lessthan30daysold.
1.Cleanaroundthefueltankcap,andremovethecap
fromthetank.
2.Fillthefueltank,leavingatleast1cm(1/2inch)from
thebottomoftheneckemptytoallowthegasoline
roomtoexpand(Figure7).
7

G020143
1
Figure7
1.1cm(1/2inch)
3.Installthefueltankcapandtightenitsecurelybyhand.
CheckingtheEngineOilLevel
ServiceInterval:Beforeeachuseordaily
1.Removethedipstick,wipeitclean,andinsertitintothe
oilllerneck,butdonotscrewitin(Figure8).
G020008
Figure8
2.Removethedipstickandchecktheoillevel(Figure8).
IftheoillevelisbelowtheAddmarkonthedipstick,
slowlypouroilintotheoil-llholetoraisetheoillevel
totheFullmarkonthedipstick.Donotoverll.(Max.
ll:0.65l(22oz.),type:10W-30orSAE30detergent
oilwithanAPIserviceclassicationofSJorhigher.)
Note:Ifyouoverlltheengine,poursomeoiloutofit
asdirected;refertoChangingtheEngineOil(page13).
3.Installthedipsticksecurely.
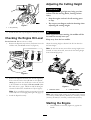
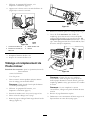
AdjustingtheCuttingHeight
WARNING
Adjustingthecuttingheightmaybringyouinto
contactwiththemovingblade,causingserious
injury.
•Stoptheengineandwaitforallmovingparts
tostop.
•Donotputyourngersunderthehousingwhen
adjustingthecuttingheight.
CAUTION
Iftheenginehasbeenrunning,themuferwillbe
hotandcanseverelyburnyou.
Keepawayfromthehotmufer.
Adjustthecuttingheightasdesired.Setallfourwheelsto
thesameheight.
Note:Toraisethemower,moveallthecuttingheightlevers
forward;tolowerthemower,movetheallthecuttingheight
leversrearward(Figure9).
G020140
Figure9
1.Raisethemower2.Lowerthemower
Note:Thecuttingheightsettingsare25mm(1inch);38mm
(1-1/2inch);51mm(2inches);64mm(2-1/2inches);76mm
(3inches);89mm(3-1/2inches);and102mm(4inches).
StartingtheEngine
1.Holdthebladecontrolbar(Figure10)againstthe
handle.
8

Figure10
1.Bladecontrolbar
2.Turntheignitionkey(Figure11)orpulltherecoilstart
handle(Figure12).
Figure11
Figure12
Note:Ifthemachinedoesnotstartafterseveral
attempts,contactanAuthorizedServiceDealer.
UsingtheSelf-propelDrive
Tooperatetheself-propeldrive,squeezetheself-propeldrive
bar(Figure13)towardthehandleandholdit.
Figure13
1.Self-propeldrivebar
Todisengagetheself-propeldrive,releasetheself-propel
drivebar.
Note:Themaximumself-propelgroundspeedisxed.To
reducethegroundspeed,increasethespacebetweenthe
self-propeldrivebarandthehandle.
StoppingtheEngine
ServiceInterval:Beforeeachuseordaily
Tostoptheengine,releasethebladecontrolbar(Figure14).
Important:Whenyoureleasethebladecontrolbar,
boththeengineandbladeshouldstopwithin3seconds.
Iftheydonotstopproperly,stopusingyourmower
immediatelyandcontactanAuthorizedServiceDealer.
Figure14
MulchingtheClippings
Themachinecomesfromthefactoryreadytomulchthe
grassandleafclippingsbackintothelawn.
Ifthegrassbagisonthemachine,removeitbeforemulching
theclippings;refertoRemovingtheGrassBag(page10).
BaggingtheClippings
Usethegrassbagwhenyouwanttocollectgrassandleaf
clippingsfromthelawn.
9

WARNING
Aworngrassbagcouldallowsmallstonesand
othersimilardebristobethrownintheoperator'sor
bystanders’directionandresultinseriouspersonal
injuryordeathtotheoperatororbystanders.
Checkthegrassbagfrequently.Ifitisdamaged,
installanewTororeplacementbag.
WARNING
Thebladeissharp;contactingthebladecanresult
inseriouspersonalinjury.
Stoptheengineandwaitforallmovingpartstostop
beforeleavingtheoperatingposition.
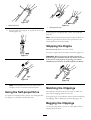
InstallingtheGrassBag
1.Liftupthereardeector(Figure15).
G020135
Figure15
1.Reardeector
2.Insertthegrassbaghandleontothenotchesonthe
handlebracketsandmakesurethatitiswellseated
(Figure15).
RemovingtheGrassBag
1.Liftupthereardeector(Figure15).
2.Liftthegrassbaghandleoutfromthenotchesonthe
handlebracketsandremovethebagfromthemachine.
3.Closethereardeector.
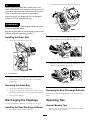
DischargingtheClippings
Usetherear-dischargedeectorforcuttingverytallgrass.
InstallingtheRear-DischargeDeector
1.Ifthebagisonthemachine,removeit.
2.Liftupthereardeectorandholdit(Figure16).
G020136
Figure16
3.Insertthetabontherear-dischargedeectorintothe
right-handslotinthereardeector(Figure17).
G020137
Figure17
4.Inserttherodontherear-dischargedeectorintothe
notchesonthemachine(Figure18).
G020138
Figure18
RemovingtheRear-DischargeDeector
Toremovetherear-dischargedeector,reversethesteps
above.
OperatingTips
GeneralMowingTips
•Cleartheareaofsticks,stones,wire,branches,andother
debristhatthebladecouldhit.
10

•Avoidstrikingsolidobjectswiththeblade.Never
deliberatelymowoveranyobject.
•Ifthemachinestrikesanobjectorstartstovibrate,
immediatelystoptheengine,disconnectthewirefrom
thesparkplug,andexaminethemachinefordamage.
•Forbestperformance,installanewbladebeforethe
cuttingseasonbegins.
•ReplacethebladewhennecessarywithaToro
replacementblade.
CuttingGrass
•Cutonlyaboutathirdofthegrassbladeatatime.Donot
cutbelowthe51mm(2inch)settingunlessthegrassis
sparseoritislatefallwhengrassgrowthbeginstoslow
down.RefertoAdjustingtheCuttingHeight.
•Whencuttinggrassover15cm(6inches)tall,mowatthe
highestcuttingheightsettingandwalkslower;thenmow
againatalowersettingforthebestlawnappearance.If
thegrassistoolong,themachinemaybecomeclogged
andcausetheenginetostall.
•Mowonlydrygrassorleaves.Wetgrassandleavestend
toclumpontheyardandcancausethemowertobecome
cloggedortheenginetostall.
WARNING
Wetgrassorleavescancauseseriousinjuryif
youslipandcontacttheblade.Mowonlyindry
conditions.
•Alternatethemowingdirection.Thishelpsdispersethe
clippingsoverthelawnforevenfertilization.
•Ifthenishedlawnappearanceisunsatisfactory,tryone
ormoreofthefollowing:
–Replacethebladeorhaveitsharpened.
–Walkataslowerpacewhilemowing.
–Raisethecuttingheightonthemachine.
–Cutthegrassmorefrequently.
–Overlapcuttingswathsinsteadofcuttingafullswath
witheachpass.
–Setthecuttingheightonthefrontwheelsonenotch
lowerthantherearwheels.Forexample,setthefront
wheelsat51mm(2inches)andtherearwheelsat64
mm(2-1/2inches).
CuttingLeaves
•Aftercuttingthelawn,ensurethathalfofthelawnshows
throughthecutleafcover.Youmayneedtomakemore
thanonepassovertheleaves.
•Iftherearemorethan13cm(5inches)ofleavesonthe
lawn,setthefrontcuttingheightoneortwonotches
higherthantherearcuttingheight.
•Slowdownyourmowingspeedifthemachinedoesnot
cuttheleavesnelyenough.
11

Maintenance
Note:Determinetheleftandrightsidesofthemachinefromthenormaloperatingposition.
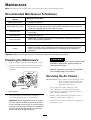
RecommendedMaintenanceSchedule(s)
MaintenanceService
Interval
MaintenanceProcedure
Aftertherst5hours
•Changetheengineoil.
Beforeeachuseordaily
•Checktheengineoillevel.
•Ensurethattheenginestopswithin3secondsafterreleasingthebladecontrolbar.
•Cleangrassclippingsanddirtfromunderthemower.
Every25hours
•Checktheaircleanerfordirty,loose,ordamagedparts,andcleanorreplacethem
ifnecessary.
Every50hours
•Changetheengineoil.
Every100hours
•Replacetheaircleanerelement(morefrequentlywhenoperatingthemachinein
dustyordirtyoperatingconditions).
Beforestorage
•Emptythefueltankbeforerepairsasdirectedandbeforeannualstorage.
Yearly
•Changetheengineoil.
•Replacethebladeorhaveitsharpened(morefrequentlyiftheedgedullsquickly).
•RefertoyourEngineOperator'sManualforanyadditionalyearlymaintenance
procedures.
Important:Refertoyour
EngineOperator'sManual
foradditionalmaintenanceprocedures.
PreparingforMaintenance
1.Stoptheengineandwaitforallmovingpartstostop.
2.Disconnectthesparkplugwirefromthesparkplug
(Figure19)beforeperforminganymaintenance
procedure.
Figure19
1.Sparkplugwire
3.Afterperformingthemaintenanceprocedure(s),
connectthesparkplugwiretothesparkplug.
Important:Beforetippingthemowertochange
theoilorreplacetheblade,allowthefueltankto
rundrythroughnormalusage.Ifyoumusttipthe
mowerpriortorunningoutoffuel,useahandfuel
pumptoremovethefuel.Alwaystipthemower
ontoitssidewiththedipstickdown.
WARNING
Tippingthemowermaycausethefueltoleak.
Gasolineisammable,explosiveandcan
causepersonalinjury.
Runtheenginedryorremovethegasoline
withahandpump;neversiphon.
ServicingtheAirCleaner
ServiceInterval:Every25hours/Yearly(whichevercomes
rst)—Checktheaircleanerfordirty,
loose,ordamagedparts,andcleanor
replacethemifnecessary.
Every100hours/Yearly(whichevercomes
rst)—Replacetheaircleanerelement(more
frequentlywhenoperatingthemachineindustyor
dirtyoperatingconditions).
1.Performthepre-maintenanceprocedures;referto
PreparingforMaintenance(page12).
2.Pressthebuttonontheaircleanercover(Figure20)
andopenthecover.
12

1
2
3
4
G020144
1
Figure20
1.Aircleanercover3.Aircleanerhousing
2.Aircleanerfoamelement
4.Button
3.Replacetheaircleanerelement.
4.Installtheaircleanercover.
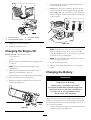
ChangingtheEngineOil
ServiceInterval:Aftertherst5hours
Every50hours
Yearly
1.Runtheengineafewminutesbeforechangingtheoil
towarmit.
Note:Warmoilowsbetterandcarriesmore
contaminants.
2.Performthepre-maintenanceprocedures;referto
PreparingforMaintenance(page12).
3.Tipthemachineontoitsside,withthedipstickdown.
4.Setanoil-drainpanunderthedipstick.
5.Removethedipstickanddraintheusedoilintoan
oil-drainpan(Figure21).
G020139
Figure21
6.Afterdrainingtheusedoil,returnthemachinetothe
normaloperatingposition.
7.Slowlypouroilintotheoil-llholeuntiltheoillevel
reachestheFulllineonthedipstick(Figure22).Do
notoverll.(Max.ll:0.59l(20oz.),type:10W-30or
SAE30detergentoilwithanAPIserviceclassication
ofSJorhigher.)
G020008
Figure22
Note:Eachtimeyouchecktheoillevel,removethe
dipstickandwipeitclean,insertitintotheoilller
neck(butdonotscrewitin),thenremoveitagainand
checktheoillevelonthedipstick.
Note:Ifyouoverlltheengine,drainsomeoftheoil
outoftheenginecrankcase.
8.Installthedipsticksecurely.
9.Disposeoftheusedoilproperlyatalocalrecycling
center.
ChargingtheBattery
WARNING
CALIFORNIA
Proposition65Warning
Batteryposts,terminals,andrelated
accessoriescontainleadandleadcompounds,
chemicalsknowntotheStateofCalifornia
tocausecancerandreproductiveharm.
Washhandsafterhandling.
Chargethebatteryfor24hoursinitially,thenmonthly(every
25starts)orasneeded.Alwaysusethechargerinasheltered
areaandchargethebatteryatroomtemperature(22°Cor
70°F)wheneverpossible.
1.Connectthechargertothemowerwireharnesslocated
belowtheignitionkey(Figure23).
13

Figure23
2.Plugthechargerintoawalloutlet.
Note:Whenthebatterynolongerholdsacharge,
recycleordisposeofthelead-acidbatteryaccording
tolocalcodes.
ReplacingtheFuse
Yourmowercomeswithafusethatprotectstheelectric
starter.Ifthebatterydoesnotchargeortheenginedoesnot
runwiththeelectricstarter,thefusemaybeblown.Replace
itwitha40-ampplug-intypefuse.
Important:Youcannotstartthemowerwiththeelectric
starterorchargethebatteryunlessyouinstallthefuse.
1.Unclipbothendsofthebatterycoverandremoveit
(Figure24).
G020141
Figure24
2.Insertthefuseintothefuseholder(Figure25).
Figure25
3.Installthebatterycover.
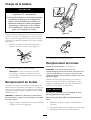
ReplacingtheBlade
ServiceInterval:Yearly
Important:
Youwillneedatorquewrenchtoinstallthe
bladeproperly
.Ifyoudonothaveatorquewrenchor
areuncomfortableperformingthisprocedure,contact
anAuthorizedServiceDealer.
Examinethebladewheneveryourunoutofgasoline.Ifthe
bladeisdamagedorcracked,replaceitimmediately.Ifthe
bladeedgeisdullornicked,haveitsharpenedorreplaceit.
WARNING
Thebladeissharp;contactingthebladecanresult
inseriouspersonalinjury.
Weargloveswhenservicingtheblade.
1.Disconnectthesparkplugwirefromthesparkplug.
RefertoPreparingforMaintenance.
2.Tipthemowerontoitsside,withtheairlterup.
3.Useablockofwoodtoholdthebladesteady.
4.Removetheblade(turnthebladebolt
counterclockwise),savingallthemounting
hardware.
5.Installthenewblade(turnthebladeboltclockwise)
andallmountinghardware(Figure26).
Figure26
Important:Positionthecurvedendsoftheblade
topointtowardthemowerhousing.
14

6.Useatorquewrenchtotightenthebladeboltto
82N-m(60ft-lb).
Important:Abolttorquedto82N-m(60ft-lb)is
verytight.Whileholdingthebladewithablock
ofwood,putyourweightbehindtheratchetor
wrenchandtightentheboltsecurely.Thisboltis
verydifculttoovertighten.
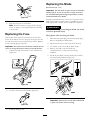
AdjustingtheSelf-propelDrive
Cable
Wheneveryouinstallanewself-propelcableorifthe
self-propeldriveisoutofadjustment,adjusttheself-propel
drivecable.
1.Loosenthecablesupportnut(Figure27).
Figure27
1.25to38mm(1to1-1/2
inches)
4.Cablesupportnut
2.Self-propeldrivebar5.Cablesupport
3.Cablejacket
2.Holdtheself-propeldrivebar25to38mm(1to1-1/2
inches)fromthehandle(Figure27).
3.Pulldownthecablejacket(towardthemower)until
thereisnoslackinthecable(Figure27).
4.Tightenthenutonthecablesupport.
5.Releasetheself-propeldrivebarandensurethatthe
cableisloose.
Note:Thecablemustbeloosewiththeself-propel
drivebarinthereleasedposition;otherwise,themower
maycreepwhenthebarisdisengaged.
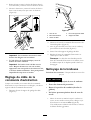
CleaningtheMower
ServiceInterval:Beforeeachuseordaily
WARNING
Themowermaydislodgematerialfromunderthe
mowerhousing.
•Weareyeprotection.
•Stayintheoperatingposition(behindthe
handle).
•Donotallowbystandersinthearea.
1.Withtheenginerunningonaatpavedsurface,spray
astreamofwaterinfrontoftherightrearwheel
(Figure28).
Thewaterwillsplashintothepathoftheblade,
cleaningouttheclippings.
Figure28
2.Whennomoreclippingscomeout,stopthewaterand
movethemowertoadryarea.
3.Runtheengineforafewminutestodrythehousing
topreventitfromrusting.
15

Storage
Storethemowerinacool,clean,dryplace.
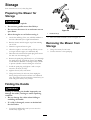
PreparingtheMowerfor
Storage
WARNING
Gasolinevaporscanexplode.
•Donotstoregasolinemorethan30days.
•Donotstorethemowerinanenclosurenearan
opename.
•Allowtheenginetocoolbeforestoringit.
1.Onthelastrefuelingoftheyear,addfuelstabilizerto
thefuelasdirectedbytheenginemanufacturer.
2.Runthemoweruntiltheenginestopsfromrunning
outoffuel.
3.Primetheengineandstartitagain.
4.Allowtheenginetorununtilitstops.Whenyoucan
nolongerstarttheengine,itissufcientlydry.
5.Disconnectthewirefromthesparkplugandconnect
thewireontotheretainingpost.
6.Removethesparkplug,add30ml(1oz.)ofoilthrough
thesparkplughole,andpullthestarterropeslowly
severaltimestodistributeoilthroughoutthecylinder
topreventcylindercorrosionduringtheoff-season.
7.Installthesparkplugandtightenitwithatorque
wrenchto20N-m(15ft-lb).
8.Tightenallnuts,bolts,andscrews.
9.Chargethebatteryfor24hours,thenunplugthe
batterychargerandstorethemowerinanunheated
area.Ifyoumuststorethemowerinaheatedarea,you
mustchargethebatteryevery90days.
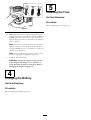
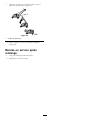
FoldingtheHandle
WARNING
Foldingorunfoldingthehandleimproperlycan
damagethecables,causinganunsafeoperating
condition.
•Donotdamagethecableswhenfoldingor
unfoldingthehandle.
•Ifacableisdamaged,contactanAuthorized
ServiceDealer.
1.Loosenthehandleknobsuntilyoucanmovethe
handlefreely(Figure29).
G020134
1
Figure29
1.Handleknob(2)
2.MovethehandleforwardasshowninFigure29.
RemovingtheMowerfrom
Storage
1.Chargethebatteryfor24hours.
2.Connectthewiretothesparkplug.
16

Troubleshooting
Problem
PossibleCauseCorrectiveAction
1.Thewireisnotconnectedtothespark
plug.
1.Connectthewiretothesparkplug.
2.Thefuelcapventholeisplugged.2.Cleanthefuelcapventholeorreplace
thefuelcap.
3.Thesparkplugispitted,fouled,or
incorrectlygapped.
3.Checkthesparkplugandadjustthe
gapifnecessary.Replacethespark
plugifitispitted,fouled,orcracked.
Theenginedoesnotstart.
4.Thefueltankisemptyorthefuel
systemcontainsstalefuel.
4.Drainand/orllthefueltankwith
freshgasoline.Iftheproblempersists,
contactanAuthorizedServiceDealer.
1.Thefuelcapventholeisplugged.1.Cleanthefuelcapventholeorreplace
thefuelcap.
2.Theairlterelementisdirtyandis
restrictingtheairow.
2.Cleantheairlterpre-cleanerand/or
replacethepaperairlter.
3.Theundersideofthemachinecontains
clippingsanddebris.
3.Cleanunderthemachine.
4.Thesparkplugispitted,fouled,or
incorrectlygapped.
4.Checkthesparkplugandadjustthe
gapifnecessary.Replacethespark
plugifitispitted,fouled,orcracked.
5.Theengineoillevelistoolow,toohigh,
orexcessivelydirty.
5.Checktheengineoil.Changetheoilif
itisdirty;addordraintheoiltoadjust
theoilleveltotheFullmarkonthe
dipstick.
Theenginestartshardorlosespower.
6.Thefueltankcontainsstalefuel.6.Drainandllthefueltankwithfresh
gasoline.
1.Thewireisnotconnectedtothespark
plug.
1.Connectthewiretothesparkplug.
2.Theairlterelementisdirtyandis
restrictingtheairow.
2.Cleantheairlterpre-cleanerand/or
replacethepaperairlter.
Theenginerunsrough.
3.Thesparkplugispitted,fouled,or
incorrectlygapped.
3.Checkthesparkplugandadjustthe
gapifnecessary.Replacethespark
plugifitispitted,fouled,orcracked.
1.Theundersideofthemachinehousing
containsclippingsanddebris.
1.Cleanunderthemachinehousing.
2.Theenginemountingboltsareloose.2.Tightentheenginemountingbolts.
3.Theblademountingnutsareloose.3.Tightentheblademountingnuts.
Themachineorenginevibrates
excessively.
4.Thebladeisbentorisoutofbalance.4.Balancetheblade.Ifthebladeisbent,
replaceit.
1.Youaremowinginthesamepattern
repeatedly.
1.Changethemowingpattern.
2.All4wheelsarenotatthesameheight.2.Placeall4wheelsatthesameheight.
3.Theundersideofthemachinehousing
containsclippingsanddebris.
3.Cleanunderthemachinehousing.
Thereisanunevencuttingpattern.
4.Thebladeisdull.
4.Sharpenandbalancetheblade.
1.Thereisdebrisunderthebeltcover.
1.Cleanthedebrisfromunderthebelt
cover.
Themachinedoesnotself-propel.
2.Theself-propeldrivecableisoutof
adjustmentorisdamaged.
2.Adjusttheself-propeldrivecable.
Replacethecableifnecessary.
17

Notes:
18

InternationalDistributorList
Distributor:
Country:
PhoneNumber:Distributor:
Country:
PhoneNumber:
AtlantisSuveSulamaSisstemleriLt
Turkey902163448674
MaquiverS.A.Colombia
5712364079
BalamaPrimaEngineeringEquip.HongKong85221552163
MaruyamaMfg.Co.Inc.
Japan81332522285
B-RayCorporation
Korea82325512076
AgrolancKft
Hungary3627539640
CascoSalesCompany
PuertoRico7877888383
Mountelda.s.CzechRepublic
420255704220
CeresS.A.CostaRica
5062391138
MunditolS.A.
Argentina541148219999
CSSCTurfEquipment(pvt)Ltd.SriLanka
94112746100
OslingerTurfEquipmentSA
Ecuador59342396970
CyrilJohnston&Co.
NorthernIreland442890813121
OyHakoGroundandGardenAb
Finland35898700733
EquiverMexico525553995444ParklandProductsLtd.NewZealand6433493760
FemcoS.A.Guatemala
5024423277
PratoVerdeS.p.A.
Italy390499128128
G.Y.K.CompanyLtd.
Japan81726325861
Prochaska&Cie
Austria4312785100
GeomechanikiofAthensGreece
30109350054
RTCohen2004Ltd.
Israel97298617979
GuandongGoldenStarChina
862087651338Riversa
Spain
34952837500
HakoGroundandGardenSweden
4635100000
ScSvendCarlsenA/S
Denmark4566109200
HakoGroundandGarden
Norway4722907760
SolvertS.A.S.
France33130817700
HayterLimited(U.K.)
UnitedKingdom441279723444
SpyprosStavrinidesLimitedCyprus
35722434131
HydroturfInt.CoDubai
UnitedArabEmirates97143479479
SurgeSystemsIndiaLimited
India911292299901
HydroturfEgyptLLC
Egypt2025194308T-MarktLogisticsLtd.Hungary3626525500
IrriamcPortugal351212388260ToroAustraliaAustralia61395807355
IrrigationProductsInt'lPvtLtd.India862283960789ToroEuropeNVBelgium3214562960
JeanHeybroekb.v.Netherlands31306394611
EuropeanPrivacyNotice
TheInformationToroCollects
ToroWarrantyCompany(Toro)respectsyourprivacy.Inordertoprocessyourwarrantyclaimandcontactyouintheeventofaproductrecall,weaskyou
tosharecertainpersonalinformationwithus,eitherdirectlyorthroughyourlocalTorocompanyordealer.
TheTorowarrantysystemishostedonserverslocatedwithintheUnitedStateswhereprivacylawmaynotprovidethesameprotectionasapplies
inyourcountry.
BYSHARINGYOURPERSONALINFORMATIONWITHUS,YOUARECONSENTINGTOTHEPROCESSINGOFYOURPERSONALINFORMATION
ASDESCRIBEDINTHISPRIVACYNOTICE.
TheWayToroUsesInformation
Toromayuseyourpersonalinformationtoprocesswarrantyclaims,tocontactyouintheeventofaproductrecallandforanyotherpurposewhichwetell
youabout.ToromayshareyourinformationwithToro'safliates,dealersorotherbusinesspartnersinconnectionwithanyoftheseactivities.Wewillnot
sellyourpersonalinformationtoanyothercompany.Wereservetherighttodisclosepersonalinformationinordertocomplywithapplicablelawsand
withrequestsbytheappropriateauthorities,tooperateoursystemsproperlyorforourownprotectionorthatofotherusers.
RetentionofyourPersonalInformation
Wewillkeepyourpersonalinformationaslongasweneeditforthepurposesforwhichitwasoriginallycollectedorforotherlegitimatepurposes
(suchasregulatorycompliance),orasrequiredbyapplicablelaw.
Toro'sCommitmenttoSecurityofYourPersonalInformation
Wetakereasonableprecautionsinordertoprotectthesecurityofyourpersonalinformation.Wealsotakestepstomaintaintheaccuracyandcurrent
statusofpersonalinformation.
AccessandCorrectionofyourPersonalInformation
Ifyouwouldliketorevieworcorrectyourpersonalinformation,pleasecontactusbyemailat[email protected].
AustralianConsumerLaw
AustraliancustomerswillnddetailsrelatingtotheAustralianConsumerLaweitherinsidetheboxoratyourlocalToroDealer.
374-0269RevF

TheToroWarranty
and
TheToroGTSStartingGuarantee
ConditionsandProductsCovered
TheToroCompanyanditsafliate,T oroWarrantyCompany,pursuant
toanagreementbetweenthem,jointlypromisetorepairfortheoriginal
purchaser
1
theToroProductlistedbelowifdefectiveinmaterialsor
workmanshiporiftheToroGTS(GuaranteedtoStart)enginewillnotstart
ontherstorsecondpull,providedtheroutinemaintenancerequiredin
theOperator'sManualhavebeenperformed.
Thefollowingtimeperiodsapplyfromthedateofpurchase:
ProductsWarrantyPeriod
WalkPowerMowers
•CastDeck
5yearsResidentialUse
2
90DaysCommercialUse
•Engine
5yearsGTSGuarantee,
ResidentialUse
3
•Battery2years
•SteelDeck
2yearsResidentialUse
2
90DaysCommercialUse
•Engine
2yearsGTSGuarantee,
ResidentialUse
3
TimeMasterMowers3yearsResidentialUse
2
90DaysCommercialUse
•Engine
3yearsGTSGuarantee,
ResidentialUse
3
•Battery2years
ElectricHandHeldProducts2yearsResidentialUse
2
NoWarrantyforCommercialUse
Snowthrowers
•SingleStage
2yearsResidentialUse
2
45DaysCommercialUse
•Engine
2yearsGTSGuarantee,
ResidentialUse
3
•TwoStage
3yearsResidentialUse
2
45DaysCommercialUse
•Chute,chutedeectorand
impellerhousingcover
Lifetime(originalowneronly)
5
ElectricSnowthrowers
2yearsResidentialUse
2
NoWarrantyforCommercialUse
AllRide-OnUnitsBelow
•Engine
Seeenginemanufacturer'swarranty
4
•Battery2yearsResidentialUse
2
•Attachments2yearsResidentialUse
2
DHLawn&GardenTractors
2yearsResidentialUse
2
90DaysCommercialUse
XLSLawn&GardenTractors
3yearsResidentialUse
2
90DaysCommercialUse
TimeCutter
3yearsResidentialUse
2
90DaysCommercialUse
TITANMowers3yearsor240hours
5
•Frame
Lifetime(originalowneronly)
6
ZMasterMowers—2000Series
4yearsor500hours
5
•Frame
Lifetime(originalowneronly)
6
1
OriginalPurchasermeansthepersonwhooriginallypurchasedtheT oroProduct.
2
Residentialusemeansuseoftheproductonthesamelotasyourhome.Useatmorethanone
locationisconsideredcommercialuseandthecommercialusewarrantywouldapply.
3
TheToroGTSStartingGuaranteedoesnotapplywhentheproductisusedcommercially.
4
SomeenginesusedonT oroProductsarewarrantedbytheenginemanufacturer.
5
Whicheveroccursrst.
6
LifetimeFrameWarranty-Ifthemainframe,consistingofthepartsweldedtogethertoformthe
tractorstructurethatothercomponentssuchastheenginearesecuredto,cracksorbreaksin
normaluse,itwillberepairedorreplaced,atToro'soption,underwarrantyatnocostforparts
andlabor.Framefailureduetomisuseorabuseandfailureorrepairrequiredduetorustor
corrosionarenotcovered.
Thiswarrantycoversthecostofpartsandlabor,butyoumustpay
transportationcosts.
Warrantymaybedeniedifthehourmeterisdisconnected,altered,or
showssignsofbeingtamperedwith.
OwnerResponsibilities
YoumustmaintainyourToroProductbyfollowingthemaintenance
proceduresdescribedintheOperator'sManual.Suchroutine
maintenance,whetherperformedbyadealerorbyyou,isatyourexpense.
InstructionsforObtainingWarrantyService
IfyouthinkthatyourToroProductcontainsadefectinmaterialsor
workmanship,followthisprocedure:
1.Contactyoursellertoarrangeserviceoftheproduct.Ifforany
reasonitisimpossibleforyoutocontactyourseller,youmaycontact
anyToroAuthorizedDistributortoarrangeservice.Seeattached
DistributorList.
2.Bringtheproductandyourproofofpurchase(salesreceipt)to
theservicingoutlet.Ifforanyreasonyouaredissatisedwiththe
servicingoutlet’sanalysisorwiththeassistanceprovided,contact
usat:
ToroCustomerCareDepartment,RLCDivision
ToroWarrantyCompany
8111LyndaleAvenueSouth
Bloomington,MN55420-1196
001–952–948–4707
ItemsandConditionsNotCovered
Thisexpresswarrantydoesnotcoverthefollowing:
•Costofregularmaintenanceserviceorwearparts,suchasblades,
rotorblades(paddles),scraperblades,belts,fuel,lubricants,oil
changes,sparkplugs,pneumatictires,cable/linkageorbrake
adjustments
•Anyproductorpartwhichhasbeenalteredormisusedandrequires
replacementorrepairduetoaccidentsorlackofpropermaintenance
•Repairsnecessaryduetofailuretousefreshfuel(lessthanone
monthold),orfailuretoproperlypreparetheunitpriortoanyperiod
ofnon-useoveronemonth
•Allrepairscoveredbythesewarrantiesmustbeperformedbyan
authorizedToroservicingoutletusingapprovedreplacementparts.
GeneralConditions
Thepurchaseriscoveredbythenationallawsofeachcountry.Therights
towhichthepurchaserisentitledwiththesupportoftheselawsarenot
restrictedbythiswarranty.
374-0268RevE
La page charge ...
La page charge ...
La page charge ...
La page charge ...
La page charge ...
La page charge ...
La page charge ...
La page charge ...
La page charge ...
La page charge ...
La page charge ...
La page charge ...
La page charge ...
La page charge ...
La page charge ...
La page charge ...
La page charge ...
La page charge ...
La page charge ...
La page charge ...
La page charge ...
La page charge ...
La page charge ...
La page charge ...
-
 1
1
-
 2
2
-
 3
3
-
 4
4
-
 5
5
-
 6
6
-
 7
7
-
 8
8
-
 9
9
-
 10
10
-
 11
11
-
 12
12
-
 13
13
-
 14
14
-
 15
15
-
 16
16
-
 17
17
-
 18
18
-
 19
19
-
 20
20
-
 21
21
-
 22
22
-
 23
23
-
 24
24
-
 25
25
-
 26
26
-
 27
27
-
 28
28
-
 29
29
-
 30
30
-
 31
31
-
 32
32
-
 33
33
-
 34
34
-
 35
35
-
 36
36
-
 37
37
-
 38
38
-
 39
39
-
 40
40
-
 41
41
-
 42
42
-
 43
43
-
 44
44


Toro 50cm Mulching/Side Discharge/Rear Bagging Lawn Mower Manuel utilisateur
- Catégorie
- Tondeuses à gazon
- Taper
- Manuel utilisateur
dans d''autres langues
Documents connexes
-
Toro 53cm Recycler Lawn Mower Manuel utilisateur
-
Toro 55cm Recycler Lawn Mower Manuel utilisateur
-
-
Toro 22in Recycler Lawn Mower Manuel utilisateur
-
-
-
-
-
-