
4-279-077-11(1)
BDV-L600
©2011 Sony Corporation Printed in Malaysia
1
4
3
5
Speaker Installation Guide / Guide d’installation des enceintes /
Guía de instalación de los altavoces / Montageanleitung für Lautsprecher /
Installatiegids voor de luidspreker / Guida all’installazione dei diffusori /
Podręcznik instalacji głośników / 扬声器安装指南
(1)
6
7
8
9
64 mm
(2
33
/
64
in / 2
33
/
64
po /
2
33
/
64
pulg)
Read this guide to install the speakers on a wall. / Lisez ce guide si
vous accrochez les enceintes au mur. / Lea esta guía para instalar los
altavoces en una pared. / Lesen Sie diese Anleitung, wenn Sie die
Lautsprecher an der Wand montieren wollen.
Spread a cloth on the floor to avoid damaging the floor when you
assemble the speakers.
Contact a screw shop or installer regarding the wall material or
screws to be used.
Use screws that are suitable for the wall material and strength. As
a plaster board wall is especially fragile, attach the screws securely
to a beam and fasten them to the wall. Install the speakers on a
vertical and flat wall where reinforcement is applied.
Sony is not responsible for accidents or damage caused by
improper installation, insufficient wall strength or improper screw
installation, natural calamity, etc.
Recouvrez le sol d’un linge pour éviter de l’endommager lors de
l’assemblage des enceintes.
Adressez-vous à un quincaillier ou à un installateur pour
connaître le matériau du mur ou les vis à utiliser.
Utilisez des vis adaptées au matériau et à la résistance du mur.
Comme les plaques de plâtre sont particulièrement fragiles, fixez
fermement les vis à une poutre et fixez-les au mur. Installez les
enceintes sur une paroi verticale et plane à un endroit où se
trouve un renforcement.
Sony ne peut être tenu responsable de tout accident ou dégât
entraîné par une installation incorrecte, une résistance
insuffisante du mur, une mauvaise fixation des vis, une
catastrophe naturelle, etc.
Coloque una tela en el suelo para evitar dañarlo al instalar los
altavoces.
Consulte con una tienda especializada en tornillos o con un
instalador acerca del material de pared o de los tornillos que se
deben utilizar.
Utilice tornillos adecuados para el material y la resistencia de la
pared. Dado que una pared de yeso es especialmente frágil,
acople los tornillos firmemente a una viga y fíjelos en la pared.
Instale los altavoces en una pared vertical y lisa que esté reforzada.
Sony no se responsabiliza de ningún accidente o daño causado por
una instalación inadecuada, una pared de poca resistencia, una
instalación incorrecta de los tornillos, una catástrofe natural, etc.
Breiten Sie ein Tuch auf dem Boden aus, damit dieser beim
Zusammenbauen der Lautsprecher nicht beschädigt wird.
Wenden Sie sich bei Fragen bezüglich des Wandmaterials oder
geeigneter Schrauben an einen Fachmann.
Verwenden Sie Schrauben, die für das Material der Wand und die
Wandstärke geeignet sind. Wände aus Gipskarton sind nicht sehr
stabil. Drehen Sie die Schrauben zur Befestigung in einen
Holzträger. Montieren Sie die Lautsprecher an einer senkrechten
und ebenen Wand, die ausreichend verstärkt ist.
Sony haftet nicht für Unfälle oder Schäden, die durch
unsachgemäße Montage, unzureichende Wandstärke, schlechte
Schraubenverankerung, Naturkatastrophen usw. entstehen.
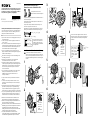
Necessary Items / Eléments requis /
Elementos necesarios / Erforderliche Teile
Front speakers / Enceintes avant /
Altavoces frontales / Vordere Lautsprecher
Prepare four screws (not supplied) that are suitable for the holes on
the back of each speaker.
Préparez quatre vis (non fournies) adaptées aux orifices situés au
dos de chaque enceinte.
Prepare cuatro tornillos (no suministrados) adecuados para los
orificios de la parte posterior de los altavoces.
Beschaffen Sie vier Schrauben (nicht mitgeliefert), die sich für die
Bohrungen an der Rückseite der einzelnen Lautsprecher eignen.
5 mm (
7
/
32
in /
7
/
32
po /
7
/
32
pulg)
10 mm (
13
/
32
in /
13
/
32
po /
13
/
32
pulg)
Hole on the back of the speaker /
Orifice situé au dos de l’enceinte /
Orificio de la parte posterior del
altavoz / Bohrung an der Rückseite
des Lautsprechers
30 mm (1
3
/
16
in / 1
3
/
16
po / 1
3
/
16
pulg)
4 mm (
3
/
16
in /
3
/
16
po /
3
/
16
pulg)
Fasten the screws (not supplied) to the wall. / Fixez les vis
(non fournies) au mur. / Fije los tornillos (no suministrados)
a la pared. / Drehen Sie die Schrauben (nicht mitgeliefert)
in die Wand.
Installation / Installation / Instalación / Montage
: Use this mark to identify the orientation of the stand. /
Utilisez ce repère pour déterminer l’orientation de l’enceinte. /
Utilice esta marca para identificar la orientación del soporte. /
Anhand dieser Markierung erkennen Sie die Ausrichtung des
Ständers.
Colored tube
Tube coloré
Tubo de color
Farbige
Kabelschlaufe
2
Colored tube
Tube coloré
Tubo de color
Farbige
Kabelschlaufe
6 mm to 8 mm (
15
/
64
in to
5
/
16
in) / 6 mm à
8 mm (
15
/
64
po. à
5
/
16
po.) / de 6 mm a
8 mm (de
15
/
64
pulg a
5
/
16
pulg) / 6 mm bis
8 mm

1
4
3
5
6
7
8
9
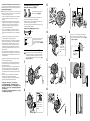
6 mm tot 8 mm /
Da 6 mm a 8 mm /
6 mm do 8 mm /
6 mm至8 mm
64 mm
Lees deze gids om de luidsprekers aan een muur te bevestigen. /
Leggere la presente guida per installare i diffusori sulla parete. / Aby
zainstalować głośniki na ścianie, zapoznaj się z niniejszą instrukcją. /
请阅读本指南将扬声器安装到墙上。
Spreid een doek uit op de vloer zodat u de vloer niet beschadigt
wanneer u de luidsprekers monteert.
Contacteer een ijzerhandel of installateur voor meer informatie
omtrent het muurmateriaal of de schroeven die u dient te
gebruiken.
Gebruik schroeven die geschikt zijn voor het materiaal en de
stevigheid van de muur. Aangezien een muur in gipsplaat erg
zwak is, draait u de schroeven het best in een balk om de
luidsprekers te bevestigen. Bevestig de luidsprekers op een
verticale, vlakke en verstevigde muur.
Sony is niet aansprakelijk voor ongevallen noch schade ten
gevolge van een ondeskundige montage, een onvoldoende
sterke muur, verkeerd aangebrachte schroeven, natuurrampen
enz.
Stendere un telo sul pavimento per evitare di danneggiare
quest’ultimo durante il montaggio dei diffusori.
Rivolgersi a una ferramenta o a un installatore per informazioni
sul tipo di materiale della parete e sul tipo di viti da utilizzare.
Usare viti adatte al tipo di materiale della parete e alla sua
robustezza. Nel caso di una parete di cartongesso, materiale
particolarmente fragile, fissare saldamente le viti a una trave,
quindi alla parete. Installare i diffusori su una parete verticale,
piatta e rinforzata.
Sony declina qualsiasi responsabilità per eventuali incidenti o
danneggiamenti causati da installazioni non corrette, pareti non
sufficientemente robuste o installazioni delle viti non corrette,
calamità naturali, ecc.
Przed rozpoczęciem montażu pod głośniki należy podłożyć
materiał, aby nie uszkodzić podłogi.
Jeśli masz wątpliwości co do rodzaju wkrętów lub materiału, z
którego wykonana jest ściana, skontaktuj się ze sprzedawcą
wkrętów lub instalatorem.
Używaj wkrętów odpowiednich do materiału i wytrzymałości
ściany. Ponieważ ściana gipsowa jest wyjątkowo delikatna,
najpierw przytwierdź wkręty do deski, a następnie do ściany.
Głośniki należy instalować na płaskich, pionowych i zbrojonych
ścianach.
Firma Sony nie ponosi odpowiedzialności za wypadki lub
uszkodzenia spowodowane niewłaściwą instalacją,
niewystarczającą wytrzymałością ścian lub nieprawidłowym
wkręceniem wkrętów, klęskami żywiołowymi itd.
安装扬声器时,请在地板上铺一块布以防损坏地板。
关于使用的墙面材料或螺丝,请联络螺丝商店或安装人员。
使用适合墙面材料和强度的螺丝。由于石膏板墙壁易碎,请将
螺丝牢固钉入柱子并拧入墙壁。将扬声器安装在足够牢固的垂
直和平整的墙壁上。
Sony对因安装不当、墙壁不够坚固或螺丝安装不当、自然灾害
等引起的事故或损坏不承担责任。
Benodigde items / Articoli necessari /
Niezbędne elementy / 必需物品
Voorluidsprekers / Diffusori anteriori /
Głośniki przednie / 前置扬声器
Neem vier schroeven (niet bijgeleverd) die geschikt zijn voor de
openingen aan de achterkant van elke luidspreker.
Predisporre quattro viti (non in dotazione) di dimensioni idonee
per i fori situati sul retro di ciascun diffusore.
Przygotuj cztery śruby (nie wchodzą w skład zestawu) pasujące do
otworów z tyłu każdego głośnika.
请准备四个适合各扬声器背面孔的螺丝(不提供)。
5 mm
10 mm
Opening aan de achterkant van de
luidspreker / Foro nella parte
posteriore del diffusore / Otwór w
tylnej części głośnika / 扬声器背面
的孔
30 mm
4 mm
Bevestig de schroeven (niet bijgeleverd) in de muur. /
Serrare le viti (non in dotazione) nella parete. / Dokręć
śruby (nie wchodzą w skład zestawu) do ściany. / 将螺丝
(不提供)拧紧到墙上。
Installatie / Installazione / Montaż / 安装
: U kunt de oriëntatie van de standaard identificeren aan de
hand van deze markering. / Servirsi di questo contrassegno
per identificare l’orientamento del supporto. / Przy użyciu
tego oznaczenia możesz określić ułożenie podstawy. / 使用
此标记辨认支架的方向。
Gekleurde buis
Cilindro colorato
Kolorowa opaska
色环
2
Gekleurde buis
Cilindro colorato
Kolorowa opaska
色环
-
 1
1
-
 2
2


dans d''autres langues
- italiano: Sony BDV-L600 Guida d'installazione
- español: Sony BDV-L600 Guía de instalación
- Deutsch: Sony BDV-L600 Installationsanleitung
- Nederlands: Sony BDV-L600 Installatie gids
- polski: Sony BDV-L600 Instrukcja instalacji
Documents connexes
-
Sony BDV-NF620 Guide d'installation
-
Sony BDV-N790W Le manuel du propriétaire
-
-
Sony BDV-EF200 Guide d'installation
-
Sony BDVE780W Le manuel du propriétaire
-
Sony BDV-L800M Guide d'installation
-
-
-
Sony BDV-E4100 Manuel utilisateur
-