
OPERATOR MANUAL
Three-Level Ophthalmic Rack
with Removable Upper Insert - Long
(2022-04-25) 10095339


i
Introduction Operator Manual 10095339
This manual contains important information on the proper use and
routine maintenance of the Three-level Ophthalmic Rack with
Removable Upper Insert – Long. All personnel involved in the use
and routine maintenance of this equipment must carefully
review and comply with the Safety Precautions and instructions
contained in this manual.
These instructions are important to
protect the health and safety of personnel using the
Three-level
Ophthalmic Rack with Removable Upper Insert – Long to process
items in the AMSCO® 7053L Single-Chamber Washer/Disinfector and
should be retained in a conveniently accessible area for quick
reference.
Advisory IMPORTANT: A listing of the Safety Precautions to be observed
when using and servicing this equipment can be found in SECTION 1
of this manual. Do not use the equipment until you have become
familiar with this information.
STERIS does not intend, recommend or represent in any way that the
Three-level Ophthalmic Rack with Removable Upper Insert – Long
be used in the AMSCO 7053L Single-Chamber Washer/Disinfector
for the terminal disinfection or sterilization of any regulated medical
device.
The
Three-level Ophthalmic Rack with Removable Upper
Insert – Long is intended only to perform an initial step in the
processing of soiled, reusable medical devices in the washer/
disinfector. If medical devices will be contacting blood or
compromised tissues, such devices must be terminally processed
in accordance with Good Hospital Practices before each use in
human patients.
STERIS does not recommend processing flexible endoscopes, single-
use instruments, rigid telescopes (optical lens), fiber-optic cables,
multi-part instruments that cannot be disassembled, heat-sensitive
devices and coagulating electrodes using the Three-level Ophthalmic
Rack with Removable Upper Insert – Long in the washer/disinfector.
Processing these types of instruments may result in instrument or
equipment damage as well as improperly cleaned items. All items
processed using the Three-level Ophthalmic Rack with Removable
Upper Insert – Long in the washer/disinfector must withstand
temperatures of up to 116°C (240°F).
The Three-level Ophthalmic Rack with Removable Upper Insert –
Long
is specifically designed to only hold items as outlined in this
manual. If there is any doubt about a specific material or product,
contact the instrument manufacturer for recommended washing
techniques.
©2022 STERIS Corporation. All rights reserved. Printed in Canada.
A WORD FROM STERIS

ii
10095339 Operator Manual Introduction
Any alteration of this equipment not authorized or performed by
STERIS will void the warranty. Alteration of this equipment which
could adversely affect its operation and efficacy may violate national,
state and local laws or regulations.
Serious incidents that have occurred in relation to this medical
device should be reported to the manufacturer and competent
authority in the country where the incident occurred.
Indications For Use The Three-level Ophthalmic Rack with Removable Upper Insert –
Long is designed to be used in the AMSCO 7053L Single-Chamber
Washer/Disinfector for the efficient cleaning, rinsing, drying and
intermediate level disinfection of different types of ophthalmic
instruments that, according to device manufacturer’s instructions for
use, can be processed in a washer/disinfector.
IMPORTANT: The Three-level Ophthalmic Rack with Removable
Upper Insert – Long is designed to be used only with the Rigid MIS
cycle.
Service Information A thorough preventive maintenance program is essential to help
ensure safe and proper washer/disinfector and rack operation. This
manual contains a routine maintenance procedure which should be
followed for satisfactory equipment performance.
Customers are encouraged to contact STERIS concerning extended
service maintenance agreements to give your washer/disinfector
and rack planned maintenance, which will help ensure equipment
performance according to factory specifications. STERIS maintains a
global staff of well-equipped, qualified service technicians to provide
this service, as well as professional repair services. Please contact
STERIS for details.

iii
Introduction Operator Manual 10095339
Technical
Specifications
Three-level Ophthalmic Rack with Removable Upper Insert –
Long:
• Overall size: 648 x 825 x 561 mm
• Weight: 26 kg
• Material: Stainless steel, Plastic, Silicone, Polypropylene
Total load capacity:
• 4 vitrectomy ophthalmic instrument sets
• 4 cataract ophthalmic instrument sets
• 2 spare slots for DIN trays
Load capacity for cannulated instruments:
• 4 bimanual irrigation handpieces holder
• 4 bimanual aspiration handpieces holder
• 4 phako instrument holder
• 4 micro tweezers instruments holder
• 16 hollow jets Ø 4x60 mm for cannulated instruments
• 4 hollow jets Ø 4x59 mm for cannulated instruments
• 8 hollow jets Ø 4x50 mm for cannulated instruments
• 20 Luer locks male, 4 Luer locks female for cannulated
instruments
• 4 phako tip holder
• 4 quick tip I/A holder
• 7 bulldog instruments holder
• 8 holders for biom lens
Certification The AMSCO 7053L Single-Chamber Washer/Disinfector, compatible
with the Three-Level Ophthalmic Rack with Removable Upper Insert -
Long, meet the applicable requirements of certain standards. Refer
to washer/disinfector Operator Manual (10085881) for the current list
of standards.

iv
10095339 Operator Manual Introduction
The base language of this
document is ENGLISH. Any
translation must be made from
the base language document.
Manufactured by:
STERIS Canada ULC
490 boulevard Armand-Paris
Québec (Québec)
Canada G1C 8A3
European Community Representative:
STERIS Ireland Limited
IDA Business and Technology Park
Tullamore
County Offaly
R35 X865
Ireland
Sales and Service -- Europe, Middle-East and Africa:
STERIS
116 Avenue de Magudas, 33185
Le Haillan
FRANCE
Support Service, by email:
Support_EMEA_IPT_SE@steris.com
All other requests, by phone: +33 5 56 93 94 94
Website:
www.steris.com
Sales and Service -- Americas, Oceania and Asia:
STERIS Corporation
5960 Heisley Road
Mentor, Ohio 44060
800-548-4873

TABLE OF CONTENTS
Section
Number Description Page
v
Table of Contents Operator Manual 10095339
A WORD FROM STERIS .......................................................................................... I
Advisory ........................................................................................................................................................... i
Indications For Use ..........................................................................................................................................ii
Service Information ..........................................................................................................................................ii
Technical Specifications .................................................................................................................................iii
Certification......................................................................................................................................................iii
1 SAFETY PRECAUTIONS .....................................................................................1-1
2 LOADING INSTRUCTIONS ..................................................................................2-1
2.1 Three-level Ophthalmic Rack with Removable Upper Insert – Long: Components ............................. 2-1
2.2 Three-level Ophthalmic Rack with Removable Upper Insert – Long: Sections .................................... 2-2
2.3 Preparing Instruments ........................................................................................................................... 2-6
2.4 Loading Rack ........................................................................................................................................ 2-6
2.5 Ophthalmic Insert .................................................................................................................................. 2-8
3 OPERATING INSTRUCTIONS .............................................................................3-1
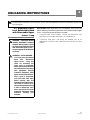
4 UNLOADING INSTRUCTIONS .............................................................................4-1
4.1 Unloading Three-Level Ophthalmic Rack with Removable Upper Insert– Long................................... 4-1
4.2 Visual Inspection ................................................................................................................................... 4-2
5 ROUTINE MAINTENANCE AND REPLACEMENT PARTS ....................................5-1
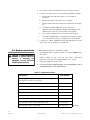
5.1 Routine Maintenance ............................................................................................................................ 5-1
5.2 Replacement Parts ................................................................................................................................ 5-2

vi
10095339 Operator Manual Table of Contents
2 LOADING INSTRUCTIONS ..................................................................................2-1
2-1 Three-Level Ophthalmic Rack with Removable Upper Insert– Long – Components ........................ 2-1
2-2 Ophthalmic Upper Insert ................................................................................................................... 2-2
2-3 Base Rack ......................................................................................................................................... 2-3
2-4 Assembling Ophthalmic Rack ........................................................................................................... 2-4
2-5 Ophthalmic Basket Pre-Loaded ........................................................................................................ 2-5
2-6 Loading Lower Part (Base Rack) ....................................................................................................... 2-6
2-7 Virectomy Ophthalmic Instrument Set ............................................................................................... 2-7
2-8 Load Instruments on Instrument Holder ............................................................................................ 2-8
2-9 Loading Instruments and Tips on Luer Locks (1 of 2) ....................................................................... 2-9
2-10 Loading Instruments and Tips on Luer Locks (2 of 2) ..................................................................... 2-10
2-11 Loading Cannulated Instruments .................................................................................................... 2-11
2-12 Instrument Holder ............................................................................................................................ 2-11
2-13 Loading Lenses ............................................................................................................................... 2-12
2-14 Loading Instruments on Hollow Jets ............................................................................................... 2-12
2-15 Mounting Protective Cover .............................................................................................................. 2-13
2-16 Loading Micro Tweezers on Protective Cover .................................................................................2-13
2-17 Connecting Tubes ........................................................................................................................... 2-14
2-18 Loaded Three-Level Ophthalmic Rack with Removable Upper Insert– Long.................................. 2-14
5 ROUTINE MAINTENANCE AND REPLACEMENT PARTS ....................................5-1
5.1 Replacement Parts ................................................................................................................................ 5-2
LIST OF ILLUSTRATIONS
Figure
Number Description Page
LIST OF TABLES
Table
Number Description Page

1-1
Safety Precautions Operator Manual 10095339
1
The following Safety Precautions must be observed when operating or servicing the Three-Level Ophthalmic
Rack. WARNING indicates the potential for personal injury and CAUTION indicates the potential for damage to
equipment. For emphasis, certain Safety Precautions are repeated throughout the manual. It is important to
review ALL Safety Precautions before operating or servicing the equipment.
Strictly following these Safety Precautions enhances the Customer’s ability to safely and effectively utilize the unit
and helps avoid improper maintenance methods which may damage the unit or render it unsafe. It is important to
understand that these Safety Precautions are not exhaustive; Customers are encouraged to develop their own
safety policies and procedures to enhance and complement these Safety Precautions.
WARNING – PERSONAL INJURY AND/OR EQUIPMENT DAMAGE HAZARD:
WARNING – BURN HAZARD:
Always wear Personal Protective Equipment (PPE) appropriate to the task to perform.
Always load or unload the Three-level Ophthalmic Rack with Removable Upper Insert – Long on
appropriate loading cart or surface.
Always load and unload the Three-level Ophthalmic Rack with Removable Upper Insert – Long facing
rack. Trocar ends sticking out of the rack can be extremely sharp and can cause injuries such as cuts.
Incorrect rack loading or overloading could lead to injury and/or damage to the equipment or
instruments.
Regularly scheduled preventive maintenance is required for safe and reliable operation of this
equipment. Contact STERIS to schedule preventive maintenance or obtain the necessary washer/
disinfector Maintenance Manual if preventive maintenance is done by the Customer.
Repairs and adjustments to this equipment must be made only by STERIS or STERIS-trained service
personnel. Repairs and adjustments performed by unqualified personnel or installation of unauthorized
parts could cause personal injury, result in improper equipment performance, void the warranty or result
in costly damage. Contact STERIS regarding service options.
Three-level Ophthalmic Rack with Removable Upper Insert – Long and items are extremely hot when
cycle is completed. Allow rack and items to cool to room temperature and always wear appropriate
Personal Protective Equipment (PPE) before reaching into chamber.
When cycle is completed, wait until water flow stops before opening door and unloading washer/
disinfector. Hot water or steam may be sprayed through door opening if door is opened too soon. Wear
appropriate Personal Protective Equipment (PPE) whenever reaching into chamber.
SAFETY PRECAUTIONS

1-2
10095339 Operator Manual Safety Precautions
CAUTION – POSSIBLE EQUIPMENT DAMAGE:
To avoid equipment damage and maximize processing efficiency, always load soiled items as instructed
in this Three-level Ophthalmic Rack with Removable Upper Insert – Long Operator Manual.
To prevent voiding the warranty or damaging the equipment, use only authorized STERIS replacement
parts.
Use nonabrasive cleaners when cleaning the Three-level Ophthalmic Rack with Removable Upper
Insert – Long. Follow directions on containers and rub in a back-and forth motion (in same direction as
surface grain). Abrasive cleaners will damage stainless steel.

2
2-1
Loading Instructions Operator Manual 10095339
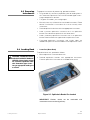
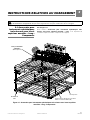
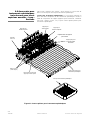
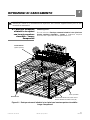
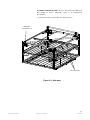
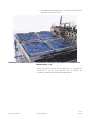
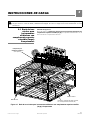
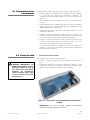
2.1 Three-level
Ophthalmic Rack with
Removable Upper
Insert – Long:
Components
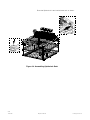
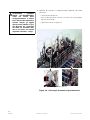
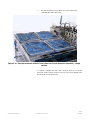
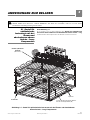
See Figure 2-1.
Before using the Three-level Ophthalmic Rack with Removable
Upper Insert – Long, it is important to become familiar with the
location of the rack components.
IMPORTANT: A listing of the Safety Precautions to be observed when using and servicing this equipment
can be found in SECTION 1 of this manual. Do not use the equipment until you have become familiar with
this information.
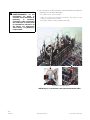
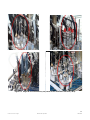
Figure 2-1. Three-level Ophthalmic Rack with Removable Upper Insert – Long: Components
Rack Base
Ophthalmic Insert
(Upper Level)
Spray Arms
Bar code tag location.
Use bar code Gentle (06)
LOADING INSTRUCTIONS

2-2
10095339 Operator Manual Loading Instructions
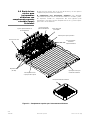
2.2 Three-level
Ophthalmic Rack with
Removable Upper
Insert – Long: Sections
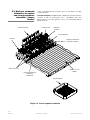
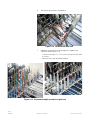
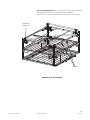
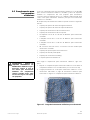
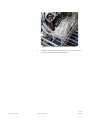
The rack has three levels; two on the base rack and one level for the
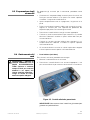
ophthalmic insert.
The ophthalmic insert is designed to hold cannulated ophthalmic
instruments and suction tubes using rack components (instrument
holders, Luer locks, hollow jets, etc.) and has space for four
ophthalmic baskets.
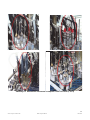
4'(ÄÄ
Hollow Jets
(Two Rows)
Bimanual
Aspiration Hand
Pieces Holder
Slots for Lens Holder
Quick Tip I/A
Holder
Protective Cover for
Micro Tweezers Holder
Luer Locks
Phako Instrument
Holders
Phako Tip
Holder
Space for Ophthalmic
Baskets
Figure 2-2. Ophthalmic Upper Insert
Ophthalmic Basket

2-3
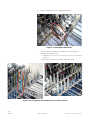
Loading Instructions Operator Manual 10095339
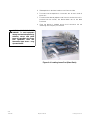
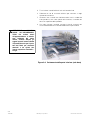
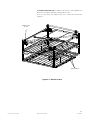
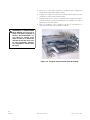
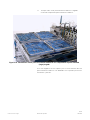
The lower section of the rack is divided in two levels and is
equipped with two rotary spray arm assemblies and Cool Touch
Handles.
Lower section has space for six ophthalmic baskets.
Figure 2-3. Base Rack
Spray Arms
Cool Touch
Handles (4 x)

2-4
10095339 Operator Manual Loading Instructions
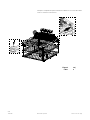
Place the Ophthalmic insert into the base rack as shown:
Figure 2-4. Assembling Ophthalmic Rack

2-5
Loading Instructions Operator Manual 10095339
2.3 Preparing
Instruments
To prepare instruments for processing, proceed as follows:
• Disassemble all instrument components prior to loading them in
the Three-level Ophthalmic Rack with Removable Upper Insert –
Long and ophthalmic baskets.
• Fully open all handles, jaws and graspers.
• Manually clean any visible soil on cannulated instruments. Follow
device manufacturer’s instructions for use to manually clean
instruments.
• Pre-load ophthalmic baskets with the appropriate instruments.
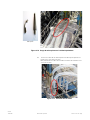
• Load a cataract ophthalmic instrument set in an ophthalmic
basket. Place basket on ophthalmic rack lower levels.
• Load a vitrectomy ophthalmic instrument set in an ophthalmic
basket Place basket on the upper level on ophthalmic insert.
• Cannulated ophthalmic instruments and suction tubes are
loaded onto special instrument holders on the ophthalmic insert.
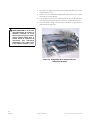
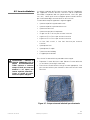
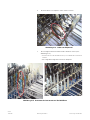
2.4 Loading Rack • Lower Part (Base Rack)
To load the base rack, proceed as follows:
1. Mount ophthalmic insert onto base rack.
2. Pre-load ophthalmic baskets with appropriate instruments.
Cataract ophthalmic instrument set is loaded on base rack.
IMPORTANT: Baskets should not be overloaded with
instruments to ensure cleaning efficacy.
WARNING – PERSONAL INJURY
AND/OR EQUIPMENT DAMAGE
HAZARD: Always load or unload
the Three-level Ophthalmic Rack
with Removable Upper Insert –
Long on appropriate loading cart
or surface.
Figure 2-5. Ophthalmic Basket Pre-Loaded

2-6
10095339 Operator Manual Loading Instructions
3. Slide ophthalmic baskets into base rack from the side.
4. Put three cataract ophthalmic instrument sets on each level of
base rack.
5. Ensure baskets do not project out of the rack so when the rack is
pushed into the washer, the basket does not hit the door
enclosure.
6. Once the basket is loaded, ensure that instruments are not
interfering with the spray arm rotation.
CAUTION – POSSIBLE EQUIPMENT
DAMAGE: To avoid equipment
damage and maximize processing
efficiency, always load soiled
items as instructed in this Three-
level Ophthalmic Rack with
Removable Upper Insert – Long
Operator Manual.
Figure 2-6. Loading Lower Part (Base Rack)

2-7
Loading Instructions Operator Manual 10095339
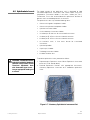
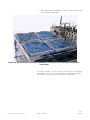
2.5 Ophthalmic Insert The upper section of the ophthalmic rack is designed to hold
cannulated ophthalmic instruments and suction tubes using rack
components (instrument holders, Luer locks, hollow jets, etc.).
Furthermore, it can also accommodate four ophthalmic baskets to
process non-cannulated ophthalmic instruments.
The ophthalmic insert may hold the following items:
• 4 bimanual irrigation handpieces holder
• 4 bimanual aspiration handpieces holder
• 4 phako instrument holder
• 4 micro tweezers instruments holder
• 16 hollow jets Ø 4x60 mm for cannulated instruments
• 4 hollow jets Ø 4x59 mm for cannulated instruments
• 8 hollow jets Ø 4x50 mm for cannulated instruments
• 20 luer-locks male, 4 Luer locks female for cannulated
instruments
• 4 phako tip holder
• 4 quick tip I/A holder
• 7 bulldog instruments holder
• 8 holders for biom lens
To load the ophthalmic insert, proceed as follows.
1. Prepare empty Ophthalmic insert. Mount Ophthalmic insert onto
base rack (if not already done).
2. Pre-load ophthalmic baskets with appropriate instruments;
vitrectomy ophthalmic instrument set is loaded on ophthalmic
insert.
WARNING – PERSONAL INJURY
AND/OR EQUIPMENT DAMAGE
HAZARD: Always load or unload
Three-level Ophthalmic Rack
with Removable Upper Insert –
Long on appropriate loading cart
or surface.
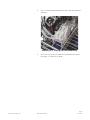
Figure 2-7. Virectomy Ophthalmic Instrument Set

2-8
10095339 Operator Manual Loading Instructions
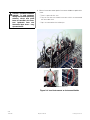
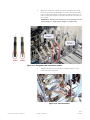
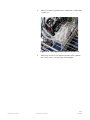
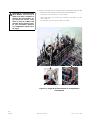
3. Mount instruments onto special instrument holder on ophthalmic
insert.
- There is space for four sets.
- Every set has two cannulated instruments which are connected
with two tubes each.
- Caps are mounted on the hollow jets.
CAUTION – POSSIBLE EQUIPMENT
DAMAGE: To avoid equipment
damage and maximize processing
efficiency, always load soiled
items as instructed in this Three-
level Ophthalmic Rack with
Removable Upper Insert – Long
Operator Manual.
Figure 2-8. Load Instruments on Instrument Holder
Caps Mounted on Hollow Jets

2-9
Loading Instructions Operator Manual 10095339
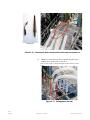
Figure 2-9. Loading Instruments and Tips on Luer Locks (1 of 2)

2-10
10095339 Operator Manual Loading Instructions
Tip
Figure 2-10. Loading Instruments and Tips on Luer Locks (2 of 2)
La page est en cours de chargement...
La page est en cours de chargement...
La page est en cours de chargement...
La page est en cours de chargement...
La page est en cours de chargement...
La page est en cours de chargement...
La page est en cours de chargement...
La page est en cours de chargement...
La page est en cours de chargement...
La page est en cours de chargement...
La page est en cours de chargement...
La page est en cours de chargement...
La page est en cours de chargement...
La page est en cours de chargement...
La page est en cours de chargement...
La page est en cours de chargement...
La page est en cours de chargement...
La page est en cours de chargement...
La page est en cours de chargement...
La page est en cours de chargement...
La page est en cours de chargement...
La page est en cours de chargement...
La page est en cours de chargement...
La page est en cours de chargement...
La page est en cours de chargement...
La page est en cours de chargement...
La page est en cours de chargement...
La page est en cours de chargement...
La page est en cours de chargement...
La page est en cours de chargement...
La page est en cours de chargement...
La page est en cours de chargement...
La page est en cours de chargement...
La page est en cours de chargement...
La page est en cours de chargement...
La page est en cours de chargement...
La page est en cours de chargement...
La page est en cours de chargement...
La page est en cours de chargement...
La page est en cours de chargement...
La page est en cours de chargement...
La page est en cours de chargement...
La page est en cours de chargement...
La page est en cours de chargement...
La page est en cours de chargement...
La page est en cours de chargement...
La page est en cours de chargement...
La page est en cours de chargement...
La page est en cours de chargement...
La page est en cours de chargement...
La page est en cours de chargement...
La page est en cours de chargement...
La page est en cours de chargement...
La page est en cours de chargement...
La page est en cours de chargement...
La page est en cours de chargement...
La page est en cours de chargement...
La page est en cours de chargement...
La page est en cours de chargement...
La page est en cours de chargement...
La page est en cours de chargement...
La page est en cours de chargement...
La page est en cours de chargement...
La page est en cours de chargement...
La page est en cours de chargement...
La page est en cours de chargement...
La page est en cours de chargement...
La page est en cours de chargement...
La page est en cours de chargement...
La page est en cours de chargement...
La page est en cours de chargement...
La page est en cours de chargement...
La page est en cours de chargement...
La page est en cours de chargement...
La page est en cours de chargement...
La page est en cours de chargement...
La page est en cours de chargement...
La page est en cours de chargement...
La page est en cours de chargement...
La page est en cours de chargement...
La page est en cours de chargement...
La page est en cours de chargement...
La page est en cours de chargement...
La page est en cours de chargement...
La page est en cours de chargement...
La page est en cours de chargement...
La page est en cours de chargement...
La page est en cours de chargement...
La page est en cours de chargement...
La page est en cours de chargement...
La page est en cours de chargement...
La page est en cours de chargement...
La page est en cours de chargement...
La page est en cours de chargement...
La page est en cours de chargement...
La page est en cours de chargement...
La page est en cours de chargement...
La page est en cours de chargement...
La page est en cours de chargement...
La page est en cours de chargement...
La page est en cours de chargement...
La page est en cours de chargement...
La page est en cours de chargement...
La page est en cours de chargement...
La page est en cours de chargement...
La page est en cours de chargement...
La page est en cours de chargement...
La page est en cours de chargement...
La page est en cours de chargement...
La page est en cours de chargement...
La page est en cours de chargement...
La page est en cours de chargement...
La page est en cours de chargement...
La page est en cours de chargement...
La page est en cours de chargement...
La page est en cours de chargement...
La page est en cours de chargement...
La page est en cours de chargement...
La page est en cours de chargement...
La page est en cours de chargement...
La page est en cours de chargement...
La page est en cours de chargement...
La page est en cours de chargement...
La page est en cours de chargement...
La page est en cours de chargement...
La page est en cours de chargement...
La page est en cours de chargement...
La page est en cours de chargement...
La page est en cours de chargement...
La page est en cours de chargement...
La page est en cours de chargement...
La page est en cours de chargement...
La page est en cours de chargement...
La page est en cours de chargement...
La page est en cours de chargement...
La page est en cours de chargement...
La page est en cours de chargement...
La page est en cours de chargement...
La page est en cours de chargement...
La page est en cours de chargement...
La page est en cours de chargement...
La page est en cours de chargement...
La page est en cours de chargement...
La page est en cours de chargement...
La page est en cours de chargement...
La page est en cours de chargement...
La page est en cours de chargement...
La page est en cours de chargement...
La page est en cours de chargement...
La page est en cours de chargement...
La page est en cours de chargement...
La page est en cours de chargement...
La page est en cours de chargement...
La page est en cours de chargement...
La page est en cours de chargement...
La page est en cours de chargement...
La page est en cours de chargement...
La page est en cours de chargement...
La page est en cours de chargement...
La page est en cours de chargement...
-
 1
1
-
 2
2
-
 3
3
-
 4
4
-
 5
5
-
 6
6
-
 7
7
-
 8
8
-
 9
9
-
 10
10
-
 11
11
-
 12
12
-
 13
13
-
 14
14
-
 15
15
-
 16
16
-
 17
17
-
 18
18
-
 19
19
-
 20
20
-
 21
21
-
 22
22
-
 23
23
-
 24
24
-
 25
25
-
 26
26
-
 27
27
-
 28
28
-
 29
29
-
 30
30
-
 31
31
-
 32
32
-
 33
33
-
 34
34
-
 35
35
-
 36
36
-
 37
37
-
 38
38
-
 39
39
-
 40
40
-
 41
41
-
 42
42
-
 43
43
-
 44
44
-
 45
45
-
 46
46
-
 47
47
-
 48
48
-
 49
49
-
 50
50
-
 51
51
-
 52
52
-
 53
53
-
 54
54
-
 55
55
-
 56
56
-
 57
57
-
 58
58
-
 59
59
-
 60
60
-
 61
61
-
 62
62
-
 63
63
-
 64
64
-
 65
65
-
 66
66
-
 67
67
-
 68
68
-
 69
69
-
 70
70
-
 71
71
-
 72
72
-
 73
73
-
 74
74
-
 75
75
-
 76
76
-
 77
77
-
 78
78
-
 79
79
-
 80
80
-
 81
81
-
 82
82
-
 83
83
-
 84
84
-
 85
85
-
 86
86
-
 87
87
-
 88
88
-
 89
89
-
 90
90
-
 91
91
-
 92
92
-
 93
93
-
 94
94
-
 95
95
-
 96
96
-
 97
97
-
 98
98
-
 99
99
-
 100
100
-
 101
101
-
 102
102
-
 103
103
-
 104
104
-
 105
105
-
 106
106
-
 107
107
-
 108
108
-
 109
109
-
 110
110
-
 111
111
-
 112
112
-
 113
113
-
 114
114
-
 115
115
-
 116
116
-
 117
117
-
 118
118
-
 119
119
-
 120
120
-
 121
121
-
 122
122
-
 123
123
-
 124
124
-
 125
125
-
 126
126
-
 127
127
-
 128
128
-
 129
129
-
 130
130
-
 131
131
-
 132
132
-
 133
133
-
 134
134
-
 135
135
-
 136
136
-
 137
137
-
 138
138
-
 139
139
-
 140
140
-
 141
141
-
 142
142
-
 143
143
-
 144
144
-
 145
145
-
 146
146
-
 147
147
-
 148
148
-
 149
149
-
 150
150
-
 151
151
-
 152
152
-
 153
153
-
 154
154
-
 155
155
-
 156
156
-
 157
157
-
 158
158
-
 159
159
-
 160
160
-
 161
161
-
 162
162
-
 163
163
-
 164
164
-
 165
165
-
 166
166
-
 167
167
-
 168
168
-
 169
169
-
 170
170
-
 171
171
-
 172
172
-
 173
173
-
 174
174
-
 175
175
-
 176
176
-
 177
177
-
 178
178
-
 179
179
-
 180
180


Steris Amsco 7053Hp Washer Disinfector Mode d'emploi
- Taper
- Mode d'emploi
- Ce manuel convient également à
dans d''autres langues
Documents connexes
-
 Steris Amsco 5052 Single-Chamber Washer/Disinfector Mode d'emploi
-
 Steris Amsco 1215 Cart And Utensil Washer/Disinfector Mode d'emploi
-
 Steris Amsco 300 Series Steam Sterilizer Mode d'emploi
-
 Steris Prolystica Ultra Concentrate Lubricant Mode d'emploi
-
 Steris Anesthesia / Respiratory Rack Mode d'emploi
-
 Steris Streamline Scrub Station Mode d'emploi
-
 Steris Reliance Ptx Endoscope Processing System Mode d'emploi
-
 Steris Valsure Alkaline Detergent Mode d'emploi
-
 Steris Harmony La Surgical Lighting And Visualization System Mode d'emploi
-
 Steris Labklenz 200 Mode d'emploi


Autres documents
-
MTI 830 & 829 Le manuel du propriétaire
-
Hill-Rom Hill-Rom 719 Series 71930 Lithium Ion Handle Manuel utilisateur
-
-
 Welch Allyn 18200 Manuel utilisateur
-
 Welch Allyn 71911 Manuel utilisateur
-
Gima 22351 Le manuel du propriétaire
-
SciCan STATIM 2000S Manuel utilisateur
-
 Welch Allyn PocketScope Ophthalmoscope Mode d'emploi
-
 PRAXISDIENST EliteVue Mode d'emploi


