LG Electronics LSWS307ST Le manuel du propriétaire
- Catégorie
- Micro-ondes
- Taper
- Le manuel du propriétaire

LSWS307ST
www.lg.com
OWNER’S MANUAL
ELECTRIC CONVECTION BUILT-IN OVEN
Please read this guide thoroughly before operating
and keep it handy for reference at all times.
ENGLISH FRANÇAIS
MFL69362008_03
Copyright © 2021 - 2022 LG Electronics Inc. All Rights Reserved.

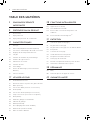
2TABLE OF CONTENTS
TABLE OF CONTENTS
3 IMPORTANT SAFETY INSTRUCTIONS
8 PRODUCT OVERVIEW
8 Accessories
9 Oven Overview
10 Control Panel Overview
11 FEATURES
11 Clock
12 Timer ON/OFF
12 Convection Auto Conversion
13 Oven Temperature Adjustment
13 Language
13 Preheating Alarm Light
14 Beeper Volume
14 Fahrenheit or Celsius
14 Oven Light
14 Lockout
15 Start Time(Delayed Timed Cook)
16 Cook Time(Timed Cook)
17 USING THE OVEN
17 Before Using the Oven
17 Removing and Replacing the Oven Racks
18 Bake
19 Convection Bake
20 Roast
20 Convection Roast
21 Crisp Convection
22 Broil
23 Recommended Broiling Guide
24 Broiling Tips
25 Warm
25 Proof
26 Meat Probe
27 Remote Start
28 SMART FUNCTIONS
28 LG ThinQ Application
29 Industry Canada Statement
29 IC Radiation Exposure Statement
30 Smart Diagnosis™ Feature
31 MAINTENANCE
31 Self-Clean
31 Setting Self Clean
32 Setting Self Clean with a Delayed Start
33 EasyClean®
33 Cleaning Tips
34 EasyClean® Instruction Guide
35 Changing the Oven Light
35 Cleaning the Exterior
37 Removing and Replacing the Lift-Off Oven
Door
37 Door Care Instructions
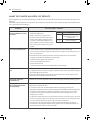
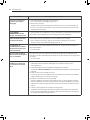
38 TROUBLESHOOTING
38 FAQs
40 Before Calling for Service
43 LIMITED WARRANTY

3
IMPORTANT SAFETY INSTRUCTIONS
ENGLISH
IMPORTANT SAFETY INSTRUCTIONS
Read and follow all instructions before using your oven to prevent the risk of re, electric
shock, personal injury, or damage when using the oven. This guide does not cover all
possible conditions that may occur. Always contact your service agent or manufacturer
about problems that you do not understand.
Download this owner's manual at: www.lg.com
This is the safety alert symbol. This symbol alerts you to potential hazards
that can result in property damage and/or serious bodily harm or death.
All safety messages will follow the safety alert symbol and either the word
WARNING or CAUTION. These words mean:
WARNING WARNING
Indicates a hazardous situation which, if not avoided, could result in death or serious injury.
CAUTION CAUTION
Indicates a hazardous situation which, if not avoided, could result in minor or moderate
injury.
SAFETY PRECAUTIONS
yBe certain your appliance is properly installed and grounded by a qualied technician.
yDo not repair or replace any part of the appliance unless specically recommended in the
manual.
yAll other servicing should be referred to a qualied technician.
yAlways disconnect power to appliance before servicing by unplugging, removing the fuse or
switching o the circuit breaker.
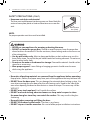
yDO NOT TOUCH HEATING ELEMENTS OR INTERIOR SURFACES OF OVEN.
Heating elements may be hot even though they are dark in color. Interior surfaces of an oven
become hot enough to cause burns. During and after use, do not touch or let clothing or
other ammable materials contact heating elements or interior surfaces of oven until they
have had sucient time to cool. Other surfaces of the appliance may become hot enough to
cause burns. Among these surfaces are oven vent openings and surfaces near these openings,
oven doors, and windows of oven doors.
yUse care when opening door.
Let hot air or steam escape before you remove or replace food in the oven.
yDo not heat unopened food containers.
Build-up of pressure may cause containers to burst and result in injury.

4IMPORTANT SAFETY INSTRUCTIONS
SAFETY PRECAUTIONS
(CONT.)
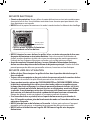
yKeep oven vent ducts unobstructed.
The oven vent could become hot during oven use. Never block this
vent and never place plastic or heat-sensitive items on or near the
vent.
yBe certain all packing materials are removed from the appliance before operating.
Keep plastics, clothes, and paper away from parts of the appliance that may become hot.
yDO NOT force the door open. This can damage the automatic door locking system. Use
care when opening the oven door after the self-cleaning cycle. Stand to the side of the
oven when opening the door to allow hot air or steam to escape. The oven may still be
VERY HOT.
yDO NOT use a steel-wool pad. It will scratch the surface.
yDO NOT use harsh etching, abrasive cleaners or sharp metal scrapers to clean
the oven door glass since they can scratch the surface. This may result in the glass
shattering.
yBe careful when removing and lifting the door.
yDO NOT lift the door by the handle. The door is very heavy.
yDO NOT step or sit on the oven door. Be sure to follow proper installation instructions.
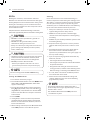
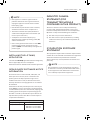
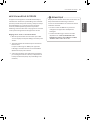
NOTE:
For proper operation vent trim must be installed.
Metal bottom
trim (Vent)
WARNING WARNING
yNEVER use your appliance for warming or heating the room.
yDO NOT use water on grease res. Should an oven re occur, leave the oven door
closed and turn the oven o. If the re continues, throw baking soda on the re or use
a re extinguisher.
yUse dry pot holders only. Moist or damp pot holders on hot surfaces may result in
burns from steam. Do not let the pot holder touch hot heating elements. Do not use a
towel or other bulky cloth.
yDo not use the oven or the drawer for storage. Flammable materials should not be
stored in or on an oven.
yWear proper apparel. Loose-tting or hanging garments should never be worn
while using the appliance.

5
IMPORTANT SAFETY INSTRUCTIONS
ENGLISH
ELECTRICAL SAFETY
yProtective Liners. Do not use aluminum foil or any other material to line the oven bottoms.
Improper installation of these liners may result in a risk of electric shock or re.
yDo Not allow aluminum foil or the meat probe to contact heating elements.
yDO NOT line the oven walls, racks, bottom, or any other part of the oven with
aluminum foil or any other material. Doing so will disrupt heat distribution, produce poor
baking results and cause permanent damage to the oven interior (aluminum foil will melt to
the interior surface of the oven.)
yBefore replacing your oven light bulb, switch o the electrical power to the oven at
the main fuse or circuit breaker panel. Failure to do so can result in severe personal injury,
death, or electrical shock.
SAFETY DURING USE
yOven Racks. Always place oven racks in the desired position while the oven is cool.
yAlways use pot holders or oven mitts when removing food from the oven.
Hot cookware or plates can cause burns.
yUse caution with the TIMED BAKE or DELAYED TIMED BAKE features. Use the
automatic timer when cooking cured or frozen meats and most fruits and vegetables.
Foods that can easily spoil, such as milk, eggs, sh, meat or poultry, should be chilled
in the refrigerator rst. Even when chilled, they should not stand in the oven for more
than 1 hour before cooking begins, and should be removed promptly when cooking is
completed. Eating spoiled food can result in sickness from food poisoning.
yShould an oven re occur, leave the oven door closed and turn the oven o. If the re
continues, throw baking soda on the re or use a re extinguisher.
yDO NOT put water or our on the re. Flour may be explosive and water can cause a grease
re to spread and cause personal injury.
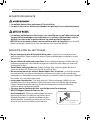
yDO NOT use the broiler pan without the grid. DO NOT cover the grid with aluminum
foil.
No Aluminum foil
WARNING
• DO NOT place aluminum foil directly on the
oven bottom.

6IMPORTANT SAFETY INSTRUCTIONS
CHILD SAFETY
WARNING WARNING
yChildren should be kept away from the oven.
yAccessory parts will become hot when the broiler is in use.
CAUTION CAUTION
yChildren should not be left alone or unattended in an area where the appliance
is in use. Children should never be allowed to sit or stand on any part of the
appliance.
yDO NOT leave small children unattended near the appliance. During the self-
cleaning cycle, the outside of the oven can become very hot to the touch.
SAFETY WHEN CLEANING
yDo not clean the door gasket. The door gasket is essential for a good seal. Care should be taken
not to rub, damage, or move the gasket.
yDo not use oven cleaners. No commercial oven cleaner or oven liner protective coating of any
kind should be used in or around any part of the oven.
yBefore self cleaning the oven, remove broiler pan, all oven racks, meat probe and any other
utensils from the oven cavity.
yNever keep pet birds in the kitchen. The health of birds is extremely sensitive to the fumes
released during an oven self-clean cycle. Fumes may be harmful or fatal to birds. Move birds to a
well-ventilated room.
yImportant instruction : In the event the self clean error code F is displayed, and error melody
sounds, the oven is malfunctioning in the self clean mode. Switch o the electrical power to the
main fuse or breaker and have the appliance serviced by a
qualied technician.
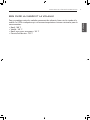
yMake sure oven lights are cool before cleaning. Clean
only parts listed in manual.
yDO NOT block the oven vent during operation. This can
damage the electric parts of the oven. Air must be able
to move freely. The metal bottom trim (vent) should be
properly assembled on the front bottom of the oven before
installing the oven door.
Metal bottom trim
(Vent)

7
IMPORTANT SAFETY INSTRUCTIONS
ENGLISH
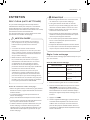
COOK MEAT AND POULTRY THOROUGHLY
To protect against food-borne illnesses, cook meat and poultry thoroughly. The USDA has indicated
the following as safe minimum internal temperatures for consumption:
yGround beef: 160 °F
yPoultry: 165 °F
yBeef, veal, pork, or lamb: 145 °F
yFish/seafood: 145°F

8PRODUCT OVERVIEW
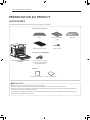
PRODUCT OVERVIEW
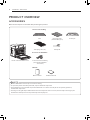
ACCESSORIES
Make sure that all parts are included after purchasing this product.
NOTE
yContact LG Customer Service if any accessories are missing.
yFor your safety and for extended product life, only use authorized components.
yThe manufacturer is not responsible for product malfunction or accidents caused by the use of separately purchased,
unauthorized components.
yThe images in this guide may be different from the actual components and accessories, which are subject to change by the
manufacturer without prior notice for product improvement purposes.
Electric convection built-in oven
Grid
Telescoping rack (1 ea)
6 wood screws for mounting
(4 needed for installation
and 2 extras)
Accessories for Installation
Accessories for Cooking
Heavy duty racks
(Standard Rack) (2 ea)
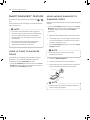
Meat probe
Broiler pan
Owner’s manual
Manuals
Installation manual

9
PRODUCT OVERVIEW
ENGLISH
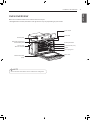
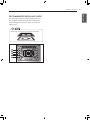
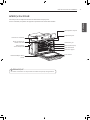
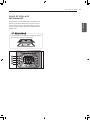
OVEN OVERVIEW
Make sure to understand the name and function of each part.
* Throughout this manual, the features and appearance may vary depending on your model.
NOTE
y The model and serial number can be verified at the rating label.
Control panel
Door switch
Door latch
Broiler pan & Grid
Standard racks (2 ea)
Oven door
Gasket
Telescoping rack
Rating label model and
serial number plate
Spacer (2 ea)
- One on each side
Metal bottom trim
(vent)

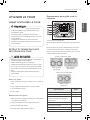
10 PRODUCT OVERVIEW
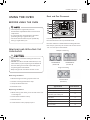
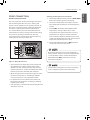
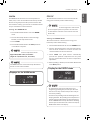
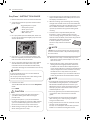
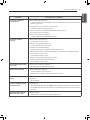
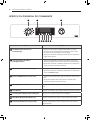
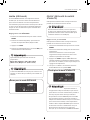
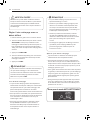
CONTROL PANEL OVERVIEW
Name Description
1
Cook Time / Clock − Touch button and turn the Time/Temp knob to set the desired
amount of time for food to cook. The oven shuts off when the
set cooking time runs out.
− Touch and hold the button for three seconds to set the time
of day.
2
Start Time / Setting − Touch button and turn the Time/Temp knob to set the
delayed start time. The oven starts at the set time.
− Touch and hold button for three seconds to select and adjust
oven settings.
3
Probe / Lockout − Touch button to select probe function.
− Touch and hold button for three seconds to activate to active
LOCKOUT.
4
Timer On/Off (Wi-Fi) − Touch the button to set or cancel timer on oven.
− Touch and hold button for three seconds to connect the
appliance to Wi-Fi network.
5
Oven Light Touch button to turn oven light on/off.
6
Start Touch button to start all oven features.
7
Smart Diagnosis Use during the Smart Diagnosis feature.
8
Oven Mode Knob Turn knob to select oven operating mode.
9
Time/Temp Knob Turn knob to set temperature or cook time for oven.
8
1 2 3 4 5 6
97

11
FEATURES
ENGLISH
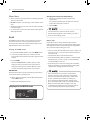
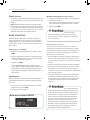
FEATURES
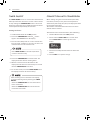
CLOCK
The clock must be set to the correct time of day in order
for the automatic oven timing functions to work properly.
1. Set Oven Mode knobs to the OFF position.
2. Touch and hold COOK TIME for 3 seconds.
3. Turn the Time/Temp knob to select the desired time.
Turn the knob clockwise to increase the time and
counterclockwise to decrease the time.
4. Touch START to enter the time and start the clock.
Setting the Hour Mode on the Clock
(12 or 24 hours)
The control is set to use a 12-hour clock. To change it to a
24-hour time clock, follow the steps below.
1. Set Oven Mode knobs to the OFF position.
2. Touch and hold START TIME for 3 seconds.
3. Turn the Time/Temp knob to set the desired hour
mode on the clock.
4. Touch START to accept the change.
Power Outage
If the dot of dot of time ashes on the display, there
may have been a power outage. Reset the clock.
Touch any button or turn any knob once to reset.
Enter the correct time of day by turning the Time/
Temp knob. Touch START.
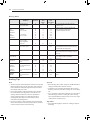
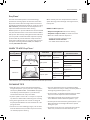
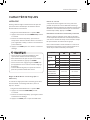
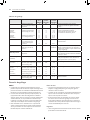
Minimum and Maximum Default Settings
All of the features listed have a minimum and a
maximum time or temperature setting that can be
entered into the control. A beep sounds each time a
control button is touched.
Two short tones sound if the entry of the temperature
or time is below the minimum or above the maximum
setting for the feature.
FEATURE MIN. TEMP. /TIME MAX. TEMP. / TIME
CLOCK TIME 12 Hr. 1:00 Hr. / Min. 12:59 Hr. / Min.
24 Hr. 0:00 Hr. / Min. 23:59 Hr. / Min.
TIMER 12 Hr. 0:01 Min. 11:59 Hr. / Min.
24 Hr. 0:01 Min. 11:59 Hr. / Min.
COOKING TIME 12 Hr. 0:01 Min. 11:59 Hr. / Min.
24 Hr. 0:01 Min. 11:59 Hr. / Min.
BAKE/ROAST 170°F / 80°C 550°F / 285°C
CONVECTION BAKE
/CONVECTION ROAST
/CRISP CONVECTION
170°F / 80°C 550°F / 285°C
BROIL Full/Center Low (350°F)High (550°F)
SELF CLEAN TIME 3Hr. 5Hr.
PROOF 0:01 Min. 11:59 Hr. / Min.
WARM Low (140°F)High (200°F)
PROBE 80 °F / 27°C 210 °F / 100°C
• The time of day cannot be changed during a Timed
Baking or Self Clean cycle.
• To check the time of day when the display is
showing other information, touch CLOCK.
• The display reverts to the original setting if START
is not touched within 25 seconds of the clock being
set.
• If the display time is blinking, there may have been
a power failure. Reset the time.
NOTE NOTE

12 FEATURES
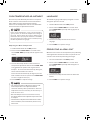
TIMER ON/OFF
The TIMER ON/OFF serves as an extra timer in the kitchen
that beeps when the set time has run out. It does not start
or stop cooking. The TIMER ON/OFF feature can be used
during any of the other oven control functions. The timers
can be operated independently of each other.
Setting the Timer
1. Set Oven Mode knobs to the OFF position.
2. Touch the TIMER ON/OFF. 0:00 with HR inside it
appears and TIMER ashes in the display.
3. Turn the Time/Temp knob to set the desired time.
Turn the knob clockwise to increase the time and
counterclockwise to decrease the time.
If the TIMER ON/OFF is not touched, the timer
returns to the time of day.
NOTE NOTE
4. Touch the TIMER ON/OFF to start the timer. The
display shows the set time counting down.
5. When the set time runs out End shows in the
display. The indicator tones sound every 15 seconds
until the TIMER ON/OFF is touched.
6. To cancel the timer, touch the TIMER ON/OFF once.
The display will return to the time of day.
If the remaining time is not shown in the display,
recall the remaining time by touching the TIMER
ON/OFF.
- Touch the TIMER ON/OFF once to set the time in
hours and minutes.
- Touch the TIMER ON/OFF twice to set the time
in minutes and seconds.
NOTE NOTE
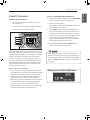
CONVECTION AUTO CONVERSION
When cooking using the convection mode (Conv. Bake,
Conv. Roast, and Crisp Conv.), the oven temperature is
automatically reduced by 25°F(14°C). The display will show
the changed temperature.
This feature is called auto conversion. Your oven comes
with this feature enabled.
To disable the auto conversion feature, do the following:
1. Set Oven Mode knobs to the OFF position.
2. Touch and hold START TIME for 3 seconds. Then
touch START TIME once. Auto appears in the
display.
3. Turn the Time/Temp knob to enable or disable the
feature.
4. Touch START to accept the change.

13
FEATURES
ENGLISH
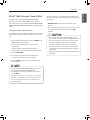
OVEN TEMPERATURE ADJUSTMENT
This oven may cook differently than the one it replaced.
Use the oven for a few weeks to become more familiar
with it before changing the thermostat settings.
If the oven consistently undercooks or overcooks follow
these instructions to adjust the thermostat.
Don't use thermometers, such as those found in
grocery stores, to check the temperature setting of
the oven. Instead, begin by raising or lowering the
thermostat 15°F (8°C). Try the oven for a week with
the new setting and adjust again if needed, using
the rst adjustment as a gauge.
NOTE NOTE
Adjusting the Oven Temperature
1. Set Oven Mode knobs to the OFF position.
2. Touch and hold START TIME for 3 seconds. Then
touch START TIME repeatedly until AJ appears in the
display.
3. Turn the Time/Temp knob to set the amount of
temperature adjustment desired. Touch START TIME
to toggle between positive and negative values.
Example : To increase the thermostat by 15 degrees,
turn the knob clockwise to select 15.
To decrease the thermostat by 15 degrees, turn the
knob clockwise to select 15, then touch START TIME
to select a negative value (-15).
4. Touch START to accept the change.
• This adjustment will not aect the broiling or Self
Clean temperatures. The adjustment will be
retained in memory after a power failure. The oven
temperature can be increased (+) or decreased (-) as
much as 35°F or 19°C.
• Once the temperature is increased or decreased,
the display will show the adjusted temperature until
it readjusts.
• The thermostat adjustment for Bake will also aect
Convection Bake, Convection Roast, Roast or Crisp
Convection.
NOTE NOTE
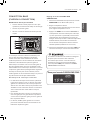
LANGUAGE
The default language of the display is English. It can be
changed to Spanish or French.
1. Set Oven Mode knobs to the OFF position.
2. Touch and hold START TIME for 3 seconds. Then
touch START TIME repeatedly until Lng appears in
the display.
3. Turn the Time/Temp knob to set the desired
language.
4. Touch START to accept the change.
PREHEATING ALARM LIGHT
When the oven reaches its set-temperature, the preheating
alarm light flashes until the oven door is opened. You can
activate or deactivate the preheating alarm light.
1. Set oven mode knobs to the OFF position.
2. Touch and hold START TIME for 3 seconds. Then
touch START TIME repeatedly until PrE appears in
the display.
3. Turn the Time/Temp knob to enable or disable the
feature.
4. Touch START to accept the change.

14 FEATURES
BEEPER VOLUME
The beeper volume can be adjusted to three possible
volume levels, LOUD, LOW and MUTE.
1. Set Oven Mode knobs to the OFF position.
2. Touch and hold START TIME for 3 seconds. Then
touch START TIME repeatedly until BEEP appears in
the display.
3. Turn the Time/Temp knob to select the desired
volume.
4. Touch START to accept the change.
FAHRENHEIT OR CELSIUS
The oven control is set by default to display the Fahrenheit
temperature scale. To display the Celsius scale, follow
these instructions.
1. Set Oven Mode knobs to the OFF position.
2. Touch and hold START TIME for 3 seconds. Then
touch START TIME repeatedly until Unit appears in
the display.
3. Turn the Time/Temp knob to select °F (Fahrenheit) or
°C (Celsius).
4. Touch START to accept the change.
OVEN LIGHT
The interior oven light automatically turns ON when the
door is opened. Touch OVEN LIGHT to manually turn the
oven light on. The lamp of the oven will turn off after 2
minutes and 30 seconds to save power.
The oven light cannot be turned on if the Self Clean
function is active.
NOTE NOTE
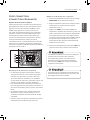
LOCKOUT
The Lockout feature automatically locks the oven door
and prevents most oven controls from being turned on. It
does not disable the clock, timer or the interior oven light.
1. Set Oven Mode knobs to the OFF position.
2. Touch and hold PROBE for 3 seconds.
3. The lock melody sounds, OVEN LOCKOUT appears
in the display and DOOR LOCKED will icker in the
display.
4. Once the oven door is locked, the DOOR LOCKED
indicator stops ickering and remains on along with
the lock icon.
5. To deactivate the Lockout feature, touch and hold
PROBE for 3 seconds. The unlock melody sounds
and UNLOCKING appears in the display until the
controls are unlocked.

15
FEATURES
ENGLISH
START TIME (Delayed Timed COOK)
The automatic timer of the DELAYED TIMED COOK
function turns the oven ON and OFF at the time you
select. This feature can only be used with the BAKE, ROAST,
CONV. BAKE, CONV. ROAST, CRISP CONV. and SELF CLEAN
modes.
Setting the Oven to Delayed Start
The following example is to Bake at 300°F and start baking
at 4:30. Make sure the clock is set for the correct time of
day.
1. Turn the Oven Mode knob to select the BAKE mode.
350°F appears in the display.
2. Turn the Time/Temp knob to set the desired
temperature.
For this example, turn the Time/Temp knob
counterclockwise until 300°F appears in the display.
3. Touch START TIME.
4. Set the start time: Turn the Time/Temp knob
clockwise until 4:30 appears in the display.
5. Touch START. A short beep sounds and the oven
begins baking.
• To cancel the DELAYED TIMED COOK function, turn
the Oven Mode knob to the OFF position.
• To change the cooking time, repeat steps 3-4 and
touch START.
• If your oven clock is set as a 12-hour clock, you can
delay the cook time for 12 hours. If your oven clock
is set as a 24-hour clock, you can delay the cook
time for 24 hours.
NOTE NOTE
The oven continues to cook for the set amount of time
and then turns off automatically when the cooking time
has elapsed.
•END OF CYCLE and the time of day shows in the
display.
•The cook end indicator tone sounds every 60 seconds
until the Oven Mode knob is turned to the OFF
position.
• Use the automatic timer when cooking cured or
frozen meats and most fruits and vegetables. Foods
that can easily spoil, such as milk, eggs, sh, meat
or poultry, should be chilled in the refrigerator.
Even when chilled, they should not stand in the
oven for more than 1 hour before cooking begins,
and should be removed promptly when cooking is
completed.
• Eating spoiled food can result in sickness from food
poisoning.
CAUTIONCAUTION

16 FEATURES
COOK TIME (TIMED COOK)
The oven turns on immediately and cooks for a selected
length of time. At the end of the cooking time, the oven
turns off automatically.
Setting the Timed Cook Function
The following example is to Bake at 300°F for 30 minutes.
1. Set the clock for the correct time of day.
2. Turn the Oven Mode knob to select BAKE. 350°F
appears in the display.
3. Set the oven temperature.
For this example, turn the Time/Temp knob
counterclockwise to select 300°F.
4. Touch COOK TIME. TIMED ashes. BAKE, 0:00 and
300°F appears in the display.
5. Set the desired baking time.
For this example, turn the Time/Temp knob
clockwise until 30:00 appears in the display.
6. Touch START. The oven turns on, and the display
shows the cooking time countdown. The oven
continues to cook for the set amount of time, then
turns o automatically.
Baking time can be set for any amount of time from
1 minute to 11 hours and 59 minutes.
NOTE NOTE • During the preheating mode, the convection fan
operates constantly to circulate the hot air. The
convection fan turns o automatically after the
preset temperature is attained.
• After any cooking cycle has been completed
cooling fans operate to protect the control panel.
This is normal.
NOTE NOTE
When the cooking time has elapsed:
1. END OF CYCLE and the time of day show in the
display. The oven shuts o automatically.
2. The control continues to sound the cook end melody
every minute until the Oven Mode knob is moved to
any position.
Changing the Cook Time while Operating the
Oven
This example is to change the cook time from 30 minutes
to 1 hour and 30 minutes.
1. Touch COOK TIME.
2. Set the new baking time.
For this example, turn the Time/Temp knob
clockwise until 01HR:30 appears in the display.
3. Touch START to accept the change, or wait 10
seconds without touching and the display resets to
the original cooking time.

17
USING THE OVEN
ENGLISH
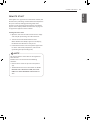
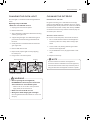
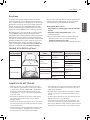
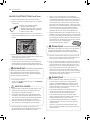
Rack and Pan Placement
A
B
C
D
E
If cooking on two racks:
Place standard oven racks in positions B and D.
Place the cookware as shown below. If baking with more
than one pan, place the pans so that each one has at least
1” to 1 ½” of air space around them.
Type of Food Rack Position
Angel food cake, frozen pies A
Bundt or pound cakes B
Biscuits, muns, brownies, cookies,
cupcakes, layer cakes, pies C
Casseroles C
Turkey, roasts, or ham A
Frozen pizza C
Roast chicken B
USING THE OVEN
BEFORE USING THE OVEN
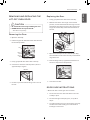
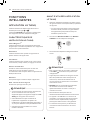
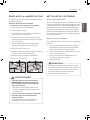
REMOVING AND REPLACING THE
OVEN RACKS
Removing the Racks
1. While wearing oven mitts, grasp the oven rack.
2. Pull the rack straight out until it stops.
3. Lift up the front of the rack.
4. Pull out the rack.
Replacing the Racks:
1. While wearing oven mitts, place the end of the rack
on the support.
2. Tilt the front end of the rack up.
3. Push the rack in.
4. Check that the rack is properly in place.
Standard Rack
(Position B)
Standard Rack
(Position D)
Multiple rack baking
Standard Rack
(Position C)
• The temperature registered by an oven
thermometer may dier from the actual set oven
temperature.
• It is normal for the convection fan to run while
preheating during a regular bake cycle.
• The convection fan motor may run periodically
during a regular bake cycle.
NOTE NOTE
Single rack baking
• Replace oven racks before turning the oven on to
prevent burns.
• DO NOT cover the racks with aluminum foil, or any
other material, or place anything on the bottom of
the oven. Doing so will result in poor baking and
may damage the oven bottom.
• Only arrange oven racks when the oven is cool.
CAUTIONCAUTION

18 USING THE OVEN
Changing the Temperature while Baking
1. Turn the Time/Temp knob to reset the oven
temperature.
For example, turn the knob clockwise to reset the
temperature from 375°F to 425°F.
2. Touch START.
It is normal for the convection fan to operate
periodically throughout a normal bake cycle. This is
to ensure even baking results.
NOTE NOTE
Baking Tips
Follow the recipe or convection food directions for
baking temperature, time, and rack position. Baking time
and temperature will vary depending on the ingredients,
size, and shape of the baking pan used.
yFor best results, food should be placed on a single rack
with at least 1” to 1 1/2” of air space between the pans
and oven walls.
yCheck for doneness at the minimum time.
yUse metal bakeware (with or without a nonstick nish),
heatproof glass-ceramic, ceramic or other bakeware
recommended for oven use.
yDark metal pans or nonstick coatings will cook faster
with more browning. Insulated bakeware will slightly
lengthen the cooking time for most foods.
The oven bottom has a porcelain-enamel nish.
To make cleaning easier, protect the oven bottom
from excessive spillovers by placing a cookie sheet
on the rack below the rack you are cooking on.
This is particularly important when baking a fruit
pie or other foods with a high acid content. Hot fruit
llings or other foods that are highly acidic may
cause pitting and damage to the porcelain-enamel
surface and should be wiped up immediately.
NOTE NOTE
Oven Vent
yAreas near the vent may become hot during operation
and may cause burns.
yDo not block the vent opening at the bottom of the
oven.
yAvoid placing plastics near the vent as heat may distort
or melt the plastic.
yIt is normal for steam to be visible when cooking foods
with high moisture.
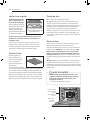
BAKE
Use BAKE to prepare foods such as pastries, breads and
casseroles. The oven can be programmed to bake at
any temperature from 170°F (80°C) to 550°F (285°C). The
default temperature is 350°F (175°C).
Setting the BAKE mode
1. Turn the Oven Mode knob to select the BAKE mode.
2. Set the oven temperature. For example, turn the
Time/Temp knob clockwise until 375°F appears in the
display.
3. Touch START.
The word PREHEATING and 100°F appears in the
display. As the oven preheats the temperature is
displayed in 5-degree increments. Once the oven
reaches the desired temperature, a tone sounds.
PREHEATING
Place the food in the oven after preheating. Preheating is
necessary for better cooking results.
4. When cooking is nished, turn the Oven Mode knob
to the OFF position.
5. Remove the food from the oven.
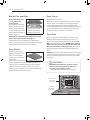
Displays for the BAKE mode

19
USING THE OVEN
ENGLISH
CONVECTION BAKE
Benets of Convection Bake
ySome foods cook up to 25 to 30% faster, saving
time and energy.
yEven cooking results during multiple rack baking.
yNo special pans or bakeware needed.
Convection baking uses a fan to circulate the oven’s heat
evenly and continuously within the oven. This improved
heat distribution allows for even cooking and excellent
results using multiple racks at the same time. Foods
cooked on a single oven rack will generally cook faster
and more evenly with Convection Bake. Multiple oven
rack cooking may slightly increase cook times for some
foods, but the overall result is time saved. Breads and
pastries brown more evenly.
Tips for Convection Baking
yTime saved will vary depending on the amount and
type of food to be cooked. Cookies and biscuits should
be baked on pans with no sides or very low sides to
allow heated air to circulate around the food. Food
baked on pans with a dark nish will cook faster.
yWhen using Convection Bake with a single rack, place
the oven rack in position C. If cooking on multiple
racks, place the oven racks in positions B and D.
yCookies, muns, biscuits and other quickbreads give
very good results when using multiple racks.
The heating elements and a fan turn o when the
door is opened. They turn on again approximately 1
seconds after the door is closed. Turn the Oven Mode
knob to the OFF position to cancel Convection Bake
at any time.
NOTE NOTE
Setting the CONVECTION BAKE Mode
1. Turn the Oven Mode knob to select the CONV. BAKE
mode. 350°F (175°C) appears in the display.
2. Set the oven temperature.
For example, turn the Time/Temp knob clockwise to
set the temperature to 375°F.
3. Touch START. The display shows CONV BAKE and
the converted temperature starting at 100°F (35°C).
As the oven preheats, the display shows increasing
temperatures in 5-degree increments. Once the oven
reaches the desired adjusted temperature, a tone
sounds. The display shows the auto converted oven
temperature (reduced by 25°F or 14°C).
4. Turn the Oven Mode knob to the OFF position to
cancel Convection Bake at any time.
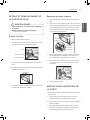
Displays for the CONV. BAKE mode

20 USING THE OVEN
Setting the CONVECTION ROAST Mode
1. Turn the Oven Mode knob to select the CONV.
ROAST mode. 350°F (175°C) appears in the display.
2. Set the oven temperature. For example, turn the
Time/Temp knob clockwise to set the temperature
to 375°F.
3. Touch START. The display shows CONV ROAST and
the temperature, starting at 100°F (35°C). As the
oven preheats, the display shows the increasing
temperature in 5-degree increments. Once the
oven reaches the adjusted set temperature, a tone
sounds. The display shows the auto-converted
oven temperature (reduced by 25°F or 14°C), CONV
ROAST, and the fan icon.
4. Turn the Oven Mode knob to the OFF position to
cancel Convection Roast at any time.
CONVECTION ROAST
The Convection Roast mode is designed to give optimum
cooking performance for roasting meats and poultry.
Preheating is not necessary for meats and poultry. Heated
air circulates around the food from all sides, sealing in
juices and avors. Foods are crispy brown on the outside
while staying moist on the inside. Convection Roast is
especially good for large tender cuts of meat.
The heating elements and a fan turn o when the
door is opened. They turn on again in approximately
1 seconds after the door is closed. When preparing
meats for roasting, use the broiler pan and grid. The
broiler pan catches grease spills and the grid helps
prevent grease splatters. Adjust the Oven Mode knob
to the OFF position to cancel the Convection Roast
feature at any time.
NOTE NOTE
It is normal for cooling fans to run after any cooking
cycle is complete, to protect the control panel.
NOTE NOTE
ROAST
Use the ROAST mode to cook large cuts of meat.
Setting the ROAST Mode
1. Turn the Oven Mode knob to select the ROAST
mode. 350°F (175°C) appears in the display.
2. Set the oven temperature in the display.
For example, turn the Time/Temp knob clockwise
to set the temperature to 375°F.
3. Touch START.
It is normal for cooling fans to run after any cooking
cycle is complete, to protect the control panel.
NOTE NOTE
• The heating elements turn o when the door is
opened. They turn on again in approximately 1
seconds after the door is closed.
• When preparing meats for roasting, use the broiler
pan and grid. The broiler pan catches grease spills
and the grid helps prevent grease splatters.
• Turn the Oven Mode knob to the OFF position to
cancel Roast at any time.
NOTE NOTE
Changing the Temperature while Roasting
1. Turn the Time/Temp knob to reset the oven
temperature.
For example, turn the knob clockwise to reset the
temperature from 375°F to 425°F.
2. Touch START.
Displays for the CONV. ROAST mode
La page est en cours de chargement...
La page est en cours de chargement...
La page est en cours de chargement...
La page est en cours de chargement...
La page est en cours de chargement...
La page est en cours de chargement...
La page est en cours de chargement...
La page est en cours de chargement...
La page est en cours de chargement...
La page est en cours de chargement...
La page est en cours de chargement...
La page est en cours de chargement...
La page est en cours de chargement...
La page est en cours de chargement...
La page est en cours de chargement...
La page est en cours de chargement...
La page est en cours de chargement...
La page est en cours de chargement...
La page est en cours de chargement...
La page est en cours de chargement...
La page est en cours de chargement...
La page est en cours de chargement...
La page est en cours de chargement...
La page est en cours de chargement...
La page est en cours de chargement...
La page est en cours de chargement...
La page est en cours de chargement...
La page est en cours de chargement...
La page est en cours de chargement...
La page est en cours de chargement...
La page est en cours de chargement...
La page est en cours de chargement...
La page est en cours de chargement...
La page est en cours de chargement...
La page est en cours de chargement...
La page est en cours de chargement...
La page est en cours de chargement...
La page est en cours de chargement...
La page est en cours de chargement...
La page est en cours de chargement...
La page est en cours de chargement...
La page est en cours de chargement...
La page est en cours de chargement...
La page est en cours de chargement...
La page est en cours de chargement...
La page est en cours de chargement...
La page est en cours de chargement...
La page est en cours de chargement...
La page est en cours de chargement...
La page est en cours de chargement...
La page est en cours de chargement...
La page est en cours de chargement...
La page est en cours de chargement...
La page est en cours de chargement...
La page est en cours de chargement...
La page est en cours de chargement...
La page est en cours de chargement...
La page est en cours de chargement...
La page est en cours de chargement...
La page est en cours de chargement...
La page est en cours de chargement...
La page est en cours de chargement...
La page est en cours de chargement...
La page est en cours de chargement...
La page est en cours de chargement...
La page est en cours de chargement...
La page est en cours de chargement...
La page est en cours de chargement...
La page est en cours de chargement...
La page est en cours de chargement...
La page est en cours de chargement...
La page est en cours de chargement...
-
 1
1
-
 2
2
-
 3
3
-
 4
4
-
 5
5
-
 6
6
-
 7
7
-
 8
8
-
 9
9
-
 10
10
-
 11
11
-
 12
12
-
 13
13
-
 14
14
-
 15
15
-
 16
16
-
 17
17
-
 18
18
-
 19
19
-
 20
20
-
 21
21
-
 22
22
-
 23
23
-
 24
24
-
 25
25
-
 26
26
-
 27
27
-
 28
28
-
 29
29
-
 30
30
-
 31
31
-
 32
32
-
 33
33
-
 34
34
-
 35
35
-
 36
36
-
 37
37
-
 38
38
-
 39
39
-
 40
40
-
 41
41
-
 42
42
-
 43
43
-
 44
44
-
 45
45
-
 46
46
-
 47
47
-
 48
48
-
 49
49
-
 50
50
-
 51
51
-
 52
52
-
 53
53
-
 54
54
-
 55
55
-
 56
56
-
 57
57
-
 58
58
-
 59
59
-
 60
60
-
 61
61
-
 62
62
-
 63
63
-
 64
64
-
 65
65
-
 66
66
-
 67
67
-
 68
68
-
 69
69
-
 70
70
-
 71
71
-
 72
72
-
 73
73
-
 74
74
-
 75
75
-
 76
76
-
 77
77
-
 78
78
-
 79
79
-
 80
80
-
 81
81
-
 82
82
-
 83
83
-
 84
84
-
 85
85
-
 86
86
-
 87
87
-
 88
88
-
 89
89
-
 90
90
-
 91
91
-
 92
92


LG Electronics LSWS307ST Le manuel du propriétaire
- Catégorie
- Micro-ondes
- Taper
- Le manuel du propriétaire
dans d''autres langues
Autres documents
-
LG LSWS306ST Le manuel du propriétaire
-
LG LSWS309BD Le manuel du propriétaire
-
LG LTE4815ST Le manuel du propriétaire
-
-
LG LSSE3026BD Le manuel du propriétaire
-
-
LG LSSE3026ST Le manuel du propriétaire
-
-
LG LSE4611ST Le manuel du propriétaire