Maytag MVWB455YQ0 Mode d'emploi
- Catégorie
- Machines à laver
- Taper
- Mode d'emploi
Ce manuel convient également à

BRAVOS ®
AUTOMATIC WASHER
USE AND CARE GUIDE
LAVEUSE AUTOMATIQUE
BRAVOS ®
GUIDE D'UTILISATION
ET D'ENTRETIEN
Table of Contents
WASHER SAFETY ......................................................... 2
WHAT'S NEW UNDER THE LiD? ................................. 3
CONTROL PANEL AND FEATURES ............................ 4
DISPENSERS ................................................................ 5
CYCLE GUIDE ............................................................... 6
USING YOUR WASHER ................................................ 7
Using Laundry Product Dispensers...............................8
Starting YourWasher......................................................9
WASHER MAINTENANCE .............................................. 10
TROUBLESHOOTING ...................................................... 11
WARRANTY ........................................................................17
ASSISTANCE OR SERVICE ...........................Back Cover
Table des mati6res
S¢:CURIT¢: DE LA LAVEUSE ...................................... 18
QUOI DE NEUF SOUS LE COUVERCLE? ................ 19
TABLEAU DE COMMANDE
ET CARACTC::RISTIQUES .......................................... 20
DISTRIBUTEURS ........................................................ 22
GUIDE DES PROGRAMMES ...................................... 23
UTILISATION DE LA LAVEUSE .................................. 25
Utilisation des distributeurs de produits de lessive...26
Mise en marche de la laveuse......................................26
ENTRETIEN DE LA LAVEUSE ........................................ 28
DI_PANNAGE ...................................................................... 30
GARANTIE ..........................................................................37
ASSISTANCE OU SERVICE ..............Couverture arri_re
Para una versi6n en espaSol, visite www.maytag.com
Designed to use only HE High Efficiency
detergents.
Congue pour I'utilisation d'un d6tergent
haute efficacit6 seulement.
W10371232B
W10371233A =SP

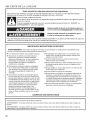
WASHER SAFETY
Your safety and the safety of others are very important.
We have provided many important safety messages in this manual and on your appliance. Always read and obey all
safety messages.
This is the safety alert symbol.
This symbol alerts you to potential hazards that can kill or hurt you and others.
All safety messages will follow the safety alert symbol and either the word "DANGER" or
"WARNING." These words mean:
You can be killed or seriously injured if you don't
immediately follow instructions.
You can be killed or seriously injured if you don't
follow instructions.
All safety messages will tell you what the potential hazard is, tell you how to reduce the chance of injury, and tell you
what can happen if the instructions are not followed.
IMPORTANT SAFETY INSTRUCTIONS
WARNING: To reduce the risk of fire, electric shock, or injury to persons when using the washer, follow basic precautions,
including the following:
[] Read all instructions before using the washer.
[] Do not wash articles that have been previously cleaned
in, washed in, soaked in, or spotted with gasoline,
dry-cleaning solvents, other flammable, or explosive
substances as they give off vapors that could ignite or
explode.
[] Do not add gasoline, dry-cleaning solvents, or other
flammable, or explosive substances to the wash water.
These substances give off vapors that could ignite or
explode.
[] Under certain conditions, hydrogen gas may be
produced in a hot water system that has not been used
for 2 weeks or more. HYDROGEN GAS IS
EXPLOSIVE. If the hot water system has not been
used for such a period, before using the washing
machine, turn on all hot water faucets and let the water
flow from each for several minutes. This will release
any accumulated hydrogen gas. As the gas is
flammable, do not smoke or use an open flame during
[]
[]
Do not allow children to play on or in the washer. Close
supervision of children is necessary when the washer is used
near children.
Before the washer is removed from service or discarded,
remove the door or lid.
[] Do not reach into the washer if the drum, tub or agitator is
moving.
[] Do not install or store the washer where it will be exposed to
the weather.
[] Do not tamper with controls.
[] Do not repair or replace any part of the washer or attempt any
servicing unless specifically recommended in this manual or in
published user-repair instructions that you understand and
have the skills to carry out.
[] See "Electrical Requirements" located in the installation
instructions for grounding instructions.
this time.
SAVE THESE INSTRUCTIONS
State of California Proposition 65 Warnings:
WARNING: This product contains one or more chemicals known to the State of California to cause cancer.
WARNING: This product contains one or more chemicals known to the State of California to cause birth defects or other
reproductive harm.
2

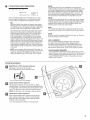
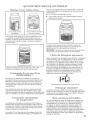
WHAT'S NEW UNDER THE LID?
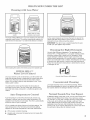
Cleaning with Less
Traditional agitator-style
washer
Washer with low-water
washplate wash system
The most striking difference inyour new washer is the low-water
washplate wash system. The washer automatically adjusts the
water level to the load size--no water level selector is needed.
When loading the washer, fill it evenly around the basket wall.
INTELLIFILL TM
D ter Level Control
Once you start the cycle, the lid will lock, and the washer will
begin the sensing process to determine the correct water level
for the load. This may take several minutes before water is
added. You will find a step-by-step description in the "Cycle
Status Lights" section.
You will hear the motor turn the basket in short pulses to
thoroughly wet the load. This low-water wash method uses
less water and energy compared to a traditional agitator-style
washer.
Auto Temperature Control
Auto Temperature Control (ATC) electronically senses and
maintains a uniform wash and rinse water temperature. ATC
regulates incoming hot and cold water. The ATC is automatically
turned on when a cycle is selected.
ATC is available with Warm/Cold and Cool/Cold settings. The
water temperature in the Hot/Cold and Cold/Cold settings
depends on the water temperature at the water inlet faucets.
m ATC ensures consistent cleaning.
m Heated water consumes the largest amount of energy that
a washer uses.
As the washer dampens and moves the load, the level of the
clothes will settle in the basket. This is normal, and does not
indicate that more clothes should be added.
IMPORTANT: You will not see a washer basket full of water
as with your past agitator-style washer.
Choosing the Right Detergent
Use only High Efficiency detergents. The package will be
marked "HE" or "High Efficiency." Low-water washing creates
excessive sudsing with a regular non-HE detergent. Using
regular detergent will likely result in longer cycle times and
reduced rinsing performance. It may also result in component
failures and noticeable mold or mildew. HE detergents are made
to produce the right amount of suds for the best performance.
Follow the manufacturer's instructions to determine the amount
of detergent to use.
Use only High Efficiency (HE) detergent.
Concentrated Cleaning
Low-water cleaning means concentrated cleaning. Rather
than diluting detergent as done in an agitator-style washer,
this washer delivers the detergent directly to the soils.
Normal Sounds You Can Expect
At different stages of the wash cycle, you may hear sounds and
noises that are different from those of your previous washer.
For example, you may hear a clicking and hum at the beginning
of the cycle, as the lid lock goes through a self-test. There
will be different kinds of humming and whirring sounds as the
washplate moves the load. And sometimes, you may hear
nothing at all, as the washer determines the correct water level
for your load or allows time for clothes to soak.
3

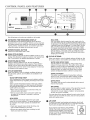
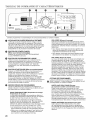
CONTROL P EL FEATURES
Not all features and cycles are available on all models.
ESTIMATED TIME REMAINING DISPLAY
The Estimated Time Remaining display shows the time
required for the cycle to complete. Factors such as load size
and water pressure may affect the time shown in the display.
Tightly packed, unbalanced loads, or excessive suds may
cause the washer to adjust the cycle time, as well.
O POWER/CANCEL BUTTON
Pressto turn the washer ON or OFF.
WASH CYCLE KNOB
Use the Wash Cycle knob to select available cycles on your
washer. Turn the knob to select a cycle for your laundry load.
See "Cycle Guide" for detailed descriptions of cycles.
START/PAUSE BUTTON
Press to start the selected cycle. Be sure all desired
Modifiers and Options have been selected. Press START/
PAUSE once to unlock the lid and add a garment. Press to
complete the cycle from where it was stopped. The lid must
be closed for the washer to start.
CYCLE MODIFIERS
When you select a cycle, its default modifiers will light up.
Not all cycles, options, and modifiers are available on all
models.
WASH TEMP/RINSE TEMP
Auto Temperature Control senses and maintains uniform
water temperatures by regulating incoming hot and cold
water.
Select a wash temperature based on the type of fabric
and soils being washed. For best results and following
the garment label instructions, use the warmest wash
water safe for your fabric.
• Warm and hot water may be cooler than what your
previous washer provided.
• Even in a Cool water wash, some warm water may
be added to the washer to maintain a minimum
temperature.
SPIN SPEED
This washer automatically selects the spin speed
based on the cycle selected. The preset speeds can
be changed. Not all spin speeds are available with
all cycles.
• Faster spin speeds mean shorter dry times, but
may increase wrinkling in your load.
• Slower spin speeds mean less wrinkling, but will
leave your load more damp.
4
O
SOIL LEVEL
Soil Level (wash time) is preset for each wash cycle. As
you press Soil Level, the cycle time (minutes) will increase
or decrease in the Estimated Time Remaining display and
a different wash time will appear. For most loads, use the
Soil Level that is preset with the cycle you have chosen.
For heavily soiled and sturdy fabrics, press SOIL LEVEL
to select more wash time, if needed. For lightly soiled and
delicate fabrics, press SOIL LEVEL to select less wash
time, if needed. Lower Soil Level setting will help reduce
tangling and wrinkling.
CYCLE OPTIONS
When you select a cycle, its default options will light up. Not
all cycles, options, and modifiers are available on all models.
WATER SAVE SPRAY RINSE
Use this option to save water by using a spray rinse
instead of a deep water rinse. This option is the default
setting on some cycles, and selectable on other cycles.
When using fabric softener, always select the Fabric
Softener button, or select Extra Rinse; both of these
options will dispense fabric softener in a deep rinse.
FABRIC SOFTENER
This option must be selected if using fabric softener
during a cycle. It ensures that fabric softener is added
at the correct time in the rinse for even distribution.
EXTRA RINSE
This option can be used to automatically add a second
rinse to most cycles.
END SIGNAL
Use this option to adjust volume of the signal that sounds
at end of cycle. You may select Hi, Low, or Off (no
indicator lit). A louder signal is helpful in removing items
as soon as cycle is complete.
You may also add or remove options for each cycle. Not all
options can be used with all cycles, and some are preset to
work with certain cycles.
O
LID LOCK
To allow for proper load sensing and spinning, the lid will
lock and the Lid Lock light will turn on. This light indicates
that the lid is locked and cannot be opened.
start
if you need to open the lid, press START/
PAUSE.The lid will unlock once the washer
movement has stopped. This may take
several minutes if the load was spinning
at high speed. Press START/PAUSE again pause
to resume the cycle.

O
CYCLE STATUS LIGHT iNDiCATORS
fill wash rinse spin done
a add a garment
U c[ean washer reminder
The Cycle Status Lights show the progress of a cycle.
At each stage of the process, you may notice sounds
or pauses that are different from traditional washers.
FILL
When the Start/Pause button is pressed, the washer
will first perform a self-test on the lid lock mechanism.
You will hear a click, the basket will make a slight turn,
and the lid will unlock briefly before locking again.
Once the lid has locked the second time, the washer
will use short, slow spins to estimate the load size.
These sensing spins may take 2 to 3 minutes before
water is added to the load and you may hear the
hum of these spins. If the Fill light is on, the washer
is working properly. You will hear the motor turn the
basket in short pulses to thoroughly wet the load. The
washer will then move the load briefly, pause to allow
water to soak in to the load, and resume adding water.
This process may repeat until the correct amount of
water has been added for the load. You may also hear
water flowing through the dispenser, adding detergent
to the load.
NOTE: Avoid opening the lid during the Fill portion of
the cycle. The sensing process will start over when the
washer is restarted. The Fill light may also come on
during the Wash portion of the cycle. This is normal.
WAS H
You will hear the motor and washplate moving the load.
Unlike traditional washers, the load is not covered with water.
Low-water cleaning means concentrated cleaning. Rather
than diluting detergent as done in an agitator-style washer,
this washer delivers the detergent directly to the soils. The
motor sounds may change at different stages in the cycle.
The wash time is determined by the selected Soil Level.
RINSE
You will hear sounds similar to the wash cycle as the washer
rinses and moves the load. You may hear the motor turning
on briefly (short hum) to move the basket while filling. Fabric
softener will be added if the Fabric Softener option was
selected. Some cycles use spray rinsing.
SPIN
The washer spins the load at increasing speeds for proper
water removal, based on the selected cycle and spin speed.
DONE
Once the cycle is complete, this light will come on. Remove
the load promptly for best results.
ADD A GARMENT
You may place additional clothing in the wash when
the Add a Garment indicator light is glowing without
sacrificing wash performance. Press START/Pause once.
The Lid Lock light will turn off. Open the washer lid, add
garments and close the lid. Press START/Pause to restart.
CLEAN WASHER REMINDER
The Clean Washer Reminder indicator lights after 45 wash
cycles without a clean washer cycle. See the "Cleaning your
washer" section to run the clean washer cycle, or you can
press REMINDER RESET button to manually reset clean
washer cycle counter.
DISPENSERS
High Efficiency "HE" detergent dispenser
Add liquid or powdered HE detergent
to this dispenser for your main wash cycle.
Use only High Efficiency (HE) detergent.
Liquid chlorine bleach dispenser
This dispenser holds up to 3/4 cup (180 mL) liquid
chlorine bleach. The bleach will be automatically diluted
and dispensed at the optimum time during the the wash
cycle. This dispenser cannot dilute powdered bleach.
NOTE: Fill dispenser only with liquid chlorine bleach.
Liquid fabric softener dispenser
Pour measured liquid fabric softener into the liquid
fabric softener dispenser, if desired. It will dispense
automatically at the optimum time when the Fabric
Softener option is selected.
• Use only liquid fabric softener in this dispenser.
5

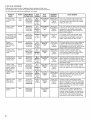
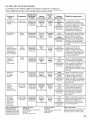
CYCLE (]U[DE
Settings and options shown in bold are default settings for that cycle.
For best fabric care, choose the cycle that best fits the load being washed.
Not all cycles and options are available on all models.
Items to
wash:
Heavily soiled
or sturdy cotton
items
Heavily soiled
white fabrics
Large items such
as sleeping bags,
small comforters,
and blankets
Sheets,
pillowcases,
light blankets,
throws
Cottons, and
mixed garment
loads
Sturdy fabrics,
colorfast items,
towels, jeans
Lightly soiled,
colored clothing,
towels, fabrics
with a wrinkle-
free finish
Lightly soiled
fabrics
Machine-wash
silks, hand-
wash fabrics
Cycle:
Heavy
Duty
Whites
Bulky
Sheets
Normal
Power
Wash
Colors/
Towels
Rapid
Wash
Hand
Wash
Soak
m H =
Wash/Rinse Spin Soil Available Cycle Details:
Temperature: Speed: Level: Options:.
Hot/Cold Max Heavy/Stains Water Save
Warm/Cold Extract Medium Extra Rinse
Cool/Cold Medium Light Fabric
Cold/Cold Low Softener
No Spin
Hot/Cold Max Heavy/Stains Water Save
Warm/Cold Extract Medium Extra Rinse
Cool/Cold Medium Light Fabric
Cold/Cold Low Softener
No Spin
Hot/Cold Medium Heaw/Stains Extra Rinse
Warm/Cold Low Medium Fabric
Cool/Cold No Spin Light Softener
Cold/Cold
Hot/Cold Max Heaw/Stains Water Save
Warm/Cold Extract Medium Extra Rinse
Cool/Cold Medium Light Fabric
Cold/Cold Low Softener
No Spin
Hot/Cold Max Heaw/Stains Water Save
Warm/Cold Extract Medium Extra Rinse
Cool/Cold Medium Light Fabric
Cold/Cold No Spin Softener
Hot/Cold Max Heavy/Stains Water Save
Warm/Cold Extract Medium Extra Rinse
Cool/Cold Medium Light Fabric
Cold/Cold Low Softener
No Spin
Hot/Cold Max Heavy/Stains Water Save
Warm/Cold Extract Medium Extra Rinse
Cool/Cold Medium Light Fabric
Cold/Cold Low Softener
No Spin
Hot/Cold Max Heavy/Stains Water Save
Warm/Cold Extract Medium Extra Rinse
Cool/Cold Medium Light Fabric
Cold/Cold Low Softener
No Spin
Hot/Cold Medium Heaw/Stains Water Save
Warm/Cold Low Medium Extra Rinse
Cool/Cold No Spin Light Fabric
Cold/Cold Softener
Heavily soiled
fabrics
Warm/Cold Heavy/Stains
Cool/Cold Medium
Cold/Cold Light
This cycle combines high-speed wash
action with the Max Extract spin speed.
The Water Save Spray Rinse is a preset
setting for this cycle.
This cycle introduces liquid chlorine bleach
to the load at the proper time for improved
whitening of your heavily soiled white
fabrics. For maximum soil removal use
liquid chlorine bleach.
The washer will fill with enough water
to wet down the load before the wash
portion of the cycle begins, and uses a
higher water level than other cycles.
The wash action of this cycle is designed
to keep large items from tangling and
bailing up. Do not load items directly on
the washplate for this cycle, load in loose
heaps evenly around the basket wall.
Use this cycle for normally soiled
cottons and mixed fabric loads. This
cycle uses the Water Save Spray Rinse.
Low Speed Spin is not available.
Use this cycle for heavily soiled or sturdy
items. Water-level sensing process may
take longer for some items than for others
because they will absorb more water than
other fabric types.
Use this cycle for lightly soiled, colored
clothing or towels. This cycle is a good
choice for fabrics with a wrinkle-free finish.
Use this cycle to wash small, lightly soiled
loads that are needed in a hurry. A Water
Save Spray Rinse is the preset cycle
setting for this cycle.
Use this cycle to wash lightly soiled
garments indicating "Machine Washable
Silks" or "Gentle" cycle on the care label.
Place small items in mesh garment bags
before washing. This cycle uses a higher,
preset water level.
Use this cycle to soak small spots of
set-in stains on fabrics. After time has
expired, water will drain, but washer will
not spin. To set a follow-up cycle, select
Drain & Spin, add additional detergent
and select a cycle based on fabric type.
6

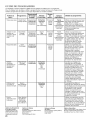
CYCLE GUIDE
Settings and options shown in bold are default settings for that cycle.
For best fabric care, choose the cycle that best fits the load being washed.
Not all cycles and options are available on all models.
msto
wash:
Swimsuits and
items requiring
rinsing without
detergent
Hand-wash
items or
dripping wet
items
No clothes in
washer
Cycle:--W'ash/Rinse
Temperature:
Rinse &
Spin
Drain &
Spin
Clean
Washer
with
Affresh T''
Warm/Cold
Cold/Cold
Max
Extract
Medium
Low
No Spin
Max
Extract
Medium
Low
soil--Available
Level: Options:
Combines a rinse and spin for loads
requiring an additional rinse cycle or to
complete a load after power interruption.
Spin speed is selectable; default is Max
Extract. This cycle uses a higher, preset
water level. Also use for loads that require
rinsing only.
This cycle uses a spin to shorten drying
times for heavy fabrics or special-care
items washed by hand. Use this cycle to
drain washer after cancelling a cycle or
completing a cycle after a power failure.
Use once a month to keep the inside
of the washer fresh and clean. Higher
water levels and Affresh ®work together
to thoroughly clean the washer interior.
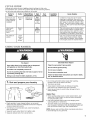
USING YOUR WASHER
Fire Hazard
Never place items in the washer that are dampened
with gasoline or other flammable fluids.
No washer can completely remove oil,
Do not dry anything that has ever had any type of oil on
it (including cooking oils).
Doing so can result in death, explosion, or fire.
Electrical Shock Hazard
Plug into a grounded 3 prong outlet.
Do not remove ground prong.
Do not use an adapter.
Do not use an extension cord.
Failure to follow these instructions can result in death,
fire, or electrical shock.
1. Sort and prepare your laundry
• Empty pockets. Loose change, buttons, or any small
object can pass under the washplate and become trapped,
causing unexpected sounds.
• Sort items by recommended cycle, water temperature,
and colorfastness.
• Separate heavily soiled items from lightly soiled.
• Separate delicate items from sturdy fabrics.
o
o
o
o
Do not dry garments if stains remain after washing,
because heat can set stains into fabric.
Treat stains promptly.
Close zippers, fasten hooks, tie strings and sashes,
and remove non-washable trim and ornaments.
Mend rips and tears to avoid further damage to items
during washing.
Helpful Tips:
• When washing water-proof or water-resistant items, load
evenly. See "Cycle Guide" for tips and more information
on using the Bulky cycle.
• Use mesh garment bags to help avoid tangling when
washing delicate or small items.
• Turn knits inside out to avoid pilling. Separate lint-takers
from lint-givers. Synthetics, knits, and corduroy fabrics will
pick up lint from towels, rugs, and chenille fabrics.
NOTE: Always read and follow fabric care labels instructions
to avoid damage to your garments.
7

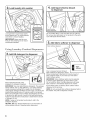
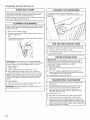
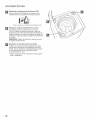
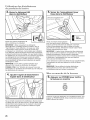
Load laundry into washer
- ._
Load garments in loose heaps evenly
around basket wall. Try mixing different
sized items to reduce tangling.
iMPORTANT: Items need to move
freely for best cleaning and to reduce
wrinkling and tangling.
to dispenser
Do not overfill, dilute, or use more than 3/4 cup (180 mL).
Do not use color-safe bleach or Oxi products in the same
cycle with liquid chlorine bleach.
Using Laundry Product Dispensers
Add HE detergent to dispenser
Detergent dispenser
Add a measured amount of HE
detergent into detergent dispenser.
IMPORTANT: Use only High Efficiency detergents. The package
will be marked "HE" or "High Efficiency." Low-water washing
creates excessive sudsing with a regular non-HE detergent.
Using regular detergent will likely result in longer cycle times and
reduced rinsing performance. It may also result in component
failures and noticeable mold or mildew. HE detergents are made
to produce the right amount of suds for the best performance.
Follow the manufacturer's instructions to determine the amount
of detergent to use.
NOTE: If using an Oxi laundry boost product, add to the
detergent dispenser.
HELPFUL TIP: See "Washer Maintenance" for information on
recommended method of cleaning washer dispensers.
fabric
softener
Pour a measured amount of liquid
fabric softener into dispenser; always
follow manufacturer's directions for correct amount of
fabric softener based on your load size. Then select
Fabric Softener option.
IMPORTANT: Fabric Softener option must be selected
to ensure proper distribution at correct time in cycle.
Do not overfill or dilute. Overfilling dispenser will cause
fabric softener to immediately dispense into washer.
If Extra Rinse option is selected, fabric softener will be
dispensed in the last rinse.
NOTE: Do not use liquid fabric softener dispenser balls in
this washer. They will not dispense correctly.
8

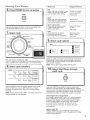
Starting Your Washer
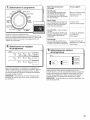
6, Press POWER to turn on washer
power
cancel
Make sure the dispenser drawer is closed completely, then
press POWER/CANCEL to turn on the washer.
7, Select cycle
normal
sheets
)owerwash
colors/towels
rapid
wash
hand
estimated time remaining
drain
rinse &spin _anwasher
soak withafi_sh
Turn cycle knob to choose your wash
cycle. The indicator for Estimated Time Remaining will light up
with a cycle time. For more information, see "Control Panel".
8, Select cycle modifiers
modifiers
Ulcold l cool mwarm Uhot f _ }
cold cold cold cold | rinse temp |
auto temperature control _ _ .I
U no 11 low Immedium III max I spin speed I
spin extract
I
J
Wash Temp ::Suggested Fabrics
Hot ::
Some cold water is added to save :: Whites and pastels
energy. This may be cooler than ::iDurable garments
Warm
_i Some cold water will be added, Bright colors
so this may be cooler than what Moderate to light soils
i: your previous washer provided.
Cool - brights/darks
Warm water is added to assist Colors that bleed
in soil removal and to help or fade
dissolve detergents. Light soils
Cold
Warm water may be added ::iDark colors that
to assist in soil removal bleed or fade
and to help dissolve detergents. Light soils
9, Select cycle options
options
fabric
softener
extra rinse
water save ]
spray rinse
end signal ]
off, tow- hi
Select any other cycle options you may wish to add, if not
previously set. Some cycles will automatically add certain
options such as Fabric Softener or Extra Rinse. These can
be turned off, if desired.
NOTE: Not all options are available with all cycles.
1 O, Select Start/Pause to begin
wash cycle
start
pause
Once you select a cycle, the default settings for that cycle
will be lit. Press the cycle modifiers buttons to change
the Wash Temp/Rinse Temp, Soil Level, and Spin Speed,
if desired.
NOTE: Always read and follow fabric care labels instructions
to avoid damage to your garments.
Press the START/Pause button to start the wash cycle.
When the cycle has finished, the DONE indicator will light
and the end of cycle signal will sound (if set). Promptly remove
garments after cycle has completed to avoid odor, reduce
wrinkling, and rusting of metal hooks, zippers, and snaps.
Unlocking the lid to add garments
If you need to open the lid to add 1 or 2 missed garments:
Press START/Pause; the lid will unlock once the washer
movement has stopped. This may take several minutes
if the load was spinning at high speed. Then close lid
and press START/Pause again to restart the cycle.
If lid is left open for more than 10 minutes, the water
will pump out.
Delay in water fill
Fillling is delayed for 2 to 3 minutes to check for load
unbalance. You will hear the hum of the spin prior to filling.
This is normal operation.
9

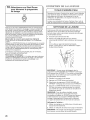
WASHER r INTENANCE
WATER iNLET HOSES
Replace inlet hoses after 5 years of use to reduce the risk of
hose failure. Periodically inspect and replace inlet hoses if
bulges, kinks, cuts, wear, or leaks are found.
When replacing your inlet hoses, mark the date of replacement
on the label with a permanent marker.
r
CLEANING YOUR WASHER
Keep your washer as clean and fresh as your clothes. To keep
washer interior odor-free, follow this recommended monthly
cleaning procedure:
1. Make sure the washer is empty.
2. Using recommended AFFRESH ®washer cleaner, add one
tablet to washer drum
OR
If using liquid chlorine bleach, add 1 cup (250 mL) to liquid
chlorine bleach dispenser.
IMPORTANT: Do not add detergent to CLEAN WASHER
with AFFRESH TM cycle. Do not use more than recommended
amount of bleach to avoid damaging product over time.
3. Close washer lid.
4. Press POWER.
5. Select CLEAN WASHER with AFFRESH TM cycle.
6. Press START/Pause. Water will pour into washer for a
moment and pause, lid will lock, then cycle will continue.
NOTE: For best results, do not interrupt cycle. If cycle must
be interrupted, press POWER and run a RINSE AND SPIN
cycle to ensure cleaner or bleach have been rinsed from
washer.
To clean exterior:
1. Use a soft, damp cloth or sponge to wipe up any spills.
2. Use all-purpose surface cleaner, if needed.
IMPORTANT: To avoid damaging the washer's finish, do not
use abrasive products.
f CLEANING YOUR DISPENSERS
You may find laundry product residue leftover in your
dispensers. To remove residue, wipe with a damp cloth and
towel dry.
NON=USE AND VACATION CARE
Operate your washer only when you are home. If moving, or
not using your washer for a period of time, follow these steps:
1. Unplug or disconnect power to washer.
2. Turn off water supply to washer, to avoid flooding due to
water pressure surge.
WINTER STORAGE CARE
IMPORTANT: To avoid damage, install and store washer
where it will not freeze. Because some water may stay
in hoses, freezing can damage washer. If storing or moving
during freezing weather, winterize your washer.
To winterize washer:
1. Shut off both water faucets; disconnect and drain water
inlet hoses.
2. Put 1 qt. (1 L) of R.V.-type antifreeze in basket and run
washer on RINSE AND SPIN cycle for about 30 seconds
to mix antifreeze and remaining water.
3. Unplug washer or disconnect power.
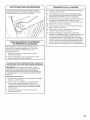
TRANSPORTING YOUR WASHER
1.
2.
3.
4.
5.
6.
7.
Shut off both water faucets. Disconnect and drain water
inlet hoses.
If washer will be moved during freezing weather, follow
WINTER STORAGE CARE directions before moving.
Disconnect drain from drain system and drain any
remaining water into a pan or bucket. Disconnect drain
hose from back of washer.
Unplug power cord.
Place inlet hoses and drain hose inside washer basket.
Drape power cord over edge and into washer basket.
Place packing tray from original shipping materials back
inside washer. If you do not have packing tray, place heavy
blankets or towels into basket opening. Close lid and place
tape over lid and down front of washer. Keep lid taped until
washer is placed in new location.
10

r
RE! NSTALLING/USI NG WASHER AGAI N
To reinstall washer after non-use, vacation, winter storage,
or moving:
1. Refer to Installation Instructions to locate, level, and
connect washer.
2. Before using again, run washer through the following
recommended procedure:
To use washer again:
1. Flush water pipes and hoses. Reconnect water inlet hoses.
Turn on both water faucets.
Electrical Shock Hazard
Plug into a grounded 3 prong outlet.
Do not remove ground prong.
De not use an adapter.
Do not use an extension cord.
Failure to fellow these instructions can result in death,
fire, or electrical shock.
2. Plug in washer or reconnect power.
3. Run washer through BULKY cycle to clean washer and
remove antifreeze, if used. Use only HE High Efficiency
detergent. Use half the manufacturer's recommended
amount for a medium-size load.
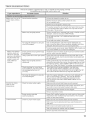
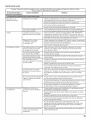
TROUBLESHOOTING
First try the solutions suggested here or visit our website at www.maytag.com/help
for assistance and to possibly avoid a service call.
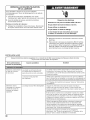
mfyou experience
Vibration, rocking, or Feet may not be in contact with the Front and rear feet must be in firm contact with floor, and washer
"walking" floor and locked, must be level to operate properly= Jam nuts must be tight
against the bottom of the cabinet.
Washer may not be level.
Vibration during spinning
or washer stopped with
all dial lights flashing
Load could be unbalanced.
Check floor for flexing or sagging. Ifflooring is uneven, a 3/4"
(19 mm) piece of plywood under your washer will reduce sound.
See "Level the Washer" in the "Installation Instructions".
Load dry items in loose heaps evenly around basket wall.
Adding wet items to washer or adding more water to basket
could unbalance washer.
Avoid washing single items=Balance a single item such as a
rug or jeans jacket with afew extra items. Ifthe din isflashing,
redistribute the load, close the lid, and press START/PAUSE.
Use Bulky Item cycle for oversized, non=absorbent items
such as comforters or poly=filled jackets= Other items are
not appropriate for Bulky Items cycle. See "Cycle Guide".
Item or load not suitable for selected cycle. See "Cycle Guide"
and "Using Your Washer" in this "Use and Care Guide".
Clicking or metallic
noises
Objects caught in washer
drain system.
Empty pockets before washing. Loose items such as coins
could fall between basket and tub or may block pump.
It may be necessary to call for service to remove items.
It is normN to hear metal items on clothing such as metal snaps,
buckles, or zippers touch against the stainless steel basket.
Gurgling or humming Washer may be It isnormN to hear the pump making a continuous humming sound
draining water, with periodic gurgling or surging asfinn amounts of water are
removed during the spin/drain cycles.
Humming The washer is sensing the You may hear the hum of the sensing spins after you have started
load size. the washer. This isnormal. Sensing spins will take several minutes
k,. before water isadded to the washer, j
11

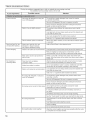
TROUBLESHOOTING
First try the solutions suggested here or visit our website at www.maytag.com/help
for assistance and to possibly avoid a service call.
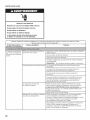
Check the following for Washer not level. Water may splash off basket if washer is not level.
proper installation:
Fill hoses not attached tightly. Tighten fill=hose connection.
Fill hose washers Make sure all four fill hose flat washers are properly seated.
Drain hose connection
Not enough water
in washer
Washer won't run or fill,
washer stops working
Check household plumbing
for leaks or clogged sink or drain.
Washer not loaded as
recommended.
Load not completely covered
in water.
Check for proper water supply.
k.
Pull drain hose from washer cabinet and properly secure it to
drainpipe or laundry tub.
Do not place tape over drain opening.
Water can backup out of a clogged sink or drainpipe. Check all
household plumbing for leaks (laundry tubs, drain pipe, water pipes,
and faucets.)
An unbalanced load can cause basket to be out of alignment and
cause water to splash off tub. See "Using Your Washer" for loading
instructions.
This is normal operation for an HE low=water washer. The load will not
be completely underwater. The washer senses load sizes and adds
correct amount of water for optimal cleaning. See "What's New under
the Lid."
IMPORTANT: Do not add more water to washer. The added water lifts
the load off the impeller, resulting in less cleaning.
Both hoses must be attached and have water flowing to
inlet valve.
Both Hot and Cold water faucets must be turned on.
Check that inlet valve screens have not become clogged.
Check for any kinks in inlet hoses, which can restrict water flow.
J
Electrical Shock Hazard
Plug into a grounded 3 prong outlet.
Do not remove ground prong.
Do not use an adapter.
Do not use an extension cord.
Failure to follow these instructions can result in death,
fire, or electrical shock.
First try the solutions suggested here or visit our website at www.maytag.com/help
for assistance and to possibly avoid a service call.
If you experience Possible Causes Solution
Washer won't run or fill,
washer stops working
(cont.)
12
Check proper electrical supply.
Plug power cord into a grounded 3 prong outlet.
Do not use an extension cord.
Ensure there is power to outlet.
Reset a tripped circuit breaker. Replace any blown fuses.
NOTE: If problems continue, contact an electrician.

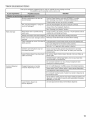
TROUBLESHOOTING
First try the solutions suggested here or visit our website at www.maytag.com/help
for assistance and to possibly avoid a service call.
Washer won't run or fill,
washer stops working
(cont.)
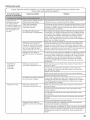
Washer not draining/
spinning, loads are
still wet or spin light
remains on (indicating
that the washer was
unable to pump out
water within ten
minutes)
Incorrect or wrong
wash or rinse
temperatures
Load not rinsed
Normal washer operation.
Washer may be tightly packed.
Not using HE detergent or using too
much HE detergent.
Empty pockets and use garment bags
for small items.
Using cycles with a lower spin speed.
Washer may be tightly packed or
unbalanced.
Check plumbing for correct drain
hose installation. Drain hose extends
into standpipe farther than 4.5"
(114 mm).
Not using HE detergent or using too
much HE detergent.
Check for proper water supply.
Energy-saving controlled
wash temperatures.
Check for proper water supply.
Lid must be closed for washer to run.
Washer will pause during certain phases of cycle.
Do not interrupt cycle.
Washer may be stopped to reduce suds.
The washer senses the dry load with short spins that may take
2 to 3 minutes before water is added. You may hear the hum
of the spins. This is normal.
Remove several items, rearrange load evenly in basket and add
detergent. Close lid and press START/PAUSE.
Do not add more than 1 or 2 additional items after cycle
has started.
Do not add more water to the washer.
Only use HE detergent. Suds from regular detergents can
slow or stop the washer. Always measure detergent and follow
detergent directions based on your load requirements.
To remove suds, cancel cycle. Select DRAIN & SPIN. Select your
cycle. Press START. Do not add more detergent.
Small items may have been caught in pump or between basket
and tub, which can slow draining.
Cycles with lower spin speeds remove less water than cycles
with high spin speeds. Use the recommended cycle/speed spin
for your garment.
Tightly packed loads may not allow the washer to spin correctly,
leaving the load wetter than normal. Evenly arrange the wet load
for balanced spinning. Select DRAIN & SPIN to remove excess
water. See "Using Your Washer" for loading recommendations.
Check drain hose for proper installation. Use drain hose
form and securely attach to drainpipe or tub. Do not tape
over drain opening. Lower drain hose if the end is higher than 96"
(2.4 m) above the floor. Remove any clogs from drain hose.
Suds from regular detergent or using too much detergent can
slow or stop draining or spinning. Use only HE detergent.
Always measure and follow detergent directions for your
load. To remove extra suds, Select RINSE & SPIN. Do not
add detergent.
Make sure hot and cold inlet hoses are not reversed.
Both hoses must be attached to both washer and faucet, and
have both hot and cold water flowing to inlet valve.
Check that inlet valve screens are not clogged.
Remove any kinks in hoses.
Energy Stad '_qualified washers use cooler wash and rinse water
temperatures than traditional topqoad washers. This includes
cooler hot and warm washes.
Make sure hot and cold inlet hoses are not reversed.
Both hoses must be attached and have water flowing to the
inlet valve.
Both hot and cold water faucets must be on.
Inlet valve screens on washer may be clogged.
Remove any kinks in the inlet hose.
.J
13

If you experience
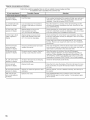
TROUBLESHOOTING
First try the solutions suggested here or visit our website at www.maytag.com/help
for assistance and to possibly avoid a service call.
PossiNe causes Somution
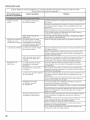
Load not rinsed
Sand, pet hair, lint, etc.
on load after washing
Load is tangling
k,
Not using HE detergent or using too
much HE detergent.
Washer may be tightly packed.
Fabric softener option not selected.
Heavy sand, pet hair, lint, and
detergent or bleach residues
may require addNona[ rinsing.
Washer not loaded as recommended.
Wash action and/or spin speed too
fast for load.
Not cleaning or Wash load not completely
removing stains covered in water.
Added more water to washer.
Washer not loaded as recommended.
Not using HE detergent or using too
much HE detergent.
Not using correct cycle for fabric type.
Not using dispensers.
Not washing like colors together.
The suds from regular detergent can cause the washer
to operate incorrectly.
Use only HE detergent. Be sure to measure correctly.
Always measure detergent and follow detergent directions
based on load size and soil [eve[.
The washer is less efficient at rinsing when load is tightly
packed.
Load garments in loose heaps evenly around the basket wall.
Load with dry items only.
Use cycle designed for the fabrics being washed.
Add only 1 or 2 garments after washer has started.
When using fabric softener, be sure the Fabric Softener option
is selected.
Add an Extra Rinse to the selected cycle.
Load garments in loose heaps evenly around the basket wall.
Reduce tangling by mixing types of load items. Use the
recommended cycle for the type of garments being washed.
Select a cycle with a slower wash action and slower spin
speed. Note that items will be wetter than when using a higher
speed spin.
Washer senses load size and adds correct amount of water.
This is normal and necessary for clothes to move.
Do not add additional water to washer. Additional water lifts
the laundry off the impeller, resulting in less cleaning.
Load garments in loose heaps evenly around the basket wall.
Load with dry items only.
Add only 1 or 2 garments after washer has started.
The suds from regular detergent can prevent washer from
operating correctly.
Use only HE detergent. Be sure to measure correctly.
Always measure detergent and follow detergent directions
based on load size and soil [eve[.
Use a higher soil level cycle option and warmer wash
temperature to improve cleaning.
If using Quick Wash cycle (on some models), wash only a
few items.
Use Whites and Heavy Duty cycle for tough cleaning.
See the "Cycle Guide" to match your load with the best cycle.
Use dispensers to avoid chlorine bleach and fabric softener
staining.
Load dispensers before starting a cycle.
Avoid overfilling.
Do not add products directly onto load.
Wash like colors together and remove promptly after the cycle
is complete to avoid dye transfer.
J
14

TROUBLESHOOTING
If you experience
f
Odors
First try the solutions suggested here or visit our website at www.maytag.com/help
for assistance and to possibly avoid a service call.
j Possible Causes j Solution
Monthly maintenance not done as
recommended.
Not using HE detergent or using too
much HE detergent.
Fabric Damage Sharp items were in pockets during
wash cycle.
Incorrect dispenser
operation
Strings and straps could have tangled.
Items may have been damaged before
washing.
Fabric damage can occur if the load is
tightly packed.
Garment care instructions may not
have been followed.
Liquid chlorine bleach may have been
added incorrectly.
Clogged dispensers or laundry
products dispensing too soon.
Liquid chlorine bleach not
used in dispenser.
Run the Clean Washer cycle with AFFRESH TM monthly.
See "Cleaning Your Washer" in Washer Maintenance.
Unload washer as soon as cycle is complete.
Use only HE detergent. Be sure to measure correctly.
Always follow the detergent directions.
See "Cleaning your Washer" section.
Empty pockets, zip zippers, and snap or hook fasteners before
washing to avoid snags and tears.
Tie all strings and straps before starting wash load.
Mend rips and broken threads in seams before washing.
Load garments in loose heaps evenly around the basket wall.
Use cycle designed for the fabrics being washed.
Add only 1 or 2 garments after washer is started.
Always read and follow garment manufacturer's care label
instructions. See the "Cycle Guide" to match your load with
the best cycle.
Do not pour liquid chlorine bleach directly onto load. Wipe up
bleach spills.
Undiluted bleach will damage fabrics. Do not use more than
recommended by manufacturer.
Do not place load items on top of bleach dispenser when
loading and unloading washer.
Do not overfill dispenser. Overfilling causes immediate dispensing.
Always select Fabric Softener option to assure proper dispensing.
Load dispensers before starting a cycle.
It is normal for small amounts of water to be remain in dispenser at
the end of the cycle.
Homes with low water pressure may result in residual powder inthe
dispenser. To avoid, select a warmer wash temperature if possible,
depending on your load.
Use only liquid chlorine bleach in the Bleach dispenser.
J
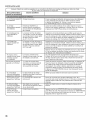
15

TROUBLESHOOTING
First try the solutions suggested here or visit our website at www.maytag.com/help
for assistance and to possibly avoid a service call.
oL (overloaded)
appears in display
uL (unbalanced load)
appears in display
LF (too long to fill)
appears in display
Ld (too long to drain
water ) appears in
display
HC (Hot and Cold
hoses reversed)
appears in display
Sd (Excess suds)
appears in display
Load too large.
Load not balanced. The washer is
running a load-balance correction
routine.
Washer taking too long to fill.
Drain extends more than
4.5" (114 mm)into standpipe.
Washer taking too long to drain
water. Drain extends more than
4.5" (114 mm)into standpipe.
Hot and cold inlet hoses have been
installed incorrectly.
Excessive suds in washer. Washer is
running a suds reduction routine.
Hfan overload is detected, the washer will drain any water and
detergent in the washer. Remove several items and add HE
detergent. Close lid and press START/PAUSE.
Allow the machine to continue. Hfthe dial is flashing and the
machine has stopped, redistribute the load, close the lid, and
press START/PAUSE.
Check plumbing for correct drain hose installation. Use drain
hose form and attach securely to drainpipe or tub. Do not tape
over drain opening. See "Installation Instructions".
Check plumbing for correct drain hose installation. Use drain
hose form and attach securely to drainpipe or tub. Do not tape
over drain opening.
Lower drain hose if the end is higher than 96" (2.4 m) above
the floor. Remove any clogs from drain hose. See "Installation
Instructions".
This code will appear at the end of the wash cycle to indicate
that cold water hose is connected to the hot water inlet and hot
water hose is connected to the cold water inlet.
Allow the washer to continue. Use only HE detergent.
Always measure detergent, and base detergent quantity on
load size. Follow detergent manufacturer's instructions. If the
dial is flashing, reselect your desired cycle using a cold wash
temperature, and press START/PAUSE. Do not add detergent.
dL (Lid cannot lock) An item in the load may be keeping Check for items directly under the lid.
appears in display the lid from locking.
lid (Lid opened) Washer lid left open. Close the lid to clear the display. If the lid is left open for more
appears in display than 10 minutes, the cycle will reset and water in the washer
will drain.
dU (Lid cannot unlock) Objects on washer lid prevent it from Remove objects, such as a basket of laundry, from the top of
appears in display unlocking, the washer.
F## code (F-type System error code. Press START/PAUSE once to clear the code. Then press
error code) appears START/PAUSE again to restart washer. If code appears again,
in display call for service.
16

MAYTAG ®LAUNDRY WARRANTY
LIMITED WARRANTY
For one year frorn the date of purchase, when this rna'orj appliance is operated and rnaintained according to instructions attached to or
furnished with the product, Maytag brand of Whirlpool Corporation or Whirlpool Canada I_P (hereafter "Maytag") will pay for factory
specified parts and repair labor to correct defects in materials or workmanship that existed when this major appliance was purchased.
Service must be provided by a Maytag designated service company. YOUR SOLE AND EXCI_USIVE REMEDY UNDER THIS IJMITED
WARRANTY SHAI.L BE PRODUCT REPAIR AS PROVIDED HEREIN. This limited warranty is valid only in the United States or Canada and
applies on[}/when the major appliance is used in the country in which it was purchased. Proof of original purchase date is required to obtain
service under this limited warranty.
ITEMS EXCLUDED FROM WARRANTY
This limited warranty does not cover:
1. Rep[acernent parts or repair labor if this rnajor appliance is used for other than norrna[, sing[e-farni[y household use or when it is used in
a manner that is inconsistent to published User or operator instructions and/or installation instructions.
2. Service calls to correct the installation of your major appliance, to instruct you on how to use your major appliance, to replace or repair
house fuses, or to correct house wMng or plumbing.
3. Service calls to repair or replace appliance light bulbs, air filters or water filters. Consumable parts are excluded from warranty coverage.
4. Damage resulting from accident, alteration, misuse, abuse, fire, flood, acts of God, improper installation, installation not in accordance
with electrical or plumbing codes, or use of products not approved by Maytag.
5. Cosmetic damage, including scratches, dents, chips or other damage to the finish of your major appliance, unless such damage results
from defects in materials or workmanship and is reported to Maytag within 30 days from the date of purchase.
6. Pick up and delivery. This major appliance is intended to be repaired in your home.
7. Repairs to parts or systems resulting from unauthorized modifications made to the appliance.
8. Expenses for travel and transportation for product service if your major appliance is located in a remote area where service by an
authorized Maytag servicer is not available.
9. The removal and reinstallation of your major appliance if it is installed in an inaccessible location or is not installed in accordance with
Maytag's published installation instructions.
10. Replacement parts or repair labor on major appliances with original model/serial numbers that have been removed, altered, or cannot be
easily determined.
DISCLAIMER OF IMPLIED WARRANTIES
IMPI.IED WARRANTIES, INCI_UDING ANY IMPIJEI) WARRANTY OF MERCHANTABIIJTY OR IMPHEI) WARRANTY OF FITNESS FOR A
PARTICUI_AR PURPOSE, ARE IJMITED TO ONE YEAR OR THE SHORTEST PERIOD AH_OWED BY I.AW. Some states and provinces do not
allow limitations on the duration of implied warranties of merchantability or fitness, so this limitation may not apply to you. This warranty
gives you specific legal rights, and you also may have other rights that vary from state to state or province to province.
LIMITATION OF REMEDIES; EXCLUSION OF INCIDENTAL AND CONSEQUENTIAL DAMAGES
YOUR SOI_E AND EXCI_USIVE REMEDY UNDER THIS I.IMITEI) WARRANTY SHAM_ BE PRODUCT REPAIR AS PROVIDED HEREIN.
MAYTAG SHAH_ NOT BE I.IABI_E FOR INCIDENTAl_ OR CONSEQUENTIAl_ DAMAGES. Some states and provinces do not allow the
exclusion or limitation of incidental or consequential damages, so these limitations and exclusions may not apply to you. This warranty gives
you specific legal rights, and you also may have other rights that vary from state to state or province to province.
If outside the 50 United States and Canada, contact your authorized Maytag dealer to determine if another warranty applies.
If you think you need repair service, first see the "Troubleshooting" section of the Use & Care Guide. If you are unable to resolve the problem
after checking "Troubleshooting," additional help can be found by checking the "Assistance or Service" section or by calling Maytag. In the
U.S.A., call 1-800-688-9900. In Canada, call 1-800-807-6777. 6/08
Keep this book and your sales slip together for future reference.
You must provide proof of purchase or installation date for in-
warranty servmce.
Write down the following inforrnation about your rnajor appliance
to better help you obtain assistance or service if you ever need it.
You will need to know your complete model number and serial
number. You can find this information on the model and serial
number label located on the product.
Dealer name
Address
Phone number
Model number
Serial number
Purchase date
1T

p p
$ECURITE DE LA LAVEUSE
Votre s_curit_ et celle des autres est tr_s importante.
Nous donnons de nombreux messages de securit6 importants dans ce manuel et sur votre appareil menager.
Assurez=vous de toujours life tousles messages de securit6 et de vous y conformer.
Voici le symbole d'alerte de securit6.
Ce symbole d'alerte de s_curit6 vous signale les dangers potentiels de d6c_s et de blessures graves
& vous et & d'autres.
Tousles messages de s6curit6 suivront le symbole d'alerte de s6curit6 et le mot "DANGER" ou
"AVERTISSEMENT". Ces mots signifient :
Risque possible de d_c_s ou de blessure grave si
vous ne suivez pas irnm6diaternent les instructions.
Risque possible de d_c_s ou de blessure grave
si vous ne suivez pas les instructions,
Tousles messages de securit6 vous diront quel est le danger potentiel et vous disent comment reduire le risque de
blessure et ce qui peut se produire en cas de non-respect des instructions.
IMPORTANTES iNSTRUCTiONS DE SECURITI_
AVERTISSEMENT : Pour r6duire les risques d'incendie, de choc electrique ou de blessures Iors de I'utilisation de la
laveuse, suivre les precautions fondamentales dont les suivantes :
[] Lire routes les instructions avant d'utiliser la laveuse.
[] Ne pas laver des articles qui ont 6t6 nettoy6s ou
lav6s avec de I'essence ou imbib6s d'essence,
solvants de nettoyage & sec, ou autres substances
inflammables ou explosives; ces substances
peuvent 6mettre des vapeurs susceptibles de
s'enflammer ou d'exploser.
[] Ne pas ajouter d'essence, solvant de nettoyage &
sec ou autre produit inflammable ou explosif dans
I'eau de lavage. Ces substances peuvent emettre
des vapeurs susceptibles de s'enflammer ou
d'exploser.
[] Dans certaines conditions, de I'hydrog_ne gazeux
peut se former dans un circuit d'eau chaude qui n'a
pas 6t6 utilis6 pendant 2 semaines ou plus. LE GAZ
HYDROGI_NE EST EXPLOSIBLE. Si le circuit d'eau
chaude n'a pas 6t6 utilis6 pendant une telle p6riode,
avant d'utiliser la laveuse, ouvrir tous les robinets
d'eau chaude et laisser I'eau s'6couler pendant
plusieurs minutes par chaque robinet. Ceci
permettra 1'6vacuation de I'hydrog_ne gazeux
accumul6. Comme ce gaz est inflammable, ne pas
fumer ou utiliser une flamme nue au cours de cette
p6riode.
[] Ne pas laisser des enfants jouer sur ou & I'int6rieur de la
laveuse. Bien surveiller les enfants Iorsque la laveuse est
utilis6e & proximit6 d'enfants.
[] Avant de mettre la laveuse au rebut ou hors de service,
enlever la porte ou le couvercle.
[] Ne pas tenter d'atteindre un article & I'interieur de la cuve de
la laveuse Iorsque le tambour, la cuve ou I'agitateur est en
mouvement.
[] Ne pas installer ou remiser cette laveuse & un endroit oQ elle
serait exposee aux intemperies.
[] Ne pas modifier les organes de commande.
[] Ne pas reparer ou remplacer un composant quelconque de
la laveuse, ni entreprendre une operation de service, sice
n'est specifiquement recommande dans ce manuel ou dans
un manuel d'instructions de reparations destine & I'utilisateur;
il est alors essentiel que la personne concernee comprenne
ces instructions et soit competente pour les executer.
[] Pour les instructions de liaison & la terre, voir "Specifications
electriques" dans les instructions d'installation.
CONSERVEZ CES iNSTRUCTiONS
Avertissements de la proposition 65 de I'E_tatde Californie :
AVERTISSEMENT : Ce produit contient au moins un produit chimique connu par I'€:tat de Californie pour 6tre & I'origine de
cancers.
AVERTISSEMENT : Ce produit contient au moins un produit chimique connu par I'l_tat de Californie pour 6tre & I'origine de
malformations et autres deficiences de naissance.
18

QUOI DE NEUF $OU$ LE COUWERCLE?
Nettoyer avec moins d'eau
;o ol f "h
Laveuse traditionnelle de
type agitateur
Laveuse a faible consommation
d'eau avec impulseur
I'eau pour les r6glages Hot/Cold (chaude/froide) et Cold/Cold
(froide/froide) d6pend de la temp@ature de I'eau aux robinets
d'arriv6e d'eau.
m La CAT assure un nettoyage uniforme.
m L'eau chaude consomme la quantit6 d'6nergie maximale
utilis6e par une laveuse.
La nouveaut6 la plus flagrante de cette nouvelle laveuse est
son systeme de lavage a faible consommation d'eau avec
impulseur. La laveuse ajuste automatiquement le niveau d'eau
en fonction de la taille de la charge - nul besoin de s61ecteur
de niveau d'eau.
Lorsque I'on charge la laveuse de linge sale, celui-ci doit
6tre r6parti uniform6ment le long des parois du panier.
Commande du niveau d'eau
INTELLIFILL TM
Une fois que I'on d6marre le programme, le couvercle se
verrouille et la laveuse entame un processus de d6tection pour
d6terminer le niveau d'eau appropri6 a la charge. Cela peut
prendre plusieurs minutes avant que I'eau ne soit ajou%e. Voir
la description pas-a-pas dans la section "T6moins lumineux
de programme".
Vous entendrez le moteur faire tourner le panier par de brefs
mouvements d'impulsion pour bien imbiber la charge. Cette
m6thode de lavage avec faible consommation d'eau utilise moins
d'eau et d'6nergie qu'une laveuse traditionnelle de type agitateur.
_,mesure que la laveuse imbibe et d6place la charge, les
v_tements se tassent dans le panier. Ceci est normal et ne
signifie pas que I'on doive rajouter des v6tements.
IMPORTANT : Le panier de la laveuse ne sera pas rempli d'eau,
comme avec votre pr6c6dente laveuse de type agitateur.
Choix du d6tergeat appropri6
Utiliser uniquement des d6tergents Haute efficacit6. Uemballage
portera la mention "HE" ou "High Efficiency" (haute efficacit6).
Un lavage avec faible consommation d'eau produit un exces
de mousse avec un d6tergent non HE ordinaire. II est probable
que I'utilisation d'un d6tergent ordinaire prolongera la dur6e
des programmes et r6duira la performance de ringage. Ceci
peut aussi entrainer des d6faillances des composants et une
moisissure perceptible. Les d6tergents HE sont congus pour
produire la quantit6 de mousse ad6quate pour le meilleur
rendement Suivre les recommandations du fabricant pour
d6terminer la quantit6 de d6tergent a utiliser.
Utiliser uniquement un dOtergent Haute efficacitO (HE).
Nettoyage conceatr6
ke systeme de lavage a faible consommation d'eau signifie un
lavage concentr6. Plut6t que de diluer du d6tergent comme dans
une laveuse de type agitateur, cette laveuse lib@e le d6tergent
directement sur les endroits souill6s.
Commande automatique
de temp6rature
La commande automatique de temp@ature (CAT) d6tecte et
maintient 61ectroniquement une temp@ature uniforme de I'eau
de lavage et de ringage. La CAT r6gule I'arriv6e d'eau chaude
et d'eau froide. La fonction CAT est automatiquement activ6e
Iorsqu'un programme est s61ectionn6.
La fonction CAT est disponible avec les r6glages Warm/Cold
(tiede/froide) et Cool/Cold (fraiche/froide). La temp@ature de
Soas normaux pr6visibles
Au cours des diffOrents stades du programme de lavage, vous
entendrez peut-_tre des bruits que votre laveuse pr6c6dente
ne produisait pas. Par exemple, vous entendrez peut-6tre
un cliquetis au d6but du programme Iorsque le systeme de
verrouillage du couvercle effectue un test automatique. On
entendra diff@ents bourdonnements et bruits de frottements
rythmiques a mesure que I'impulseur d6place la charge. Parfois,
il est possible que la laveuse soit completement silencieuse,
Iorsqu'elle d6termine le niveau d'eau ad6quat ou qu'elle laisse
tremper les v_tements.
19

LE,AU DE COM DE ET C, CTERISTIQUE$
Certains programmes et caract6ristiques ne sont pas disponibles sur certains modeles.
O AFFICHAGE DE DURI'=E RI=SIDUELLE ESTIMI=E
L'affichage de dur6e r6siduelle estim6e indique le temps
n6cessaire & I'ach_vement du programme. Des facteurs
tels que la taille de la charge et la pression de I'eau peuvent
affecter la dur6e affich6e. La laveuse peut 6galement ajuster
la dur6e du programme en cas de surcharge, de charge
d6s6quilibr6e ou de production excessive de mousse.
@
O
BOUTON DE POWER/CANCEL
(Mise sous tension/annulation)
Appuyer sur ce bouton pour METTREEN MARCHE
ou pour ARR#TERla laveuse.
BOUTON DE PROGRAMME DE LAVAGE
Utiliser le bouton de programme pour s61ectionner les
programmes disponibles de la laveuse et tourner le
bouton de programme pour s61ectionner un programme
correspondant a la charge de linge. Voir "Guide de
programmes" pour des descriptions de programmes
d6taill6es.
BOUTON START/PAUSE (Mise en marche/pause}
Appuyer sur START/PAUSE (Mise en marche/pause) pour
mettre votre laveuse en marche apr_s s61ection d'un
programme. S'assurer que tousles modificateurs et options
d6sir6s ont 6t6 s61ectionn_s. Appuyer une fois sur
START/PAUSE (Mise en marche/pause) pour d6verrouiller
le couvercle et ajouter un v_tement. Appuyer sur START/
PAUSE (Mise en marche/pause) pour reprendre le programme
la oQil a 6t6 interrompu. Le couvercle doit _tre ferm6 pour
que la laveuse se mette en marche.
O
MODIFICATEURS DE PROGRAMMES
Lorsqu'on s61ectionne un programme, ses r6glages par
d6faut s'allument. Certains programmes et options ne sont
pas disponibles sur certains modeles.
WASH TEMP/RINSE TEMP (Temperature de lavage/
Temperature de rin£age)
La commande automatique de temp6rature d6tecte et
maintient une temp6rature uniforme de I'eau en r6gulant
le d6bit d'arriv6e d'eau chaude et d'eau froide.
S61ectionner une temp6rature de lavage en fonction
du type de tissu et de salet6 a laver. Pour des r6sultats
optimaux, suivre les instructions sur 1'6tiquette du
v_tement et utiliser la temp6rature d'eau de lavage la plus
chaude possible qui reste sans danger pour le tissu.
• Les temp6ratures de I'eau tiede et de I'eau chaude
seront inf6rieures a celles de votre pr6c6dente laveuse.
• M_me avec un r6glage de lavage a I'eau fraTche, il est
possible que de I'eau tiede soit ajout6e & la laveuse
pour maintenir une temp6rature minimale.
SPiN SPEED (Vitesse d'essorage)
Cette laveuse s61ectionne automatiquement la vitesse
d'essorage en fonction du programme s61ectionn& Les
vitesses pr6r6gl6es peuvent etre modifi6es. Sur certains
programmes, certaines vitesses d'essorage ne sont pas
disponibles.
• Des vitesses d'essorage plus 61ev6es signifient des
dur6es de s6chage plus courtes mais elles peuvent
augmenter le froissement de la charge.
• Des vitesses d'essorage plus lentes signifient moins
de froissement mais laissent la charge plus humide.
SOIL LEVEL (Niveau de salet_)
Le niveau de salet6 (dur6e de lavage) est pr6r6gl6 pour
chaque programme de lavage. Lorsqu'on appuie sur
la touche Niveau de salet6, la dur6e du programme (en
minutes) augmente ou diminue sur I'afficheur de la dur6e
r6siduelle estim6e et une dur6e de lavage diff_rente
apparaft. Pour la plupart des charges, utiliser le niveau
de salet_ pr_r_gl_ pour le programme choisi. Pour les
tissus tr_s sales et robustes, appuyer sur SOIL LEVEL
(Niveau de salet_) pour prolonger la dur_e de lavage si
necessaire. Pour les tissus peu sales et delicats, appuyer
sur SOIL LEVEL (Niveau de salet_) pour abr_ger la dur_e
de lavage si n_cessaire. Un r_glage de niveau de salet_
inf_rieur aidera a r_duire I'emm_lement et le froissement.
OPTIONS DE PROGRAMMES
Lorsqu'on s_lectionne un programme, ses r_glages par
!_ d_faut s'allument. Certains programmes et options ne sont
pas disponibles sur certains modeles.
WATER SAVE SPRAY RINSE (Rin£age
par aspersion _ faible consommation d'eau)
Utiliser cette option pour _conomiser de I'eau
gr&ce a un rin(_age par aspersion au lieu d'un ringage
en profondeur. Cette option est r_gl_e par d_faut
sur certains programmes et peut _tre s_lectionn_e
pour d'autres. Si I'on utilise de I'assouplissant de tissu,
toujours s_lectionner le bouton Fabric Softener
(Assouplissant pour tissu) ou s_lectionner Extra Rinse
(Ringage suppl_mentaire); ces deux options distribueront
I'assouplissant pour tissu dans un rin(_age en profondeur.
FABRIC SOFTENER (Assouplissant pour tissu)
Cette option dolt _tre s_lectionn_e si I'on utilise
de I'assouplissant pour tissu durant un programme.
Ceci garantit que I'assouplissant pour tissu est ajout_
au bon moment Iors du ringage pour _tre correctement
distribu&
20
La page est en cours de chargement...
La page est en cours de chargement...
La page est en cours de chargement...
La page est en cours de chargement...
La page est en cours de chargement...
La page est en cours de chargement...
La page est en cours de chargement...
La page est en cours de chargement...
La page est en cours de chargement...
La page est en cours de chargement...
La page est en cours de chargement...
La page est en cours de chargement...
La page est en cours de chargement...
La page est en cours de chargement...
La page est en cours de chargement...
La page est en cours de chargement...
La page est en cours de chargement...
La page est en cours de chargement...
La page est en cours de chargement...
La page est en cours de chargement...
-
 1
1
-
 2
2
-
 3
3
-
 4
4
-
 5
5
-
 6
6
-
 7
7
-
 8
8
-
 9
9
-
 10
10
-
 11
11
-
 12
12
-
 13
13
-
 14
14
-
 15
15
-
 16
16
-
 17
17
-
 18
18
-
 19
19
-
 20
20
-
 21
21
-
 22
22
-
 23
23
-
 24
24
-
 25
25
-
 26
26
-
 27
27
-
 28
28
-
 29
29
-
 30
30
-
 31
31
-
 32
32
-
 33
33
-
 34
34
-
 35
35
-
 36
36
-
 37
37
-
 38
38
-
 39
39
-
 40
40


Maytag MVWB455YQ0 Mode d'emploi
- Catégorie
- Machines à laver
- Taper
- Mode d'emploi
- Ce manuel convient également à
dans d''autres langues
- English: Maytag MVWB455YQ0 User guide