Sigma EM-140 DG Macro Flash Canon Le manuel du propriétaire
- Catégorie
- La caméra clignote
- Taper
- Le manuel du propriétaire
Ce manuel convient également à

0
F30N04121
ELECTRONIC FLASH MACRO
EM-140
DG
NA-iTTL
INSTRUCTIONS
BEDIENUNGSANLEITUNG
MODE D’EMPLOI
INSTRUCCIONES
ISTRUZIONI PER L’USO
ENGLISH
DEUTSCH
FRANÇAIS
ESPAÑOL
ITALIANO
2~9
10~17
18~26
27~34
35~42
43~50
51~57

1

2
ᮇㄊ
EM-140 DG
㆑࿈
Ἰណ
㆑࿈
1m
Ἰណ

3
1
1. 1 2. 2 3. 4. 5.
6. 7. 8. 9. 10. MODE
11. SEL 12. 13. 14. LAMP 15. TEST
16. LIGHT 17. 18.
MACRO 50mm F2.8 EX DG MACRO 105mm F2.8 EX DG
Ø55mm, Ø58mm
Ø52mm, Ø62mm, Ø72mm, Ø77mm
D2 D70 D1 D100 F6 F5 F4
F3 F100 F90X F90 F80
F70D U F60D F50D F-801S F-801 F-601M F-601 F-501 F-401X F-401S
F-401 F-301 FA FE10 FE2 FG FM10 New FM2 600
CPU
D G IX D
AF F3AF Ai-P
CPU
Ai-S Ai E
IX APS 35mm
4
30 4
4

4

5
OFF
4
ON
TEST
ON 90
OFF TEST
ON
OFF ON
OFF
◄LOCK
①
②
ۋ

6
LIGHT 8 LIGHT
8
LAMP 20
ۋ

7
TTL
TTL
A
F3 FM10 New FM2 FE10 TTL
MODE TTL BL TTL
ۋ TTL BL
i-TTL D-TTL
”
d
”
ۋF6 F5 F4 F100 F90X F90 F80 F70D F-801S F-801
U 600 TTL BL TTL
TTL
ۋ
TTL/BL TTL 5
ۋ
A
D
3D- BL
D
AF
BL
F6 F5
F100
F90X
F90
F80
F70D
CPU
A M
TTL-BL
TTL
F5 F100 F80
TTL
TTL-BL
CPU
TTL-BL
F4
F-801S
F-801
U
600i
CPU
A M
TTL-BL
TTL
F4 F3 AF
Ai-S Ai E
TTL-BL
F4
TTL
600i M
TTL
TTL-BL
TTL-BL
CPU
TTL-BL
F-601
F-601M
CPU
A M
TTL-BL
F-601M
CPU
P S
A M
TTL-BL
M
TTL-BL
F60D
F50D
F-401X
CPU
M
TTL-BL
P
TTL
CPU
Ai-S Ai E
F3AF
A M
TTL
F-501
F-301
A M
TTL
P S
TTL
CPU
A M
TTL
F-401S
F-401
CPU
M
TTL
FA, FE2
FG, F3
CPU
CPU
A M
TTL
ۋ F5

8
F100 TTL D-TTL i-TTL

9
① TTL/ BL (TTL) SEL
② 1 2
③ SEL
SEL
10
TTL, M(1/1, 1/2)
15
M(1/4, 1/8)
20
M(1/16 1/32)
40
MULTI
10
ۋ
ۋ 1/1
~
1/64
M
MODE M
SEL 1
1
-- 1
SEL 2
2
-- 2
SEL
ۋ 1 2
ۋ 1
ۋ
m F
FV
FV

10
ۋ D70 F6
ۋ

11
ۋ F6 F5 F4 F100 F90X F90 F80
F70D U F-801S F-801 F-601M F-601 600
ۋ
ۋ F-601M F-601
ۋ 1 3 3 1
MODE TTL BL (TTL)
SEL
SEL
0
F3 FM10 New FM2 FE10
M
M
ۋ
ۋ
ۋ
MODE
TEST
10 10
10

12
1 100Hz
90
3

13
M
MODE MULTI
SEL
SEL
SEL
SEL
EF-500 DG SUPER NA-iTTL
ۋD70 F6
ۋ
ۋ
ۋ 5m
ۋ
䝳䜨䝨䝰䜽i-TTL⮤ິㄢක᧔ ᙫ
i-TTL
3
MODE
ۋ i-TTL FV
䝳䜨䝨䝰䜽䝢䝏䝩䜦䝯Ⓠක᧔ᙫ
3
MODE
SEL 2

14
MODE M
SEL
SEL

15
1 1 2 2
䝳䜨䝨䝰䜽䝢䝯䝅Ⓠක᧔ᙫ
① 3
②
MODE
SEL 2
MODE MULTI
SEL
SEL
䝅䝧䝷䝑䝯 ᏽ
① SEL
② C1 C4
③ SEL
④
14 ISO 100 m 2
4 4 4
4 25
3 25
80
430g
76.7mm 136.2mm 82.4mm
126.6mm 128.8mm 30.5mm

16
ENGLISH
Thank you for purchasing the Sigma Electronic FlashMacro EM-140 DG. The advanced features of this
flashgun allow you to enjoy AF Macro photography. Depending on the camera model, functions and
operation may vary. Please read this instruction booklet carefully. To add to your enjoyment of
photography, the flash has a variety of features. To make the most of all these features, and to get the
maximum performance and enjoyment from your flash, please read this instruction booklet, together with
your camera’s instruction manual, before using the flash, and keep it handy for future reference. (This
Flashgun is exclusive to Nikon SLR cameras)
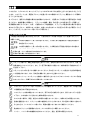
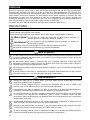
PRECAUTIONS
In order to avoid causing any damage or injury, please read this instruction manual very carefully,
paying attention to the cautionary signs below, before using the flash.
Please take special note of the two cautionary signs below.
Warning !!
Caution!!
Symbol denotes the important points, where warning and caution are required.
Symbol contains information regarding the actions that must be avoided.
Using the product disregarding this warning sign might cause serious injury
or other dangerous results.
Using the product disregarding this caution sign might cause injury or
damage.
Warning !!
This flash contains high voltage circuits. To avoid electric shock or burns, do not attempt to
disassemble the flash. If the outside shell of the unit is broken or cracked, do not touch the
mechanism inside.
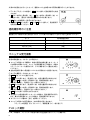
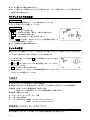
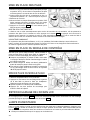
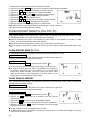
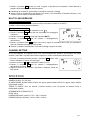
Do not fire the flash close to eyes. Otherwise the bright light could damage the eyes. Keep at least
1m/3feet distance between face and the flash unit, when taking a picture with flash.
Do not touch the synchro terminal of your camera when the flash is attached to hot shoe. High
voltage circuitry could cause electric shock.
Never use your camera in an environment where flammable, burnable, gas, liquids or chemicals,
etc, exist. Otherwise, it might cause fire or explosion.
Caution !!
Do not use this flash unit on any camera other than the Nikon NA series cameras; otherwise the
flash may damage the circuitry of these cameras.
This flash unit is not waterproof. When using the flash and camera in the rain or snow or near water,
keep it from getting wet. It is often impractical to repair internal electrical components damaged by
water.
Never subject the flash and camera to shock, dust, high temperature or humidity. These factors
might cause fire or malfunctioning of your equipment.
When the flash is subjected to sudden temperature change, as when the flash unit is brought from a
cold exterior to warm interior, condensation might form inside. In such a case, place your equipment
in a sealed plastic bag before such a change, and do not use the flash unit, until it reaches room
temperature.
Do not store your flash in a drawer or cupboard etc., containing naphthalene, camphor or other
insecticides. These chemicals will have negative effects on the flash unit.
Do not use a thinner, Benzene or other cleaning agents to remove dirt or finger prints from the
component. Clean with a soft, moistened cloth.
For extended storage, choose a cool dry place, preferably with good ventilation. It is recommended
that the flash be charged and fired several times a month, to maintain proper capacitor functioning.

17
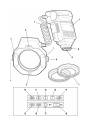
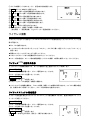
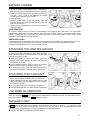
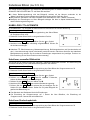
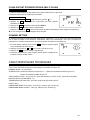
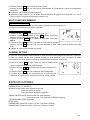
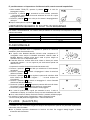
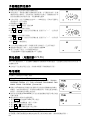
DESCRIPTION OF THE PARTS
Flash Unit
1.Left Flashtube 2.Right Flashtube 3. Auxiliary Light 4. Release Tab 5.MacroFlash Adapter
Controller Unit
6.LCD Panel 7.Battery Cover 8.Shoe Ring 9.Shoe 10.MODE Button 11.SEL SELECT Button
12. + Increment Button 13. - Decrement Button 14.LAMP Button 15.TEST Button
16.LIGHT Button 17.Ready Light 18.Power Switch
LENS USABILITY
Although this Flash is designed specifically for Macro lenses (MACRO 50mm F2.8 EX DG, MACRO
105mm F2.8 EX DG, etc.) it is also possible to use it with other lens types, however please pay attention to
the following points.
Front part or other parts of some lenses rotate while focusing, and also attaching the ring flash to such
lenses would affect focusing mechanism of your camera, possibly resulting in malfunction. Please use
Manual Focus only with such lenses.
Ø55mm, and Ø58mm filter MacroFlash Adapters are bundled with your flashgun. If you want to attach
your flashgun to a lens which has a different filter size then please purchase separately a MacroFlash
Adapter. Only Ø52mm, Ø62mm, Ø72mm, Ø77mm macroflash adapters are available .
Depending on the lens’ focal length or the distance to subject or another reason, it is possible that your
image might be affected by vignetting. Please take some test shoots first to be sure that your setting is
not causing vignetting.
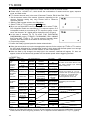
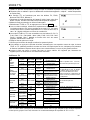
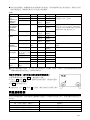
CAMERA MODELS AND FUNCTIONS
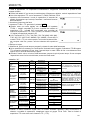
This flash can be used with cameras, which are given below.
D2 Series, D70, D1 Series, D100, F6, F5, F4 Series, F3 Series (*), F100, F90X/N90S Series,
F90/N90 Series, F80 Series, F70D/N70, U/F65/N65, F60D/N60, F50D/N50, F-801S/N8008S,
F-801/N8008, F601M, F-601/N6006, F501/N2020, F401X, F401S/N4004S, F-401/N4004, F-301,
N2000, FA, FE10, FE-2, FG, FM10, New FM2, Pronea 600i
(*) It is necessary to use adapter for connection.
This instruction book is used for the following lens types. (Please check your lens.)
With Built-in CPU Nikon Lenses
D Type Lenses, G Type Lenses, IX Nikor Lenses, Except D type AF
lens (does not include F3AF), Ai-P type lens
Without Built-in CPU Nikon Lenses
Ai-S, Ai, Series E lens
ABOUT THE BATTERY
This flash unit uses four “AA” type Alkaline dry cell batteries or Ni-Cad, Ni-MH, rechargeable batteries.
Manganese batteries can also be used but as they have a shorter life than Alkaline batteries, we do not
recommend using them. Please replace batteries if it takes more than 30seconds to light the Ready Lamp.
ۋ To assure proper electrical contact, clean the battery terminals before installing the batteries
ۋ NiCad batteries do not have standardized contacts. If you use NiCad batteries, please confirm that the
battery contacts touch the battery compartment properly.
ۋ To prevent battery explosion, leakage or overheating, use four new AA batteries of the same type and
brand. Do not mix the type or new and used batteries.
ۋ Do not disassemble or short-circuit batteries, or expose them fire or water; they may explode. Also, do
not recharge the batteries other than Ni-Cd rechargeable batteries.
ۋ When the flash will not be used for an extended period of time, remove the batteries from the flash, to
avoid the possibility of damage from leakage.
ۋ
Battery performance decreases at low temperatures. Keep batteries insulated when using the flash in cold weather.
ۋ As with any flash, it is recommended you carry spare batteries when on a long trip, or when
photographing outdoors in cold weather.

18
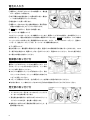
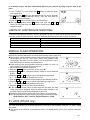
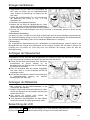
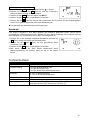
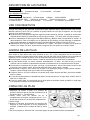
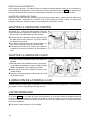
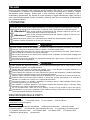
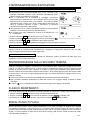
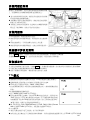
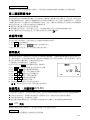
BATTERY LOADING
1.
Be sure to set the Power Switch to the off position then
slide, the battery cover in the direction of the arrow to open.
2. Insert four AA size batteries into the battery chamber. Be
sure the + and – ends of the batteries are aligned
according to the diagram in the chamber.
3. Close the cover.
4. Slide the Power Switch to the ON position. After few
seconds, the Ready Lamp will light, indicating that the
flash unit can be fired.
5. Please press the “Test Button” to be sure that the flash is
working properly.
AUTO POWER OFF
To conserve battery power, the flash unit automatically turns itself off when the flash is not used within
approximately 90seconds. To turn the flash on again, depress the “TEST” button or the camera shutter button,
halfway. Please note that, “Auto Power Off” mechanism does not work with wireless TTL flash mode, normal
slave flash, and designated slave flash modes.
ERROR INDICATION
If the battery power is not sufficient or there is electric information error between the camera and flash unit, the
“
Flash Coverage Angle
”
will blink on the LCD panel. When this occurs, turn the power switch off and on.
If it still blinks, after this procedure, check the battery power.
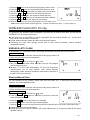
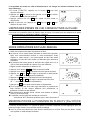
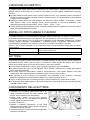
ATTACHING THE CONTROLLER UNIT
Be sure turn off the Power Switch. Then insert the Shoe
Base into the hot shoe on the camera and turn the Shoe
Locking Ring until it is tight.
ۋ When you attach or remove the flash, grasp the
bottom of the flash to prevent damage to the shoe foot
and camera’s hot shoe.
ۋ If the camera’s built-in flash is set in up position,
please close it before you attach the flash unit.
ۋ To remove the flash, rotate the shoe-locking ring in
the opposite direction of ◄LOCK mark, until it stops.
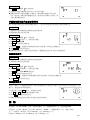
ATTACHING THE FLASH UNIT
1. Attach the MacroFlash adapter to the lens’ filter tread.
2. While pressing the left and right release tabs on both
sides of the holder, place the flash unit over the adapter,
then release both tabs.
You can adjust the position by rotating the flash unit.
Press the release tab when you detach the unit from the lens.
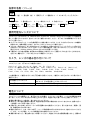
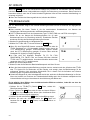
LCD PANEL ILLUMINATION
When you press the LIGHT button, the LCD panel will illuminate for about 8 seconds. The illumination stays on
longer than 8sec, if you press the LIGHT button once again.
AUXILIARY LIGHT
If LAMP button on the Flash Units is pushed, the auxiliary light will emit for 20 seconds. In a dark place, it will
be easy to focus by using the auxiliary light. This fuction is very convenient when composing pictures where
auto focus does not operate well or where focus adjusment in manual is difficult.
ۋ If the shutter button is depressed it will stop working.

19
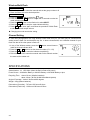
TTL MODE
TTL mode can provide correct exposure for subject, and will control the amount of flash.
ۋ Please refer to <<CHART A>>, which shows the combinations of camera and lens types, exposure
mode, and flash modes.
ۋ TTL function does not work, in the case of Cameras F3 series, FM10, New FM2, FE10.
1. Set the exposure mode of the camera. (However, depending on the
camera, exposure setting may vary). Please refer to Camera’s
Instruction manual.
2. Slide the Flash’s power switch to the ON position.
3. Select TTL/BL or TTL by pressing the MODE button.
ۋ
When you use Digital SLR Camera, please do not fail to select TTL/BL.
CLS compatible models are controlled by i-TTL exposure system. CLS
incompatible models are controlled by D-TTL exposure system. In both
cases, the character "
d
" (digital) will be displayed on the LCD panel.
ۋ In the case of cameras; F6, F5, F4 series, F100, F90X/F90/F80
(N90S/N90/N80) series, F70D/N70, F810S/N8008S, F801/ N8008S
and Pronea 600i. TTL/BL or TTL can be selected. However, Nikon
cameras, other than those on the above list can select only TTL.
4. Focus on the subject.
5. Confirm the Ready Light and press the shutter release button.
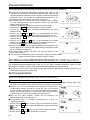
ۋ When the camera does not receive the appropriate exposure for the subject, the TTL/BL or TTL mark on
the LCD panel will appear for 5 seconds after shooting, which shows that the flash power is not enough
for this situation. Please re-take a closer distance or use a wider aperture.
ۋ When the flash is fully charged, the ready light in the camera’s viewfinder will appear. If it does not
appear, shutter of the camera may operate at a slow shutter speed without triggering the flash.
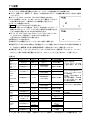
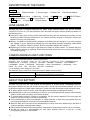
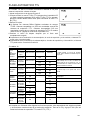
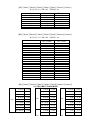
<<CHART
A
>>
Camera
Lens Type
Exp. Mode
Metering
TTL System
Note
D Type
All Modes
All Modes
3-D Multi-Sensor
BL
AF lens other than
D type
All Modes
All Modes
Multi-Sensor BL
F6, F5
F100
F90X/N90ser.
F80/N80ser.
F70D/N70
Without Built in CPU
A/M
Modes
Center-weighted,
Spot Metering
Center Weighted /
Spot Fill-Flash
Can switch to TTL Mode. With F5, F100,
F80, series Cameras spot metering
system is always TTL.
Matrix Pattern
TTL BL
With Built-in CPU
All Modes
Center-weighted,
Spot Metering
Center Weighted /
Spot Fill-Flash
F4 Series
F-801S/N8008S
F-801/N8008
F65/N65
Pronea 600i
Without
Built-in CPU
A/M
Modes
Center-weighted,
Spot Metering
Center
Weighted/Spot
Fill-Flash
Can switch to TTL Mode. TTL BL can
work with only F4 series, AF F3, Ai-S,
Ai, Series E lens. Spot metering system of
F4 is always TTL. Pronea 600i will be
TTL, when exposure mode is “M”.
Center Weighted BL cannot work.
Matrix Pattern
TTL BL
With Built-in CPU
All Modes
Center-weighted,
Spot Metering
Center Weighted /
Spot Fill-Flash
F601/N6006
F-601M
Without
Built-in CPU
A/M
Modes
Center-weighted,
Spot Metering
Center Weighted /
Spot Fill-Flash
Spot Metering cannot use with
F-601M
With Built-in CPU
P/S
A/M
TTL BL
If exposure mode is “M”, it will be Center
Weighted/Spot Fill-Flash
F60D/N60
F50D/N50
F-401X/4004S
Without
Built-in CPU
M
Center Weighted /
Spot Fill-Flash
P
TTL Programmed
Built-in CPU lens
,Ai-S, Ai, Series E,
AF F3 Lens
A/M
TTL
F501/N2020
F301/N2000
Except above
lenses
A/M
TTL
P/S
TTL Programmed
With Built-in CPU
A/M
TTL
F401S/N4004S
F401/N4004
Without Built-in CPU
M
TTL
FA, FE2
FG, F3
With Built-in CPU;
Without Built-in CPU
A/M
TTL
ۋ
When you use Digital SLR cameras, functions will vary depending on the lens type and combinations of exposure
modes, same as F5 and F100 group. (However, all TTL exposure functions will be the D-TTL (i-TTL) system).
La page est en cours de chargement...
La page est en cours de chargement...
La page est en cours de chargement...
La page est en cours de chargement...
La page est en cours de chargement...
La page est en cours de chargement...
La page est en cours de chargement...
La page est en cours de chargement...
La page est en cours de chargement...
La page est en cours de chargement...
La page est en cours de chargement...
La page est en cours de chargement...
La page est en cours de chargement...
La page est en cours de chargement...
La page est en cours de chargement...
La page est en cours de chargement...
La page est en cours de chargement...
La page est en cours de chargement...
La page est en cours de chargement...
La page est en cours de chargement...
La page est en cours de chargement...
La page est en cours de chargement...
La page est en cours de chargement...
La page est en cours de chargement...
La page est en cours de chargement...
La page est en cours de chargement...
La page est en cours de chargement...
La page est en cours de chargement...
La page est en cours de chargement...
La page est en cours de chargement...
La page est en cours de chargement...
La page est en cours de chargement...
La page est en cours de chargement...
La page est en cours de chargement...
La page est en cours de chargement...
La page est en cours de chargement...
La page est en cours de chargement...
La page est en cours de chargement...
La page est en cours de chargement...
La page est en cours de chargement...
La page est en cours de chargement...
La page est en cours de chargement...
La page est en cours de chargement...
La page est en cours de chargement...
La page est en cours de chargement...
La page est en cours de chargement...
La page est en cours de chargement...
La page est en cours de chargement...
La page est en cours de chargement...
La page est en cours de chargement...
-
 1
1
-
 2
2
-
 3
3
-
 4
4
-
 5
5
-
 6
6
-
 7
7
-
 8
8
-
 9
9
-
 10
10
-
 11
11
-
 12
12
-
 13
13
-
 14
14
-
 15
15
-
 16
16
-
 17
17
-
 18
18
-
 19
19
-
 20
20
-
 21
21
-
 22
22
-
 23
23
-
 24
24
-
 25
25
-
 26
26
-
 27
27
-
 28
28
-
 29
29
-
 30
30
-
 31
31
-
 32
32
-
 33
33
-
 34
34
-
 35
35
-
 36
36
-
 37
37
-
 38
38
-
 39
39
-
 40
40
-
 41
41
-
 42
42
-
 43
43
-
 44
44
-
 45
45
-
 46
46
-
 47
47
-
 48
48
-
 49
49
-
 50
50
-
 51
51
-
 52
52
-
 53
53
-
 54
54
-
 55
55
-
 56
56
-
 57
57
-
 58
58
-
 59
59
-
 60
60
-
 61
61
-
 62
62
-
 63
63
-
 64
64
-
 65
65
-
 66
66
-
 67
67
-
 68
68
-
 69
69
-
 70
70


Sigma EM-140 DG Macro Flash Canon Le manuel du propriétaire
- Catégorie
- La caméra clignote
- Taper
- Le manuel du propriétaire
- Ce manuel convient également à
dans d''autres langues
- italiano: Sigma EM-140 DG Macro Flash Canon Manuale del proprietario
- English: Sigma EM-140 DG Macro Flash Canon Owner's manual
- español: Sigma EM-140 DG Macro Flash Canon El manual del propietario
- Deutsch: Sigma EM-140 DG Macro Flash Canon Bedienungsanleitung
- 日本語: Sigma EM-140 DG Macro Flash Canon 取扱説明書
Documents connexes
-
Sigma EM-140 Manuel utilisateur
-
-
-
-
-
-
-
-
-
Autres documents
-
Nikon AF-SVR Zoom-Nikkor Manuel utilisateur
-
-
-
Olympus FC-WR Manuel utilisateur
-
-
Sony HVL-MT24AM Mode d'emploi
-
Nikon FM10 Manuel utilisateur
-
-
Sony HVL-FSL1 Le manuel du propriétaire
-