
1/2
NOTICE D'UTILISATION
INSTRUCTIONS OF USE
MONTAGEANLEITUNG
C11 / INSTRUCTIONS DE MONTAGE / ASSEMBLY INSTRUCTIONS /
MONTAGEANLEITUNG
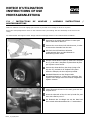
Mettre la machine en mode réglage pince avant de procéder au montage du bras sur la pince.
Select the clamp adjustment mode on the machine before proceeding with the assembly of the arm on the
clamp.
Vor dem Einbau des Bügels auf der Zange bitte den Montage-Modus an der Bedieneinheit anwählen.
Desserrer la vis pointée par la flèche ci-contre pour
retirer l’électrode du bras C11.
Unscrew the screw shown left with the arrow, in order
to remove the electrode from the arm.
Die durch den Pfeil markierte Schraube
(nebenstehend) lösen und die Elektrode in
Pfeilrichtung heraus ziehen.
Dévisser l’électrode de la pince (à l’aide d’une clé plate
de 17), et la retirer. Remplacer la plume dans la pince
par la plume courte fournie.
Unscrew the electrode from the clamp (using a flat
key size 17), and take it off. Replace the injector
inside the clamp by the short injector provided.
Standard-Elektrode von der Zange mittels
Schraubenschlüssel Gr. 17 lösen bzw. entfernen. Den
Injektor in der Zange durch den kürzeren mitgelierten
Injektor ersetzen.
Visser l’électrode du bras C11 à la main, puis avec une
clé plate de 17.
Screw the electrode of the C11 arm by hand first, and
then with a flat key size 17.
Die Elektrode des C11-Bügel erst mit der Hand und
dann mittels Schraubenschlüssel Gr. 17 anschrauben.
73502
_ V3
_07/07/2014

2/2
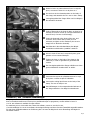
Mettre le levier en position desserrée sur le corps de
pince, et monter le bras C11 sur la pince en C.
Put the lever in the released position on the body of
the clamp, and assemble the C11 arm on the C clamp.
Verriegelungshebel der Zange öffnen und C11-Bügel in
die Aufnahme einsetzen.
Insérer l’électrode sur le shunt du bras, et visser la vis
montrée ci-contre à la main (il n’est pas nécessaire de
visser à fond, c’est une vis de blocage).
Insert the electrode in the shunt of the arm, and
screw the screw shown left by hand (it is not
necessary to tighten to the maximum, the screw is
simply here to block the electrode).
Die Elektrode in die Gelenkaufnahme des Bügels
einschieben und Schraube „handfest“ anziehen.
Serrer le levier à fond sur le corps de la pince, pour
garantir un bon contact électrique.
Tighten the lever on the body of the clamp to the
maximum, in order to guarantee a good electrical
contact.
Den Verriegelungshebel der Zange schließen um einen
guten elektrischen Kontakt sicher zu stellen.
Connecter les tuyaux de refroidissement sur le corps
de la pince. Le bras est prêt à l’utilisation.
Connect the cooling liquid hoses to the body of the
clamp. The arm is ready to use.
Die Kühlleitungen in die entsprechenden Buchsen an
der Zange einstecken. Der Bügel ist einsatzbereit.
Utilisation / Use / Auswahl Schweißbügel
• Un programme bras C11 est disponible sur les soudeuses par point.
Pour les machines antérieures à 2014 qui ne possèderaient pas ce programme, veuillez utiliser le bras C1.
• A C11 arm software is available for spot welders.
For machines prior to 2014 which don’t have this software, ensure to use the C1 arm.
• Der Schweißbügel C11 ist in der Software der Anlage hinterlegt und kann über das Tastenfeld angewählt werden.
Für mit einem Produktionsdatum vor Einführung des C11 kann der Bügel auch unter Einstellung des Bügels C1
verwendet werden.
-
 1
1
-
 2
2

