Kichler Lighting 15005AZT Manuel utilisateur
- Taper
- Manuel utilisateur

QUIC DISC
™
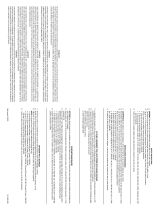
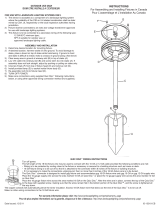
WIRING INSTRUCTIONS
Turn off power.
The full length of the 18 GA xture wire may be used to connect with the 10 GA or 12 GA cable provided the following conditions are met:
• Wiring is to be protected by routing close to the xture or accessory or secured to a building structure such as house or deck.
• 18 GA xture wiring is to be cut off so that it is attached to the connector within 6 inches of the xture or building structure.
• If it is necessary to make the connections underground, then no more than 6 inches of the 18 GA xture wire is to be buried.
The Quic Disc
™
connector is designed to install one xture and accommodates one 18 GA xture wire and one 10 GA or one 12 GA supply wire.
Place the 10 gauge supply wire across the area marked 10 GA on Quic Disc
™
or place the 12 gauge supply wire across the area marked 12 GA
on Quic Disc
™
.
Place the 18 gauge xture wire across the area marked 18 GA on the Quic Disc
™
. After the wires are in place, connecta the top of the Quic Disc
™
to the base with supplied screw, making sure that the wires remain at in the bottom portion of the Quic Disc
™
, and the screw is tightened all the
way down.
The copper contacts will automatically pierce the wires’ insulation. Excess 18 GA xture wire that sticks out the end of the Quic Disc
™
is to be cut off.
Make no other wiring connections to the 18 GA xture wire.
INSTRUCTIONS DE CBLAGE ÉLECTRIQUE AVEC UN QUIC DISC
™
Couper le courant d’alimentation.
Toute la longueur du l électrique de calibre 18 peut être utilisée pour le branchement avec le l électrique de calibre 10 ou 12 si les conditions suivantes sont
remplies :
• Le câblage doit être protégé soit par le cheminement des ls àproximité de l’appareil, par un accessoire ou bien il doit être xé à la structure d’une construction
telle qu’une maison ou une terrasse.
• Les ls de calibre 18 doivent être coupés de manière à pouvoir être reliés au connecteur à une distance maximum de 6 pouces du luminaire ou de la construction.
• Si les branchements doivent être faits sous terre, pas plus de 6 pouces de ls de calibre 18 doivent être enterrés.
Le connecteur Quic Disc™ est conçu an d’installer un luminaire et convient à un l de luminaire 18 GA et un 10 GA, ou un l de réserve 12 GA.
Poser le l électrique de calibre 10 sur le Quic Disc™ en travers de l’endroit marqué calibre 10 ou celui de calibre 12 en travers de l’endroit marqué calibre 12.
Poser le l d’alimentation du luminaire en travers de l’endroit marqué calibre 18. Lorsque les ls sont en place, connecter la partie supérieure du Quic Disc
™
à la
base avec la vi fournie. S’assurer que les ls sont bien à plat dans la partie inférieure du Quic Disc™ et que la vis est serrée à fond.
Les contacts en cuivre perceront automatiquement l’isolement des fils. Couper le fil d’alimentation de calibre 18 qui dépasse du Quic Disc
™
.
Ne faire aucune autre connexion de fils aux fils du luminaire 18 GA.No haga otras conexiones de cableado al alambre del artefacto de calibre 18.
For warranty information please visit: http://www.landscapelighting.com/portal/warranty_page
Pour de plus amples informations sur la garantie, cliquez sur le lien ci-dessous : http://www.landscapelighting.com/portal/warranty_page
FOR USE WITH LANDSCAPE LIGHTING SYSTEMS ONLY.
1) The device is accepted as a component of a landscape lighting system
where the suitability of the CSA or UL labeled combination shall be deter
mined by CSA, UL respectively or the local inspection authorities having
jurisdiction.
2) Fixture shall be connected to an extra low voltage transformer approved for
use with landscape lighting systems.
3) This xture is to be connected to a secondary wiring of the following type:
12 GA 60°C minimum type;
SPT-3 suitable for outdoor use; or
approved landscape lighting cable.
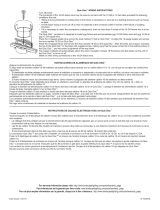
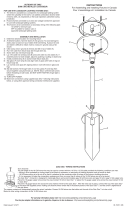
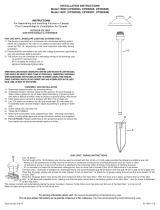
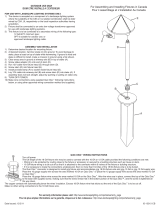
1) Fixture can be mounted using a variety of accessories. Select mounting
accessories and follow the installation instructions provided with each.
2) To mount xture on a stem, a 1/2 NPSM threaded stem is needed (sold
separately). Pass xture wires through stem before threading together.
Secure xture to stem using a set screw and hex wrench.
3) Install supplied lamp to socket inside xture base.
4) Thread diffuser into xture roof. The bead around diffuser is to be at top of
xture.
5) Slide louver over diffuser so that small diameter end is nearest xture roof.
6) Repeat step #5 for remaining louvers. Louvers will t together when tabs
are lined up with grooves in adjoining louver.
7) Thread diffuser assembly into lamped xure base.
A UTILISER UNIQUEMENT POUR LES SYSTÈMES D’ÉCLAIRAG PAYSAGER
1) Le dispositif est accepté en tant que composant d’un système d’é
clairage paysager lorsque la compatibilité de la combinaison étiquetée
UL ou CSA (ACNOR) doit être déterminée par CSA, UL respectivement
ou les autorités d’inspection locales ayant compétence.
2) L’appareil doit étre connecté à un transformateur supplémentaire à
basse tension approuvé pour une utilisation avec les systémes
d’éclairage paysager.
3) Cet apareil doit étre connecté à un câblage secondaire du type suivant:
12GA 60°C type minimum;
SPT-3 combatible pour utilisation extreme;
ou câble d’éclairage paysager agréé.
1) Ce luminaire peut être installé avec une variété d’accessoires. Sélectionnez
les accessoires que vous désirez et suivez les directives qui les accompagnent.
2) Pour monter ce luminaire sur une tige, une tige letée de 1/2 NPSM est
nécessaire. Cette tige est vendue séparément. Passez les ls due luminaire
dans la tige avant de la visser au luminaire.
3) Placez l’ampoule dans la douille à l’intérieur de la base du luminaire.
4) Vissez le diffuser ¡a la base du luminaire. La partie non striée doit être vers
le haut.
5) Glissez les claire - voies sur le diffuseur. Le plus petit diamètre est le plus
proche du couvercle.
6) Répétez numèero 5, pour chaque claire - voie. Les claire-voies s’emboitent
l’un dans l’autre.
7) Vissez le diffuseur maintenant assemblé dans la base du luminaire.
Date Issued: 11/18/11 IS-15005-CB
OUTDOOR USE ONLY
DOM ETRE INSTALLE A L’EXTERIEUR
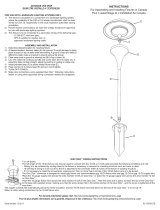
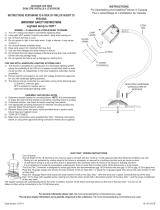
INSTRUCTIONS
For Assembling and Installing Fixtures in Canada
Pour L’assemblage et L’installation Au Canada
ROOF
COUVERCLE
FIXTURE BASE
BASE DU LUMINAIRE
DIFFUSER
DIFFUSEUR
STEM
TIGE
LOUVER
CLAIRE-
VOIE
SHIELD
ECRAN
CHANNEL
CHAINE
FIXTURE BASE
BASE DU
LUMINAIRE
FIG. A
FIG. B
SHIELD
ECRAN
CHANNEL
CHAINE
ROOF
COUVERCLE
BEAD
PARTIE NON
STRIÉE
-
 1
1

Kichler Lighting 15005AZT Manuel utilisateur
- Taper
- Manuel utilisateur
dans d''autres langues
Documents connexes
-
 Kichler Lighting 15509CBR Manuel utilisateur
-
 Kichler Lighting 15005AZT Manuel utilisateur
-
Kichler Lighting 15361AZT Manuel utilisateur
-
 Kichler Lighting 15326AZT Manuel utilisateur
-
 Kichler Lighting 15317AZT Manuel utilisateur
-
 Kichler Lighting 15336BKT Manuel utilisateur
-
 Kichler Lighting 15318AZT Manuel utilisateur
-
 Kichler Lighting 15821AZT27 Manuel utilisateur
-
 Kichler Lighting 15315AZT Manuel utilisateur
-
 Kichler Lighting 15123BK Manuel utilisateur


