Home Decorators Collection 27244 Mode d'emploi
- Taper
- Mode d'emploi

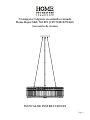
3 Light Pendant in Chrome Finish
Home Depot SKU 763 893 (UPC 718212272442)
(Chrome Fixture)
INSTRUCTION MANUAL
Page 1

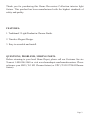
Thank you for purchasing this Home Decorators Collection interior light
fixture. This product has been manufactured with the highest standards of
safety and quality.
FEATURES:
1. Traditional 3 Light Pendant in Chrome Finish.
2. Timeless Elegant Design.
3. Easy to assemble and install.
QUESTIONS, PROBLEMS, MISSING PARTS
:
Before returning to your local Home Depot, please call our Customer Service
Team at 1-800-986-3460 or visit www.homedepot.com/homedecorators. Please
reference your SKU (763 893 Chrome xture) or UPC (718212272442Chrome
xture).
Page 2

Page 3
CAUTION:
1. Before starting installation of this xture or removal of a previous xture,
disconnect the power by turning off the circuit breaker or by removing the
fuse at the fuse box.
2.
CONSULT A QUALIFIED ELECTRICIAN IF YOU HAVE ANY ELECTRICAL
QUESTIONS.
3. If you have any non-electrical questions about this xture, please call our
Customer Service Team at 1-800-986-3460 or visit www.homedepot.com/
homedecorators. Please reference your SKU (763 893 Chrome xture) or
UPC (718212272442 Chrome xture).
4. Keep your receipt and these Instructions for Proof of purchase.
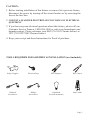
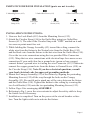
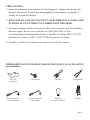
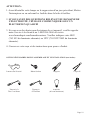
TOOLS REQUIRED FOR ASSEMBLY & INSTALLATION
(not included):
Safety Goggles
Flathead
Screwdriver
Phillips
Screwdriver
Step LadderLight Bulb
(60 watt maximum)
Electrical Tape Wire Strippers Wire Cutters

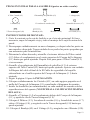
PARTS INCLUDED FOR ASSEMBLY (parts are not to scale):
Page 4
4 Center Tube (#2)
1 Canopy Assembly (#3)
1 Diffuser (#5)
1 Holder (#9) 1 Finial (#10) 68 Crystal (#11)
1 Stem (#4)
1 Rubber Washer (#6) 1 Steel Washer (#7)
2 Hex Nut (#8)
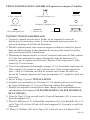
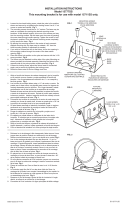
ASSEMBLY INSTRUCTIONS:
1. Shut off power at the fuse box or circuit breaker box, if necessary remove
old xture and all mounting hardware from outlet box.
2. Carefully unpack your new xture and lay out all the parts on a clear area,
take care not to lose any small parts necessary for installation.
3. Determine the desired height and screw the bottom end of Center Tube (#2)
onto the coupling at the top center of Fixture Body (#1) until snug. Repeat
this step for the remaining Center Tube (#2) if necessary.
4. Screw the coupling from the Canopy Assembly (#3) to the top end of the
Center Tube (#2) until snug. Carefully tighten the Cable lock at the end of
Safety cable to the protruding nipple at top ring of Fixture Body (#1) until
snug.
5. Follow Page 6 for INSTALLATION.
6. Carefully attach the Crystals (#11) to each small hole on the ring of Fixture
Body (#1) refering to the assembly diagram.
7.
Install bulbs (not provided) to each socket in accordance with the specications
on xture (DO NOT EXCEED THE MAXIMUM WATTAGE RATING).
8. Screw the Stem (#4) to the coupling under the Fixture Body (#1) and tighten
with Hex Nut (#8).
9. Place the Diffuser (#5), Rubber Washer (#6) and Steel Washer (#7) over the
Stem (#4) and secure with the Hex Nut (#8) until snug.
10. Place the Holder (#9) onto the Stem (#4) and secure with the Finial (#10).

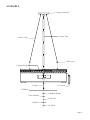
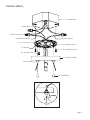
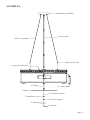
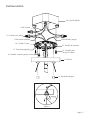
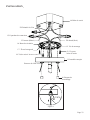
ASSEMBLY
:
3. Canopy Assembly
2. Center Tube
Safety Cable
4. Stem
Cable Lock
11. Crystal
1. Fixture Body
6. Rubber Washer
8. Hex Nut
10. Finial
9. Holder
5. Diffuser
7. Steel Washer
Page 5

Page 6
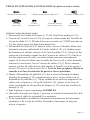
PARTS INCLUDED FOR INSTALATION (parts are not to scale):
1 Ground
Screw (#18)
2 Mounting Screw (#12) 2 Outlet Box Screw (#13)
2 Lock
Knob (#19)
3 Wire Connector (#15)
1 Circular
Strap (#16)
2 Hex Nut
(#17)
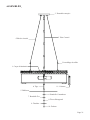
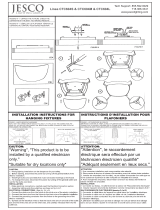
INSTALATION INSTRUCTIONS:
1. Unscrew the Lock Knob (#19) from the Mounting Screw (#12).
2. Attach the Circular Strap (#16) to the Outlet Box using two Outlet Box
Screws (#13). The side of the Circular Strap with “GND” marked on it and
two convex points must face out.
3. While holding the Canopy Assembly (#3) toward the ceiling, connect the
white wire from the xture to the Neutral wire from the Outlet Box (#14)
and the black wire from the xture to the hot wire from the Outlet Box (#14).
Cover the two wire connections using the two provided Wire Connectors
(#15). Wrap the two wire connections with electrical tape for a more secure
connection. If your outlet box has a ground wire (green or bare copper),
connect xture’s ground wire to it using the wire Connector (#15). Otherwise
connect the copper ground wire from the xture to Ground Screw (#18) on
the Circular Strap (#16). Note: If you have electrical questions, consult
your local electrical code for approved grounding methods.
4. Mount the Canopy Assembly (#3) of the xture by aligning the protruding
Mounting Screws (#12) all the way through the holes on the Canopy
Assembly (#3). Be careful not to pinch any of the wires between the xture
and the Outlet Box (#14). Tighten the xture to the ceiling by screwing the
two Lock Knobs (#19) onto the two protruding Mounting Screws (#12).
5. Follow Page 4 for remainging ASSEMBLY.
6. Referring to Fig.1, press the wire restraint to adjust the safety cable to keep
the xture level if necessary.
7. Installation is completed. Turn on the power at the circuit breaker or fuse
box. Turn the light switch on to activate the xture.

Page 7
3. Canopy Assembly
12. Mounting Screw
13. Outlet Box Screw
Hot Wire (Black)
14. Outlet Box
15. Wire Connector
Ground Wire
Neutral Wire (White)
16.
Circular Strap
18. Ground Screw
Wire restraint
17. Hex Nut
INSTALATION
:
19. Lock Knob
Fig. 1

Page 8
TROUBLESHOOTING:
PRODUCT MAINTENANCE:
1. To clean the outside of the xture, use a dry or slightly dampened clean cloth (use clean
water, never a solvent) to wipe the glass and surface of the xture.
2. To clean the inside of the xture, rst disconnect power to the xture by turning off the
circuit breaker or by removing the fuse at the fuse box. Next, use a dry or slightly
dampened clean cloth (use clean water, never a solvent) to wipe the inside glass and
interior surface of the xture.
3. Do not use any cleaners with chemicals, solvents or harsh abrasives. Use only a dry soft
cloth to dust or wipe carefully.
LIMITED WARRANTY
The manufacturer warrants this lighting fixture to be free from defects in materials and
workmanship for a period of ve (5) years from date of purchase. This warranty applies
only to the original consumer purchaser and only to products used in normal use and
service. If this product is found to be defective, the manufacturer’s only obligation, and
your exclusive remedy, is the repair or replacement of the product at the manufacturer’s
discretion, provided that the product has not been damaged through misuse, abuse,
accident, modications, alterations, neglect or mishandling. This warranty shall not apply
to any product that is found to have been improperly installed, set-up, or used in any way
not in accordance with the instructions supplied with the product. This warranty shall
not apply to a failure of the product as a result of an accident, misuse, abuse, negligence,
alteration, or faulty installation, or any other failure not relating to faulty material or
workmanship. This warranty shall not apply to the nish on any portion of the product,
such as surface and/or weathering, as this is considered normal wear and tear.
The manufacturer does not warrant and specially disclaims any warranty, whether
express or implied, of fitness for a particular purpose, other than the warranty
contained herein. The manufacturer specically disclaims any liability and shall not
be liable for any consequential or incidental loss or damage, including but not limited
to any labor / expense costs involved in the replacement or repair of said product.
Possible Cause Corrective Action
Bulb will not light. 1. Bulb is burned out. 1. Replace light bulb.
2. Power is off. 2. Make sure power supply is on.
3. Faulty wire connection. 3. Check wiring.
4. Faulty switch. 4. Test or replace switch.
Fuse blows or circuit breaker trips
when light is turned on.
Crossed wires or power wire is
grounding out.
Check wire connections.

3 Lámpara Colgante en acabado cromado
Home Depot SKU 763 893 (UPC718212272442)
(Accesorio de cromo)
MANUAL DE INSTRUCCIONES
Page 9

Gracias por la compra de este accesorio Home Decorators Collection luz
interior. Este producto ha sido fabricado con los más altos niveles de seguridad
y calidad.
CARACTERÍSTICAS:
1. Tradicional 3 Lámpara Colgante en acabado cromado.
2. Atemporal Elegante Diseño.
3. Fácil de montar e instalar con Enlace rápido.
PREGUNTAS, PROBLEMAS, PIEZAS FALTANTES:
Antes de volver a su local Home Depot, por favor llame a nuestro equipo
de servicio al cliente en 1-800-986-3460 o visite www.homedepot.com/
homedecorators. Consulte su Código SKU (763 893 artefacto de cromo) o UPC
(718212272442 artefacto de cromo).
Page 10

Page 11
PRECAUCIÓN:
1. Antes de comenzar la instalación de este lampara o eliminación de una luz
anteror, desconecte la alimentación apagando el interruptor o quitando el
fusible en la caja de fusibles.
2. PÓNGASE EN CONTACTO CON UN ELECTRICISTA CALIFICADO
SI TIENE ALGUNA PREGUNTA SOBRE ELECTRICIDAD.
3. Si tienes cualquier duda no eléctricos sobre este accesorio, por favor llame a
nuestro equipo de servicio al cliente en 1-800-986-3460 o visite
www.homedepot.com/homedecorators. Consulte su Código SKU (763 893
artefacto de cromo) o UPC (718212272442 artefacto de cromo).
4. Guarde su recibo y las instrucciones para la prueba de compra.
HERRAMIENTAS NECESARIAS PARA EL MONTAJE Y LA NSTALACIÓN
(no incluidos):
Gafas De
Seguridad
Cita Aislante
Pelacable
Cortaalambres
Destornillador De
Cabeza Phillips
Destornillador De
Cabeza Plana
EscaleraBombilla
(60 vatios máximo)

PIEZAS INCLUIDAS PARA LA ASAMBLEA (partes no están a escala)
:
Page 12
4 Tubo Central (#2)
1 Ensamblaje de pabellón (#3)
1 difusor (#5)
1 Bandeja (#9) 1 Remate (#10) 68 Cristal (#11)
1 vástago (#4)
1 Lavadora de caucho (#6)
1 Arandela de acero (#7)
2 Tuerca hexagonal (#8)
INSTRUCCIONES DE MONTAJE:
1. Corte la corriente en la caja de fusibles o en el circuito principal. Si fuera
necesario, saque la lampara vieja y todo el montaje de la caja de union de la
pared.
2. Desempaque cuidadosamente su nueva lampara y coloque todas las partes en
una superce despejada. Tenga cuidado de no perder las partes pequeñas que
son necesarias para la instalacion.
3. Determine la altura deseada y atornille el extremo inferior del Tubo central
(# 2) Sobre el acoplamiento en el centro superior del Cuerpo del la lámpara
(# 1) hasta que quede ajustado. Repetir Este paso para el Tubo Central (# 2)
si es necesario.
4. Atornille el acoplamiento del Ensamblaje de pabellón (# 3) al extremo
superior del Tubo Central (#2) hasta que quede ajustado. Apriete con cuidado
la Bloqueo del cable al nal de la El Cable de seguridad a la boquilla
sobresaliente en el anillo superior del Cuerpo de la lámpara (# 1) hasta
ajustado.
5. Seguir la página 14 para la INSTALACIÓN.
6. Coloque cuidadosamente los Cristales (#11) en cada agujero pequeño en el
anillo del Cuerpo de la lámpara (#1) consultando el diagrama de montaje.
7. Instale las bombillas (no suministradas) en cada enchufe de acuerdo con las
especicaciones del aparato (
NO EXCEDA LA CALIFICACIÓN MÁXIMA
DEL AGUA
).
8. Atornille el Vástago (# 4) al acoplamiento debajo del Cuerpo de la lámpara
(# 1) y apriételo con la Tuerca hexagonal (# 8).
9. Coloque el Difusor (# 5), Lavadora de caucho (# 6) y Arandela de acero (# 7)
sobre el Vástago (# 4) y asegúrelo con la Tuerca hexagonal (# 8) hasta que
quede ajustado.
10. Coloque el Bandeja (#9) en el Vástago (# 4) y asegúrelo con el Remate (#10).

ASAMBLEA
:
Page 13
3. Ensamblaje de pabellón
2. Tubo central
Cable de seguridad
4. vástago
Bloqueo del cable
11. Cristal
1. Cuerpo de la lámpara
6. Lavadora de caucho
8. Tuerca hexagonal
10. Remate
9. Bandeja
5. Difusor
7. Arandela de acero

Page 14
PIEZAS INCLUIDAS PARA LA INSTALACIÓN (las partes no están a escala)
:
1 Tornillo verde de
puesta a tierra (#18
)
2 Tornillo de montaje (#12)
2 Tornillo para la caja de salida (#13)
2 Perilla de
bloqueo (#19)
3 Conector de cables (#15)
1 Circular
Correa (#16)
2 Tuerca
hexagonal (#17)
INSTRUCCIONES DE INSTALACIÓN:
1. Desatornille los Perilla de bloqueo (# 19) del Tornillo de montaje (# 12).
2. Conecte la Circular Correa (# 16) a la caja de salida usando dos Tornillos de
la caja de salida (# 13). El lado de la correa circular con "GND" marcado en
él y dos puntos convexos debe mirar hacia fuera.
3. Sosteniendo el Cubierta (# 3) hacia el techo, conecte el alambre blanco del
luminario al neutro cable desde la Caja de salida (# 14) y el alambre negro
del luminario al alambre caliente de la Caja de salida (# 14). Cubrir Las dos
conexiones de alambre usando los dos Conector de cables (# 15). Envolver
Las dos conexiones de cable con cinta aislante para una conexión más
segura. Si Su caja de salida tiene un cable de tierra (verde o cobre desnudo),
conectar los accesorios Con el Conector de cables (# 15). De lo contrario,
conecte el cobre El cable de tierra del aparato al Tornillo verde de puesta a
tierra (#18) en la Circular Correa (#16). Nota: Si tiene preguntas eléctricas,
consulte a su Para los métodos de puesta a tierra aprobados.
4. Monte el Ensamblaje de pabellón (# 3) del accesorio alineando el aliente
Tornillos de montaje (# 12) completamente a través de los oricios en el
Ensamblaje de pabellón (# 3). Tenga cuidado de no pellizcar ninguno de los
cables entre el aparato y el Caja De Salida (# 14). Apriete el accesorio al
techo atornillando las dos perillas de bloqueo (# 19) en los dos tornillos de
montaje (# 12).
5. Siga la página 12 para remainging ASAMBLEA.
6. Haciendo referencia a la Figura 1, presione el sistema de retención del cable
para ajustar el cable de seguridad Si es necesario.
7. Se ha completado la instalación. Encienda la alimentación del interruptor
automático o de la caja de fusibles. Encienda el interruptor de luz para
activar el aparato.

Page 15
INSTALACIÓN
:
3. Cubierta
12. Tornillo de montaje
13. Tornillo para
la caja de salida
Hilo caliente (negro)
14. Caja De Salida
15. Conector de cables
Cable a tierra
Cable neutro (blanco)
16. Circular Correa
18. Tornillo verde de puesta a tierra
17. Tuerca hexagonal
19. Perilla de bloqueo
Figura. 1

Page 16
SOLUCIÓN DE PROBLEMAS:
MANTENIMIENTO DE PRODUCTOS:
1. Para limpiar el exterior del aparato, utilice un seca o ligeramente húmeda tela (use agua
limpia, nunca un disolvente) para limpiar el vidrio y la supercie de la lámpara.
2. Para limpiar el interior del aparato, primero desconecte la alimentación de la lámpara de
apagar el interruptor de circuito o quitando el fusible de la caja de fusibles. A
continuación,
utilice una tela seca o ligeramente húmeda (use agua limpia, nunca un disolvente) para
limpiar el cristal en el interior y la supercie interior de la lámpara.
3. No utilice limpiadores con productos químicos, solventes o abrasivos severos. Utilice
sólo un paño suave y seco para el polvo o limpiar con cuidado.
GARANTÍA LIMITADA
El fabricante garantiza que este accesorio de iluminación a estar libre de defectos en
materiales y mano de obra durante un período de cinco (5) años a partir de la fecha de
compra. Esta garantía se aplica sólo al comprador original y sólo a los productos utilizados
en condiciones normales de uso y servicio. Si se encuentra que este producto está
defectuoso, la única obligación del fabricante, y su solución exclusiva, es la reparación o
sustitución del producto, a discreción del fabricante, siempre que el producto no ha sido
dañado por el mal uso, abuso, accidentes, modicaciones, alteraciones , negligencia o mal
manejo. Esta garantía no se aplicará a cualquier producto que se demuestre que ha sido
instalado incorrectamente, puesta a punto, o utilizado en cualquier manera no conforme
con las instrucciones suministradas con el producto. Esta garantía no se aplicará a una falla
del producto como consecuencia de un accidente, mal uso, abuso, negligencia, alteración o
instalación defectuosa, o cualquier otro fallo que no se reeran a los materiales o ejecución
defectuosa. Esta garantía no se aplicará a la meta en cualquier parte del producto, tales
como la supercie y / o la intemperie, ya que se considera uso y desgaste normal.
El fabricante no garantiza y especialmente niega cualquier garantía, expresa o
implícita, de aptitud para un propósito particular, excepto la garantía contenida en
este documento. El fabricante rechaza específicamente cualquier responsabilidad
y no será responsable por cualquier pérdida consecuente o incidental o daños,
incluyendo pero no limitado a cualquier mano de obra Gastos de gastos que implica
la sustitución o reparación de dicho producto.
Posible causa de Acción
Correctiva
Bombilla no se encenderá
la oferta está encendido. 1. Bombilla está quemada 1. Reemplace la bombilla.
2. Está apagada. 2. Asegúrese de que el poder .
3. Conexión del cable defectuoso. 3. Verique el cableado.
4. Interruptor defectuoso. 4. Pruebe o cambiar el interruptor.
Funde un fusible o circuito viajes
interruptor cuando la luz
está encendida. Cables cruzados o
cables de alimentación
es tierra hacia fuera. Compruebe
las conexiones de cables.

3 lumières Pendentif en Finition chromée
Home Depot SKU 763 893 (UPC 718212272442)
(Lampe chromée)
MANUEL D'INSTRUCTIONS
Page 17

Nous vous remercions d'avoir acheté ce Home Decorators Collection appareil
d'éclairage à l'intérieur. Ce produit a été fabriqué avec des niveaux plus élevés
de sécurité et de qualité.
CARACTÉRISTIQUES:
1. traditionnel 3 Lumière Pendentif en nition chromée.
2. Design élégant et intemporel.
3. Facile à assembler et installer.
QUESTIONS, DES PROBLÈMES, DES PIÈCES MANQUANTES:
Avant de regagner votre local Home Depot, veuillez appeler notre Service à la
clientèle au 1-800-986-3460 ou visitez www.homedepot.com/homedecorators.
Veuillez indiquer votre SKU (763 893 du luminaire chromée) ou UPC
(718212272442 du luminaire chromée).
Page 18

Page 19
ATTENTION:
1. Avant d'installer cette lampe ou la suppression d'un jour précédent, Mettez
l'interrupteur ou en enlevant les fusibles dans la boîte à fusibles.
2. SI VOUS AVEZ DES QUESTIONS RELEVANT DU DOMAINE DE
L’ÉLECTRICITÉ, VEUILLEZ COMMUNIQUER AVEC UN
ÉLECTRICIEN QUALIFIÉ
3. Si vous avez des doutes non électriques de cet appareil, veuillez appeler
notre Service à la clientèle au 1-800-986-3460 ou visitez
www.homedepot.com/homedecorators. Veuillez indiquer votre SKU
(763 893 du luminaire chromée) ou UPC (718212272442 du luminaire
chromée).
4. Conservez votre reçu et des instructions pour preuve d'achat.
OUTILS NÉCESSAIRES POUR L'ASSEMBLAGE ET L'INSTALLATION (non inclus):
Lunettes De Sécurité Ruban Isolant Strippers Coupe-l
Tourenvis À
Tête Cruciforme
Tourenvis
À TêtePlate
échelleAmpoule
(60 watt maximum)

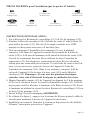
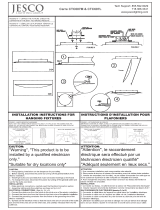
PIÈCES FOURNIES POUR L'ASSEMBLAGE
(pièces ne sont pas à l'échelle):
INSTRUCTIONS D'ASSEMBLAGE:
1. Couper le courant en enlevant le fusible ou en coupant le circuit du
disjoncteur. Si nécessaire, retirer le vieux luminaire ainsi que toutes les
pièces de montage de la boîte de dérivation.
2. Déballez attentivement votre nouveau support et disposez toutes les pieces
dans un endroit degage. Faites attention de ne pas perdre toutes les petites
pièces nécessaires pour l’installation.
3. Déterminer la hauteur désirée et visser l'extrémité inférieure du Tube central
(# 2) Sur l'accouplement au centre du haut du Corps du luminaire (# 1)
jusqu'à ce que le support soit bien serré. Répéter Cette étape pour le Tube
central (# 2) si nécessaire.
4. Visser l'accouplement de Ensemble canopée (# 3) à l'extrémité supérieure du
Tube central (# 2) jusqu'à ce qu'il soit bien serré. Serrez soigneusement le
serre - câble à l 'extrémité du câble de sécurité sur la tétine en saillie au
niveau de l' anneau supérieur du Corps du luminaire (# 1) jusqu'à ce qu'il soit
bien serré.
5. Suivre la Page 22 pour l’INSTALLATION.
6. Attachez avec précaution les Cristaux (# 11) à chaque petit trou sur la bague
du Corps du luminaire (# 1) en se référant au schéma d'assemblage.
7. Installer les ampoules (non fournies) dans chaque prise conformément aux
spécications du luminaire (
NE PAS DÉPASSER LA VALEUR MAXIMALE
DE LA VITESSE
).
8. Visser la Tige (# 4) au raccord sous le Corps du luminaire (#1) et serrer avec
Ecrou hexagonal (# 8).
9. Placez le diffuseur (# 5), la Rondelle caoutchouc (#6) et la Rondelle Fer (# 7)
sur la Tige (#4) et xez à l'aide de Ecrou hexagonal (# 8) jusqu'à ce qu'il soit
bien serré.
10. Placez le Titulaire (#9) sur la Tige (# 4) et xez-le avec le Faîteau (#10).
Page 20
1 Titulaire (#9) 1 Faîteau (#10) 68 Cristaux (#11)2 Écrou Hexagonal (#8)
4 Tube central (#2) 1 Ensemble canopée (#3)
1 Diffuseur (#5)
1 Tige (#4)
1 Rondelle Caoutchouc (#6)
1 Rondelle Fer (#7)
La page est en cours de chargement...
La page est en cours de chargement...
La page est en cours de chargement...
La page est en cours de chargement...
-
 1
1
-
 2
2
-
 3
3
-
 4
4
-
 5
5
-
 6
6
-
 7
7
-
 8
8
-
 9
9
-
 10
10
-
 11
11
-
 12
12
-
 13
13
-
 14
14
-
 15
15
-
 16
16
-
 17
17
-
 18
18
-
 19
19
-
 20
20
-
 21
21
-
 22
22
-
 23
23
-
 24
24


Home Decorators Collection 27244 Mode d'emploi
- Taper
- Mode d'emploi
dans d''autres langues
Documents connexes
-
Home Decorators Collection HB7039-246 Mode d'emploi
-
-
-
-
 Hampton Bay 17231 Mode d'emploi
-
Home Decorators Collection 15334B Mode d'emploi
-
-
-
-

Autres documents
-
Triarch 32504 Manuel utilisateur
-
Nuvo Lighting 60/548 Guide d'installation
-
ROOMS TO GO 90603486 Assembly Instructions
-
Satco 60-6115 Mode d'emploi
-
Portfolio LWS2812H Guide d'installation
-
 JESCO Lighting WS601 Guide d'installation
-
 Kichler Lighting 15777SS Manuel utilisateur
-
 JESCO Lighting CTC604L Guide d'installation
-
 JESCO Lighting CTC607M Guide d'installation
-
Decor Living P579GB-CHR Guide d'installation


