Haier A3FE742CMJ Manuel utilisateur
- Catégorie
- Réfrigérateurs combinés
- Taper
- Manuel utilisateur
Ce manuel convient également à

GB
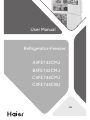
User Manual
Refrigerator-Freezer
A3FE742CMJ
B3FE742CMJ
C3FE744CMJ
C3FE744CWJ

Thank You
GB GB
Content
Legend
Warning – Important Safety information
General information and tips
Environmental information
Disposal
Help protect the environment and human health. Put
the packaging in applicable containers to recycle it.
Help to recycle waste of electrical and electronic ap-
pliances. Do not dispose appliances marked with this
symbol with the household waste. Return the product
to your local recycling facility or contact your municipal
oce.
Thank you for purchasing a Haier Product.
Please read these instructions carefully before using this appliance. The instructions con-
tain important information which will help you get the best out of the appliance and ensure
safe and proper installation, use and maintenance.
Keep this manual in a convenient place so you can always refer to it for the safe and proper
use of the appliance.
If you sell the appliance, give it away, or leave it behind when you move house, make sure
you also pass this manual so that the new owner can become familiar with the appliance
and safety warnings.
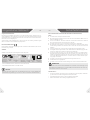
WARNING!
Risk of injury or suocation!
Refrigerants and gases must be disposed of pro-
fessionally. Ensure that the tubing of the refrigerant
circuit is not damaged before being properly dis-
posed of. Disconnect the appliance from the mains
supply. Cut o the mains cable and dispose of it.
Remove the trays and drawers as well as the door
catch and seals, to prevent children and pets to get
closed in the appliance.
Intended Use ..................................................................................................................................... 4
Safety .................................................................................................................................................. 5
Product Description ........................................................................................................................ 8
Use .....................................................................................................................................................10
Equipment .......................................................................................................................................20
Care and Cleaning ..........................................................................................................................23
Troubleshooting .............................................................................................................................26
Installation ........................................................................................................................................29
Technical Data.................................................................................................................................33
Customer Service ..........................................................................................................................34
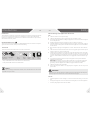
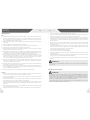
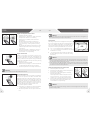
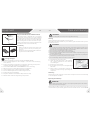
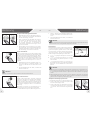
CAUTION! Model B3FE742CMJ
When you close the door, the vertical door strip on
the left door should be bent inside (1).
If you try to close the left door and the vertical door
strip is unbent (2), you should bend it rstly, otherwise
the door strip will hit the xing shaft or right door.
Thus a damage to the door slip or a leak will occur.
There is a heating thread inside the vertical door strp.
The temperature of the surface will rise a little, which
is normal and won´t aect the function of refrigera-
tor.
1.
2.
2 3

Intended Use
GB GB
Safety
Before switching on the appliance for the rst time
Do…
▶ make sure there is no transport damage.
▶ make sure all packaging is removed and is kept out of children´s reach.
▶ wait at least two hours before installing the appliance in order to ensure the refrigerant
circuit is fully ecient.
▶ handle the appliance always with at least two persons because it is heavy.
▶ install the appliance in a well-ventilated place. Ensure a space of at least 20 cm above
and 10 cm around the appliance. Install and level the appliance in an area suitable for
its size and use.
▶ keep ventilation openings in the appliance or in the in-built structure clear of obstruc-
tion.
▶ make sure that the electrical information on the rating plate agrees with the power
supply. If it does not, contact an electrician.
▶ consider that the appliance is operated by a 220~240 VAC/50 Hz power supply. Ab-
normal voltage uctuation may cause the appliance to fail to start or not to operate
correctly and damage the temperature control or compressor, originating abnormal
noise too. To eliminate abnormal uctuation it is suggested to use an automatic regu-
lator.
▶ use a separate earthed socket for the power supply which is easy accessible. The
appliance must be earthed.
Only for UK: The appliance’s power cable is tted with 3-cord (grounding) plug that
ts a standard 3-cord (grounded) socket. Never cut o or dismount the third pin
(grounding). After the appliance is installed, the plug should be accessible.
▶ make sure the plug is easy accessible.
▶ ensure that the power cable is not trapped by the refrigerator. Do not step on the
power cable.
Do not…
x install the appliance in direct sunlight or in the near of heat sources(e.g. stoves, heat-
ers).
x damage the refrigerant circuit. If it does become damaged, do not use the appliance.
x use multi-plug adapters and extension cables.
Intended use
This appliance is intended for cooling and freezing food. It has been designed exclusively
for use in dry-interior house-holds. It is not intended for commercial or industrial use.
Changes or modications to the device are not allowed. Unintended use may cause haz-
ards and loss of warranty claims.
Standards and directives
This product meets the requirements of all applicable EC directives with the correspond-
ing harmonised standards, which provide for CE marking.
Accessories
Check the accessories and literature in accordance with this list:
Energy-
lable
Egg trays
Ice cube tray
with cover
Hinge
cover*
User
manual
Warranty
card
Door
hinges
* Only model A3FE742CMJ, C3FE744CMJ and C3FE744CWJ,.
** Only model C3FE744CMJ and C3FE744CWJ.
Notice
Due to technical changes and dierent models, some of the illustrations in this manual
may dier from your model.
WARNING!
Make sure not to damage the electric cable and the plug. If damaged it must only be re-
placed by eighter the manufacturer or the authorised service agent.
*
*
**
4 5

Safety
GB GB
Safety
WARNING!
The appliance contains the ammable refrigerant ISOBUTHANE (R600a). Make sure
the refrigerant circuit is not damaged during transportation or installation. Leaking re-
frigerant may cause eye injuries or ignite. If a damage has occurred, keep away open re
sources, thoroughly ventilate the room, do not plug or unplug the power cords of the
appliance or any other appliance. Inform the customer service.
In case of eyes get into contact with the refrigerant, rinse immediately it under running
water and call immediately the eye specialist.
During daily use
Do…
▶ make sure that this appliance is only used by children from the age of 8 as well as from
persons with reduced physical, sensory or mental capabilities, or lack of experience
and knowledge, if they are supervised or have been instructed how to use it in a safe
way and understand the hazards involved.
▶ keep away children under 3 years of age from the appliance unless they are constantly
supervised.
▶ make sure children are not playing with the appliance.
▶ make sure children are supervised if they carry out cleaning and maintenance.
▶ hold the plug, not the cable, when unplugging the appliance.
▶ replace a damaged supply cord only by the manufacturer, its service agent or similarly
qualied persons in order to avoid a hazard.
▶ follow these instructions if coal gas or other inammable gas is leaking in the vicinity of
the appliance: turn o the valve of the leaking gas, open the doors and windows and do
not unplug or plug in the power cable of the appliance or any other appliance.
▶ open and close the doors only with the handles. The gap between the doors and be-
tween the doors and the cabinet is very narrow. Do not extend your hands in these
areas to avoid pinching your ngers. Open or close the refrigerator doors only when
there are no children standing within the range of door movement.
▶ disconnect the appliance from the electrical supply before undertaking any routine
maintenance. Allow at least 5 minutes before restarting the appliance, as frequent
starting may damage the compressor.
▶ eliminate the dust on the back of the unit at least once in the year to avoid hazard by
re, as well as increased energy consumption.
▶ notice that the product is set for operation at a specic ambient range between 10 and
43°C. The appliance may not work properly if it is left for a long period at a temperature
above or below the indicated range.
▶ check the condition of food if a warming in the freezer has taken place.
Do not…
x set unnecessarily low temperature in the refrigerator compartment. Minus tempera-
tures may occur at high settings. Attention: Bottles can burst.
x store medicines which need a precision storage temperature or bacteria or chemical
agents in the appliance.
x store liquids in bottles or cans (besides high percentage spirits) especially carbonated
beverages in the freezer, as these will burst during freezing.
x place unstable articles (heavy objects, containers lled with water) on the top of the
appliance, to avoid personal injury caused by falling or electric shock caused by contact
with water.
x pull on the door shelves. The door may be pulled slant, the bottle rack, may be pulled
away, or the appliance may topple.
x damage the refrigerant circuit. If it does become damaged, do not use the appliance.
x step on the freezer storage compartment door or drawer.
x touch the inside surface of the freezer storage compartment when in operation, es-
pecially with wet hands, as your hands may freeze onto the surface.
x touch frozen goods with wet hands (wear gloves). Especially do not eat ice lollies im-
mediately after removal from the freezer compartment. There is the risk to freeze or
the formation of frost blisters. FIRST aid: keep immediately under running cold water.
Do not pull away!
x scrape o frost and ice with sharp objects. Do not use sprays, electric heaters like
heater, hair dryer, steam cleaners or other sources of heat in order to avoid damage
to the plastic parts.
x clean the appliance with hard brushes, wire brushes, detergent powder, petrol, amyl
acetate, acetone and similar organic solutions, acid or alkaline solutions. Please clean
with special refrigerator detergent to avoid damage.
x spray or ush the appliance during cleaning.
x use water spray or steam to clean the appliance.
x clean the cold glass shelves with hot water. Sudden temperature change may cause
the glass to break.
x use electrical devices inside the food storage compartments of the appliance, unless
they are of the type recommended by the manufacturer.
x try to repair the appliance by yourself. In case of repair please contact our customer
service.
WARNING!
Do not store or use inammables, explosives or corrosive materials in the appliance or
in the vicinity.
Refrigerant gas information
6 7

Product Description
GB GB
Product Description
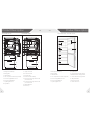
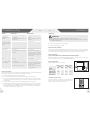
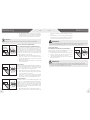
Model A3FE742CMJ
Model B3FE742CMJ
2
4
5
6
7
9
10
11
12
13
8
3
1
14
15
10
9
9
10
11
12
13
14
9
15
2
5
6
7
8
3
1
4
16
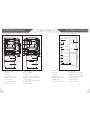
1 Refrigerator LED lamp
2 Rating plate
3 Glass shelves
4 O.K.-temperature indicator (optional)
5 Fruit and vegetable box cover
6 Fruit and vegetable box
7 My Zone glass cover
8 Special box
9 Upper door rack
10 Lower door rack
11 My Zone box
12 Freezer drawer LED lamp
13 Upper freezer storage drawer with
pre-freezer rack
14 Lower freezer storage drawer with
pre-freezer rack
15 Adjustable feet
16 Door strip
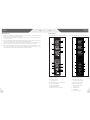
Model C3FE744CMJ and C3FE744CWJ
1 Refrigerator LED lamp
2 Rating plate
3 Glass shelves
4 O.K.-temperature indicator (optional)
5 Fruit and vegetable box cover
6 Fruit and vegetable box
7 My Zone glass cover
8 My Zone box
9 Upper freezer storage drawer
10 Middle freezer storage drawer
11 Lower freezer storage drawer
12 Adjustable feet
13 Upper door rack
14 Lower door rack
2
4
5
6
7
3
1
8
9
10
11
12
13
14
8 9

Use
GB GB
Use
Fridge off
A
B
C
E
F
H
G
a1
a2
b
c1
c2
h
g
e
f
A
B
C
D
E
F
G
a1
a2
b
c1
c2
f
g
d
e
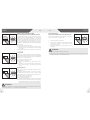
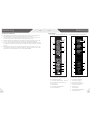
Control panelBefore rst use
▶ Remove all packaging materials, keep them out of children`s reach and dispose
them in an environmentally friendly manner.
▶ Clean the inside and outside of the appliance with water and a mild detergent before
putting any food in it.
▶ After the appliance has been levelled and cleaned, wait for at least 2 hours before
connecting it to the power supply. See Section INSTALLATION.
▶ Precool the compartments at high settings before loading with food. The function
Super Cool and Super Freeze help to cool down the compartments quickly.
▶ The refrigerator temperature and freezer temperature are automatically set to 5° C
and -18° C respectively. These are the recommended settings. If desired, you can
change these temperatures manually. Please see FUNCTIONS.
Buttons:
A Fridge selector
B My Zone selector
C Freezer selector
D Special box/instant cool selector
E Fuzzy mode selector
F Holiday mode selector
G Panel lock selector
H Fridge o- function sellector
Model A3FE742CMJ and B3FE742CMJ Model C3FE744CMJ and C3FE744CWJ
Indicators:
a1 Super cool function
a2 Temperature fridge
b Temperature My Zone
c1 Super freeze function
c2 Temperature freezer
d Instant cool function
e Fuzzy mode
f Holiday mode
g Panel lock
h Fridge o function
10 11

Use
GB GB
Use
Notice
▶ The appliance is preset to the recommended temperature of 5°C (refrigerator) and -
18°C (freezer). Under normal ambient condition you need not to set a temperature.
▶ When the appliance is switched on after disconnection from the main power supply, it
may take up to 12 hours for the correct temperatures to be reached.
Notice
The control panel is automatically blocked against activation if 30 seconds no button is
pressed. For any settings the control panel must be unlocked.
Select the working mode
You may need to select one of the following two ways to set the appliance:
1) Fuzzy mode
Under fuzzy mode, the appliance can automatically adjust the temperature setting ac-
cording to the ambient temperature and temperature change in the appliance. If you do
not have any special requirements, we recommend that you use fuzzy mode (refer to
FUZZY MODE).
2) Manual adjusting mode:
If you want to manually adjust the temperature of the appliance in order to store a par-
ticular food, you can set the temperature via a temperature adjusting button (refer to
ADJUST THE TEMPERATURE).
Empty the appliance before switching o. To switch o the appliance,pull the power cord
out o the power socket.
The indoor temperatures are inuenced by the follow-
ing factors:
▶ Ambient temperature
▶ Frequency of door opening
▶ Amount of stored foods
▶ Installation of the appliance
12 13
Lock/unlock panel
▶ Touch button “G” for 3 seconds to block all panel
elements against activation. The related indicator
“g” is now displayed.
▶ For unlocking press again the button.
Lock
Hold 3 Sec.
Switch on /o the appliance
The appliance is in operation as soon as it is connected to the power supply.
When the appliance is powered on for the rst time, indicator “c2” is shining on the display
until the temperature reaches -5°C or after 1 hour working. The temperatures displayed in
“a2”, “b” and “c2” will shown the actual temperatures in the compartment.
Standby-mode
The display screen turns o automatically 30 seconds after pressing a key. The display will
be automatically locked. It lights up automatically when pressing any key or opening the
door (Alarm does not light up the display screen).
Adjust the temperature for fridge
1. Unlock the panel if it is locked.
2. Press button „A“ (Fridge) for select the fridge
compartment. Indicator „a2“ is ashing.
3. Press button “A” to set the refrigerator tempera-
ture.
The temperature increases in sequences of 1°C
from a minimum of 2°C to a maximum of 8°C,
switching to 2°C again when pressing further.
The optimum temperature in the refrigerator is
5 ° C. Colder temperatures mean unnecessary
energy consumption.
4. Press any key except „A“ to conrm, or the setting
conrms automatically after 5 seconds. Indicator
„a2“ stops ashing
Door/drawer opening alarm
When the refrigerator door or the freezer drawer is
opened for more than 3 minutes, the door/drawer
opening alarm will sound. The alarm can be silenced by
either closing the door/drawer or touching the control
panel. If the door/drawer is left open for more than 7
minutes, the light inside the refrigerator/under the re-
frigerator door and control panel illumination will auto-
matically switch o.
Adjust the temperature
Sensor keys
The buttons on the control panel are sensor keys, which already respond when lightly
touched with the nger.

Use
GB GB
Use
Super cool function
Switch on the Super cool function if larger quan-
tity of food should be stored (for example after the
purchase). The Super cool function accelerates the
cooling of fresh food and protects the goods already
stored from undesirable warming. The factory setting
temperature is + 2 °C.
1. Unlock the panel if it is locked.
2. Press button „A“ (Fridge) for 3 seconds. Indicator
„a1“ illuminates and the function is activated.
3. The same operation can exit super cool function.
Notice
The Super-freeze function will automatically switch o after 56 hours. The appliance is
then operated at the previously set temperature.
Super freeze function
Fresh food should be frozen as quickly as possible to
the core. This preserved the best nutritional value,
appearance and taste. The Super freeze function ac-
celerates the freezing of fresh food and protects the
goods already stored from undesirable warming. If
you need to freeze a large amount of food once, it is
recommended to set the Super -freeze function on
ahead for 24h before the usage of frozen room.
1. Unlock the panel if it is locked.
2. Press button „C“ (Freeze) for 3 seconds Indicator
„c1“ illuminates and the function is activated.
3. The same operation can exit super freeze func-
tion.
Notice
This function will be automatically disabled after 3 hours.
Notice
▶ Due to dierent water contents of meat, some meat with more moisture will be fro-
zen at temperatures lower than 0°C. So “immediately cut” meat should be stored in
My-Zone box, with temperatures min. 0°C.
▶ Cold-sensitive fruits like pineapple, avocado, bananas, grapefruits and vegetables
such as potatoes, aubergines, beans, cucumbers, zucchini and tomatoes and cheese
should not be stored in the My Zone box.
Notice
My zone storage temperature setting number cannot be higher than the fridge tem-
perature setting number.
14 15
My Zone box
The fridge compartment is equipped with a My Zone
box. In accordance with the food’s storage demands,
the most suitable temperature can be selected to
get the optimal nutritional value of the foods. Storage
temperature can be adjusted between -3°C and 5°C.
▶ +2 °C ~5 °C is suitable to store vegetable and fruit,
▶ -2 °C ~2 °C is suitable to store fresh sh, meat and
cooked food in 1-2 days
▶ -3 °C can defrost the frozen food, after defrosting
the food will be part frozen, convenient for cutting
and cooking
M
Y
Z
O
N
E
Adjust the temperature for My Zone box
1. Unlock the panel if it is locked.
2. Press button “B” (My Zone) for select the My Zone
box. Indicator “b” is ashing.
3. Press button “B” (My Zone) again to set the My
Zone box temperature.
The temperature increases in sequences of 1° C
from a minimum of -3° C to a maximum of 5° C,
switching to -3° C again when pressing further.
4. Press any key except “B” (My Zone) to conrm, or
the setting conrms automatically after 5 sec-
onds. Indicator “b” stops ashing.
Adjust the temperature for freezer
1. Unlock the panel if it is locked.
2. Press button “C” (Freezer) for select the freezer
compartment. Indicator “c2” is ashing.
3. Press button “C” (Freezer) to set the freezer
temperature.
The temperature increases in sequences of
1°C from a minimum of -16°C to a maximum of
-24°C, switching to -16°C again when pressing
further.
The optimum temperature in the freezer is -18°C.
Colder temperatures mean unnecessary energy
consumption.
4. Press any key except “C” (Freezer) to conrm, or
the setting conrms automatically after 5 sec-
onds. Indicator “c2” stops ashing.

Use
GB GB
Use
WARNING!
During the holiday function no goods must be stored in the refrigerator compartment.
The temperature of + 17 ° C is too high for storing food.
Fridge o function
(Only model C3FE744CMJ and C3FE744CW)
This function shuts down the refrigerator. This has no
eect on the freezer compartment.
1. Unlock the panel if it is locked.
2. Press button “H” (Fridge o) to select the Fridge
o function. Indicator “h” illuminates and the
function is activated.
3. The same operation can exit Fridge o function
manually.
Fridge o
Fridge o
WARNING!
▶ Empty the appliance before switching o.
▶ Keep the door of the refrigerating compartment open, when Fridge o function is
activated, in order to avoid odour or mold.
16 17
Fuzzy mode
In the Fuzzy mode, the appliance can automatically ad-
just the temperature setting according to the ambient
temperature and temperature change in the appliance.
This function is totally hand free.
▶ Unlock the panel if it is locked.
▶ Press button “E” (Fuzzy).
▶ Indicator “e” illuminates and the function is acti-
vated.
▶ The function can be deactivated by pressing but-
ton “E” (Fuzzy) again or by performing any other
setting.
Fuzzy
Fuzzy
Holiday function
This function sets the refrigerator temperature per-
manently to 17°C.
This allows to keep the door of the empty refrigera-
tor closed without causing an odour or mold - during
a long absence (e.g. during holiday). The freezer com-
partment is free for your setting.
▶ Unlock the panel if it is locked.
▶ Press button F (Holiday).
▶ Indicator f illuminates and the function is activated.
▶ The function can be deactivated by pressing but-
ton F (Holiday) again or by setting the refrigerator
temperature or by performing any other setting.
Holiday
Holiday
Instant cool function (Special Box)
(Only model A3FE742CMJ and B3FE742CMJ)
In instant cool function, you can quick cool beverages,
which are stored in the special box, from room tem-
perature to a refreshing temperature in 30 minutes,
The function will exit after 30 minutes, after the com-
partment temperature is set between 0 °C and 5 °C,
suggest to store beverages. The temperature of the-
special box will inuenced by the setting of refrigerator
temperature.
▶ Unlock the panel if it is locked.
▶ Press button “D” (Instant cool) to select the Spe-
cial Box. Indicator “d” illuminates and the function
is activated.
▶ The same operation can exit instant cool function
manually.
Special Box
Only for drinks
Instant cool
Instant cool
Only for drinks
Special Box

Use
GB GB
Use
When storing commercially frozen foods, please follow these guidelines:
▶ Always follow manufacturers’ guidelines for the length of time you should store food
for. Do not exceed these guidelines!
▶ Try to keep the length of time between purchase and storage as short as possible to
preserve food quality.
▶ Buy frozen foods, which have been stored at a temperature of –18 °C or below.
▶ Avoid buying food which has ice or frost on the packaging – This indicates that the
products might have been partially defrosted and refrozen at some point – temper-
ature rises aect the quality of food.
Storage into the freezer compartment
▶ Keep the freezer temperature at- 18°C.
▶ 24 hours before freezing switch on the Super-freeze function; -for small quantities
of food 4-6 hours are sucient.
▶ Hot food must be cooled to room temperature before storing in the freezer com-
partment.
▶ Food cut into small portions will freeze faster and be easier to defrost and cook. The
recommended weight for each portion is less than 2.5 kg
▶ It is better to pack food before putting it into the freezer. The outside of the pack-
aging must be dry to avoid bags sticking together. Packaging materials should be
odour-free, airtight, non-poisonous and nontoxic.
▶ In order to avoid expiration of storage periods, please note the freezing date, time
limit and name of the food on the packaging according to the storage periods of dif-
ferent foods.
▶ WARNING!: Acid, alkali and salt etc. could erode the internal surface of the freezer.
Do not place the food having these substances (e.g. sea sh) directly on the internal
surface. Salt water in the freezer should be cleaned up immediately.
▶ Do not exceed the food storage times recommended by the manufacturers. Only
take the required amount of food out of the freezer.
▶ Consume defrosted food quickly. Defrosted food cannot be re-frozen unless it is
rst cooked, otherwise it may bless edible.
▶ Do not load excessive quantities of fresh food in the freezer compartment. Refer
to the freezing capacity of the freezer – See TECHNICAL DATA or data at the type
plate.
▶ Food can be stored in the freezer at a temperature of at least -18°C for 2 to 12
months, depending on its properties (e.g., meat: 3-12 months, vegetables: 6-12
months)
▶ When freezing fresh food, avoid bringing it in contact with already frozen food. Risk
of thawing!
▶ Defreeze frozen food in the fridge. This way, you can use the frozen food to decrease
the temperature in the compartment and save energy.
18 19
Tips on storing fresh food
Storing into the refrigerator compartment
▶ Keep your fridge temperature below 5°C.
▶ Hot food must be cooled to room temperature before storing in the appliance.
▶ Foods stored in the refrigerator should be washed and dried before storing
▶ Food to be stored should be properly sealed to avoid odour or taste alterations.
▶ Do not store excessive quantities of food. Leave spaces between foods to allow cold
air owing around them, for a better and more homogeneous cooling.
▶ Foods eaten daily should be stored at the front of the shelf.
▶ Leave a gap between foods and the inner walls, allowing air owing. In special way
don’t store foods against the rear wall: foods could freeze against rear wall. Avoid di-
rect contact of food (especially oily or acidic food) with the inner liner, as oil/acid can
erode the inner liner. Clean away oily/acid dirt whenever it is found.
▶ Defreeze frozen food in the fridge storage compartment. This way, you can use the
frozen food to decrease the temperature in the compartment and save energy.
▶ The ageing process of fruit and vegetables such as courgettes, melons, papaya, ba-
nana, pineapple, etc. can be accelerated in the refrigerator. Therefore, it is not advis-
able to store them in the refrigerator. However, the ripening of strongly green fruits
can be promoted for a certain period. Onions, garlic, ginger and other root vegeta-
bles should also be stored at room temperature.
▶ Unpleasant odours inside the fridge are a sign that something has spilled and clean-
ing is required. See CARE AND CLEANING.
▶ Dierent foods should be placed in dierent areas according to their properties:
Food Location
Butter, cheese Upper door rack
Eggs Door rack
Fruit, vegetables, salad
Fruit- and vegetable box or My Zone box (2°C ~ 5°C)
Meat, sausage, cheese, milk
Lower area (lowest shelf / coverage above the fruit-
and vegetable box)
Dairy products, canned
food, cans
Upper area or door rack
Drinks, bottles, tubes Door rack
Fresh meat, fresh sh, sau-
sages, cooked foods
My Zone box (-2°C ~ 2°C)
Drinks
Special box with instant cool function (Only
model
A3FE742CMJ and B3FE742CMJ)

Equipment
GB GB
Equipment
Notice:
Ensure that all ends of a shelf are level.
Notice:
Do not cover the plant membrane!
Notice:
When the appliance is switched on, it may take up to 12 hours for the correct tempera-
tures to be reached.
WARNING!
Do not overload the drawers: Max. load of each drawer: 35 kg.!.
20 21
Multi-air-ow
The refrigerator is equipped with a multi-air-ow sys-
tem, with which cool air ows are located on every shelf
level. This helps to maintain a uniform temperature to
ensure that your food is kept fresher for longer.
My-Zone box
For the use and setting of the My Zone box, please
check section USE (My- Zone box)
M
Y
Z
O
N
E
Fruit and vegetable box with automatic humid-
ity control
Fruits and vegetables will remain fresh for a longer time
if they are stored in this compartment with automati-
cally humidity control.
The fruit and vegetable box cover is equipped with an
ecological plant membrane with respiratory function.
If the humidity increases due to respiration of fresh
vegetables, the structure of the membrane opens and
allows excess moisture to escape to the outside air. If
the vegetable/fruit loses too much water, the mem-
brane prevents water evaporation. So fruits and veg-
etables box humidity can be maintained at optimum
humidity of 90%.
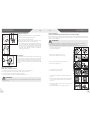
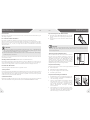
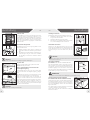
Adjustable shelves
The height of the shelves can be adjusted to t your
storage needs.
1. To relocate a shelf, remove it rst by uplifting its
hind edge (1) and pulling it out (2).
2. To reinstall it, put it on the lugs on both sides and
push it to the most rearward position until the rear
of the shelf is xed inside the slots in the sides
Removable door racks
The door racks can be removed for cleaning:
Place hands on each side of the rack, lift it upwards (1)
and pull it out (2).
In order to insert the door rack, the above steps are
carried out in reverse order.
1
2
1
OPTIONAL: OK-temperature indicator
The OK-temperature indicator can be used to deter-
mine temperatures below +4°C. Gradually reduce the
temperature if the sign does not indicate “OK”.
3D-freezer drawer
(Only model A3FE742CMJ and B3FE742CMJ)
The freezer drawers can be extended straightly and
completely. They are mounted on easy-roll telescopic
runners, so that you can store and remove the freez-
ing good comfortable. Because of the automatic door
closing mechanism the handling is easy and you save
energy.
Removable freezer drawer
(Only model A3FE742CMJ and B3FE742CMJ)
Large items of e.g. frozen food can be stored after
removing internal drawers and trays. For optimized
freezing of the maximum amount, put the food on the
glass shelf between the freezing compartments (see
arrow).
To remove the trays pull out to the stop, lift and re-
move. Goods should not protrude beyond the front
edge of the shelf.

Equipment
GB GB
Care and Cleaning
Cleaning
Clean the appliance when only little or no food is stored.
The appliance should be cleaned every four weeks for good maintenance and to prevent
bad stored food odors.
WARNING!
▶ Do not clean the appliance with hard brushes, wire brushes, detergent powder, petrol,
amyl acetate, acetone and similar organic solutions, acid or alkaline solutions. Please
clean with special refrigerator detergent to avoid damage.
▶ Do not spray or ush the appliance during cleaning.
▶ Do not use water spray or steam to clean the appliance.
▶ Do not clean the cold glass shelves with hot water. Sudden temperature change may
cause the glass to break .
▶ Do not touch the inside surface of the freezer storage compartment, especially with
wet hands, as your hands may freeze onto the surface.
▶ In case of heating check the condition of frozen goods.
WARNING!
Disconnect the appliance from the power supply before cleaning.
WARNING!
Do not replace the LED lamp yourself, it must only be replaced by either the manufac-
turer or the authorised service agent.
22 23
Pre-freezing compartment
(Only model A3FE742CMJ and B3FE742CMJ)
Each freezer drawer is equipped with a pre-freezing
compartment. Fresh frozen food can be separated
from already frozen, so that a smooth freezing process
can take place and freezing food will not defrosted.
After rearrangement of frozen food these compart-
ments can be used for easy storage of small parts such
as herbals, ice cream or for the ice cube tray.
Ice cube tray
1. Fill the ice cube tray 3/4 full of water, close t with
the cover and put it into the pre-freezing com-
partment.
2. Twist the ice cube tray slightly or hold it under ow-
ing water to loosen the ice cubes.
Energy saving tips
▶ Make sure the appliance is properly ventilated (see INSTALLATION).
▶ Do not install the appliance in direct sunlight or in the near of heat sources(e.g.
stoves, heaters).
▶ Avoid unnecessarily low temperature in the appliance. The energy consumption in-
creases the lower the temperature in the appliance is set.
▶ Functions like SUPER COOL or SUPER FREEZE consume more energy.
▶ Allow warm food to cool down before placing it in the appliance.
▶ Open the appliance door as little and as briey as possible.
▶ Do not overll the appliance to avoid obstructing the air ow.
▶ Avoid air within the food packaging.
▶ Keep door seals clean so that the door always closes correctly.
▶ Defreeze frozen food in the fridge storage compartment.
▶ Always keep the door gasket clean.
▶ Clean the inside and housing of the appliance
with a sponge dampened in warm water and
neutral detergent.
▶ Rinse and dry with soft cloth.
▶ Do not clean any of the parts of the appliance in a
dishwasher.
▶ Allow at least 5 minutes before restarting the
appliance as frequent starting may damage the
compressor.
Defrosting
The defrosting of the refrigerator and the freezer compartment are done automatically;
no manual operation is needed.
Replacing the LED-lamps
The lamp adopts LED as its light source, featuring low energy consumption and long ser-
vice life. If there is any abnormality, please contact the customer service . See CUSTOMER

Care and Cleaning
GB GB
Care and Cleaning
Notice
Turn the appliance o only if strictly necessary.
WARNING!
▶ Do not lift the appliance by its handles.
▶ Never place the appliance horizontally on the ground.
24 25
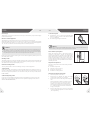
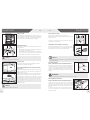
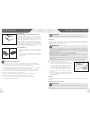
Removable auxiliary door gaskets
(Only model A3FE742CMJ and B3FE742CMJ)
There are six auxiliary door gaskets on the upper and
lower freezer drawer.
1. Locate the ve indicated door gaskets on the up-
per and lower freezer drawer.
2. Make sure the bent slices of the gaskets point in-
wards when attaching.
3. Locate the lower gasket of the upper drawer as
indicated.
4. Make sure the bent slice of this gasket points
downwards when attaching.
You get these gaskets as well as the revolving door /
drawer gaskets via the customer service (see warranty
card).
4
1. 2.
3.
4.
Non-use for a longer period
If the appliance is not used for an extended period of time, and you will not use the Holiday-
function for the refrigerator:
▶ Take out the food.
▶ Unplug the power cord.
▶ Clean the appliance as described above.
▶ Keep the door and freezer drawers/door open to prevent the creation of bad odours
inside.
Moving the appliance
1. Remove all food and unplug the appliance.
2. Secure shelves and other moveable parts in the fridge and the freezer with adhesive
tape.
3. Do not tilt the refrigerator more than 45° to avoid damaging the refrigerating system.
SERVICE.
Parameters of the lamp:
Model
Refrigerator compartment Freezer compartment
Voltage max Power Voltage max Power
A3FE742CMJ
B3FE742CMJ
12 V 10 W 12V 2 W
C3FE744CMJ
C3FE744CWJ
12V 2 W - -

Troubleshooting
GB GB
Troubleshooting
Many occuring problems could be solved by yourself without specic expertise. In case
of a problem please check all shown possibilities and follow below instructions before you
contact an after sales service. See CUSTOMER SERVICE.
Problem Possible Cause Possible Solution
The compressor
does not work.
• Mains plug is not connected in the
mains socket.
• The appliance is in the defrosting
cycle
• Connect the mains plug.
• This is normal for an automatic
defrosting
The appliance runs
frequently or runs
for a too long period
of time.
• The indoor or outdoor tempera-
ture is too high.
• The appliance has been o power
for a period of time.
• A door/drawer of the appliance is
not tightly closed.
• The door/drawer has been opened
too frequently or for too long.
• The temperature setting for the
freezer compartment is too low.
• The door/drawer gasket is dirty,
worn, cracked or mismatched.
• The required air circulation is not
guaranteed.
• In this case, it is normal for the
appliance to run longer.
• Normally, it takes 8 to 12 hours
for the appliance to cool down
completely.
• Close the door/drawer and
ensure the appliance is located
on a level ground and there is
no food or container jarring the
door.
• Do not open the door/drawer
too frequently.
• Set the temperature higher
until a satisfactory refrigera-
tor temperature is obtained. It
takes 24 hours for the refrig-
erator temperature to become
stable.
• Clean the door/drawer gasket
or replace them by the cus-
tomer service.
• Ensure adequate ventilation.
The inside of the re-
frigerator is dirty and/
or smells.
• The inside of the refrigerator
needs cleaning.
• Food of strong odour is stored in
the refrigerator.
• Clean the inside of the refrig-
erator.
• Wrap the food thoroughly..
WARNING!
▶ Before maintenance, deactivate the appliance and disconnect the mains plug from
the mains socket.
▶ Electrical equipment should be serviced only by qualied electrical experts, because
improper repairs can cause considerable consequential damages.
▶ A damaged supply should only be replaced by the manufacturer, its service agent or
similarly qualied persons in order to avoid a hazard.
Problem Possible Cause Possible Solution
It is not cold enough
i
nside the appli-
ance.
• The temperature is set too high.
• Too warm goods has been stored.
• Too much food has been stored at
one time.
• The goods are too close to each
other.
• A door/drawer of the appliance is
not tightly closed.
• The door/drawer has been opened
too frequently or for too long.
• Reset the temperature.
• Always cool down goods be-
fore storing them.
• Always store small quantities of
food.
• Leave a gap between several
foods allowing air owing.
• Close the door/drawer.
• Do not open the door/drawer
too frequently.
It is too cold inside
the appliance.
• The temperature is set too low.
• The Super freeze/Super cool-
function is activated or is running
too long.
• Reset the temperature.
• Switch o the Super freeze/Su-
per cool--function
Moisture formation
on the inside of the
refrigerator com-
partment.
• The climate is too warm and too-
damp.
• A door/drawer of the appliance is
not tightly closed.
• The door/drawer has been opened
too frequently or for too long.
• Food containers or liquids are left
open.
• Increase the temperature.
• Close the door/drawer.
• Do not open the door/drawer
too frequently.
• Let hot foods cool to room
temperature and cover foods
and liquids.
Moisture accumu-
lates on the refrig-
erators outside
surface or between
the doors/door and
drawer.
• The climate is too warm and too
damp.
• The door/drawer is not closed
tightly. The cold air in the appliance
and the warm air outside it con-
densates.
• This is normal in damp climate
and will change when the hu-
midity decreases.
• Ensure that he door/drawer is
tightly shut.
Strong ice and frost
in the freezer com-
partment.
• The goods were not adequately
packaged .
• A door/drawer of the appliance is
not tightly closed.
• The door/drawer has been opened
too frequently or for too long.
• The door/drawer gasket is dirty,
worn, cracked or mismatched.
• Something on the inside prevents
the door/drawer to close properly.
• Always pack the goods well.
• Close the door/drawer.
• Do not open the door/drawer
too frequently.
• Clean the door/drawer gasket
or replace them by new ones.
• Reposition the shelves, door
racks, or internal containers to
allow the door/drawer to close.
26 27

Troubleshooting
GB GB
Installation
Problem Possible Cause Possible Solution
The appliance
makes abnormal
sounds.
• The appliance is not located on
level ground.
• The appliance touches some ob-
ject around it.
• Adjust the feet to level the ap-
pliance.
• Remove objects around the
appliance.
A slight sound is
to be heard si
milar
to that of owing
water.
• - • This is normal.
You will hear an
alarm beep.
• The fridge storage compartment
door is open.
• The temperature in the freezer is
too high.
• Close the door or silence the
alarm manually.
• The alarm is normal when it is
rst started due to relatively
higher temperature. You can
silence the alarm manually (see
section USE).
You will hear a faint
hum.
• The anti-condensation system is
working
• This prevents condensation
and is normal
The interior lighting
or cooling system
does not work
.
• Mains plug is not connected in the
mains socket.
• The power supply is not intact.
• The LED-lamp is out of order.
• Connect the mains plug.
• Check the electrical supply to
the room. Call the local elec-
tricity company!
• Please call the service for
changing the lamp.
Unpacking
▶ Take the appliance out of the packaging.
▶ Remove all packaging materials.
Environmental conditions
The room temperature should always be between 10° C and 43° C, since it can inuence
the temperature inside the appliance and its energy consumption. Do not install the appli-
ance near other heat-emitting appliances (ovens, refrigerators) without isolation.
Door reversibility
(Only model A3FE742CMJ,C3FE744CMJ and C3FE744CWJ)
Before the appliance is permanently installed, check the correct position of the door
hinge. If necessary see section the DOOR REVERSIBILITY.
Space requirement
Required space when door is opened:
W2
W1
D2
D1
WARNING!
▶ The appliance is heavy. Always handle with at least two persons.
▶ Keep all packaging materials out of children´s reach and dispose them in an environ-
mentally friendly manner.
Ventilaton cross-section
To achieve sucient ventilation of the appliance for
safety reasons, the information of the required venti-
lation cross sections must be observed.
200 mm
100 mm
100 mm
28 29
Power interruption
In the event of a power cut, food should remain safely cold for about 16 hours. Follow these
tips during a prolonged power interruption, especially in summer:
▶ Open the door/drawer as few times as possible.
▶ Do not put additional food into the appliance during a power interruption.
▶ If prior notice of a power interruption is given and the interruption duration is longer
than 16 hours, make some ice and put it in a container in the top of the refrigerator
compartment.
▶ An inspection of the goods is required immediately after the interruption.
▶ As temperature in the refrigerator will rise during a power interruption or other fail-
ure, the storage period and edible quality of food will be reduced. Any food that de-
frosts should be either consumed, or cooked and refrozen (where suitable) soon
afterwards in order to prevent health risks.
Model
Appliance width
in mm
Appliance depth
in mm
W1 W2 D1 D2
A3FE742CMJ
C3FE744CMJ
C3FE744CWJ
1100 - 700 1323
B3FE742CMJ
- 1120 700 970

Installation
GB GB
Installation
Waiting time
To the maintenance-free lubrication oil is located in the
capsule of the compressor. This oil can get through
the closed pipe system during slanting transport. Be-
fore connecting the appliance to the power supply you
have to wait 2 hours so that the oil runs back into the
capsule.
2 h
Aigning the appliance
The appliance should be placed on a at and solid sur-
face.
1. Tilt the appliance slightly backwards.
2. Set the feet to the desired level.
Make sure the distance to the wall on the hinge side is
at least 100 mm for the door to open properly.
3. The stability can be checked by alternately bump-
ing on the diagonals. The slightly swaying should
be the same in both directions. Otherwise the
frame can warp; possible leaking door seals are
the result. A low tendency to the rear facilitates
the closing of the door.
max 45°
1. 2.
3.
WARNING!
To avoid risks a damaged power cord must be replaced by the customer service (see
warranty card).
Electrical connection
Before each connection check if:
▶ power supply, socket and fusing are appropriate to the rating plate.
▶ the power socket is earthed and no multi-plug or extension.
▶ the power plug and socket are strictly according.
Connect the plug to a properly installed household socket.
Door Reversibility
(Only model A3FE742CMJ,C3FE744CMJ and C3FE744CWJ)
Before connecting the appliance to the power supply you should check, whether the door
swing must changed from right (as delivered) to left, if this is required by the installation
location and the usability.
WARNING!
▶ The appliance is heavy. You need two persons to carry out the door reversibility.
▶ Before any operation, rst unplug the appliance from the mains .
▶ Do not tilt the appliance more than 45 ° to prevent damage of the cooling system.
1. Provide necessary tool.
2. Unplug the appliance.
3. Remove the xation of the cover
4. Remove the faceplate of the body
5. Remove the topplate of the upper door.
6. Remove the hinge cover.
7. Unplug the connection cable
8. Unscrew the upper hinge.
9. Lift the loose upper door carefully o the lower
hinge.
10. Turn the upper door upside down and change the
position of the hinge barrel on the lower side of
the door.
11. Change the door stop from the current position
to opposite side
12. Unscrew the lower hinge of the upper door.
1. 2.
3. 4.
5.
25
6.
7. 8.
9.
10.
12.
11.
30 31

Installation
GB GB
Technical Data
13. Change the positions of the blanking plugs and
the screw on the side.
After the change of the door check that the door seals
are located properly on the housing and all screws are
tightened well.
Next steps (a-f) are only necessary for model
C3FE744CMJ and C3FE744CWJ:
a Remove lower door
b Change the positions of the blanking plug at the
top of the lower door.
c Change the door stop at the bottom of the lower
door from the current position to opposite side
d Unscrew the lower hinge
e Take out the new lower hinges from the accessory
bag and screw the new lower hinge to the other
side of the door opening
f Lift the lower door carefully on to the lower hinge
so that the pivot ts into the hinge barrel.
a b
c
d
e f
14. Take out the new hinges from the accessory bag
and screw the new lower hinge of upper door to
the other side of the door opening.
14.
13.
Only for model C3FE744CMJ and C3FE744CWJ:
Be sure the pivot ts into the hinge barrel of lower
door.
15. Lift the door carefully on to the lower hinge so
that the pivot ts into the hinge barrel.
16. Fix the upper hinge with the screws.
17. Put the connection cable through the hinge
cover (delivered in the accessory bag) and put it
over the hinge.
18. Plug in the connection cable and t it into the
opening.
19. Replace faceplate and cover, x it with the screws
and reinsert the xation (see g. 3).
15. 16.
17. 18.
19.
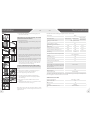
Product che according to regulation EU No. 1060/2010
Trade mark Haier
Model identier A3FE742CMJ B3FE742CMJ
C3FE744CMJ
C3FE744CWJ
Category of the model
Refrigerator-freezer
Energy eciency class A++
Annual energy consumption
(kWh/year)
1)
313 311 321
Storage volume cooling (L) 307 297 314
Storage volume freezing (L) **** 129 129 136
Star rating ****
Temperature of other compartments
> 14°C
Non applicaber
Frostfree system
Yes
Power cut safe (h)
16
Freezing capacity (kg/24h)
12
Climate class
This appliance is intended to be used
at an ambient temperature between
10 °C and 43°C.
SN-N-ST-T
Airborne acoustical noise emissions
(db(A) re 1pW)
38
Construction type
Freestanding
1)
based on standard test results for 24 hours. Actual energy consumption will depend on
how the appliance is used and where it is located.
Additional technical data
32 33
Voltage / Frequency 220-240V ~/ 50Hz
Input current (A)
1.4
Main fuse (A)
15
Coolant R600a
Dimensions (H/W/D in mm)
1905 /700/676

Customer Service
GB GB
Customer Service
We recommend our Haier Customer Service and the use of original spare parts.
If you have a problem with your appliance, please rst check section TROUBLESHOOT-
ING.
If you cannot nd a solution there, please contact
▶ your local dealer or
▶ our European Call Service-Center (see listed phone numbers below) or
▶ the Service & Support area at www.haier.com where you can activate the service
claim and also nd FAQs.
To contact our Service, ensure that you have the following data available.
The information can be found on the rating plate.
Model _____________
Serial No. _____________
Also check the Warranty Card supplied with the product in case of warranty.
European Call Service-Center
Country* Phone number Costs
Haier Italy (IT)
199 100 912
Haier Spain (ES)
902 509 123
Haier Germany (DE)
0180 5 39 39 99
• 14 Ct/Min Landline
• max 42 Ct/Min Mobile
Haier Austria (AT)
0820 001 205
• 14,53 Ct/Min Landline
• max 20 Ct/Min all others
Haier United Kingdom (UK)
0333 003 8122
Haier France (FR)
0980 406 409
* For other countries please refer to www.haier.com
34 35

DE
Gebrauchsanleitung
Kühl-Gefrierkombination
A3FE742CMJ
B3FE742CMJ
C3FE744CMJ
C3FE744CWJ

Danke
DE DE
Inhalt
Inhalt
Vorgesehener Gebrauch ..................................................................................................................4
Sicherheitshinweise ...........................................................................................................................5
Gerätebeschreibung ..........................................................................................................................8
Bedienung .......................................................................................................................................... 10
Ausstattung ....................................................................................................................................... 20
Reinigung und Pege ...................................................................................................................... 23
Fehlerbehebung ............................................................................................................................... 26
Installation .......................................................................................................................................... 29
Technische Daten ............................................................................................................................ 33
Kundendienst .................................................................................................................................... 34
Danke, dass Sie sich für ein Haier Produkt entschieden haben.
Bitte lesen Sie diese Gebrauchsanleitung sehr sorgfältig bevor Sie das Gerät in Betrieb
nehmen. Sie enthält wichtige Informationen, damit Sie viel Freude an Ihrem Gerät haben
und ein sicherer und sauberer Betrieb gewährleistet ist.
Bewahren Sie dieses Handbuch gut auf, damit Sie bei Bedarf immer wieder darauf
zurückgreifen können.
Wenn Sie die Maschine verkaufen, abgeben oder bei einem Umzug zurücklassen,
geben Sie bitte die Gebrauchsanleitung dazu, damit der neue Besitzer sich mit den
Anweisungen zur Benutzung und zum sicheren Betrieb vertraut machen kann.
Legende
Achtung! Unbedingt lesen!
Wichtige Sicherheitshinweise.
Allgemeine Hinweise und Tipps
Umwelt-Tipps
Entsorgung
Produkte mit diesem Symbol dürfen am Ende ihrer
Lebensdauer nicht in den Hausmüll gegeben werden,
sondern müssen an einem Sammelpunkt für das Re-
cycling von elektrischen und elektronischen Geräten
abgegeben werden.
WARNUNG!
Verletzungs- und Erstickungsrisiko!
Das Altgerät ist vor der Verschrottung
funktionsuntüchtig zu machen, damit Kinder sich
nicht selbst einschließen können.
Achten Sie vor der fachgerechten Entsorgung da-
rauf, dass die Kühlmittelleitungen nicht beschädigt
sind.
Trennen Sie das Gerät vom Stromnetz, entfer-
nen Sie das Netzanschlusskabel, entnehmen Sie
die Ablagen und Behälter und demontieren Sie
die Tür/en und Dichtungen oder machen Sie den
Türverschluss unbrauchbar, damit spielende Kinder
sich oder andere nicht einsperren und somit in Le-
bensgefahr kommen.
ACHTUNG! Modell B3FE742CMJ
Schließen Sie die linke Tür nur mit eingeklappter Tür-
leiste (1)
Anderenfalls (2) kann die Türleiste verbiegen und
deren Aufhängung oder die rechte Tür beschädigt
werden, sodass die Dichtung und Kühlleistung nicht
mehr gewährleistet ist.
Innerhalb der Türleiste bendet sich ein Heizungs-
Element, wodurch die Oberächentemperatur an-
steigen kann. Dies ist normal und beeinusst die
Funktion des Gerätes nicht.
1.
2.
2 3
La page est en cours de chargement...
La page est en cours de chargement...
La page est en cours de chargement...
La page est en cours de chargement...
La page est en cours de chargement...
La page est en cours de chargement...
La page est en cours de chargement...
La page est en cours de chargement...
La page est en cours de chargement...
La page est en cours de chargement...
La page est en cours de chargement...
La page est en cours de chargement...
La page est en cours de chargement...
La page est en cours de chargement...
La page est en cours de chargement...
La page est en cours de chargement...
La page est en cours de chargement...
La page est en cours de chargement...
La page est en cours de chargement...
La page est en cours de chargement...
La page est en cours de chargement...
La page est en cours de chargement...
La page est en cours de chargement...
La page est en cours de chargement...
La page est en cours de chargement...
La page est en cours de chargement...
La page est en cours de chargement...
La page est en cours de chargement...
La page est en cours de chargement...
La page est en cours de chargement...
La page est en cours de chargement...
La page est en cours de chargement...
La page est en cours de chargement...
La page est en cours de chargement...
La page est en cours de chargement...
La page est en cours de chargement...
La page est en cours de chargement...
La page est en cours de chargement...
La page est en cours de chargement...
La page est en cours de chargement...
La page est en cours de chargement...
La page est en cours de chargement...
La page est en cours de chargement...
La page est en cours de chargement...
La page est en cours de chargement...
La page est en cours de chargement...
La page est en cours de chargement...
La page est en cours de chargement...
La page est en cours de chargement...
La page est en cours de chargement...
La page est en cours de chargement...
La page est en cours de chargement...
La page est en cours de chargement...
La page est en cours de chargement...
La page est en cours de chargement...
La page est en cours de chargement...
La page est en cours de chargement...
La page est en cours de chargement...
La page est en cours de chargement...
La page est en cours de chargement...
La page est en cours de chargement...
La page est en cours de chargement...
La page est en cours de chargement...
La page est en cours de chargement...
La page est en cours de chargement...
La page est en cours de chargement...
La page est en cours de chargement...
La page est en cours de chargement...
La page est en cours de chargement...
La page est en cours de chargement...
La page est en cours de chargement...
La page est en cours de chargement...
La page est en cours de chargement...
La page est en cours de chargement...
La page est en cours de chargement...
La page est en cours de chargement...
La page est en cours de chargement...
La page est en cours de chargement...
La page est en cours de chargement...
La page est en cours de chargement...
La page est en cours de chargement...
La page est en cours de chargement...
La page est en cours de chargement...
La page est en cours de chargement...
La page est en cours de chargement...
La page est en cours de chargement...
La page est en cours de chargement...
La page est en cours de chargement...
La page est en cours de chargement...
La page est en cours de chargement...
La page est en cours de chargement...
La page est en cours de chargement...
La page est en cours de chargement...
La page est en cours de chargement...
La page est en cours de chargement...
La page est en cours de chargement...
La page est en cours de chargement...
La page est en cours de chargement...
La page est en cours de chargement...
La page est en cours de chargement...
La page est en cours de chargement...
La page est en cours de chargement...
La page est en cours de chargement...
La page est en cours de chargement...
La page est en cours de chargement...
La page est en cours de chargement...
La page est en cours de chargement...
La page est en cours de chargement...
La page est en cours de chargement...
La page est en cours de chargement...
La page est en cours de chargement...
La page est en cours de chargement...
La page est en cours de chargement...
La page est en cours de chargement...
La page est en cours de chargement...
La page est en cours de chargement...
La page est en cours de chargement...
La page est en cours de chargement...
La page est en cours de chargement...
La page est en cours de chargement...
La page est en cours de chargement...
La page est en cours de chargement...
La page est en cours de chargement...
La page est en cours de chargement...
La page est en cours de chargement...
La page est en cours de chargement...
La page est en cours de chargement...
La page est en cours de chargement...
La page est en cours de chargement...
La page est en cours de chargement...
La page est en cours de chargement...
La page est en cours de chargement...
La page est en cours de chargement...
La page est en cours de chargement...
La page est en cours de chargement...
La page est en cours de chargement...
La page est en cours de chargement...
La page est en cours de chargement...
La page est en cours de chargement...
La page est en cours de chargement...
La page est en cours de chargement...
La page est en cours de chargement...
La page est en cours de chargement...
La page est en cours de chargement...
La page est en cours de chargement...
La page est en cours de chargement...
La page est en cours de chargement...
La page est en cours de chargement...
La page est en cours de chargement...
La page est en cours de chargement...
La page est en cours de chargement...
La page est en cours de chargement...
La page est en cours de chargement...
La page est en cours de chargement...
La page est en cours de chargement...
La page est en cours de chargement...
La page est en cours de chargement...
La page est en cours de chargement...
La page est en cours de chargement...
La page est en cours de chargement...
La page est en cours de chargement...
La page est en cours de chargement...
La page est en cours de chargement...
La page est en cours de chargement...
La page est en cours de chargement...
La page est en cours de chargement...
La page est en cours de chargement...
La page est en cours de chargement...
La page est en cours de chargement...
La page est en cours de chargement...
La page est en cours de chargement...
La page est en cours de chargement...
La page est en cours de chargement...
La page est en cours de chargement...
La page est en cours de chargement...
La page est en cours de chargement...
La page est en cours de chargement...
La page est en cours de chargement...
La page est en cours de chargement...
La page est en cours de chargement...
La page est en cours de chargement...
La page est en cours de chargement...
La page est en cours de chargement...
La page est en cours de chargement...
La page est en cours de chargement...
La page est en cours de chargement...
La page est en cours de chargement...
La page est en cours de chargement...
La page est en cours de chargement...
La page est en cours de chargement...
La page est en cours de chargement...
La page est en cours de chargement...
La page est en cours de chargement...
La page est en cours de chargement...
La page est en cours de chargement...
La page est en cours de chargement...
La page est en cours de chargement...
La page est en cours de chargement...
La page est en cours de chargement...
La page est en cours de chargement...
La page est en cours de chargement...
La page est en cours de chargement...
La page est en cours de chargement...
La page est en cours de chargement...
La page est en cours de chargement...
La page est en cours de chargement...
La page est en cours de chargement...
La page est en cours de chargement...
La page est en cours de chargement...
La page est en cours de chargement...
La page est en cours de chargement...
La page est en cours de chargement...
La page est en cours de chargement...
La page est en cours de chargement...
La page est en cours de chargement...
La page est en cours de chargement...
La page est en cours de chargement...
La page est en cours de chargement...
La page est en cours de chargement...
La page est en cours de chargement...
La page est en cours de chargement...
La page est en cours de chargement...
La page est en cours de chargement...
La page est en cours de chargement...
La page est en cours de chargement...
La page est en cours de chargement...
La page est en cours de chargement...
La page est en cours de chargement...
La page est en cours de chargement...
La page est en cours de chargement...
La page est en cours de chargement...
La page est en cours de chargement...
La page est en cours de chargement...
La page est en cours de chargement...
La page est en cours de chargement...
La page est en cours de chargement...
La page est en cours de chargement...
La page est en cours de chargement...
La page est en cours de chargement...
La page est en cours de chargement...
La page est en cours de chargement...
La page est en cours de chargement...
La page est en cours de chargement...
La page est en cours de chargement...
La page est en cours de chargement...
La page est en cours de chargement...
La page est en cours de chargement...
La page est en cours de chargement...
La page est en cours de chargement...
La page est en cours de chargement...
La page est en cours de chargement...
La page est en cours de chargement...
La page est en cours de chargement...
La page est en cours de chargement...
La page est en cours de chargement...
La page est en cours de chargement...
La page est en cours de chargement...
La page est en cours de chargement...
La page est en cours de chargement...
La page est en cours de chargement...
La page est en cours de chargement...
La page est en cours de chargement...
La page est en cours de chargement...
La page est en cours de chargement...
La page est en cours de chargement...
La page est en cours de chargement...
La page est en cours de chargement...
La page est en cours de chargement...
La page est en cours de chargement...
La page est en cours de chargement...
La page est en cours de chargement...
La page est en cours de chargement...
La page est en cours de chargement...
La page est en cours de chargement...
La page est en cours de chargement...
La page est en cours de chargement...
La page est en cours de chargement...
La page est en cours de chargement...
La page est en cours de chargement...
La page est en cours de chargement...
La page est en cours de chargement...
La page est en cours de chargement...
La page est en cours de chargement...
La page est en cours de chargement...
La page est en cours de chargement...
La page est en cours de chargement...
La page est en cours de chargement...
La page est en cours de chargement...
La page est en cours de chargement...
La page est en cours de chargement...
La page est en cours de chargement...
La page est en cours de chargement...
La page est en cours de chargement...
La page est en cours de chargement...
La page est en cours de chargement...
La page est en cours de chargement...
La page est en cours de chargement...
La page est en cours de chargement...
La page est en cours de chargement...
La page est en cours de chargement...
La page est en cours de chargement...
La page est en cours de chargement...
La page est en cours de chargement...
La page est en cours de chargement...
La page est en cours de chargement...
La page est en cours de chargement...
La page est en cours de chargement...
La page est en cours de chargement...
La page est en cours de chargement...
La page est en cours de chargement...
La page est en cours de chargement...
La page est en cours de chargement...
La page est en cours de chargement...
La page est en cours de chargement...
La page est en cours de chargement...
La page est en cours de chargement...
La page est en cours de chargement...
La page est en cours de chargement...
La page est en cours de chargement...
La page est en cours de chargement...
La page est en cours de chargement...
La page est en cours de chargement...
La page est en cours de chargement...
La page est en cours de chargement...
La page est en cours de chargement...
La page est en cours de chargement...
La page est en cours de chargement...
La page est en cours de chargement...
La page est en cours de chargement...
La page est en cours de chargement...
La page est en cours de chargement...
La page est en cours de chargement...
La page est en cours de chargement...
La page est en cours de chargement...
La page est en cours de chargement...
La page est en cours de chargement...
La page est en cours de chargement...
La page est en cours de chargement...
La page est en cours de chargement...
La page est en cours de chargement...
La page est en cours de chargement...
La page est en cours de chargement...
La page est en cours de chargement...
La page est en cours de chargement...
La page est en cours de chargement...
La page est en cours de chargement...
La page est en cours de chargement...
La page est en cours de chargement...
La page est en cours de chargement...
La page est en cours de chargement...
La page est en cours de chargement...
La page est en cours de chargement...
La page est en cours de chargement...
La page est en cours de chargement...
La page est en cours de chargement...
La page est en cours de chargement...
La page est en cours de chargement...
La page est en cours de chargement...
La page est en cours de chargement...
La page est en cours de chargement...
La page est en cours de chargement...
La page est en cours de chargement...
La page est en cours de chargement...
La page est en cours de chargement...
La page est en cours de chargement...
La page est en cours de chargement...
La page est en cours de chargement...
La page est en cours de chargement...
La page est en cours de chargement...
La page est en cours de chargement...
La page est en cours de chargement...
La page est en cours de chargement...
La page est en cours de chargement...
La page est en cours de chargement...
La page est en cours de chargement...
La page est en cours de chargement...
La page est en cours de chargement...
La page est en cours de chargement...
La page est en cours de chargement...
La page est en cours de chargement...
La page est en cours de chargement...
La page est en cours de chargement...
La page est en cours de chargement...
La page est en cours de chargement...
La page est en cours de chargement...
La page est en cours de chargement...
La page est en cours de chargement...
La page est en cours de chargement...
La page est en cours de chargement...
La page est en cours de chargement...
La page est en cours de chargement...
La page est en cours de chargement...
-
 1
1
-
 2
2
-
 3
3
-
 4
4
-
 5
5
-
 6
6
-
 7
7
-
 8
8
-
 9
9
-
 10
10
-
 11
11
-
 12
12
-
 13
13
-
 14
14
-
 15
15
-
 16
16
-
 17
17
-
 18
18
-
 19
19
-
 20
20
-
 21
21
-
 22
22
-
 23
23
-
 24
24
-
 25
25
-
 26
26
-
 27
27
-
 28
28
-
 29
29
-
 30
30
-
 31
31
-
 32
32
-
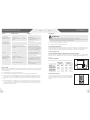 33
33
-
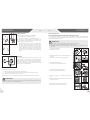 34
34
-
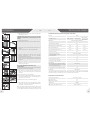 35
35
-
 36
36
-
 37
37
-
 38
38
-
 39
39
-
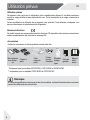 40
40
-
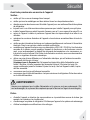 41
41
-
 42
42
-
 43
43
-
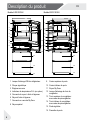 44
44
-
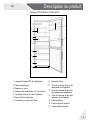 45
45
-
 46
46
-
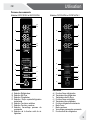 47
47
-
 48
48
-
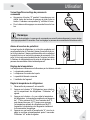 49
49
-
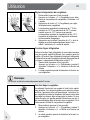 50
50
-
 51
51
-
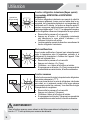 52
52
-
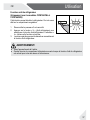 53
53
-
 54
54
-
 55
55
-
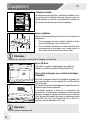 56
56
-
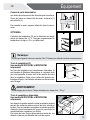 57
57
-
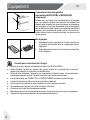 58
58
-
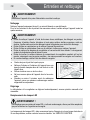 59
59
-
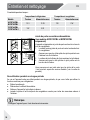 60
60
-
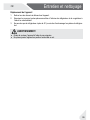 61
61
-
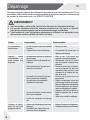 62
62
-
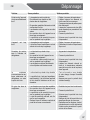 63
63
-
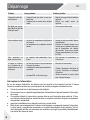 64
64
-
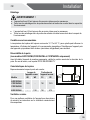 65
65
-
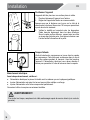 66
66
-
 67
67
-
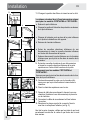 68
68
-
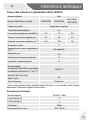 69
69
-
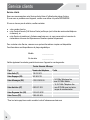 70
70
-
 71
71
-
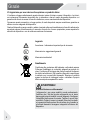 72
72
-
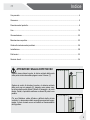 73
73
-
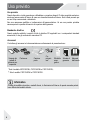 74
74
-
 75
75
-
 76
76
-
 77
77
-
 78
78
-
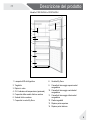 79
79
-
 80
80
-
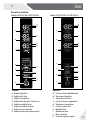 81
81
-
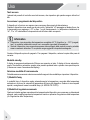 82
82
-
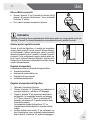 83
83
-
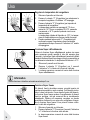 84
84
-
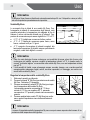 85
85
-
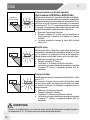 86
86
-
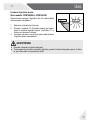 87
87
-
 88
88
-
 89
89
-
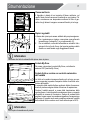 90
90
-
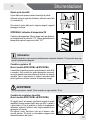 91
91
-
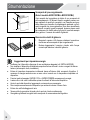 92
92
-
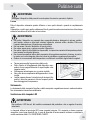 93
93
-
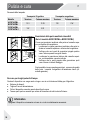 94
94
-
 95
95
-
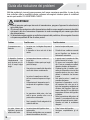 96
96
-
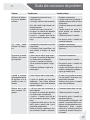 97
97
-
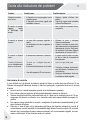 98
98
-
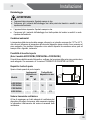 99
99
-
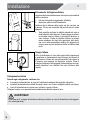 100
100
-
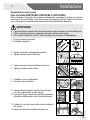 101
101
-
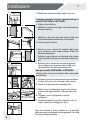 102
102
-
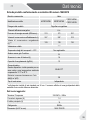 103
103
-
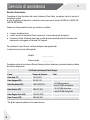 104
104
-
 105
105
-
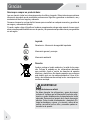 106
106
-
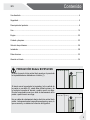 107
107
-
 108
108
-
 109
109
-
 110
110
-
 111
111
-
 112
112
-
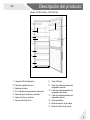 113
113
-
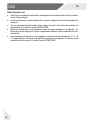 114
114
-
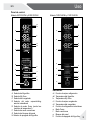 115
115
-
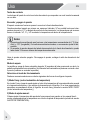 116
116
-
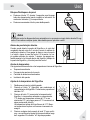 117
117
-
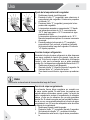 118
118
-
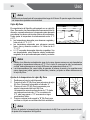 119
119
-
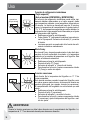 120
120
-
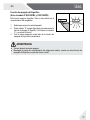 121
121
-
 122
122
-
 123
123
-
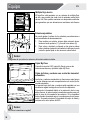 124
124
-
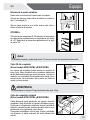 125
125
-
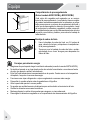 126
126
-
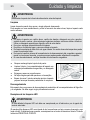 127
127
-
 128
128
-
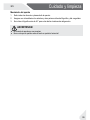 129
129
-
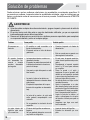 130
130
-
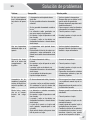 131
131
-
 132
132
-
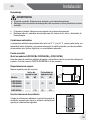 133
133
-
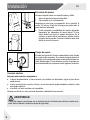 134
134
-
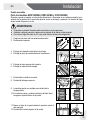 135
135
-
 136
136
-
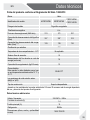 137
137
-
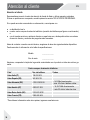 138
138
-
 139
139
-
 140
140
-
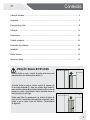 141
141
-
 142
142
-
 143
143
-
 144
144
-
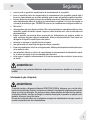 145
145
-
 146
146
-
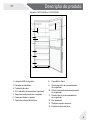 147
147
-
 148
148
-
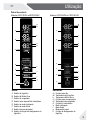 149
149
-
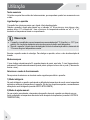 150
150
-
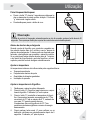 151
151
-
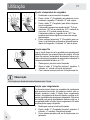 152
152
-
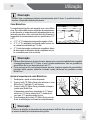 153
153
-
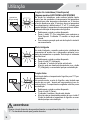 154
154
-
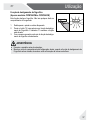 155
155
-
 156
156
-
 157
157
-
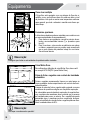 158
158
-
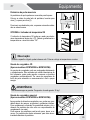 159
159
-
 160
160
-
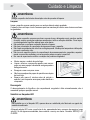 161
161
-
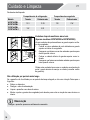 162
162
-
 163
163
-
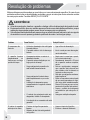 164
164
-
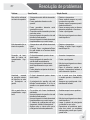 165
165
-
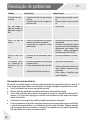 166
166
-
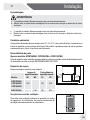 167
167
-
 168
168
-
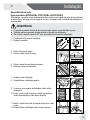 169
169
-
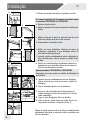 170
170
-
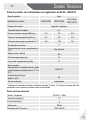 171
171
-
 172
172
-
 173
173
-
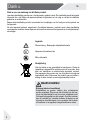 174
174
-
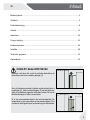 175
175
-
 176
176
-
 177
177
-
 178
178
-
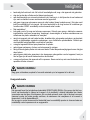 179
179
-
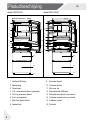 180
180
-
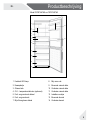 181
181
-
 182
182
-
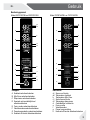 183
183
-
 184
184
-
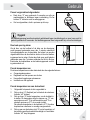 185
185
-
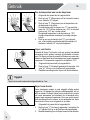 186
186
-
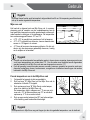 187
187
-
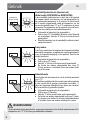 188
188
-
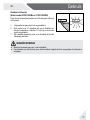 189
189
-
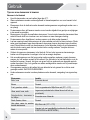 190
190
-
 191
191
-
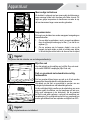 192
192
-
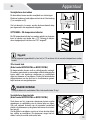 193
193
-
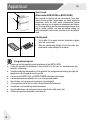 194
194
-
 195
195
-
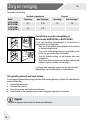 196
196
-
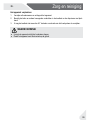 197
197
-
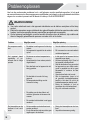 198
198
-
 199
199
-
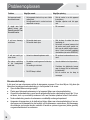 200
200
-
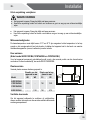 201
201
-
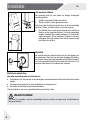 202
202
-
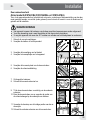 203
203
-
 204
204
-
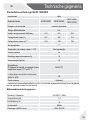 205
205
-
 206
206
-
 207
207
-
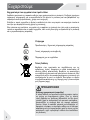 208
208
-
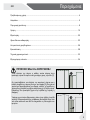 209
209
-
 210
210
-
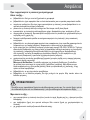 211
211
-
 212
212
-
 213
213
-
 214
214
-
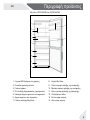 215
215
-
 216
216
-
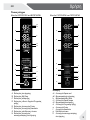 217
217
-
 218
218
-
 219
219
-
 220
220
-
 221
221
-
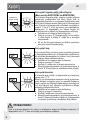 222
222
-
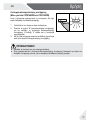 223
223
-
 224
224
-
 225
225
-
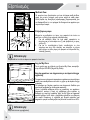 226
226
-
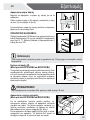 227
227
-
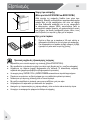 228
228
-
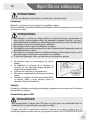 229
229
-
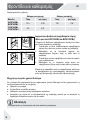 230
230
-
 231
231
-
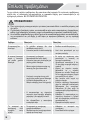 232
232
-
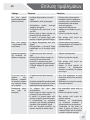 233
233
-
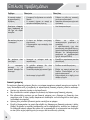 234
234
-
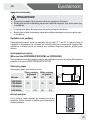 235
235
-
 236
236
-
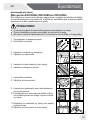 237
237
-
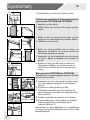 238
238
-
 239
239
-
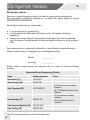 240
240
-
 241
241
-
 242
242
-
 243
243
-
 244
244
-
 245
245
-
 246
246
-
 247
247
-
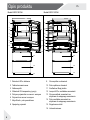 248
248
-
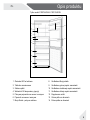 249
249
-
 250
250
-
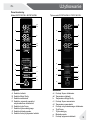 251
251
-
 252
252
-
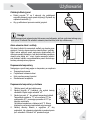 253
253
-
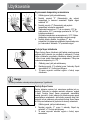 254
254
-
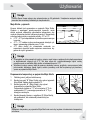 255
255
-
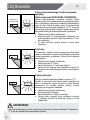 256
256
-
 257
257
-
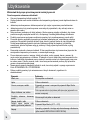 258
258
-
 259
259
-
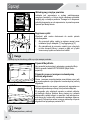 260
260
-
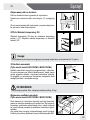 261
261
-
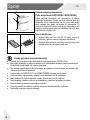 262
262
-
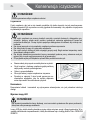 263
263
-
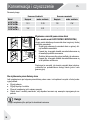 264
264
-
 265
265
-
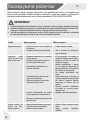 266
266
-
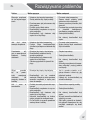 267
267
-
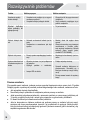 268
268
-
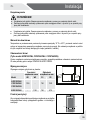 269
269
-
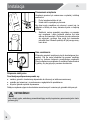 270
270
-
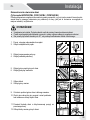 271
271
-
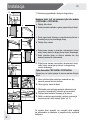 272
272
-
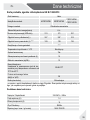 273
273
-
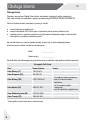 274
274
-
 275
275
-
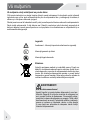 276
276
-
 277
277
-
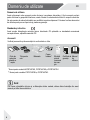 278
278
-
 279
279
-
 280
280
-
 281
281
-
 282
282
-
 283
283
-
 284
284
-
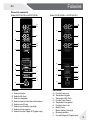 285
285
-
 286
286
-
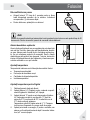 287
287
-
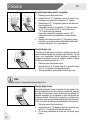 288
288
-
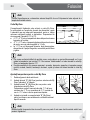 289
289
-
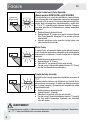 290
290
-
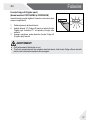 291
291
-
 292
292
-
 293
293
-
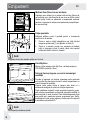 294
294
-
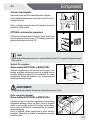 295
295
-
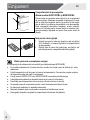 296
296
-
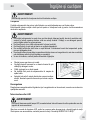 297
297
-
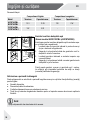 298
298
-
 299
299
-
 300
300
-
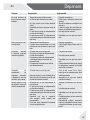 301
301
-
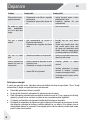 302
302
-
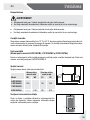 303
303
-
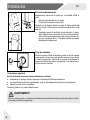 304
304
-
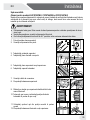 305
305
-
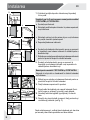 306
306
-
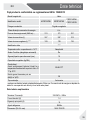 307
307
-
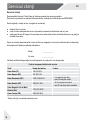 308
308
-
 309
309
-
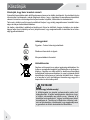 310
310
-
 311
311
-
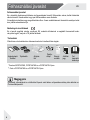 312
312
-
 313
313
-
 314
314
-
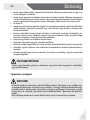 315
315
-
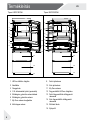 316
316
-
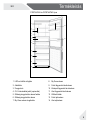 317
317
-
 318
318
-
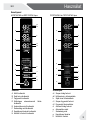 319
319
-
 320
320
-
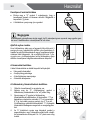 321
321
-
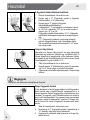 322
322
-
 323
323
-
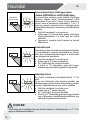 324
324
-
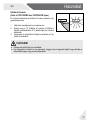 325
325
-
 326
326
-
 327
327
-
 328
328
-
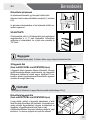 329
329
-
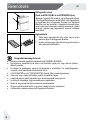 330
330
-
 331
331
-
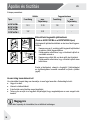 332
332
-
 333
333
-
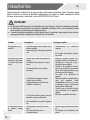 334
334
-
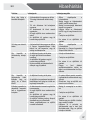 335
335
-
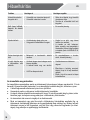 336
336
-
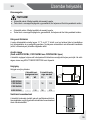 337
337
-
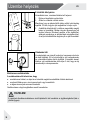 338
338
-
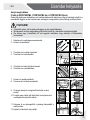 339
339
-
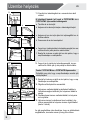 340
340
-
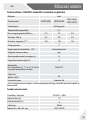 341
341
-
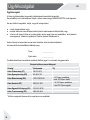 342
342
-
 343
343
-
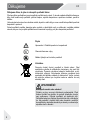 344
344
-
 345
345
-
 346
346
-
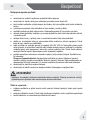 347
347
-
 348
348
-
 349
349
-
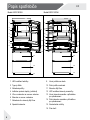 350
350
-
 351
351
-
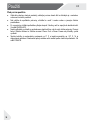 352
352
-
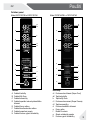 353
353
-
 354
354
-
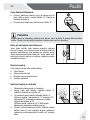 355
355
-
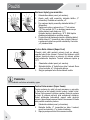 356
356
-
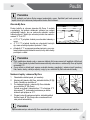 357
357
-
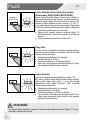 358
358
-
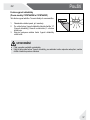 359
359
-
 360
360
-
 361
361
-
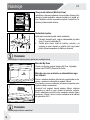 362
362
-
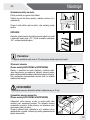 363
363
-
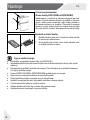 364
364
-
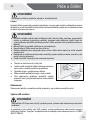 365
365
-
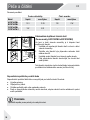 366
366
-
 367
367
-
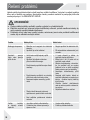 368
368
-
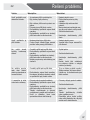 369
369
-
 370
370
-
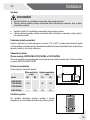 371
371
-
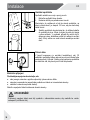 372
372
-
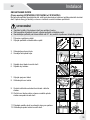 373
373
-
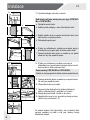 374
374
-
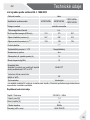 375
375
-
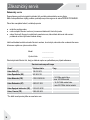 376
376
-
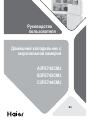 377
377
-
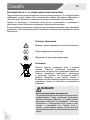 378
378
-
 379
379
-
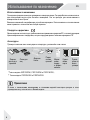 380
380
-
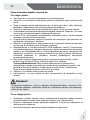 381
381
-
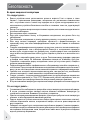 382
382
-
 383
383
-
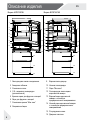 384
384
-
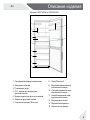 385
385
-
 386
386
-
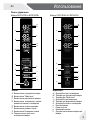 387
387
-
 388
388
-
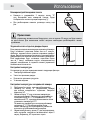 389
389
-
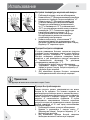 390
390
-
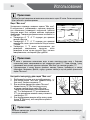 391
391
-
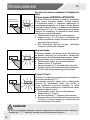 392
392
-
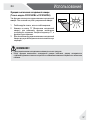 393
393
-
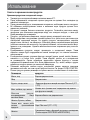 394
394
-
 395
395
-
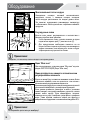 396
396
-
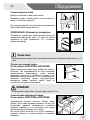 397
397
-
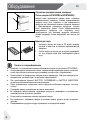 398
398
-
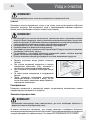 399
399
-
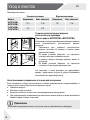 400
400
-
 401
401
-
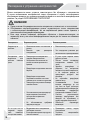 402
402
-
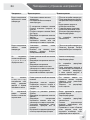 403
403
-
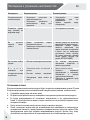 404
404
-
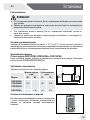 405
405
-
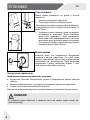 406
406
-
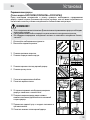 407
407
-
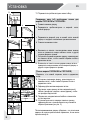 408
408
-
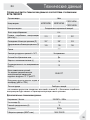 409
409
-
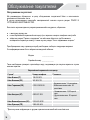 410
410
-
 411
411
-
 412
412


Haier A3FE742CMJ Manuel utilisateur
- Catégorie
- Réfrigérateurs combinés
- Taper
- Manuel utilisateur
- Ce manuel convient également à
dans d''autres langues
- italiano: Haier A3FE742CMJ Manuale utente
- English: Haier A3FE742CMJ User manual
- español: Haier A3FE742CMJ Manual de usuario
- Deutsch: Haier A3FE742CMJ Benutzerhandbuch
- русский: Haier A3FE742CMJ Руководство пользователя
- Nederlands: Haier A3FE742CMJ Handleiding
- português: Haier A3FE742CMJ Manual do usuário
- polski: Haier A3FE742CMJ Instrukcja obsługi
- čeština: Haier A3FE742CMJ Uživatelský manuál
- română: Haier A3FE742CMJ Manual de utilizare