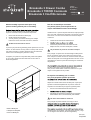
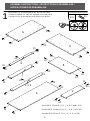
Storkcraft Brookside 3-Drawer Combo Dresser Assembly Instructions
- Taper
- Assembly Instructions

1
Adult assembly required. Small parts may
present choking hazard prior to assembly.
to help you quickly assemble your product. Before you
begin we recommend that you follow the steps below:
1. Please read the instructions thoroughly
2. Identify all parts and hardware
3. You may need to provide the following tools: Philips
Head screw driver, Flat head screw driver, Hammer.
Do Not Use Power Drills or Drivers
To protect your parts during assembly please place them on a soft
surface. To clean surface use only water on a damp cloth. Do not
use window cleaners or cleaning abrasives as it will scratch the
surface and could damage the protective coating.
To register your product for important safety alerts and updates
to your product please visit www.storkcraft.com and click on
Product Registration.
Doit être assemblé par un adulte.
Les petites pièces peuvent présenter un
risque d’étouffement avant l’assemblage.
Veuillez trouver ci-joint les simples instructions, étape par étape,
pour vous aider à rapidement assembler votre produit. Avant de
commencer, nous vous recommandons de suivre les étapes
ci-dessous:
1. Veuillez lire les instructions attentivement
2.
3. Vous devrez peut-être fournir les outils suivants:
Philips tournevis, tournevis à tête plate, marteau.
Ne pas utiliser de perceuse out outils électrique
Pour protéger vos pièces lors de l’assemblage veuillez placez-
les sur une surface souple. Pour nettoyer la surface souple.
Pour nettoyer la surface de l’eau sur un chiffon humide. Ne pas
utiliser de nettoyants ou de nettoyage abrasifs comme il ne fera
qu’égratigner la surface et pourrait endommager le revêtement
de protection.
sécurité et des mises à jour importantes relatives à
votre produit, veuillez visiter le site www.storkcraft.com, puis
cliquer sur Enregistrement de produits.
Se requiere ensamblaje por un adulto.
Las pieza pequeñas pueden presentar
Adjunto encontrará instrucciones sencillas paso a paso para
ayudarle a ensamblar rápidamente su producto. Antes de
empezar le recomendamos que siga los siguientes pasos:
1. Por favor leer detenidamente las instrucciones
2.
3. Necesitará las siguientes herramientas (no incluidas):
Destornillador de cruz, Destornillador plano Martillo
No utilice destornilladores eléctricos
Para proteger las piezas durante el montaje por favor,
actualizaciones de seguridad, visite www.storkcraft.com y haga
clic en Registro de Productos (Product Registration).
Made in Malaysia/
Fabriqué en Malaysia/
Hecho en Malaysia
ID7131C
COLOR / COULEUR / COLOR
Model /
Modele No /
de modèle
03663-110 - AC
Brookside 3 Drawer Combo
Brookside 3 TIROIR Commode
Brookside 3 CAJÓN cómoda
Sep,2018

2
Nuestro equipo de atención al cliente está aquí para ayudarle.
Si tiene alguna duda con el ensamblaje de su producto o si tiene alguna pregunta acerca del envío, partes; y/o si desea
información de su nuevo producto, por favor, póngase en contacto primero con nuestro equipo de atención al cliente.
Nuestro equipo estará feliz de ayudarle. Estamos disponibles de Lunes a Viernes de 6:30am a 4pm PST / 9:30am a 7pm EST.
S.V.P. veuillez vous assurer d'avoir l'information suivante en main. Vous trouverez cette information sur l'étiquette
blanche située sur votre produit : Modele No | Numéro de PO | Date de fabrication
La manera más fácil de contactarnos es:
• Por nuestro chat en línea a través de nuestra página web www.storkcraftdirect.com
• Por correo electrónico a [email protected]
• Por teléfono sin costo al 1-877-274-0277 en Norte América.
Será un placer asistirle.
¿NECESITA AYUDA CON SU PRODUCTO?
Our Customer Care team is here for you.
If you have any questions about assembling your product, or have any concerns relating to parts, shipping, or your
new product, get in touch with our Customer Care team first and they will be happy to let you know what to do next
We’re available Monday to Friday, from 6:30 am – 4:00pm PST / 9:30 am – 7:00 pm EST.
Please have the following product information ready, located on the white sticker label on your product:
Model number | PO number | Date of manufacture
Here are a few easy ways to contact us:
• Online at www.storkcraftdirect.com via our live chat
• Email us at [email protected]
• Call us toll-free in North America at 1.877.274.0277
We look forward to hearing from you.
NEED PRODUCT SUPPORT?
Notre service à la clientèle est ici pour vous aider.
Si vous avez des questions au sujet de l’assemblage de votre produit ou si vous avez des préoccupations au sujet du produit
lui-même, des pièces ou de la livraison, veuillez contacter notre service à la clientèle et nous serons heureux de vous aider.
Nous sommes disponible du Lundi au Vendredi de 6:30am - 4:00pm (HNP) / 9:30am - 7:00pm (HNE).
Por favor tenga la información completa del producto a la mano. Esta se encuentra ubicada en la etiqueta blanca pegada al
producto: Número de modelo | Numero postal | Fecha de manufactura
Voici deux manières faciles de nous contacter :
• Par courrier électronique : [email protected]
• Par téléphone : En Amérique du Nord composez sans frais 1-877-274-0277
N’hésitez pas à nous contacter.
BESOIN D’AIDE AVEC VOTRE PRODUIT ?

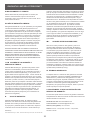
Serious or fatal crushing injuries can occur from furniture tip-over.
To help prevent tip-over:
.Install tipover restraint provided.
.Place heaviest items in the lowest drawers.
.Do not set TV's or other heavy objects on the top of this product, unless the product is specifically
designed to accomodate them.
.Never allow children to climb or hang on drawers, doors,or shelves.
.Never open more than one drawer at a time.
Use of tip-over restraints may only reduce, but not eliminate, the risk of tip-over.
.Always monitor your child’s activity when in the nursery.
.Do not allow standing in drawers.
.Do not allow standing on top of this product.
.Accessory Items must be securely fastened to this product according to the instructions provided with
those items.
.To avoid head injury, do not allow children to play underneath open drawers.
.Do not leave drawers open when not in use.
NOTES ON ASSEMBLY:
-Must be assembled by an adult.
-Includes small parts with sharp points which could be hazardous to children.
-Care should be taken when unpacking and assembling this product.
-During the assembly process whenever using screws or bolts, check each by placing the screw/bolt on
the diagram of the item which is drawn actual size and design. Be sure to use the proper size and
shape specied in the instructions.
-To assemble this unit you may be required to place the unit on it’s side and face. It is strongly
recommended that assembly is done on a soft, non-abrasive surface to avoid damaging the nish.
NOTES ON CARE AND MAINTENANCE:
-Do not scratch or chip the nish.
- Inspect the product periodically, contact Stork Craft Customer service for replacement parts or
questions.
-Do not store the product or any parts in extreme temperatures and conditions such as a hot attic or a
damp, cold basement. These extremes can cause a loss of structural integrity.
-To preserve the luster of the high quality nish on your product, it is recommended to place a doily or
felt pad under any items you place on the nish.
-Clean with a damp cloth, then a dry cloth to preserve the original luster and beauty of this ne nish. -
Do not use abrasive chemicals.
-Do not spray cleaners directly onto furniture.
-Lift slightly when moving on carpeting to prevent leg breakage.
-Use of a vaporizer near furniture will cause wood to swell and nish to peel.
3
WARNING
Distributed by
Storkcraft Manufacturing Inc. #200 12033 Riverside way Richmond, BC V6W 1K6 T: 1 877 274 0277 | E: [email protected] | Twitter @Storkcraft

-Doit être assemblé par un adulte
-Inclus de petites pièces pointues qui pourrait être dangereuse pour les enfants
-Veuiller déballer et assembler ce meuble avec précautions
-Durant l’assemblage veuillez comparer chaque visse et boulons en plaçant la visse ou les boulons
directement sure le diagramme pour vérier la dimension et le style. Veuiller vous assurez d’utiliser les
visse et boulon spécié sur chaque étapes.
-L’assemblage de cet meuble requiert de le placer sure les côté et le devant, an d’éviter les
égratignures il est recommandé que l’assemblage soit fait sur une surface douce, non-abrasive an
d’éviter d’endommagé le ni
NOTES SUR LA MAINTENANCE DU MEUBLE:
- Ne pas égratigner ou ébrèche le meuble
- Inspecter le produit régulièrement, veuiller contacter notre service aux clients pour le remplacement
de pièces ou questions
- Ne JAMAIS entreposer ce meuble ou ces pièces sous température extrême ou condition comme le
grenier ou sous-sol humide. Ces conditions extrêmes pourraient endommager l’intégrité de la structure
du meuble
-An de protéger la haute qualité du ni du meuble, il est recommandé d’utiliser des napperons ou
cousiner de feutre en dessous de tous articles placés sur le meuble
-Nettoyer à l’aide d’un chion humide et après d’un chion sec pour préserver le lustre et beauté
original du ni du meuble
-Ne pas utiliser de produit abrasif
-Ne pas pulvériser de produit nettoyant sur le meuble
-Soulever le meuble durant le déplacement an d’éviter de casser les pieds du meuble
-Utilisation d’un vaporisateur près du meuble pourrait causer le bois de goner et le ni de pelée
4
Les lésions par écrasement graves ou mortelles peuvent survenir en
raison d'un renversement de meubles. Pour aider à prévenir les :
.Un renversement d'installation fourni. modération
.Place des éléments dans la plus lourde des tiroirs plus bas.
.Ne pas mettre la TV ou autres objets lourds sur le dessus de ce produit, à moins que le produit est
spécialement conçu pour les accueillir.
.Ne laissez jamais les enfants à grimper ou s'accrocher sur les tiroirs, portes,ou des étagères.
.N'ouvrez jamais plus d'un tiroir à la fois. L'utilisation de tip-plus de protections peuvent seulement
de réduire, mais non éliminer, le risque de renversement.
.Toujours surveiller votre activité de l'enfant lorsqu'à la pépinière.
.Ne pas laisser debout dans des tiroirs.
.Ne pas laisser debout sur ce produit.
.Les accessoires doivent être solidement fixés sur ce produit selon les instructions fournies avec ces
éléments.
.Pour éviter toute blessure à la tête, ne pas laisser les enfants jouer sous les tiroirs ouverts.
.Ne pas laisser ouvrir les tiroirs lorsqu'il n'est pas utilisé.
NOTES POUR L’ASSEMBLAGE:
MISE EN GARDE
Distribué par
Storkcraft Manufacturing Inc. #200 12033 Riverside way Richmond, BC V6W 1K6 T: 1 877 274 0277 | E: [email protected] | Twitter @Storkcraft

-Debe ser ensamblado por un adulto.
- Incluye piezas pequeñas con puntas filosas que podrían ser peligrosas para los niños.
-Debe tener cuidado cuando desempaque y ensamble este producto.
-Durante el proceso de montaje cuando use los tornillos, revíselos guiándose con el diagrama y
que coincidan con el diseño. Asegúrese de utilizar el tamaño correcto y la forma especificada en las
instrucciones.
- Para ensamblar esta unidad puede ser necesario colocarlo de lado y de frente. Se recomienda que
el ensamble se realice sobre una superficie suave, no abrasiva para evitar dañar el acabado.
NOTAS SOBRE EL ENSAMBLE:
NOTAS SOBRE EL CUIDADO Y EL MANTENIMIENTO:
- No rayar ni estropear el acabado.
-Revise el producto periódicamente, póngase en contacto con Stork Craft a servicio al cliente para
obtener piezas de reemplazo o alguna pregunta.
- No almacene el producto o cualquier pieza en temperaturas y condiciones extremas, tales como
un ático caliente o un sótano húmedo y frío. Estos extremos pueden causar un daño al producto en
la estructura y/o acabado.
- Para conservar el brillo del acabado de alta calidad de su producto, se recomienda colocar un
tapete o mantel de fieltro debajo de cualquier artículo que coloque en el acabado.
-Limpie con un paño húmedo y luego con un paño seco para conservar el brillo original y la belleza
de este acabado fino.
- No utilice productos químicos abrasivos.
- No rocíe limpiadores directamente sobre el mueble.
-Levante ligeramente cuando lo muevan sobre una alfombra para así evitar dañar las patas del
mueble.
- El uso de un vaporizador cerca de los muebles hará que la madera se hinche y el acabado se
descarapele.
5
La posibilidad de sufrir lesiones graves o mortales pueden ocurrir
desde muebles volcar. Para evitar vuelcos:
.Instale el vuelco con moderación.
.Colocar elementos más pesados en los cajones más bajos.
.No configura el televisor u otros objetos pesados sobre la parte superior de este producto, a
menos que el producto está diseñado específicamente para acomodar a ellos.
.Nunca permita que los niños suban o colgar en cajones, puertas,o estantes.
.Nunca abra más de un cajón a la vez. Uso de volcar las restricciones sólo
pueden reducir, pero no eliminar, el riesgo de vuelco.
.Siempre supervisa la actividad de su hijo cuando en el vivero.
.No dejar reposar en los cajones. .
.No permiten de pie en la parte superior de este producto.
.Los elementos accesorios deben sujetarse firmemente a este producto de acuerdo a las instrucciones
provistas con esos elementos.
.Para evitar lesiones en la cabeza, no permita que los niños jueguen debajo abrir cajones.
.No deje los cajones abiertos cuando no está en uso.
ADVERTENCIA
Distribuido por
Storkcraft Manufacturing Inc. #200 12033 Riverside way Richmond, BC V6W 1K6 T: 1 877 274 0277 | E: [email protected] | Twitter @Storkcraft

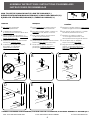
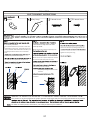
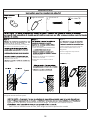
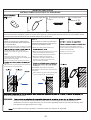
Fully insert the “Camlock Bolt
-3-” into the specified holes.
To withdraw the “Camlock Bolt -3-",
do not use any tool, unscrew it with the hand.
With your thumb, insert the “camlock -1-”
into the specified holes with the arrow pointing
towards the insertion hole.
Insert the pieces into one another and make
sure they are completely united.
To lock the pieces together, turn (tighten)
the “camlock -1-” to the right for
slightly more than half a turn.
Insérer jusqu’au fond le «boulon camlock à
enfoncer -3-» dans les trous mentionnés.
Pour retirer le «boulon camlock à enfoncer -3-»,
n’utiliser aucun outil, dévisser le à la main.
Avec le pouce, insérer «raccord camlock
-1-» dans les trous mentionnés,
la flèche vers le trou d’insertion.
Joindre les pièces l’une dans l’autre et s’assurer
qu’elles sont bien unies l’une contre l’autre.
Tourner (serrer) «raccord camlock -1-»
vers la droite, un peu plus d’un demi tour,
pour bloquer les pièces ensemble.
Introduzca el “Tornillo camlock -3-”hasta el fondo
en todos los agujeros mencionados.
Una las piezas entre sí. Asegúrese
de que se encuentren bien unidas
Haga girar hacia la derecha y ajuste la “
camlock -1-” dando algo más que una
media vuelta para que las piezas queden
atrancadas.
A
***THINGS TO REMEMBER FOR ASSEMBLING/ À RETENIR LORS DE L'ASSEMBLAGE/ A RECORDAR DURANTE EL ENSAMBLAJE***
FOR YOUR INFORMATION ONLY POUR INFORMATION SEULEMENT A TÍTULO INFORMATIVO
BC
D E
3
1
1
3
1
or
ou
o
1
HOW TO USE THE CAMLOCK BOLT(-3-) AND THE CAMLOCK(-1-)
EXEMPLE D'UTILISATION (BOULON CAMLOCK(-3-) RACCORD CAMLOCK(-1-))
EJEMPLO DE UTILIZACIÓN (CAMLOCK(-3-) TORNILLO CAMLOCK(-1-)
ENGLISH FRANÇAIS ESPAÑOL
Para retirar el “Tornillo camlock -3-”, no utilizar
herramientas, desatornillar el a la mano.
Introduzca con el pulgar la “camlock
-1-” en los agujeros mencionados, con la
flecha apuntando hacia el agujero de inserción.
31
A.
B.
C.
D.
E.
A.
B.
C.
D.
E.
A.
B.
C.
D.
E.
ASSEMBLY INSTRUCTIONS / INSTRUCTIONS D'ASSEMBLAGE /
INSTRUCCIONES DE ENSAMBLAJE
6

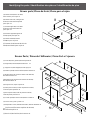
Identifying the parts / Identification des pièces / Identificación de piez
7
(A) Drawer back/Arrière de tiroir/
Panel trasero para cajón x3
(B) Drawer left side / Côté gauche
de tiroir/ Panel lateral izquierdo
para cajón x3
(C) Drawer right side/ Côté droit
de tiroir/ Panel lateral derecho
para cajón x3
(D) Drawer support/Support de
tiroir/Soporte paracajón x3
(E) Drawer bottom/Fond de
tiroir/Base para cajón x3
(F) Drawer front/ Devant de tiroir du
haut/Panel frontal para cajón x3
E
B
C
A
D
Dresser Parts / Pièces du Chiffonnier / Piezas De La Cajonera
(G) Left side/Cote guache/Lateral izquierdo x1
(H) Right side/Cote droit/Lateral derecho x1
(J) Support rail/ Rail d'appui/ Riel de apoyo x1
(K) Bottom panel/Panneau inférieur/Panel inferior x1
(L) Bottom back rail/ Traverse inferieur du derrière/
Riel trasero inferior x2
(M) Bottom front rail/Traverse inferieur du devant/
Riel frontal inferior x1
(N) Top/ Dessus/ Tapa superior x1
(P) Back panel center/ Centre du panneau arrière/
Cenro de panel posterior x2
(Q) Back panel Side/ Côté du panneau arrière/
Lado del panel posterior x1
(R) Center panel/Panneau central/Panel central x1
(S) Door Panel / porte / puerta x 1
(T) Adjustable Shelf /Tablette Amovible /Estante Extraible x1
(U) Top front rail/Traverse supérieur du devant/
Riel frontal superior x1
(V) Back rail/ Rail arrière/ Guia trasera x1
F
N
L
Q
P
P
H
G
R
J
L
M
K
S
T
U
V
Drawer parts/ Pièces du tiroir/ Piezas para el cajón

8
Identifying the parts / Identification des pièces / Identificación de piez
HARDWARE/ Quincailleries/ HERRAJE
58R x 3
Right Drawer Track
Droit voie de tiroir
Cajón derecho vía
57L x 3
Left Panel Drawer Track
Panneau gauche voie de tiroir
Panel izquierdo vía cajón
58L x 3
Left Drawer Track
Tiroir gauche voie
Cajón izquierdo vía
80 x 1
Wall Stud
Montant Du Mur
Montaje Para Pared
1 x 20
Camlock
Raccord camlock
Camlock
4 x 9
Drawer Camlock
Tiroir: Camlock
Camlock cajón
3 x 20
Camlock Bolt
Boulon Camlock
Tornillo Camlock
5 x 9
Drawer Camlock Bolt
Cajón Perno Camlock
Tiroir vis Camlock
20 x 31
M8 x 25mm Wood Dowel
M8 x 25mm de la cheville en bois
M8 x 25mm la espiga de madera
23 x 36
M6 x 30mm Wood Dowel
M6 x 30mm de la cheville en bois
M6 x 30mm la espiga de madera
30 x 46
M3.5 x 12mm Screw
M3.5 x 12mm de la vis
M3.5 x 12mm el tornillo
43 x 8
Handle Screw
La vis de poignée
El tornillo de la empuñadura
31 x 8
M3.5 x 16mm Screw
M3.5 x 16mm de la vis
M3.5 x 16mm el tornillo
41 x 26
Nail 5/8"
Nail 5/8"
Clavo de 5/8"
72 x 4
Handle
la poignée
agarradera
85 x 4
Shelf Support
Taquet
Soporte de estante
57R x 3
Right Panel Drawer Track
Panneau droit voie de tiroir
Panel derecho vía cajón
36 x 9
M4 x 38mm Screw
M4 x 38mm de la vis
M4 x 38mm el tornillo
87 x 2
Hinges
Charnières
Bisagras
81 x 1
L Bracket
Support en L
Soporte en L

9
ASSEMBLY INSTRUCTIONS / INSTRUCTIONS D'ASSEMBLAGE /
INSTRUCCIONES DE ENSAMBLAJE
120
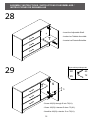
- Insert 20 (X 31) into G, H, R, J, K, U, V and L (X2)
- Insérer 20 (X 31) dans G, H, R, J, K, U, V et L (X2)
- Insertar 20 (X 31) en G, H, R, J, K, U, V y L (X2)
Required/Requis/Requerido
G
H
R
20
20
20
20 20
20
J
20
20
20
20
20
X31
20 20
20
20
20
20
20
K
L x 2
20
20
V
20
20
20
20 U
20
20
20
20
Wood dowel -20- should be pushed into the end of the hole.
Pasador de madera -20- debe ser empujado al final del orificio.
Cheville en bois -20- devrait être poussé dans la fin du trou.

ASSEMBLY INSTRUCTIONS / INSTRUCTIONS D'ASSEMBLAGE /
INSTRUCCIONES DE ENSAMBLAJE
10
1
Required/Requis/Requerido
X20
- Insert 1 (X 20) into G, H, R, J, K and L (X2)
- Insérer 1 (X 20) dans G, H, R, J, K et L (X2)
- Insertar 1 (X 20) en G, H, R, J, K y L (X2)
JL x 2
2
11
1
1
11
1
1
K
G
H
11
1
1
1
1
1
1
1
1
R
With your thumb, insert the “camlock -1-” into the specified holes with the
arrow pointing towards the insertion hole.
Avec le pouce, insérer «raccord camlock -1-» dans les trous mentionnés,
la flèche vers le trou d’insertion
Introduzca con el pulgar la “ camlock -1-” en los agujeros
mencionados, con la flecha apuntando hacia el agujero de inserción.

11
ASSEMBLY INSTRUCTIONS / INSTRUCTIONS D'ASSEMBLAGE /
INSTRUCCIONES DE ENSAMBLAJE
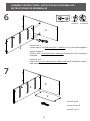
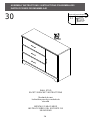
- Insert 3 (X 20) into G, H, K, M,N and R
- Insérer 3 (X 20) dans G, H, K, M,N et R
- Insertar 3 (X 20) en G, H, K, M,N y R
GH
3
3
33
3
3
3
3
3
33
3
3
3
3
3
3
N
3
3
M
K
3
3
R
3
Required/Requis/Requerido
X20

ASSEMBLY INSTRUCTIONS / INSTRUCTIONS D'ASSEMBLAGE /
INSTRUCCIONES DE ENSAMBLAJE
12
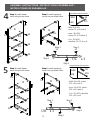
- With 30 (X12),
screw 57L (X 3) into G
- Avec 30 (X12),
visser 57L (X 3) dans G
- Con 30 (X12),
atornillar 57L (X 3) en G
- With 30 (X12), screw
57R (X 3) into R
- Avec 30 (X12), visser
57R (X 3) dans R
- Con 30 (X12), atornillar
57R (X 3) en R
4
5
Step 1, install drawer
track using locator holes. Step 2, install remaining
screws no pre drilled holes.
57L x 3
30
30
30
30
Step 1 Step 1
Step 2
Step 2
57R x 3
30
30
30
30
Step 1
Step 1
Step 2
Step 2
Step 2, install remaining
screws no pre drilled holes.
R
57R
30
30
UP
Step 1, install drawer
track using locator holes.
UP
57R
30
30
57R
30
30
UPR
57R
30 30
G
57L 30
30
UP
57L 30
30
57L 30
30
UP
UP
30
30
G57L
30
X12
57L
X3
Required/Requis/Requerido
30
X12
57R
X3
Required/Requis/Requerido

13
ASSEMBLY INSTRUCTIONS / INSTRUCTIONS D'ASSEMBLAGE /
INSTRUCCIONES DE ENSAMBLAJE
6
7
- Insert K into R.
- Tighten right 1(X2) little more than a half turn on R to lock them together.
- Insérer K dans R.
- Tourner 1(X2) un peu plus qu'un demi tour à droite sur R pour les barrer
ensemble.
- Insertar K en R.
- Girar 1(X2) un poco màs que una media vuelta hacia la derecha sobre R
para trancarlos juntos.
LOCK correct/
correcto incorrect/
incorrecto
1
R
K
RK
V
- Insert V into R
- Insérer V dans R
- Insertar V en R

ASSEMBLY INSTRUCTIONS / INSTRUCTIONS D'ASSEMBLAGE /
INSTRUCCIONES DE ENSAMBLAJE
14
8
9
L
K
J
R
V- Insert L into K
- Insérer L dans K
- Insertar L en K
K
J
R
V
LOCK correct/
correcto incorrect/
incorrecto
1
- Insert J into R.
- Tighten right 1(X1) little more than
a half turn on J to lock them together.
- Insérer J dans R.
- Tourner 1(X1) un peu plus qu'un
demi tour à droite sur J pour les
barrer ensemble.
- Insertar J en R.
- Girar 1(X1) un poco màs que una media vuelta
hacia la derecha sobre J para trancarlos juntos.

15
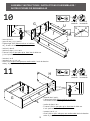
ASSEMBLY INSTRUCTIONS / INSTRUCTIONS D'ASSEMBLAGE /
INSTRUCCIONES DE ENSAMBLAJE
J
KL
GU
- Insert U into R
- Insert G into J,K,L,V and U.
- Tighten right 1(X5) little more than a half turn
on J,K and L to lock them together.
- Insérer U dans R
- Insérer G dans J,K,L,V et U.
- Tourner 1(X5) un peu plus qu'un demi tour à droite sur
J,K et L pour les barrer ensemble.
- Insertar U en R
- Insertar G en J,K,L,V y U.
- Girar 1(X5) un poco màs que una media vuelta hacia la derecha
sobre J,K y L para trancarlos juntos.
LOCK correct/
correcto incorrect/
incorrecto
1
3
H
GK
L
10
11
LOCK correct/
correcto incorrect/
incorrecto
1
- Insert H into K and L.
- Tighten right 1(X4) little more than a half turn
on K and L to lock them together.
- Insérer H dans K et L.
- Tourner 1(X4) un peu plus qu'un demi tour à droite sur
K et L pour les barrer ensemble.
- Insertar H en K y L.
- Girar 1(X4) un poco màs que una media vuelta hacia la derecha
sobre K y L para trancarlos juntos.
13
R
UR

ASSEMBLY INSTRUCTIONS / INSTRUCTIONS D'ASSEMBLAGE /
INSTRUCCIONES DE ENSAMBLAJE
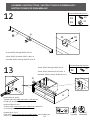
16
30
81
81
M
30
- Screw 30(X2) through 81(X1) into M.
- Visser 30(X2) à travers 81(X1). dans M.
- Atornillar 30(X2) a través de 81(X1) en M.
12
13
MG
H
K
81
30
1
3
- Screw 30(X2) through 81(X1) into K.
- Visser 30(X2) à travers 81(X1) dans K.
- Atornillar 30(X2) a través de 81(X1) en K.
M
K
LOCK correct/
correcto incorrect/
incorrecto
1
- Insert M into G and H.
- Tighten right 1(X2) little more than a half turn on
G and H to lock them together.
- Insérer M dans G et H.
- Tourner 1(X2) un peu plus qu'un demi tour à droite sur
G et H pour les barrer ensemble.
- Insertar M en G y H.
- Girar 1(X2) un poco màs que una media vuelta hacia la derecha
sobre G y H para trancarlos juntos.
Required/Requis/Requerido
30
X2
81
X1
Required/Requis/Requerido
30
X2

ASSEMBLY INSTRUCTIONS / INSTRUCTIONS D'ASSEMBLAGE /
INSTRUCCIONES DE ENSAMBLAJE
17
N
M
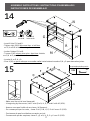
- Insert N into G,H and R.
- Tighten right 1(X6) little more than a half turn
on G,H and R to lock them together.
- Insérer N dans G,H et R.
- Tourner 1(X6) un peu plus qu'un demi tour à droite
sur G,H et R pour les barrer ensemble.
- Insertar N en G,H y R.
- Girar 1(X6) un poco màs que una media vuelta hacia la derecha sobre G,H y R para trancarlos juntos.
LOCK correct/
correcto incorrect/
incorrecto
1
H
R
G
14
15 P
P
Q
41
- Make sure the unit is level (squared).
- In beginning by the corners, nail P and Q to N, H, G, R and K with 41 (X26).
- Assurez vous que l'unité soit au niveau (à l'équerre).
- En commençant par les coins, clouer P et Q à N, H, G, R et K avec 41 (X26).
- Cerciorarse de que la unidad se encuentre a nivel.
- Comenzando por las esquinas, clavar P y Q a N, H, G, R y K con 41 (X26).
HR
VG
K
41
X26
Required/Requis/Requerido

18
ASSEMBLY INSTRUCTIONS / INSTRUCTIONS D'ASSEMBLAGE /
INSTRUCCIONES DE ENSAMBLAJE
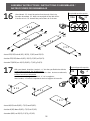
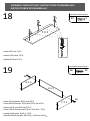
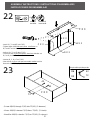
- Insert 23(X36) into A(X3), B(X3), C(X3) and D(X3).
- Insérer 23(X36) dans A(X3), B(X3), C(X3) et D(X3).
- Insertar 23(X36) en A(X3), B(X3), C(X3) y D(X3).
16
17
- Insert 4(X9) into B(X3), C(X3) and D(X3).
- Insérer 4(X9) dans B(X3), C(X3) et D(X3).
- Insertar 4(X9) en B(X3), C(X3) y D(X3).
C X 3 4
B X 3
4
D X 3
4
With your thumb, insert the “camlock -4-” into the specified holes with the
arrow pointing towards the insertion hole.
Avec le pouce, insérer «raccord camlock -4-» dans les trous mentionnés,
la flèche vers le trou d’insertion
Introduzca con el pulgar la “ camlock -4-” en los agujeros
mencionados, con la flecha apuntando hacia el agujero de inserción.
B X 3
A X 3
23 23
23
C X 3
23
23
23
23 23
23
23
D X 3
Wood dowel -23- should be pushed into the end of the hole.
Pasador de madera -23- debe ser empujado al final del orificio.
Cheville en bois -23- devrait être poussé dans la fin du trou.
23
23
X36
Required/Requis/Requerido
Required/Requis/Requerido
4
X9

ASSEMBLY INSTRUCTIONS / INSTRUCTIONS D'ASSEMBLAGE /
INSTRUCCIONES DE ENSAMBLAJE
19
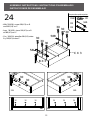
F X 3
- Insert 5(X9) into F(X3).
- Insérer 5(X9) dans F(X3).
- Insertar 5(X9) en F(X3).
5
5
5
18
19
36
36
- Insert A(X3) between B(X3) and C(X3).
- Screw 36(X6) through B(X3) and C(X3) into A(X3).
- Insérer A(X3) entre B(X3) et C(X3).
- Visser 36(X6) à travers de B(3) et C(X3) dans T(X3).
- Insertar A(X3) entre B(X3) y C(X3).
- Atornillar 36(X6) a través de B(X3) y C(X3) en A(X3).
C X 3
B X 3
A X 3
Required/Requis/Requerido
5
X9
Required/Requis/Requerido
36
X6

ASSEMBLY INSTRUCTIONS / INSTRUCTIONS D'ASSEMBLAGE /
INSTRUCCIONES DE ENSAMBLAJE
20
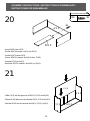
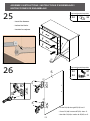
D X 3
36
A X 3
- Insert D(X3) into A(X3).
- Screw 36(X3) through A(X3) into D(X3).
- Insérer D(X3) dans A(X3).
- Visser 36(X3) à travers de A(X3) dans D(X3).
- Insertar D(X3) en A(X3).
- Atornillar 36(X3) a través de A(X3) en D(X3).
- Slide E(X3) into the grooves of B(X3), C(X3) and A(X3).
- Glisser E(X3) dans les rainures de B(X3), C(X3) et A(X3).
- Deslizar E(X3) en las ranuras de B(X3), C(X3) y A(X3).
E X 3
A X 3
B X 3
C X 3
20
21
Required/Requis/Requerido
36
X3
La page est en cours de chargement...
La page est en cours de chargement...
La page est en cours de chargement...
La page est en cours de chargement...
La page est en cours de chargement...
La page est en cours de chargement...
La page est en cours de chargement...
La page est en cours de chargement...
La page est en cours de chargement...
La page est en cours de chargement...
La page est en cours de chargement...
La page est en cours de chargement...
-
 1
1
-
 2
2
-
 3
3
-
 4
4
-
 5
5
-
 6
6
-
 7
7
-
 8
8
-
 9
9
-
 10
10
-
 11
11
-
 12
12
-
 13
13
-
 14
14
-
 15
15
-
 16
16
-
 17
17
-
 18
18
-
 19
19
-
 20
20
-
 21
21
-
 22
22
-
 23
23
-
 24
24
-
 25
25
-
 26
26
-
 27
27
-
 28
28
-
 29
29
-
 30
30
-
 31
31
-
 32
32


Storkcraft Brookside 3-Drawer Combo Dresser Assembly Instructions
- Taper
- Assembly Instructions
dans d''autres langues
Documents connexes
-
Storkcraft Brookside 3-Drawer Chest Assembly Instructions
-
-
-
-
-
-
-
-
-