The First Years Indigo S430 Manuel utilisateur
- Catégorie
- Poussettes
- Taper
- Manuel utilisateur

Read all instructions BEFORE assembly and USE of product
KEEP INSTRUCTIONS FOR FUTURE USE.
© 2010 Learning Curve Brands 4000001000 12/09
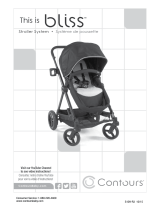
Indigo
Stroller
S430
Keep this instruction manual for future use.
Learning Curve Brands, Inc.
Attn: Consumer Services
2021 9th St. SE
Dyersville, IA 52040
or call 1-888-899-2229
or visit us at www.learningcurve.com
For use with children whose:
Weight is:
50 lbs. (22.5 kg) or less.
Standing Height is:
40 inches (102 cm) or less.
Adult assembly required.
See “Stroller Assembly”
section.
No tools requried.
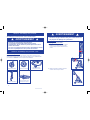
INSTRUCTION MANUAL

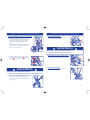
Section 1 - Table of Contents
Adult assembly required. See “Stroller Assembly” section.
Section 1 Table of Contents..........................................................
1
Section 2 Important Information..................................................2
Section 3 Warnings.......................................................................3
Section 5 Stroller Operation and Use
5.1 Seat Back Recline
...................................................
10
5.2 Leg Rest Adjustment 10
5.3 Canopy Extension........................................................... 10
5.4 Brake Operation.................................................... 11
5.5 Front Wheel Swivel Lock Operation.......................................11
Section 4 Stroller Assembly
......................................................
5
Section 7 Cleaning and Maintenance........................................19
Section 8 Replacement Parts.....................................................20
Section 9 Storage........................................................................20
Section 10 Registration................................................................
20
Section 11 Warranty.....................................................................20
Safety Checklist/Safe Practices
Safety Checklist:
√
Did you read and understand these instructions and labels before assembling the
Stroller?
√ Is the child the proper weight and height for the product use mode?
Safe Practices:
*
NEVER leave child unattended.
*
USE with only one (1) child at a time.
*
DO NOT use accessories other than those provided by Learning Curve.
Section 2 - Important Information
Have A Question?
If you have a question, are missing parts or need assistance, please contact Learning
Curve Consumer Affairs at 1-888-899-2229 or at www.learningcurve.com.
Or write us at: Learning Curve Brands Attn: Consumer Affairs
2021 9th St SE
Dyersville, Iowa 52040
Please have the following information available. See label on bottom of footrest.
Model Number: _________________________
Manufacture Date: _______________________
Date Of Purchase: _______________________
1
2
Use Recommendations
Stroller Use:
Maximum Weight: 50 lbs. (22.5 kg).
Maximum Height: 40 inches (102 cm).
Car Seat Attachment.........................................................12
The First Years
TM
certifies the compliance of this stroller to ASTM F833
Standard Consumer Safety Performance for Strollers and Carriages.
The First Years
TM
has also validated compliance through independent
laboratory testing.
The First Years
TM
Safety Certification
5.6
Securing Child................................................................
17
5.12
................................................

3
4
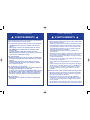
Section 3 - Warnings
WARNINGS
Avoid serious injury to your child:
• DO NOT allow child to sit or stand in storage basket.
• Keep parent organizer out of child’s reach.
• ALWAYS remove child and fold stroller before going up
or down stairs or escalators.
• ALWAYS use caution when maneuvering the stroller up
or down curbs or on uneven surfaces.
• ALWAYS apply brakes when parking the stroller.
• DO NOT run, jog, or skate with this stroller. Stroller is for
use when walking only. Running, jogging, or skating can
cause loss of control and tip over.
• Discontinue use of stroller when child weighs 50 lbs.
(22.5 kg) or is 40 inches (102 cm) tall.
• Discontinue use of stroller when it becomes damaged or
broken.
Only use the The First Years
TM
I450, The First Years
TM
I470,
Graco SnugRide
®
, Graco SnugRide 32
®
,
Graco SnugRide 35
®
,
Chicco KeyFit
TM
30 and Chicco KeyFit
TM
infant car seats
with this stroller.
Avoid injury from stroller tipping over:
• DO NOT overload stroller as it can become unstable.
• DO NOT carry extra children, parcels or goods in or on
stroller.
• DO NOT add package - carrying accessories or hang
items from stroller. NEVER place purses, shopping bags,
or parcels on stroller handle or canopy.
• DO NOT place more than 5 lbs. (2.25 kg) in storage basket.
• DO NOT place more than 0.5 lbs. (0.225 kg) in parent
Avoid burns:
• DO NOT place hot liquids in parent organizer.
Section 3 - Warnings
WARNINGS
organizer.
DO NOT place more than 0.5 lbs. (0.225 kg) on the child’s tray.
Failure to follow these warnings and the instructions could
result in serious injury or death.
Avoid serious injury from falling or sliding out:
• ALWAYS use seat belt to restrain child.
• Snugly adjust seat belt around child.
• NEVER leave child unattended, even when sleeping.
Always keep child in view.
• DO NOT allow child to climb on stroller or stand in seat.
Avoid strangulation:
• Place shoulder belts under seat pad when not used to
restain child.
• DO NOT place items with a string around child’s neck,
suspend string from this product, or attach strings to
toys.
Avoid pinch injury:
• Keep fingers clear of hinged joints when folding and
unfolding stroller.
• Make sure stroller is LOCKED in the use position before
placing child in stroller.
• When making adjustments, always ensure child’s body
parts are clear of any moving parts.
•
•

Section 4 - Stroller Assembly - continued
Avoid pinch injury:
• Keep fingers clear of hinged joints when folding and
unfolding stroller.
WARNING
Section 4 - Stroller Assembly
Adult assembly required. No tools required.
Stroller Parts:
Remove all parts from carton and identify all parts. if any parts are missing or damaged,
call Learning Curve Consumer Affairs at 1-888-899-2229 for assistance. DO NOT return
product to the retailer.
• Correct assembly is required. Follow all instructions for
assembly and use.
• Stroller contains small parts until assembled. Keep small
parts away from children.
• Plastic bags can cause suffocation. Keep plastic bags
away from children.
WARNING
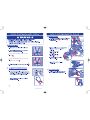
Stroller Frame (1)
Front Wheel Assembly (2)
5
Rear Wheel Assembly (2) Infant Car seat adapter (1)
Stroller Seat with bumper bar
and canopy (1)
6
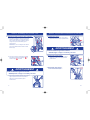
Assembly :
1. To unfold stroller:
A. Position stroller on the as shown. Release the
fold lock and rotate handle until it locks into
position.
B. Position stroller upright and ensure frame
is locked.

Section 4 - Stroller Assembly Continued
7 8
4. Canopy Assembly:
A. Position stroller seat on the ground as shown.
Attach canopy clips to seat on both sides.
B. To remove the front wheel assembly, push the
red button on top of the front wheel assembly
and pull off the front wheel assembly.
2. Front Wheel Assembly:
A. Locate a front wheel assembly and push the red
button on top and firmly push on the wheel
assembly until it ‘clicks’ . Repeat for the
other side.
NOTE:Pull down on each wheel to ensure it is
attached.
B. To remove the rear wheel assembly, push the
button and pull off the rear wheel
assembly .
3. Rear Wheel Assembly:
A. Locate a rear wheel assembly. Push in the button
and slide rear wheel assembly pin into the rear
wheel housing . Repeat for the other side.
NOTE:Pull out on each wheel to ensure it is
attached.
2
1
1
1
1
2
2
2
Section 4 - Stroller Assembly Continued
C. To remove the canopy, rotate c-clip and pull.
Detach the hook and loop fasteners.
B. Attach hook and loop fasteners on each side of
canopy to the seat.
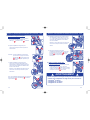
B. To remove bumper bar, push button to release
bumper bar and pull to remove.
A. To attach bumper bar, align ends on bumper
bar and push into holes until it clicks.
NOTE: Pull up on each side of bumper bar
to ensure it is attached.
5. Bumper Bar Assembly:
1
2
2
1
1
2
1
2

Section 4 - Stroller Assembly Continued
9 10
C. To reverse seat direction rotate seat to rear facing
position and push seat into hinges until it clicks.
B. To remove the seat from the stroller frame, slide
release buttons and lift off seat from
the frame.
6. Attach Seat to Stroller Frame:
A. To attach the seat to the stroller frame, locate the
arms on the seat and align with the hinges on the
frame. Push seat into hinges until it clicks.
NOTE: Pull up on seat to ensure it is attached
before securing child in seat.
Avoid serious injury to your child:
• DO NOT carry seat with child in it.
WARNING
Section 5 - Stroller Operation and Use
1. To recline the seat:
A. Push button on both sides of seat and rotate
seat to the desired position.
A. Pull forward on the front of the canopy.
A. Push button on both sides of legrest and rotate
legrest to the desired position.
Avoid serious injury to your child:
•
DO NOT adjust seat with child in it.
WARNING
2. To adjust the legrest:
1
2
1
2
3. To extend canopy:

11 12
Section 5 - Stroller Operation and Use - Continued
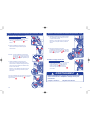
A. To activate the rear brake, press down on
the brake lever. To release brake lever,
push up on the brake lever.
4. Rear brake operation:
A. To activate and lock front wheels, push up
on the front wheel lock lever. To unlock front
wheels, push down on the front wheel lock lever.
5. To lock front wheels in position:
Section 5 - Stroller Operation and Use - Continued
6. To attach The First Years
TM
Via Infant
Car Seat:
A. Pull release handle on back of infant car seat .
Pull up on infant car seat to remove and
detach from hinges.
7. To remove The First Years
TM
Via infant
car seat:
A. To remove the toddler seat from the stroller frame,
slide release buttons and lift off seat
from the frame.
1
2
1
2
B. Lower the The First Years
TM
Via infant seat onto
hinges until it clicks.
Note: Pull up on the infant seat to ensure it is
attached.
Use only the The First Years
TM
Via I450 and I470 infant car
seats to attach directly to the hinges.
WARNING
1
2
2
1

Section 5 - Stroller Operation and Use - Continued
13 14
Section 5 - Stroller Operation and Use - Continued
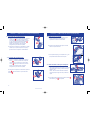
8. To attach the Graco infant car seat:
A. Unbuckle the webbing strap over the infant car
seat. Pull release handle on back of infant
car seat. Pull up on infant car seat to
remove.
9. To remove the Graco infant car seat:
A. To remove the toddler seat from the stroller frame,
slide release buttons and lift off seat
from the frame.
1
C. Lower the infant car seat adapter onto the hinges
until it clicks. Infant car seat adapter can be installed
forward or rear facing.
Note: Pull up on the infant car seat adapter to
ensure it is attached.
To remove infant car seat adapter
Pull on release tab and pull up adapter .
Use only the following Graco infant car seats with the infant
car seat adapter:
• Graco SnugRide®
• Graco SnugRide 32®
• Graco SnugRide 35®
WARNING
1
2
D. Lower the Graco infant car seat into the infant car
seat adapter. The Graco infant car seat should latch
onto adapter shown in the detail view.
Note: Pull up on the Graco infant car seat to
ensure it is attached.
1
2
B. Locate the infant car seat adapter and rotate
arms until they lock into place.
E. Route buckle webbing through the belt path on
both sides of the infant car seat . Attach the
buckle . Tighten strap so that the infant
car seat is held tightly.
1
2
3
Note: To fold up infant car seat adapter, push release
button and rotate arm up.
Repeat for other side.
1
1
2
2
2
1
2
2
1
1
2
2
3
2
1

Section 5 - Stroller Operation and Use - Continued
15 16
Section 5 - Stroller Operation and Use - Continued
10. To attach the Chicco infant car seat:
A. Unbuckle the webbing strap over the infant car
seat. Pull release handle on back of infant
car seat. Pull up on infant car seat to
remove.
11.To remove the Graco infant car seat:
A. To remove the toddler seat from the stroller frame,
slide release buttons and lift off seat
from the frame.
1
2
C. Lower the infant car seat adapter onto the hinges
until it clicks. Infant car seat adapter can be installed
forward or rear facing.
Note: Pull up on the infant car seat adapter to
ensure it is attached.
Use only the following Chicco infant car seats with the infant
car seat adapter:
• Chicco KeyFit™
• Chicco KeyFit™ 30
WARNING
1
2
D. Lower the Chicco infant car seat into the infant car
seat adapter until it clicks.
Note: Pull up on the Chicco infant car seat to
ensure it is attached.
B. Locate the infant car seat adapter and rotate
arms until they lock into place.
E. Route buckle webbing through the belt path on
both sides of the infant car seat . Attach the
buckle . Tighten strap so that the infant car
seat is held tightly.
1
2
3
1
2
1
2
1
2
2
3
1
Note: To fold up infant car seat adapter, push release
button and rotate arm up.
Repeat for other side.
1
2
To remove infant car seat adapter
Pull on release tab and pull up adapter .
1
2
2
1

Snugly adjust waist straps by pulling on strap
ends.
Snugly adjust shoulder straps by moving slide
adjusters along belts.
1
1
2
2
3
3

Cleaning seat pad:
1. Spot clean only:
- Surface wash small spots with mild solution of soap and water.
-
Rinse with water to remove soap solution.
Wipe or air dry.
Cleaning stroller:
1. Surface wash stroller frame, plastic parts and fabric with mild solution of soap and
water. Wipe surfaces with water to remove soap solution.
2. Wipe or air dry.
Parent organizer:
1. Spot clean only:
- Surface wash small spots with mild solution of soap and water.
- Rinse with water to remove soap solution.
Section 7 - Cleaning and Maintenance
19
20
-
Section 8 - Replacement Parts
We know parts get worn or damaged. Some companies charge outrageous
prices when their parts wear out. At Learning Curve, we will sell you replacement
parts at or near our cost plus what it costs us to handle and ship them. They
are still expensive, but we promise they are fair prices. Of course,
replacement instructions are always free.
Please contact Learning Curve
Consumer Affairs at 1-888-899-2229 for current prices on other items or visit our website
at www.Learningcurve.com.
Section 9 - Storage
For long-term storage, fold stroller and store in cool dry location.
Long-term storage at high temperature or other conditions can damage stroller.
Before each use check stroller:
- For broken or missing parts. DO NOT use stroller if parts are damaged or missing.
- For proper operation of all parts and adjustments. Check that stroller fold locks
securely lock the stroller in the use position.
Section 10 - Registration
At Learning Curve, providing you, our customer, the best service and best products possible
are two of our top priorities. In the event we have new product related information or a
service announcement related to your product, we would like to be able to share that
information directly with you. To accomplish this, Learning Curve has established an
innovative Consumer Registration System for our products similar to that used for
children’s car seats. Our innovative system allows you to directly register your product
with Learning Curve by accessing our website at www.learningcurve.com. Be assured,
your contact information will be handled confidentially and only used for the purpose
described above.
Now, the rest is up to you.
To register your product, log onto www.Learningcurve.com, select Customer Services,
and then Product Registration or leave us a message with your name and contact
information (address and telephone number) and the information for your product (model
number, date of manufacture, and date of purchase).
We would like to thank you for joining our family of Learning Curve product users.
Section 11 - Warranty
Learning Curve provides a limited 1 year warranty. For more details, please access the
Consumer Services link to our website at www.learningcurve.com.


© 2010 Learning Curve Brands 4000001000 12/09
Carriola
Indigo
S430
Guarde este manual de instrucciones para uso futuro
Learning Curve Brands, Inc.
Att.: Consumer Services
2021 9th St. SE
Dyersville, IA 52040
o llame al 1-888-899-2229
o visítenos en www.learningcurve.com
Para usar con niños cuyo:
Peso es:
50 libras (22,5 kg) o menos.
Estatura es:
40 pulgadas (102 cm) o menos.
Requiere ser ensamblado
por un adulto.
Consulte la sección
“Cómo armar la carriola”.
No se necesitan herramientas.
MANUAL DE INSTRUCCIONES
Lea todas las instrucciones ANTES del ensamblado y uso del producto
GUARDE LAS INSTRUCCIONES PARA USO FUTURO.

Requiere ser ensamblado por un adulto. Consulte la
sección “Cómo armar la carriola”.
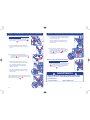
Sección 1 Índice
1
Sección 2 Información importante 2
Sección 3 Advertencias 3
Sección 5 Funcionamiento y uso de la carriola
5.1
Cómo reclinar el respaldo del asiento 10
5.2 Ajuste del soporte de las piernas 10
5.3 Apertura de la capota 10
5.4 Funcionamiento del freno 11
5.5
Bloqueo de las ruedas delanteras
11
Sección 4 Cómo armar la carriola 5
Sección 7 Limpieza y mantenimiento 19
Sección 8 Piezas de repuesto 20
Sección 9 Almacenamiento 20
Sección 10 Registro 20
Sección 11 Garantía
20
Lista de verificación de seguridad/prácticas seguras
Lista de verificación de seguridad:
√
¿Leyó y entendió estas instrucciones y las etiquetas antes de armar la carriola?
√
¿Tiene el niño el peso y estatura adecuados para la modalidad de uso del producto?
Prácticas seguras:
NUNCA deje al niño sin supervisión.
UTILICE el producto con sólo un (1) niño a la vez.
NO utilice accesorios aparte de los suministrados por Learning Curve.
Sección 2 – Información importante
¿Tiene alguna pregunta?
También puede escribirnos a la siguiente dirección: Learning Curve Brands Att: Consumer Affairs
2021 9th St SE
Dyersville, Iowa 52040
Le rogamos que tenga a mano la información siguiente. Consulte la etiqueta debajo del descansapiés.
Número de modelo : _________________________
Fecha de fabricación : _______________________
Fecha de compra : _______________________
1
2
Recomendaciones para el uso
Uso de la carriola:
Peso máximo: 50 libras (22,5 kg).
Estatura máxima: 40 pulgadas (102 cm).
Sujeción del asiento para automóvil 12
Certificado de seguridad de The First Years
TM
5.6
Protección del niño 17
5.12
Sección 1 – Índice
The First Years
TM
certifica que esta carriola cumple las normas estipuladas
para el uso de carriolas y coches de paseo en la normativa ASTM F833
relativa a la seguridad de usuarios y consumidores. The First Years
TM
también cuenta con la certificación de un laboratorio de pruebas
independiente.
Si tiene alguna pregunta, le faltan piezas o necesita asistencia, llame a Learning Curve
Consumer Affairs al 1-888-899-2229 o visite www.learningcurve.com.
*
*
*

3
4
Sección 3 – Advertencias
ADVERTENCIAS
Evite que su niño sufra lesiones graves:
Evite las quemaduras:
• NO ponga líquidos calientes en el organizador de los padres.
Sección 3 – Advertencias
ADVERTENCIAS
El no seguir estas advertencias y las instrucciones puede
producir lesiones personales o la muerte.
Evite lesiones graves causadas por una caída o deslizamiento:
• SIEMPRE use el cinturón de seguridad para sujetar al niño.
•
Ajuste ceñidamente el cinturón de seguridad alrededor del niño.
• NUNCA deje el niño desatendido, ni siquiera cuando esté
durmiendo.
Siempre mantenga al niño a la vista.
• NO permita que el niño se suba por sí solo a la
carriola o se ponga de pie en el asiento.
Evite el estrangulamiento:
• Coloque los cinturones de hombro debajo del cojín del
asiento cuando no los utilice para sujetar al niño.
• NO cuelgue nada que tenga una cuerda alrededor del
cuello del niño, no cuelgue ninguna cuerda de este
producto y no sujete cuerdas a los juguetes.
Evite pellizcarse:
• Mantenga los dedos alejados de juntas abisagradas
al plegar y abrir la carriola
.
• Asegúrese de que la carriola esté BLOQUEADA en
la posición de uso antes de colocar al niño en ella.
• Cuando haga ajustes, asegúrese siempre de que el
cuerpo del niño esté alejado de las partes
• NO permita que el niño se siente o se ponga de pie
en el cesto porta-objetos.
• Mantenga el organizador de los padres fuera del alcance del niño.
• SIEMPRE saque al niño y pliegue la carriola antes de subir o bajar
escaleras normales o mecánicas.
• SIEMPRE tenga cuidado al subir y bajar la acera con la carriola o
al utilizarla en superficies irregulares.
• SIEMPRE use los frenos cuando estacione la carriola.
• NO corra, haga jogging ni patine con esta carriola. Esta carriola
sólo debe utilizarse para caminar. Correr, hacer jogging o patinar
puede hacer que se pierda el control de la carriola y que
ésta vuelque.
•
Deje de usar la carriola cuando el niño alcance 50 libras
(22,5 kg) de peso o 40 pulgadas (102 cm) de estatura.
• Deje de usar la carriola si sufre daños o se rompe.
•
Utilice únicamente los siguientes asientos para automóvil con esta
carriola: The First Years
TM
I450, The First Years
TM
I470, Graco SnugRide
®
,
Graco SnugRide 32
®,
Graco SnugRide 35
®,
Chicco KeyFit
™
30 y el
asiento infantil para automóvil Chicco KeyFit
TM
.
•
NO sobrecargue la carriola ya que podría desestabilizarse.
• NO lleve niños, paquetes ni artículos de más en la car riola ni
encima de ella.
• NO instale accesorios para llevar paquetes en la carriola ni
cuelgue artículos de ella. NUNCA ponga monederos, bolsas de la
compra ni paquetes en el manillar o sobre la capota de la carriola.
• NUNCA coloque más de 5 libras (2,25 kg) en el cesto de
almacenamiento.
• NUNCA coloque más de 0,5 libras (0,225 kg) en el organiza dor de
los padres.
• NUNCA coloque más de 0,5 libras (0,225 kg) sobre la bandeja del
niño.
Evite lesiones causadas por un vuelco de la carriola:

Requiere ser ensamblado por un adulto. No se necesitan herramientas.
Armazón de la carriola (1)
Conjunto de las ruedas
delanteras (2)
5
Conjunto de las ruedas
traseras (2)
el adaptador de asiento
infantile para automovil (1)
6
Cómo armar:
1. Cómo abrir la carriola:
Sección 4 – Cómo armar la carriola
Sección 4 – Cómo armar la carriola - continuación
ADVERTENCIA
ADVERTENCIA
• Se debe armar correctamente. Siga todas las instrucciones
sobre cómo armar y cómo usar el producto.
•
Antes de ser armada la carriola contiene piezas pequeñas.
Mantenga las piezas pequeñas fuera del alcance de los niños.
• Las bolsas plásticas pueden causar asfixia. Mantenga las
bolsas plásticas fuera del alcance de los niños.
Piezas de la carriola:
Retire e identifique todas las piezas de la caja. Si faltan piezas o se encuentran dañadas,
llame a Learning Curve Consumer Affairs al 1-888-899-2229 para recibir asistencia.
NO devuelva el producto al vendedor.
Asiento de la carriola con barra
parachoques y capota (1)
Evite pellizcarse:
• Mantenga los dedos alejados de juntas abisagradas al
plegar y abrir la carriola.
A. Coloque la carriola sobre el piso según se
ilustra en la figura. Libere el seguro de
bloqueo y gire el asa hasta que se bloquee
en posición abierta.
B. Ponga la carriola en posición vertical y
compruebe que el armazón está bloqueado.

A. Ubique un conjunto de rueda delantera y presione
el botón rojo en la parte superior al tiempo
que ejerza firmemente presión hasta que sienta
un ‘clic’ para encajar el conjunto de rueda .
Repita el procedimiento en el otro lado.
NOTA: Jale hacia abajo cada rueda para
asegurarse de que esté bien acoplada.
A. Ubique un conjunto de rueda trasera. Apriete el
botón y deslice el pasador del conjunto de
rueda trasera en el interior de la caja de dicha
rueda.
Repita el procedimiento en el otro lado.
NOTA: Jale hacia fuera cada rueda para
asegurarse de que esté bien acoplada.
A. Para instalar la barra parachoques, alinee los
extremos de la barra con los orificios en la carriola
para introducirlos en ellos y presione hasta que
sienta un "clic".
NOTA: Jale hacia arriba cada lado de la barra
parachoques para asegurarse de que esté bien
sujeta.
B. Para quitar el conjunto de rueda delantera, apriete
el botón rojo en la parte superior del conjunto y
jale hacia fuera el conjunto de rueda delantera.
A. Coloque el asiento de la carriola sobre el piso
según se ilustra en la figura. Acople los
sujetadores al asiento en ambos lados.
B. Sujete las tiras adhesivas de sujeción de cada
lado de la capota al asiento.
B. Para quitar la barra parachoques, apriete el botón
para liberarla y jale para quitarla.
C. Para quitar la capota, gire el sujetador en C y jale.
Desprenda las tiras adhesivas de sujeción.
B. Para quitar el conjunto de rueda trasera, apriete el
botón y jale hacia fuera el conjunto de rueda
trasera.
7 8
4. Cómo poner la capota:
2. Conjunto de rueda delantera:
3. Conjunto de rueda trasera:
2
1
1
2
5.
Cómo instalar la barra parachoques:
1
2
2
1
Sección 4 – Cómo armar la carriola (continuación) Sección 4 – Cómo armar la carriola (continuación)
1
1
2
2
1
2
1
2

Sección 4 – Cómo armar la carriola (continuación) Sección 5 – Funcionamiento y uso de la carriola
9 10
6.
Acoplar el asiento al armazón de la carriola:
Evite que su niño sufra lesiones graves:
• NO traslade el asiento de un sitio a otro con el niño en él.
1.
Para reclinar el asiento:
A.
Jale hacia delante la parte delantera de
la capota.
Evite que su niño sufra lesiones graves:
• NO ajuste el asiento con el niño en él.
2.
Para ajustar el soporte de las piernas:
1
2
1
2
3. Para abrir la capota:
A. Para acoplar el asiento al armazón de la carriola,
localice los brazos del asiento y alinéelos con las
bisagras del armazón. Empuje el asiento para
introducirlo en las bisagras hasta que sienta
un "clic".
NOTA: Jale hacia arriba el asiento para asegurarse
de que está bien acoplado antes de colocar al
niño y sujetarlo en el asiento.
B. Para quitar el asiento del armazón de la carriola,
deslice los botones de liberación y levante el
asiento para extraerlo del armazón.
C. Para invertir la dirección del asiento, gire el asiento
a la posición mirando hacia atrás y empuje el
asiento para introducirlo en las bisagras hasta que
escuche un "clic".
A. Apriete el botón en ambos lados del asiento y gire
el asiento a la posición deseada.
A. Apriete el botón en ambos lados del soporte de las
piernas y gire el soporte a la posición deseada.
ADVERTENCIA
ADVERTENCIA

11 12
4. Funcionamiento del freno trasero:
5. Cómo bloquear las ruedas delanteras:
6. Para acoplar el asiento infantil para
automóvil Via de The First Years
TM
:
7.
Para retirar el asiento infantil para
automóvil Via de The First Years
TM
:
1
2
1
2
1
2
2
1
Sección 5 – Funcionamiento y uso de la carriola (continuación) Sección 5 – Funcionamiento y uso de la carriola (continuación)
A. Para quitar el asiento para niños del armazón de
la carriola, deslice los botones de liberación y
levante el asiento para extraerlo del armazón.
A. Jale la manija de liberación en la parte trasera del
asiento infantil para automóvil . Jale hacia arriba
el asiento infantil para automóvil para despren
derlo de las bisagras y retirarlo.
B. Inserte el asiento infantil Via de The First Years
TM
Via sobre las bisagras hasta que sienta un "clic".
Nota: Jale hacia arriba el asiento infantil para
asegurarse de que esté bien sujeto.
A. Para activar el freno trasero, empuje hacia abajo
la palanca del freno. Para liberar el freno, empuje
hacia arriba la palanca del freno.
A. Para activar y bloquear las ruedas delanteras,
empuje hacia arriba la palanca de bloqueo de las
ruedas delanteras. Para desbloquear las ruedas
delanteras, empuje hacia abajo la palanca de
bloqueo de las ruedas delanteras.
ADVERTENCIA
Utilice únicamente los asientos para automóvil infantiles Via I450 y I470
de The First Year
TM
s para acoplar el asiento directamente a las bisagras.

A. Desabroche la cinta con la hebilla del asiento
infantil para automóvil. Jale la manija de liberación
en la parte trasera del asiento infantil para
automóvil. Jale hacia arriba del asiento infantil
para automóvil para retirarlo.
E. Pase la cinta con la hebilla a través de la
trayectoria para el cinturón en ambos lados del
asiento infantil para automóvil . Abroche la
hebilla . Apriete la cinta de manera
que el asiento infantil para automóvil
quede bien sujeto.
Nota: Para plegar hacia arriba el adaptador de
asiento infantil para automóvil, apriete el botón
de liberación y gire hacia arriba el brazo .
Repita en el otro lado.
13 14
8. Para instalar el asiento infantil para
automóvil de Graco:
9. Para retirar el asiento infantil para
automóvil de Graco:
1
1
2
1
2
1
2
3
1
2
2
1
2
2
3
1
1
2
2
3
Sección 5 – Funcionamiento y uso de la carriola (continuación) Sección 5 – Funcionamiento y uso de la carriola (continuación)
A. Para quitar el asiento para niños del armazón de
la carriola, deslice los botones de liberación
y levante el asiento para extraerlo del
armazón.
B. Localice el adaptador del asiento infantil para
automóvil y gire los brazos hasta que encajen en
su lugar.
C. Inserte el adaptador para asiento infantil para
automóvil sobre las bisagras hasta que sienta un
"clic". El adaptador de asiento infantil para
automóvil puede instalarse orientado hacia
delante o hacia atrás.
Nota: Jale hacia arriba el adaptador del asiento
infantil para automóvil para asegurarse de que
está bien sujeto.
D. Inserte el asiento infantil para automóvil de Graco
en el adaptador de asiento infantil para automóvil.
El asiento infantil para automóvil de Graco debe
encajar sobre el adaptador tal como se muestra
en la figura detallada.
Nota: Jale hacia arriba el asiento infantil para
automóvil de Graco para asegurarse de que
está bien sujeto.
Utilice solamente los siguientes asientos infantiles para
automóvil de Graco con el adaptador de asiento infantil
para automóvil:
• Graco SnugRide® • Graco SnugRide 32®
• Graco SnugRide 35®
ADVERTENCIA
Quite el adaptador del asiento infantil para automóvil,
deslice los botones de liberación y levante el asiento
para extraerlo del armazón .
2
1
1
2
La page est en cours de chargement...
La page est en cours de chargement...
La page est en cours de chargement...
La page est en cours de chargement...
La page est en cours de chargement...
La page est en cours de chargement...
La page est en cours de chargement...
La page est en cours de chargement...
La page est en cours de chargement...
La page est en cours de chargement...
La page est en cours de chargement...
La page est en cours de chargement...
La page est en cours de chargement...
La page est en cours de chargement...
La page est en cours de chargement...
La page est en cours de chargement...
-
 1
1
-
 2
2
-
 3
3
-
 4
4
-
 5
5
-
 6
6
-
 7
7
-
 8
8
-
 9
9
-
 10
10
-
 11
11
-
 12
12
-
 13
13
-
 14
14
-
 15
15
-
 16
16
-
 17
17
-
 18
18
-
 19
19
-
 20
20
-
 21
21
-
 22
22
-
 23
23
-
 24
24
-
 25
25
-
 26
26
-
 27
27
-
 28
28
-
 29
29
-
 30
30
-
 31
31
-
 32
32
-
 33
33
-
 34
34
-
 35
35
-
 36
36


The First Years Indigo S430 Manuel utilisateur
- Catégorie
- Poussettes
- Taper
- Manuel utilisateur