Orbegozo CPB 123105 Le manuel du propriétaire
- Taper
- Le manuel du propriétaire

VENTILADOR DE TECHO LED CON ALTAVOZ – MANUAL DE INSTRUCCIONES
LED CEILING FAN WITH SPEAKER - INSTRUCTION MANUAL
VENTILATEUR DE PLAFOND LED AVEC HAUT-PARLEUR - MANUEL D’INSTRUCTIONS
VENTILADOR DE TETO LED COM ALTO-FALANTE - MANUAL DE INSTRUÇÕES
CPB 123105
Sonifer, S.A.
Avenida de Santiago, 86 30007, Murcia, España.
sonifer@sonifer.es / www.orbegozo.com
MADE IN P.R.C.
Lea atentamente este manual antes de utilizar este aparato y guárdelo para futuras consultas. Sólo así podrá obtener
los mejores resultados y la máxima seguridad de uso.
Read this manual carefully before running this appliance and save it for reference in order to obtain the best results
and ensure safe use.
Veuillez lire attentivement ce manuel avant d’utiliser cet appareil et conservez-le pour toute consultation future. C’est
la seule façon d’obtenir les meilleurs résultats et une sécurité optimale d’utilisation.
Leia este manual cuidadosamente antes de utilizar este aparelho e guarde-o para consulta futura. Só assim, poderá
obter os melhores resultados e a máxima segurança na utilização.

CPB 123105
2
ESPAÑOL
GENERALES
1. Este aparato pueden utilizarlo niños con edad de 8
años y superior y personas con capacidades físicas,
sensoriales o mentales reducidas o falta de
experiencia y conocimiento, si se les ha dado la
supervisión o formación apropiadas respecto al
uso del aparato de una manera segura y
comprenden los peligros que implica. Los niños no
deben jugar con el aparato. La limpieza y el
mantenimiento a realizar por el usuario no deben
realizarlo los niños sin supervisión.
2. Se deberá supervisar a los niños para asegurarse
de que no juegan con este aparato.
3. Mantenga el aparato y su cable fuera del alcance
de los niños menores de 8 años.
4. PRECAUCIÓN: Para la seguridad de sus niños no
deje material de embalaje (bolsas de plástico,
cartón, polietileno etc.) a su alcance.
5. Si el cable de alimentación está dañado, debe ser
sustituido por el fabricante, el servicio técnico o
cualquier otro profesional cualificado.
6. No desconecte nunca tirando del cable.

CPB 123105
3
7. No lo ponga en funcionamiento si el cable o el
enchufe están dañados o si observa que el aparato
no funciona correctamente.
8. No manipule el aparato con las manos mojadas.
9. No sumergir el aparato en agua o cualquier otro
líquido.
10. Antes de su limpieza observe que el aparato está
desconectado.
11. El aparato debe instalarse de acuerdo con la
reglamentación nacional para instalaciones
eléctricas.
12. Este aparato es sólo para uso doméstico.
13. En caso de necesitar una copia del manual de
instrucciones, puede encontrarla en
www.orbegozo.com.
14. ADVERTENCIA: En caso de mala utilización,
existe riesgo de posibles heridas.
Otras precauciones específicas
1. Los medios de desconexión que deben ser
incorporados a la instalación fija, para su
desconexión omnipolar de la red de alimentación,
deben presentar una separación de contactos de
como mínimo de 3 mm en todos los polos.

CPB 123105
4
2. Asegure que el lugar de instalación deje libre la
rotación de la hélice del ventilador. La hélice debe
estar como mínimo a 2.30 m. por encima del
suelo una vez instalado.
3. Si va a instalar más de un ventilador asegúrese de
no mezclar las palas de las hélices de distintos
ventiladores, aunque sean del mismo modelo.
4. Antes de empezar a manipular la red eléctrica,
quite los fusibles o desconecte el interruptor
principal del suministro eléctrico.
5. Después de instalar el ventilador, asegúrese de
que todas las fijaciones estén correctas para evitar
la caída del ventilador.
6. El ventilador debe estar apagado y parado antes
de cambiar la dirección de la rotación.
7. Compruebe que el punto de fijación del aparato
sea capaz de soportar el peso del ventilador en
movimiento (mínimo 50Kg).

CPB 123105
5
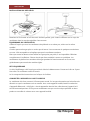
COMPONENTES DEL VENTILADOR
Soporte de techo
Cazoleta
Barra de soporte
Cubierta del acople
Motor
Difusor
Lámpara LED
Bolsa de accesorios
de montaje Piezas del altavoz

CPB 123105
6
INSTALACIÓN DEL VENTILADOR
1. Colocar el soporte de techo con los dos tornillos y tacos (dependiendo del tipo de techo)
En techos de hormigón, taladre dos agujeros
de 8mm e inserte el tornillo. Alinee el soporte
con el orificio y luego apriete la tuerca.
En techos de madera, sujete el soporte
mediante el uso de los 4 tornillos.
2. Pase la barra de soporte por el hueco de la cubierta de acople
3. Afloje los tornillos de la unión del motor y acople la barra con la cubierta al motor mediante
el pasador con brida y los tornillos
ATENCIÓN: Es muy importante asegurarse de que el pasador con brida está correctamente
instalado y asegurado. Una mala fijación del pasador puede provocar la caída del
ventilador.

CPB 123105
7
COLGAR EL VENTILADOR
Levante con cuidado el ventilador y coloque la barra
de soporte basculante en el soporte de suspensión
fijado al techo. Asegúrese de que la ranura de la bola
esté correctamente alineada con la lengüeta de la
barra de soporte.
ADVERTENCIA
El ventilador debe colgarse con al menos 230 cm de
espacio libre desde el suelo hasta las aspas.
CONEXIÓN DEL MANDO A DISTANCIA

CPB 123105
8
DIAGRAMA DE CABLEADO DEL CONTROLADOR
MONTAJE DE LA CAZOLETA
Monte la cazoleta apretando los dos tornillos
INSTALACIÓN DEL ALTAVOZ

CPB 123105
9
INSTALACIÓN DEL DIFUSOR
Enchufe el cable de entrada y el cable de salida del controlador del altavoz, luego enrosque el
difusor al cuerpo del ventilador en el sentido de las agujas del reloj.
EQUILIBRADO DEL VENTILADOR
Tenga en cuenta que todos los ventiladores de techo no son iguales, ¡incluso en el mismo
modelo!
Algunos pueden moverse más o menos que otros. El movimiento de un par de centímetros es
bastante aceptable y no implica que el ventilador se caiga.
Aunque todas las palas están ponderadas y agrupadas por peso, es imposible eliminar la
oscilación por completo. Esto no debe considerarse un problema. Los ventiladores de techo
tienden a moverse durante el funcionamiento debido a que, por lo general, no están montados
de forma rígida.
KIT DE EQUILIBRADO
Se ha suministrado un kit de equilibrado para ayudar a reducir el balanceo. Conserve el kit ya
que puede ser útil si el ventilador se tambalea en el futuro.
El kit incluye instrucciones sobre cómo utilizarlo.
CONECTAR DISPOSITIVO AL ALTAVOZ
El ventilador debe estar conectado del interruptor de la pared, no es necesario que la luz esté
encendida o el ventilador en marcha. Con su dispositivo móvil inicie la búsqueda de dispositivos
Bluetooth, en la lista debe aparecer “MX_light”, seleccione el dispositivo y se vinculará de forma
automática. Ahora puede enviar al altavoz su música favorita y controlar el volumen con su
dispositivo móvil.

CPB 123105
10
FUNCIONAMIENTO DEL VENTILADOR
Para encender el ventilador, pulse una de las velocidades, 1/2/3/4/5/6, siendo 1 la más baja y 6
la más alta. Puede cambiar la velocidad en cualquier momento presionando el nivel deseado.
Apague el ventilador de techo
Encienda / apague la luz (en caso de que su ventilador
tenga luz incorporada)
Modo brisa
Este botón cambia el sentido del giro de las aspas. En
invierno, seleccione el giro hacia arriba, puesto que
dirigirán el aire cálido atrapado cerca del ventilador hacia abajo
por toda la habitación. Cuando haga calor, seleccione el giro hacia
abajo y las aspas crearán una brisa que distribuirán por la habitación.
Encienda y apague el altavoz
Pulse 1H: el ventilador y la luz se apagarán en 1 hora.
Pulse 2H: el ventilador y la luz se apagarán en 2 horas.
Pulse 4H: el ventilador y la luz se apagarán en 4 horas.
MANTENIMIENTO Y LIMPIEZA
- Cambie la pila abriendo la tapa del compartimento de la pila en el mando a distancia, ponga 2
pilas tipo AAA y asegúrese de que la polaridad de la pila coincide con el diagrama del
compartimento (Nota: La pila no está incluida). Vuelva a colocar la tapa del compartimento.
- Asegúrese siempre de que el compartimento de la pila ha quedado bien cerrado.
- No exponga el mando a distancia a luz solar directa
- No intente recargar las pilas agotadas. Existen pilas especiales recargables, en cuyo caso está
claramente especificado.
- No tire las pilas al fuego, existe riesgo de explosión.
- Limpie el ventilador con un trapo suave y seco. No utilice nunca estropajos, abrasivos o
limpiador químico. Evite que la condensación entre en contacto con los componentes eléctricos.

CPB 123105
11
Eliminación del electrodoméstico viejo.
En base a la Norma europea 2012/19/EU de Residuos deaparatos Eléctricos y
Electrónicos (RAEE), los electrodomésticos viejos no pueden ser arrojados en los
contenedores municipales habituales; tienen que ser recogidos selectivamente para
optimizar la recuperación y reciclado de los componentes y materiales que los
constituyen, y reducir el impacto en la salud humana y el medioambiente. El símbolo
del cubo de basura tachado se marca sobre todos los productos para recordar al consumidor la
obligación de separarlos para la recogida selectiva.
El consumidor debe contactar con la autoridad local o con el vendedor para informarse en
relación a la correcta eliminación de su electrodoméstico viejo.
DECLARACIÓN DE CONFORMIDAD:
Este dispositivo cumple con los requisitos de la Directiva de Baja Tensión 2014/35/EU y los
requisitos de la directiva de Compatibilidad Electromagnética 2014/30/EU.
GARANTÍA
Este aparato está cubierto y cuenta con el derecho de la garantía legal conforme a la legislación
vigente desde la fecha de compra. Conserve el ticket de compra para poder reclamar su derecho
a la garantía. Para encontrar el servicio más cercano a su localización contacte a través del
siguiente enlace web: https://orbegozo.com/asistencia-tecnica/
Para cualquier tipo de consulta, duda o incidencia puede ponerse en contacto con nosotros a
través de nuestro correo electrónico reflejado en la página principal de este manual o a través
de nuestro servicio de asistencia técnica en https://orbegozo.com/contacto/
Orbegozo no se hace responsable de los componentes y accesorios que son objeto de desgaste
debido al uso, así como los compuestos perecederos o que se hayan deteriorado por un uso
indebido. Tampoco se hará responsable si el propietario ha modificado técnicamente el aparato.
Consulte las condiciones legales en nuestra página web.

CPB 123105
12
ENGLISH
SAFETY INSTRUCTIONS
Dear Customer, If you follow the recommendations
contained in this Instruction Manual, our appliance
will give you constant high performance and will
remain efficient for many years to come. Read the
operating instructions carefully before putting the
appliance into operation and keep the instructions
including the warranty, the receipt and, if possible,
the box with the internal packing. If you give this
device to other people, please also pass on the
operating instructions.
General Safety Instructions
1. This appliance can be used by children aged from
8 years and above and persons with reduced
physical, sensory or mental capabilities or lack of
experience and knowledge if they have been given
supervision or instruction concerning use of the
appliance in a safe way and understand the
hazards involved. Children must never play with

CPB 123105
13
the appliance. Cleaning and user maintenance
must never be carried out by children without
supervision.
2. Children should be supervised to ensure that they
do not play with the appliance.
3. Keep the appliance and the cable cord out of the
reach of children less than 8 years old.
4. WARNING: In order to ensure your children‘s
safety, please keep all packaging (plastic bags,
boxes, polystyrene etc.) out of their reach.
5. If the supply cord is damaged it must be repaired
by the Authorized Service Agent.
6. Never pull on the cord when unplugging.
7. Do not use the unit with a damaged cord or plug,
or if it is not working properly.
8. Do not handle the appliance with wet hands.
9. Never immerse the appliance in water or any other
liquid.
10. Make sure the appliance has been unplugged
before cleaning.
11. This appliance must be installed following the
national regulations for electrical installations.
12. This appliance is for household use only.
13. In case that you need a copy of the instruction
manual, you can find it in www.orbegozo.com.

CPB 123105
14
14. WARNING: In case of misuse, there is a risk of
possible injury.
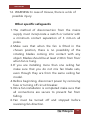
Other specific safeguards
1. The method of disconnection from the mains
supply must incorporate a switch or isolator with
a minimum contact separation of 3 mm.on all
poles.
2. Make sure that when the fan is fitted in the
chosen position, there is no possibility of the
rotating blades coming into contact with any
object. Blades should be at least 2.30 m from floor
when fan is hung.
3. If you are installing more than one ceiling fan
make sure that you do not mix fan blade sets,
even though they are from the same ceiling fan
model.
4. Before beginning, disconnect power by removing
fuse or turning off circuit breaker.
5. Once fan installation is completed make sure that
all connections are secure to prevent fan from
falling.
6. Fan must be turned off and stopped before
reversing fan direction.

CPB 123105
15
7. Check that the means of fitting the fan to the
ceiling is capable of supporting the weight of the
fan when in operation. (Minimum 50Kg.).
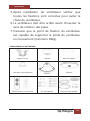
FAN COMPONENTS
Roof support
Canopy
Support bar
Coupling cover
Motor Diffuser
Remote + Controller
Instalation bag
Speaker Parts

CPB 123105
16
FAN INSTALLATION
1. Position the roof support with the two screws and plugs (depending on the type of roof)
On concrete ceilings, drill two 8mm holes and
insert the screw. Align the bracket with the
hole, and then tighten the nut.
On wooden ceilings, fasten the bracket using
the 4 screws.
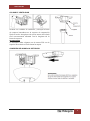
2. Pass the support bar through the hole in the docking cover
3. Loosen the motor joint bolts and attach the bar with cover to the motor using the flanged pin
and bolts
ATTENTION: It is very important to ensure that the flanged pin is correctly installed and
secured. Poor fixing of the pin can cause the fan to fall.

CPB 123105
17
HOW TO HANG THE FAN
Carefully lift the fan and place the tilt support bar on
the suspension bracket attached to the ceiling. Make
sure the slot in the ball is properly aligned with the
tab on the support bar.
WARNING
The fan must be hung with at least 230 cm of free
space from the ground to the blades.
REMOTE CONTROL CONNECTION
CONTROLLER WIRING DIAGRAM

CPB 123105
18
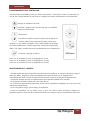
ASSEMBLY OF THE CANOPY
Mount the bowl by tightening the two screws
SPEAKER INSTALLATION
DIFFUSER INSTALLATION
Plug in the input wire and output wire of the speaker driver, then screw the diffuser onto the fan body
in a clockwise direction.

CPB 123105
19
FAN BALANCING
Keep in mind that all ceiling fans are not created equal, even on the same model!
Some may move more or less than others. Movement of a couple of centimeters is quite acceptable and
does not imply that the fan will fall over.
Although all blades are weighted and grouped by weight, it is impossible to completely eliminate
wobble. This should not be considered a problem. Ceiling fans tend to move during operation because
they are generally not rigidly mounted.
BALANCING KIT
A balancing kit has been supplied to help reduce sway. Keep the kit as it may come in handy if the fan
wobbles in the future.
The kit includes instructions on how to use it.
CONNECT DEVICE TO SPEAKER
The fan must be connected to the wall switch, it is not necessary that the light is on or the fan is
running. With your mobile device, start the search for Bluetooth devices, “MX_light” should appear in
the list, select the device and it will be linked automatically. Now you can send your favorite music to
the speaker and control the volume with your mobile device.
OPERATING THE FAN
In order to turn on the fun press one of the speeds, 1/2/3/4/5/6, being 1 the lowest and 6 the
highest one. You can change the speed anytime by pressing the desired level.
Turn off the ceiling fan
Turn on or off the light (in case that your ceiling fan includes
light kit.
Breeze mode
This button changes the direction of rotation of the blades. In
winter, select the upward rotation, as they will direct warm air
trapped near the fan downward throughout the room. When it's hot,
select the down spin and the blades will create a breeze that will spread
throughout the room.
Speaker On/Off
Press 1H: the fan and light will turn off automatically after 1 hour.
Press 2H: the fan and light will turn off automatically after 2 hours.
Press 4H: the fan and light will turn off automatically after 4 hours.

CPB 123105
20
MAINTENANCE AND CLEANING
- Change the battery by opening the battery compartment cover on the remote control, put in 2
AAA batteries and make sure the battery polarity matches the compartment diagram (Note:
Battery is not included). Replace the compartment cover.
- Always make sure that the battery compartment has been properly closed.
- Do not expose the remote control to direct sunlight
- Do not try to recharge exhausted batteries. There are special rechargeable batteries, in which
case it is clearly specified.
- Do not throw batteries into fire; there is a risk of explosion.
- Clean the fan with a soft, dry cloth. Never use scourers, abrasives or chemical cleaners. Avoid
condensation coming into contact with electrical components.
DISPOSAL OF OLD ELECTRICAL APPLIANCES
The European directive 2012/19/EU on Waste Electrical and Electronic Equipment
(WEEE), requires that old household electrical appliances must not be disposed of in the
normal unsorted municipal waste stream. Old appliances must be collected separately
in order to optimize the recovery and recycling of the materials they contain, and
reduce the impact on human health and the environment. The crossed out “wheeled bin”
symbol on the product reminds you of your obligation, that when you dispose of the appliance,
it must be separately collected. Consumers should contact their local authority or retailer for
information concerning the correct disposal of their old appliance.
DECLARATION OF CONFORMITY:
This device complies with the requirements of the Low Voltage Directive 2014/35/EU and the
requirements of the EMC directive 2014/30/EU.
GUARANTEE
This appliance is covered and is entitled to the legal guarantee in accordance with the legislation
in force from the date of purchase. Keep the purchase receipt to be able to claim your right to
the guarantee. To find the closest service to your location, contact through the following web
link: https://orbegozo.com/asistencia-tecnica/
For any type of query, doubt or incident, you can contact us through our email shown on the
main page of this manual or through our technical assistance service at
https://orbegozo.com/contacto/
Orbegozo is not responsible for components and accessories that are subject to wear and tear
due to use, as well as perishable compounds or those that have deteriorated due to improper
use. Nor will it be held responsible if the owner has technically modified the device. Check the
legal conditions on our website.
La page charge ...
La page charge ...
La page charge ...
La page charge ...
La page charge ...
La page charge ...
La page charge ...
La page charge ...
La page charge ...
La page charge ...
La page charge ...
La page charge ...
La page charge ...
La page charge ...
La page charge ...
La page charge ...
La page charge ...
La page charge ...
La page charge ...
La page charge ...
La page charge ...
La page charge ...
-
 1
1
-
 2
2
-
 3
3
-
 4
4
-
 5
5
-
 6
6
-
 7
7
-
 8
8
-
 9
9
-
 10
10
-
 11
11
-
 12
12
-
 13
13
-
 14
14
-
 15
15
-
 16
16
-
 17
17
-
 18
18
-
 19
19
-
 20
20
-
 21
21
-
 22
22
-
 23
23
-
 24
24
-
 25
25
-
 26
26
-
 27
27
-
 28
28
-
 29
29
-
 30
30
-
 31
31
-
 32
32
-
 33
33
-
 34
34
-
 35
35
-
 36
36
-
 37
37
-
 38
38
-
 39
39
-
 40
40
-
 41
41
-
 42
42


Orbegozo CPB 123105 Le manuel du propriétaire
- Taper
- Le manuel du propriétaire
dans d''autres langues
- English: Orbegozo CPB 123105 Owner's manual
- español: Orbegozo CPB 123105 El manual del propietario
- português: Orbegozo CPB 123105 Manual do proprietário