Panasonic TX40MS360E Guide de démarrage rapide
- Taper
- Guide de démarrage rapide

OPERATING INSTRUCTIONS / BEDIENUNGSANLEITUNG /
MODE D’EMPLOI / MANUAL DE FUNCIONAMIENTO /
ISTRUZIONI DI FUNZIONAMENTO / BRUGSANVISNING/
KÄYTTÖOHJE / DRIFTINSTRUKTIONER / BRUKSANVISNING
TX-40MS360E
LED TV / Téléviseur LED / Televisor LED / TV a LED
You can find instructions for your TV’s features in the E-Manual. To access the E-Manual, enter Settings menu, select Manuals and
press OK. For quick access press Home/Menu button and then Info button.
Im E-Manuel können Sie Anweisungen über die Eigenschaften Ihres TV-Gerätes finden. Um auf die E-Manuel zuzugreifen, rufen
Sie das Einstellungenmenü auf, wählen Sie Anleitungen und drücken Sie OK. Für einen schnellen Zugriff drücken Sie die Home/
Menu-Taste und dann die Info-Taste.
Vous pouvez accéder aux instructions relatives aux fonctions de votre téléviseur à partir du E-Manuel. Pour accéder au E-Manual,
accédez au menu Réglages, sélectionnez Manuels et appuyez sur OK. Pour un accès rapide, appuyez sur le bouton Home/Menu,
puis sur le bouton Info.
Puede encontrar instrucciones sobre las funciones de su televisor en el E-Manual. Para acceder al E-Manual o manual electrónico,
ingrese al menú de Settings Configuración, seleccione Manuales y presione OK. Para un acceso rápido, presione el botón Home/
Menu y luego el botón Info.
Sarà possibile trovare istruzioni per le caratteristiche della TV nel E-Manual (Manuale elettronico). Per accedere al E-Manual, aprire
il menu Impostazioni, selezionare Manuali e premere OK. Per un accesso rapido premere il pulsante Home/Menu e il pulsante Info.
Du kan finde en vejledning til TV‘ets funktioner i E-Manualen. For at bruge E-Manualen, skal du indtaste menuen Indstillinger,
vælge Manualer og trykke på OK. For hurtig adgang til E-Manual skal du trykke på Home/Menu-knappen og derefter Info-knappen.
Löydät TV:n käyttöohjeet E-oppaasta. E-oppaan käyttämiseksi, avaa Asetukset-valikko, valitse Oppaat ja paina OK. Avataksesi
E-oppaan nopeasti, paina Home/Menu-painiketta ja sitten Info-painiketta.
Du kan hitta instruktionerna för Tv:ns funktioner i E-manualen. För att komma till E-manualen, gå in i inställningsmenyn, välj Manualer
(Handböcker) och tryck på OK. För snabb åtkomst, tryck på Home/Menu-knappen och sedan Info-knappen.
Du kan finne anvisninger for TV-funksjonen i den E-Manual (elektroniske håndboken). For å få tilgang til den E-Manual (elektroniske
håndboken), gå inn i Instllinger-menyen, velg Bruksanvininger (Håndbøker) og trykk OK. For rask tilgan, trykk på Home/Menu-
knappen og deretter Info-knappen.
e-MANUAL

English - 1 -
Contents
Safety Information ................................................... 2
Markings on the Product.......................................... 2
Assembling / Removing the pedestal ...................... 4
When using the wall-hanging bracket...................... 4
Environmental Information....................................... 5
Features .................................................................. 5
Accessories Included............................................... 5
TV Control & Operation ........................................... 5
Using Main TV Menu ............................................... 5
Inserting the Batteries into the Remote ................... 6
Power Connection ................................................... 6
Antenna Connection ................................................ 6
Switching On/Off ...................................................... 6
First Time Installation............................................... 7
Media Browser......................................................... 7
Software Upgrade.................................................... 7
Specification ............................................................ 8
Remote Control ....................................................... 9
Troubleshooting & Tips .......................................... 10
Connectivity ........................................................... 10
Wired Connectivity................................................. 10
Wireless Connectivity ............................................ 11
Handling of the customer information .................... 12
Licence Notification ............................................... 13
Disposal of Old Equipment and Batteries .............. 13
Declaration of Conformity (DoC) ........................... 13
More Information ................................................... 13

English - 2 -
Safety Information
CAUTION
RISK OF ELECTRIC SHOCK
DO NOT OPEN
CAUTION: TO REDUCE THE RISK OF ELECTRIC SHOCK DO
NOT REMOVE COVER (OR BACK).
NO USER-SERVICEABLE PARTS INSIDE. REFER
SERVICING TO QUALIFIED SERVICE PERSONNEL.
Note: Follow the on screen instructions for operating the related
features.
In extreme weather (storms, lightning) and long inactivity
periods (going on holiday) disconnect the TV set from the
mains.
The mains plug is used to disconnect TV set from the mains
and therefore it must remain readily operable. If the TV set is
not disconnected electrically from the mains, the device will
still draw power for all situations even if the TV is in standby
mode or switched off.
IMPORTANT - Please read these instructions
fully before installing or operating
WARNING: This device is intended to be used
by persons (including children) who are
capable / experienced of operating such a device
unsupervised, unless they have been given
supervision or instruction concerning the use of
the device by a person responsible for their safety.
• Use this TV set at an altitude of less than 5000 meters
above the sea level, in dry locations and in regions
with moderate or tropical climates.
• The TV set is intended for household and similar
indoor use but may also be used in public places.
• For ventilation purposes, leave at least 5cm of free
space around the TV.
• The ventilation should not be impeded by covering
or blocking the ventilation openings with items, such
as newspapers, table-cloths, curtains, etc.
• The power cord plug should be easily accessible. Do
not place the TV, furniture, etc. on the power cord.
A damaged power cord/plug can cause fire or give
you an electric shock. Handle the power cord by the
plug, do not unplug the TV by pulling the power cord.
Never touch the power cord/plug with wet hands as
this could cause a short circuit or electric shock.
Never make a knot in the power cord or tie it with
other cords. When damaged it must be replaced, this
should only be done by qualified personnel.
• Do not expose the TV to dripping or splashing of
liquids and do not place objects filled with liquids,
such as vases, cups, etc. on or over the TV (e.g.,
on shelves above the unit).
• Do not expose the TV to direct sunlight or do not
place open flames such as lit candles on the top of
or near the TV.
• Do not place any heat sources such as electric
heaters, radiators, etc. near the TV set.
• Do not place the TV on the floor and inclined
surfaces.
• To avoid danger of suffocation, keep plastic bags
out of the reach of the babies, children and domestic
animals.
• Carefully attach the stand to the TV. If the stand is
provided with screws, tighten the screws firmly to
prevent the TV from tilting. Do not over-tighten the
screws and mount the stand rubbers properly.
• Do not dispose of the batteries in fire or with
hazardous or flammable materials.
WARNING
• Batteries must not be exposed to excessive heat
such as sunshine, fire or the like.
• Excessive sound pressure from earphones or
headphones can cause hearing loss.
ABOVE ALL - NEVER let anyone, especially
children, push or hit the screen, push anything
into holes, slots or any other openings in the case.
Caution Serious injury or death risk
Risk of electric shock Dangerous voltage risk
Maintenance
Important maintenance
component
Markings on the Product
The following symbols are used on the product as
a marker for restrictions and precautions and safety
instructions. Each explanation shall be considered
where the product bears related marking only. Note
such information for security reasons.
Class II Equipment: This appliance is
designed in such a way that it does not require
a safety connection to electrical earth.
Hazardous Live Terminal: The marked
terminal(s) is/are hazardous live under normal
operating conditions.
i
Caution, See Operating Instructions: The
marked area(s) contain(s) user replaceable
coin or button cell batteries.
CLASS 1
LASER PRODUCT
Class 1 Laser Product: This
product contains Class 1
laser source that is safe under
reasonably foreseeable
conditions of operation.

English - 3 -
WARNING
Do not ingest the battery, Chemical Burn Hazard
This product or the accessories supplied with the pro-
duct may contain a coin/button cell battery. If the coin/
button cell battery is swallowed, it can cause severe
internal burns in just 2 hours and can lead to death.
Keep new and used batteries away from children.
If the battery compartment does not close securely,
stop using the product and keep it away from children.
If you think batteries might have been swallowed or
placed inside any part of the body, seek immediate
medical attention.
– – – – – – – – – – – –
A television may fall, causing serious personal injury
or death. Many injuries, particularly to children, can be
avoided by taking simple precautions such as:
• ALWAYS use cabinets or stands or mounting me-
thods recommended by the manufacturer of the
television set.
• ALWAYS use furniture that can safely support the
television set.
• ALWAYS ensure the television set is not overhanging
the edge of the supporting furniture.
• ALWAYS educate children about the dangers of
climbing on furniture to reach the television set or
its controls.
• ALWAYS route cords and cables connected to your
television so they cannot be tripped over, pulled or
grabbed.
• NEVER place a television set in an unstable location.
• NEVER place the television set on tall furniture
(for example, cupboards or bookcases) without
anchoring both the furniture and the television set
to a suitable support.
• NEVER place the television set on cloth or other
materials that may be located between the television
set and supporting furniture.
• NEVER place items that might tempt children to
climb, such as toys and remote controls, on the top
of the television or furniture on which the television
is placed.
• The equipment is only suitable for mounting at
If the existing television set is going to be retained and
relocated, the same considerations as above should
be applied. – – – – – – – – – – – –
Apparatus connected to the protective earthing of the
building installation through the MAINS connection or
through other apparatus with a connection to protective
earthing – and to a television distribution system using
coaxial cable, may in some circumstances create a fire
hazard. Connection to a television distribution system
has therefore to be provided through a device providing
electrical isolation below a certain frequency range
(galvanic isolator)
WALL MOUNTING WARNINGS
• Read the instructions before mounting your TV
on the wall.
• The wall mount kit is optional. You can obtain from
your local dealer, if not supplied with your TV.
• Do not install the TV on a ceiling or on an inclined
wall.
• Use the specified wall mounting screws and other
accessories.
• Tighten the wall mounting screws firmly to prevent
the TV from fall. Do not over-tighten the screws.
WARNING
• Using other wall-hanging brackets, or installing
a wall-hanging bracket by yourself have the risk
of personal injury and product damage. In order
to maintain the unit’s performance and safety, be
absolutely sure to ask your dealer or a licensed
contractor to secure the wall-hanging brackets.
Any damage caused by installing without a
qualified installer will void your warranty.
• Carefully read the instructions accompanying
optional accessories, and be absolutely sure to
take steps to prevent the TV from falling off.
• Handle the TV carefully during installation since
subjecting it to impact or other forces may cause
product damage.
• Take care when fixing wall brackets to the wall.
Always ensure that there are no electrical cables
or pipes in the wall before hanging bracket.
• To prevent fall and injury, remove the TV from
its fixed wall position when it is no longer in use.
Figures and illustrations in this user manual are
provided for reference only and may differ from the
actual product appearance. Product design and
specifications may be changed without notice.

English - 4 -
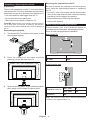
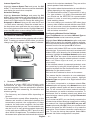
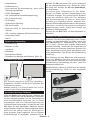
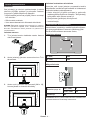
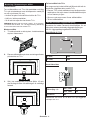
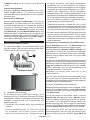
Removing the pedestal from the TV
Be sure to remove the pedestal in the following way
when using the wall-hanging bracket or repacking
the TV.
• Put the TV onto a work table with the screen panel
down on the clean and soft cloth. Leave the stand(s)
protruding over the edge of the surface.
• Unscrew the screws that fixing the stand(s).
• Remove the stand(s).
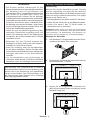
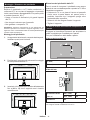
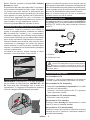
When using the wall-hanging bracket
Please contact your local Panasonic dealer to
purchase the recommended wall-hanging bracket.
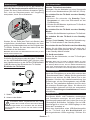
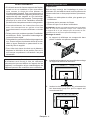
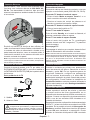
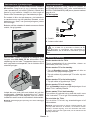
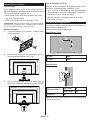
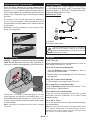
Holes for wall-hanging bracket installation;
Rear of the TV
a
b
a (mm) 100
b (mm) 100
View from the side
a
Depth of screw (a) min. (mm) 9
max. (mm) 10
Diameter M4
Note: The screws for fixing the TV onto the wall-hanging
bracket are not supplied with the TV.
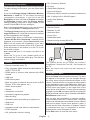
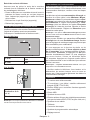
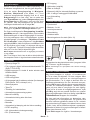
Assembling / Removing the pedestal
Preparations
Take out the pedestal(s) and the TV from the packing
case and put the TV onto a work table with the screen
panel down on the clean and soft cloth (blanket, etc.)
• Use a flat and firm table bigger than the TV.
• Do not hold the screen panel part.
• Make sure not to scratch or break the TV.
CAUTION: Please refrain from inserting pictured screws to
the TV body when not using the TV stand e.g. wall hanging.
Inserting screws without pedestal may cause a damage of
the TV.
Assembling the pedestal
1. The stand of the TV consists of two pieces. Install
these pieces together.
2. Place the stand(s) on the stand mounting
pattern(s) on the rear side of the TV.
3. Insert the screws (M4 x 12) provided and tighten
them gently until the stand is properly fitted.
x4

English - 5 -
Environmental Information
This television is designed to be environment friendly.
To reduce energy consumption, you can follow these
steps:
If you set the Energy Saving to Minimum, Medium,
Maximum or Auto the TV will reduce the energy
consumption accordingly. If you like to set the
Backlight to a fixed value set as Custom and adjust
the Backlight (located under the Energy Saving
setting) manually using Left or Right buttons on the
remote. Set as Off to turn this setting off.
Note: Available Energy Saving options may differ depending
on the selected Mode in the Settings>Picture menu.
The Energy Saving settings can be found in the Set-
tings>Picture menu. Note that some picture settings
will be unavailable to be changed.
If pressed Right button or Left button consecutively,
“Screen will be off in 15 seconds.
Proceed and press
OK to turn the screen off immediately. If you don’t
press any button, the screen will be off in 15 seconds.
Press any button on the remote or on the TV to turn
the screen on again.
Note: Screen Off option is not available if the Mode is set
to Game.
When the TV is not in use, please switch off or
disconnect the TV from the mains plug. This will also
reduce energy consumption.
Features
• Remote controlled colour TV
• Fully integrated digital terrestrial/cable/satellite TV
(DVB-T-T2/C/S-S2)
• HDMI inputs to connect other devices with HDMI
sockets
• USB input
• OSD menu system
• Back AV inputs for external devices (such as DVD
Players, PVR, video games, etc.)
• Stereo sound system
• Teletext
• Headphone connection
• Automatic programming system
• Manual tuning
• Automatic power down after up to eight hours
• Sleep timer
• Child lock
• Automatic sound mute when no transmission
• NTSC playback
• AVL (Automatic Volume Limiting)
• PLL (Frequency Search)
• PC input
• Game Mode (Optional)
• Picture off function
• Ethernet (LAN) for Internet connectivity and service
• 802.11 a/b/g/n built in WLAN Support
• Audio Video Sharing
• HbbTV
Accessories Included
• Remote Control
• Batteries: 2 x AA
• Instruction Book
• Power Cord
• Detachable stand
• Stand mounting screws (M4 x 12)
TV Control & Operation
The joystick allows you to control the Volume /
Programme / Source and Turn Off - On functions of
the TV.
Note: The position of the joystick may differ depending on
the model.
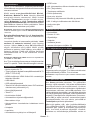
Using Main TV Menu
When the Home button is pressed, the main TV menu
will appear on the screen. You can navigate through
the menu items using the directional buttons on the
remote. To select an item or see the sub-menu options
of the highlighted menu press OK button. When you
highlight a menu option some of the sub-menu items
of this menu may appear on the upper side of the
menu bar for quick access. To use a quick access item
highlight it, press OK and set as desired using the Left/
Right directional buttons. When finished press OK or
Back/Return button to exit.
You can also see information on location, weather,
time and date on the main TV menu screen. The green
small icons indicate the current status for time, network
and sync for apps. If these icons appear in green, it
means that the time information is updated, network
is connected and sync is completed in success.
Otherwise the icons will appear in white.
Press Exit button to close the main menu.

English - 6 -
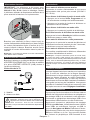
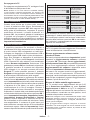
Inserting the Batteries into the Remote
Remove the back cover to reveal the battery compart-
ment. Insert two size AA batteries. Make sure the (+)
and (-) signs match (observe correct polarity). Do not
mix old and new batteries. Replace only with same or
equivalent type. Place the cover back on.
A message will be displayed on the screen when the
batteries are low and must be replaced. Note that when
the batteries are low, the performance of the remote
control may be impaired.
Batteries should not be exposed to excessive heat
such as sunshine, fire or the like.
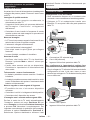
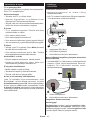
Power Connection
IMPORTANT: The TV set is designed to operate on a
220-240V AC, 50 Hz supply. After unpacking, allow the
TV set to reach the ambient room temperature before
you connect the set to the mains.
Plug one end (the two-hole plug) of the supplied
detachable power cord into the power cord inlet on
the rear side of the TV as shown above. Then plug
the other end of the power cord into the mains socket
outlet.
Note: The position of the power cord inlet may differ depending
on the model.
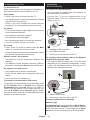
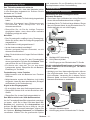
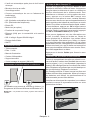
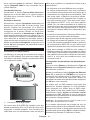
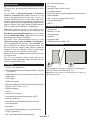
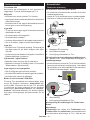
Antenna Connection
Connect the aerial or cable TV plug to the aerial input
(ANT) socket or satellite plug to the satellite input (LNB)
socket located on the rear side of the TV.
Rear side of the TV
1
2
LNB
ANT
1. Satellite
2. Aerial or cable
If you want to connect a device to the TV, make
sure that both the TV and the device are turned off
before making any connection. After the connection
is done, you can turn on the units and use them.
Switching On/Off
To Switch the TV On
Connect the power cord to a power source such as a
wall socket (220-240V AC, 50 Hz).
To switch on the TV from standby
• Press the Standby button, Programme +/- or a
numeric button on the remote control.
• Press the centre of the joystick on the TV in or push
it up/down.
To switch on the TV from hard standby
• Press the centre of the joystick on the TV in.
To switch the TV into standby
Press the Standby button on the remote control, the
TV will switch into standby mode.
To switch the TV into hard standby
Press the centre of the joystick on the TV in and hold it
down for more than 3 seconds, the TV will switch into
hard standby mode.
To switch off the TV
To power down the TV completely, unplug the power
cord from the mains socket.
Note: When the TV is switched into standby mode, the standby
LED can blink to indicate that features such as Standby Mode
Search, Over Air Download or Timer is active. The LED can
also blink when you switch on the TV from standby mode.

English - 7 -
First Time Installation
When turned on for the first time, the language
selection screen is displayed. Select the desired
language and press OK. In the following steps of the
installation, set your preferences using the directional
buttons and OK button. The installation wizard will
guide you through the setup process. You can perform
first time installation anytime using the option in the
Settings>Installation menu.
Media Browser
You can play back music and movie files and display
photo files stored on a USB storage device by
connecting it to your TV. Connect a USB storage device
to one of the USB inputs located on the side of the TV.
After connecting a USB storage device to your TV, the
Sources bar will be displayed with USBx highlighted.
Press OK, Media Browser menu will be displayed on
the screen. Select the file of your choice and press OK
to display or play it back. You can access the content
of the connected USB device any time later from the
Sources menu. You can also press the Source button
on the remote and then select your USB storage device
from the list of sources.
You can set your media browser preferences by using
the Settings menu. Settings menu can be accessed
via the information bar which is displayed on the
bottom of the screen while playing back a video or
an audio file or displaying a picture file. Press the
Info button if the information bar has disappeared,
highlight the gear wheel symbol positioned on the
right side of the information bar and press OK. Picture
Settings, Sound Settings, Media Browser Settings
and Options menus may be available depending on
the media file type and the model of your TV and its
features. The content of these menus may also differ
according to the type of the currently open media file.
Only Sound Settings menu will be available while
playing back audio files.
Loop/Shuffle Mode Operation
Start playback and activate
All files in the list will be
continuously played in
original order
Start playback and activate
The same file will be
played continuously
(repeat)
Start playback and activate
All files in the list will be
played once in random
order
Start playback and activate ,
All files in the list will be
continuously played in
the same random order
To use the functions on the information bar highlight the
symbol of the function and press OK. To change the
status of a function highlight the symbol of the function
and press OK as much as needed. If the symbol is
marked with a red cross, that means it is deactivated.
Software Upgrade
Your TV is capable of finding and updating the firmware
automatically via the broadcast signal or via Internet.
Software upgrade search via user interface
On the main menu select Settings, then navigate to
Software Upgrade and press the OK button. Then
select Scan for upgrade and press OK button to check
for a new software upgrade. The Software Upgrade
option is also available in the Settings>System>More
menu.
If a new upgrade is found, it starts to download the
upgrade. After the download is completed, a warning
will be displayed, press OK button to complete software
upgrade process and restart TV.
3 AM search and upgrade mode
Your TV will search for new upgrades at 3:00 o’clock
if Automatic scanning option is set to Enabled and if
the TV is connected to an aerial signal or to Internet. If
a new software is found and downloaded successfully,
it will be installed at the next power on.
Note: Do not unplug the power cord while led is blinking during
the reboot process. If the TV fails to come on after the upgrade,
unplug, wait for two minutes then plug it back in.
All updates are automatically controlled. If a manual search
is carried out and no software is found then this is the current
version.

English - 8 -
Specification
TV Broadcasting PAL BG/I/DK
SECAM BG/DK
Receiving Channels VHF (BAND I/III) - UHF
(BAND U) - HYPERBAND
Digital Reception
TV(DVB-T-C-S)
(DVB-T2, DVB-S2
Number of Preset
Channels 11 000
Channel Indicator On Screen Display
RF Aerial Input 75 Ohm (unbalanced)
Operating Voltage 220-240V AC, 50Hz.
Audio A2 Stereo+Nicam Stereo
Headphone 3.5 mm mini stereo jack
Audio Output Power
(WRMS.) (10% THD) 2 x 8 W
Power Consumption (W) 75 W
Networked Standby Mode
Power Consumption (W) < 2
Weight (kg) 7,5 Kg
TV Dimensions DxLxH
(with stand) (mm) 235 x 909 x 563
TV Dimensions DxLxH
(without stand) (mm) 87 x 909 x 522
Display 16/9 40”
Operation temperature
and operation humidity
0ºC up to 40ºC, 85%
humidity max
For more product information, please visit EPREL:
https://eprel.ec.europa.eu.
EPREL registration number is available on
https://eprel.panasonic.eu/product.
Wireless LAN Transmitter Specifications
Frequency Ranges Max Output
Power
2400 - 2483,5 MHz (CH1-CH13) < 100 mW
5150 - 5250 MHz (CH36 - CH48) < 200 mW
5250 - 5350 MHz (CH52 - CH64) < 200 mW
5470 - 5725 MHz (CH100 - CH140) < 200 mW
Country Restrictions
This device is intended for home and office use in
all EU countries (and other countries following the
relevant EU directive). The 5.15 - 5.35 GHz band is
restricted to indoor operations only in the EU countries.
Country Restriction
Bulgaria General authorization required for outdoor
use and public service
Italy
If used outside of its own premises, general
authorization is required. Public use is
subject to general authorisation by the
respective service provider
Greece In-door use only for 5470 MHz to 5725
MHz band
Luxembourg General authorization required for network
and service supply(not for spectrum)
Norway
Radio transmission is prohibited for the
geographical area within a radius of 20 km
from the centre of Ny-Ålesund
Russian
Federation In-door use only
Israel 5 GHz band only for 5180 MHz-5320
MHz range
The requirements for any country may change at
any time. It’s recommended that user checks with
local authorities for the current status of their national
regulations for 5 GHz wireless LAN’s.
Standard
IEEE 802.11.a/b/g/n
Host Interface
USB 2.0
Security
WEP 64/128, WPA, WPA2, TKIP, AES, WAPI

English - 9 -
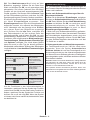
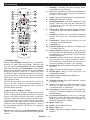
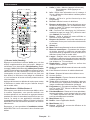
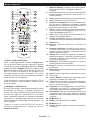
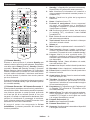
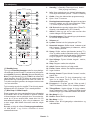
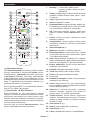
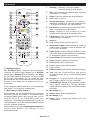
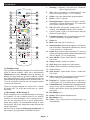
Remote Control
EXIT
LANG.LANG.
E
M
O
H
BACK
G
1
2
2
1
3
4
5
21
6
10
7
9
8
11
12
13
14
15 16
17
18
19
20
22
23
24
25
(*) Standby Button
Press and hold the Standby button to see additional ac-
tions for this button. Highlight one of the Reset (Restart),
Standby (Normal Standby), and Power off (Forced
Standby) options and press OK to perform the selected
action. If your TV stops responding to commands and
the actions menu can not be displayed, the TV will be
forced to restart when the button is kept pressed for
about five seconds.
Press briefly and release the button to switch the
TV into standby mode or to switch it on when it’s in
standby mode.
(**) My Button 1 & My Button 2
These buttons may have default functions depending
on the model. However you can set a special function
to these buttons by pressing on them for more than
three seconds when on a desired source, channel or
application. A confirmation message will be displayed on
the screen. Now the selected My Button is associated
with the selected function.
Note that if you perform First Time Installation, My
Button 1&2 will return to their default function.
1. Standby (*): Standby / On (press briefly)
Reset / Power Off (press and hold)
2. Info: Displays information about on-screen content,
shows hidden information (reveal - in TXT mode)
3. Guide: Displays the electronic programme guide
4. Home: Displays TV menu
5. Directional buttons: Helps navigate menus,
content etc. and displays the subpages in TXT
mode when pressed Right or Left
6. OK: Confirms user selections, holds the page (in
TXT mode), views Channels menu (DTV mode)
7. Exit: Closes and exits from displayed menus or
returns to previous screen
8. Coloured Buttons: Follow the on-screen instruc-
tions for coloured button functions
9. Volume +/-
10. Mute: Completely turns off the volume of the TV
11. Numeric buttons: Switches the channel, enters
a number or a letter in the text box on the screen,
switches the TV on when in standby mode
12. Language: Switches among sound modes (an-
alogue TV), displays and changes audio/subtitle
language and turns subtitles on or off (digital TV,
where available)
13. Rewind: Moves frames backwards in media such
as movies
14. Stop: Stops the media being played
15. Play: Starts to play selected media
16. Pause: Pauses the media being played
17. No function
18. Fast Forward: Moves frames forward in media
such as movies
19. Text: Displays teletext (where available), press
again to superimpose the teletext over a normal
broadcast picture (mix)
20. Programme +/-: Programme up-down, Page up-
down (in TXT mode), switches the TV on when in
standby mode
21. Back/Return: Returns to previous screen, previous
menu, opens index page (in TXT mode). Quickly
cycles between previous and current channels
or sources
22. My Button 2 (**)
23. Netflix: Launches the Netflix application
24. My Button 1 (**)
25. Source: Shows available broadcast and content
sources

English - 10 -
Troubleshooting & Tips
TV will not turn on
Make sure the power cord is plugged in securely to a
wall outlet. Press the Power button on the TV.
Poor picture
• Check if you have correctly tuned the TV.
• Low signal level can cause picture distortion. Please
check antenna connections.
• Check if you have entered the correct channel
frequency if you have performed manual tuning.
No picture
• TV is not receiving any signal. Make sure the correct
source has been selected.
• Is the antenna connected properly?
• Is the antenna cable damaged?
• Are suitable plugs used to connect the antenna?
• If you are in doubt, consult your dealer.
No sound
• Check if the TV sound is muted. Press the Mute
button or increase the volume to check.
• Sound may be coming from only one speaker. Check
the balance settings from Sound menu.
Remote control - no operation
• The batteries may be exhausted. Replace the
batteries.
• The batteries maybe inserted incorrectly. Refer to
the section “Inserting the Batteries into the Remote”.
No signal on an input source
• It is possible that no device is connected.
• Check the AV cables and connections from your
device.
• Check the device is switched on.
The Image is not centered in VGA source
To have your TV automatically center the image, enter
the PC Position menu in Picture menu, highlight
Autoposition and press OK. Wait for it to finish. In
order to set the position of the image manually you
can use H Position and V Position options. Select
the desired option and use Left and Right directional
buttons on the remote to set.
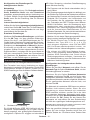
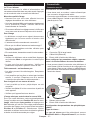
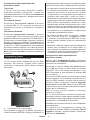
Connectivity
Wired Connectivity
To Connect to a Wired Network
• You must have a modem/router connected to an
•
(back) of your TV.
2
3
1
1. Broadband ISP connection
2. LAN (Ethernet) cable
3. LAN input on the rear side of the TV
To configure wired settings refer to the Network
section in the Settings menu.
•
a case, use an Ethernet cable to connect your TV
1
2
1. Network wall socket
2. LAN input on the rear side of the TV
Configuring Wired Device Settings
Network Type
The Network Type can be selected as Wired Device,
Wireless Device or Disabled, in accordance with the
active connection to the TV set. Select this as Wired
Device if you are connecting via an Ethernet cable.

English - 11 -
Internet Speed Test
Highlight Internet Speed Test and press the OK
button. TV will check the internet connection bandwidth
and display the result when complete.
Advanced Settings
Highlight Advanced Settings and press the OK
button. On the next screen you can change the IP and
DNS settings of the TV. Highlight the desired one and
press Left or Right button to change the setting from
Automatic to Manual. Now you can enter the IP and
/ or DNS values manually. Select the related item in
the drop down menu and enter the new values using
the numeric buttons of the remote. Highlight Save and
press the OK button to save settings when complete.
Wireless Connectivity
To Connect to a Wireless Network
The TV cannot connect to the networks with a hidden
SSID. To make your modem’s SSID visible, you should
change your SSID settings via the modem’s software.
1
1. Broadband ISP connection
A Wireless-N router (IEEE 802.11a/b/g/n) with
simultaneous 2.4 and 5 GHz bands is designed to
increase bandwidth. These are optimized for smoother
and faster HD video streaming, file transfers and
wireless gaming.
•
the area.
•
•
•
• You must change your modem’s SSID when there
Configuring Wireless Device Settings
Open the Network menu and select Network Type as
Wireless Device
Scan Wireless Networks
OK
OK to connect.
A network with hidden SSID can not be detected by
other devices. If you want to connect to a network with
hidden SSID, scroll down the list of detected wireless
networks, highlight the Add New Network option and
press OK. Enter the name of the network and select
the security type using the related options to connect.
Note: If the modem supports N mode, you should set N
mode settings.
OK button on the remote control.
Network Type
as Disabled.
If you have connected to a wireless network Dis-
connect option will appear in the Network menu and
your wireless network profile will also be saved, thus
your TV will connect to the same network automati-
cally whenever you switch to wireless connection. To
Disconnect
and press OK.
If your router has WPS, you can directly connect to the
modem/router without entering a password or adding
the network first. Highlight Press WPS on your wifi
router option and press OK. Go to your modem/router
device and press the WPS button on it to make the
connection. You will see a connection confirmation on
your TV once the devices have paired. Select OK to
proceed. No further configuration is required.

English - 12 -
Internet Speed Test and press the OK button
Advanced Settings and press the OK button to
Save and press the
OK
Other Information
Connected or Not Connected and the current IP
Connecting to your mobile device via WLAN
•
your TV.
of your TV.
Audio Video Sharing
Sources menu and press OK
OK
• If available, you can download a virtual remote
controller application from the server of your mobile
device application provider.
Note: This feature may not be supported on all mobile
devices.
Handling of the customer information
When using Internet connecting function of this TV,
after agreeing to Panasonic’s terms of service / privacy
policy (hereinafter referred to as terms and conditions
etc.), Customer Information on the use of this unit
may be collected and used according to terms and
conditions etc.
For details of terms of service / privacy policy, refer to
[HOME] Settings>System>Privacy Settings
Customer’s personal information may be recorded on
this TV by broadcasting organisation or application
provider. Before repairing, transferring or discarding
this TV, erase all the information recorded on this TV
according to the following procedure.
[HOME] Installation>First time installation
Customer information may be collected by provider
via application provided by third parties on this TV or
website. Please confirm the terms and conditions etc.
of provide in advance.
• Panasonic will not be held responsible for collecting
or using customer Information via application
provided by third party on this TV or website.
• When entering your credit card number, name, etc.,
pay special attention to the trustworthiness of the
provider.
• Registered information may be registered in the
server etc. of provider. Before repairing, transferring
or discarding this TV, be sure to erase the information
according to the terms and conditions etc. of provider.

English - 13 -
Licence Notification
The terms HDMI, HDMI High-Definition Multimedia
Interface, HDMI trade dress and the HDMI Logos
are trademarks or registered trademarks of HDMI
Licensing Administrator, Inc.
Manufactured under licence from Dolby Laboratories.
Dolby, Dolby Audio, and the double-D symbol
are trademarks of Dolby Laboratories Licensing
Corporation.
YouTube and the YouTube logo are trademarks of
Google Inc.
This product contains technology subject to certain
intellectual property rights of Microsoft. Use or
distribution of this technology outside of this product
is prohibited without the appropriate licence(s) from
Microsoft.
Content owners use Microsoft PlayReady™ content
access technology to protect their intellectual property,
including copyrighted content. This device uses
PlayReady technology to access PlayReady-protected
content and/or WMDRM-protected content. If the
device fails to properly enforce restrictions on content
usage, content owners may require Microsoft to revoke
the device’s ability to consume PlayReady-protected
content. Revocation should not affect unprotected
content or content protected by other content access
technologies. Content owners may require you to
upgrade PlayReady to access their content. If you
decline an upgrade, you will not be able to access
content that requires the upgrade.
The “CI Plus” Logo is a trademark of CI Plus LLP.
This product is protected by certain intellectual property
rights of Microsoft Corporation. Use or distribution of
such technology outside of this product is prohibited
without a licence from Microsoft or an authorised
Microsoft subsidiary.
Disposal of Old Equipment and Batteries
Only for European Union and countries
with recycling systems
These symbols on the products,
packaging, and/or accompanying
documents mean that used electrical and
electronic products and batteries must not
be mixed with general household waste.
For proper treatment, recovery and
recycling of old products and batteries,
please take them to applicable collection
points in accordance with your national
legislation.
By disposing of them correctly, you will
help to save valuable resouces and
on human health and the environment.
For more information about collection
and recycling, please contact your local
municipality.
Penalties may be applicable for incorrect
disposal of this waste, in accordance with
national legislation.
Note for the battery symbol (bottom
symbol):
This symbol might be used in combination
with a chemical symbol. In this case it
complies with the requirement set by the
Directive for the chemical involved.
Declaration of Conformity (DoC)
Hereby, Panasonic Marketing Europe GmbH, declares
that this TV is in compliance with the essential requi-
rements and other relevant provisions of the Directive
2014/53/EU.
If you want to get a copy of the original DoC of this TV,
please visit the following website:
http://www.ptc.panasonic.eu/compliance-documents
Authorized Representative:
Panasonic Testing Centre
Panasonic Marketing Europe GmbH
Winsbergring 15, 22525 Hamburg, Germany
Web Site: http://www.panasonic.com
More Information
For more information, please visit the Support page
on Panasonic website, where you can find the full
manual instruction.

Deutsch - 1 -
Inhalt
Sicherheitsinformationen ......................................... 2
Kennzeichnungen auf dem Gerät ............................ 3
Montage / Entfernen der Standfüße ........................ 4
Bei der Verwendung einer Wandhalterung. ............. 5
Umweltinformationen ............................................... 5
Eigenschaften .......................................................... 5
Zubehör im Lieferumfang ........................................ 6
TV-Steuerung & Betrieb........................................... 6
Verwenden des Haupt-TV-Menüs............................ 6
Einlegen der Batterien in die Fernbedienung .......... 6
Netzanschluss ......................................................... 7
Anschluss der Antenne ............................................ 7
Ein-/Ausschalten...................................................... 7
Erstinstallation ......................................................... 7
Medienbrowser ........................................................ 7
Softwareaktualisierung ............................................ 8
Technische Daten .................................................... 9
Fernbedienung ...................................................... 10
Fehlerbehebung & Tipps ....................................... 11
Konnektivität .......................................................... 11
Drahtgebundene Konnektivität .............................. 11
Drahtlose Verbindung ............................................ 12
Umgang mit den Kundeninformationen ................. 13
Lizenzhinweise ...................................................... 14
Entsorgung von Altgeräten und Akkus................... 14
Konformitätserklärung (DoC) ................................. 14
Mehr Informationen ............................................... 14

Deutsch - 2 -
Sicherheitsinformationen
VORSICHT:
STROMSCHLAGGEFAHR
NICHT ÖFFNEN
VORSICHT: UM DAS RISIKO AUF EINEN ELEKTRISCHEN
SCHOCK ZU REDUZIEREN, DEN DECKEL (ODER
DAS RÜCKTEIL) NICHT ENTFERNEN.
IN DIESEM GERÄT BEFINDEN SICH KEINE TEILE,
DIE VOM BENUTZER GEWARTET WERDEN
KÖNNEN. WENDEN SIE SICH AN QUALIFIZIERTES
SERVICEPERSONAL.
Hinweis: Für die entsprechenden Eigenschaften befolgen Sie bitte
die Instruktionen auf dem Bildschirm.
In extremen Wetterbedingungen (Stürme, Blitzschlag) und
wenn das TV-Gerät über einen langen Zeitraum nicht benutzt
wird (im Urlaub) trennen Sie den das Gerät vom Netz
Der Netzstecker wird verwendet, um das TV-Gerät vom Netz
zu trennen und muss daher stets gut zugänglich sein. Wenn
das Gerät nicht vollständig vom Netz getrennt wird, wird es
auch im Standby-Modus oder sogar im ausgeschalteten
Zustand weiter Strom ziehen.
WICHTIG - Bitte lesen Sie diese Anleitung
vollständig vor der Installation oder
Inbetriebnahme durch.
WARNUNG : Dieses Gerät ist nur zur
Benutzung von Personen (einschl. Kindern)
gedacht, die in der Lage (körperlich oder geistig)
bzw. erfahren genug sind, mit dem Gerät
unbeaufsichtigt umzugehen. Andernfalls sind
solche Personen unter Aufsicht eines für ihre
Sicherheit verantwortlichen Erwachsenen zu
stellen.
• Dieses TV-Gerät ist für den Einsatz in einer Höhe von
weniger als 5000 Metern über dem Meeresspiegel,
an einem trockenen Standort und in Regionen mit
gemäßigtem oder tropischem Klima vorgesehen.
• Das TV-Gerät ist für den Hausgebrauch und ähnliche
Zwecke in Innenräumen vorgesehen, kann jedoch
auch an öffentlichen Orten verwendet werden.
• Lassen Sie für Lüftungszwecke mindestens 5 cm
Abstand um das TV-Gerät herum.
• Die Ventilation darf nicht durch Abdecken oder
Verstellen der Ventilationsöffnungen durch
Gegenstände wie Zeitungen, Tischdecken, Gardinen
o.ä. behindert werden.
• Der Stecker des Stromkabels sollte leicht zugänglich
sein. Stellen Sie keine Gegenstände auf das
Netzkabel (weder das Gerät selbst, noch Möbel
usw.), und klemmen Sie das Kabel nicht ein.
Beschädigungen am Netzkabel/Netzstecker können
zu Bränden oder Stromschlägen führen. Handhaben
Sie das Netzkabel immer am Stecker, trennen Sie
das TV-Gerät nicht durch Ziehen des Netzkabels
vom Netz. Berühren Sie niemals das Netzkabel
/ den Stecker mit nassen Händen, da dies einen
Kurzschluss oder elektrischen Schlag verursachen
kann. Machen Sie niemals Knoten in das Netzkabel,
und binden Sie es nie mit anderen Kabeln zusammen.
Wenn es beschädigt ist, muss das Kabel ersetzt
werden. Diese Arbeit darf ausschließlich durch eine
qualifizierte Fachkraft ausgeführt werden.
• Setzen Sie das TV-Gerät möglichst keinen tropfenden
oder spritzenden Flüssigkeiten aus, und stellen Sie
keine mit Flüssigkeiten gefüllte Objekte, wie z.B.
Vasen, Tassen usw. auf dem bzw. oberhalb (z. B. in
Regalfächern darüber) des TV-Geräts ab.
• Setzen Sie das TV-Gerät nicht direkter Sonneneinst
rahlung aus, und stellen Sie keine offenen Flammen
(wie z. B. erleuchtete Kerzen) auf oder neben das
TV-Gerät.
• Stellen Sie keine Hitzequellen, wie z. B. Elektroheizer,
Radiatoren usw. in die unmittelbare Nähe des Geräts.
• Stellen Sie das TV-Gerät nicht auf dem Fußboden
oder geneigte Unterlagen.
• Um Erstickungsgefahr zu vermeiden, müssen Sie
Kunststofftüten aus der Reichweite von Säuglingen,
Kindern und Haustieren halten.
• Befestigen Sie den Ständer sorgfältig am TV-Gerät
Sollten der Ständer mit Schrauben geliefert worden
sein, müssen Sie die Schrauben fest nachziehen, um
das TV-Gerät vor dem Kippen zu bewahren. Ziehen
Sie die Schrauben nicht zu fest und montieren Sie
die Gummistopfen vorschriftsmäßig.
• Entsorgen Sie die Batterien niemals im offenen
Feuer oder zusammen mit gefährlichen bzw.
entflammbaren Stoffen.
WARNUNG
• Batterien dürfen nicht zu großer Hitze, wie direkter
Sonneneinstrahlung, Feuer oder Vergleichbarem
ausgesetzt werden.
• Zu hoher Schalldruck oder zu hohe Lautstärken von
Kopf- oder Ohrhörern können zu Gehörschäden
führen.
VOR ALLEM ABER lassen Sie NIEMALS zu,
dass jemand, insbesondere Kinder, gegen den
Bildschirm drückt oder dagegen schlägt oder
irgendwelche Gegenstände in Löcher, Schlitze
oder andere Öffnungen in der Abdeckung steckt.
Vorsicht
Schweres oder tödliches
Verletzungsrisiko
Stromschlaggefahr
Gefährliches
Spannungsrisiko
Wartung
Wichtige
Wartungskomponente

Deutsch - 3 -
Kennzeichnungen auf dem Gerät
Die folgenden Symbole werden auf dem Gerät
als Kennzeichnungen für Einschränkungen und
Vorsichtsmaßnahmen sowie Sicherheitshinweise
verwendet. Jede Kennzeichnung ist nur dann zu
beachten, wenn diese auf dem Gerät angebracht
worden ist. Beachten Sie diese Informationen aus
Sicherheitsgründen.
Gerät der Schutzklasse II: Dieses Gerät ist
so gebaut, das es keinen Schutzleiter
(elektrische Erdung) für die Verbindung zum
Stromnetz erfordert.
Lebensgefährdende Klemme: Die
markierte(n) Klemme(n) ist/sind im normalen
Betriebszustand lebensgefährdend.
iVorsicht. Bitte beachten Sie die
Bedienungsanleitung: Der markierte
Bereich bzw. die markierten Bereiche
enthalten durch den Benutzer auszutauschende
Knopfzellenbatterien.
CLASS 1
LASER PRODUCT
Gerät der Laserklasse 1:
Dieses Gerät enthält eine
Laserquelle der Klasse 1,
die unter vernünftigerweise
vorhersehbaren Betriebsbe
dingungen ungefährlich ist.
WARNUNG
Batterien dürfen nicht verschluckt werden, es besteht
chemische Verätzungsgefahr.
Dieses Gerät bzw. das zum Gerät mitgelieferte Zube-
hör enthält möglicherweise eine Knopfzellenbatterie.
Wenn die Knopfzellenbatterie verschluckt wird, führt
dies innerhalb 2 Stunden zu schweren internen Ver-
ätzungen mit möglicher Todesfolge.
Halten Sie gebrauchte und neue Batterien von Kin-
dern fern.
Wenn das Batteriefach nicht sicher geschlossen ist,
stoppen Sie die Verwendung des Geräts und halten
Sie Kinder fern.
Falls Sie den Verdacht haben, dass Batterien ver-
schluckt wurden oder in irgendeinen Körperteil platziert
wurde, suchen Sie sofort medizinische Hilfe auf.
– – – – – – – – – – – –
Ein TV-Gerät kann umfallen und dabei ernste Ver-
letzungen mit möglicher Todesfolge verursachen.
Viele Verletzungen, insbesondere bei Kindern, können
vermieden werden, wenn die folgenden einfachen
Vorsichtsmaßnahmen getroffen werden:
• Verwenden Sie IMMER vom Hersteller des TV-Ge-
räts empfohlene TV-Möbel oder Standfüße oder
Montagemethoden.
• Verwenden Sie IMMER Möbelstücke, die das Ge-
wicht des TV-Geräts sicher tragen können.
• Stellen Sie IMMER sicher, dass das TV-Gerät nicht
über die Ränder des Möbelstücks hinausragt.
• Klären Sie IMMER Ihre Kinder darüber auf, dass es
gefährlich ist, auf hohe Möbelstücke zu klettern, um
das TV-Gerät oder die Fernbedienung zu erreichen.
• Verlegen Sie Kabel und Leitungen, die an Ihr
TV-Gerät angeschlossen sind, IMMER so, dass sie
nicht darüber gestolpert, gezogen oder ergriffen
werden können.
• Stellen Sie das TV-Gerät NIEMALS auf eine instabile
Unterlage.
• Stellen Sie das TV-Gerät NIEMALS auf hohe Mö-
belstücke (z.B. Regale oder Bücherregale), ohne
das Möbelstück selbst und das TV-Gerät an einem
sicheren Halt abzustützen.
• Das TV-Gerät NIEMALS auf Stoff oder andere Ma-
terialien stellen, die sich möglicherweise zwischen
TV-Gerät und Möbel befinden.
• Stellen Sie NIEMALS Gegenstände auf das TV-Gerät
oder die Möbel, auf denen das TV-Gerät aufgestellt
ist, die Kinder zum Klettern verleiten könnten, z. B.
Spielzeug und Fernbedienungen.
•
geeignet.
Wenn Sie Ihr vorhandenes TV-Gerät weiterhin nutzen
und an einen neuen Platz stellen, sind die gleichen
Vorsichtsmaßnahmen zu beachten.
– – – – – – – – – – – –
Der Anschluss von Geräten, die über die Netzverbin-
dung oder andere Geräte an die Schutzerdung des
Gebäudes angeschlossen sind, über Koaxialkabel an
ein TV-Verteilersystem kann unter Umständen eine
mögliche Feuergefahr darstellen. Eine Verbindung
über einen Kabelverteilersystem ist nur dann zulässig,
wenn die Vorrichtung eine Isolierung unterhalb eines
gewissen Frequenzbereichs liefert (Galvanische
Isolation)
WARNHINWEISE ZUR
WANDMONTAGE
• Lesen Sie sich die Bedienungsanleitung durch,
bevor Sie das Gerät an der Wand befestigen.
• Das Set für Wandbefestigung ist optional. Sie
können es bei Ihrem lokalen Händler kaufen, falls
es nicht dem Gerät gekauft wurde.
• Installieren Sie das TV-Gerät nicht an der Decke
oder einer geneigten Wand.
• Verwenden Sie für die Wandmontage nur die dazu
vorgesehenen Schrauben und Zubehörteile.
• Ziehen Sie die Schrauben zu Wandmontage fest
nach, um das TV-Gerät vor dem Herabfallen zu
bewahren. Ziehen Sie die Schrauben nicht zu
stark an.

Deutsch - 4 -
WARNUNG
• Der Einsatz anderer Halterungen für die
Wandmontage oder eine eigenständige Installation
der Halterung kann zu Verletzungen und
Sachschäden führen. Um das Betriebsbereitschaft
des Geräts zu gewährleisten sowie aus
Sicherheitsgründen müssen Sie die Montage
unbedingt durch den entsprechenden qualifizierten
Kundendiensts des Händlers oder eine geeigneten
Fachmann durchführen lassen. Sämtliche durch
die Montage verursachten Schäden, sofern diese
durch nicht befugte Personen erfolgte, führen zum
Verlust der Gewährleistungsgarantie.
• Lesen Sie sich die Bedienungsanleitung aller
optionalen Zubehörteile sorgfältig durch und
achten Sie unbedingt darauf, alle Maßnahmen
zu ergreifen, die ein Herunterfallen des TV-Geräts
verhindern können.
• Behandeln Sie das TV-Gerät während der
Montage mit Vorsicht, Stöße oder rohe Gewalt zu
Schäden am Gerät führen können.
• Seien Sie vorsichtig, wenn Sie die Halterungen
an der Wand befestigen. Stellen Sie dabei stets
sicher, dass an der betreffenden keine elektrischen
Leitungen oder Rohre in der Wand dahinter
verlaufen.
• Um ein Herabfallen und Verletzungen zu
verhindern, sollten Sie das TV-Gerät von der Wand
abnehmen, wenn es nicht länger verwendet wird.
Abbildungen und Illustrationen in diesem
Benutzerhandbuch dienen nur der Anschauung und
können sich in der Erscheinung vom eigentlichen
Gerät unterscheiden. Das Produktdesign und
die Technischen Daten können ohne vorherige
Ankündigung geändert werden.
Montage / Entfernen der Standfüße
Vorbereitung
Nehmen Sie den/die Standfüße und das TV-Gerät
aus der Verpackung und legen Sie das Gerät auf
eine ebene Arbeitsfläche mit der Bildschirmseite nach
unten, die auf ein sauberes und weiches Tuch gelegt
werden muss (Decke usw.).
• Die Ablagefläche muss größer als das TV-Gerät sein.
• Halten Sie das Gerät nicht an der Bildschirmplatte.
• Achten Sie darauf, das TV-Gerät weder zu
zerbrechen noch zu zerkratzen.
VORSICHT: Bitte setzen Sie keine der abgebildeten
Schrauben in das TV-Gehäuse ein, wenn Sie den TV-Ständer
nicht verwenden, z.B. Wandbehang. Das Einsetzen von
Schrauben ohne Sockel kann das TV-Gerät beschädigen.
Montage der Standfüße
1. Der Stand des TV-Geräts besteht aus zwei Teilen.
Installieren Sie diese Teile zusammen.
2. Positionieren Sie den auf der markierten Stelle an
der Rückseite des TV-Geräts.
3. Setzen Sie die mitgelieferten Schrauben ein
(M4 x 12) und ziehen Sie sie vorsichtig an, bis der
Standfuß richtig sitzt.
x4

Deutsch - 5 -
Umweltinformationen
Bei der Entwicklung dieses Fernsehgeräts wurde auf
eine umweltfreundliche Funktionsweise Wert gelegt.
Um den Energieverbrauch zu senken, gehen Sie wie
folgt vor:
Wenn Sie die Energiespar-Option auf Minimum,
Medium, Maximum oder Auto einstellen, wird das
TV-Gerät seinen Energieverbrauch unverzüglich
entsprechend anpassen. Wenn Sie das Backlight auf
einen festen Wert wie Benutzerdefiniert stellen und
das Backlight (angesiedelt unter den Energiespar-
Einstellungen) mit Hilfe der Links- oder Rechts-Taste
der Fernbedienung manuell anpassen möchten.
Stellen Sie diese Einstellung zum Abschalten auf Aus.
Hinweis: Die verfügbaren Energiespar-Optionen können
abhängig vom gewählten Modus im System>Bild-Menü
variieren.
Die Energiespar-Einstellungen finden sich im Sys-
tem>Bild-Menü. Ist dies nicht der Fall, können die
Einstellungen nicht geändert werden.
Wenn die rechte Taste und linke Taste nacheinander
gedrückt wird, wird die „
Meldung auf dem
Fortfahren und
OK
auszuschalten. Wenn Sie keine Taste drücken, wird der
Bildschirm nach 15 Sekunden ausgeschaltet. Drücken
Sie eine beliebige Taste auf der Fernbedienung
oder auf dem TV-Gerät, um den Bildschirm wieder
einzuschalten.
Hinweis: Die Bildschirm Aus-Option is nicht verfügbar, wenn
der Modus auf Spielen gestellt ist.
Schalten Sie das Gerät aus oder ziehen Sie den
Netzstecker, wenn das TV-Gerät nicht verwendet wird.
Dies wird auch den Energieverbrauch reduzieren.
Eigenschaften
• Fernbedienbares Farbfernsehgerät
• Vollintegriertes digitales terrestrisches/Kabel-/
Satelliten-TV (DVB-T-T2/C/S-S2)
• HDMI Eingänge, um andere Geräte mit HDMI-
Anschlüssen zu verbinden
• USB-Eingang*
• OSD-Menüsystem
• Rückseitige AV-Eingänge für externe Geräte (wie z.
B. DVD-Player, PVR, Videospiele usw.)
• Stereo-Audiosystem
• Teletext
• Kopfhöreranschluss
• Automatische Programmierung
• Manuelle Sendereinstellung
• Automatische Abschaltung nach bis zu acht Stunden.
Entfernen des Standfußes vom TV-Gerät
Achten Sie darauf, den Standfuß in der folgenden
Weise zu entfernen, wenn Sie eine Wandhalterung
verwenden oder das TV-Gerät wieder verpacken
wollen.
• Legen Sie das Gerät auf eine Arbeitsfläche mit der
Bildschirmseite nach unten, die auf ein sauberes und
weiches Tuch gelegt werden muss. Lassen Sie den
Standfuß über den Rand der Fläche hinausragen.
• Drehen Sie die Schrauben heraus, mit denen
Standfuß fixiert ist.
• Entfernen Sie den Standfuß.
Bei der Verwendung einer Wandhalterung.
Bitte wenden Sie sich an Ihren örtlichen Panasonic-
Händler, um die empfohlene Wandhalterung zu kaufen.
Löcher für die Installation der Wandhalterung;
Rückseite des TV-Geräts
a
b
a (mm) 100
b (mm) 100
Seitenansicht
a
Schraubenlänge
(a)
min. (mm) 9
max. (mm) 10
Durchmesser M4
Hinweis: Die Schrauben zur Befestigung des TV-Geräts an
der Wandhalterung werden nicht mit dem TV-Gerät geliefert.

Deutsch - 6 -
• Ausschalttimer
• Kindersicherung
• Automatische Stummschaltung, wenn keine
Übertragung stattfindet.
• NTSC-Wiedergabe
• AVL (Automatische Lautstärkebegrenzung)
• PLL (Frequenzsuche)
• PC-Eingang
• Spielemodus (Optional)
• Bild-Aus-Funktion
• Ethernet (LAN) für Internetverbindungen und
-Dienste
• 802.11 a/b/g/n integrierte WLAN-Unterstützung
• Audio-Video-Teilen
• HbbTV
Zubehör im Lieferumfang
• Fernbedienung
• Batterien: 2 X AA
• Handbuch
• Netzkabel
• Abnehmbarer Ständer
• Schrauben zur Montage des Ständers (M4 x 12)
TV-Steuerung & Betrieb
Der Joystick ermöglicht Ihnen die Lautstärke /
Programme / Quellen und Ein-/Aus-Funktionen des
Fernsehers zu steuern.
Hinweis: Abhängig vom jeweiligen Modell kann sich der
Joystick an einer anderen Stelle befinden.
Verwenden des Haupt-TV-Menüs
Wenn die Home-Taste gedrückt wird, erscheint das
Haupt-TV-Menü unten auf dem Bildschirm. Sie können
mit den Navigationstasten auf der Fernbedienung
durch die Menüpunkte navigieren. Um ein Punkt
auszuwählen oder die Untermenüoptionen des
markierten Menüs anzuzeigen, drücken Sie die Taste
OK. Wenn Sie eine Menüoption markieren, werden
möglicherweise einige der Untermenüpunkte dieses
Menüs auf der oberen Seite der Menüleiste für
einen schnellen Zugriff angezeigt. Um ein Element
mit Schnellzugriff zu verwenden, markieren Sie es,
drücken Sie OK und stellen Sie es wie gewünscht
mit den Navigationstasten Links / Rechts ein. Wenn
Sie fertig sind, drücken Sie OK oder Back/Return,
um fortzusetzen.
Sie können auch Informationen zu Ort, Wetter,
Uhrzeit und Datum auf dem Hauptbildschirm des
TV-Menüs anzeigen. Die grünen kleinen Symbole
zeigen den aktuellen Status für Zeit, Netzwerk
und Synchronisierung für Apps an. Wenn diese
Symbole grün angezeigt werden, bedeutet dies,
dass die Zeitinformationen aktualisiert, das Netzwerk
verbunden und die Synchronisierung erfolgreich
abgeschlossen wurde. Andernfalls werden die
Symbole in Weiß angezeigt.
Drücken Sie die Exit-Taste, um das Hauptmenü zu
schließen.
Einlegen der Batterien in die Fernbedienung
Entfernen Sie die hintere Abdeckung Ihrer Fernbe-
dienung, um das Batteriefach zu öffnen. Setzen Sie
zwei AA-Batterien ein. Vergewissern Sie sich, dass
die (+) und (-) Zeichen sich einander entsprechen
(korrekte Polarität). • Verwenden Sie niemals alte und
neue Akkus bzw. Batterien zusammen. Ersetzen Sie
diese ausschließlich durch solche des gleichen oder
eines gleichwertigen Typs. Setzen Sie die Abdeckung
wieder auf.
Eine Meldung auf dem Bildschirm wird angezeigt,
wenn die Batterien fast leer sind und müssen
ersetzt werden. Beachten Sie, dass die Leistung der
Fernbedienung beeinträchtigt sein kann, wenn die
Batterien schwach sind.
Batterien dürfen niemals zu großer Hitze wie direkter
Sonneneinstrahlung, Feuer od. dgl. ausgesetzt
werden.
La page charge ...
La page charge ...
La page charge ...
La page charge ...
La page charge ...
La page charge ...
La page charge ...
La page charge ...
La page charge ...
La page charge ...
La page charge ...
La page charge ...
La page charge ...
La page charge ...
La page charge ...
La page charge ...
La page charge ...
La page charge ...
La page charge ...
La page charge ...
La page charge ...
La page charge ...
La page charge ...
La page charge ...
La page charge ...
La page charge ...
La page charge ...
La page charge ...
La page charge ...
La page charge ...
La page charge ...
La page charge ...
La page charge ...
La page charge ...
La page charge ...
La page charge ...
La page charge ...
La page charge ...
La page charge ...
La page charge ...
La page charge ...
La page charge ...
La page charge ...
La page charge ...
La page charge ...
La page charge ...
La page charge ...
La page charge ...
La page charge ...
La page charge ...
La page charge ...
La page charge ...
La page charge ...
La page charge ...
La page charge ...
La page charge ...
La page charge ...
La page charge ...
La page charge ...
La page charge ...
La page charge ...
La page charge ...
La page charge ...
La page charge ...
La page charge ...
La page charge ...
La page charge ...
La page charge ...
La page charge ...
La page charge ...
La page charge ...
La page charge ...
La page charge ...
La page charge ...
La page charge ...
La page charge ...
La page charge ...
La page charge ...
La page charge ...
La page charge ...
La page charge ...
La page charge ...
La page charge ...
La page charge ...
La page charge ...
La page charge ...
La page charge ...
La page charge ...
La page charge ...
La page charge ...
La page charge ...
La page charge ...
La page charge ...
La page charge ...
La page charge ...
La page charge ...
La page charge ...
La page charge ...
La page charge ...
La page charge ...
La page charge ...
La page charge ...
-
 1
1
-
 2
2
-
 3
3
-
 4
4
-
 5
5
-
 6
6
-
 7
7
-
 8
8
-
 9
9
-
 10
10
-
 11
11
-
 12
12
-
 13
13
-
 14
14
-
 15
15
-
 16
16
-
 17
17
-
 18
18
-
 19
19
-
 20
20
-
 21
21
-
 22
22
-
 23
23
-
 24
24
-
 25
25
-
 26
26
-
 27
27
-
 28
28
-
 29
29
-
 30
30
-
 31
31
-
 32
32
-
 33
33
-
 34
34
-
 35
35
-
 36
36
-
 37
37
-
 38
38
-
 39
39
-
 40
40
-
 41
41
-
 42
42
-
 43
43
-
 44
44
-
 45
45
-
 46
46
-
 47
47
-
 48
48
-
 49
49
-
 50
50
-
 51
51
-
 52
52
-
 53
53
-
 54
54
-
 55
55
-
 56
56
-
 57
57
-
 58
58
-
 59
59
-
 60
60
-
 61
61
-
 62
62
-
 63
63
-
 64
64
-
 65
65
-
 66
66
-
 67
67
-
 68
68
-
 69
69
-
 70
70
-
 71
71
-
 72
72
-
 73
73
-
 74
74
-
 75
75
-
 76
76
-
 77
77
-
 78
78
-
 79
79
-
 80
80
-
 81
81
-
 82
82
-
 83
83
-
 84
84
-
 85
85
-
 86
86
-
 87
87
-
 88
88
-
 89
89
-
 90
90
-
 91
91
-
 92
92
-
 93
93
-
 94
94
-
 95
95
-
 96
96
-
 97
97
-
 98
98
-
 99
99
-
 100
100
-
 101
101
-
 102
102
-
 103
103
-
 104
104
-
 105
105
-
 106
106
-
 107
107
-
 108
108
-
 109
109
-
 110
110
-
 111
111
-
 112
112
-
 113
113
-
 114
114
-
 115
115
-
 116
116
-
 117
117
-
 118
118
-
 119
119
-
 120
120
-
 121
121
-
 122
122


Panasonic TX40MS360E Guide de démarrage rapide
- Taper
- Guide de démarrage rapide
dans d''autres langues
- italiano: Panasonic TX40MS360E Guida Rapida
- English: Panasonic TX40MS360E Quick start guide
- español: Panasonic TX40MS360E Guía de inicio rápido
- Deutsch: Panasonic TX40MS360E Schnellstartanleitung
- dansk: Panasonic TX40MS360E Hurtig start guide
- svenska: Panasonic TX40MS360E Snabbstartsguide
- suomi: Panasonic TX40MS360E Pikaopas