Artika MONSOON2 Assembly Instructions Manual
- Taper
- Assembly Instructions Manual

Customer service
Monday to Friday: 9 AM - 5 PM EST
Service à la clientèle
Lundi au vendredi: 9 h à 17 h H.N.E.
Tel./Tél. : 1-866-661-9606
support@artika.com
Artika for Living Inc.
Dorval, Canada H9P 2R2
www.artika.com
Made in China /
Fabriqué en Chine
rev. 05-Oct-2015
MONSOON
TM/MC
Assembly Instructions
IMPORTANT, RETAIN FOR FUTURE REFERENCE: READ CAREFULLY
Instructions d’assemblage
IMPORTANT, CONSERVER POUR CONSULTATION FUTURE: LIRE ATTENTIVEMENT
For domestic use only /
Pour usage domestique seulement
SHOWER CADDY
TOUR DE RANGEMENT

Instruction Manual / Manuel d’instruction
2
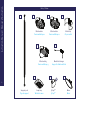
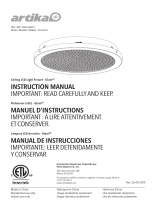
Wire basket 1
Panier métallique 1
Wire basket 2
Panier métallique 2
Metal clip
Clip en métal
Wire basket 3
Panier métallique 3
Washcloth hanger
Support à débarbouillette
Q-Cup
TM
Q-Cup
MC
Soap tray
Tablette à savon
Support pole
Tige de support
Mirror
Miroir
Parts / Pièces:
a
f
g
i
h
b
c
d
e
×2

Instruction Manual / Manuel d’instruction
3
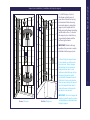
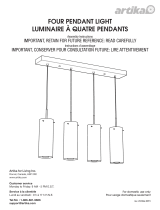
Support pole installation / Installation de la tige de support
a
a
Shower / Douche Bathtub / Baignoire
1. Poser la tige de support dans
le coin du bain ou de la douche
de votre choix. Visser la bague
du haut dans le sens horaire et
la bague du bas dans le sens
antihoraire afin d’allonger la tige
de support jusqu’à ce qu’elle
soit installée fermement entre le
plafond et le bain ou le plancher.
Pour raccourcir la tige de support,
visser la bague du haut dans le
sens antihoraire et la bague du
bas dans le sens horaire.
IMPORTANT: Visser les bagues de
manière égale afin que la pression
soit distribuée correctement dans
la tige de support.
1. Install the support pole in
the shower or bath corner of
your choice. Rotate the top ring
clockwise and the bottom ring
counterclockwise to extend the
support pole’s height until it is
firmly secured between the ceiling
and the bath or floor. To shorten
the support pole, rotate the top
ring counterclockwise and the
bottom ring clockwise.
IMPORTANT: Rotate both rings
equally so the pressure is evenly
distributed in the support pole.

Instruction Manual / Manuel d’instruction
4
Mirror installation / Installation du miroir
i
Mirror cleaning / Nettoyage du miroir
WARNING: DO NOT USE AMMONIABASED
CLEANING AGENT
AVERTISSEMENT: NE PAS UTILISER DE
PRODUITS NETTOYANTS CONTENANT DE
L’AMMONIAQUE

Instruction Manual / Manuel d’instruction
5
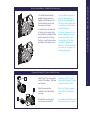
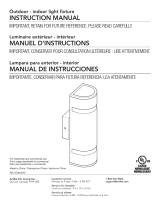
Accessories installation / Installation des accessoires
1. To install the wire baskets,
washcloth hanger and mirror,
slightly rotate the accessory to
the left and push the clip onto
the support pole insert.
2. Carefully snap the right side
of the clip on the support pole
insert until the assembly is fixed
onto the support pole. Ensure
the clip is correctly inserted into
both sides of the support pole.
1. Pour installer les paniers, le
support à débarbouillette et
le miroir, tourner légèrement
l’accessoire vers la gauche puis
poser l’attache dans l’encavure
de la tige de support.
2. Pousser doucement le côté
droit de l’attache sur la tige
de support jusqu’à ce que
l’assemblage soit fixé dans
l’encavure. S’assurer que
l’attache soit bien insérée dans
les encavures de chaque côté
de la tige de support.
Install Q-Cup
TM
onto the rounded
corners of the shelves. Clip them
over the wires.
Note: Q-Cup
TM
cannot be
installed on the shelf with the
soap tray.
To install the soap tray, clip it
over the wires on the shelf.
Installer les Q-Cup
MC
sur les
coins ronds des paniers. Pousser
en place sur la barre d’acier.
Note: Les Q-Cup
MC
ne peuvent
être installés sur la tablette à
savon.
Pour installer la tablette à savon,
pousser les pinces sur le panier.
Q-cup
TM
and soap dish / Q-cup
MC
et tablette à savon
g
e
h

Instruction Manual / Manuel d’instruction
6
To modify accessories height:
1. Pull the clip toggle.
2. Slide the accessory on the
support pole until desired
position.
3. Close the clip toggle.
Pour modifier la hauteur des
accessoires:
1. Lever le loquet.
2. Glisser l’accessoire jusqu’à la
position désirée sur la tige de
support.
3. Fermer le loquet.
Accessories installation / Installation des accessoires

Instruction Manual / Manuel d’instruction
7
Artika For Living Inc. est fière de vous orir une
garantie de un (1) an. Nous garantissons que notre
produit est exempt de tout défaut de fabri cation
ou de matériel pendant une période d’un (1) an,
suivant la date d’achat. Si notre produit présente
un problème durant la période de garantie, Artika
For Living Inc. fournira le produit ou les pièces de
remplacement sans frais.
Notre garantie ne couvre pas les produits
installés incorrectement ou un produit sujet à une
utilisation anormale. L’usure normale des pièces,
une mauvaise utilisation, un entretien inadéquat,
l’altération du produit ou un produit installé
à l’encontre des instructions d’installation ne
sont pas couvert.
La garantie est valide seulement pour les
produits installés en conformité avec le Code
du Bâtiment effectif dans la province où ils ont
été installés.
Notre produit est destiné à un usage résidentiel
seulement. La garantie ne couvre pas les frais
d’expédition, les frais de main d’œuvre ou
tout autre coût associé à l’installation ou le
remplacement de nos produits. La garantie est
applicable seulement envers le propriétaire
original du produit.
La valeur de l’application de la garantie ne
peut pas excéder la valeur totale du produit au
moment de l’achat.
Artika se dégage de toute responsabilité en
cas de dommages directs ou indirects, de
tout bris de biens ou de blessures corporelles.
Cette garantie devient invalide si les défauts de
fabrication avaient pu être découverts, réparés
ou évités avant l’installation.
Artika ne sera pas responsable de tout dommage
direct ou indirect causé par une utilisation
inadéquate de ce produit.
La garantie s’applique uniquement sur les
produits achetés aux États-Unis et au Canada.
Artika For Living Inc. is proud to offer you a one
(1) year Warranty. We guarantee our product to
be free of manufacturing defects in material
and workmanship for a period of one (1) year
from the date of purchase. Should a defect arise
within the warranty period, Artika For Living
Inc. will provide replacement product or parts
free of charge.
Our warranty does not cover products installed
incorrectly, or subjected to abnormal use.
Normal wear and tear, misuse, improper
maintenance, alteration of the product or units
not installed in accordance to the installation
ma nual will not be covered.
This warranty is valid only on products installed
in accordance with the Building Code effective
in the region where the unit is used.
Our products are intended for residential use
only. The Warranty does not cover shipping
costs, labour costs or any other cost associated
with the installation or replacement of the
product. The Warranty is extended to the
original owner.
The amount of the claim cannot exceed the
original purchase price of the item.
Artika will not be held responsible for any direct
or consequential damages or injuries related to
the use of this product. The warranty will be nul
and void if any damage or defect could have been
noticed, repaired or avoided prior installation.
Artika For Living Inc. is not responsible for
indirect or consequential damages arising from
improper use or installation of this product.
Warranty only applicable for purchases made in
the USA or in Canada.
Warranty / Garantie
Customer service
Monday to Friday: 9 AM - 5 PM EST
Service à la clientèle
Lundi au vendredi: 9 h à 17 h H.N.E.
Tel./Tél. : 1-866-661-9606
support@artika.com

-
 1
1
-
 2
2
-
 3
3
-
 4
4
-
 5
5
-
 6
6
-
 7
7
-
 8
8


Artika MONSOON2 Assembly Instructions Manual
- Taper
- Assembly Instructions Manual
dans d''autres langues
- English: Artika MONSOON2
Documents connexes
-
 Artika FM-FA Mode d'emploi
-
 Artika PDT1-CG-HD2BG Champagne Globe 1 Light LED Pendant Manuel utilisateur
-
 Artika FMGL-C1 Mode d'emploi
-
 Artika CLGL-HD1 Mode d'emploi
-
 Artika FM-CNT-C1 Mode d'emploi
-
 Artika OME59 Guide d'installation
-
 Artika OME1L Mode d'emploi
-
 Artika AMP71-HDBL Mode d'emploi
-
 Artika V3 Manuel utilisateur
-
 Artika VAN4M-HD1 Mode d'emploi


