
CARE INSTRUCTIONS
Rinse the product with clear water.
Dry the product with a soft cloth.
DO NOT:
Use abrasive cleansers, cloths, or
paper towels. Use any cleaning agents
containing acid, polish, wax, alcohol,
ammonia, bleach, solvent or any other
corrosive or harsh chemical cleansers.
INSTRUCTIONS D’ENTRETIEN
Rincer le robinet avec de l’eau claire
et l’essuyer avec un tissu doux.
À NE PAS FAIRE :
Utiliser des tissus ou essuie-tout
abrasifs, produits nettoyants contenant
de l’acide, agent polisseur, cires, alcool,
ammoniaque, eau de Javel, solvants ou
tout autres produits chimiques corrosifs.
Customer Service
Monday to Friday:
8 a.m. - 4:30 p.m. E.S.T.
Tel: 1-800-361-5960
Service à la clientèle
Lundi au vendredi :
8 h 00 à 16 h 30 H.N.E.
Fax : 1-888-533-8313
clientinf[email protected]
Replacement parts are available on order
Les pièces de remplacement sont disponibles sur commande
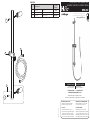
SLIDING BAR KIT WITH FLEXIBLE HOSE
ENSEMBLE DE BARRE À GLISSIÈRE ET BOYAU
IBB90-730_v210902
B90-730
B90-730
2
1
3
No Description Part
Pièce
1Flexible hose Boyau 96179
2Hand shower holder Support pour douche à main B93700
3Wall support Support murale B93501
For warranty and to register your product
Garantie et enregistrement de votre produit
belangerH2O.com

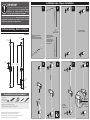
Installation steps - Étapes d’installation
Technical drawing - Dessin technique
IMPORTANT
The slide bar is not to be used as a grab bar or for support. It is
intended for holding a handshower only. WE DENY ALL LIABILITY
RELATED TO ANY ACCIDENT, INCIDENT OR BREAKAGE
FOLLOWING ANY USAGE IN BREACH OF THIS WARNING.
La barre à glissière ne doit en aucun cas être utilisée comme barre d’appui. Elle a été
conçue pour supporter une douche à main. NOUS NOUS DÉGAGEONS DE TOUTE
RESPONSABILITÉ POUR QUELQUE ACCIDENT, INCIDENT OU BRIS OCCASIONNÉ
SUITE À UN USAGE QUI NE TIENT PAS COMPTE DE CET AVIS.
The model shown in the installation steps may differ from the one in box
however the connection type and installation steps are the same.
Le modèle démontré dans les étapes d’installation peut différer du produit en boîte,
mais le type de connexions et d’installation demeure le même.
RECOMMENDED TOOLS / OUTILS RECOMMANDÉS
Thread seal tape
Ruban d’étanchéité
pour joints letés *
* Apply thread seal tape on threaded connections.
Appliquez du ruban d’étanchéité sur les connexions letées.
A
B
A
B
A
B
A
B
A
B
A
B
A
B90-730
Finished wall
mur ni
Floor
Plancher
30”
(763 mm)
2-1/2”
(64 mm) 26”
(660 mm)
13/16”
(21 mm)
3-1/16”
(78 mm)
2-3/16”
(55 mm)
A
B
DRILL THROUGH LOWER WALL
ON POINT “A”
PERCER LA PARTIE INFÉRIEURE
DU MUR AU POINT DE PERÇAGE “A”
MEASURE AND DRILL
THROUGH UPPER WALL
ON POINT “B”
MESURER ET PERCER
LA PARTIE SUPÉRIEURE
DU MUR AU POINT
DE PERÇAGE “B”
SCREW THE BRACKETS
SERRER LES SUPPORTS
TIGHTEN
THE SCREWS
SERRER LES VIS
26”
(660 MM)
PUSH
TO ADJUST
HEIGHT
POUSSER
POUR
AJUSTER
LA HAUTEUR
A
B
21 43
65 87
-
 1
1
-
 2
2


