Green Creative PLS-BYP-HYB Guide d'installation
- Taper
- Guide d'installation

NOTE : This retrofit kit is for a 2 PIN Horizontal and Vertical mounts and can replace 13W
and 18W CFL lamps with GX23 bases.
CAUTION – IF THE LAMP OR LUMINAIRE EXHIBITS UNDESIRABLE OPERATION
(BUZZING, FLICKERING, ETC.), IMMEDIATELY TURN OFF POWER,REMOVE LAMP
FROM LUMINAIRE AND CONTACT THE MANUFACTURER.
WARNING – Risk of fire or electric shock. LED Retrofit Kit installation requires knowledge
of luminaire electrical systems. If not
qualified electrician. Installation should be performed only by a qualified electrician in
qualified, do not attempt installation. Contact a
accordance with the National Electrical Code and relevant local code.
WARNING – Risk of fire or electric shock. Install this kit only in the luminaires that have
the construction features and
where the input rating of the retrofit kit does not exceed the input
dimensions shown in the photographs and/or drawings and
rating of the luminaire.
WARNING – To prevent wiring damage or abrasion, do not expose wiring to edges of
sheet metal or other sharp objects.
Do not make or alter any open holes in an enclosure of wiring or electrical components
during kit installation.
Installers should not disconnect existing wires from lamp holder terminals to make new
connections at lamp holder terminals.
Instead installers should cut existing lamp holder leads away from the lamp holder and
make new electrical connections to lamp holder lead wires by employing applicable
connectors.
THE RETROFIT ASSEMBLY IS ACCEPTED AS A COMPONENT OF A LUMINAIRE
WHERE THE SUITABILITY OF THE COMBINATION SHALL BE DETERMINED BY
ULOR AUTHORITIES HAVING JURISDICTION.
• Disconnect power at the source before installation, inspection or removal. Do not simply switch off fixture.
• This item is rated at 120-277V. Installer must determine whether line voltage 120-277V is available at the luminaire before installation.
• Not intended for use with emergency exit fixtures or emergency exit lights.
• Not for use with luminaire ballast.
• Do not use if product is damaged.
• This lamp is non-dimmable. Not for use with dimmers.
• “This luminaire has been modified to operate LED lamps” shall be marked on the retrofit luminaire where readily visible by the user
during normal maintenance including re-lamping.
• Risk of fire or electric shock. Do not open or modify. No user serviceable parts inside.
• SUITABLE FOR DAMP LOCATIONS. Suitable for use in wet locations when used in an outdoor-rated fixture. Not for use where
directly exposed to the weather or water.
• Complies with Part 15 of FCC. Operation is subject to the following two conditions: (1) This device may not cause harmful
interference, and (2) This device must accept any
interference received including interference that may cause undesired operation.
• No external weight or mechanical force should be applied to lamp or components.
LED PLS BYPASS LAMP INSTALLATION GUIDE – WARNING
For model #: 3.5PLS/xxx/BYP/2G7/R, 5.5PLS/xxx/BYP/2GX7/R, 3.5PLS/xxx/HYB/G23/R,
5.5PLS/xxx/HYB/GX23/R, 5.5PLSH/xxx/HYB/GX23/R, 5.5PLSV/xxx/HYB/GX23
Where xxx means 824-965 which indicates CRI and color temperature
Pour les produits suivants: 3.5PLS/xxx/BYP/2G7/R, 5.5PLS/xxx/BYP/2GX7/R,
3.5PLS/xxx/HYB/G23/R, 5.5PLS/xxx/HYB/GX23/R, 5.5PLSH/xxx/HYB/GX23/R,
5.5PLSV/xxx/HYB/GX23
Où xxx signifie 824-965 qui correspond au CRI et couleur de température
NOTE Ce kit d'adaptation est adapté à un montage horizontal et vertical à 2 broches et
remplace les lampes CFL 13W et 18w par une base GX23.
.
FONCTIONNEMENT INAPPROPRIÉ
INTERROMPRE IMMÉDIATEMENT LE COURANT, ENLEVER LA LAMPE
MISE EN GARDE – SI LA LAMPE OU LE LUMINAIRE MONTRE UN
(BOURDONNEMENT, CLIGNOTEMENT, ETC.),
DU LUMINAIRE ET CONTACTER LE FABRICANT.
ATTENTION – Risque d’incendie ou de choc électrique. L’installation de ce kit LED
nécéssite la connaissance des systèmes
doit être faite par un électricien qualifié en accord avec les normes électriques
et locales en vigueur.
électriques des luminaires. L’installation
nationales
ATTENTION – Risque d’incendie ou de choc électrique. Installer uniquement dans des
luminaires aux spécificités et dimensions similaires au dessin et/ou photos.
ATTENTION – Afin d’éviter tout dommage ou abrasion ne pas laisser de câble en
contact avec les bords métaliques ou autre endroit abrasif.
Ne pas faire ou modifier des trous dans les boîte de câblage ou tout composant
électrique pendant l’installation.
L’installateur ne doit pas déconnecter les câbles existants au niveau des connecteur de
la douille. L’installateur doit couper le câble existant à distance des douilles et utiliser
des connecteurs appropriés pour faire une nouvelle connection.
L’INSTALLATION DE CE KIT DE CONVERSION EST ACCEPTÉ COMME UN
COMPOSANT DU LUMINAIRE POUR LEQUEL LE CARACTÈRE APPROPRIÉ DE LA
COMBINAISON DOIT ÊTRE DETERMINÉ PAR UL OU LES AUTORITÉS
COMPÉTENTES AYANT JURISDICTION.
• Eteindre le courant au compteur avant vérification, installation ou suppression.
• Ce produit est classifié 120-277V. L’installateur doit s’assurer que le courant de l’installation au luminaire est de 120-277V.
• Ne convient pas aux éclairages et luminaires de sorties de secours.
• Ne pas utiliser avec ballast.
• Ne pas utiliser si le luminaire est endommagé.
• Ne pas utiliser avec des gradateurs.
GUIDE D’INSTALLATION – ATTENTION
• Risque de choc électrique. Ne pas ouvrir. Aucune pièce ne peut être changée à l’intérieur.
• “Ce luminaire a été modifié pour opérer une lampe LED. Ne pas installer ou opérer de lampe fluorescente dans ce luminaire”
doit être inscrit sur le luminaire converti de manière à être visible pendant l’entretien et notamment le changement de lampe.
• CONVIENT AUX EMPLACEMENTS HUMIDES. Convient aux emplacements mouillés si installé dans un luminaire pour extérieur.
Ne pas utiliser si directement exposé aux éléments ou à l’eau.
• Ce produit est conforme à la partie 15 des règlements de la FCC. Son utilisation est soumise à deux conditions:
1) Ce produit ne cause pas d’interférence dangereuse, et
2) Ce produit peut accepter les interférences reçues qui pourraient causer des opérations non voulues.
• Ne pas appliquer de force sur la lampe ou les composants.
www.greencreative.com - [email protected] - Tel / Fax: (866) 774-5433 - / GREENCREATIVELED / GClightingLED / GREEN-CREATIVE An ILLUMUS Brand www.greencreative.com - [email protected] - Tel / Fax: (866) 774-5433 - / GREENCREATIVELED / GClightingLED / GREEN-CREATIVE An ILLUMUS Brand

NOTE:
• This retrofit kit is for a 2 PIN Horizontal and Vertical mounts and can replace 13W and 18W CFL lamps with GX23 bases.
• This lamp is non-dimmable. Not for use with dimmers.
• Operates on magnetic ballasts only.
• This lamp is not compatible with luminaires that use a remote starter.
• Suitable to replace compact fluorescent lamps as specified on the product label.
CAUTION- IF THE LAMP OR LUMINAIRE EXHIBITS UNDESIRABLE OPERATION
(BUZZING, FLICKERING, ETC.), IMMEDIATELY TURN OFF POWER, REMOVE
LAMP
CAUTION- RISK OF FIRE. DO NOT INSTALL IN A PRE-HEAT LUMINAIRE.
FROM LUMINAIRE AND CONTACT THE MANUFACTURER.
WARNING- RISK OF FIRE. USE ONLY IN PLACE OF COMPACT FLUORESCENT
LAMPS SPECIFIED ON LABEL. SEE INSTRUCTIONS.
THIS LAMP ONLY OPERATES ON MAGNETIC BALLASTS. IF LAMP DOES NOT
LIGHT WHEN THE LUMINAIRE IS ENERGIZED, REMOVE LAMP FROM LUMINAIRE
AND CONTACT LAMP MANUFACTURER OR QUALIFIED ELECTRICIAN.
THIS PRODUCT MAY CAUSE INTERFERENCE TO RADIO EQUIPMENT AND SHOULD
NOT BE INSTALLED NEAR MARITIME SAFETY COMMUNICATIONS EQUIPMENT OR
OTHER CRITICAL NAVIGATION OR COMMUNICATION EQUIPMENT OPERATING
BETWEEN 0.45 – 30MHZ.
THESE DEVICES ARE NOT INTENDED FOR USE WITH EMERGENCY EXIT
FIXTURES OR EMERGENCY EXIT LIGHTS.
LAMPS MUST BE OPERATED WITHIN AN AMBIENT FIXTURE TEMPERATURE OF
-4ºF (-20ºC) AND 95ºF (35ºC).
INSTALLATION INSTRUCTIONS:
1. Switch-off power to luminaire.
2. Remove the cover lens (if provided).
3. Remove existing CFL lamp(s) from luminaire. Note: Verify that the CFL type is listed on the LED lamp label.
4. Confirm the lampholder has a GX23 socket.
5. Install LED lamp (one for each CFL lamp removed, ensure pins are firmly seated in lampholders).
NOTE:This retrofit kit is a hybrid product meaning it can work with a magnetic CFL
ballast or run off line voltage. For installation with a magnetic CFL ballast, please refer
to the LED PLS DIRECT LAMP INSTALLATION GUIDE section. For line voltage
installation (ballast bypass), please refer to the LED PLS BYPASS LAMP
INSTALLATION GUIDE section.
NOTE:Ce Kit Retrofit est un produit hybride, ceci signifie qu'il peut fonctionner sur
ballast magnétique CFL ou directement sur le secteur. Pour l'installation avec une
ballast magnétique CFL, veuillez-vous référer au GUIDE D'INSTALLATION DIRECT
DES LAMPES LED PLS. Pour une installtion sur le secteur (contourner la ballast),
veuillez-vous référer au GUIDE D'INSTALLATION BYPASS DES LAMPES LED PLS.
LED PLS DIRECT LAMP INSTALLATION GUIDE – WARNING
GUIDE D’INSTALLATION – ATTENTION
NOTE:
• Ce kit d'adaptation est adapté à un montage horizontal et vertical à 2 broches et remplace les lampes CFL 13W et 18w par une base GX23.
• Cette lampe n'est pas compatible avec tous les gradateurs. Liste de compatibilité sur ww w.greencreative.com.
• Fonctionne uniquement avec ballast magnetic.
• Cette lampe n’est pas compatible avec ballasts magnétiques uniquement.
• Approprié pour le remplacement de lampe CFL comme indiqué sur le label du produit.
MISE EN GARDE- SI LA LAMPE OU LE LUMINAIRE MONTRE UN
FONCTIONNEMENT INAPPROPRIÉ (BOURDONNEMENT, CLIGNOTEMENT, ETC.),
INTERROMPRE IMMÉDIATEMENT LE COURANT, ENLEVER LA LAMPE DU
LUMINAIRE ET CONTACTER LE FABRICANT.
MISE EN GARDE- RISQUE D’INCENDIE. NE PAS INSTALLER DANS UN
LUMINAIRE DU TYPE À PRÉCHAUFFAGE.
AVERTISSEMENT - RISQUE D’INCENDIE. UTILISER UNIQUEMENT EN
REMPLACEMENT DES LAMPES FLUORESCENTES PRÉCISÉES SUR
L'ÉTIQUETTE. VOIR LES INSTRUCTIONS.
CETTE LAMPE FONCTIONNE SEULEMENT SUR UN BALLAST MAGNETIC.
SI LA LAMPE NE S’ALLUME PAS LORSQUE LE LUMINAIRE EST MIS SOUS
TENSION,RETIRER LA LAMPE DU LUMINAIRE ET CONTACTER LE FABRICANT
DE LA LAMPE OU UN ÉLECTRICIEN QUALIFIÉ.
CE PRODUIT EST SUSCEPTIBLE DE CAUSER DE L’INTERFÉRENCE AVEC LES
ÉQUIPEMENTS RADIO ET NE DEVRAIT PAS ÊTRE INSTALLÉ PRÈS DES
APPAREILS DE COMMUNICATION DE SÉCURITÉ MARITIME OU TOUT AUTRE
ÉQUIPEMENT DE COMMUNICATION OU DE NAVIGATION QUI FONCTIONNE À
UNE BANDE ENTRE 0.45 ET 30 MHZ.
CETTE LAMPE NE DOIT PAS ÊTRE UTILISÉE POUR DES APPAREILS
D'URGENCE OU DE SORTIE DE SECOURS.
LES LAMPES DOIVENT ÊTRE EXPLOITÉES DANS UNE TEMPÉRATURE
AMBIANTE DE FIXATION DE -4ºF (-20ºC) ET 95ºF (35ºC) POUR ASSURER LA
CONFORMITÉUL
INSTALLATION INSTRUCTIONS:
1. Couper le courant du luminaire.
2. Enlever le diffuseur (si applicable).
3. Retirer les lampes existances de luminaire et verifier que le type de ballast soit bien liste ci-dessus.
4. Vérifier que la douille soit bien de type GX23.
5. Installer les lampes LED (une lampe LED pour chaque lampe CFL remplacée et bien s’assurer que les broches soient bien
insérés dans les douilles).
6. Allumer le courant du luminaire après avoir remis le diffuseur en place (si applicable).
6. Turn on the luminaire power after replacing the diffuser (if applicable).
For model #: 3.5PLS/xxx/BYP/2G7/R, 5.5PLS/xxx/BYP/2GX7/R, 3.5PLS/xxx/HYB/G23/R,
5.5PLS/xxx/HYB/GX23/R, 5.5PLSH/xxx/HYB/GX23/R, 5.5PLSV/xxx/HYB/GX23
Where xxx means 824-965 which indicates CRI and color temperature
Pour les produits suivants: 3.5PLS/xxx/BYP/2G7/R, 5.5PLS/xxx/BYP/2GX7/R,
3.5PLS/xxx/HYB/G23/R, 5.5PLS/xxx/HYB/GX23/R, 5.5PLSH/xxx/HYB/GX23/R,
5.5PLSV/xxx/HYB/GX23
Où xxx signifie 824-965 qui correspond au CRI et couleur de température
For model #: 3.5PLS/xxx/BYP/2G7/R, 5.5PLS/xxx/BYP/2GX7/R, 3.5PLS/xxx/HYB/G23/R,
5.5PLS/xxx/HYB/GX23/R, 5.5PLSH/xxx/HYB/GX23/R, 5.5PLSV/xxx/HYB/GX23
Where xxx means 824-965 which indicates CRI and color temperature
Pour les produits suivants: 3.5PLS/xxx/BYP/2G7/R, 5.5PLS/xxx/BYP/2GX7/R,
3.5PLS/xxx/HYB/G23/R, 5.5PLS/xxx/HYB/GX23/R, 5.5PLSH/xxx/HYB/GX23/R,
5.5PLSV/xxx/HYB/GX23
www.greencreative.com - [email protected] - Tel / Fax: (866) 774-5433 - / GREENCREATIVELED / GClightingLED / GREEN-CREATIVE An ILLUMUS Brand www.greencreative.com - [email protected] - Tel / Fax: (866) 774-5433 - / GREENCREATIVELED / GClightingLED / GREEN-CREATIVE An ILLUMUS Brand

LED PLS BYPASS LAMP INSTALLATION GUIDE – INSTALLATION STEPS /
GUIDE D’INSTALLATION – ETAPES D’INSTALLATION
1) Read all WARNINGS before continuing this section.
2) Ensure fixture is 120-277V.
3) Make sure POWER IS TURNED OFF AT THE SOURCE.
4) Remove lens if applicable, remove cover and fluorescent lamp.
5) Before rewiring, check the ballast type and refer to the relevant diagram.
6) Before rewiring, please check the number of lamps per fixture and refer to the
relevant diagram.
7) If fixture is new without ballast, please refer to Cf. Diagram 1.
8) If fixture ballast type is magnetic please refer to Cf. Diagram 2.
9) This device is powered by two pins; Install lamp into the wired lampholder end.
10) Visibly affix “Modification Sticker” and reinstall housing cover and lens if
applicable.
11) Return power back to source and installation is now complete.
1) Lire tous les points d’ATTENTION.
2) Verifier que le luminaire soit bien en 120-277V.
3) Assurez-vous que le COURANT SOIT COUPÉ À LA SOURCE.
4) Retirez l’optique et capot du luminaire (si nécéssaire) et retirez les lampes
fluorescentes.
5) Verifier le type de ballast et se référer au diagramme (“diagram”) approprié
avant tout cablage.
6) Verifier le nombre de lampe par luminaire et se référer au diagramme
(“diagram”) approprié avant tout cablage.
7) Pour un luminaire sans ballast, se référer au “Cf. Diagram 1.”
8) Pour un luminaire avec ballast magnétique, se référer au “Cf. Diagram 2.”
9) Cette lampe est alimenté par 2 broches seulement. Installater la lamp dans la
douille.
10) Coller l’autocollant de modification du luminaire de maniere visible et
reinstaller l’optique si necessaire.
11) Refermer le luminaire et remetter le courant, l’installation est terminèe.
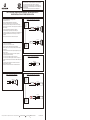
Diagram 2 – Magnetic ballast fixture wiring modification
L
N
L
N
Magnetic ballast
Ballast
Cut all wires
that connect
ballast. Cut wire
away from
lampholder
Rewire power
source directly
to wires leading
to lampholders
Diagram 1 – New fixture without ballast wiring
L
N
Single lamp
Diagram 1 – New fixture without ballast wiring
L
N
Single lamp
Single lamp
Single lamp
Diagram 2 – Magnetic ballast fixture wiring modification
L
N
L
N
Magnetic ballast
Ballast
Cut all wires
that connect
ballast. Cut wire
away from
lampholder
Rewire power
source directly
to wires leading
to lampholders
Single lamp
For model #: 3.5PLS/xxx/BYP/2G7/R, 5.5PLS/xxx/BYP/2GX7/R, 3.5PLS/xxx/HYB/G23/R,
5.5PLS/xxx/HYB/GX23/R, 5.5PLSH/xxx/HYB/GX23/R, 5.5PLSV/xxx/HYB/GX23
Where xxx means 824-965 which indicates CRI and color temperature
Pour les produits suivants: 3.5PLS/xxx/BYP/2G7/R, 5.5PLS/xxx/BYP/2GX7/R,
3.5PLS/xxx/HYB/G23/R, 5.5PLS/xxx/HYB/GX23/R, 5.5PLSH/xxx/HYB/GX23/R,
5.5PLSV/xxx/HYB/GX23
Où xxx signifie 824-965 qui correspond au CRI et couleur de température
www.greencreative.com - [email protected] - Tel / Fax: (866) 774-5433 - / GREENCREATIVELED / GClightingLED / GREEN-CREATIVE An ILLUMUS Brand
Single lamp
-
 1
1
-
 2
2
-
 3
3


