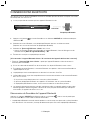
Samsung 300 W 2.1Ch Curved Soundbar HW-J6 Series Guide de démarrage rapide
- Catégorie
- Cheminées
- Taper
- Guide de démarrage rapide
Ce manuel convient également à

HW-J6000R
HW-J6001R
* Design and specifications are subject to change without prior notice.
For further information, refer to the Web Manual.
Web manual : www.Samsung.com Support
Product name search HW-J6000R or HW-J6001R
User Manual

· 1 · English
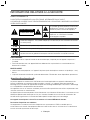
SAFETY INFORMATION
SAFETY WARNINGS
TO REDUCE THE RISK OF ELECTRIC SHOCK, DO NOT REMOVE THE COVER (OR BACK).
NO USER-SERVICEABLE PARTS ARE INSIDE. REFER SERVICING TO QUALIFIED SERVICE PERSONNEL.
CAUTION
RISK OF ELECTRIC SHOCK
DO NOT OPEN
This symbol indicates that high voltage is
present inside. It is dangerous to make any
kind of contact with any internal part of this
product.
This symbol indicates that important literature
concerning operation and maintenance has
been included with this product.
Class II product : This symbol indicates that it does not require a safety connection to electrical
earth (ground).
AC voltage : This symbol indicates that the rated voltage marked with the symbol is AC
voltage.
DC voltage : This symbol indicates that the rated voltage marked with the symbol is DC
voltage.
Caution, Consult instructions for use : This symbol instructs the user to consult the user
manual for further safety related information.
WARNING
• To reduce the risk of fire or electric shock, do not expose this appliance to rain or moisture.
• To prevent injury, this apparatus must be securely attached to the floor/wall in accordance with the installation
instructions.
CAUTION
• Do not expose this apparatus to dripping or splashing. Do not put objects filled with liquids, such as vases on
the apparatus.
• To turn this apparatus off completely, you must pull the power plug out of the wall socket. Consequently, the
power plug must be easily and readily accessible at all times.
CAUTION (for Canada)
This equipment complies with Industry Canada licence-exempt RSS standard(s). Operation is subject to the
following two conditions: (1) this device may not cause interference, and (2) this device must accept any
interference, including interference that may cause undesired operation of the device.
This device and its antenna(s) must not be co-located or operation in conjunction with any other antenna or
transmitter.
This device may automatically discontinue transmission if there is no information to transmit, or an operational
failure. Note that this is not intended to prohibit the transmission of control or signaling information or the use of
repetitive codes where required by the technology.
This Class B digital apparatus complies with Canadian ICES-003.
FCC Radiation Exposure Statement
This equipment complies with IC RSS-102 radiation exposure limits set forth for an uncontrolled environment.
This equipment should be installed and operated with minimum distance 20cm between the radiator & your body.

· 2 · English
Important Safety Instructions
Read these operating instructions carefully before
using the unit. Follow all the safety instructions listed
below. Keep these operating instructions handy for
future reference.
1) Read these instructions.
2) Keep these Instructions.
3) Heed all warnings.
4) Follow all instructions.
5) Do not use this apparatus near water.
6) Clean only with a dry cloth.
7) Do not block any ventilation openings. Install in
accordance with the manufacturer's instructions.
8) Do not install near any heat sources such as
radiators, heat registers, stoves, or other
apparatus (including amplifiers) that produce
heat.
9) Do not defeat the safety purpose of the polarized
or grounding-type plug. A polarized plug has two
blades with one wider than the other.
A grounding type plug has two blades and a third
grounding prong. The wide blade or the third
prong are provided for your safety. If the provided
plug does not fit into your outlet, consult an
electrician for replacement of the obsolete outlet.
10) Protect the power cord from being walked on or
pinched particularly at plugs, convenience
receptacles, and the point where they exit from
the apparatus.
11) Only use attachments/accessories specified by
the manufacturer.
12) Use only with the cart, stand,
tripod, bracket, or table specified
by the manufacturer, or sold with
the apparatus. When a cart is
used, use caution when moving
the cart/apparatus combination to
avoid injury from tip-over.
13) Unplug this apparatus during lightning storms or
when unused for long periods of time.
14) Refer all servicing to qualified service personnel.
Servicing is required when the apparatus has
been damaged in any way, such as when the
power-supply cord or plug is damaged, liquid has
been spilled or objects have fallen into the
apparatus, the apparatus has been exposed to
rain or moisture, does not operate normally, or
has been dropped.
PRECAUTIONS
1. Ensure that the AC power supply in your house
complies with the power requirements listed on the
identification sticker located on the back of your
product. Install your product horizontally, on a
suitable base (furniture), with enough space around it
for ventilation (3~4 inches). Make sure the ventilation
slots are not covered. Do not place the unit on
amplifiers or other equipment which may become
hot. This unit is designed for continuous use. To fully
turn off the unit, disconnect the AC plug from the wall
outlet. Unplug the unit if you intend to leave it unused
for a long period of time.
2. During thunderstorms, disconnect the AC plug from
the wall outlet. Voltage peaks due to lightning could
damage the unit.
3. Do not expose the unit to direct sunlight or other
heat sources. This could lead to overheating and
cause the unit to malfunction.
4. Protect the product from moisture (i.e. vases), and
excess heat (e.g. a fireplace) or equipment creating
strong magnetic or electric fields. Unplug the power
cable from the AC wall socket if the unit
malfunctions. Your product is not intended for
industrial use. It is for personal use only.
Condensation may occur if your product has been
stored in cold temperatures. If transporting the unit
during the winter, wait approximately 2 hours until the
unit has reached room temperature before using.
5. The battery used with this product contains
chemicals that are harmful to the environment.
Do not dispose of the battery in the general
household trash. Do not expose the battery to
excess heat, direct sunlight, or fire. Do not short
circuit, disassemble, or overheat the battery.
Danger of explosion if the battery is replaced
incorrectly. Replace only with the same or equivalent
type.
WARNING: DO NOT INGEST BATTERY.
CHEMICAL BURN HAZARD.
The remote control supplied with this product
contains a coin/button cell battery. If the coin/button
cell battery is swallowed, it can cause severe internal
burns in just 2 hours and can lead to death. Keep
new and used batteries away from children. If the
battery compartment does not close securely, stop
using the remote and make sure to keep it away from
children. If you think the battery might have been
swallowed or placed inside any part of the body, seek
immediate medical attention.

· 3 · English
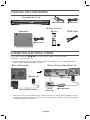
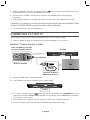
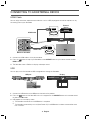
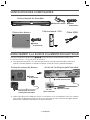
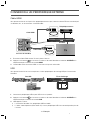
CHECKING THE COMPONENTS
Subwoofer
Remote Control /
Battery
HDMI Cable
1 Power Cord
Soundbar Main Unit
2 AC/DC Adapter 3 Power Cord
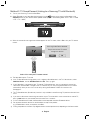
CONNECTING ELECTRICAL POWER
Use the power components (1, 2, 3) to connect the power supplies in the following order:
Subwoofer Soundbar Main Unit
c For more information about the power supply and power consumption, refer to the label attached to the
product. (Label : Bottom of Soundbar main unit)
DC 14V
AUX IN
OPTICAL IN
HDMI IN
HDMI OUT
(TV-ARC)
5V 0.5A
DC 14V
POWER
POWER
DC 14V
(Power Jack)
Connecting electrical power
1 Power Cord
2 AC/DC Adapter
3 Power Cord
Rear of Subwoofer Rear of the Soundbar Main Unit
c Make sure to rest the AC/DC Adapter flat on a table or the floor. If you place the AC/DC Adapter so that it is
hanging with the AC cord input facing upwards, water or other foreign substances could enter the Adapter
and cause the Adapter to malfunction.

· 4 · English
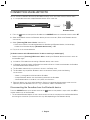
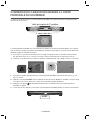
CONNECTING THE SUBWOOFER TO THE SOUNDBAR
MAIN UNIT
You can enjoy rich bass tones and better sound quality by linking the subwoofer to the Soundbar main unit.
Subwoofer
Soundbar Main Unit
So
u
So
Unit
Unit
The Soundbar main unit and subwoofer should link (connect wirelessly) automatically when the Soundbar main
unit and subwoofer are turned on. When auto-connection is complete, the blue indicator on the front of the
subwoofer stops blinking and glows blue continuously.
c If the indicator on the front of the subwoofer displays in red or flashes in blue, the subwoofer has not
automatically connected. If this occurs, follow the directions below to connect the subwoofer manually.
c Important: Before you begin, put the battery into the remote. See page 11 for instructions.
POWER
1. Plug the power cords of the Soundbar main unit and subwoofer into an AC wall outlet.
2. Press the ID SET button on the rear of the subwoofer for 5 seconds. The red indicator on the front of the
subwoofer turns off and the blue indicator flashes rapidly.
3. Press the
button on your remote control for 5 seconds while the Soundbar main unit is turned OFF.
4. The ID SET message appears on the display of the Soundbar main unit for a short period of time, and then
disappears.
ID SET

· 5 · English
5. While the subwoofer's indicator is flashing blue, press the button on your remote control or on the top of
the Soundbar main unit to turn on the Soundbar main unit.
6. The connection is complete if the indicator on the front of the subwoofer stops flashing and glows
continuously.
c If the connection process fails, the blue indicator will flash continuously. Go to Step 2 and start again.
Expand to true wireless surround sound by connecting the Samsung Wireless Rear
Speaker Kit (SWA-8000S) to your Soundbar. (Sold separately)
c For further information, refer to the Web Manual.
CONNECTING TO YOUR TV
You can enjoy TV sound after connecting the Soundbar to your TV with or without a cable.
c Important: Before you begin, put the battery into the remote. See page 11 for instructions.
Method 1. Connecting with a Cable
HDMI OUT
(TV-ARC)
Bottom of Soundbar
HDMI IN
(TV-ARC)
Soundbar
HDMI Cable
Check the HDMI OUT (TV-ARC)
port of the Soundbar main unit.
Check the (TV-ARC) at
HDMI IN port of your TV.
1. Connect the HDMI cable as in the picture above.
2. TV ARC appears on display of the product and TV sound is output.
TV ARC
c If TV sound is not output, press the button on the top of your Soundbar or the SOURCE button on the
remote control to select the D.IN mode on Soundbar main unit display. Then, the D.IN mode is changed to
TV ARC and TV sound is output.
c If the Soundbar main unit display does not change to TV ARC, check the cable connections.
c You can conveniently control the volume of the Soundbar and interlock power supply.

· 6 · English
Method 2. TV SoundConnect (Linking to a Samsung TV with Bluetooth)
1. Turn on your Samsung TV and the Soundbar.
2. Select TV mode in your Soundbar display by pressing the
button on the top of the Soundbar or the
SOURCE button on your remote control. (Modes are displayed in the following order: D.IN → AUX → HDMI
→ BT → TV → USB.)
3. When the connection message shown below appears on the TV screen, select <Yes> with your TV remote
control.
Samsung Audio Device detected.
Do you want to hear TV sound
through this device?
Yes
No
Select <Yes> with your TV remote control.
4. The Soundbar outputs TV sound.
c If the TV SoundConnect linking process fails, navigate to SoundConnect in the TV's Sound menu, select
Add New Device, and set Add New Device to ON. Then, try again.
c If your Soundbar is connected to your TV through TV SoundConnect, you can conveniently control the
volume with the Soundbar's remote or the TV's remote. You can also have the Soundbar turn on and off
automatically when you turn the TV on or off by setting the Bluetooth POWER On function to On.
See page 12.
c The TV SoundConnect (Soundshare) function is only available in some Samsung TV products released since
2012.
c If you want to disconnect the existing connection to your TV and establish a new connection to another TV,
press the & button on your remote control for more than 5 seconds.
c In the TV SoundConnect mode, the Soundbar cannot be paired to another Bluetooth device.
c Do not place electronic devices or metallic objects on top of the product.
e.g., Wired/wireless router, set-top box, or modem.
c Placing the product on the floor may degrade wireless network performance, depending on the floor material.

· 7 · English
CONNECTION VIA BLUETOOTH
You can connect a Bluetooth device to the Soundbar and enjoy music with stereo sound, all without wires!
c It is not possible to connect multiple Bluetooth devices at the same time.
Connect
Bluetooth device
1. Press the
button on the top of the Soundbar or the SOURCE button on the remote control to select BT.
2. Select the Bluetooth menu on the Bluetooth device you want to connect. (Refer to the Bluetooth device's
user manual.)
3. Select "[Samsung] HW-Jxxxx J-Series" from the list.
• When the connection is established between the Soundbar and Bluetooth device, the front display
window of the Soundbar displays [Bluetooth device name] → BT.
4. Play music on the connected device.
[If failed to connect to the Bluetooth device / If device searching is needed again]
• Delete the previous "[Samsung] HW-Jxxxx J-Series" found by the Bluetooth device and have it search for
the Soundbar again.
c If asked for a PIN code when connecting a Bluetooth device, enter <0000>.
c In Bluetooth connection mode, the Bluetooth connection will be lost if the distance between the Soundbar
and the Bluetooth device exceeds 32.8 ft.
c The Soundbar automatically turns off after 5 minutes in the Ready state.
c The Soundbar may not perform Bluetooth search or connection correctly under the following
circumstances:
If there is a strong electrical field around the Soundbar.
If several Bluetooth devices are simultaneously paired with the Soundbar.
If the Bluetooth device is turned off, not in place, or malfunctions.
c Electronic devices may cause radio interference. Devices that generate electromagnetic waves must be
kept away from the Soundbar main unit - e.g., microwaves, wireless LAN devices, etc.
Disconnecting the Soundbar from the Bluetooth device
Press the SOURCE button on the remote control or the button on the product's top to switch from BT to
another mode or turn off the Soundbar.
• The connected Bluetooth device will wait a certain amount of time for a response from the Soundbar before
terminating the connection. (Disconnection time may differ, depending on the Bluetooth device)

· 8 · English
CONNECTING TO AN EXTERNAL DEVICE
HDMI Cable
You can enjoy sound from separate external devices such as a BD player/game console/set-top box, etc. by
connecting them to your Soundbar.
HDMI IN
HDMI OUT
(TV-ARC)
HDMI Cable
HDMI Cable
External
Device
Soundbar
HDMI OUT
HDMI IN
Bottom of Soundbar
1. Connect the HDMI cable as in the picture above.
2. Press the
button on top of your Soundbar or the SOURCE button on your remote control to select
HDMI mode.
3. The Soundbar shows HDMI on its display and output sound.
USB
You can play music files located on USB storage devices through the Soundbar.
DC 14V
AUX IN
OPTICAL IN
HDMI IN
HDMI OUT
(TV-ARC)
5V 0.5A
5V 0.5A
USB port Display
1. Connect the USB device to the USB port on the back of the product.
2. Press the
button on the Soundbar main unit’s top panel or the SOURCE button on the remote control
to select the USB mode.
3. USB appears on the display screen.
●
The Soundbar connection to the USB device is complete.
●
The Soundbar automatically turns off (Auto Power Off) if no USB device has been connected for more
than 5 minutes.

· 9 · English
SOFTWARE UPDATE
Samsung may offer updates for the Soundbar's system firmware in the future.
DC 14V
AUX IN
OPTICAL IN
HDMI IN
HDMI OUT
(TV-ARC)
5V 0.5A
5V 0.5A
If an update is offered, you can update the firmware by connecting a USB device with the firmware update
stored on it to the USB port on your Soundbar.
For more information about how to download update files, go to the Samsung Electronics website at
(samsung.com/sec) search for the model name download the firmware from the customer support menu
option. The option name can vary.
INSTALLING THE WALL MOUNT
I nstallation Precautions
• Install on a vertical wall only.
• Do not install the Soundbar system in a location with high temperature and/or humidity. Install the system on a
stable wall that can bear the weight of the Soundbar main unit.
• Check the strength of the wall. To install the Soundbar system on a wall that may not bear the Soundbar main
unit weight, reinforce the wall before installation. If this is not possible, install the system on another wall, one
stable enough to bear the weight of the Soundbar main unit.
• Purchase and use the fixing screws or anchors appropriate for the kind of wall you have (plaster board,
iron board, wood, etc.). If possible, fix the support screws into wall studs.
• Purchase wall mounting screws according to the type and thickness of the wall you will mount the Soundbar
on.
Diameter : M5
Length: 1 3/8 inches or longer recommended.
• Connect cables from the unit to external devices before you install it on the wall.
• Make sure the unit is turned off and unplugged before you install it. Otherwise, it may cause an electric shock.

· 10 · English
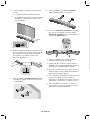
1. Place the installation guide against the wall
surface.
●
The installation guide must be level.
●
If the TV is mounted on the wall, install the
Soundbar at least 2 inches (5 cm) below the
TV.
2 inches or
more
2. Mark the location where the screws will go
through on the wall, and then remove the
installation guide. Next, drill holes for the screws
using an appropriately sized drill bit.
Center Line
Center Line
3. Fasten the 2 Bracket-Wall pieces firmly to the
wall at the marked locations using the appropriate
screws.
4. Attach the Soundbar to the 2 Bracket-Wall
pieces as shown in the illustration.
5. Insert a Holder-Fix Mount into each hole on the
product’s bottom side. Tighten each Holder-Fix
Mount to fix the Soundbar to the 2 Bracket-Wall
pieces.
DC 14V
AUX IN
OPTICAL IN
HDMI IN
HDMI OUT
(TV-ARC)
5V 0.5A
c Do not hang onto the installed unit and avoid
striking or dropping the unit.
c Secure the unit firmly to the wall so that it does
not fall off. If the unit falls off, it may cause an
injury or damage the product.
c When the unit is installed on a wall, please make
sure that children do not pull any of the
connecting cables, as this may cause it to fall.
c For the optimal performance of a wall mount
installation, install the speaker system at least
2 inches (5 cm) below the TV, if the TV is
mounted on the wall.
c For your safety, if you do not mount the unit on
the wall, install it on a secure, flat surface where it
is unlikely to fall.

· 11 · English
Inserting Battery before using the Remote Control
1. Use a suitable coin to turn the remote control's battery cover
counterclockwise to remove it as shown in the figure below.
2. Insert a 3V lithium battery. Keep the positive (+) pole facing up when
inserting the battery. Put the battery cover on, and then align the '●'
marks side by side as shown in the figure below.
3. Use a suitable coin to turn the remote control battery cover clockwise
as far as it will go to fix it in place.
Controlling the Soundbar using Your TV Remote
Control
1. Press and hold the SOUND button for more than 5 seconds while
the Soundbar is turned on.
2. "ON - TV REMOTE" appears on the Soundbar's display.
3. In the TV's menu, set the TV speaker to external speaker.
c Not available if the TV ARC function or HDMI mode is in use.
c All buttons are not available except the VOL +/- and the
buttons in
this function.
c TV menus differ by manufacturer and model. Refer to the TV's user
manual for further information.
c Manufacturers supporting this function:
●
VIZIO, LG, Sony, Sharp, PHILIPS, PANASONIC, TOSHIBA,
GRUNDIG, Hisense, RCA
●
This function may not be compatible with your TV's remote
depending on the remote control's manufacturer.
c To turn off this function, press the
SOUND button for 5 seconds.
"OFF - TV REMOTE" appears on the Soundbar's display.
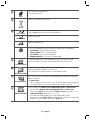
REMOTE CONTROL BUTTONS & FEATURES
Power
Turns the Soundbar on and off.
SOURCE
Press to select a source connected to the Soundbar.

· 12 · English
Mute
Sets the volume temporarily to 0.
Press again to cancel.
Volume
Adjusts the volume level of the unit.
Play / Pause
Press the
&
button to pause a music temporarily.
Press the
&
button again to play the selected music.
Skip Forward
Selects the next file.
Skip Back
Selects the previous file.
Repeat
Press to set the Repeat function during music playback from a USB device.
• OFF-REPEAT : Cancels Repeat Playback.
• TRACK-REPEAT : Plays a track repeatedly.
• ALL-REPEAT : Plays all tracks repeatedly.
• RANDOM-REPEAT : Plays tracks in random order.
Surround Sound
The Surround Sound function adds depth and a sense of space to sound.
Each time you press this button, Surround Sound ON and OFF alternates.
Bluetooth POWER
Press to turn the Bluetooth POWER On function on and off.
When the Bluetooth POWER On function is on,
ON - BLUETOOTH POWER appears in the Soundbar’s display.
SOUND EFFECT
You can select from 6 sound modes: STANDARD, MUSIC, CLEAR VOICE, SPORTS,
MOVIE, and NIGHT.
c NIGHT Mode
When changing a channel or music source, the volume difference between different
music input sources is automatically adjusted to be suitable for listening.
SOUND CONTROL
You can select from TREBLE, BASS, SUBWOOFER LEVEL or AUDIO SYNC.
• Press to select TREBLE, BASS,
SUBWOOFER LEVEL or AUDIO SYNC.
Then, use the , buttons to adjust the TREBLE or BASS volume from -6 ~ +6,
SUBWOOFER LEVEL volume from -12, -6 ~ +6.
• If the video and audio between the TV and your Soundbar are not
synchronized, select AUDIO SYNC in Sound Settings, and then set audio delay
between 0~300 milliseconds by using the , buttons.

· 13 · English
TROUBLESHOOTING
Before seeking assistance, check the following.
The unit will not turn on.
Is the power cord plugged into the outlet?
Connect the power plug to the outlet.
A function does not work when the button is
pressed.
Is there static electricity in the air?
Disconnect the power plug and connect it again.
Sound is not produced.
Is the Mute function on?
Press the (Mute) button to cancel the function.
Is the volume set to minimum?
Adjust the Volume.
The remote control does not work.
Is the battery drained?
Replace with new battery.
Is the distance between the remote control and
Soundbar main unit too far?
Move the remote control closer to the Soundbar
main unit.
The TV SoundConnect (TV pairing) failed.
Does your TV support TV SoundConnect?
TV SoundConnect is supported by some
Samsung TVs released from 2012 on. Check
your TV to see if it supports TV SoundConnect.
Is your TV firmware the latest version?
Update your TV with the latest firmware.
Does an error occur when connecting?
Contact the Samsung Call Center.
Reset TV SoundConnect and connect again.
To reset the TV SoundConnect connection,
press and hold the p button for 5 seconds.
The red LED on the subwoofer blinks and the
subwoofer is not producing sound.
Your subwoofer may not be connected to the
Soundbar main unit.
Try to connect your subwoofer again.
See page 4.
LICENSE
Manufactured under license from Dolby
Laboratories. Dolby, Dolby Audio and the double-D
symbol are trademarks of Dolby Laboratories.
For DTS patents, see http://patents.dts.com.
Manufactured under license from DTS Licensing
Limited. DTS, the Symbol, & DTS and the Symbol
together are registered trademarks, and DTS 2.0
Channel is a trademark of DTS, Inc. © DTS, Inc.
All Rights Reserved.
The terms HDMI and HDMI High-Definition
Multimedia Interface, and the HDMI Logo are
trademarks or registered trademarks of HDMI
Licensing LLC in the United States and other
countries.

· 14 · English
OPEN SOURCE LICENSE NOTICE
To send inquiries and requests regarding open sources, contact Samsung via Email (oss.r[email protected]).
IMPORTANT NOTE ABOUT SERVICE
Figures and illustrations in this User Manual are provided for reference only and may differ from actual product
appearance.
SPECIFICATIONS
GENERAL
USB
5V / 0.5A
Weight
Soundbar Main Unit
6.0 lbs (2.7 kg)
Subwoofer
(PS-WJ6000R/ PS-WJ6001R)
15.0 lbs (6.8 kg)
Dimensions
(W x H x D)
Soundbar Main Unit
42.4 x 1.9 x 5.1 inches
(1078.0 x 47.5 x 129.0 mm)
Subwoofer
(PS-WJ6000R/ PS-WJ6001R)
17.8 x 13.2 x 6.1 inches
(452.0 x 335.0 x 154.0 mm)
Operating Temperature Range
+41°F to +95°F (+5°C to +35°C)
Operating Humidity Range
10 % to 75 %
AMPLIFIER
Rated Output
Power
Soundbar Main Unit
22W x 6, 4 ohm, THD≦10%
Subwoofer
(PS-WJ6000R/ PS-WJ6001R)
168W, 3 ohm, THD≦10%
• Nominal specification
Samsung Electronics Co., Ltd reserves the right to change the specifications without notice.
Weight and dimensions are approximate.
For more information about the power supply and power consumption, refer to the label attached to the
product. (Label : Bottom of Soundbar main unit)

LIMITED WARRANTY TO ORIGINAL PURCHASER
Samsung Electronics Canada Inc.(SECA), warrants that this product is free from defective
material and workmanship.
SECA further warrants that if this product falls to operate properly within the specifi ed
warranty period and the failure is due to improper workmanship or defective materials,
SECA will repair or replace the product at its option.
All warranty repairs must be performed by a SECA Authorized Service Center. (The name and
address of the location nearest you can be obtained by calling toll free: 1- 800- SAMSUNG)
LABOR
One year (Carry- in)
PARTS
One year
On carry-in models, transportation to and from the service center is the customer’s
responsibility.
The original dated sales receipt must be retained by the customer and is the only acceptable
proof of purchase. It must be presented to the authorized service center at the time service
is requested.
EXCLUSIONS (WHAT IS NOT COVERED)
This warranty does not cover damage due to accident, fi re, fl ood and/ or other acts of
God; misuse,incorrect line voltage, improper installation, improper or unauthorized repairs,
commercial use or damage that occurs in shipping. Exterior and interior fi nish, lamps, glass
are not covered under this warranty. Customer adjustments which are explained in the
instruction manual are not covered under the terms of this warranty. This warranty will
automatically be voided for any unit found with a missing or altered serial number. This
warranty is valid only on products purchased and used in Canada.
Samsung Electronics Canada Inc
2050 Derry Rd West
Mississauga, On. L5N 0B9
Tel: 1-800-SAMSUNG (726-7864)
Fax: (905) 542- 1199
Website: www.samsung.com/ca

© 2016 Samsung Electronics Co., Ltd. All rights reserved.
Contact SAMSUNG WORLD WIDE
If you have any questions or comments relating to Samsung products, please contact the SAMSUNG customer
care Center.
HEADQUARTERS
Samsung Electronics Canada Inc. 2050 Derry Road
West, Mississauga, Ontario L5N 0B9 Canada
TEL: 1-800-SAMSUNG (1-800-726-7864)
www.samsung.com/ca/support
Country Contact Center
Web Site
`
North America
CANADA 1-800-SAMSUNG (726-7864)
www.samsung.com/ca/support (English)
www.samsung.com/ca_fr/support (French)
U.S.A 1-800-SAMSUNG (726-7864) www.samsung.com/us/support

HW-J6000R
HW-J6001R
* La conception et les spécifications sont susceptibles d'être modifiées sans préavis.
Pour de plus amples renseignements, consultez le guide de l’utilisateur en ligne.
Guide Web : www.Samsung.com Assistance
Recherche du nom de produit HW-J6000R ou HW-J6001R
Guide d'utilisation

· 1 · Français
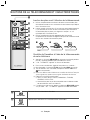
INFORMATIONS RELATIVES À LA SÉCURITÉ
AVERTISSEMENTS
POUR ÉVITER LES RISQUES DE CHOC ÉLECTRIQUE, NE DÉMONTEZ PAS LE CAPOT.
L’APPAREIL NE CONTIENT PAS DE PIÈCES RÉPARABLES PAR L’UTILISATEUR. S’ADRESSER À UN SERVICE
APRÈS-VENTE QUALIFIÉ.
MISE EN GARDE
RISQUE DE CHOC
ÉLECTRIQUE NE PAS OUVRIR
Ce symbole signale la présence d’une tension
dangereuse à l’intérieur. Il est dangereux de
toucher les pièces internes de ce produit.
Ce symbole indique que des documents
importants sur l’utilisation et l’entretien
accompagnent ce produit.
Produit de catégorie II : Ce symbole indique qu'il ne nécessite pas une connextion de sécurité
à la terre (masse).
Tension CA : Ce symbole indique que la tension nominale est la tension CA.
Tension CC : Ce symbole indique que la tension nominale est la tension CC.
Attention, consultez les instructions aux fins d'utilisation : Ce symbole indique à l'utilisateur
qu'il doit consulter le guide d'utilisation pour avoir de l'information au sujet de la sécurité.
AVERTISSEMENT
• Afin de diminuer les risques d’incendie ou de choc électrique, n’exposez pas cet appareil à la pluie ou à
l’humidité.
• Pour éviter des blessures, cet appareil doit être solidement fixé au plancher/au mur conformément aux
directives d’installation.
MISE EN GARDE
• Veillez à éviter toute projection sur l'appareil. Ne placez jamais de récipients contenant un liquide (ex. : vase)
dessus.
• La prise d’alimentation fait office de système de déconnexion. Elle doit donc rester disponible en permanence.
ATTENTION (Pour le Canada)
Le présent appareil est conforme aux CNR d’Industrie Canada applicables aux appareils radio exempts de
licence. L’exploitation est autorisée aux deux conditions suivantes : (1) l’appareil ne doit pas produire de
brouillage, et (2) l’utilisateur de l’appareil doit accepter tout brouillage radioélectrique subi, même si le brouillage
est susceptible d’en compromettre le fonctionnement.
Cet appareil et son ou ses antennes ne doivent pas etre installés a proximité ou etre utilisés conjointement avec
une autre antenne ou un autre émetteur..
Le dispositif pourrait automatiquement cesser d’émettre en cas d’absence d’informations à transmettre, ou une
défaillance opérationnelle. Notez que ce n’est pas l’intention d’interdire la transmission des informations de
contrôle ou de signalisation ou l’utilisation de codes répétitifs lorsque requis par la technologie.
Cet appareil numerique de la classe B est conforme a la norme NMB-003 du Canada.
Declaration d’exposition aux radiations:
Cet equipement est conforme aux limites d’exposition aux rayonnements IC RSS-102 etablies pour un
environnement non controle. Cet equipement doit etre installe et utilise avec un minimum de 20 cm de distance
entre la source de rayonnement et votre corps.

· 2 · Français
Consignes de sécurité importantes
Lisez attentivement ces consignes avant d'utiliser
l'appareil. Veillez à respecter toutes les consignes
répertoriées ci-après. Conservez ces instructions à
portée de main pour vous y référer ultérieurement.
1) Lisez attentivement ces consignes.
2) Conservez-les précieusement.
3) Tenez compte de tous les avertissements
mentionnés.
4) Respectez toutes les instructions sans exception.
5) N'utilisez pas cet appareil à proximité de l'eau.
6) Nettoyez-le à l'aide d'un tissu sec.
7) Ne bloquez pas les ouvertures de ventilation.
Installez l'appareil conformément aux instructions
du fabricant.
8) N'installez pas le lecteur à proximité d’une source
de chaleur de type radiateur, registre de chaleur,
cuisinière ou tout autre appareil (y compris les
récepteurs AV) générateur de chaleur.
9) Ne désactivez pas le dispositif de sécurité de la
fiche de mise à la terre ou de la fiche polarisée.
Une fiche polarisée comporte deux lames dont
l’une est plus large que l’autre. Une fiche de mise
à la terre comporte deux lames et une troisième
broche de mise à la terre. La lame la plus large et
la troisième broche sont destinées à assurer votre
sécurité. Si la fiche fournie ne s'insère pas dans
la prise utilisée, faites appel à un électricien pour
faire remplacer celle-ci.
10) Placez le cordon d'alimentation de sorte qu'il ne
puisse être ni piétiné ni pincé, particulièrement au
niveau de la fiche, de la prise de courant et du
point de sortie de l'appareil.
11) Utilisez exclusivement les fixations/ accessoires
spécifiés par le fabricant.
12) Utilisez exclusivement le meuble à
roulettes, le socle, le trépied, le
support ou la table recommandés
par le fabricant ou vendus avec
l’appareil. Si l’appareil est posé sur
un meuble à roulettes, déplacez
l’ensemble avec précaution pour éviter de faire
tomber le lecteur et de vous blesser.
13) Débranchez l’appareil en cas d'orage ou lorsqu’il
est inutilisé pendant une période prolongée.
14) Confiez toutes les réparations à un technicien
qualifié. Votre appareil doit impérativement être
réparé lorsqu’il a été endommagé de quelque
manière que ce soit : détérioration du cordon ou
de la fiche d’alimentation, projection de liquide
sur l’appareil, chute d’objets à l’intérieur de
l’appareil, exposition à la pluie ou à l’humidité,
dysfonctionnement, chute.
PRÉCAUTIONS
1. Assurez-vous que l'alimentation c.a. de votre
domicile satisfait aux normes inscrites sur l'étiquette
d'identification située à l'arrière du produit. Installez
votre produit horizontalement, sur un socle
approprié (meuble), en laissant un espace suffisant
pour la ventilation sur le pourtour 3~4 po. Faites
attention à ne pas obstruer les orifices de ventilation.
Ne posez pas l'ensemble sur un amplificateur ou un
autre appareil susceptible de chauffer. Cet ensemble
est conçu pour une utilisation en continu. Pour
éteindre totalement l'appareil, débranchez la fiche
c.a. de la prise murale. Débranchez l'appareil si
vous prévoyez une longue période d'inactivité.
2. En cas d'orage, débranchez la fiche de l'appareil de
la prise murale. Les surtensions occasionnées par
l'orage pourraient endommager votre appareil.
3. N'exposez pas l'ensemble aux rayons directs du
soleil ou à toute autre source de chaleur. Cela
pourrait causer une surchauffe du fil et causer un
dysfonctionnement de l’unité.
4. Protégez le produit de l'humidité (comme les vases)
et d'une chaleur excessive (comme une cheminée)
ou de tout équipement capable de créer des champs
magnétiques ou électriques. Débranchez le câble
d'alimentation en cas de dysfonctionnement. Votre
produit n'est pas prévu pour un usage industriel. Ce
produit ne peut être utilisé qu'à des fins personnelles.
Une condensation peut se former si le produit ou un
disque a été stocké à basse température. Si vous
devez transporter l'ensemble pendant l'hiver,
attendez environ 2 heures que l'appareil ait atteint la
température de la pièce avant de l'utiliser.
5. Les piles utilisées dans ce produit peuvent contenir
des produits chimiques dangereux pour
l'environnement. Ne jetez pas les piles dans votre
poubelle habituelle. Ne vous débarrassez pas des piles
en les faisant brûler. Les piles ne doivent pas être
court-circuitées, démontées ou subir de surchauffe.
Le remplacement incorrect des piles peut entraîner un
danger d'explosion. Remplacez-les uniquement par
des produits similaires ou équivalents.
AVERTISSEMENT, NE PAS INGÉRER LA
PILE, RISQUE DE BRÛLURE CHIMIQUE
[La télécommande fournie avec] Ce produit contient une
pile bouton. Si la pile bouton est avalée, elle risque de
causer, en quelques heures seulement, des brûlures
internes graves pouvant entraîner la mort. Conservez les
piles neuves et usées hors de portée des enfants. Si le
compartiment des piles ne se ferme pas correctement,
arrêtez d'utiliser le produit et tenez-le à l’écart des
enfants. Si vous pensez que des piles ont été ingérées
ou insérées à l’intérieur d’une partie du corps, consultez
immédiatement un médecin.
V
La page est en cours de chargement...
La page est en cours de chargement...
La page est en cours de chargement...
La page est en cours de chargement...
La page est en cours de chargement...
La page est en cours de chargement...
La page est en cours de chargement...
La page est en cours de chargement...
La page est en cours de chargement...
La page est en cours de chargement...
La page est en cours de chargement...
La page est en cours de chargement...
La page est en cours de chargement...
La page est en cours de chargement...
-
 1
1
-
 2
2
-
 3
3
-
 4
4
-
 5
5
-
 6
6
-
 7
7
-
 8
8
-
 9
9
-
 10
10
-
 11
11
-
 12
12
-
 13
13
-
 14
14
-
 15
15
-
 16
16
-
 17
17
-
 18
18
-
 19
19
-
 20
20
-
 21
21
-
 22
22
-
 23
23
-
 24
24
-
 25
25
-
 26
26
-
 27
27
-
 28
28
-
 29
29
-
 30
30
-
 31
31
-
 32
32
-
 33
33
-
 34
34


Samsung 300 W 2.1Ch Curved Soundbar HW-J6 Series Guide de démarrage rapide
- Catégorie
- Cheminées
- Taper
- Guide de démarrage rapide
- Ce manuel convient également à
dans d''autres langues
Documents connexes
-
Samsung HW-J6000R Manuel utilisateur
-
Samsung HW-J6001R Le manuel du propriétaire
-
-
-
-
-
-
-
-
Samsung HW-J6000 Manuel utilisateur