1) COUPER L’ALIMENTATION SECTEUR.
IMPORTANT: TOUJOURS couper l’électricité avant de
commencer le travail.
a) Localiser le coffret à fusibles ou le disjoncteur du domicile.
Mettre l’interrupteur principal en position d’Arrêt.
b) Dévisser le ou les fusibles (ou mettre le disjoncteur sur
Arrêt) qui contrôlent l’alimentation vers le luminaire ou la
pièce dans laquelle le travail est effectué.
c) Mettre l’interrupteur mural en position d’Arrêt. Si le
luminaire à remplacer est doté d’un interrupteur ou d’une
chaîne connectée à l‘interrupteur, placer ces éléments en
position d’Arrêt.
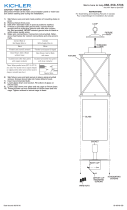
2) Passer le luminaire par dessus le support et marquer un repère
pour les trous de montage sur le support.
3) Enlever le luminaire du support.
4) Percer des trous de 1/8 po sur chacun des repères du support.
5) Si luminaire est fourni a vec un fil de mise à la terre, le
connecter à la boîte de sortie de courant de mise à la terre
avec un serre-fils (non fourni). Ne jamais connecter un fil de
mise à la terre aux fils d’alimentation noir ou blanc.
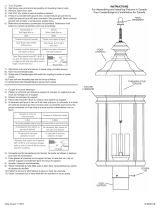
6) Connecter les fils (connecteurs non fournis). Se porter au
tableau ci-dessous pour faire les connexions.
7) Faire glisser le luminaire sur le support et fixer à l’aide des vis.
Les vis doivent s’ajuster correctement dans les trous du
support.
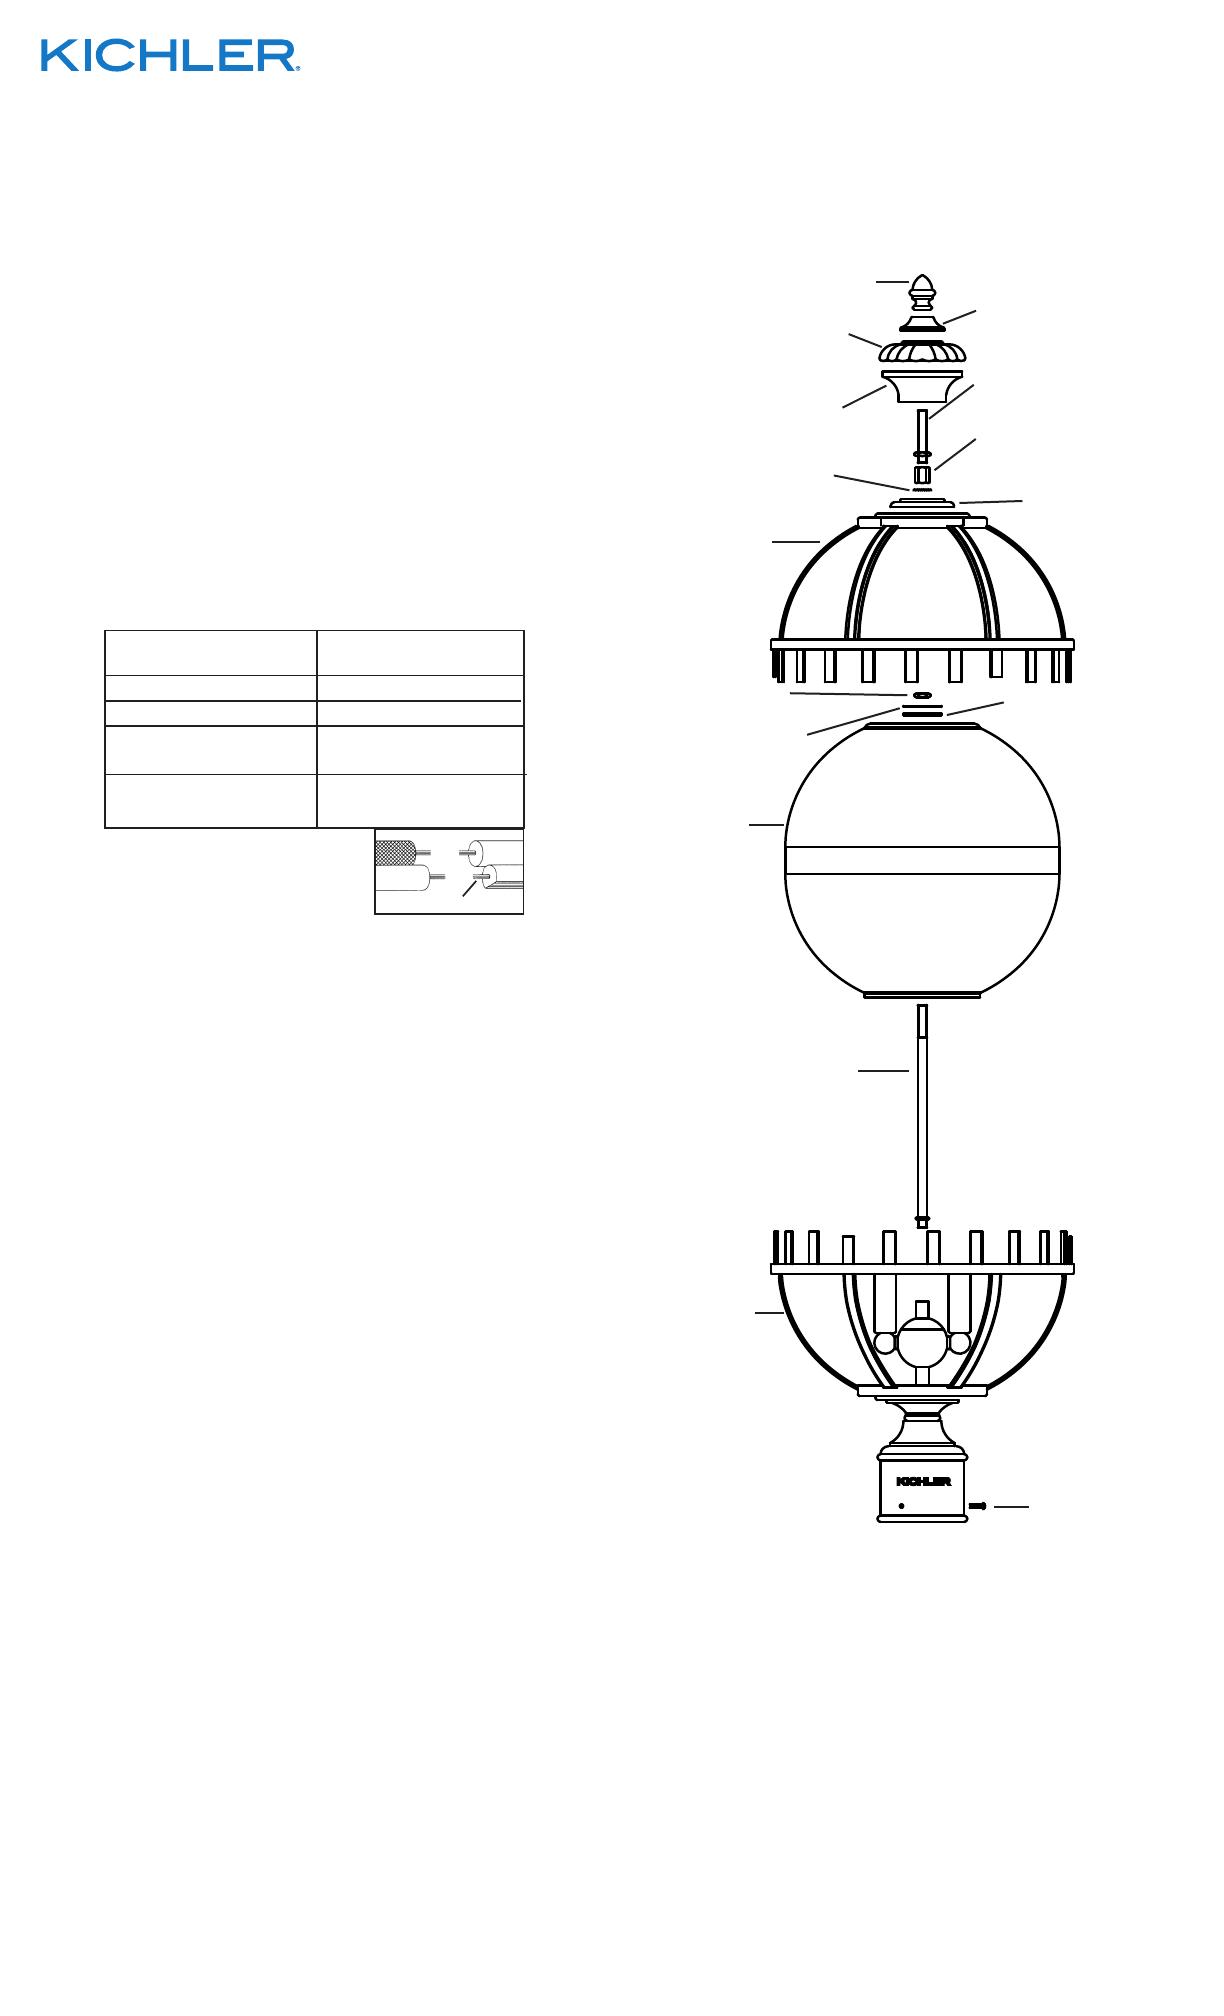
8) Visser l’extrémité courte avec l’écrou hexagonal du long tube
fileté dans l’accouplement au centre du groupe de douilles.
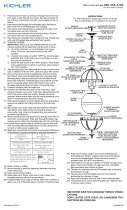
9) Introduire l’ampoule recommandée.
10) Abaisser le verre et passer le trou dans le fond du verre sur
l’extrémité du long tube fileté. Passer le trou en bas du verre
sur le groupe de douilles. Poser soigneusement le verre au
fond de la cage.
11) Passer la rondelle caoutchoutée puis la rondelle plate sur le
tube fileté. Visser l’écrou hexagonal sur l’extrémité du tube
fileté. (NE PAS serrer avec excès).
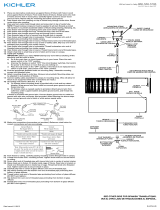
12) Abaisser le dessus de la cage. Passer le trou dans la partie
supérieure de la cage sur l’extrémité du tube fileté sortant du
dessus du dessus du verre.
13) Passer le trou dans le capuchon sur l’extrémité du tube fileté
sortant du dessus de la cage. Placer le capuchon sur le dessus
de la cage.
14) Visser une petite rondelle sur l’extrémité du tube fileté sortant
de l’intérieur du capuchon. Serrer la rondelle contre le capuchon.
15) Visser un accouplement hexagonal sur l’extrémité du tube
fileté sortant du capuchon.
16) Abaisser la première garniture supérieure. Poser la garniture
supérieure en haut du luminaire. Passer le trou situé dans la
garniture supérieure sur l’accouplement en haut du luminaire.
17) Visser l’extrémité du tube fileté court avec l’écrou hexagonal
dans l’accouplement au centre de la première pièce de la
garniture supérieure.
18) Passer un trou dans la pièce de la garniture à bordure festonnée
sur l’extrémité du tube fileté sortant de la première pièce de la
garniture supérieure. Placer la pièce de garniture à bordure
festonnée sur le dessus de la première pièce de garniture.
19) Passer un trou dans la troisième pièce de la garniture sur
l’extrémité du tube fileté sortant du dessus de la garniture à
bordure festonnée. Placer la pièce de garniture sur le dessus
de la garniture à bordure festonnée.
20) Visser l’ornement sur l’extrémité de tube fileté sortant de la
dernière pièce de la garniture. (NE PAS serrer avec excès).
Date Issued: 1/2/15 IS-49604-CB
Connecter le fil noir ou
rouge de la boite
Connecter le fil blanc de la boîte
A Noir A Blanc
*Au cordon parallèle (rond et lisse)
*Au cordon parallele (à angles droits el strié)
Au bransparent, doré, marron, ou
noir sans fil distinctif
Au transparent, doré, marron, ou
noir avec un til distinctif
Fil isolé (sauf fil vert) avec
conducteur en cuivre
Fil isolé (sauf fil vert) avec
conducteur en argent
*Remarque: Avec emploi d’un fil paralléle
(SPT I et SPT II). Le fil neutre est á angles
droits ou strié et l’autre fil doit étre rond ou
lisse (Voir le schéma).
Fil Neutre
We’re here to help 866-558-5706
Hrs: M-F 9am to 5pm EST
INSTRUCTIONS
For Assembling and Installing Fixtures in Canada
Pour L’assemblage et L’installation Au Canada
GLASS
VERRE
SCREW
VIS
THREADED PIPE
TUBE FILETÉ
FIRST TOP TRIM
PREMIÈRE GARNITURE
SUPÉRIEURE
HEX COUPLING
ACCOUPLEMENT
HEXAGONAL
THIRD TOP TRIM PIECE
TROISIÈME PIÈCE DE
GARNITURE
BOTTOM CAGE
PARTIE INFÉRIEURE
DE LA CAGE
FINIAL
ORNEMENT
SCALLOPED TOP TRIM
PIECE
GARNITURE À BORDURE
FESTONNÉE
TOP CAGE
PARTIE
SUPÉRIEURE
DE LA CAGE
LONG THREADED PIPE
LONG TUBE FILETÉ
LOCKWASHER
RONDELLE DE BLOCAGE
CAP
CAPUCHON
RUBBER WASHER
RONDELLE
CAOUTCHOUTÉE
FLAT WASHER
RONDELLE PLATE
HEXNUT
ECROU HEXAGONAL