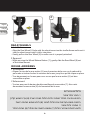
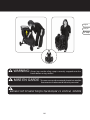
Baby Jogger city mini GT Assembly Instructions Manual
- Catégorie
- Poussettes
- Taper
- Assembly Instructions Manual

CITY MINI
™
GT
www.babyjogger.com
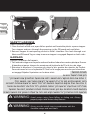
IMPORTANT - Garder ces instructions pour
references futures
Veuillez lire ces instructions avant l’utilisation.
La sécurité de votre enfant peut être affecté.
Ce produit conforme au norme EN 1888: 2012
N ASSEMBLY I STRUCTIONS
IS UAN TRUCTIONS PO R L' SSEMBLAGE
IMPORTANT - Keep these instructions for
future reference.
Read these instructions carefully before use.
Your child’s safety may be affected if you do
not follow these instructions.
This product complies with EN 1888: 2012
רגו‘ג יבייב
GT ינימ יטיס םגדמ הלגעל תוחיטבו שומיש ,הבכרה תוארוה
דיחי - GT ינימ יטיס רגו‘ג יבייב
ינכפהמה לופיקה טנטפ םע
Quick - Fold
םישדוח 6 ליגמ שומישל המיאתמ הלגעה
הביכש בכרמב שמתשהל שי הדיל ליגמ שומישל
PRAM DELUXE םגדמ
ןהילע רומשלו ,שומישה ינפל ןלהלש תוארוהה תא ןויעב אורקל שי :בושח
!דליה תא ןכסל לולע הלא תוארוה םויק יא .דיתעב תוסחייתה ךרוצל

2
Français
English
Table of Contents
Table de matières
תירבע
םינייניע ןכות
English
Français (French) /
תירבע
»
...............................................................................................................
3
הרהזא תוארוה
» Features
Traits / םינייפאמ
.....................................................................................
7
» Frame
Cadre / בכרמ
..................................................................................................
8
» Front Wheel
Roue avant / םיימדק םילגלג ..................................................................... 10
» Rear Wheels
Roues arrières / םיירוחא םילגלג .................................................................. 12
» Brake
Frein/
רוצעמ
......................................................................................................
13
» Canopy
Auvent / ןוגג
...............................................................................................
15
» Safety Harness
Harnais de sécurité / תוחיטב תרוגח
....................................................
16
» Seat
Siège/ בשומ
................................................................................................
19
» Basket Removal
Enlever le panier / ןותחת םיצפח לס
....................................................
23
» Quick Fold Technology
Pliage / הלגעה לופיק
..................................................................................
24
» Care & Maintenance
.........................................................................................
26
Soin et entretien / הקזחאו ןויקנ 27/28
»
..............................................................................................
29
תוחוקל תורישו תוירחא
..............................................................................................

3
תירבע
םישדוח 6 ליגמ תוקוניתל הדעונ וז הלגע
Pram Deluxe םגדמ הביכש בכרמ ביכרהל שי (0 ליג) הדיל ליגמ שומישל
.םייקה ןרזמל רבעמ ףסונ ןרזמ ףיסוהל ןיא הביכש יבכרמ םע שומישב :הרהזא
.ג"ק 15 לש ףוג לקשמ דע םידלי םע שומישל המיאתמ הלגעה
!דבלב דחא דלי םע שומישל המיאתמ הלגעה
תנכוסמ תויהל הלולע החגשה אלל דליה תראשה :הרהזא
לוענ בצמב הליענה ינקתה לכש אדוול שי שומישה ינפל :הרהזא
תע לכב דליה תא רושקל הבוח .תוחיטבה תרוגחב שמתשהל שי דימת :הרהזא
תודוקנ 5 ב הריגסו רוביח י"ע הלגעב רתויב הרצקה ולו העיסנ וא תחיינ הבישי לש
העשפמה תעוצרו םיינתומ תועוצר 2 ,םייפתכה תועוצר 2 :ןוגיעה
ןותחת ןוסחא אתבו ,ג"ק 1 בשומה בג אתב ןעטמל ילאמיסקמ לקשמ :הרהזא
הלגעב הטילשו תוביצי רסוחל םורגל לולע רתי לקשמ .ג"ק 4.5 םומיסקמ
לולעו הלגעה תוביצי לע עיפשמ ,הלגעה תידיל דמצומה ןעטמ לכ :הרהזא
דליה תעיצפל םורגל
תואיכ םירבוחמ בשומה תדיחי לש רוביחה ינקתהש אדוול שי :הרהזא
סדיילברלור וא תויליגלגב הקלחה וא הצירל דעוימ וניא הז רצומ :הרהזא
(18 ליג לעמ) רגובמ תחגשה אלל הלגעב דלי ריאשהל ןיא םלועל :הרהזא
םידלי לש םדי גשיהמ השדחה הלגעב הזיראה תויקש תא קיחרהל שי :הרהזא
תוענ תוגרדמ וא תוליגר תוגרדמב הלגעה תא עיסהל רוסא *
ןאוביה וא/ו ןרציה י"ע םירשואמ אל ףוליח יקלחו םירזיבאב שמתשיהל רוסא *
ידכב דיה ףכ קרפל דיה תעוצר תא רבחל שי ,הלגעב דליה תחנה רחאל דימ *
הלגעב האלמ הטילש חיטבהל
ירוחאה לגרה רוצעמ תא דירוהל שי ,העיסנה םויסב וא הריצעב ,היינחב *
הלגעהמ ותאצוהו תוחיטבה תרוגחמ דליה רורחש םרטב הריצע בצמל
.הלגעב דומעל דליהמ עונמל שי *
.הייצח ירבעמו םיליבש ,תוכרדמב האלמ תונרע טוקנל שי :הרהזא
םכתא םיאור תוינוכמה יגהנ יכ חינהל ןיא םלועל
,הלגעה לש האלמ תוניקת העיסנה ינפל אדוול שי – לכל לעמ תוחיטב
לכ העיצפ וא קזנל תיארחא הניא מ"עב טרדנטס ייה 'בח .התעיסנו היקלח
הלגעב ןוכנ אל שומיש וא/ו ולא תוארוה לש האירק יאמ האצותכ איהש
.תוארוהל םאתהב
ןהילע רומשלו ,שומישה ינפל ןלהלש תוארוהה תא ןויעב אורקל שי :בושח
!דליה תא ןכסל לולע הלא תוארוה םויק יא .דיתעב תוסחייתה ךרוצל
תוחיטב תוארוה

4
English
WARNING:
Single Stroller
• This stroller seats one passenger.
•
This vehicle is suitable from birth to
5 years. Maximum weight: 15 kg,
maximum height: 111.8 cm.
•
Total weight load recommended for this
stroller is 20.5 kg (15 kg in seat, 1 kg in
seat back pocket, 4.5 kg in basket).
Double Stroller
• This stroller seats two passengers.
•
This vehicle is suitable from birth to 5
years.
Maximum weight: 15 kg in each sea t.
•
Total weight load recommended for this
stroller is 36.5 kg (15 kg in each seat,1 kg
in each seat back pocket, 4.5 kg in basket).
• WARNING:
This stroller is not suitable for running, jogging, skating or rollerblading.
• WARNING: Never leave your child unattended.
• WARNING: Always use the restraint system.
• WARNING:
Child may slip into leg openings and strangle. Never use in reclined
carriage position unless safety harness is properly fastened.
• WARNING:
Check that the pram body or seat unit attachment devices are correctly
engaged before use.
• WARNING:
To avoid injury, ensure that your child is kept away when unfolding and
folding this product.
• WARNING: Do not let your child play with this product.
• WARNING:
Parcels or accessory items, or both, placed on the unit may cause the
unit to become unstable.
• WARNING:
Any load attached to the handle aects the stability of the pram/pushchair.
• Recommended weight for seat back pocket is 1 kg and basket is 4.5 kg. Excessive
weight may cause a hazardous unstable condition to exist.
• This seat should be used in the most reclined position until a child can sit up unaided,
roll over, or push itself up on it’s hands and knees.
•
Stroller is not meant to be used for transporting children up or down stairs. Damage
resulting to stroller, will not be covered under warranty.
• This stroller does not replace a cot or a bed. Should your child need to sleep, then it
should be placed in a suitable pram body, cot, or bed.
•
Accessories which are not approved by the manufacturer or distributor shall not be used.
• Watch out for cars – never assume that a driver can see you and your child.
• The passenger shall remain seated (no standing in the stroller).
• It may be unsafe to use replacement parts other than those supplied or approved
by the manufacturer.

5
Français
MISE EN GARDE :
Poussette double
• Cette poussette est conçue pour 2 passagers.
•
Ce promeneur est convenable de la naissance
à 5 ans (le poids maximum: 15 kg par siège).
•
Le poids total recommandé pour cette
poussette est de 36,5 kg (15 kg par siège,
1 kg par poche du dossier du siège, 4,5 kg
dans le panier).
Poussette simple
•
Cette poussette est conçue pour 1 passager.
• Ce promeneur est convenable de la
naissance à 5 ans - le poids maximum:
15 kg; l’hauteur maximum: 111,8 cm.
•
Le poids total recommandé pour cette
poussette est de 20.5 kg (15 kg dans le
siège, 1 kg dans la poche
du dossier du siège,
4,5 kg dans le panier).
• MISE EN GARDE :
Cette poussette n’est pas conçue pour la course, le jogging, le patin à
glace ou à roues alignées.
• MISE EN GARDE : Ne laissez jamais votre enfant sans surveillance.
• MISE EN GARDE : Utilisez toujours le harnais de sécurité.
• MISE EN GARDE :
L’enfant peut glisser dans les ouvertures de jambe et étrangler.
N’utilisez jamais dans la position de voiture appuyée à moins que le harnais de sécurité
ne soit correctement attaché.
• MISE EN GARDE :
Vériez que les dispositifs d’attachement d’unité de landau ou de
siège sont correctement engagés avant emploi.
• MISE EN GARDE :
Pour éviter de blessures, gardez votre enfant loin de la poussette
en dépliant et pliant ce produit.
• MISE EN GARDE : Ne laissez pas à votre enfant de jouer avec ce produit.
• MISE EN GARDE :
Les colis ou les articles d’accessoire, ou tous les deux, placés sur l’unité
peuvent faire devenir l’unité instable.
• MISE EN GARDE :
N’importe quelle charge xée à la poignée aecte la stabilité du
landau/de poussette.
•
Le poids recommandé pour la pochette du siège est de 1 kg et du panier 4,5 kg. Le
poids excessif peut faire exister un état instable dangereux.”
•
Cette pousette devrait être utilisée dans la position la plus allongée jusqu’à ce qu’un
enfant puisse être assis sans aide, retourner, ou se faire monter sur ses mains et genoux.”
•
La poussette n’est pas conçue pour transporter un enfant dans les escaliers. La garantie
ne couvre pas les dommages à la poussette comme un résultat.”
•
Cette poussette ne remplace pas de lit ou un lit de bébé à barreaux. Si votre enfant doit
dormir, alors il devrait être placé dans un landau approprié, le lit, ou le lit de bébé à barreaux.
•
Les accessoires non approuvés par le manufacturier ou le distributeur ne devraient pas être utilisé.
•
Faire attention aux automobiles - ne jamais assumer qu’un conducteur peut vous voir.
•
Le passager devrait rester assis en tout temps (ne pas se tenir debout dans la poussette).
•
Il peut être dangereux d’utiliser des pièces de remplacement autres que celles fournies
ou approuvées par le manufacturier.

6
Français
English
1
16
2
13
3
15
4
14
6
12
7
11
8
10
9
5
תירבע

7
Français
English
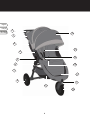
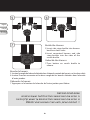
FEATURES TRAITS
1
Handlebar Poignée
2
Parking Brake Frein
3
Auto-lock Levier de verrouillage
4
Accessory Mounting
Bracket
Accessoire de xation de
montage
5
Frame Cadre
6
Safety Strap Courroie de sécurité
7
Rear Wheel Release
Button
Roues arrière bouton de
déverrouillage
8
Rear Wheel Roues arrière
9
Storage Basket Panier
10
Front Wheel Roue avant
11
Swivel/Lock
Faites pivoter et présentez
directement
12
Footwell Repose-pied
13
Fold Handle Courroie de plier
14
Harness Buckle Boucle de harnais
15
Harness Pads Epaulettes de harnais
16
Canopy Auvent
תירבע
םינייפאמ
תידי
וטוא לופיק תליענ
םירזיבא רבחמ
לופיק תעינמ תעוצר
לגלג רורחש רותפכ
ירוחא לגלג
םילגלג רוצעמ
םיצפח לס
ימדק לגלג
רשי לגלג תליענ
םיילגר חטשמ
לופיק תידי
הרוגח םזבא
םייפתכ תודיפר
ןוגג
הדלש / בכרמ

8
Français
English
3
1
2
CADRE
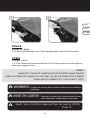
1 Déballer le cadre [5] la poussette de la boîte et mettre les roues de côté.
2 Déplier la poussette en tirant sur le levier de verrouillage [3] tout en levant la
poignée [1] loin du fond du cadre. La pousette cliquera en place.
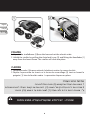
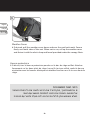
FRAME
1 Unpack the stroller Frame [5] from the box and set the wheels aside.
2 Unfold the stroller by pulling the Auto-lock Lever [3] and lifting the Handlebar [1]
away from the lower frame. The stroller will click into place.
1
5
תירבע
הלגעה בכרמ תחיתפ
.דצב םילגלגה וחינהו (5) אספוקהמ הלגעה תא ואיצוה 1
םידגונמ םינוויכל הלגעה תווצק ינש תא ופחד .(3) ׳וטואה לופיקה תליענ תידי תא וררחש 2
רוביחה קילק עמשיה דע חותפ בצמל (1) הלעמ יפלכ תידיה תמרה תכישמ י"ע
חותפ בצמב הלוענ הלגעהש אדוול שי :הרהזא

9
Français
English
MISE EN GARDE : Assurez-vous que la courroie de sécurité est attachée
fermement au cadre avant d’utiliser la poussette!
ADVERTENCIA: Asegúrese de que todos los dispositivos de seguridad
están activados antes del uso.
3
5
4
3 Placer la poussette dans la position droite.
4 Attacher les boutons-pression de la courroie de sécurité [6] rouge sous le
mécanisme de pliage avant l’utilisation.
3 Place the stroller in the upright position.
4 Snap the red Safety Strap [6] to the frame under the fold mechanism before use.
תירבע
תדמועו חותפ בצמב הלגעה תא ודימעה 3
תולפקתה תעינמל (5) ןוחטיבה תעוצר תא ורבח שומישה ינפל 4

10
Français
English
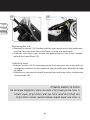
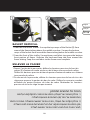
ROUE AVANT
Installation
1 Déposer la poussette pour que la poignée soit sur le plancher.
2 Insérer la roue avant [10] en la glissant dans le support pour la roue avant jusqu'à
ce qu'elle clique en place. Tirer doucement sur la roue avant pour vous assurer
qu'il est correctement serré.
Enlevement
• Tout en poussant le bouton de déverrouillage de roue avant, faire sortir
doucement la roue avant [10] de la monture de la roue.
FRONT WHEEL
Installation
1 Lay stroller on its back so the Handlebar is resting on the oor.
2 Attach the Front Wheel [10] by sliding it into the front wheel mount until it clicks.
Gently pull on the Front Wheel to make sure it is properly attached.
Removal
• While pressing the front wheel release button, gently slide the Front Wheel [10]
out of the front wheel mount.
2
10
10
1
תירבע
םיימדק םילגלג
.הפצרה לע תחנומ תידיה רשאכ הלגעה תא וחינה םילגלגה רוביח ינפל 1
לגלגה יכ וקדבו רוביחה קילק עמשיה דע (10) לגלגה תיבל םילגלגה תא וסינכה 2
הצוחה קילחמ וניא לגלגה יכו ,הנוכנ הרוצב סנכוה
םילגלג רורחש
הטמ יפלכ לגלגה תא וכשמו הלעמ יפלכ לגלגה לעמ רורחשה רותפכ לע וצחל
קילק

11
Français
English
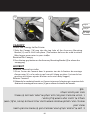
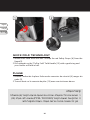
Trait de pivoter
3 Pousser le verrouillage de pivoter [11] permettre à la roue avant de pivoter.
4 Enlever le verrouillage de pivoter [11] en bas pour fermer à clef la roue avant en
position xe.
REMARQUE : En chargeant et en déchargeant l'enfant, fermez toujours la roue en
position xe. Bien que la roue avant de votre City Mini se serre, il ne soit pas destiné
pour des buts d'exercice ou de jogging.
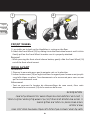
Swivel Feature
3 Press down on the Swivel Lock [11] to allow the front wheel assembly to swivel.
4 Raise the Swivel Lock [11] to lock the front wheel assembly in a xed position for
long distance strolling.
NOTE: When loading and unloading child, lock the front wheel in a xed position.
Although the front wheel of your City Mini GT locks it is not intended for jogging or
exercise purposes.
3
10
11
4
10
11
תירבע
(11) הטמ יפלכ (רופא) לגלג תליענ רורחש רותפכ לע וצחל 360 בבותסמ לגלגל 3
(11) הלעמ יפלכ (רופאה) רותפכה לע וצחל רשי וקב לגלגה תליענל 4
רתוי םישק חטש יאנתבו רשי וקב תוכורא תועיסנל תצלמומ רשי וקב לגלג םע העיסנ
רשי וקב םילגלגה תא לוענל ץלמומ ותאצוה וא הלגעב דלי תחנה תעב :הרעה
גניגוגו הצירל המיאתמ הניא הלגעה :הרהזא ! !
360 רורחשו רשי לגלג תליענ

12
Français
English
7
8
2
ROUES ARRIÈRES
1 Installation
• Aligner l’essieu de la roue arrière [8] avec la monture de la roue sur le cadre de la
poussette et insérer-le dans la monture de la roue jusqu’à ce qu’elle clique en place.
• Tirer doucement sur la roue pour vous assure que la roue arrière [ 8] est bien
verrouillée en place.
2 Enlevement
• Tout en poussant le bouton de déverrouillage de roue arrière [7], faire sortir
doucement la roue arrière [8] de la monture de la roue.
REAR WHEELS
1 Installation
• Align the Rear Wheel [8] axle with the wheel mount on the stroller frame and insert it
into the wheel mount until it clicks into place.
• Gently pull on the Rear Wheel [8] to make sure it is properly attached.
2 Removal
• While pressing the Wheel Release Button [ 7], gently slide the Rear Wheel [8] out
of the wheel mount.
1
תירבע
ירוחא לגלג רוביח 1
קילק עמשיה דע (8) הרשי הרוצב לגלגה תיבל ירוחאה לגלגה ריצ תא וסינכה
תואיכ רבוחמ אוהש אדוול (8) רוחאל לגלגה תא תונידעב וכשמ רוביחה
ירוחא לגלג רורחש 2
לגלגה תיבמ (8) לגלגה תא הצוחה וכשמו (7) לגלגה רורחש רותפכב וצחל
םיירוחא םילגלג
8

13
Français
English
FREIN
Engager le frein
1 et 2 Tirer simplement la manette de frein [2] vers le haut jusqu’à ce qu’elle clique en
place pour engager le frein.
BRAKE
Engage the Brake
1 & 2 Gently pull the Brake Lever [2] into upright position until it clicks into place.
WARNING: Engage the parking device before loading and unloading a
passenger.
MISE EN GARDE : Employer le dispositif de stationnement lorsque
vous embarquez et débarquez un passager.
1
2
2
2
תירבע
תבשוה ירחאו ינפל םילגלגה רוצעמ םע הלגעה תא רוצעל שי :הרהזא
הלגעב דלי
רוצעמ
רוצעמה תידי תא םירהלו ךושמל שי םיירוחאה םילגלגה רוצעמ תלעפהל
עמשיה דע הלעמ יפלכ רוצעמה תידי תא וכשמ .(2) ןימי דצב הלגעה תידיב תיאצמנה
הלוענו ףוסה דע הכושמ תידיה יכ ואדוו רוביחה “קילק”

14
Français
English
3
4
5
2
Relâcher le frien
3 Pincent les étiquettes grises et tirent le levier vers vous.
4 et 5 Pousser la manette de frein [2] vers le bas jusqu'à ce que c'est parallèle avec
l'encadrement pour la relâcher.
Release the Brake
3 Pinch the gray tabs and pull the
lever towards you.
4 & 5 Push the brake lever [2] down
until it is parallel with the frame.
תירבע
רורחש
םירותפכה ינשב תחא הנועבו תעב ץוחלל שי םיירוחאה םילגלגה רוצעמ רורחשל
.ךנוויכל הלעמ יפלכ ליבקמב םתוא ךושמלו רוצעמה תידי יבג לע םיאצמנה םירופאה
הטמ יפלכ ,ירוקמה הבצמל תידיה תא הרזח לפקל שי ליבקמב

15
Français
English
16
4
2
16
4
1
AUVENT
Attacher l'auvent au cadre
1 Glisser l'essieu de l'auvent dans le premier trou de la xation de montage
d'accessoires [4] sur le cadre jusqu'à ce qu'il clique en place. (Le trou du bas
peu être utilisé pour ajouter d'autres accessoires Baby Jogger.)
Enlever l’auvent
2 Déboucler le crochet-et-boucle sur l’auvent et presser le bouton gris superieur de la
xation de montage d’accessoires [4] pour enlever la cheville de l’auvent.
CANOPY
Attach the Canopy to the Frame
1 Slide the Canopy [16] peg into the top hole of the Accessory Mounting
Bracket [4] until it clicks into place. (The bottom hole can be used to attach
Baby Jogger accessories to your stroller.)
Remove the Canopy
2 Press the top gray button on the Accessory Mounting Bracket [4] to release the
canopy peg.
תירבע
הלגעה בכרמל ןוגגה רוביח
ידיצבש (4) םירזיבאה רבחמ לש ןוילעה רוחל (16) ןוגגה ירבחמ תא וסינכה 1
.רוביחה קילק עמשיהו אלמ רוביחל דע הדלשה
(שוגפ ,לקלס ,הסירע) םירחא םירזיבא רוביחל שמשמ רבחמבש ןותחתה רוחה :בל ומיש
ןוגגה רורחש
הצוחה ןוגגה תא וכשמו (4) ןוגגה רבחמבש רופאה ןוילעה רותפכה לע וצחל 2
ןוגג
קילק

16
Français
English
WARNING: Avoid serious injury from falling or sliding out. Always
properly adjust and fasten safety harness.
WARNING: Always use the crotch strap in combination with the
shoulder straps and waist belt.
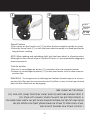
SAFETY HARNESS
Adjust Harness Height
1 From the back of the seat, open Velcro pocket and locate the plastic square stopper.
Turn stopper and pass through the openings in the PE board and seat fabric.
2 Reinsert stopper at seat opening closest to child’s shoulders. Pass back through seat
fabric and PE board. Tug on strap to ensure stopper is engaged. Repeat on both sides.
1 2
HARNAIS
Ajustez l’hauteur du harnais
1 De l’arrière du siège, ouvrir la poche velcro et localiser le bouchon carré en plastique. To urner
le bouchon et passer à travers les ouvertures de la planche de PE et le tissu du siège.
2 R éinsérez le bouchon à l’ouverture du siège la plus proche des épaules de l’enfant.
Passez à travers le tissu e la planche PE. Tirez sur la sangle pour assurer que le bouchon
est engagé. Répéter l’opération sur les deux côtés.
תירבע
דליה בשומ דצ
בשומה בג
דליה בשומ דצ
תוחיטב תרוגח
םייפתכ תועוצר הבוג ןוויכ
ךרד העוצרה םע קיטסלפה תעבט תא ופחד .בשומה בגב צוקסה חתפ תא וחתפ 1
.דליה בשומב ,ינש דצהמ ותאיציל דע בשומה דב ךרדו בגה שרקב אצמנה רוחה
.םייפתכל תודומצ תועוצרה רשאכ דליה ליגל םאתהב תועוצרה םוקימו הבוג תא ורחב 2
הבוגה תא םיאתהל רתוי לודג דליל .ןותחתה חתפה ךרד העוצרה ריבעהל שי הדיל ליגמ
תעבטה תא ופחד ,םיאתמה חתפה תריחבו הבוגה ןוויכ םע .םייפתכה הבוגל םאתהב
היינשה העוצרב ההז ןפואב וז הלועפ לע ורזח .בגה שרקו בשומה דב ךרד המינפ הרזח העוצרהו

17
Français
English
MISE EN GARDE : Prévenir les blessures sérieuses à votre enfant
en utilisant le harnais de sécurité.
MISE EN GARDE : Toujours utiliser la courroie de l’entrejambe en même
temps que les baudriers et la ceinture à la taille.
Adjust Harness Length
3 Slide the Harness Pads [15] up to access plastic guide on strap.
4 Hold the plastic guide and pull strap to tighten or loosen.
15
3 4
Ajustez la longueur du harnais
3 Glissez les épaulières de le harnais Jusqu’à pouvoir accéder le guidage en
plastique sur la sangle
4 Tenez le guidage en plastique et tirez sangle pour serrer ou desserrer.
תירבע
םייפתכ תועוצר ךרוא ןוויכ תוחיטב תרוגח
ןוויכה תעבטב זוחאל ידכ (15) םייפתכה תודיפר תא וזיזה 3
דע הטמ יפלכ תעבטהמ תאצויש ףדועה תעוצר תא וכשמ העוצרה ךרוא תנטקהל 4
קיטסלפה תעבטב וזחא העוצרה ךרוא תלדגהו רורחשל .םייפתכל הדומצ העוצרהש
הלעמ יפלכ ומירהו וכשמו דבלב
.תועיצפו תוליפנ וענמ :הרהזא
אלמ ןפואב תוחיטבה תרוגחב דליה תא רוגסל שי דימת
םייפתכה תועוצר 2 תא רוגסל דימת שי :
הרהזא
םזבאה רוגסלו העשפמה תעוצר םע

18
Français
English
Buckle the Harness
5 Insert side strap buckle into harness
buckle on both sides.
6 Insert connected harness and side
strap buckles into the sides of the
crotch buckle.
Unbuckle the Harness
7 Press button on crotch buckle to
release.
PRESS
PRESS
PRESS
5
7
6
Boucler le harnais
5 Insérez la sangle de la boucle latérale dans la boucle centrale du harnais sur les deux côtés.
6 I n sérez l’harnais connectez et les deux sangle de les boucles latérales dans la boucle
d’entre jambes.
Déboucler le harnais
7 Appuyez sur le bouton de la boucle de l’entre jambes pour libérer
תירבע
תוחיטבה תרוגח םזבא
םייפתכה תועוצר תאלולל םידדצה ינשב םירגוסה תא וסינכה 5
רוביחה קילק עמשה דע םזבאל םידדצה ינשב םירגוסה תא וסינכה 6
PRESS רותפכב םזבאה זכרמב וצחל ,םזבאה תחיתפל 7

19
Français
English
21
SIÈGE
Incliner le siège
1 Pincez l'attache derrière la place et faites-les glisser en bas à désiré s'allongent.
2 Baissez la place des deux côtés pour vous accorder appuient la position
d'attaches. Refaire les étapes à l'inverse pour retourner à la position verticale.
SEAT
Recline the Seat
1 Pinch the clamp behind the seat, and slide it down to desired recline.
2 Pull seat down on both sides to match recline position of clamp.
Reverse steps to return to the upright position.
תירבע
הלגעה בשומ
בגה תנעשמ ןוויכ
הטמל יפלכ ותוא וקילחהו בשומה בגב העוצרבש ןצחלה לע וצחל תנעשמה תדרוהל 1
היוצרה תיווזל דע תנעשמה ידיצ ינשב הטמלו רוחאל וכשמ 2
העוצרה הצקב קיטסלפה תועבט 2 ב וזחא .ךופה רדסב תאז ושע תנעשמה תמרהל
הלעמ יפלכ תנעשמה תא ופחדו ןצחלב וצחלו

20
Français
English
16
3
10
4
Enlever le siège
3 Enlever l’auvent [16]. En commençant par le bouton-pression le plus près de
la poignée, continuer en descendant le long du cadre, pour détacher le siège
du cadre.
4 Détacher les courroies du siege d’autour du bas/arrière du cadre, situé derrière
la roue avant [10].
Removing the seat
3 Remove the canopy [16]. Starting with the top snap closest to the handle and
working your way down the entire frame, unsnap seat from frame.
4 Unfasten seat straps from around the bottom/back of the frame, located
behind the Front Wheel [10].
תירבע
הלגעהמ בשומה דב תרסה
תא םירבחמש םיקתקיתה ירותפכ תא וחתפ .(16) הלגעה ןוגג תא וריסה 3
הדלשל ביבסמ ,ימדקה לגלגה רוזאל דעו תידיה רוזאב לחה הדלשל דבה
ימדקה לגלגה ירוחאמ ,בשומל תחתמש צוקסה תועוצר תא וחתפ 4
La page est en cours de chargement...
La page est en cours de chargement...
La page est en cours de chargement...
La page est en cours de chargement...
La page est en cours de chargement...
La page est en cours de chargement...
La page est en cours de chargement...
La page est en cours de chargement...
La page est en cours de chargement...
La page est en cours de chargement...
La page est en cours de chargement...
-
 1
1
-
 2
2
-
 3
3
-
 4
4
-
 5
5
-
 6
6
-
 7
7
-
 8
8
-
 9
9
-
 10
10
-
 11
11
-
 12
12
-
 13
13
-
 14
14
-
 15
15
-
 16
16
-
 17
17
-
 18
18
-
 19
19
-
 20
20
-
 21
21
-
 22
22
-
 23
23
-
 24
24
-
 25
25
-
 26
26
-
 27
27
-
 28
28
-
 29
29
-
 30
30
-
 31
31


Baby Jogger city mini GT Assembly Instructions Manual
- Catégorie
- Poussettes
- Taper
- Assembly Instructions Manual
dans d''autres langues
- English: Baby Jogger city mini GT
Documents connexes
-
 Baby Jogger CITY PREIER Assembly Instructions Manual
-
Baby Jogger CITY TOUR LUX DUO Le manuel du propriétaire
-
 Baby Jogger City Tour LUX Mode d'emploi
-
Baby Jogger CITY MINI GT 2 Assembly Instructions Manual
-
-
 Baby Jogger City Tour LUX Instructions For Use Manual
-
 Baby Jogger CITY MINI GT 2 Assembly Instructions Manual


Autres documents
-
LG VC3120NNT Le manuel du propriétaire
-
 ickle bubba 10-005-101-014 Manuel utilisateur
-
 Bebecar Spot+ Le manuel du propriétaire
-
Stokke XPLORY Le manuel du propriétaire
-
Britax B-AGILE MULTI Le manuel du propriétaire
-
Stokke CARRY COT Le manuel du propriétaire
-
Stokke Stroller Seat Le manuel du propriétaire
-
-
Stokke Crusi Mode d'emploi
-
CYBEX Priam Manuel utilisateur

