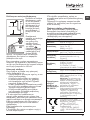
HOTPOINT/ARISTON RDPD 107617 JD EU Mode d'emploi
- Catégorie
- Machines à laver
- Taper
- Mode d'emploi

GB
1
! This symbol reminds you to read this instruc-
tion manual.
Contents
Installation, 2-3
Unpacking and levelling
Connecting the electricity and water supplies
The first wash cycle
Technical data
Care and maintenance, 4
Cutting off the water or electricity supply
Cleaning the washer-dryer
Cleaning the detergent dispenser drawer
Caring for the door and drum of your appliance
Cleaning the pump
Checking the water inlet hose
Precautions and tips, 5
General safety
Disposal
Opening the porthole door manually
Description of the washer-dryer, 6-7
Control panel
Display
How to run a wash cycle or a drying cycle, 8
Wash cycles and functions, 9
Table of wash cycles
Wash functions
Detergents and laundry, 10
Detergent dispenser drawer
Preparing the laundry
Special wash cycles
Load balancing system
Troubleshooting, 11
Service, 12
RDPD 107617 J
Instructions for use
WASHER-DRYER
English,1
GB
Ελληνικα,13
GR
Ελληνικα,25
FR

2
GB
Installation
! This instruction manual should be kept in a safe
place for future reference. If the washer-dryer is
sold, transferred or moved, make sure that the
instruction manual remains with the machine so
that the new owner is able to familiarise himself/
herself with its operation and features.
! Read these instructions carefully: they con-
tain vital information relating to the safe instal-
lation and operation of the appliance.
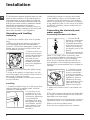
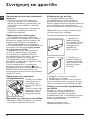
Unpacking and levelling
Unpacking
1. Remove the washer-dryer from its packa-
ging.
2. Make sure that the washer-dryer has not
been damaged during the transportation
process. If it has been damaged, contact the
retailer and do not proceed any further with
the installation process.
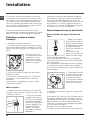
3. Remove the 4 pro-
tective screws (used
during transportation)
and the rubber wa-
sher with the cor-
responding spacer,
located on the rear
part of the appliance
(see figure).
4. Close off the holes using the plastic plugs
provided.
5. Keep all the parts in a safe place: you will
need them again if the washer-dryer needs to
be moved to another location.
! Packaging materials should not be used as
toys for children.
Levelling
1. Install the washer-dryer on a flat sturdy floor,
without resting it up against walls, furniture
cabinets or anything else.
2. If the floor is not
perfectly level, com-
pensate for any une-
venness by tightening
or loosening the
adjustable front feet
(see figure); the angle
of inclination, measu-
red in relation to the
worktop, must not
exceed 2°.
Levelling the machine correctly will provide
it with stability, help to avoid vibrations and
excessive noise and prevent it from shifting
while it is operating. If it is placed on carpet or
a rug, adjust the feet in such a way as to allow
a sufficient ventilation space underneath the
washer-dryer.
Connecting the electricity and
water supplies
Connecting the water inlet hose
1. Connect the A
device to a cold water
tap using a 3/4 gas
threaded attachment,
then perform the con-
nection by screwing
the supply hose to the
device.
Before performing the
connection, allow the
water to run freely until it is perfectly clear.
For a correct installation of the device, follow
the instructions given in the packaging.
! The device is already adjusted for the cor-
rect operation of the washing machine and
therefore it is recommended not to change its
settings
2. Connect the inlet
hose to the washer-
dryer by screwing it
onto the correspon-
ding water inlet of the
appliance, which is
situated on the top
right-hand side of the
rear part of the ap-
pliance (see figure).
3. Make sure that the hose is not folded over
or bent.
! The water pressure at the tap must fall within
the range of values indicated in the Technical
data table (see next page).
! If the inlet hose is not long enough, contact a
specialised shop or an authorised technician.
! Never use second-hand hoses.
! Use the ones supplied with the machine.
A

GB
3
Connecting the drain hose
Connect the drain
hose, without bending
it, to a drain duct or
a wall drain situated
between 65 and 100
cm from the floor.
Alternatively, place
the drain hose over
the edge of a wa-
shbasin or bathtub,
by fastening the
guide (which
can be purchased at
the technical assi-
stance centre) to the
tap (see figure). The
free end of the hose
should not be underwater.
! We advise against the use of hose extensions;
if it is absolutely necessary, the extension must
have the same diameter as the original hose
and must not exceed 150 cm in length.
Electrical connections
Before plugging the appliance into the electri-
city socket, make sure that:
• thesocketisearthedandcomplieswithall
applicable laws;
• thesocketisabletowithstandthemaxi-
mum power load of the appliance as indicated
in the Technical data table (see opposite);
• thepowersupplyvoltagefallswithintheva-
lues indicated in the Technical data table (see
opposite);
• thesocketiscompatiblewiththeplugofthe
washer-dryer. If this is not the case, replace
the socket or the plug.
! The washer-dryer must not be installed ou-
tdoors, even in covered areas. It is extremely
dangerous to leave the appliance exposed to
rain, storms and other weather conditions.
! When the washer-dryer has been installed,
the electricity socket must remain within easy
reach.
! Do not use extension cords or multiple sockets.
! The cable should not be bent or compressed.
65 - 100 cm
! The power supply cable must only be repla-
ced by authorised technicians.
Warning! The company shall not be held re-
sponsible in the event that these standards are
not observed.
The first wash cycle
Once the appliance has been installed, and
before you use it for the first time, run a wash
cycle with detergent and no laundry, using
wash cycle auto clean (see “Cleaning the
washer-dryer”).
Technical data
Model
RDPD 107617 J
Dimensions
width 59.5 cm
height 85 cm
depth 60,5 cm
Capacity
from 1 to 10 kg for the wash
programme
from 1 to 7 kg for the drying
programme
Electrical
connections
please refer to the technical
data plate fixed to the machine
Water con-
nections
maximum pressure
1 MPa (10 bar)
minimum pressure
0.05 MPa (0.5 bar)
drum capacity 71 litres
Spin speed
up to 1600 rotations per
minute
Energy
rated
programmes
according to
regulation
EN 50229
Wash: programme 8; tem-
perature 60°C; using a load
of 10 kg.
Drying: the greater load
(7kg) must be dried by se-
lecting the “EXTRA” dryness
level.
The remainder of the load
must be dried by selecting
the “EXTRA” dryness level:
the load must consist of 3
sheets, 2 pillowcases and
1 hand towel.
This appliance conforms to
the following EC Directives:
- EMC - 2014/30/EU (Elec-
tromagnetic Compatibility)
- LVD - 2014/35/EU (Low
Voltage)
- 2012/19/EU (WEEE)

4
GB
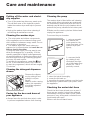
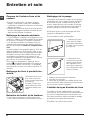
Cleaning the pump
The washer-dryer is fitted with a self-cleaning
pump which does not require any maintenan-
ce. Sometimes, small items (such as coins or
buttons) may fall into the pre-chamber which
protects the pump, situated in its bottom part.
! Make sure the wash cycle has finished and
unplug the appliance.
To access the pre-chamber:
1. using a screwdri-
ver, remove the
cover panel on the
lower front part of the
washer-dryer (see
figure);
2. unscrew the lid
by rotating it anti-
clockwise (see figu-
re): a little water may
trickle out. This is
perfectly normal;
3. clean the inside thoroughly;
4. screw the lid back on;
5. reposition the panel, making sure the hooks
are securely in place before you push it onto
the appliance.
Checking the water inlet hose
Check the inlet hose at least once a year. If
there are any cracks, it should be replaced
immediately: during the wash cycles, water
pressure is very strong and a cracked hose
could easily split open.
! Never use second-hand hoses.
Care and maintenance
Cutting off the water and electri-
city supplies
•Turnoffthewatertapaftereverywashcycle.
This will limit wear on the hydraulic system
inside the washer-dryer and help to prevent
leaks.
•Unplugthewasher-dryerwhencleaningit
and during all maintenance work.
Cleaning the washer-dryer
•Theouterpartsandrubbercomponents
of the appliance can be cleaned using a soft
cloth soaked in lukewarm soapy water. Do not
use solvents or abrasives.
•Thewasher-dryerhasaautocleanpro-
gramme for its internal parts that must be run
with no load in the drum.
To help the wash cycle you may want to use
either the detergent (i.e. a quantity 10% the
quantity specified for lightly-soiled garments)
or special additives to clean the washer-dryer.
We recommend running a cleaning program-
me every 40 wash cycles.
To activate the programme, press the but-
ton for 5 seconds then press START/PAUSE
to start the programme, which will last roughly
70 minutes.
Cleaning the detergent dispenser
drawer
Remove the dispen-
ser by raising it and
pulling it out (see
figure).
Wash it under running
water; this operation
should be repeated
frequently.
Caring for the door and drum of
your appliance
•Alwaysleavetheportholedoorajarinorder
to prevent unpleasant odours from forming.
1
2

GB
5
Precautions and tips
! This washer-dryer was designed and constructed in
accordance with international safety regulations. The fol-
lowing information is provided for safety reasons and must
therefore be read carefully.
General safety
• This appliance was designed for domestic use only.
•Thisappliancecanbeusedbychildrenaged
from 8 years and above and persons with
reduced physical, sensory or mental capabi-
lities or lack of experience and knowledge if
they have been given supervision or instruction
concerning use of the appliance in a safe way
and understand the hazards involved. Children
shall not play with the appliance. Cleaning and
user maintenance shall not be made by children
without supervision.
– Do not dry unwashed items in the tumble dryer.
– Items that have been soiled with substan-
ces such as cooking oil, acetone, alcohol,
petrol, kerosene, spot removers, turpentine,
waxes and wax removers should be washed
in hot water with an extra amount of deter-
gent before being dried in the tumble dryer.
– Items such as foam rubber (latex foam),
shower caps, waterproof textiles, rubber
backed articles and clothes or pillows fitted
with foam rubber pads should not be dried in
the tumble dryer.
– Fabric softeners, or similar products,
should be used as specified by the fabric
softener instructions.
– The final part of a tumble dryer cycle occurs
without heat (cool down cycle) to ensure that
the items are left at a temperature that ensures
that the items will not be damaged.
WARNING: Never stop a tumble dryer before
the end of the drying cycle unless all items
are quickly removed and spread out so that
the heat is dissipated.
•Do not touch the machine when barefoot or with wet or
damp hands or feet.
•Do not pull on the power supply cable when unplugging
the appliance from the electricity socket. Hold the plug
and pull.
•Do not open the detergent dispenser drawer while the
machine is in operation.
•Do not touch the drained water as it may reach extreme-
ly high temperatures.
•Never force the porthole door. This could damage the
safety lock mechanism designed to prevent accidental
opening.
•If the appliance breaks down, do not under any circum-
stances access the internal mechanisms in an attempt
to repair it yourself.
•Always keep children well away from the appliance while
it is operating.
•The door can become quite hot during the wash cycle.
•If the appliance has to be moved, work in a group of two
or three people and handle it with the utmost care. Never
try to do this alone, because the appliance is very heavy.
•Before loading laundry into the washer-dryer, make sure
the drum is empty.
• During the drying phase, the door tends to get quite hot.
• Donotusetheappliancetodryclothesthat
have been washed with flammable solvents
(e.g. trichlorethylene).
• Donotusetheappliancetodryfoamrubber
or similar elastomers.
• Make sure that the water tap is turned on during
the drying cycles.
• Childrenoflessthan3yearsshouldbekept
away from the appliance unless continuou-
sly supervised.
• Removeallobjectsfrompocketssuchas
lighters and matches.
Disposal
•Disposingofthepackagingmaterials:observelocal
regulations so that the packaging may be re-used.
• TheEuropeanDirective2012/19/EUonWaste
Electrical and Electronic Equipment, requires that
old household electrical appliances must not be
disposed of in the normal unsorted municipal waste
stream. Old appliances must be collected
separately in order to optimise the recovery and
recycling of the materials they contain and reduce
the impact on human health and the environment.
The crossed out “wheeled bin” symbol on the
product reminds you of your obligation, that when
you dispose of the appliance it must be separately
collected.
Consumers should contact their local authority or
retailer for information concerning the correct
disposal of their old appliance.
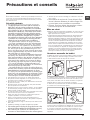
Opening the porthole door manually
In the event that it is not possible to open the porthole
door due to a powercut, and if you wish to remove the
laundry, proceed as follows:
1. remove the plug from the electrical socket.
2. make sure the water level inside the machine is lower
than the door opening; if it is not, remove excess water
using the drain hose, collecting it in a bucket as indicated
in the figure.
3. using a screwdriver, remove the cover panel on the
lower front part of the washer-dryer (see figure).
4. pull outwards using the tab as indicated in the figure,
until the plastic tie-rod is freed from its stop position; pull
downwards and open the door at the same time.
5. reposition the panel, making sure the hooks are securely
in place before you push it onto the appliance.
20

6
GB
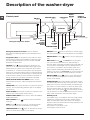
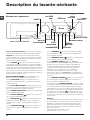
Detergent dispenser drawer: used to dispense
detergents and washing additives (see “Detergents and
laundry”).
Programme Key: the Programme Key inside the deter-
gent dispenser shows all the available programmes toge-
ther with a graphical guide on how to use the individual
dispenser compartments.
ON/OFF button : press this briefly to switch the ma-
chine on or off. The START/PAUSE indicator light, which
flashes slowly in a green colour shows that the machine
is switched on. To switch off the washer-dryer during the
wash cycle, press and hold the button for approximately 3
seconds; if the button is pressed briefly or accidentally the
machine will not switch off. If the machine is switched off
during a wash cycle, this wash cycle will be cancelled.
WASH CYCLE SELECTOR KNOB: used to set the
desired wash cycle (see “Table of programmes and wash
cycles”).
FUNCTION button: press the button to select the desired
function. The corresponding indicator light on the display
will switch on.
AUTO CLEAN button: press to clean the machine’s inter-
nal parts (see “Cleaning the washer-dryer”).
DIRECT INJECTION button: press to select the DIRECT
INJECTION option.
MULTI RINSE button : press to select the desired
rinse type.
SPIN button : press to reduce or completely exclude
the spin cycle - the value is indicated on the display.
TEMPERATURE button : press to decrease the tempe-
rature: the value will be shown on the display.
DRYING button : press to decrease or exclude drying;
the selected drying level or time will appear on the display.
DRYING ONLY button : press to run the drying cycle
only.
KEY LOCK button : to activate the control panel
lock, press and hold the button for approximately 2
seconds. When the display visualises “KEY LOCK ON” the
control panel is locked (apart from the ON/OFF button).
This means it is possible to prevent wash cycles from
being modified accidentally, especially where there are
children in the home. To deactivate the control panel lock,
press and hold the button for approximately 2 seconds.
DELAY TIMER button : press to set a delayed start
time for the selected wash cycle. The delay time will be
shown on the display.
START/PAUSE button with indicator light: when the gre-
en indicator light flashes slowly, press the button to start a
wash cycle. Once the cycle has started the indicator light
will remain lit in a fixed manner. To pause the wash cycle,
press the button again; the indicator light will flash in an
orange colour. If the symbol is not illuminated, the door
may be opened. To start the wash cycle from the point at
which it was interrupted, press the button again.
Standby mode
This washer-dryer, in compliance with new energy saving
regulations, is fitted with an automatic standby system
which is enabled after about 30 minutes if no activity is
detected. Press the ON-OFF button briefly and wait for the
machine to start up again.
Consumption in off-mode: 0,5 W
Consumption in Left-on: 8 W
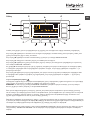
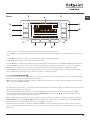
Description of the washer-dryer
Control panel
TEMPERATURE
button
Detergent dispenser drawer
FUNCTION
button
ON/OFF
button
SPIN
button
START/PAUSE
button with indicator light
KEY LOCK
button
DELAY
TIMER
button
MULTI
RINSE
button
DISPLAY
AUTO
CLEAN
button
DIRECT
INJECTION
button
Programme
Key
WASH
CYCLE
SELECTOR
KNOB
DRYING ONLY
button
DRYING
button

GB
7
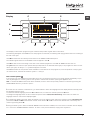
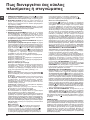
The display is useful when programming the machine and provides a great deal of information.
The following will appear in area A: the icon and programme selected, the washing and drying phases and time remaining to
the end of the cycle.
Area B will include the two intensity levels relative to the DIRECT INJECTION option.
The indicator lights relative to the available functions appear in area C.
Area D will have the time remaining to the start of the selected programme if the DELAY TIMER function was set.
String E shows the maximum spin speed value (this depends on the selected wash cycle); if the programme does not inclu-
de the spin cycle, the dimly lit “--” symbol will appear in the area.
Area F will visualise the temperature value selectable on the basis of the set programme; if the temperature of the program-
me cannot be set, the area will show the symbol “--” dimly lit.
Door locked symbol
If the symbol is lit, this indicates that the washer-dryer door is blocked to prevent it from being opened accidentally. To pre-
vent any damage from occurring, wait for the symbol to switch itself off before opening the appliance door.
N.B.: if the DELAY TIMER function has been activated, the door cannot be opened; pauses the machine by pressing the
START/PAUSE button if you wish to open it.
! The first time the machine is switched on, you will be asked to select the language and the display will automatically show
the language selection menu.
To select the desired language press the X and Y buttons; to confirm the selection press the Z button.
To change the language switch off the machine and press buttons G, H, I simultaneously until an alarm is heard: the
language-selection menu will be displayed again.
! To change the display luminosity, which by default is set to the highest value, switch the machine off then simultaneously
press buttons G, L and M until the buzzer sounds. Press buttons X and Y to choose the desired level of luminosity then
confirm by pressing button Z.
! During the wash cycle or when the DELAY TIMER function has been enabled, if the user does not interact with the display
for 1 minute the “SCREEN SAVER” activates. To return to the previous window, simply press any button.
Display
2:55
90°
1200
-- h
--
COTONE
H
G
Y
X Z
I
L M
A
B
C
C
D
E
C
F

8
GB
How to run a wash cycle or a
drying cycle
1. SWITCH THE MACHINE ON. Press the On/Off button ;
the text HOTPOINT will appear on the display and the START/
PAUSE indicator light will flash slowly in a green colour.
2. LOAD THE LAUNDRY. Open the porthole door. Load
the laundry, making sure you do not exceed the maximum
load value indicated in the table of programmes on the
following page.
3. MEASURE OUT THE DETERGENT. Open the
detergent dispenser drawer and pour the detergent into
the relevant compartments as described in “Detergents
and laundry”.
4. CLOSE THE DOOR.
5. SELECT THE WASH CYCLE. Use the WASH CYCLE
SELECTOR knob to select the desired wash cycle; the
name of the wash cycle will appear on the display. A
temperature and spin speed is set for each wash cycle;
these may be adjusted. The duration of the cycle will
appear on the display.
6. CUSTOMISE THE WASH CYCLE. Use the relevant
buttons:
Modifying the temperature and/or spin speed. The
machine automatically selects the maximum temperature
and spin speed set for the selected wash cycle; these
values cannot therefore be increased. The temperature
can be decreased by pressing the button, until the cold
wash (the display will visualise the “--” symbol) setting is
reached. The spin speed may be progressively reduced by
pressing the button, until it is completely excluded (the
display will visualise the “--” symbol). If these buttons are
pressed again, the maximum values are restored.
! Exception: if the 5 programme is selected, the
temperature can be increased up to a value of 40°C.
! Exception: if the 7 programme is selected, the
temperature can be increased up to a value of 90°C.
! Exception: if the 9 programme is selected, the
temperature can be increased up to a value of 60°C.
Setting a delayed start.
To set a delayed start for the selected programme, press
the corresponding button repeatedly until the required
delay period has been reached. To remove the delayed
start function press the button until the text
“-- h” appears on the display.
Setting the drying cycle.
The desired drying cycle type may be set by pressing the
DRYING button once or several times. Two options are
available:
A - Based on the how damp the clothes are once they
have been dried:
Iron: suitable for clothes which will need ironing afterwards.
the remaining dampness softens creases, making them
easier to remove.
Hanger: ideal for clothes which do not need to be dried fully.
Cupboard: suitable for laundry which can be put back in a
cupboard without being ironed.
Extra: suitable for garments which need to be dried
completely, such as sponges and bathrobes.
B - Based on a set time period: between 30 and 180 minutes.
To exclude the drying phase press the relevant button until
the text OFF appears on the display.
If your laundry load to be washed and dried is much greater
than the maximum stated load, perform the wash cycle, and
when the cycle is complete, divide the garments into groups
and put some of them back in the drum. At this point, follow
the instructions provided for a “Drying only” cycle. Repeat
this procedure for the remainder of the load. A cooling-down
period is always added to the end of each drying cycle.
Drying only
Press button to perform the drying-only cycle.
After selecting the desired cycle (compatible with the type
of garments), press button to exclude the washing
phase and start the drying phase at the maximum level for
the selected cycle. The drying level or time may be set and
changed by pressing the drying button . (Not compati-
ble with cycles 1-2-3-4 and 14).
Set the rinse type.
Option makes it possible to select the desired rinse
type for sensitive skin. Press the button once for the “Extra
+1” level, which makes it possible to select an additional
rinse after the standard cycle rinse and remove all traces
of detergent. Press the button again for the “Extra +2”
level, which makes it possible to select two additional
rinses to the standard cycle rinses; it is recommended
for very sensitive skin. When the button is pressed for the
third time, the “Extra +3” level is set, thus allowing the
selection of 3 rinses in addition to the standard cycle’s
rinses. The option - started with cycles at a temperature of
40°C - makes it possible to remove major allergens such
as pollen, cat and dog hair. With cycles at a temperature
higher than 40° a very good level of antiallergic protection
is achieved. Press the button again to go back to the
“Normal rinse” rinse type. If the current adjustment can
be neither set nor changed, the display will show “No
Selection” or “No Change”.
Modifying the cycle settings.
• Pressthebuttontoenablethefunction;therelevant
indicator light on the display will light up.
• Pressthebuttonagaintodisablethefunction;the
relevant indicator light on the display will switch off.
! If the selected function is incompatible with the set
programme, the relevant indicator light will appear dimly lit;
in addition, the incompatibility will be signalled by a buzzer
(3 beeps) and the wording “No Selection” will appear on
the display.
! If the selected function is incompatible with another
previously set function, the wording “No Selection” will
appear on the display and the function will not be enabled.
! The functions may affect the recommended load value
and/or the duration of the cycle.
7. START THE PROGRAMME. Press the START/PAUSE
button. The corresponding indicator light will become
green, remaining lit in a fixed manner, and the door will be
locked (the DOOR LOCKED symbol will be on). During
the wash cycle, the name of the phase in progress will
appear on the display. To change a wash cycle while it is in
progress, pause the washer-dryer using the START/PAUSE
button (the START/PAUSE indicator light will flash slowly in
an orange colour); then select the desired cycle and press
the START/PAUSE button again. To open the door while
a cycle is in progress, press the START/PAUSE button; if
the DOOR LOCKED symbol is switched off the door
may be opened. Press the START/PAUSE button again
to restart the wash cycle from the point at which it was
interrupted.
8. THE END OF THE WASH CYCLE. This will be indicated
by the text “CYCLE END” on the display; when the DOOR
LOCKED symbol switches off the door may be opened.
Open the door, unload the laundry and switch off the machine.
! If you wish to cancel a cycle which has already begun, press
and hold the button. The cycle will be stopped and the
machine will switch off.
Direct Injection
The washer-dryer is equipped with the innovative technology
«Direct Injection» which pre-mixes water and detergent, thus
immediately activating the detergent’s cleaning principles.
This active emulsion is directly introduced into the drum of the
washer-dryer and penetrates the fibres with more efficacy in
cleaning even heavily soiled garments at low temperatures,
fully preserving colours and fabrics.
The mode «Power» ensures the best cleaning performance
and the mode «EcoEnergy» allows more energy saving.

GB
9
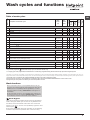
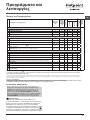
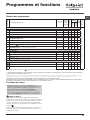
Wash cycles and functions
Table of wash cycles
Wash functions
! If the selected function is incompatible with the set pro-
gramme, the relevant indicator light will appear dimly lit; in
addition, the incompatibility will be signalled by a buzzer
(3 beeps) and the wording “No Selection” will appear on
the display.
! If the selected function is incompatible with another pre-
viously set function, the wording “No Selection” will appear
on the display and the function will not be enabled.
Steam Hygiene
This option enhances washing performance by generating
steam during the wash cycle to remove any bacteria from
the fibres, which are treated at the same time. Place the
laundry in the drum, choose a compatible programme and
select option .
! The steam generated during the operation of the washing
machine may cause the porthole door to become hazy.
1) Test wash cycle in compliance with regulation EN 50229: set wash cycle 8 with a temperature of 60°C.
2) Long wash cycle for cottons: set programme 8 at temperature 40°C and press the DIRECT INJECTION button under “Power” mode.
3) Long wash cycle for synthetics: set wash cycle 9 with a temperature of 40°C.
* If you select programme and exclude the spin cycle, the machine will drain only.
The length of cycle shown on the display or in this booklet is an estimation only and is calculated assuming standard working conditions. The actual duration can vary accor-
ding to factors such as water temperature and pressure, the amount of detergent used, the amount and type of load inserted, load balancing and any wash options selected.
Wash cycles
Description of the wash cycle
Max.
temp.
(°C)
Max.
speed
(rpm)
Drying
Detergents
Max. load
(kg)
Cycle dura-
tion
Wash
Fabric
softener
ANTI CREASE
The duration of the wash cycle can be checked on the display.
1
Daily Mix Wash & Dry
40°
800
3
2
Shirts Wash & Dry
40°
1000
2
3
Pre Iron
- - - - - 1,5
4
Steam Refresh
- - - - - 2
DAILY CLEAN
5 Anti-Stain Turbo 45’
20°
(Max. 40°C)
1200
5,5
6 Anti-Stain Power 20°C
20°
1600
10
7
Cotton: lightly soiled resistant and delicate colours.
40°
(Max. 90°C)
1600
10
8
Eco Cotton
60°/40°
(1-2): heavily soiled whites and resistant colours.
60° 1600
10
9
Synthetics (3): lightly soiled resistant colours.
40°
(Max. 60°C)
1000
5
SPECIALS
10 Multi Colour
40° 1600
10
11
Ultra Delicates
30°
--
1
12
Wool: for wool, cashmere, etc.
40° 800
2,5
13
Sport
40° 600
4,5
14
Fast 30’ (**): to refresh lightly soiled garments quickly (not suitable for wool, silk and
clothes which require washing by hand).
30° 800
4
Partial Programmes
Rinse
- 1600
-
10
Spin + Pump out
- 1600
- - 10
Pump out only *
-
--
- - - 10
** If a drying cycle is also programmed, the machine will run a “wash+dry” programme lasting 45’ with maximum spin speed and a 1kg laundry load.

10
GB
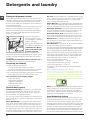
Detergent dispenser drawer
Good washing results also depend on the correct dose of
detergent: adding too much detergent will not necessarily
result in a more efficient wash, and may in fact cause a
build up on the inside of your appliance and contribute to
environmental pollution.
! Use powder detergent for white cotton garments, for pre-
washing, and for washing at temperatures over 60°C.
! Follow the instructions given on the detergent packaging.
! Do not use hand washing detergents because these
create too much foam.
Open the detergent di-
spenser drawer and pour
in the detergent or washing
additive, as follows.
! Do not pour detergent into
the middle compartment (*).
compartment 1: Deter-
gent for the wash cycle
(powder or liquid)
If liquid detergent is used, it is recommended that the
removable plastic partition A (supplied) be used for proper
dosage. If powder detergent is used, place the partition
into slot B.
compartment 2: Additives (fabric softeners, etc.)
The fabric softener should not overflow the grid.
Preparing the laundry
•Dividethelaundryaccordingto:
- the type of fabric/the symbol on the label
- the colours: separate coloured garments from whites.
•Emptyallgarmentpocketsandcheckthebuttons.
•Donotexceedthelistedvalues,whichrefertotheweight
of the laundry when dry: see “Table of wash cycles”.
How much does your laundry weigh?
1 sheet 400-500 g
1 pillow case 150-200 g
1 tablecloth 400-500 g
1 bathrobe 900-1200 g
1 towel 150-250 g
Special wash cycles
Daily Mix Wash & Dry use programme 1 to wash and
dry mixed garments (cotton and synthetics). This cycle
may be used to wash and dry loads of up to 3 kg; we
recommend the use of liquid detergent.
The use of the steam in this programme is optimised to re-
duce the formation of creases on garments, making them
easier to iron.
Shirts Wash & Dry: use programme 2 to wash and dry
shirts and T-shirts in different fabrics and colours to ensure
maximum care. This cycle may be used to wash and dry
loads of up to 2 kg. To achieve optimum results, use liquid
detergent and pre-treat cuffs, collars and stains. The use of
the steam in this programme is optimised to reduce the for-
mation of creases on garments, making them easier to iron.
Pre Iron: use this programme immediately before ironing;
max. 1.5 kg load. The use of the steam in this programme
is optimised to reduce the formation of creases on gar-
ments, making them easier to iron.
Steam Refresh: for refreshing garments, neutralised unple-
asant odours and relaxing the fibres by delivering steam into
the drum. The garments will be damp at the end of the cycle.
Anti-Stain Turbo 45’: this cycle ensures excellent stain
removal capacity even at 20°C in just 45 minutes. The tem-
perature of this cycle can be increased up to 40°C.
Anti-Stain Power 20°C: this programme ensures ma-
ximum stain removal capacity with no need for pre-treat-
ment at low temperatures, preserving fabrics and colours.
Multi Colour: for washing coloured cotton garments.
This programme is optimised to keep colours bright even
after repeated washing.
Ultra Delicates: use programme 11 to wash very delica-
te garments having strasses or sequins.
We recommend turning the garments inside out before washing
and placing small items into the special bag for washing delica-
tes. Use liquid detergent on delicate garments for best results.
When selecting an exclusively time-based drying function,
a drying cycle is performed at the end of the wash cycle
that is particularly delicate, thanks to light handling and
appropriate temperature control of the water jet.
The recommended durations are:
1 kg of synthetic garments --> 165 min
1 kg of synthetic and cotton garments --> 180 min
1 kg of cotton garments --> 180 min
The degree of dryness depends on the load and fabric
composition.
Wool - Woolmark Apparel Care - Green:
the wool wash cycle of this machine has been approved
by The Woolmark Company for the washing of wool gar-
ments labelled as “hand wash” provided that the products
are washed according to the instructions on the garment
label and those issued by the manufacturer of this washer-
dryer. (M1135)
Sport: for washing lightly soiled sports clothing (tracksuits,
shorts, towels, etc.); for best results, we recommend not
exceeding the maximum load indicated in the “Table of
wash cycles”. We recommend using liquid detergent, and
adding the amount suitable for a half-load.
Load balancing system
Before every spin cycle, to avoid excessive vibrations and
to distribute the load in a uniform manner, the drum rotates
continuously at a speed which is slightly greater than the
washing rotation speed. If, after several attempts, the load is
not balanced correctly, the machine spins at a reduced spin
speed. If the load is excessively unbalanced, the washer-
dryer performs the distribution process instead of spinning.
To encourage improved load distribution and balance, we
recommend small and large garments are mixed in the load.
Detergents and laundry
1
2
A
B
*

GB
11
Troubleshooting
Your washer-dryer could fail to work. Before contacting the Technical Assistance Centre (see “Assistance”), make sure that
the problem cannot be solved easily using the following list.
Problem:
The washer-dryer does not switch on.
The wash cycle does not start.
The washer-dryer does not take in
water (the text “NO WATER, Turn
tap on” appears on the display).
The washer-dryer continuously
takes in and
drains water.
The washer-dryer does not drain or
spin.
The washer-dryer vibrates a lot
during the spin cycle.
The washer-dryer leaks.
The machine is locked and the display
flashes, indicating an error code (e.g.
F-01, F-..).
There is too much foam.
The washer-dryer does not dry.
Possible causes / Solutions:
• Theapplianceisnotpluggedintothesocketfully,orisnotmakingcontact.
•Thereisnopowerinthehouse.
•Thewasher-dryerdoorisnotclosedproperly.
•TheON/OFFbuttonhasnotbeenpressed.
•TheSTART/PAUSEbuttonhasnotbeenpressed.
•Thewatertaphasnotbeenopened.
•Adelayedstarthasbeenset.
•Thewaterinlethoseisnotconnectedtothetap.
•Thehoseisbent.
•Thewatertaphasnotbeenopened.
•Thereisnowatersupplyinthehouse.
•Thepressureistoolow.
•TheSTART/PAUSEbuttonhasnotbeenpressed.
•Thedrainhoseisnotfittedataheightbetween65and100cmfromthefloor
(see “Installation”).
•Thefreeendofthehoseisunderwater(see “Installation”).
•Thewalldrainagesystemisnotfittedwithabreatherpipe.
If the problem persists even after these checks, turn off the water tap, switch
the appliance off and contact the Assistance Service. If the dwelling is on one of
the upper floors of a building, there may be problems relating to water drainage,
causing the washer-dryer to fill with water and drain continuously. Special anti-
draining valves are available in shops and help to avoid this inconvenience.
•Thewashcycledoesnotincludedraining:somewashcyclesrequirethedrain
phase to be started manually (see “Wash cycles and functions”).
•Thedrainhoseisbent(see “Installation”).
•Thedrainageductisclogged.
•Thedrumwasnotunlockedcorrectlyduringinstallation(see “Installation”).
•Thewasher-dryerisnotlevel(see “Installation”).
•Thewasher-dryeristrappedbetweencabinetsandwalls(see “Installation”).
•Thewaterinlethoseisnotscrewedonproperly(see “Installation”).
•Thedetergentdispenserdrawerisblocked(forcleaninginstructions,see “Care
and maintenance”).
•Thedrainhoseisnotfixedproperly(see “Installation”).
•Switchoffthemachineandunplugit,waitforapproximately1minuteandthen
switch it back on again.
If the problem persists, contact the Technical Assistance Service.
•Thedetergentisnotsuitableformachinewashing(itshoulddisplaythetext
“for washer-dryers” or “hand and machine wash”, or the like).
•Toomuchdetergentwasused.
• Theapplianceisnotpluggedintothesocket,ornotenoughtomakecontact.
• Therehasbeenapowerfailure.
• Theappliancedoorisnotshutproperly.
• ADelayTimerhasbeenset.
• DRYINGisintheOFF position.

12
GB
Before calling for Assistance:
• Check whether you can solve the problem alone (see “Troubleshooting”);
•Restarttheprogrammetocheckwhethertheproblemhasbeensolved;
•Ifthisisnotthecase,contactanauthorisedTechnicalAssistanceCentreusingthetelephonenumberprovidedonthe
guarantee certificate.
! Always request the assistance of authorised technicians.
Have the following information to hand:
• thetypeofproblem;
• theappliancemodel(Mod.);
• theserialnumber(S/N).
This information can be found on the data plate applied to the rear of the washer-dryer, and can also be found on the front of
the appliance by opening the door.
Service

13
GR
Ελληνικά
! Το σύμβολο αυτό σου υπενθυμίζει να
διαβάσεις αυτό το εγχειρίδιο οδηγιών.
Περιεχόμενα
Εγκατάσταση, 14-15
Αποσυσκευασία και οριζοντίωση
Υδραυλικές και ηλεκτρικές συνδέσεις
Πρώτος κύκλος πλυσίματος
Τεχνικά στοιχεία
Συντήρηση και φροντίδα, 16
Αποκλεισμός νερού και ηλεκτρικού ρεύματος
Καθαρισμός του πλυντηρίου
Καθαρισμός του συρταριού απορρυπαντικών
Φροντίδα της πόρτας και του κάδου
Καθαρισμός της αντλίας
Έλεγχος του σωλήνα τροφοδοσίας του νερού
Προφυλάξεις και συμβουλές, 17
Γενική ασφάλεια
Διάθεση
Χειρονακτικό άνοιγμα της πόρτας
Περιγραφή του πλυντηρίου, 18-19
Πίνακας ελέγχου
Οθόνη
Πως διενεργείται έας κύκλος πλυσίματος ή
στεγνώματος, 20
Προγράμματα και λειτουργίες, 21
Πίνακας των Προγραμμάτων
Λειτουργίες πλυσίματος
Απορρυπαντικά και μπουγάδα, 22
Θήκη απορρυπαντικών
Προετοιμασία της μπουγάδας
Ειδικά προγράμματα
Σύστημα ισοστάθμισης του φορτίου
Ανωμαλίες και λύσεις, 23
Υποστήριξη, 24
GR
Οδηγίες χρήσης
ΠΛΥΝΤΗΡΙΟ ΡΟΥΧΩΝ
RDPD 107617 J

14
GR
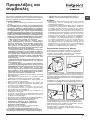
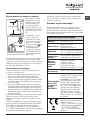
Εγκατάσταση
Μια φροντισμένη οριζοντίωση προσδίδει
σταθερότητα στη μηχανή και αποσοβεί
δονήσεις, θορύβους και μετατοπίσεις κατά
τη λειτουργία. Σε περίπτωση μοκέτας ή
τάπητα, ρυθμίστε τα ποδαράκια έτσι ώστε να
υφίσταται κάτω από το πλυντήριο αρκετός
χώρος για τον αερισμό.
Υδραυλικές και ηλεκτρικές
συνδέσεις
Σύνδεση του σωλήνα τροφοδοσίας του
νερού
1. Συνδέστε τη
συσκευή A σε έναν
κρουνό κρύου
νερού με στόμιο
σπειρώματος 3/4 gas
και, στη συνέχεια,
βιδώστε επάνω
του το σωλήνα
τροφοδοσίας.
Πριν από τη σύνδεση,
αφήστε να τρέξει το
νερό μέχρι να γίνει διαυγές.
Για τη σωστή εγκατάσταση της συσκευής,
ακολουθήστε τις οδηγίες που αναφέρονται
στη συσκευασία.
! Η συσκευή είναι ήδη ρυθμισμένη για
να επιτρέπει τη σωστή λειτουργία του
πλυντηρίου με στεγνωτήριο. Συνεπώς,
συνιστάται να αποφεύγετε την τροποποίηση
των ρυθμίσεων
2. Συνδέστε το
σωλήνα τροφοδοσίας
στο πλυντήριο
βιδώνοντάς τον στην
αντίστοιχη είσοδο
νερού, στο πίσω
μέρος επάνω δεξιά
(βλέπε εικόνα).
3. Προσέξτε ώστε στο σωλήνα να μην
υπάρχουν ούτε πτυχώσεις, ούτε στενώσεις.
! Η πίεση νερού του κρουνού πρέπει να
κυμαίνεται μεταξύ των τιμών του πίνακα
Τεχνικά στοιχεία (βλέπε σελίδα δίπλα).
! Αν το μήκος του σωλήνα τροφοδοσίας δεν
επαρκεί, απευθυνθείτε σε ένα ειδικευμένο
κατάστημα ή σε εξουσιοδοτημένο τεχνικό.
! Μη χρησιμοποιείτε ποτέ
χρησιμοποιημένους σωλήνες.
! Χρησιμοποιείτε εκείνους που σας
παρέχονται με τη μηχανή.
! Είναι σημαντικό να διατηρήσετε το
εγχειρίδιο αυτό για να μπορείτε να το
συμβουλεύεστε οποιαδήποτε στιγμή. Σε
περίπτωση πώλησης, παραχώρησης ή
μετακόμισης, βεβαιωθείτε ότι παραμένει μαζί
με το πλυντήριο για να πληροφορεί τον νέο
ιδιοκτήτη για τη λειτουργία και τις σχετικές
προειδοποιήσεις.
! Διαβάστε προσεκτικά τις οδηγίες:
υπάρχουν σημαντικές πληροφορίες για την
εγκατάσταση, τη χρήση και την ασφάλεια.
Αποσυσκευασία και οριζοντίωση
Αποσυσκευασία
1. Αποσυσκευάστε το
πλυντήριο.
2. Ελέγξτε αν το
πλυντήριο έχει
υποστεί ζημιές κατά
τη μεταφορά. Αν
έχει υποστεί ζημιές
μην το συνδέετε και
επικοινωνήστε με τον
μεταπωλητή.
3. Αφαιρέστε τις 4 βίδες προστασίας για
τη μεταφορά και το λαστιχάκι με το σχετικό
διαχωριστικό, που βρίσκονται στο πίσω
μέρος (βλέπε εικόνα).
4. Κλείστε τις οπές με τα πλαστικά πώματα
που σας παρέχονται.
5. Διατηρείστε και τα τρία τεμάχια: αν το
πλυντήριο χρειαστεί να μεταφερθεί, θα
πρέπει να ξαναμονταριστούν.
! Οι συσκευασίες δεν είναι παιχνίδια για
μικρά παιδιά.
Ευθυγράμμιση
1. Εγκαταστήστε το πλυντήριο σε ένα
δάπεδο επίπεδο και ανθεκτικό, χωρίς να το
ακουμπήσετε σε τοίχους, έπιπλα ή άλλο.
2. Αν το δάπεδο
δεν είναι απόλυτα
οριζοντιωμένο,
αντισταθμίστε
τις ανωμαλίες
βιδώνοντας ή
ξεβιδώνοντας τα
πρόσθια ποδαράκια
(βλέπε εικόνα).Η
γωνία κλίσης,
μετρημένη στην
επιφάνεια εργασίας, δεν πρέπει να ξεπερνάει
τις 2°.
A

15
GR
Σύνδεση του σωλήνα αδειάσματος
Συνδέστε το σωλήνα
αδειάσματος, χωρίς
να τον διπλώσετε,
σε μια σωλήνωση
αδειάσματος ή σε
μια παροχέτευση
επιτοίχια σε ύψος
από το έδαφος
μεταξύ 65 και 100
cm.
Εναλλακτικά,
στηρίξτε τον σωλήνα
αδειάσματος
στο χείλος ενός
νιπτήρα ή μιας
λεκάνης, δένοντας
τον οδηγό
(διατίθεται από την
υπηρεσία τεχνικής
υποστήριξης) στη
βρύση (βλέπε
εικόνα). Το ελεύθερο άκρο του σωλήνα
αδειάσματος δεν πρέπει να παραμένει
βυθισμένο στο νερό.
! Δεν συνιστάται η χρήση προεκτάσεων
σωλήνων. Αν απαιτείται, η προέκταση πρέπει
να έχει την ίδια διάμετρο του αρχικού σωλήνα
και να μην ξεπερνάει τα 150 cm.
Ηλεκτρική σύνδεση
Πριν εισάγετε το βύσμα στην ηλεκτρική
πρίζα, βεβαιωθείτε ότι:
• η πρίζα διαθέτει γείωση και τηρεί τις εκ του
νόμου προδιαγραφές.
• Η πρίζα να είναι σε θέση να υποφέρει
το μέγιστο φορτίο ισχύος της μηχανής,
που αναφέρεται στον πίνακα Τεχνικών
στοιχείων (βλέπε δίπλα).
• Η τάση τροφοδοσίας να κυμαίνεται μεταξύ
των τιμών που αναφέρονται στον πίνακα
Τεχνικών στοιχείων (βλέπε δίπλα).
• Η πρίζα να είναι συμβατή με το βύσμα
του πλυντηρίου. Σε αντίθετη περίπτωση,
αντικαταστήστε την πρίζα.
! Το πλυντήριο δεν εγκαθίσταται σε
ανοιχτό χώρο, ακόμη και αν ο χώρος είναι
καλυμμένος, διότι είναι πολύ επικίνδυνο να το
αφήνετε εκτεθειμένο σε βροχή και κακοκαιρία.
! Με την εγκατάσταση του πλυντηρίου, η
πρίζα ρεύματος πρέπει να είναι εύκολα
προσβάσιμη.
! Μη χρησιμοποιείτε προεκτάσεις και
πολύπριζα.
! Το καλώδιο δεν πρέπει να φέρει πτυχές ή
να είναι συμπιεσμένο.
65 - 100 cm
! Το καλώδιο τροφοδοσίας πρέπει να
αντικαθίσταται μόνο από εξουσιοδοτημένους
τεχνικούς.
Προσοχή! Η επιχείρηση αποποιείται κάθε
ευθύνης σε περίπτωση που δεν τηρούνται
αυτοί οι κανόνες.
Πρώτος κύκλος πλυσίματος
Μετά την εγκατάσταση, πριν τη χρήση,
διενεργήστε ένα κύκλο πλυσίματος με
απορρυπαντικό και χωρίς ρούχα θέτοντας
το πρόγραμμα ΚΑΘΑΡΙΣΜΟΣ (βλέπε
«Καθαρισμός του πλυντηρίου»).
Ôå÷íéêÜ óôïé÷åßá
ÌïíôÝëï RDPD 107617 J
ÄéáóôÜóåéò
ðëÜôïò cm 59,5
ýøïò cm 85
âÜèïò cm 60,5
×ùñçôéêüôçôá
áðü 1 Ýùò 10 kg ãéá ôï ðëýóéìï
áðü 1 Ýùò 7 kg ãéá ôï óôÝãíùìá
ÇëåêôñéêÝò
óõíäÝóåéò
ÂëÝðå ôçí ðéíáêßäá
÷áñáêôçñéóôéêþí åðß ôçò
ìç÷áíÞò
ÓõíäÝóåéò
íåñïý
ìÝãéóôç ðßåóç
1 MPa (10 bar)
ÅëÜ÷éóôç ðßåóç
0,05 MPa (0,5 bar)
÷ùñçôéêüôçôá ôïõ êÜäïõ 71 ëßôñá
Ôá÷ýôçôá
óôõøßìáôïò
ìÝ÷ñé 1600 óôñïöÝò ôï ëåðôü
ÐñïãñÜììáôá
åëÝã÷ïõ
óýìöùíá ìå
ôïí êáíïíéóìü
EN 50229
ðëýóéìï: ðñüãñáììá 8
(60°); êôåëïýìåíï ìå 10 kg
ìðïõãÜäáò.
óôÝãíùìá: το στέγνωμα του
μέγιστου φορτίου (7 kg) θα
πρέπει να πραγματοποιείται
επιλέγοντας το επίπεδο
στεγνώματος “Έξτρα”. Το
στέγνωμα του υπόλοιπου
φορτίου θα πρέπει
πραγματοποιείται επιλέγοντας
το επίπεδο στεγνώματος
“Έξτρα”: το φορτίο της
μπουγάδας θα πρέπει να
αποτελείται από 3 σεντόνια,
1 μαξιλαροθήκη και 2
πετσέτες.
Ç óõóêåõÞ áõôÞ åßíáé
óýìöùíç ìå ôéò áêüëïõèåò
ÊïéíïôéêÝò Ïäçãßåò:
- EMC - 2014/30/
EU (ÇëåêôñïìáãíçôéêÞ
Óõìâáôüôçôá)
- 2012/19/EU (WEEE)
- LVD - 2014/35/EU (×áìçëÞ
ÔÜóç)

16
GR
Συντήρηση και φροντίδα
Αποκλεισμός νερού και ηλεκτρικού
ρεύματος
• Κλείνετε τον κρουνό του νερού μετά
από κάθε πλύσιμο. Έτσι περιορίζεται η
φθορά της υδραυλικής εγκατάστασης του
πλυντηρίου και αποσοβείται ο κίνδυνος
απωλειών.
• Να βγάζετε το βύσμα από το ρεύμα όταν
καθαρίζετε το μηχάνημα και κατά τις
εργασίες συντήρησης.
Καθαρισμός του πλυντηρίου
• Το εξωτερικό μέρος και τα λαστιχένια
μέρη μπορούν να καθαρίζονται με ένα πανί
βρεγμένο με χλιαρό νερό και σαπούνι. Μη
χρησιμοποιείτε διαλύτες ή αποξυστικά.
• Το πλυντήριο διαθέτει ένα πρόγραμμα
ΑΥΤΌ-ΚΑΘΑΡΙΣΜΟΣ των εσωτερικών μερών
που πρέπει να διενεργείται χωρίς κανένα
τύπο φορτίου στον κάδο.
Το απορρυπαντικό (σε ποσότητα ίση με
το 10% της προτεινόμενης για ρούχα
λίγο λερωμένα) ή πρόσθετα ειδικά για
τον καθαρισμό του πλυντηρίου, μπορούν
να χρησιμοποιηθούν ως ενισχυτικά
στο πρόγραμμα πλύσης. Συνιστάται να
διενεργείτε το πρόγραμμα καθαρισμού κάθε
40 κύκλους πλυσίματος.
Για να ενεργοποιήσετε το πρόγραμμα,
κρατήστε πατημένο το πλήκτρο για 5
δευτερόλεπτα κι έπειτα πατήστε το πλήκτρο
ΕΝΑΡΞΗ/ΠΑΥΣΗ (Έναρξη/Παύση). Το
πρόγραμμα θα ξεκινήσει και θα έχει διάρκεια
περίπου 70 λεπτά.
Καθαρισμός του συρταριού
απορρυπαντικών
Τραβήξτε το συρτάρι
ανασηκώνοντάς το
και τραβώντας το
προς τα έξω (βλέπε
εικόνα).
Πλένετέ το κάτω από
τρεχούμενο νερό. Ο
καθαρισμός αυτός
διενεργείται συχνά.
Φροντίδα της πόρτας και του κάδου
• Να αφήνετε πάντα μισόκλειστη την πόρτα
για να μην παράγονται δυσοσμίες.
Καθαρισμός της αντλίας
Το πλυντήριο διαθέτει μια αντλία
αυτοκαθαριζόμενη που δεν χρειάζεται
συντήρηση. Μπορεί, όμως, να τύχει να
πέσουν μικρά αντικείμενα (κέρματα, κουμπιά)
στον προθάλαμο που προστατεύει την
αντλία, που βρίσκεται στο κάτω μέρος αυτής.
! Βεβαιωθείτε ότι ο κύκλος πλυσίματος έχει
τελειώσει και βγάλτε το βύσμα.
Για να έχετε πρόσβαση στον προθάλαμο:
1. αφαιρέστε το
ταμπλό κάλυψης
στο πρόσθιο πλευρό
του πλυντηρίου με
τη βοήθεια ενός
κατσαβιδιού
(βλέπε εικόνα).
2. Ξεβιδώστε το
καπάκι στρέφοντάς
το αριστερόστροφα
(βλέπε εικόνα): είναι
φυσικό να βγαίνει
λίγο νερό.
3. καθαρίστε επιμελώς το εσωτερικό.
4. ξαναβιδώστε το καπάκι.
5. ξαναμοντάρετε το πάνελ όντας σίγουροι,
πριν το σπρώξετε προς τη μηχανή, ότι έχετε
εισάγει τα γαντζάκια στις αντίστοιχες εσοχές.
Έλεγχος του σωλήνα τροφοδοσίας
του νερού
Ελέγχετε το σωλήνα τροφοδοσίας
τουλάχιστον μια φορά ετησίως. Αν
παρουσιάζει σκασίματα και σχισμές
αντικαθίσταται: κατά τα πλυσίματα οι ισχυρές
πιέσεις θα μπορούσαν να προκαλέσουν
αναπάντεχα σπασίματα.
! Μη χρησιμοποιείτε ποτέ
χρησιμοποιημένους σωλήνες.
1
2

17
GR
Προφυλάξεις και
συμβουλές
! Το πλυντήριο σχεδιάστηκε και κατασκευάστηκε σύμφωνα με τους
διεθνείς κανόνες ασφαλείας. Αυτές οι προειδοποιήσεις παρέχονται
για λόγους ασφαλείας και πρέπει να διαβάζονται προσεκτικά.
Γενική ασφάλεια
• Η συσκευή αυτή σχεδιάστηκε αποκλειστικά για οικιακή
χρήση.
• Η συσκευή αυτή μπορεί να χρησιμοποιηθεί
από παιδιά άνω των 8 ετών και από άτομα με
μειωμένες φυσικές, αισθητηριακές ή νοητικές
ικανότητες ή με εμπειρία και γνώσεις ανεπαρκείς,
αν επιτηρούνται ή αν έχουν δεχτεί κατάλληλη
εκπαίδευση σχετικά με τη χρήση της συσκευής με
τρόπο ασφαλή και κατανοώντας τους σχετικούς
κινδύνους. Τα παιδιά δεν πρέπει να παίζουν με τη
συσκευή. Συντήρηση και καθαρισμός δεν πρέπει
να διενεργούνται από παιδιά χωρίς επιτήρηση.
– Μη στεγνώνετε ρούχα μη πλυμένα.
– Τα ρούχα λερωμένα με ουσίες όπως
λάδι μαγειρέματος, ακετόνη, οινόπνευμα,
βενζίνη, κηροζίνη, ξελεκιαστικά, τρεμεντίνη,
κερί και οι ουσίες για την απομάκρυνσή
του πρέπει να πλένονται σε ζεστό νερό με
μεγαλύτερη ποσότητα απορρυπαντικού πριν
τα στεγνώσετε στο στεγνωτήριο.
– Αντικείμενα όπως το διογκωμένο ελαστικό
(αφρώδες ελαστικό), τα σκουφάκια μπάνιου,
τα αδιάβροχα υφασμάτινα υλικά, τα είδη με
ένα μέρος από ελαστικό και τα ενδύματα ή
τα μαξιλάρια που έχουν μέρη από αφρώδες
ελαστικό δεν πρέπει να στεγνώνονται στο
στεγνωτήριο.
– Μαλακτικά ή προϊόντα παρόμοια πρέπει να
χρησιμοποιούνται σύμφωνα με τις οδηγίες
του παραγωγού.
– Το τελικός μέρος ενός κύκλου στεγνώματος
γίνεται χωρίς θερμότητα (κύκλος ψύξης) για να
εξασφαλιστεί ότι τα είδη δεν θα υποστούν ζημιά.
ΠΡΟΣΟΧΗ: Μη σταματάτε ποτέ ένα
στεγνωτήριο πριν το τέλος του προγράμματος
στεγνώματος. Στην περίπτωση αυτή πάρτε
γρήγορα όλα τα ασπρόρουχα και απλώστε
τα για να κρυώσουν γρηγορότερα.
• Μην αγγίζετε το μηχάνημα με γυμνά πόδια ή χέρια ή τα
πόδια βρεγμένα.
• Μην βγάζετε το βύσμα από την ηλεκτρική πρίζα
τραβώντας το καλώδιο, αλλά να πιάνετε την πρίζα.
• Μην αγγίζετε το νερό αδειάσματος, αφού μπορεί να
φτάσει σε υψηλές θερμοκρασίες.
• Μην ζορίζετε σε καμία περίπτωση την πόρτα: θα
μπορούσε να χαλάσει ο μηχανισμός ασφαλείας που
προστατεύει από τυχαία ανοίγματα.
• Σε περίπτωση βλάβης, σε καμία περίπτωση να
μην επεμβαίνετε στους εσωτερικούς μηχανισμούς
προσπαθώντας να επισκευάσετε.
• Να ελέγχετε πάντα τα παιδιά να μην πλησιάζουν στο
μηχάνημα σε λειτουργία.
• Αν πρέπει να μετατοπιστεί, συνεργαστείτε δύο ή τρία
άτομα με τη μέγιστη προσοχή. Ποτέ μόνοι σας γιατί το
μηχάνημα είναι πολύ βαρύ.
• Πριν εισάγετε τη μπουγάδα ελέγξτε αν ο κάδος είναι άδειος.
• Η πόρτα κατά το στέγνωμα τείνει να θερμαίνεται.
• Μη στεγνώνεις ρούχα πλυμένα με
εύφλεκτους διαλύτες (π.χ. τριελίνη).
• Μη στεγνώνεις αφρώδη συνθετικά ή
ανάλογα ελαστομερή.
• Βεβαιώσου ότι κατά τις φάσεις του στεγνώματος
ο κρουνός του νερού είναι ανοιχτός.
• Τα παιδιά ηλικίας μικρότερης των 3 ετών
θα πρέπει να κρατιούνται σε απόσταση από το
στεγνωτήριο εκτός κι αν επιτηρούνται συνεχώς.
Χειρονακτικό άνοιγμα της πόρτας
Στην περίπτωση αδυναμίας ανοίγματος της πόρτας εξ
αιτίας απουσίας ηλεκτρικής ενέργειας ενώ θέλετε να
απλώσετε την μπουγάδα, προχωρήστε ως ακολούθως:
1. βγάλτε το βύσμα από την ηλεκτρική πρίζα.
2. βεβαιωθείτε ότι η στάθμη του νερού στο εσωτερικό της
μηχανής είναι χαμηλότερη σε σχέση με το άνοιγμα της πόρτας.
Σε αντίθετη περίπτωση αφαιρέστε το σε περίσσεια νερό μέσω
του σωλήνα αδειάσματος συλλέγοντάς το σε ένα κουβά όπως
φαίνεται στηνεικόνα.
3. αφαιρέστε το ταμπλό κάλυψης στο πρόσθιο πλευρό του
πλυντηρίου με τη βοήθεια ενός κατσαβιδιού (βλέπε εικόνα).
4. χρησιμοποιώντας τη γλωσσίτσα που φαίνεται στην
εικόνα τραβήξτε προς τα έξω μέχρι να ελευθερώσετε το
πλαστικό από το στοπ. Τραβήξτε το ακολούθως προς τα
κάτω και ταυτόχρονα ανοίξτε την πόρτα.
5. ξαναμοντάρετε το πάνελ όντας σίγουροι, πριν το
σπρώξετε προς τη μηχανή, ότι έχετε εισάγει τα γαντζάκια
στις αντίστοιχες εσοχές.
• Αφαιρέστε όλα τα αντικείμενα από τις
τσέπες, όπως αναπτήρες και σπίρτα.
Διάθεση
• Διάθεση του υλικού συσκευασίας: τηρείτε τους τοπικούς
κανονισμούς, ώστε οι συσκευασίες να μπορούν να
επαναχρησιμοποιηθούν.
• Η ευρωπαϊκή οδηγία 2012/19/EU για τα Απόβλητα
Ηλεκτρικού και Ηλεκτρονικού Εξοπλισμού, απαιτεί ότι
οι παλαιές οικιακές ηλεκτρικές συσκευές δεν πρέπει
να αποβάλονται μαζί με τα υπόλοιπα απόβλητα του
δημοτικού δικτύου. Οι παλαιές συσκευές πρέπει να
συλλεχθούν χωριστά προκειμένου να βελτιστοποιηθούν
η αποκατάσταση και η ανακύκλωση των υλικών που
περιέχουν και με σκοπό τη μείωση των βλαβερών
επιπτώσεων στην ανθρώπινη υγεία και το περιβάλλον.
Το σύμβολο με το διεγραμμένο “δοχείο αποβλήτων”
στο προϊόν υπενθυμίζει σε σας την υποχρέωσή σας,
πως όταν επιθυμείτε να πετάξετε τη συσκευή ,πρέπει
να συλλεχθεί χωριστά. Οι καταναλωτές θα πρέπει να
απευθύνονται στις τοπικές αρχές ή στα καταστήματα
λιανικής για πληροφορίες που αφορούν τη σωστή
διάθεση των παλαιών ηλεκτρικών συσκευών.
20

18
GR
Θήκη απορρυπαντικών: για την προσθήκη απορρυπαντικών
και πρόσθετων (βλέπε «Απορρυπαντικά και μπουγάδα»).
Αναλόγιο : στο συρταράκι απορρυπαντικών είναι
τοποθετημένο το αναλόγιο στο οποίο αναφέρονται όλα τα
διαθέσιμα προγράμματα, μαζί με έναν γραφικό οδηγό για
τον τρόπο χρήσης κάθε διαμερίσματος του συρταριού.
Κουμπί ON/OFF : πιέστε για λίγο το κουμπί για να
ανάψετε ή να σβήσετε το πλυντήριο. Το ενδεικτικό φωτάκι
ΕΝΑΡΞΗ/ΠΑΥΣΗ πράσινου χρώματος που αναβοσβήνει
αργά δείχνει ότι το πλυντήριο είναι αναμμένη. Για να
σβήσετε το πλυντήριο κατά το πλύσιμο πρέπει να κρατάτε
πατημένο το κουμπί πιο πολύ, περίπου 3 sec. Στιγμιαίο ή
τυχαίο πάτημα δεν επιτρέπει το σβήσιμο του πλυντηρίου.
Το σβήσιμο του πλυντηρίου κατά το πλύσιμο σε εξέλιξη
ακυρώνει το ίδιο το πλύσιμο
ΕΠΙΛΟΓΕΑΣ ΠΡΟΓΡΑΜΜΑΤΩΝ: Για να θέσετε το
επιθυμητό πρόγραμμα (βλέπε τον “Πίνακα προγραμμάτων”).
Κουμπι ΛΕΙΤΟΥΡΓΙΑΣ: πιέστε το πλήκτρο για να επιλέξετε
την επιθυμητή λειτουργία. Στην οθόνη θα φωτιστεί το
σχετικό ενδεικτικό φωτάκι.
Κουμπι ΚΑΘΑΡΙΣΜΟΣ: πατήστε το για καθαρισμό των
εσωτερικών τμημάτων της συσκευής (βλέπε «Καθαρισμός
του πλυντηρίου»).
Κουμπί ΑΜΕΣΗ ΕΓΧΥΣΗ: πατήστε για να επιλέξετε τη
δυνατότητα ΑΜΕΣΗ ΕΓΧΥΣΗ.
Κουμπι ΠΟΛΛΑ ΞΕΒΓΑΛΜΑΤΑ : πιέστε για να
επιλέξετε τον επιθυμητό τύπο ξεβγάλματος.
Κουμπι ΣΤΥΨΙΜΟ : πιέστε για να μειώσετε ή να
αποκλείσετε τελείως το στύψιμο – η τιμή φαίνεται στην
οθόνη.
Κουμπι ΘΕΡΜΟΚΡΑΣΙΑ : Πατήστε για να μειώσετε τη
θερμοκρασία: η τιμή εμφανίζεται στην οθόνη.
Κουμπι ΣΤΕΓΝΩΜΑ : πιέστε για να μειώσετε ή να
αποκλείσετε το στέγνωμα. Το επίπεδο ή ο επιλεγμένος
χρόνος στεγνώματος φαίνεραι στην οθόνη
Κουμπι ΜΟΝΟ ΣΤΕΓΝΩΜΑ : πιέστε το για να
εκτελεστεί μόνο το στάδιο στεγνώματος.
Κουμπι ΑΣΦΑΛΙΣΗ ΚΟΥΜΠΙΩΝ : Για την
ενεργοποίηση του μπλοκ του πίνακα ελέγχου, κρατήστε
πατημένο το κουμπί για περίπου 2 δευτερόλεπτα.
Όταν στην οθόνη εμφανίζεται η ένδειξη “ΑΣΦΑΛΙΣΗ
ΚΟΥΜΠΙΩΝ ΕΝΕΡΓΟ” σημαίνει ότι ο πίνακας ελέγχου
έχει μπλοκάρει (πλην του κουμπιού ON/OFF). Με τον
τρόπο αυτόν παρεμποδίζονται τυχαίες τροποποιήσεις των
προγραμμάτων, κυρίως αν στο σπίτι υπάρχουν παιδιά. Για
την απενεργοποίηση του κλειδώματος του πίνακα ελέγχου,
κρατήστε πατημένο το κουμπί για περίπου 2 δευτερόλεπτα.
Κουμπι ΕΚΚΙΝ.ΜΕ ΥΣΤΕΡΗΣΗ : Πατήστε για να
θέσετε μια εκκίνηση με υστέρηση του προεπιλεγμένου
προγράμματος. Η υστέρηση εμφανίζεται στην οθόνη.
Κουμπί με ενδεικτικό φωτάκι ΕΝΑΡΞΗ/ΠΑΥΣΗ: όταν το
πράσινο ενδεικτικό φωτάκι αναβοσβήνει αργά, πατήστε το
κουμπί για την εκκίνηση πλυσίματος. Με την εκκίνηση του
κύκλου το ενδεικτικό φωτάκι σταθεροποιείται. Για να θέσετε
μια παύση στο πλύσιμο, πατήστε εκ νέου το κουμπί. Το
ενδεικτικό φωτάκι θα αναβοσβήνει με πορτοκαλί χρώμα. Αν
το σύμβολο δεν είναι φωτισμένο, μπορείτε να ανοίξετε
την πόρτα. Για να ξεκινήσει πάλι το πλύσιμο από το σημείο
διακοπής, πατήστε εκ νέου το κουμπί.
Τρόπος stand by
Το πλυντήριο αυτό, σύμφωνα με τις νέες διατάξεις για
την εξοικονόμηση ενέργειας, διαθέτει ένα σύστημα
αυτόματου σβησίματος (stand by) που τίθεται σε λειτουργία
εντός περίπου 30 λεπτών στην περίπτωση μη χρήσης.
Πιέστε στιγμιαία το κουμπί ON/OFF και περιμένετε να
ενεργοποιηθεί εκ νέου η μηχανή.
Κατανάλωση σε off-mode: 0,5 W
Κατανάλωση σε Left-on: 8 W
Περιγραφή του πλυντηρίου
Κουμπί με ενδεικτικό
φωτάκι ΕΝΑΡΞΗ/ΠΑΥΣΗ
Πίνακας ελέγχου
Κουμπι
ΛΕΙΤΟΥΡΓΙΑΣ
Κουμπί
ON/OFF
Θήκη απορρυπαντικών
Κουμπί
ΘΕΡΜΟΚΡΑΣΙΑ
Οθόνη
Κουμπί
ΣΤΥΨΙΜΟ
Κουμπί
ΚΑΘΑΡΙΣΜΟΣ
Κουμπί
ΕΚΚΙΝ.ΜΕ
ΥΣΤΕΡΗΣΗ
Κουμπί
ΑΣΦΑΛΙΣΗ
ΚΟΥΜΠΙΩΝ
Κουμπί
ΑΜΕΣΗ
ΕΓΧΥΣΗ
Κουμπί
ΠΟΛΛΑ
ΞΕΒΓΑΛΜΑΤΑ
Αναλόγιο
ΕΠΙΛΟΓΈΑΣ
ΠΡΟΓΡΑΜΜΆΤΩΝ
Κουμπί
ΜΟΝΟ
ΣΤΕΓΝΩΜΑ
Κουμπί
ΣΤΕΓΝΩΜΑ

19
GR
Κουμπί με ενδεικτικό
φωτάκι ΕΝΑΡΞΗ/ΠΑΥΣΗ
Οθόνη
Η οθόνη είναι χρήσιμη για τον προγραμματσισμό της μηχανής του πλυντηρίου και παρέχει πολλαπλές πληροφορίες.
Στην περιοχή A εμφανίζεται το εικονίδιο και το επιλεγμένο πρόγραμμα, τα στάδια πλύσης και στεγνώματος, καθώς και ο
χρόνος που απομένει μέχρι το τέλος του κύκλου.
Στην περιοχή B εμφανίζονται τα δύο επίπεδα έντασης σχετικά με την επιλογή
ΑΜΕΣΗ ΕΓΧΥΣΗ
.
Στην περιοχή C υπάρχουν οι ενδεικτικές λυχνίες των διαθέσιμων λειτουργιών.
Στην περιοχή D εμφανίζεται ο χρόνος που απομένει μέχρι την εκκίνηση του επιλεγμένου προγράμματος σε περίπτωση
που επιλέξετε ΕΚΚΙΝ.ΜΕ ΥΣΤΕΡΗΣΗ.
Στη γραμμή E απεικονίζεται η μέγιστη τιμή της ταχύτητας στυψίματος που μπορεί να διενεργήσει το πλυντήριο με βάση
το επιλεγμένο πρόγραμμα. Εάν το πρόγραμμα δεν προβλέπει στύψιμο, στην περιοχή εμφανίζεται το σύμβολο “--” με
μειωμένη φωτεινότητα.
Στην περιοχή F εμφανίζεται η τιμή της θερμοκρασίας που μπορεί να επιλεγεί με βάση το καθορισμένο πρόγραμμα. Εάν
το πρόγραμμα δεν προβλέπει τη ρύθμιση της θερμοκρασίας, στην περιοχή εμφανίζεται το σύμβολο “--” με μειωμένη
φωτεινότητα.
Σύμβολο ασφαλισμένη Πόρτας
Το αναμμένο σύμβολο δείχνει ότι η πόρτα είναι ασφαλισμένη για την παρεμπόδιση τυχαίων ανοιγμάτων. Για την αποφυγή
ζημιών πρέπει να περιμένετε να σβήσει το σύμβολο πριν ανοίξετε την πόρτα.
ΣΗΜΕΙΩΣΗ: αν είναι ενεργή η λειτουργία ΕΚΚΙΝ.ΜΕ ΥΣΤΕΡΗΣΗ η πόρτα δεν μπορεί να ανοίξει, για να την ανοίξετε
θέστε τη μηχανή σε παύση πιέζοντας το κουμπί ΕΝΑΡΞΗ/ΠΑΥΣΗ.
! Στο πρώτο άναμμα θα ζητηθεί η επιλογή της γλώσσας και η οθόνη θα μπει αυτόματα στο μενού επιλογής γλώσσας.
Για να επιλέξετε την επιθυμητή γλώσσα πιέστε τα κουμπιά X και Y, για να επιβεβαιώσετε την επιλογή πιέστε το κουμπί Z.
Αν θέλετε να αλλάξετε γλώσσα, σβήστε τη συσκευή, πατήστε ταυτόχρονα τα κουμπιά G, H, I μέχρι να ακούσετε ένα
ηχητικό σήμα, θα εμφανιστεί εκ νέου το μενού επιλογής γλώσσας.
! Εάν θέλετε να αλλάξετε τη φωτεινότητα της οθόνης, η οποία από προεπιλογή είναι στο υψηλότερο επίπεδο, απενεργοποιήστε
τη συσκευή και πατήστε ταυτόχρονα τα πλήκτρα G, L, M μέχρι να ακούσετε ένα ηχητικό σήμα. Πατήστε τα πλήκτρα X και Y για
να επιλέξετε την επιθυμητή φωτεινότητα. Για επιβεβαίωση της επιλογής σας πατήστε το πλήκτρο Z.
! Κατά τη διάρκεια ενός κύκλου πλύσης ή όταν επιλέγετε ΕΚΚΙΝ.ΜΕ ΥΣΤΕΡΗΣΗ, εάν δεν ενεργήσετε στην οθόνη για 1 λεπτό,
ενεργοποιείται η “ΠΡΟΦΥΛΑΞΗ ΟΘΟΝΗΣ”. Για να επιστρέψετε στην προηγούμενη οθόνη αρκεί να πατήσετε οποιοδήποτε
πλήκτρο.
2:55
90°
1200
-- h
--
COTONE
H
G
Y
X Z
I
L M
A
B
C
C
D
E
C
F

20
GR
Πως διενεργείται έας κύκλος
πλυσίματος ή στεγνώματος
1. ΑΝΑΨΤΕ ΤΟ ΠΛΥΝΤΗΡΙΟ. Πατήστε το κουμπί , στην οθόνη
θα εμφανιστεί η ένδειξη HOTPOINT. Το ενδεικτικό φωτάκι
ΕΝΑΡΞΗ/ΠΑΥΣΗ θα αναβοσβήνει αργά με πράσινο χρώμα.
2. ΦΟΡΤΩΣΗ ΡΟΥΧΩΝ. Ανοίξτε την πόρτα. Φορτώστε τα
ρούχα, προσέχοντας να μην ξεπεράσετε την ποσότητα
φορτίου που υποδεικνύεται στον πίνακα προγραμμάτων
της επόμενης σελίδας.
3. ΔΟΣΟΛΟΓΙΑ ΤΟΥ ΑΠΟΡΡΥΠΑΝΤΙΚΟΥ. Βγάλτε το συρτάρι
και χύστε το απορρυπαντικό στις αντίστοιχες λεκανίτσες όπως
εξηγείται στο “Απορρυπαντικά και μπουγάδα”.
4. ΚΛΕΙΣΤΕ ΤΗΝ ΠΟΡΤΑ.
5. ΕΠΙΛΕΞΤΕ ΤΟ ΠΡΟΓΡΑΜΜΑ. Επιλέξτε με τον επιλογέα
ΠΡΟΓΡΑΜΜΑΤΩΝ το επιθυμητό πρόγραμμα. Το όνομα
του προγράμματος θα εμφανιστεί στην οθόνη και σε
αυτό αντιστοιχίζεται μια θερμοκρασία και μια ταχύτητα
στυψίματος που μπορούν να τροποποιηθούν. Στην οθόνη
θα εμφανιστεί η διάρκεια του κύκλου.
6. ΕΞΑΤΟΜΙΚΕΥΣΗ ΤΟΥ ΚΥΚΛΟΥ ΠΛΥΣΙΜΑΤΟΣ. Ενεργήστε
στα αντίστοιχα κουμπιά:
Τροποποιήστε τη θερμοκρασία ή/και το στύψιμο. Η μηχανή
επιλέγει αυτόματα τη μέγιστη θερμοκρασία και στύψιμο για το
τεθέν πρόγραμμα και συνεπώς δεν μπορούν να αυξηθούν.
Πατώντας το κουμπί μειώνεται προοδευτικά η θερμοκρασία
μέχρι το πλύσιμο σε κρύο νερό (Στην οθόνη εμφανίζεται το
σύμβολο “--”). Πατώντας το κουμπί μειώνεται προοδευτικά
το στύψιμο μέχρι τον αποκλεισμό του (Στην οθόνη εμφανίζεται
το σύμβολο “--”). Περαιτέρω πάτημα των κουμπιών
επαναφέρει τις τιμές στις μέγιστες προβλεπόμενες.
! Εξαίρεση: επιλέγοντας το πρόγραμμα 5 η θερμοκρασία
μπορεί να αυξηθεί μέχρι 40°.
! Εξαίρεση: επιλέγοντας το πρόγραμμα 7 η θερμοκρασία
μπορεί να αυξηθεί μέχρι 90°.
! Εξαίρεση: επιλέγοντας το πρόγραμμα 9 η θερμοκρασία
μπορεί να αυξηθεί μέχρι 60°.
Θέστε μια εκκίνηση με υστέρηση.
Για να θέσετε την εκκίνηση με υστέρηση του προεπιλεγμένου
προγράμματος, πατήστε το σχετικό κουμπί μέχρι να
επιτευχθεί ο χρόνος της επιθυμητής υστέρησης. Για να
απαλείψετε την εκκίνηση με υστέρηση πατήστε το κουμπί
μέχρις ότου εμφανιστεί στην οθόνη η ένδειξη “-- h”.
Θέστε το στέγνωμα
Πιέζοντας μια ή περισσότερες φορές το κουμπί ΣΤΕΓΝΩΜΑ
τίθεται ο επιθυμητός τύπος στεγνώματος. Προβλέπονται δύο
δυνατότητες:
A - Με βάση το βαθμό υγρασίας των στεγνωμένων ρούχων:
Για σιδέρωμα: ενδείκνυται για ρούχα που πρέπει μετά
να σιδερωθούν. Το επίπεδο υπολειπόμενης υγρασίας
μαλακώνει τις πτυχές και διευκολύνει την εξαφάνισή τους.
Για κρέμασμα: ιδανικό για τα ρούχα εκείνα που δεν
απαιτούν πλήρες στέγνωμα.
Για δίπλωμα: κατάλληλο για την μπουγάδα που θα βάλετε
στην ντουλάπα χωρίς σιδέρωμα.
Έξτρα: κατάλληλο για ρούχα που απαιτούν πλήρες
στέγνωμα όπως πετσετέ και μπουρνούζια.
B - Με βάση το χρόνο: Από 30 έως 180 λεπτά.
Για να αποκλείσετε το στέγνωμα πιέστε το σχετικό κουμπί
μέχρι να εμφανιστεί στην οθόνη η ένδειξη OFF.
Αν, εξαιρετικά, το φορτίο ρούχων για πλύσιμο και στέγνωμα είναι
μεγαλύτερο του μέγιστου προβλεπόμενου (βλέπε πίνακα στο
πλάι), διενεργήστε το πλύσιμο, και με το πέρας του προγράμματος,
χωρίστε το φορτίο και ξαναβάλτε ένα μέρος στο καλαθάκι. Στο
σημείο αυτό ακολουθήστε τις οδηγίες για να εκτελέσετε «Μόνο το
στέγνωμα». Επανάλαβε τις ίδιες ενέργειες για το υπόλοιπο φορτίο.
ΠΑΡΑΤΉΡΗΣΗ: στο τέλος του στεγνώματος εκτελείται πάντα
μια φάση ψύξης.
Μόνο στέγνωμα
Πατήστε το κουμπί για να κάνετε μόνο στέγνωμα.
Αφού επιλέξετε το επιθυμητό πρόγραμμα συμβατό με
τον τύπο των ρούχων, με το πάτημα του κουμπιού
αποκλείεται η φάση πλυσίματος και θα ενεργοποιηθεί
το στέγνωμα με το μέγιστο προβλεπόμενο επίπεδο για
το επιλεγμένο πρόγραμμα. Μπορείτε να τροποποιήσετε
και να καταχωρήσετε το επίπεδο ή τη διάρκεια του
στεγνώματος πατώντας το κουμπί στεγνώματος .
(Δεν είναι συμβατό με τα προγράμματα 1-2-3-4 και 14).
Θέστε τον τύπο ξεβγάλματος.
Η δυνατότητα επιτρέπει την επιλογή του επιθυμητού
τύπου ξεβγάλματος για τη μέγιστη φροντίδα των ευαίσθητων
επιδερμίδων. Με το πρώτο πάτημα του κουμπιού τίθεται
το επίπεδο “Έξτρα +1” που επιτρέπει την επιλογή ενός
πρόσθετου ξεβγάλματος με εκείνα τα στάνταρ του κύκλου,
για την απομάκρυνση όλων των ιχνών του απορρυπαντικού.
Στο δεύτερο πάτημα του κουμπιού τίθεται το επίπεδο “Έξτρα
+2” που επιτρέπει την επιλογή δύο πρόσθετων ξεβγαλμάτων
με εκείνα τα στάνταρ του κύκλου και συνιστάται για τις πιο
ευαίσθητες επιδερμίδες. Στο τρίτο πάτημα του κουμπιού
καταχωρείται το επίπεδο “Έξτρα +3” που επιτρέπει την
επιλογή 3 πρόσθετων ξεβγαλμάτων πλέον εκείνων των στάνταρ
του κύκλου. Η ενεργοποιημένη δυνατότητα με κύκλους σε
θερμοκρασία 40° επιτρέπει την απομάκρυνση των κυριοτέρων
αλλεργιογόνων όπως τρίχες γάτας και γύρη, με κύκλους σε
θερμοκρασία μεγαλύτερη των 40° επιτυγχάνεται ένα εξαιρετικό
επίπεδο αντιαλλεργικής προστασίας. Πατήστε πάλι το κουμπί
για να επιστρέψετε στον τύπο ξεβγάλματος “Κανονικό
Ξέβγαλμα”. Αν δεν είναι δυνατό να θέσετε ή να τροποποιήσετε
την υπάρχουσα ρύθμιση, στην οθόνη θα εμφανιστεί η ένδειξη
“ΜΗ ΕΠΙΛΕΞΙΜΟΣ” ή “ΜΗ ΤΡΟΠΟΠΟΙΗΣΙΜΟΣ”.
Τροποποίηση των χαρακτηριστικών του κύκλου.
• Πατήστε το κουμπί για την ενεργοποίηση της λειτουργίας.
Η αντίστοιχη ενδεικτική λυχνία στην οθόνη ανάβει.
• Πατήστε εκ νέου το κουμπί για την απενεργοποίηση της
λειτουργίας. Η αντίστοιχη ενδεικτική λυχνία στην οθόνη σβήνει.
! Εάν η επιλεγμένη λειτουργία δεν είναι συμβατή με το
ρυθμισμένο πρόγραμμα, η σχετική ενδεικτική λυχνία
εμφανίζεται με μειωμένη φωτεινότητα. Επίσης, η μη
συμβατότητα επισημαίνεται με ένα ηχητικό σήμα (3 μπιπ)
και την ένδειξη “ΜΗ ΕΠΙΛΕΞΙΜΟΣ” στην οθόνη.
! Εάν η επιλεγμένη λειτουργία δεν είναι συμβατή με κάποια
άλλη ήδη ρυθμισμένη, εμφανίζεται στην οθόνη η ένδειξη “ΜΗ
ΕΠΙΛΕΞΙΜΟΣ” και η λειτουργία δεν ενεργοποιείται.
! Οι λειτουργίες μπορεί να τροποποιούν το προτεινόμενο
φορτίο ή/και τη διάρκεια του κύκλου.
7. ΕΚΚΙΝΗΣΗ ΤΟΥ ΠΡΟΓΡΑΜΜΑΤΟΣ. Πατήστε το κουμπί
ΕΝΑΡΞΗ/ΠΑΥΣΗ. Το σχετικό ενδεικτικό φωτάκι θα φωτιστεί
πράσινο σταθερό και η πόρτα θα μπλοκάρει (σύμβολο
ΑΣΦΑΛΙΣΜΕΝΗΣ ΠΟΡΤΑΣ αναμμένο). Κατά το πλύσιμο,
στην οθόνη θα εμφανιστεί το όνομα της σε εξέλιξη φάσης. Για
να αλλάξετε ένα πρόγραμμα ενώ είναι σε εξέλιξη ένας κύκλος,
θέστε το πλυντήριο σε παύση πιέζοντας το κουμπί ΕΝΑΡΞΗ/
ΠΑΥΣΗ (το ενδεικτικό φωτάκι ΕΝΑΡΞΗ/ΠΑΥΣΗ θα αναβοσβήνει
αργά με πορτοκαλί χρώμα). Κατόπιν επιλέξτε τον επιθυμητό
κύκλο και πατήστε εκ νέου το κουμπί ΕΝΑΡΞΗ/ΠΑΥΣΗ. Για να
ανοίξετε την πόρτα όσο ένας κύκλος είναι σε εξέλιξη πατήστε
το κουμπί ΕΝΑΡΞΗ/ΠΑΥΣΗ. Αν το σύμβολο ΑΣΦΑΛΙΣΜΕΝΗΣ
ΠΟΡΤΑΣ είναι σβηστό μπορείτε να ανοίξετε την πόρτα.
Πατήστε εκ νέου το κουμπί ΕΝΑΡΞΗ/ΠΑΥΣΗ για να ξεκινήσει
πάλι το πρόγραμμα από το σημείο διακοπής.
8. ΤΕΛΟΣ ΤΟΥ ΠΡΟΓΡΑΜΜΑΤΟΣ. Επισημαίνεται με την
ένδειξη “ΤΕΛΟΣ ΚΥΚΛΟΥ” στην οθόνη, όταν το σύμβολο
ΑΣΦΑΛΙΣΜΕΝΗΣ ΠΟΡΤΑΣ σβήσει μπορείτε να ανοίξετε την
πόρτα. Ανοίξτε την πόρτα, αδειάστε τα ρούχα και σβήστε τη μηχανή.
! Αν επιθυμείτε αν ακυρώσετε έναν ήδη τεθέντα κύκλο, πατήστε
επί μακρόν το κουμπί . Ο κύκλος θα διακοπεί και η μηχανή
θα σβήσει.
ΑΜΕΣΗ ΕΓΧΥΣΗ
Το πλυντήριο διαθέτει μια καινοτόμο τεχνολογία «Direct Injection»
η οποία προ-αναμιγνύει νερό και απορρυπαντικό ενεργοποιώντας
άμεσα τα καθαριστικά συστατικά του απορρυπαντικού. Το ενεργό
γαλάκτωμα αυτό εγχύεται κατ’ ευθείαν στον κάδο του πλυντηρίου
και διεισδύει πιο αποτελεσματικά στις ίνες απομακρύνοντας την
πλέον ανθεκτική βρωμιά ακόμα και σε χαμηλές θερμοκρασίες,
προστατεύοντας τα χρώματα και τα υφάσματα. Μπορείτε να
επιλέξετε τον τρόπο «Ισχύς» για να πετύχετε καλύτερες επιδόσεις
καθαρισμού ή τον τρόπο «ΟικολογικήΕνέργεια» για μεγαλύτερη
εξοικονόμηση ενέργειας.
La page est en cours de chargement...
La page est en cours de chargement...
La page est en cours de chargement...
La page est en cours de chargement...
La page est en cours de chargement...
La page est en cours de chargement...
La page est en cours de chargement...
La page est en cours de chargement...
La page est en cours de chargement...
La page est en cours de chargement...
La page est en cours de chargement...
La page est en cours de chargement...
La page est en cours de chargement...
La page est en cours de chargement...
La page est en cours de chargement...
La page est en cours de chargement...
-
 1
1
-
 2
2
-
 3
3
-
 4
4
-
 5
5
-
 6
6
-
 7
7
-
 8
8
-
 9
9
-
 10
10
-
 11
11
-
 12
12
-
 13
13
-
 14
14
-
 15
15
-
 16
16
-
 17
17
-
 18
18
-
 19
19
-
 20
20
-
 21
21
-
 22
22
-
 23
23
-
 24
24
-
 25
25
-
 26
26
-
 27
27
-
 28
28
-
 29
29
-
 30
30
-
 31
31
-
 32
32
-
 33
33
-
 34
34
-
 35
35
-
 36
36


HOTPOINT/ARISTON RDPD 107617 JD EU Mode d'emploi
- Catégorie
- Machines à laver
- Taper
- Mode d'emploi
dans d''autres langues
Documents connexes
Autres documents
-
Hotpoint RPD 11657 DS EX Le manuel du propriétaire
-
Indesit XWDE 751680X K FR Mode d'emploi
-
-
Whirlpool XWDE 861480X W FR Le manuel du propriétaire
-
-
-