Sportcraft 1-1-32-932FES Guide d'installation
- Catégorie
- Jeux de société
- Taper
- Guide d'installation
Ce manuel convient également à
La page est en cours de chargement...

I English I I Espan°l I I Frangais ]
Congratulations! We hope you will
have many hours of enjoyable use with
your new Sportcraft Billiard Table!
jFelicitaciones! iNosotros esperamos
que esta nueva mesa de billar Sportcraff le
proporcione muchas horas de diversi6n!
F61icitations! Nous sommes convaincus
que votre nouvelle table de billiard
Sportcraft vous apportera de nombreuses
heures de plaisir.
PLEASE KEEP YOUR
INSTRUCTIONS!
Your Model number is necessary should
you need to contact us.
Please read through this instruction book
to familiarize yourself with all the parts and
assembly steps.
Please read through this instruction book
to familiarize yourself with any assembly
steps and/or rules.
Refer to the Parts Identifier and verify that
all parts have been included.
For questions that may arise or for missing
parts, PLEASE CONTACT US BEFORE
RETURNING THE GAME TO THE
STORE.
jPOR FAVOR GUARDE ESTAS
INSTRUCCIONES!
• Su nQmero de modelo es necesario en caso
de que deba comunicarse con nosotros.
• Por favor leer este manual de instrucciones
para familiarizarse con todas las piezas y
Ice pasos a seguir en el montaje.
• Pot favor leer este manual de instrucciones
para familiarizarse con todas los pasos a
seguir en el montaje y/o las reglas.
• Consultar la lista Identificaci6n de las Piezas
y asegQrese de que todas las piezas hayan
sido incluidas.
• Para preguntas o para piezas que no se
hayan incluidos, POR FAVOR PONGASE
EN CONTACTO CON NOSOTROS ANTES
DE DEVOLVER A LATIENDA.
CONSERVEZ CES
INSTRUCTIONS!
• Vous aurez besoin de votre numero de
modele Iorsque vous communiquerez
avec nous.
• Veuillez life attentivement le mode
d'assemblage afin de vous familiariser
avec toutes les etapes d'assemblage et/
ou les reglements.
• Reportez-vous a la liste d'identification
des pieces et assurez-vous que toutes
les pieces sont incluses.
• Si vous avez des questions ou s'il manque
des pieces, ENTREZ S'IL VOUS PLAIT
EN CONTACT AVEC NOUS AVANT DE
RETOURNER AU MAGASIN.
__ CONTACT INFORMATION:
Hours: Mon.-Fri, 9:00am to 5:00pro EST
Replacement Parts: order online at:
www.sportcraft.com
Technical Support: (800) 526-0244 /
_ INFORMACI6N DE CONTACTO:
Horas: lunes a viernes, 9:00am a 5:00pro EST
PJezas de recambio: ordenar a la p&gina de
internet: www.sportcraft.com
Soporte t6cnico: (800) 526-0244 /
POUR COMMUNIQUER
AVEC NOUS:
Heures d'ouverture: tundi au vendredi, 9 h a 17 h
- HNE
Pi_ees de rechange: commander a:
vwwq.sportcraft.com
Soutien technique : (800) 526-0244 /
WARNING!
This is not a child's toy. Adult supervision is required
forchildren playing this game. Please readinstructions
carefully. Proper use of this set can avoid damage or
injury.
,_ iADVERTENCIA!
Esto no es un juguete de nifios. La supervisi6n adulta es
requerida para jugar este juego por los nifios. Por favor
leer tas instrucciones con cuidado. El empleo apropiado
de este juego puede evitar el dafio o la herida.
,_ ATTENTION!
Ce jeu n'est pas un jouet d'enfant. La presence d'un
adulte est necessaire Iorsque des enfants jouent a ce jeu.
Veuillez fire les instructions attentivement. L'utilisation
appropri6e de ce jeu peut prevenir les dommages
mat6riets et les blessures.
_] BEFORE ASSEMBLY:
• Did you receive 1 box?
• Did you inspect your playfield/main table frame
before assembly? It is not replaceable and must
be returned to the original place of purchase if
damaged.
_] ANTES DEASAMBLEAR:
• &Recibi6 usted "i caja?
• &Inspeccion6 usted su campo de juego/marco de mesa
antes de ta asambtea? No es reemptazable y debe ser
devuelto al lugar original de compra.
_] AVANT L'ASSEMBLAGE
• Avez-vous regu 1 boke?
• Avez-vous examine le cadre de la table/terrain de jeu
avant I'assembtage? Ce dernier ne peut 6tre remplac6
et, s'il est endommag6, il dolt 6tre retourne chez le
d6tailtant ou l'achat initial a 6t6 fait.
[_==] TOOLS REQUIRED FOR ASSEMBLY:
. Phillips and Slotted Head Screwdrivers / or Power
Driver (not included)
. Wrench (included)
_--_ HERRAMIENTAS NECESARIAS PARA MONTAR:
• Destornilladores Phillips y de cabeza ranurada / o
destornillador el6ctrico (no inctuido)
• Liave ingl6sa (inctuida)
OUTILS NECESSAIRES A L'ASSEMBLAGE
• Tournevis Philips ou tournevis pour vis & t6te fendue /
ou tournevis etectrique (non inclus)
• CI6 anglaise (incluse)
0509 - D
1-1-32-932 ES/ 1-1-32-932F ES
(Siga a la pagina siguiente.)
(Continued on the next page.) P. 1
(Page suivante.)
@2009 Sportcraft, Ltd.
www.sportcraft.com
La page est en cours de chargement...

I English I I Espan°l I [Frangais]
A51 BILLIARD BALL SET
8%8
OOOO JUEGO DE BOLAS DE
OOOO BILLAR
ENSEMBLE DE BILLES
9-3-36-559SS31 (1) DE BILLARD
A£J
9-3-32-662SS31 (1)
5/16"WRENCH
LLAVE INGLESA
DE 5/16 "
CLE METALLIQUE
ALl
9-3-32-762SS23 (1)
GLUE
PEGAMENTO
COLLE
ASSEMBLY INSTRUCTIONS:
We recommend that two adults work
together to assemble this table,
The tame will be assembled upside down and then
turned over onto its legs. This is a very heavy tame and
turning it over will require at least two strong adults.
We suggest that you use the bottom carton as a dean
flat work area to protect the table.
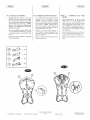
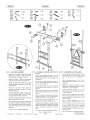
FIG. 1: INSIDE LEG ASSEMBLY
Before attaching Wooden Inside Leg - A
(#3) to Wooden Inside Leg - B (#4) apply
Glue (#A7) as shown in Fig. 1.
Attach Wooden Inside Leg - A (#3) to
Wooden Inside Leg - B (#4) with four
Screws (#11) per inside leg as shown in
Fig. 1A.
After the two Inside Legs are assembled,
attach the Leg Base (#5) to the Inside Leg
using two Screws (#11) as shown in Fig.
lB.
Screw the four Leg Levelers (#13) into each
Leg. NOTE: Leg Levelers are optional and
if the game is to be used on a smooth floor,
we recommend not installing them. See
Fig. 1B.
[ 57" 2-PC BILLIARD
: - - CUE
9-3-36-559SS33 (2)
TACO DE BILLAR (57 ")
EN 2 PEDAZSOS
QUEUE DE BILLARD
ENDEUX PARTIES 57po
INSTRUCCIONES DE ENSAMBLAJE
Recomendamos que dos adultos ayuden a
armar esta mesa.
La mesa puede arrnarse de manera invertida y despues darse
vuelta pare qua se asiente sobre las piernas. Esta mesa es
pesado y pare darle vuelta sere necesaria la participaci6n de dos
adultos fuertes
Sugerimos qua utilice el fondo de la caja como area de trabajo
limpia y plane pare la proteccidn de la mesa.
FIG. 1: ASAMBLEA DEL INTERIOR DE
PIERNA
Antes de fijar la pierna interior de madera - A
(no. 3) ala pierna interior de madera - B (no.
4) aplica la cola (no. A7) segOn la figura 1.
Fijar pierna de madera interior - A (no. 3) a
la pierna de madera interior - B (no. 4) con
cuatro tornillos (no. 11) pot pierna interior
como mostrado en la figura 1A.
Despues de que las dos piernas interiores
son montadas, fijar la base de pierna (no. 5) a
la pierna interior usando dos tornillos (no. 11)
segQn la figura lB.
Instalar los cuatro niveladores de la pierna
(no. 13) en cada pierna. NOTA: Los
niveladores de las piernas son opcionales y si
el juego va a usarse sobre un suelo parejo, le
aconsejamos no instalarlos. Ver la figura lB.
A_2J
9-3-32-662SS25 (2)
CHALK(GREEN)
TIZA (VERDE)
CRAIE (VERTE)
INSTRUCTIONS D'ASSEMBLAGE
Nous recommandons que deux adultes
proc&dent _ I'assemblage de cette table.
Cette table dolt etre assembl_e _ I'envers puis retoum_e sur
ses pieds E:tanttres Iourde, fl faudra au mains deux adultes
forts pour retoumer la table b I'endroiL
Nous recommandons d'utiliser le carton du fond comme
surface de travail propre at plate afin de prot_ger la table.
FIGURE 1: ASSEMBLAGE DU PIED EN BOB
INT_:RIEUR
Avant de fixer le pied en bois interieur - A (n°
3) au pied en bois interieur - B (n° 4), mettre
de la colle (n ° A7) selon la figure 1.
Fixer un pied en bois interieur - A (n ° 3) au
pied en bois interieur - B (n° 4) a I'aide de
quatre vis (n° 11) par pied interieur. Voir la
figure 1.
Apres avoir monter les deux pieds interieurs,
fixer une base de pied (n ° 5) a I'assemblage
de pied en bois interieur a I'aide de deux vis
(n ° 11). Voir la figure lB.
Visser Fun des verins de calage (n ° 13)
chacun des pieds. NOTE: L'emploi des
verins de calage est facultatif et si la table
est installee sur un plancher lisse, nous
recommandons de nepas se servir des
verins. Voir la figure 1B.
Q _ = (4)
:!1!
1-1-32-932 ES / 1-1-32-932F ES
(Siga a la p_gina siguiente.)
(Continued on the next page.) P.3
(Page suivante.)
@2009 Sportcraft, Ltd.
www.sportcraft.com

I English I
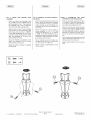
FIG. 2: MOLDED LEG ASSEMBLY
Carefully align the seams of the front
Molded Leg - A (#15) and the front Molded
Leg - B (#16) and snap them into place
from top to bottom using the locking pieces
on the Molded Legs. See Fig. 2. NOTE:
listen for "click" sound when snapping legs
together, this will indicate that the legs are
locked firmly in place.
Next, snap together the back Molded Leg
- C (#17) and back Molded Leg - D (#18)
in the same sequence, top to bottom. See
Fig. 2A.
Repeat the same precedure to assemble
the other three legs.
I Espafi°l I
FIG. 2: ASAMBLEA DE PIERNA MOLDEADA
Con cuidado alinee las costuras la pierna
moldeada - A (no. 15) del frente y la pierna
moldeada - B (no. 16) del frente, y unirlos
juntos de arriba abajo usando los pedazos
que se cierran sobre las piernas moldeadas.
Ver la figura 2. NOTA: escuchar para el
sonido de "chasquido" cuando uniendo las
piemas juntos, esto indicara que las pats son
cerradas firmemente en el lugar.
Despues, unit juntos la pierna moldeada - C
(no. 17) trasera y la piema moldeada - D (no.
18) trasera en la misma secuencia, de arriba
abajo. Vet la figura 2A.
Repetir el mismo procedimiento para montar
las otras tres piernas.
I Frangais ]
FIGURE 2: ASSEMBLAGE DES PIEDS
MOULES
Aligner soigneusement les joints du pied
moule avant A (n ° 15) et du pied moule
avant B (n ° 16) et les assembler Fun
I'autre, de haut en bas, a raide des pieces
de verrouillage des pieds moules. Voir la
figure 2. NOTE: Vous devriez entendre un <<
clic >>Iorsque vous assemblez les pieds run
rautre; ce <<clic >>vous indiquera qu'ils sont
bien assembles.
Ensuite, assembler le pied moule arriere C
(n ° 17) et le pied moule arriere D (n ° 18),
toujours de haut en bas. Voir la figure 2A.
Rep6ter cette operation pour les trois autres
pieds.
_ =(4)
P
1-1-32-932 ES / 1-1-32-932F ES
(Siga a la p_gina siguiente.)
(Continued on the next page.) P.4
(Page suivante.)
@2009 Sportcraft, Ltd.
www.sportcraft.com

I English I
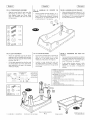
FIG. 3: INSIDE AND MOLDED LEGS
ASSEMBLY
Place one Inside Leg Assembly (from
Fig.1) inside the one set of Molded Legs (A
and B) prepared in Fig. 2. Then place one
set of Molded Legs (C and D) around the
other side of the inside Leg Assembly.
Align the holes of the two sets of Molded
Legs (A and B, C and D) and attach using
four Screws (#14). See Fig. 3. NOTE: it
is NOT RECOMMENDED to use a power
screwdriver when assembling the molded
legs. Over-tightening of the screw can
cause damage to the leg.
Secure the Molded Leg Assembly to the
Inside Leg Assembly with two Screws
(#19) at the top. See Fig. 3A
Repeat the same procedure to assemble
the other legs.
I Espafi°l I
FIG. 3: ASAMBLEA DE PIERNA INTERIOR Y
MOLDEADA
Colocar una asamblea de pierna interior (de la
figura 1) dentro del juego de pierna moideada
(A y B) preparado en la figura 2. Entonces
coloque el juego de pierna moldeada (C y
D) alrededor del otto lado de la asamblea de
pierna interior.
Alinear los agujeros de los dos juegos de
piernas moldeadas (A y B, C y D) y fijar
usando cuatro tornillos (no. 14). Ver la figura
3. NOTA: NO ES RECOMENDADO usar un
destornillador electrico montando las piernas
moldeadas. El sobreapretamiento del tornillo
puede causar da_o a la pierna.
Fijar la asamblea de pierna moldeada a la
asamblea de pierna interior con dos tornillos
(no. 19) en Io alto. Ver la figura 3A.
Repetir el mismo procedimientopara montar
las otras piernas.
I Frangais ]
FIGURE 3: ASSEMBLAGE DES PIEDS
INT#RIEURS ET DES PIEDS MOUL_:S
Placer un pied interieur assemble (voir figure
1) a i'interieur du pied moule assemble (A et
B) a la figure 2. Effectuer la m_me operation
pour ie pied moule assemble (C et D).
Aligner les trous des deux pieds assembles
(A et B, C et D) et les fixer a I'aide de quatre
vis (no 14). Voir la figure 3. NOTE: IL N'EST
PAS RECOMMANDE d'utiliser un tournevis
electrique pour assembler les pieds moules.
Une vis trop serree pourrait endommager le
pied.
Fixer les pieds moules assembles aux pieds
interieurs assembles a I'aide de deux vis (no
19) darts le haut. Voir la figure 3A.
Rep6ter cette operation pour les trois autres
pieds
1I
i
i
i
?
1-1-32-932 ES / 1-1-32-932F ES
(Siga a la p_gina siguiente.)
(Continued on the next page.) P.5
(Page suivante.)
@2009 Sportcraft, Ltd.
www.sportcraft.com

I English I
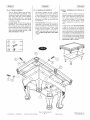
FIG. 4: CORNER BRACE ASSEMBLY
Align the Lower Side (#1) and Lower End
(#2) Aprons as shown in Fig. 4. Attach
them together using one Corner Brace
(#12), four Washers (#8) and four Bolts
(#7) per corner.
©
©
©
®
@
= (2)
= (2)
=(16)
=(16)
= (4)
I Espa_°l I
FIG. 4: ASAMBLEA DE SOPORTE DE
ESQUINA
Alinear las tablas inferiores laterales (no. 1)
y de extremo (no. 2) como mostrado en la
figura 4. Fijarlos juntos utilizando un soporte
de esquina (no. 12), cuatro arandelas (no. 8)
y cuatro pernos (no. 7) per esquina.
I Frangais ]
FIGURE 4: ASSEMBLAGE DES TABLIERS
Aligner les tabliers inf@ieurs lateraux (n° 1) et
les tabliers d'extremit6 (n ° 2) comme illustre
la figure 4. Les fixer Fun a I'autre a I'aide
d'une equerre (n° 12), de quatre rondelles (n°
8) et de quatre boulons (n ° 7) par coin.
FIG. 5: LEG ATTACHMENT
Attach the assembled Leg into the Apron
assembly with four Washers (#8) and four
Bolts (#7) per leg using the Wrench (#A6)
provided. See Fig. 5.
Lift the table assembly from the floor with
two strong adults, turn it over, and set the
table assembly on its legs in the location
where you will play.
(_ = (16)
@ @ :!10/
[A-_ _::::_ =(1)
FIG. 5: FIJACIGN DE PIERNA
Fijar la pierna montada sobre la asamblea de
tabla con cuatro arandelas (no. 8) y cuatro
pernos (no. 7) por piema usando la Ilave
metalica (no. A6) proviso. Ver la figura 5.
Levantar la mesa armada del suelo con
dos adultos fuertes, de vuelta a la mesa y
coloquela sobre sus piernas en el lugar donde
se va a jugar.
FIGURE 5: ASSEMBAGE DES PIEDS AUX
TABLIERS
Fixer les quatre pieds assembles aux tabliers
assembles a I'aide de quatre rondelles (n ° 8)
et de quatre boulons (n ° 7) par pied et de la
cle (n° A10) fournie. Voir la figure 5.
,_, deux adultes robustes, soulever la table
assemblee; la remettre a I'endroit et la
deposer sur ses pieds a I'emplacement
souhait&
CAUTION: Two strong adults are recommended to turn the table over as shown.
1. Lift the table off the ground.
2. Turn the table over.
3. Place it on all four feet at the same time on the ground.
PRECAUCI6N: Se recomienda que dos adultos fuertes le den vuelta la mesa
como se muestra en el grafico.
I. Levante la mesa del suelo.
2. Vuelque la mesa.
3. Apoye las caatro piernas en el suelo al mismo tiempo.
ATTENTION: Onrecommandequedeuxadultes remettentla table surses pieds,
t_1 telqu'illustr&
1.Souleverla table.
(_ _ 2. Rat }atableal'endroit........
3.Posersimultancment}esquatrepiedsde la tableausol.
"-Le,'4e_
t.
1-1-32-932 ES / 1-1-32-932F ES
(Siga a la p_gina siguiente.)
(Continued on the next page.) P.6
(Page suivante.)
@2009 Sportcraft, Ltd.
www.sportcraft.com

I English I
FIG. 6: CABINET ASSEMBLY
Turn the Billiard Cabinet over and put it
on top of the Apron/Leg assembly. From
underneath the table, secure them together
with twelve Bolts (#9), twelve Washers
(#8), and twelve Nuts (#10). See Figures
6 and 6A. Go back and make sure that all
connections are tight.
PLEASE NOTE: DO NOT lift the table by
the pockets. If you move the table, do not
lift it by placing your hands beneath the
pockets and do not lean or put pressure on
them. Do not lean or sit on the end or side
rafts as this may damage the table. YOU
ARE NOW READY TO PLAY.
(_ @ = (24)
I Espafi°l I
FIG. 6: ASAMBLEA DE GABINETE
Dar vuelta al gabinete de billar y coloarlo
sobre la asamblea de pierna/tabla. Debajo de
la mesa, fijarlos juntos con doce pernos (no.
9), doce arandelas (no. 8), y doce tuercas
(no. 10). Ver las figuras 6 y 6A. Regresar y
asegurarse que todas las conexiones son
bien apretadas.
POR FAVOR NOTA: NO levante la mesa por
sosteniendo los buchacas. En movando la
mesa, no levantelo por colocando sus manos
bajo Ide os buchacas y no inclinese o haga
presi6n sobre los buchacas. No inclinese
o sientese sobre el extremo o el lado de los
carriles, como esto puede causar dafio a la
mesa. AHORA USTED ESTA LISTO PARA
JUGAR.
I Fran£;ais ]
FIGURE 6: ASSEMBLAGE DU DESSUS DE
TABLE
Avec soin, remettre a I'endroit le dessus de
table et le deposer sur I'assemblage tabliers/
pieds. Par le dessous de la table, les fixer
Fun a I'autre a I'aide de douze boulons (n °
14), de douze rondelles (n ° 11) et de douze
ecrous (n° 15). Voir les figures 6 et 6B.
Verifier attentivement que tout est visse
fond.
Veuillez prendre note : NE SOULEVEZ PAS
la table par les poches. Si vous deplacez
la table, ne la soulevez pas en pla£ant les
mains sous les poches et ne vous appuyez
pas sur ces dernieres. Ne faites pas pression
sur les poches, ne vous assoyez pas sur les
bords lateraux ou les bords d'extr6mite et ne
vous assoyez pas sur les bandes laterales
ou sur les bandes des extremit6s car cela
pourrait endommager la table.VOUS #TES
MAINTENANT PR#T ,&,JOUER.
1-1-32-932 ES / 1-1-32-932F ES
(Siga a la p_gina siguiente.)
(Continued on the next page.) P.7
(Page suivante.)
@2009 Sportcraft, Ltd.
www.sportcraft.com

I English I I Espafi°l I I Fran9ais]
®
@ ® --/4/
ii
FIG. 7: CUE RACK ASSEMBLY
Attach the two Middle Shelves (#23) to the
Side Panel- A (#25) using two Screws
(#6) per Shelf. See Figures 7 and 7A
Attach Side Panel - B (#26) to the assembly
using four Screws (#6). See Figures 7A.
Attach the Base Panel (#24) to the Side
Panels assembly using four Screws (#6).
See Figures 7.
Place the Top Panel (#22) onto the
assembly and attach using four Screws
(#6).See Figures 7.
Stand the assembly upright and attach the
two Cue Fixtures (#20) to the Top Panel
using two Screws (#30) per Fixture.
Attach the Triangle Fixture (#21) to the Top
Panel using one Screw (#19).
Your Cue Rack may also be mounted on
the wall if so desired. Attach the two Cue
Rack Mounting Fasteners (#29) onto the
Top Panel using two Screws (#19) per
Fastener.
See Fig. 7B for completed assembly.
FIG, 7: ASAMBLEA DE ESTANTE DE TACO DE
BILLAR
Fijar los dos anaqueles de medio (no. 23) al
panel de lado del estante de taco - A (no. 25)
usando dos tornillos (no. 6) por anaquel. Ver
las figuras 7A.
Fijar el panel de lado del estante de taco - B
(no. 26) a la asamblea usando cuatro tornillos
(no. 6). Ver las figuras 7A.
Fijar el panel de base (no. 24) a los paneles
de lado usando cuatro tornillos (no. 6). Ver las
figuras 7.
Colocar el panel superior (no. 22) a la asamblea
y fijarlo utilizando cuatro tornillos (no. 6).Ver las
figuras 7.
Porter todo derecho la asamblea y fijar los dos
aparatos de taco (no. 20) al panel superior
usando dos tornillos (no. 19) por aparato.
Entonces fijar el aparato de triangulo (no. 21 ) al
panel superior usando un tornillo (no. 19).
Su estante de taco tambien puede ser montado
sobre la pared de tan ser deseada. Fijar los dos
cierrres de montaje (no. 29) sobre el panels
superior usando dos tornillos (no. 19) por
cierre.
Ver la figura 7B para la asamblea completada.
(Siga a la pggina siguiente.)
FIG. 7: ASSEMBL_:E DE PORTE=QUEUE
1-1-32-932 ES / 1-1-32-932F ES (Continued on the next page.)
P.8
Fixer les deux planches de centre (n ° 23) au
panneau lateral - A (n° 25) a I'aide de deux
vis (n ° 6) par planche. Voir les figures 7 et
7A.
Fixer le panneau lateral - B (n ° 26)
I'assemblee a I'aide de quatre vis (n ° 6). Voir
la figure 7A.
Attachent le panneau de base (n° 24)
I'assemblee de panneaux lateraux a I'aide de
quatre vis (n° 6). Voir la figure 7.
Placer le panneau superieur (n ° 22) sur
I'assemblee et fixer a I'aide de quatre vis (n °
6). Voire la figure 7.
Mettre de pied I'assemblee tout droit et
fixer les deux appareils de queue (n° 20) au
panneau superieur a I'aide de deux vis (n °
30) par appareil.
Fixer le crochet triangulaire (n ° 21) au
panneau superieur a I'aide d'une vis (n ° 19).
Votre porte-queue peut aussi 6tre monte
au mur si desir6. Fixer les deux attaches
de montage de porte-queue (n ° 29) sur le
panneau superieur & I'aide de deux vis (n °
19) par attache.
Voir la figure 7B pour I'assemblee achevee.
@2009 Sportcraft, Ltd.
(Page suivante.) www.sportcraft.com

J English j J Espa_ol J [Frangais]
TABLE
Mesa
Table
POCKETS
Buchacas
Poehes
LEGS
Piernas
Pieds
TABLE MAINTENANCE (MANTENIMIENTO DE LA MESA)
Keep your table covered. If there is dust on the playfield or the aprons, use a vacuum or use the brush provided to remove. Do not sit on
the table and do not use the table outside.
Cubra SUmesa. St hay el polvo Sobre el Campo de juego 0 los guamiciones, Use un vac[o O e! Cepil!o proviso para quitarlo, No Sientese
sobre la mesa y no utilice la mesa afuera.
Tenez votre table Couverte. S'il y a de la poussiere sur I'aire de jeu 0u.:: Ne Vous assoyez pas Sur la table et ne Femployez pas _ I'ext#rieur.
Pour d#terminer I'emplacement exact de la mouche de la boule noire, veuillez vous referer _ l'illustration no 1.
DO NOT lift the table by placing your hands under the pockets, and do not sit, lean or put pressure on the pockets.
NO levante la mesa pot Sosteniendo sobre los buchacas y no sientese, ni inclinese, ni haga presi6n sobre los buchacas.
Ne Soulevez pas la table en plagant Vos mains Sous ies pocheS et ne vous asseyez ni Vous penchez ni faites pression sur les poches.
Check that all the edges fit properly into the grooves of the caps. When moving the table, lift the table off of its legs and place it down
squarely on the legs, do not drag the table (and do not lift by the pockets).
u
Aseg_rese que los pernos de piema Son bien apretados. En moviendo !a mesa, levante ia mesa de sus piemas y Co!6quelo abajo
directamente sobre los piemas, no arrastre la mesa (y no levante pot los buchacas).
Wrifiez que toUS !es bords S'ajustent Correctement dons les rainures des Coins, Lorsque vous devez d@!acer la tab!el la Soulever
entierement de ses pieds et !a d@ose r _ !'endroit VOU!U en !a remettant sur ses pieds; ne pas trainer !a tableau so! (et ne pas !a sou!ever
par les poches).
BiLLiARD RULES - 8 BALL
OBJECT OF THE GAME:
8 Ball is a simple game enjoyed by players of all skill
levels. It is a Called Shot Game, meaning that players
must announce their intended shot in advance in order
for it to count. In 8 Ball, one player shoots at solid balls
(numbers 1 though 7), while the opponent shoots at
striped balls (numbers 9 through 15). The player who
pockets his or her ball group first and then sinks the 8
ball is the winner.
THE BREAK:
The balls are racked as shown in the illustration. A flip
of a coin determines which player gets to break. In
subsequent games, the loser of the previous game gets
to break. The cue ball must be placed behind the head
string and the shooter must either : (a) pocket a ball,
or (b) drive four balls to the rails. If the shooter fails
to make a legal break, the opponent has the option of
accepting the balls in this position or re-racking the balls
and shooting the opening break again.
If any balls are pocketed on the break: the shooter stays
on the table, however the table is still Open, meaning that
the choice of the stripes or solids is not yet determined.
The choice of stripes or solids is determined by the first
called shot made after the break.
If the 8 ball is pocketed on the break: the shooter stays
on the table with the option of spotting the 8 ball and
continuing play, or re-racking the balls and breaking
again.
If the shooter scratches on the break: if the cue ball is
pocketed on the break : (a) all balls pocketed remain
pocketed, except the 8 ball which is spotted, (b) the table
is open, (c) the opposing player has the cue ball in hand
and may place it anywhere behind the head string and
shoot at any ball that is not behind the head string.
PLAYING THE GAME:
After the break, regardless of whether any balls were
pocketed on the break, the table is Open, with the
choice of stripes or solids determined by the next legally
pocketed ball.
In the course of play, a shooter must caltch shot in
advance, by indicating the ball to be made and the pocket
into which it wilt be made. It is not necessary to indicate
details such as cushions, banks, caroms, etc. Failure to
make the shot as called results in a loss of turn. tf the
shot is made as called, then any other balls pocketed
remain pocketed. However, if the called shot is not made
and any other balls are pocketed, then the shooter's
ball(s) that were pocketed would be spotted and any of
the opponent's balls would remain pocketed.
In order to execute a Legal Shot, the first ball hit must be
one of the balls in the shooter's group (stripes or solids)
REGLAS DEL JUEGO DE BILLAR - 8 BOLAS
OBJETIVO DEL JUEGO:
El juego de 8 bolas es muy sencillo y Io pueden disfrutar
jugadores de todos los niveles. Se le llama juego de "tiro"
porque los jugadores deben anunciar por adelantado hacia
donde tienen la intenci6n de tirar para que el tiro sea valido.
En el juego de 8 bolas, un jugador le tira a la bolas de un
solo color (con los nOmeros del 1 al 7), mientras que su
contrincante le tira a las bolas con la raya (con los n0meros
del 9 al 15). El jugador que primero Iogre meter en las
buchacas su grupo de bolas y luego Iograr meter la bola 8
es el ganador.
LA APERTURA:
Las bolas se agrupan tal como se muestra en la Ilustraci6n.
Una moneda lanzada al aire determina qui_n es el que
hace la apertura. En juegos subsecuentes, el perdedor en
el juego anterior es quien hace la apertura. La bola blanca
debe colocarse detras de la IJnea de arranque y el jugador
debe, una de dos: (a) meter una bola en una buchaca o (b)
tener 4 bolas en las bandas. Si el jugador no Iogra hacer una
apertura limpio, el contrincante tiene la opci6n de aceptar
las bolas en la posici6n en que quedaron o volver a agrupar
las bolas y hacer la apertura inicial de nuevo.
Si aluuna bola entra en la buchaca durante la aoertura:
entonces el jugador sigue tirando; sin embargo_ la mesa aOn
esta "abierta', es decir, que la elecci6n de bolas de color o
con raya aOn no se ha determinado. La elecci6n de bolas de
color o con raya se determina con el primer tiro que se hace
despues de la apertura.
Sila bola 8 entra en la buchaca: El jugador sigue tirando
con la opci6n de sacar la bola 8 y seguir jugando o volver a
agrupar las bolas y hacer la apertura de nuevo.
Si el juqador mete la bola blanca en la apertura: Sila bola
blanca entra en una buchaca durante la apertura: (a) todas
las bolas que entraron en las buchacas permanecen ahi,
con excepci6n de la bola 8 que se vuelve a porter en juego,
(b) la mesa esta abierta, (c) el contrincante tiene la bola
blanca en la mano y puede colocarla detras de la linea de
arranque, en cualquier punto_ y tirar a cualquier bola que no
se enouentre detras de la linea de arranque.
EL JUEGO:
Despu_s de la apertura, sin importar si alguna bola entr6 en
la buchaca durante la apertura, la mesa esta "abierta', con
la opci6n de las bolas de color o con raya a determinar por
la siguiente bola que entre en la buchaca.
Durante el juego, un jugador debe anunciar cada tiro por
adelantado indicando la bola que se pretende meter en
la buchaca. No es necesario indicar detalles tales como
bandas o carambolas_ etc. En caso de no alcanzar los
resultados anunciados se pierde el turno. Si el tiro resulta
como se anunci6, entonces las otras bolas que entraron
en las buchacas se quedan ahi. Sin embargo_ si el tiro no
resulta como se anunci6 y otras bolas si entraron en la
buohaca_ entonces se sacan las bolas que le corresponden
(con raya o de color segOn se haya determinado) y las bolas
(Siga a la p_gina siguiente.)
1-1-32-932 ES / 1-1-32-932F ES (Continued on the next page.)
P.9
REGLES DE JEU - LE JEU DE LA HUIT
OBJECTIF DU JEU:
II s'agit d'un jeu simple pour des joueurs de n'importe quel
niveau, tl s'agit d'un jeu a coup nomm6_ c'est-a-dire que
les joueurs doivent annoncer leur coup au prealable. Un
joueur frappe les boules pleines (num6rotees de 1 & 7) et
son adversaire frappe les boules ray_es (num6rot_es de 9
15). Le joueur quL le premier, empoche toutes les boules
de son groupe, puis rentre la huite gagne.
LE BRIS:
On place les boules dans le triangle tel qu'indique dans
I'lllustration n° 1. On tire au sort pour d_terminer qui
bfise. Lors des parties suivantes, le perdant de la partie
pr6c_dente brise, tl faut placer la blanche derriere la Ligne
du Haut, et I'ouvreur dolt: a) empocher une boule ou b)
faire en sorte que qutare boules touchent une bande. Si
I'ouvreur ne reussit pas un bfis I_gaL son adversaire ale
choix d'accepter la table telle qu'elle est ou de remettre les
boules dans le triangle et de bfiser de nouveau.
Si une boule est emoochee Iors du bris: le joueur qui a brise
continue de jouer, cependanL la table est encore ourverte,
c'est-a-dire que le choix de pleines ou des ray_es n'a pas
encore _t6 determin& Le choix du groupe de boules est
d_termin_ Iorsqu'un joueur empoche une boule nomm_e,
apr_s le bris.
Sila huite est empoch_e Iors du bris: le joueur qui a bris_ a
toujours le contr61e de la table et il peut choisir de remettre
la huit sur la table ou de briser de nouveau.
Sila blanche est empoch_e Iors du bris: a) toutes les
boules empooh_es le demeurenL sauf la huit qui est remise
sur la table_ b) la table est ouverte, c) I'autre joueur a la
blanche en main et peut la placer n'importe cO derri&re la
Ligne du Haut et viser n'importe quelle boule sauf celles qui
se trouvent derriere la Ligne du Haut.
DEROULEMENT DE LA PARTIE:
Apr_s le bris, que des boules ai0ent _t6 empoch_es ou non,
la table est ouverte et le choix des boules est d_termin6 par
la prochaine boule legalement empoch_e.
En cours de jeu, chaque joueur dolt annoncer ses coups
en indiquant quelle boule il veut rentrer et dans quelle
poohe, tl n'est pas n_oessaire de donner des details tels
que ricochets, combines, carambolages, etc. Si un joueur
ne parvient pasa empooher la boule nom_e_ il perd son
tour. Sila boule nommee est empooh_e_ toutes autres
boules rentr_es Iors du m_me tour demeurent empooh_es.
CependanL sila boule nom_e n'est pas empochee mais
que d'autres boules le sont, les boules empooh_es qui
appartiennent au joueur sont remises sur la table et
les boules appartenant a son adversaire demeurent
empoch_es.
Pour qu'un coup soit I_gal, la blanche dolt d'abord toucher
une boule du groupe du joueur et la boule nommCe dolt
_tre empooh_e oula blanche ou toute boule numerotee dolt
(Page suivante.)
@2009 Sportcraft, Ltd.
www.sportcraft.com

I English I
and the object ball must be pocketed or the cue ball or
any object ball must come into contact with a rail. (Note:
It is legal for the shooter to bank the cue ball off a rail
before hitting the object ball.)
A player who legally pockets a ball continues play until
missing or committing a Foul. Once a player's ball group
(stripes or solids) is pocketed, the player may play the 8
ball. Again, the player must clearly indicate the intended
pocket, even if it appears obvious. A player who legally
pockets all of his ball group and the 8 ball is the winner.
FOULS:
1. Failure to execute a legal shot as defined above.
2. A scratch shot (shooting the cue ball into a pocket or
off the table)
3. Moving or touching any ball by means other than legal
play.
4. Shooting an intentional jump shot over another ball
by scooping the cue stick under the cue ball. A jump
shot executed by striking the cue ball above center
is legal.
5. Using the 8 ball first in a combination shot when the
table is not open.
FOUL PENALTY:
Opposing player gets "cue ball in hand". This means that
the player can place the cue ball anywhere on the table
(does not have to be behind the head string except on
the opening break).
SPOTTING BALLS:
Whenever an object is to be spotted, the object ball is
spotted on the tong string as close to the foot spot as
possible.
LOSS OF GAME:
A player committing any of the following infractions loses
the game:
1. Fouls when pocketing the 8 ball.
2. Pockets the 8 ball on the same stroke as the last of
his group of balls.
3. Scratches when the 8 ball is his legal object ball.
4. Jumps the 8 ball off the table at any time.
5. Pockets the 8 ball in a pocket other than the one
designated.
6. Pockets the 8 ball when it is not the legal object ball
(except on the break).
BILLIARD RULES - 9 BALL
OBJECT OF THE GAME:
Nine-Ball is a popular game enjoyed by players of all skill
levels. In 9 Ball, the shooter must make contact with the
lowest numbered ball first. The player who sinks the 9
ball is the winner.
THE BREAK:
Balls numbered 1 through 9 are racked in a "diamond"
shape with the 1 Ball at the top of the diamond and
on the foot spot and the 9 Ball in the center. See the
illistration. The cue ball must be placed behind the head
string and the shooter must make contact with the 1 Ball
first and either: (a) pockets a ball, or (b) drives four balls
to the rails, tf the shooter fails to make a legal break,
the opponent has the option of accepting the balls in this
position or re-racking the balls and shooting the opening
break again. If the cue ball is scratched on the break,
the incoming player may not play a "Push Out" (see
PUSH OUT), but places the "cue ball in hand" anywhere
on the table.
PLAYING THE GAME:
After the break, the next shot may be played as a "Push
Out", or, if the breaker pockets one or more balls, he
continues to shoot until he misses, fouls, or wins the
game. Once a player misses or fouls, the opponent
begins to shoot until missing, committing a foul, or
winning. The game ends when the 9 Ball is pocketed
on a legal shot.
I Espa_°l I
del contrincante que hayan entrado permanecen en las
buchacas.
Para hacer un tiro limpio, la pfimera bola que se golpea
debe ser una correspondiente al grupo de bolas del jugador
en turno (con raya o de color) y la bola objetivo se debe
meter en la buchaca, o la bola blanca u otra bola objetivo
debe entrar en contacto con una banda. (Nota: es valido que
el jugador mande la bola blanca a la banda antes de pegarle
a la bola objetivo)
Un jugador que limpiamente mete una bola en la buchaca
sigue jugando hasta que falle o cometa una falta. Una
vez que el grupo de bolas (con raya o de color) de un
jugador est_ por completo en las buchacas, _ste debe ir
por la bola 8. De nuevo, el jugador debe anunciar el tiro
intencionado, incluso si este parece obvio. Un jugador que
mete Iimpiamente todas las bolas de su grupo y la bola 8
es el ganador.
LAS FALTAS:
1. El hacer un tiro ilegal, tal como se ha explicado
anteriormente.
2. Un tiro de gracia (fatal) (cuando la bola blanca se mete en
la buchaca o sale de la mesa).
3. Mover o tocar una bola pot otto medio que no sea un tiro
limpio o legal.
4. Tirar intencionalmente un tiro de bfinco por encima de
otra bola metiendo el taco por debajo de la bola blanca.
Un tiro de brinco realizado con un golpe en la parte
superior del centro de la bola es legal.
5. Usar pfimero la bola 8 en un tiro de combinaci6n cuando
la mesa no esta abierta.
PENAL:
Los contfincantes toman "la bola blanca en la mano". Esto
significa que el jugador puede colocar la bola blanca en
cualquier lugar de la mesa (no tiene que ser detras de la linea
de inicio, excepto cuando se trata del tiro de apertura).
COLOCACION DE LAB BOLAS:
Cuando se va a volver a colocar una bola, la bola objetivo se
pone en la Ifnea larga, tan cerca como se pueda del punto
del pie.
JUEGO PERDIDO:
Un jugador que comete alguna de las siguientes inflacciones
pierde el juego:
1. Se comete una falta al meter la bola 8 en la buchaca.
2. Se mete la bola 8 en el mismo tiro en que se mete la
Oltima bola del grupo del jugador.
3. Meter la bola blanca cuando la bola 8 es su bola objetivo
legal.
4. Cuando se brinca la bola 8 en cualquier momento.
5. Cuando se mete la bola 8 en otra buchaca distinta a la
que se anunci6.
6. Meter la bola 8 cuando _sta no es la bola objetivo legal
(con excepci6n de la apertura).
OBJETIVO DEL JUEGO
Bola Nueve es un juego muy divertido que disfrutan
jugadores desde principiantes hasta expertos. En Bola 9, el
tirador debe contactar primero la bola cuya numeraci6n sea
lamas baja. Gana el jugador que embolse la bola 9.
LA APERTURA:
Las bolas numeradas del 1 al 9 se colocan en forma de
rombo, con la bola nQmero 1 en la punta del rombo y sobre
el punto de pie y la 9 en el centro. Vea la ilustraci6n. La
bola blanca se debe situar tras la linea de cabeza; el tirador
debera contactar primero la bola ly debe: (a) embolsar una
bola o (b) enviar cuatro bolas a las bandas. Si el jugador no
realiza un tiro de apertura reglamentario, el adversario tiene
la opci6n de aceptar las bolas en esta posici6n o volverlas
a colocar y ejecutar el tiro de apertura otra vez. Si la bola
blanca se entronera en el rompimiento, el jugador siguiente
no podra hacer una jugada de "push out" (vea PUSH OUT),
sino que debera colocar "la bola blanca en mano" en
cualquier parte de la mesa.
EL JUEGO:
Tras el rompimiento, el tiro inmediato posterior puede set un
"push out" o_ si el jugador que rompe embolsa una o mas
bolas, se puede seguir tirando hasta que se falle, cometa
una falta o gane el juego Cuando un jugador falle o cometa
una falta, el adversario empezara a tirar hasta que falle,
(Siga a la p_gina siguiente.)
1-1-32-932 ES / 1-1-32-932F ES (Continued on the next page.)
P. 10
[ Frangais ]
entrer en contact avec une bande. (Nota: la blanche peut
toucher une bande avant de toucher la boule nomm_e.)
Un joueur qui empoche legalement une boule continue de
jouer jusqu'a ce qu'il rate un coup nomme ou commette
une faute. Une lois que toutes le boules du groupe d'un
joueur ont _t6 empochees, le joueur dolt jouer la huit. Le
joueur dolt indiquer clairement dans quelle poche il compte
la rentrer_ m¢me si le choix semble _vident. Le joueur qui
empoche I_galement les boules de son groupe et la huit
gagne.
FAUTES:
1. Ne pas ex_cuter un coup I_gal tel que defini ci-dessus.
2. Empocher la blanche ou la projeter hors de la table.
3. Bouger toute boule ou y toucher d'une fa£on autre que
Iors d'un jeu legal.
4. Faire sauter intentionnellement la blanche par-dessus
une autre boule (coup saute) en se servant de la
queue pour pousser en dessous de la blanche. Le
coup saut_ est legal si la blanche a _t_ frappee au-
dessus du centre.
5. Utiliser la huite comme premiere boule d'une
combinaison Iorsque la table n'est plus ouverte.
PLeNALTE/_ LA SUITE D'UNE FAUTE:
Le joueur adverse a "la blanche en main", c'est-&-dire qui'l
peut placer la blanche n'importe oQ sur la table (il n'est pas
n_cessaire qu'elle se trouve derriere la Ligne du Haut, sauf
Iors du bris)
REMISE D'UNE BOULE SUR LA TABLE:
Lorsqu'une boule dolt _tre remise sur la table, elle dolt
_tre placee sur la Grande Ligne le plus pros possible de la
Mouche Inferieure.
PERTE DE LA PARTIE:
Le joueur qui commet une quelconque des infractions
suivantes perd la parite:
1. Commet une faute Iorsqu'il empoche la huit.
2. Empoche la huite tout en jouant la derni_re boule de
son groupe.
3. Empoche la blanche Iorsqu'il vise la huit.
4. Proj_te la huit hors de la table & n'importe quel
moment.
5. Empoche la huite dans une poche autre que celle
annonoee.
6. Empoche la huite Iorsqu'elle n'est pas la boule nomm_e
(saul Iors du bris).
REGLES DE JEU - LE JEU DU NEUF
OBJECTIP DU JEU:
Le Jeu du Neuf est populaire et aim_ par les joueurs de
tousles niveaux de competence Dans le Jeu de Neuf, le
joueur dolt premi_rement flapper la boule num_rot_e la
plus base Le joueur qui empoche la boule n ° 9 gagne
LE BRIS:
Placez les boules, numerot6e 1 a 9_ dans le triangle en
forme "de diamant". La boule n ° 1 dolt etre au sommet
du diamant et sur la mouche interieure, et la boule n° 9
au centre. La blanche dolt etre placee derriere la Ligne
du Haut. Le joueur dolt flapper la boule n°l d'abord et:
(a) empocher une boule, ou (b) conduisent quatre boules
aux bandes. Si le joueur ne reussit pas a faire un bris
legal, I'adversaire a I'option d'accepter les boules dans
cette position ou de briser de nouveau. Si la blanche est
empoch_e sur le bris, le joueur entrant ne peut pas jouer
un "Push Out" (voir PUSH OUT), mais place "la blanche en
main" n'importe oQ sur la table.
DEROULEMENT DE LA PARTIE:
Apres le bris, la frappe suivante peut etre joule comme
un "Push Out", ou_ si le joueur qui a brise empoche une
ou plusieurs boules, il continue & tirer jusqu'a ce qu'il rate,
commette une faute, ou gagne le jeu. Lors d'une rate ou
faute, I'adversaire commence & tirer jusqu'a ce qu'il rate,
commette une faute, ou gagne le jeu. Le jeu finit quand la
boule n ° 9 est mise dans sa poche sur une frappe I&gale.
PUSH-OUT :
Le joueur frappant immCdiatement apres un bris legal
peut faire une Push Out dans une tentative de d_placer la
blanche dans une meilleure position Dans une Push Out,
une boule ne dolt pas prendre contact avec aucune boule
ou bande et n'est pas considere pas une faute a moins que
d'autres fautes ne s'appliquent Le joueur dolt annoncer
@2009 Sportcraft, Ltd
(Page suivante ) www sportcraft com

I English I [ Frangais ]I I Espafi°l
HEAD OF TABLE
CABEZA DE LA MESA TC:TEDE LATABLE
HEAD SPOT
PUNTO INICIAL
MOUCHE SUPERIEURE
CENTER SPOT
PUNTO CENTRAL
MOUCHE CENTRALE
FOOT SPOT
PUNTO DEL PIE
MOUCHE INFERIEURE
SOUD
RAYA
LONG STRING LiNEA LARGA
LONGUE LIGNE
FOOT OF TABLE
PIE DE LA MESA BASDE LATABLE
HEAD STRING
LiNEA DE ARRABQUE
LIGNE DU HAUT
CENTER STRING
/LiNEA CENTRAL
LIGNE CENTRALE
FOOT STRING
/ L[NEADEL PIE
LIGNE DU BAS
9 - BALL 9 BOLAS JEU DE 9
FOOT STRING
LiNEA DEL PIE
......... " "
PUSH OUT:
The player shooting immediately following a legal break
may play a Push Out in an attempt to move the cue ball
into a better position. In a Push Out, a ball does not have
to make contact with any ball or rail and is not considered
a foul unless other foul rules apply. The player must
announce the intention of playing a Push Out before the
shot, or it is considered normal play. Any ball pocketed
on a Push Out does not count and remains pocketed
(except the 9 Ball). Following a Push Out, the incoming
player: a) must shoot from that position or b) may pass
the shot back to the other player.
FOULS:
1. Failure to execute a legal shot as defined above.
2. Failure to make first contact with the lowest numbered
ball on the table.
3. A scratch shot (shooting the cue ball into a pocket or
off the table)
4. Moving or touching any ball by means other than legal
play.
5. When the object ball is not pocketed, failure to drive
the any ball to a rail after the cue ball has made
contact with the object bait.
6. Shooting an intentional jump shot over another ball
by scooping the cue stick under the cue ball. A jump
shot executed by striking the cue ball above center
is legal.
7. Driving any ball off of the table. The object balls are
not re-spotted (except the 9 Ball).
FOUL PENALTY:
Opposing player gets "cue ball in hand". This means that
the player can place the cue ball anywhere on the table.
Balls pocketed on the foul are NOT re-spotted (except the
9 Ball). Any player that commits a foul three consecutive
times on three successive shots without making a legal
shot in between loses the game.
cometa una falta o gane. El juego termina cuando la bola 9
se entronera con un tiro reglamentario.
EL PUSH OUT:
Inmediatamente despu@s de un tiro de apertura
reglamentario, el jugador en turno puede jugar un push
out en un intento de colocar la bola blanca en una mejor
posici6n. En un push out, la bola no tiene que tocar bola
o banda alguna, Io cual no se considera una falta a menos
que aplique otra regla de faltas. El jugador debe anunciar su
intenci6n de realizar un push out antes de ejecutar el tiro, de
Io contrario se considerara como un tiro normal. Cualquier
bola embolsada en un push out no cuenta y permanecera en
la tronera (a excepci6n de la bola 9). Despu@s de un push
out, el siguiente jugador: a) debera tirar desde esa posici6n
o b) puede ceder el tiro al otro jugador.
LAS FALTAS:
1. Fallar al ejecutar un tiro reglamentario segQn la definici6n
mencionada anteriormente.
2. No tocar primero la bola con la numeraci6n mas baja en
la mesa.
3. Embolsar la bola blanca (tirar la blanca en la tronera o
fuera de la mesa)
4. Mover o tocar cualquier bola por otto medio fuera del
juego reglamentario.
5. Cuando no se embolsa la bola objetiva y ninguna bola
hace contacto con una banda despu_s de que la blanca
ha tocado la bola objetiva.
6. Ejecutar intencionalmente un tiro de salto sobre otra bola
al hacer efecto de pala con el taco por debajo de la bola
blanca. Es Iicito ejecutar un tiro de salto al golpear la
bola blanca por arfiba de su centro.
7. Hacer saltar cualquier bola fuera de la mesa. Las bola
objetivas no se reponen (con excepci6n de la bola 9).
JUEGO PERDIDO:
El adversario tendra "bola blanca en mano", esto significa
que el jugador puede colocar la blanca en cualquier lugar
de la mesa. Las bolas entroneradas durante una falta NO
se reponen (con excepci6n de la bola 9). El jugador que
cometa tres faltas consecutivas en tres tiros sucesivos sin
ejecutar entre ellos un tiro reglamentario perdera el juego.
I'intention de jouer une Push Out avant la frappe, ou on le
consid_re un tour normal. Toutes les boules empoch_es sur
une Push Out le demeurent (sauf la boule n° 9). Apr_s une
Push OuL le joueur entrant : a) dolt flapper de cette position
ou b) peut repasser le coup a I'autre joueur.
FAUTES:
1. Ne pas ex_cuter un coup I_gal tel que defini ci-dessus.
2. Echec de faire d'abord contact avec le plus bas boule
num_rot_e sur la table.
3. Empocher la blanche ou la projeter hors de la table.
4. Bouger toute boule ou y toucher d'une fa£on autre que
Iors d'un jeu legal.
5. Quand la boule d'objet n'est pas empoch_e, I'echec de
conduire une boule & une bande apr_s que la blanche
a prise contact avec la boule d'objet.
6. Faire sauter intentionnellement la blanche par-dessus
une autre boule (coup saute) en se servant de la queue
pour pousser en dessous de la blanche. Le coup
saute est legal si la blanche a _t6 frapp_e au-dessus
du centre.
7. Action de chasser n'importe quelle boule de la table. Les
boules d'objet ne sont pas remises au table (sauf la
boule n°9).
PENALTE A LA SUITE D'UNE FAUTE:
Le joueur adverse a "la blanche en main", c'est-&-dire qui'l
peut placer la blanche n'importe oQ sur la table (il n'est pas
n_cessaire qu'elle se trouve derriere la Ligne du Haul saul
Iors du bris). Les boules empoch_es sur la faute ne sont
pas re-mises au table (sauf la boule n°9). N'importe quel
joueur qui commet trois fautes consecutivement sur trois
coups successifs sans faire une frappe I&gale perd le jeu.
1-1-32-932 ES / 1-1-32-932F ES
(Siga a la p_gina siguiente.)
(Continued on the next page.) P. 11
(Page suivante.)
@2009 Sportcraft, Ltd.
www.sportcraft.com

I English I
LiMiTED WARRANTY
Limited Warranty
Sportcraft, Ltd. (the "Company") warrants the Product to be free
from defects in workmanship and materiats under normal usa and
conditions FOR A PERIOD OF 90 DAYS FROM THE DATE OF
ORIGINAL PURCHASE in the United States and Canada•
Product Registration Card
The Product Registration Card must be filled out completely and
mailed to the Company at the address printed on the card within 10
days from the date of your purchase of the Product.
What Is Covered
Except as provided below, this Limited Warranty covers all defects
in materials and workmanship. This Limited Warranty is void if the
Product is:
Damaged through improper usage, negligence, misuse, abuse,
transportation damage, acts of nature, or accident (including
failure to follow the instructions supplied with the Product)
Used in commercia_ appiicafions or rentals
Modified or repaired by anyone not authorized by the
Company.
What Is Not Covered
This Limited Warranty does not cover expendable items such as
batteries, light butbs, fuses, accessories, cosmetic parts, tools and
other items that wear out due to normal usage.
What The Company Will Pay For
If during the Limited Warranty period, any part or component of the
Product is found by the Company to be defective, the Company
will, at its option, repair the Product, replace the Product with a
new Product (either the same or an equivalent model) or cause
the original retaiter of the Product to exchange the Product with a
new Product (either the same or an equivalent model) or refund the
original purchase price of the Product, without charge for labor or
parts. The Company's obligafion to repair, replace or exchange
the Product, however, shall be limited to the amount of the original
purchase price of the Product.
How To Obtain Warranty Service
In order to enforce your rights under this Limited Warranty, you must
follow these procedures:
You must have completed and mailed the Product Registration
Card to the Company within 10 days of purchase of the
Product.
You must include THE ORIGINAL COPY OF YOUR SALES
RECEIPT.
You must call the Company's Consumer Service Department
at 1-800-526-0244 from 9:00 A.M. to 5:00 P.M. (EST) to notify
the Company of the nature of the problem and to obtain
instructions for how to obtain servicing. At the Company's
option, the Product may be serviced at your location or at a
location designated by the Company.
If you are instructed to return the Product to the Company
for servicing, you are responsible for shipping the Product, at
your expense, to the address designated by the Company in
packaging that will protect against further damage.
You must also include your name, address, daytime telephone
number, model number of the Product and a description of the
problem.
The Company will pay for any shipping charges to return the
repaired or replaced Product to you.
THIS LIMITED WARRANTY IS AVAILABLE ONLY TO THE
ORIGINAL PURCHASER OF THE PRODUCT AND IS VALID IN
THE UNITED STATES AND CANADA ONLY.
THE COMPANY'S LIABILITY IS LIMITED TO THE REPAIR
OR REPLACEMENT, AT ITS OPTION, OF ANY DEFECTIVE
PRODUCT AND SHALL NOT INCLUDE ANY LIABILITY FOR
INDIRECT, INCIDENTAL OR CONSEQUENTIAL DAMAGES OF
ANY KIND.
THiS WARRANTY IS EXPRESSLY MADE IN LIEU OF ALL OTHER
WARRANTIES, EXPRESSED OR IMPLIED.
SOME STATES DO NOT ALLOW LIMITATIONS ON HOW LONG
AN IMPLIED WARRANTY LASTS OR DO NOT ALLOW FOR
EXCLUSION OF INCIDENTAL OR CONSEQUENTIAL DAMAGES.
TO THAT EXTENT, THE ABOVE LIMITATIONS MAY NOT APPLY
TO YOU.
This Limited Warranty gives you specific legal rights, but you may
also have other rights that vary from state to state.
If you have questions regarding this Limited Warranty or the
operation of the Product, you may call or write us:
Consumer Service Department
313 Waterloo Valley Rd.
Budd Lake, NJ 07828
1-800-528-0244
www.sportcraft.com
0408 TG
**NOTE: Please save your original proof of purchase
as it is needed should you require warranty service.
I EspaS°l I
GARANTIA LIMITADA
Garantia limitada
Sportcraft, Ltd. (la "Compa5ia") garantiza que este producto no
fiene defectos de fabdcacidn ni materiales bajo condiciones y uso
normales POR UN PERIODO DE 90 DiAS A PARTIR DE LA PECHA
DE COMPRA ORIGINAL, en Estados Unidos y Canad&
Tarjeta de registro del producto
La tarjeta de registro del producto se debe tlenar por comp]eto y
enviar por correo a la Compa5ia a {a direcci6n impreso sobre }atarjeta
dentro de 10 dias a partir de }a fecha de compra de} Producto.
La cobertura
Esta garantia cubre todos los defectos de fabricacien y materia{es,
excepto Io que se indica a confinuacien. Esta garantia limitada no
fiene validez si el producto:
Se dafia por uso inapropiado, negiigencia, mal uso, abuse, da5a
de transporte, fanomenos natura{es o accidentes (incluyendo
el no seguir las instrucciones que se proporcionan con el
producto).
Se usa en aplicaciones comerciales o se aiquita
Alguna persona no autorizada por la CompaSia Io modifica o
repara.
Lo que la garantia no cubre
La garantia limitada no cubre articulos perecederos tales como
baterias, focos, fusibles, accesorios, partes cosmeticas, herramientas,
y otros articulos que se gastan con e}uso normal.
Pagos de la Compai_ia
Si durante el periodo de la Garantia Limitada, la CompaSia determina
que alguna pieza o componente del producto tiene defectos, a su
discrecien, Io reparara o reemplazara et Producto con un nuevo
Producto (ya sea con un modelo similar o equivalente) o causa la
fienda original del Producto para cambiar el Producto con un Producto
nuevo (sea con un modelo similar o equivalente) o reembolsa el
precio de compra original de} Producto, sin cargos por la mano de
obra o las piezas. La obligacidn de la Compafiia de reparar, sustituir,
o reemplazar el Producto, sin embargo, sera }imitada con el precio
de compra original del Producto.
C6mo obtener servicios de garantia
Para hacer cumplir sus derechos de esta Garantia Limitada, debe
seguir estos procedimientos:
Debe haber completado y ha enviado la tarjeta de registro de
Producto a la CompaSia dentro de 10 dias de compra del
Producto.
Debe incluir LA COPIA ORIGINAL DE SU RECIBO DE LAS
VENTAS.
Debe Ilamar al departamento de Servicio al Cliente de la
Compa_ia al 1-800-526-0244 entre las 9:00 A.M. y 5:00 RM.
(hora del este) para notificar la Compa_ia la natura del problema
y para obtener los instrucciones como adquirir la manutencion.
Enla opcion de la Compa_ia, e} Producto puede ser revisado an
su sitio o en un sitio designado por la Compa_ia.
Si esta instruido a devoiver el Producto a la Compa_ia para la
manutencien, esta responsable para el envio del Producto, a
su gasto, a la Compafiia a la direccien situada debajo, en un
embalaje que protegera contra el remoto dafio.
•Asimismo, debe incluir su nombre, direcci6n, numero de telefono
durante el dia, el modelo del producto y una descripcion del
problema.
• La CompaSia pagara cualquier gasto de envio para enviarle de
regreso el producto reparado o reemplazado.
ESTA GARANTIA LIMITADA ES DISPONIBLE SOLO AL
COMPRADOR ORIGINAL DEL PRODUCTO Y ES VALIDA
SOLAMENTE BN BSTADOS UNIDOS Y CANADA.
LA RESPONSABILIDAD DE LA COMPAI_iA SE LIMtTA A
REPARAR O REBMPLAZAR, A SU DISCRECION, CUALQUIER
PRODUCTO DEFECTUOSO Y NO INCLUIRA RESPONSABILIDAD
POR DAi_IOS INDIRECTOS, INCIDENTALES O CONSECUENTES
DE NINGUNA CLASE.
ESTA GARANTiA OTORGADA SUPERSEDE A CUALQUIER
OTRA GARANTiA, EXPRESO O IMPLiCITO.
ALGUNOS ESTADOS NO PERMtTEN LIMITACIONES EN LA
DURACION DE GARANTiAS IMPLiCITAS O NO PERMITEN LA
EXCLUSION DE DAI_OS CONSECUENTES O INCIDBNTALES.
EN ESE CASO, LAS LIMtTACIONES MENCIONADAS ARRIBA NO
SE APUCAN A USTED.
Esta garantia limitada le otorga derechos legales especificos, pero
usted tambien tiene otros derechos que varian de un estado a otro.
Si tiene alguna pregunta con respecto a esta Garantia Limitada o la
operaci6n del producto, usted puede Ilamar o escribir a:
Consumer Service Department
313 Waterloo Valtey Rd.
Budd Lake, NJ 07828
1-800-526-0244
www.sportcraft.eom
0408 TG
**NOTA: Per favor guarde su prueba de compra original
porque es necesario si requiem el servicio de la garantia.
I Fran£;ais ]
GARANTIE LIMITEE
Garantie lira}tee
Sportcraft Ltd. (la <<compagnie_) garantit }e produit contre tout defaut
de fabrication at de material si ceiui-ci est utilise darts des conditions
normales, POUR UNE PERIODE DE 90 JOURS A PARTIR DE LA
DATE D'ACHAT INITIALE, aux Etats-Unis et au Canada.
Fiche d'enregistrement de produit
Uacheteur doit rempiir la fiche d'enregistrement du produit et la
poster a {acompagnie a {'adresse imprimeesur }a carte, dans les 10
jours de la date d'achat du produit.
Ce qui est couvert
La garanfie limitee couvre tous les defauts de materiel et de
fabrication, a }'excepfion de ce qui suit. Cette garantie lira}tee est
nulle si le produit est :
•andommage a cause d'une mauvaise utilisafion, de negligence,
d'abus, du transport, d'un imprevu ou d'un accident (y compds
en cas de non respect des instructions d'utilisation)
• ufilise a des fins commerciales ou de }ocafion
• modifie ou repare par une personne non autodsee par la
compagnie
Ce qui n'est pas couvert
Cette garantie limitee ne couvre pas les articles courants comme
les piles, les ampoules, les fusibles, les accessoires, les pieces
decoratives, les oufils ou les autres articles qui subissent une usure
normaie.
Frais assumes par la compagnie
Si au cours de la periode de garanfie limitee de la compagnie,
cetta derniere juge qu'une piece ou une composante du produit
est defectueuse, la compagnie, 8 son choix, reparera le produit
ou remplacera le produit par un nouveau produit (soit du meme
modele ou d'un modeie equivalent) ou exigera du detaitlant du
produit d'echanger le produit avec un nouveau produit (soit du
mema modele ou d'un modele equivalent) ou de rembourser le prix
d'achat original du produit, sans frais de main-d'oeuvre ou de pieces.
Uobligafion de la compagnie de reparer, remplacer ou echanger le
produit, cependant, sera limitee au montant total du pdx d'achat
original du produit.
Service offert darts le cadre de la garantie
Pour faire valoir vos droits conformement a la presente garantie
limitee, ilfaut suivre }a methode suivante:
• Vous etes tenu de remplir et d'expedier par la poste la fiche
d'enregistrement de produit 8 la
compagnie dans un delai de 10 jours suivant }'achat du produit.
• Vous devez indure LA COPIE ORIGINALE DE VOTRE REQU
DECAISSE.
• Vous devez communiquer avec le Service a la clientele de la
compagnie en composant le 1 800 526-0244, de 9 h a 17 h
(HNE) pour aviser la compagnie de la nature du probleme et
pour obtenir des instructions sur }afa;on d'obtenir du service. ,_,
}a discretion de la compagnie, vous poumez obtenir du service
sur place ou a un emplacement designe par la compagnie.
• Si on vous demande de retourner le produit a lacompagnie aux
fins de service, vous etes responsable d'expedier leproduit a la
compagnie, a vos frais, a I'adresse indiquee par la compagnie.
Vous devez emballer le produit de sorte qu'il ne subisse pas de
dommages supplemantaires.
• Vous devez egalemant inclure votre nora, votre adresse, votre
numero de telephone (de jour), te numero de modeie du produit
et une description du problema.
• La compagnie assumera les frais de reexpedition du produit
repare ou remplace.
CETTE GARANTIE LIMITt_E EST OFFBRTE SEULEMENT A
L'ACHETEU R INITIAL DU PRODUtT ET EST VALIDE AUX ETATS-
UNIS ETAU CANADA SEULEMENT.
LA RESPONSABILITE DE LA COMPAGNIE SE LIMITE A LA
RE_PARATION OU AU REMPLACEMENT, A SON CHOIX, DE
TOUT PRODUIT DEFECTUEUX. LA COMPAGNIE N'EST PAS
RESPONSABLE DES DOMMAGES INDIRBCTS, ACCESSOtRES
OU CONSECUTtFS DE TOUTES SORTES.
CETTE GARANTIE REMPLACE EXPRESSEMENT TOUTE
AUTRE GARANTIE, EXPRtMI_E OU IMPLICITE.
CERTAINS ETATS NE PERMETTENT PAS QU'UNE LIMITE
SOIT IMPOSEE QUANT A LA DUREB D'UNE GARANTIE
IMPLICITE OU NE PERMETTENT PAS QUE LES DOMMAGES
ACCESSOIRES OU CONSECUTIFS SOIENT EXCLUS. IL EST
POSSIBLE QU'A CET EGARD, LES RESTRICTIONS CI-DESSUS
NE S'APPLIQUENT PAS A VOUS.
Cette garanfie lira}tee vous accorde certains droits legaux
specifiques, mais il est possible que vous ayez d'autres droits qui
peuvent varier d'un etat a }'autre ou d'une province a I'autre.
Si vous avez des questions au sujet de la presente garantie limitee
ou du foncfionnement du produit, communiquez avec ou ecrivez a:
Consumer Service Department
313 Waterloo Valley Rd.
Budd Lake, NJ 07828
1-800-526-0244
www.sportcraft.com
0408 TG-CA
**NOTEZ: Priere de garder votre preuve d'achat originale
puisqu'elle sera requise en cas de service li_ _ la garantie.
@2009 Sportcraft, Ltd.
1-1-32-932 ES / 1-1-32-932F ES PrintedinChina ImpresoenChina Imprim_enChine www.sportcraft.com
La page est en cours de chargement...
La page est en cours de chargement...

BON DE COMMANDE DE Pil_CES
1-1-32932ES / 1-1-32-932F ES - TABLE DE BILLAR
Sportcessories
313 Waterloo Valley Road
Budd Lake, NJ 07828
www.sportcraft.com
X
NOM:
ADRESSE:
VILLE: ETAT/PROV.:
DATE:
N° DE TELEPHONE:
CODE POSTAL:
REF. QUANTITE
SOMMANDEE N°. DE PIECE
1 " " 9-3-32-762SS01
2 9-3-32-762SS02
3 ' ' 9-3-32-662SS06
4 9-3-32-662SS07
5 ' 9-3-32-662SS08
6 9-3-36-559SS23
7 ' 9-3-34-012SS06
8 9-3-32-531SSll
9 " " 9-3-34-510SS10
10 9-3-34-510SS12
11 ' 9-3-34-052SS09
12 9-3-32-662SS17
13 " 9-3-32-662SS 18
14 9-3-36-039SS39
15 " " 9-3-32-762SS15
16 9-3-32-762SS16
17 " 9-3-32-762SS 17
18 9-3-32-762SS18
19 " 9-3-32-531SS17
20 9-3-32-832SS29
21 " " 9-3-36-559SS20
22 9-3-32-832SS31
23 " 9-3-32-832SS32
24 9-3-32-832SS33
25 " " 9-3-32-832SS34
26 9-3-32-832SS35
27 " 9-3-32-762SS24
28 9-3-32-762SS25
29 " 9-3-32-832SS36
30 9-3-36-765SS57
HNIX IVIUN IAN I
DESCRIPTION UNITAIRE TOTAL
Tablier inferieur lateral ' 10,00 '
Tablier inferieur d'extremit6 10,00
Pied en bois interieur- A 12,00
Pied en bois interieur- B 12,00
Base de pied • 5,00 '
Visa t_te plate 4 x 44,5 mm 0,75
Boulon 8x38 mm ' 0,75 '
Rondelle 19 mm 0,75
Boulon 8 x44,5 mm • 0,75 '
Ecrou 8 x 44,5 mm 0,75
Vis at_te plate 8 x 38 mm 2,00 •
Equerre 3,00
Verin de calage 9,5 mm • 4,00 '
Visa t6te ronde 3 x 12 mm 0,75
Pied moule-A 4,00 '
Pied moule - B 4,00
Pied moule'C 4,00 '
Pied moule - D 4,00
Visa t6te ronde 4 x 12 mm • 0,75 '
Appareil queue 3,00
Crochet triangulaire 2,00 '
Porte-queue: panneau superieur 10,00
Porte-queue: planche de centre • 8,00 '
Porte-queue: panneau de base 10,00
Porte-queue: panneau lateralA ' 9,00 •
Porte-queue: panneau lateral B 9,00
Poche de coin (preinstallee) ' 6,00 '
Poche laterale (preinstall6e) 6,00
Attache de montage de porte-queue 2,00
Visa t6te plate 3 x 12 mm 0,75
A1 " 9-3-32-531 SS26
A2 9-3-36-559SS35
A3 " 9-3-32-531SS03 ....
A4 9-3-32-531 SS12
A5 " 9-3-36-559SS31
A6 9-3-32-662SS31
A7 " 9-3-32-762SS23
A8 9-3-32-662SS25
A9 ' 9-3-36-559SS34
A10 9-3-36-559SS33
Accessoires/pi#ces pr_install_s (Disponibles _ acheter)
Grattoir 3,00 '
Triangle 2,25 po 3,00
Boulon 6,5 x 44,5 mm (preinstalle) ' 0,75 '
Ecrou cylindrique transversal (preinstall6) 0,75
Ensemble de billes de billard 20,00 '
Cle metallique 3,00
Colle 3,00 '
Craie (verte) 2,00
Queue de billard en deux parties 57 po 3,00 '
Brosse 10,00
frais d'expedition et de manutention* (en $US) Total partiel:
Valeur d'expedition $0-20 $21-40 $41-60 plus de $61 Plus tous frais d'expedition
Frais $7.00 $9.00 $11.00 $15.00 et de manutention:
*= Les prix sont valab]es aux Etats-UnJs continentales et au Canada seulement, tout autre appellez s'il vous plaTt pour un devis.
M_&thnd_ d# nai#m_ntt TOTAL:
Visa [] Mastercard [] American Express []
N° de Carte:
Date d'expiration:
Nora (imprime sur la carte): Signature:
**LES PRIX SONT EN DOLLARS AMERICAINS ET PEUVENT CHANGER SANS PRE'AWS
0509- D
1-1-32-932 ES/ 1-1-32-932F ES
X
@2009 Sportcraft, Ltd.
www, sportcraft.com
-
 1
1
-
 2
2
-
 3
3
-
 4
4
-
 5
5
-
 6
6
-
 7
7
-
 8
8
-
 9
9
-
 10
10
-
 11
11
-
 12
12
-
 13
13
-
 14
14
-
 15
15
-
 16
16


Sportcraft 1-1-32-932FES Guide d'installation
- Catégorie
- Jeux de société
- Taper
- Guide d'installation
- Ce manuel convient également à
dans d''autres langues
Documents connexes
-
Sportcraft 1-1-32-932ES Guide d'installation
-
-
-
-
-
-
Sportcraft 1-1-36-933ES Guide d'installation
-
-
-