Dometic C7 Frameless Window_DOMC7XX Guide d'installation
- Taper
- Guide d'installation

1
RECORD THIS UNIT INFORMATION FOR
FUTURE REFERENCE:
Model Number
Date Purchased
SERVICE OFFICE:
USA
Dometic, LLC
2320 Industrial Pkwy
Elkhart, IN 46516
574-294-2511
CANADA
Dometic, LLC
46 Zatonski, Unit 3
Brantford, ON N3T 5L8
CANADA
519-720-9578
For Service Center
Assistance Call:
800-544-4881
INSTALLATION INSTRUCTIONS DOMC7XXXX
Form No. 3314726.005
©Dometic, LLC
LaGrange, IN 46761
Released: 2012-03
This manual must be read and
understood before installation,
adjustment, service, or mainte-
nance is performed. This unit must
be installed by a qualied service
technician. Modification of this
product can be extremely hazard-
ous and could result in personal
injury or property damage.
AVERTISSEMENT
!
Lire et comprendre ce manuel avant
de procéder à l’installation, à des ré-
glages, de l’entretien ou des répara-
tions. L’installation de cet appareil doit
être effectuée par un réparateur quali-
é. Toute modication de cet appareil
peut être extrêmement dangereuse et
entraîner des blessures ou dommages
matériels.
C7 FRAMELESS WINDOW

Installation instructions for C7 Window
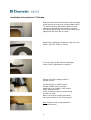
Determine and mark the window cut out and hinge
profile position according to technical data outline.
To avoid scratching the exterior plate, the area
outside the marked section should be covered
with tape before cutting. Perform the cutting using
appropriate tool (fret saw or router).
Screw on hinge profile with flat head spax-
screw 3.0x20, galvanised or rustproof.
Deburr and clean cutting surface in
window section.
Carefully bring on rubber seal all
around (sealant on the outside),
beginning in the middle on the bottom
of the window section.
Press on well all around, possibly using
the aid of a roller.
Make sure that the sealing hose does
not create wrinkles in the corner areas!
Note: Rubber must be appropriate for
the wall thickness!
Apply butyl-sealing tape under the hinge rail. (e.g.
Bostik, Type ISR 70-03 or similar)
2

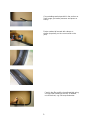
Cut protruding sealant parallel in the section ca.
5mm longer, put under pressure and press on
evenly.
Fasten sealant all around with clamps or
similar (especially on the corners and on the
joint).
Feed in the filler profile circumferentially using
a single roller starting at the top. If needed,
use a lubricant, e.g. soft soap and water.
3

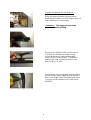
Hanging the glazing into the hinge rail:
Bring the glazing towards the hinge profile
diagonally from above (ca. 110° angle), hang it in
and carefully pivot it downwards.
! Attention ! The hinge may not clamp
downwards when pivoting.
Determine the position of the counter bracket
in relation to the bottom and side locking
latches and screw on with round headed
screw 3,5x25 similar DIN7981. The distance
between the edge of the pane and the outer
wall should be ca. 3mm.
Push together stays completely when window is
closed. Position stays (upper benchmark of the
stay) in the middle of the filler profile and screw
in using a round headed screw 3,5x50 similar
DIN7981.
4
-
 1
1
-
 2
2
-
 3
3
-
 4
4


Dometic C7 Frameless Window_DOMC7XX Guide d'installation
- Taper
- Guide d'installation
dans d''autres langues
Documents connexes
-
Dometic C5 Frameless Windows_DOMC5XX Guide d'installation
-
-
-
-
-
-
-
-