Bertazzoni REF24WCPRL Manuel utilisateur
- Catégorie
- Boissons glacées
- Taper
- Manuel utilisateur

Built-in Columns Wine Cabinets
User manual
Cave à Vins
Mode d’emploi
Armario cava
Manual del usuario
REF18WCPIXL
REF18WCPIXR
REF18WCPRL
REF18WCPRR
REF24WCPIXL
REF24WCPIXR
REF24WCPRL
REF24WCPRR


3
EN
INDEX
1
1.1
1.2
1.3
IMPORTANT DIRECTIONS OF SAFETY AND THE ENVIRONMENT
For your safety.................................................................................................................................................................
Important information when using the appliance..................................................................................................
Caring for the environment.........................................................................................................................................
4
4
4
5
2
2.1
2.2
INSTALLATION
Installation.........................................................................................................................................................................
Connection to electrical power....................................................................................................................................
6
6
6
3
3.1
3.2
3.3
3.4
BEFORE STARTING
Know your appliance....................................................................................................................................................
Main components............................................................................................................................................................
Electronic control............................................................................................................................................................
Main control panel..........................................................................................................................................................
7
7
8
9
9
4
4.1
4.2
4.3
4.4
APPLIANCE SWITCHING ON AND OFF
Turning the appliance on and o..............................................................................................................................
How to adjust the temperature for dierent requirements.........................................................................
Information signals of warning messages on the display.......................................................................
Wine Cellar temperatures...............................................................................................................................
10
10
12
13
14
5
5.1
5.2
FUNCTIONS AND SETTINGS
Functions............................................................................................................................................................
Settings...............................................................................................................................................................
15
15
16
6
6.1
INTERNAL LAYOUT
Internal layout (positioning, adjustment, removal)....................................................................................
22
22
7
7.1
LIGHTING
Interior lighting.......................................................................................................................................................
22
22
8
8.1
8.2
8.3
8.4
8.5
WINE STORAGE
General directions.........................................................................................................................................................
Conservation temperature.........................................................................................................................................
Time of conservation................................................................................................................................................
Consumption temperature.........................................................................................................................................
Position of bottles..........................................................................................................................................................
23
23
23
24
25
26
9
9.1
9.2
9.3
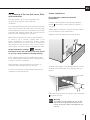
CARE AND CLEANIG
Care and cleanig.......................................................................................................................................................
Cleaning of the toe kick cover and condenser........................................................................................................
Internal cleaning..............................................................................................................................................................
26
26
27
28
10
10.1
10.2
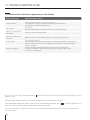
TROUBLESHOOTING GUIDE
Troubleshooting guide.................................................................................................................................................
Malfunction indications appearing of the display..............................................................................................
28
28
30
11
11.1
WARRANTY
Warranty.....................................................................................................................................................................
31
31

4
1. IMPORTANT INSTRUCTIONS FOR SAFETY AND THE ENVIRONMENT
1.1 For your safety
> If this appliance is replacing an existing
appliance which must be removed or disposed of,
make sure that it does not become a dangerous
trap for children by cutting its power supply cable
and rendering it impossible to close the door. Use
the same caution at the end of the lifespan of the
new appliance.
> This appliance is designed to refrigerate bever-
ages and foods and is intended for domestic use.
> The appliance must be installed by following the
instructions in the Installation Guide, particular
care should be taken not to obstruct the vent
openings of the appliance and of the built-in
units.
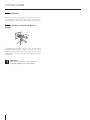
> The appliance features a concentrated lighting
system with LED lamps. Do not stare into these
lamps when they are on to avoid possible eyesight
damage.
This warning is also contained on the label at-
tached to the inside of the refrigerator door.
> Do not use any type of electrical equipment in-
side of the food conservation compartments.
> When positioning the shelves, do not place fin-
gers in the shelf slide guides.
> Do not position containers of flammable liquids
near the appliance.
> Completely switch o the appliance and unplug
the power supply cable during cleaning operations.
If the plug is not easily reached, it is a good idea to
turn o the breaker or remove the fuse that con-
trols the socket that the appliance is connected to.
> The packaging material can be dangerous for
children: do not allow children to play with the
plastic bags, plastic film or Styrofoam.
> Any repairs must be performed by a qualified
Bertazzoni Service technician.
> This appliance is not intended for use by persons
(including children) with reduced physical, sensory
or lack of experience and knowledge unless they
have been given supervision or instruction con-
cerning use of the appliance by a person responsi-
ble for their safety. Children should be supervised
to ensure that they do not play with the appliance.
> Do not damage the appliance refrigerant circuit
pipes.
> Do not store explosive substances such as
aerosol cans with a flammable propellant in this
appliance.
> If the power cord of this appliance is damaged,
it must be replaced by the manufacturer, service
company or a similarly qualified person.
Improper installations and repairs may put the
user at considerable risk.
> Repairs may be performed by the manufacturer,
service company or a similarly qualified person
only.
> Plug into a grounded 3 prong outlet.
> Do not remove ground prong.
> Do not use an adapter.
> Do not use an extension cord.
> Disconnect power to all units before servicing.
> If the SUPPLY CORD is damaged, it must be repla-
ced by the manufacturer, its service agent or simi-
lar qualified person in order to avoid a hazard.
> Children should be supervised to ensure that they
do not play with the appliance.
1.2 Important information when using
the appliance
> Never use electrical appliances inside the appli-
ance (e.g. heater, electric ice maker, etc.). Explosion
hazard!
> Never defrost or clean the appliance with a
steam cleaner! The steam may penetrate electri-
cal parts and cause a short-circuit. Risk of electric
shock!
> Do not use pointed and sharp-edged implements
to remove frost or layers of ice. You could dam-
age the refrigerant tubes. Leaking refrigerant may
cause eye injuries or ignite.
> Do not store products which contain flammable
propellants (e.g. spray cans) or explosive sub-
stances in the appliance.
Explosion hazard!
> Do not stand on or lean heavily against base of
appliance, drawers or doors, etc.
> Before cleaning the appliance, pull out the power
cord plug or switch o the fuse. Do not pull out the
power cord plug by tugging on the power cord.
> Store high-percentage alcohol tightly closed and
standing up.
> Keep plastic parts and the door seal free of oil
and grease. Otherwise, parts and door seal will
become porous.
> Never cover or block the ventilation openings for
the appliance.

5
EN
EN
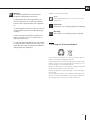
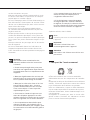
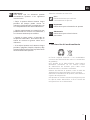
Symbols used in the Guide:
Note
Recommendations for correct use of the
appliance
Important
Directions for avoiding appliance damage
Warning
Indications for avoiding injury to people
1.3 Caring for the environment
> Pay special attention to correct disposal proce-
dure for all the packaging materials.
> The appliance must not be disposed of with urban
waste. Contact local waste disposal centers for on
how to dispose of recyclable waste.
> Prior to disposal, cut the power supply cord and
make it impossible to close the door.
> During disposal, avoid damage to the refrigera-
tion circuit.
> The appliance does not contain hazardous sub-
stances for the atmospheric ozone layer, neither in
the refrigeration circuit nor in the insulation.
Warning
To avoid contamination of food, please
respect the following instructions:
> Opening the door for long periods can
cause a significant increase of the tempe-
rature in the compartments of the applian-
ce.
> Clean regularly surfaces that can come in
contact with food and accessible drainage
systems.
> Store raw meat and fish in suitable con-
tainers, so that it is not in contact with or
drip onto other food.
> If the refrigerating appliance is left empty
for long periods, switch o, clean, dry, and
leave the door open to prevent mould deve-
loping within the appliance.

6
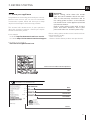
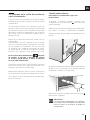
2.1 Installation
Make sure that installation is performed correct-
ly, adhering to all of the instructions in the specif-
ic installation guide provided with the appliance.
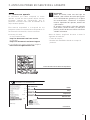
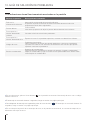
2.2 Connection to electrical power
supply
The appliance operates at 115 V AC, 60 Hz and is
equipped with a power supply cord with a 3-prong
grounded plug, which must be connected to a cor-
responding 3-prong (15 Amp) grounding-type wall
receptacle.
Important
Do not use extension cords and/or
multiple adapters for connection.
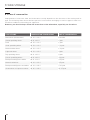
2. INSTALLATION

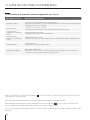
REF24WCPIXL
KS5990FW3U
HKBACAS1X..UA
F20200101000006
MODEL
CODE
TECHNICAL CODE
SER.NO./N° SERIE
3186660
ETL LISTED
Conforms to
UL 60335-1 and
UL 60335-2-24
Certified to
CSA C22.2#60335-1
CSA C22.2#60335-2-24
BERTAZZONI SPA
VIA PALAZZINA, 8 - 42016 GUSTALLA (RE) - ITALY
Fridge Gas Fill Charge
Quantité de Gaz Réfrigerateur
Freezer Gas Fill Charge
Quantité de Gaz Congélateur
Total Absorbed Current
Courant Absorbée Totale
Voltage
Tension
Frequency
Frequence
Refrigerant Gas Type
Type de Gaz Rèfrigerant
Defrost Heater
Chemical name of blowing gas
IP number
Adresse IP
oz
oz
A
V
Hz
W
Made in Italy
6.0
1.4
115
60
HFO
R134a
7
EN
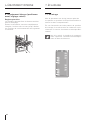
3.1 Know your appliance
Congratulations for having purchased your new ap-
pliance: from now on you can use our innovative
conservation system, which will allow you to keep
any kind of beverage in the best way possible.
This manual will answer most of your questions
about the product’s features. Should you require
further information, please
> our website
> or write us an e-mail at
aftersaleservice@bertazzoni.com
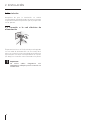
3. BEFORE STARTING
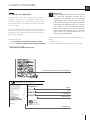
Position of the serial number inside the compartment.
Important
Before calling, write down the model
type and serial number which are avail-
able on the warranty certificate and on
the rating plate located on the bottom
left-hand corner of the appliance, behind
the bottom drawer.
Built-in wine cellars come with 2 years
parts and labor warranty and 5 year
parts and labor for sealed system only.
Before calling, please make sure to have the follow-
ing information ready:
- Date of Purchase;
- Name of dealer where product was purchased.
Model .
Code .
Technical Code .
Features .
Serial Number .
in the US http://us.bertazzoni.com/care-service
in Canada https://ca.bertazzoni.com/more/support

1
5
3
2
4
8
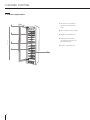
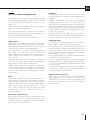
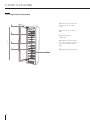
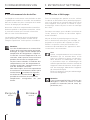
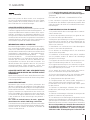
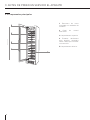
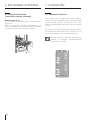
3.2 main components
1 Structure in stainless
steel with aluminium
trim.
2 Interactive control panel.
3 Upper Compartment.
4 Sliding bottle shelfs,
mounted on wheels for
easy extraction.
5 Lower compartment.
Wine Cellar
3. BEFORE STARTING

9
EN
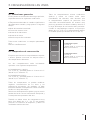
3.3 Electronic Control
The innovative electronic control system designed by Bertazzoni maintains constant temperature on the
2 temperature zones and visualizes it on the control panel display. It also allows user interaction making
it possible to personalize settings of the various functions and to receive sound and/or visual messages
should any malfunction occur in the appliance.
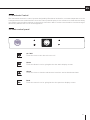
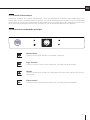
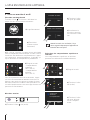
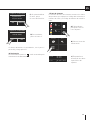
3.4 Main control panel
On / Off:
Touch the icon to turn the unit on or off.
Home
Touch the Home icon for going back to the main display screen.
Alarm
Touch the icon to view the alarm tone functions and to deactivate them.
Back
Touch the arrow icon for going back to the previous display screen.

8
+
°C
5
+
°C
Functions
Settings
8
+
°C
5
+
°C
Functions
Settings
+6 °C
+8
+7
+4
+5
OK
OFF
Turn Compartment
OFF?
Yes No
Functions
Settings
Initial test…
Are you sure you
want to power off
this unit?
Yes No
Are you sure?
Yes No
10
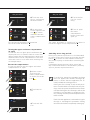
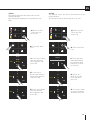
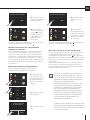
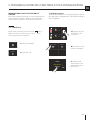
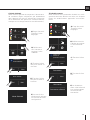
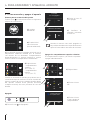
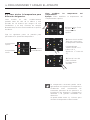
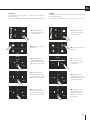
4.1 Turning the appliance on and o
First time starting the unit
Touch the button . The display shows the
following launch screens:
Shutdown.
When the appliance is first switched on is rec-
comended to wait at least 12 hours without
opening the doors and before placing any bottles
inside the unit.During such period deactivate
any error message by pressing the Alarm but-
ton.
4) Home screen.
- upper compartment
+8°C (+46°F)
- lower compartment
+5°C (+41°F)
1) Touch the button off.
1) Bertazzoni Logo.
2) Initial test (last
3 minuts).
3) The display shows the main screen with the
envirorment temperature measured from the
wine cellar inside the compartments. Automati-
cally the unit starts to cool down until reaching
the set temperatures.
When the wine cellar is o there are no
warning signs that prove that the wine cellar
is plugged to a socket.
2) Touch the icon
Yes to swich off.
3) Confirm
shutdown by
touching the Yes
icon.
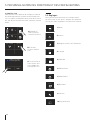
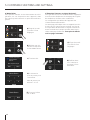
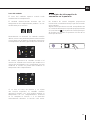
Switching off upper and lower compartments.
The upper compartment and the lower
compartment, can be shutdown individually.
1) Home screen.
3) Touch the icon
Yes to turn
compartment off.
2) Touch the Off
icon.
4. APPLIANCE SWITCHING ON AND OFF

8
+
°C
5
+
°C
Functions
Settings
+6 °C
+8
+7
+4
+5
OK
ON
Are you sure?
Yes No
Are you sure?
Yes No
Turn compartment
ON?
Yes No
8
+
°C
5
+
°C
Functions
Settings
8
+
°C
Off
Functions
Settings
8
+
°C
5
+
°C
Functions
Settings
8
+
°C
5
+
°C
Functions
Settings
11
EN
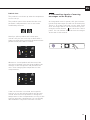
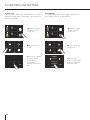
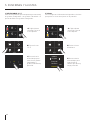
4) Touch the icon
Yes for confirming
the deactivation.
2) Touch the On
icon.
Turning the upper and lower compartments
on again
To turn the unit on again press the button, the
display will turn on and the launch screen will
appear again with the temperatures measured
inside the wine cellar compartments. The wine
cellar will start to cool down until reaching the
set temperatures.
8
+
°C
5
+
°C
Functions
Settings
For turning off the upper compartment
follow the same directions .
5) On the home
screen appears the
icon off, which
indicates that the
lower compartment
is off.
1) Home screen.
To turn on the
lower compartment
on again, touch the
icon .
3) Touch the Yes
icon.
5) Turn on again
the lower
compartment.
Home screen will
open up.
4) Touch the Yes
icon for confir-
ming.
The same procedure is required if you want to
restart the upper cellar compartment .
Switching off for long periods
During long absence periods it is recommended
to switch off the wine cellar by pressing the Unit
button for three seconds and disconnecting
the electrical plug or the breaker controlling the
socket.
Completely empty the wine cellar, clean and
dry it and leave the doors and drawers partially
open to prevent unpleasant odors.
If at the first startup the Standby message
does not appear, but another message ap-
pears, it means that the appliance has al-
ready started the cooling process.
During the first startup, it will not be possi-
ble to use the Menu to modify the factory set-
tings until the preset temperature has been
reached. During the first startup, it will not be
possible to use the Menu to modify the fac-
tory settings until the preset temperature has
been reached.
Each time the appliance is switched on it goes
through a self-diagnosis procedure lasting
three minutes before completely starting up.
Restart the compartments.
In case you wish to turn the upper and lower
compartments on again.
8
+
°C
5
+
°C
Functions
Settings

8
+
°C
5
+
°C
Functions
Settings
+6 °C
+8
+7
+4
+5
OK
OFF
+6 °C
+8
+7
+4
+5
OK
OFF
8
+
°C
5
+
°C
Functions
Settings
12
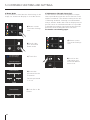
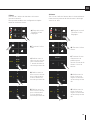
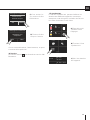
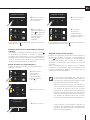
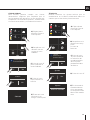
4.2 How to adjust the temperature for
dierent requirements.
Each model has been carefully tested before leav-
ing the factory and is adjusted in such a way to en-
sure high performance and low power consumption.
Usually, it is not necessary to modify the settings.
Upper
compartment.
Lower
compartment.
Preset
temperatures
Follow the following on screen steps to persona-
lize the temperature settings:
1) Home screen.
Touch icon of
upper compartment.
The temperature shown can vary slightly
in respect to the set temperature following
frequent openings of the doors or insertion
of room temperature foods or large quanti-
ties of foods.
It might take between 6 to 12 hours to reach
the selected temperature.
2) Scoll up/down to
select the desided
temperature.
Upper Compartment
from +4°C to +18°C
(from 39° F to 64° F).
3) Touch the icon Ok
to confirm the
desired temperature.
Modify the temperatures compartment
Example: How to modify the upper compartment
temperature.
4. APPLIANCE SWITCHING ON AND OFF
8
+
°C
5
+
°C
Functions
Settings

+6 °C
+8
+7
+4
+5
OK
OFF
+6 °C
+8
+7
+4
+5
OK
ON
13
EN
An integrated control system will give informa-
tion through messages you will see on the display.
There is an alarm tone that occurs with some
error messages which can be turned off by tou-
ching the alarm button on the main control
panel. You can find the list of the error messages
at the end of this manual.
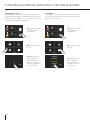
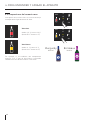
4.3 Information signals of warning
messages on the display.
Padlock icon.
The padlock icon shows up when the temperatu-
res are set up.
The padlock open/close shows that the com-
partment’s temperatures can or can not be
modified by the user.
Usually a yellow padlock will show open,
in that case you can scroll up or down with a
finger on the display, selecting the desired tem-
perature and press OK to confirm.
Whereas a closed padlock will be seen if the
user has activated a function that modifies the
settings of the refrigerator and prevents the
user from changing the temperature of the
compartment.
If the icon function is touched and a specific
function is set, the yellow padlock will be seen
closed and it won’t be possible to change the
temperature of the compartments as long as the
function won’t be completed or if it is manually
deactivated as long as the function is active.

+6 °C
+8
+7
+4
+5
OK
OFF
+6 °C
+8
+7
+4
+5
OK
ON
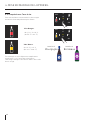
Bor
deaux
BOTTLE
Bur
gundy
BOTTLE
14
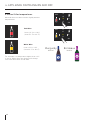
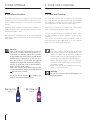
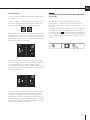
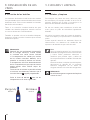
4.4 Wine Cellar temperatures.
Most red wines are best stored a slightly warmer
temperatures.
Red Wine.
White Wine.
from +10°C to +18°C
(from 50° F to 64° F).
from +4°C to +9°C
(from 39° F to 48° F).
For example if a temperature higher than +9°C
is set for white wine, the display will change
icon from white wine to red wine.
4. APPLIANCE SWITCHING ON AND OFF

Humidity Control
Light 12h
Humidity Control
Light 12h
8
+
°C
5
+
°C
Functions
Settings
Humidity Control Light 12h
Medium
Low
High
OK
15
EN
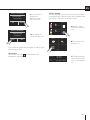
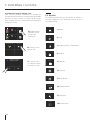
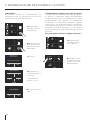
1) Humidity Control.
2) Light 12h.
INFORMATION FOR USING THE DISPLAY.
5.1 Functions.
It is possible to personalize the operation of your
unit in order to adapt it to the different ways you
might want to use it.
After touching the functions icon on the
home screen, the user will be shown the icons of
the following available functions.
8
+
°C
5
+
°C
Functions
Settings
5. FUNCTIONS AND SETTINGS
1) Humidity Control.
This function enables to set the humidity of the up-
per and lower compartments. The default setting is
set to “Medium”.
B) Touch the
Humidity Control
icon.
C) Scroll until
setting the
desired humidity
and press Ok.
A) Home screen.
Touch the Fun-
ctions icon.

8
+
°C
5
+
°C
Functions
Settings
Humidity Control Light 12h
Sabbath
Reset Demo
Sabbath
Reset Demo
Sabbath
Reset Demo
Maintenance Service
Information
Maintenance Service
Info System
Date Time
°c / °f Language
Maintenance
Service
Info System
Date Time
°c / °f Language
Date Time
°c / °f Language
Date Time
°c / °f Language
Activate
Light 12h Mode?
Yes No
16
2) Interior light for 12 h.
This function enables to set the timing of the inte-
rior light and it stays on 12 hours when the wine
cellar door is closed, in order to see the inner part
lighted up, through the glass.
A) Home screen.
Touch the Fun-
ctions icon.
It is possible to personalize the settings of your
wine cellar or adapting it to the different ways
you might want to use it.
5.2 Settings.
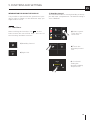
1) Date.
2) Time.
3) Celsius and Fahrenheit.
4) Language.
5) Sabbath.
6) Reset.
7) Demo Mode.
8) Maintenance.
9) Service.
10) Information.
B) Touch the Light
12h icon.
C) Push Yes if you
want to activate
Light 12h Mode.
5. FUNCTIONS AND SETTINGS

8
+
°C
5
+
°C
Functions
Settings
Date Time
°c / °f Language
9Day
11
10
7
8
OK
9
Month
11
10
7
8
OK
2017
Year
2019
2018
2015
2016
OK
37Min
39
38
35
36
OK
8
+
°C
5
+
°C
Functions
Settings
Date Time
°c / °f Language
Hour?
12 24
9
Hour
11
10
7
8
OK
17
EN
1) Date
The display will show the date in the format
(day:month:year).
By touching the display you can modify the set-
tings.
E) Scroll up or down
until the desires
date appears and
press Ok.
D) Scroll up or
down until the desi-
red month appears
and press Ok.
B) Touch the Date
icon.
A) Home screen.
Touch the Set-
tings icon.
C) Scroll up or down
until the desired
year appears and
press Ok.
2) Time
The display shows the hours and minutes in the
format hh:mm.
This function selects the display at 12 or 24 h.
C) Touch the desi-
red method which
you want the time
to display: 12 hour
or 24 hours.
B) Touch the Time
icon.
A) Home screen.
Touch the Set-
tings icon.
D) Scroll up /
down to set the
hour and then
press ok.
E) Scroll up / down
to set the minutes
and then press Ok.

8
+
°C
5
+
°C
Functions
Settings
8
+
°C
5
+
°C
Functions
Settings
OK
°C
°F
Français
Español
Deutsch
Italiano
English
OK
Date Time
°c / °f Language
Date Time
°c / °f Language
18
3) SET °C/°F
This function allows the temperature to be dis-
played in Centigrade or Fahrenheit. The factory set-
ting in Centigrade.
4) Language
To set the language of the fridge, simply touch
the settings button on the display.
B) Touch the Lan-
guage icon.
C) Scroll up /
down to select the
desired language
and press Ok.
A) Home screen.
Touch the Set-
tings icon.
C) Scroll up / down
to select either
centigrade or
fahrenheit
degrees and press
Ok.
B) Touch the icon
°C/°F.
A) Home screen.
Touch the Set-
tings icon.
5. FUNCTIONS AND SETTINGS

Sabbath
Reset Demo
Sabbath Mode
8
+
°C
5
+
°C
Functions
Settings
Confirm
Sabbath Mode
Yes No
Sabbath Mode
Yes No
Sabbath
Reset Demo
8
+
°C
5
+
°C
Functions
Settings
Confirm resetting
to factory
default settings?
Yes No
Reset
Yes No
Reset complete
Reset
19
EN
6) Sabbath Mode
The function makes it possible to comply to certain
religious observances requiring the operation of
the appliance to not be aected by the opening or
closing of the doors. The thermostatic control and
inner lighting are deactivated.
A) Home screen.
Touch the Set-
tings icon.
B) Scroll right
once and touch
the Sabbath icon.
E) The wine cellar
will work accordin-
gly to this configu-
ration.
C) Touch the Yes
button to confirm
the Sabbath Mode.
D) Touch the Yes
button to activate
the function.
7) Reset
It gives the possibility to restore the base settings
that were set in the factory, cancelling all the
changes that has been made from there onward.
A) Home screen.
Touch the Settings
icon.
B) Scroll right
once and toch
touch the Reset
icon.
D) Touch the Yes
button.
E) The reset has
been performed.
The wine cellar's
factory settings
have been restored.
C) Touch the Yes
button to to con-
firm the selection
of the resetting
of factory default
settings.

Sabbath
Reset Demo
8
+
°C
5
+
°C
Functions
Settings
Demo Mode
1
3
2
4
Demo Mode
Yes No
Maintenance Service
Information
8
+
°C
5
+
°C
Functions
Settings
C) Touch Yes.
Turn Demo Mode
On? (no cooling)
Passcode required
Yes No
20
8) Demo Mode
It is possible to simulate the functioning of the
fridge, for showroom display or for trade shows.
A) Home screen.
Touch the Settings
icon.
B) Scroll right
once and touch
Demo mode.
D) Insert the
password for the
activation.
Default password
1-2-3-4
E) Push Yes or No
button.
5. CUSTOMIZE FUNCTIONS AND SETTINGS.
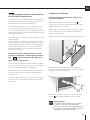
9) Maintenance (through alarm sign).
For the entire to function as designed, it is impor-
tant to periodically clean the access toe-kick cover
and the condenser. The default setting of the unit
is"Warning disabled". Cleaning is recommended
every 6 months. Audio and visual on display messa-
ges will serve as standard reminders. It is possible
to disable the warning signal and see the time left
before the next cleaning that has to be done.
For details see following pages.
B) Scroll to the
right twice and
touch the Mainte-
nance icon.
A) Home screen.
Touch the Settings
icon.
La page est en cours de chargement...
La page est en cours de chargement...
La page est en cours de chargement...
La page est en cours de chargement...
La page est en cours de chargement...
La page est en cours de chargement...
La page est en cours de chargement...
La page est en cours de chargement...
La page est en cours de chargement...
La page est en cours de chargement...
La page est en cours de chargement...
La page est en cours de chargement...
La page est en cours de chargement...
La page est en cours de chargement...
La page est en cours de chargement...
La page est en cours de chargement...
La page est en cours de chargement...
La page est en cours de chargement...
La page est en cours de chargement...
La page est en cours de chargement...
La page est en cours de chargement...
La page est en cours de chargement...
La page est en cours de chargement...
La page est en cours de chargement...
La page est en cours de chargement...
La page est en cours de chargement...
La page est en cours de chargement...
La page est en cours de chargement...
La page est en cours de chargement...
La page est en cours de chargement...
La page est en cours de chargement...
La page est en cours de chargement...
La page est en cours de chargement...
La page est en cours de chargement...
La page est en cours de chargement...
La page est en cours de chargement...
La page est en cours de chargement...
La page est en cours de chargement...
La page est en cours de chargement...
La page est en cours de chargement...
La page est en cours de chargement...
La page est en cours de chargement...
La page est en cours de chargement...
La page est en cours de chargement...
La page est en cours de chargement...
La page est en cours de chargement...
La page est en cours de chargement...
La page est en cours de chargement...
La page est en cours de chargement...
La page est en cours de chargement...
La page est en cours de chargement...
La page est en cours de chargement...
La page est en cours de chargement...
La page est en cours de chargement...
La page est en cours de chargement...
La page est en cours de chargement...
La page est en cours de chargement...
La page est en cours de chargement...
La page est en cours de chargement...
La page est en cours de chargement...
La page est en cours de chargement...
La page est en cours de chargement...
La page est en cours de chargement...
La page est en cours de chargement...
La page est en cours de chargement...
La page est en cours de chargement...
La page est en cours de chargement...
La page est en cours de chargement...
La page est en cours de chargement...
La page est en cours de chargement...
La page est en cours de chargement...
La page est en cours de chargement...
-
 1
1
-
 2
2
-
 3
3
-
 4
4
-
 5
5
-
 6
6
-
 7
7
-
 8
8
-
 9
9
-
 10
10
-
 11
11
-
 12
12
-
 13
13
-
 14
14
-
 15
15
-
 16
16
-
 17
17
-
 18
18
-
 19
19
-
 20
20
-
 21
21
-
 22
22
-
 23
23
-
 24
24
-
 25
25
-
 26
26
-
 27
27
-
 28
28
-
 29
29
-
 30
30
-
 31
31
-
 32
32
-
 33
33
-
 34
34
-
 35
35
-
 36
36
-
 37
37
-
 38
38
-
 39
39
-
 40
40
-
 41
41
-
 42
42
-
 43
43
-
 44
44
-
 45
45
-
 46
46
-
 47
47
-
 48
48
-
 49
49
-
 50
50
-
 51
51
-
 52
52
-
 53
53
-
 54
54
-
 55
55
-
 56
56
-
 57
57
-
 58
58
-
 59
59
-
 60
60
-
 61
61
-
 62
62
-
 63
63
-
 64
64
-
 65
65
-
 66
66
-
 67
67
-
 68
68
-
 69
69
-
 70
70
-
 71
71
-
 72
72
-
 73
73
-
 74
74
-
 75
75
-
 76
76
-
 77
77
-
 78
78
-
 79
79
-
 80
80
-
 81
81
-
 82
82
-
 83
83
-
 84
84
-
 85
85
-
 86
86
-
 87
87
-
 88
88
-
 89
89
-
 90
90
-
 91
91
-
 92
92


Bertazzoni REF24WCPRL Manuel utilisateur
- Catégorie
- Boissons glacées
- Taper
- Manuel utilisateur
dans d''autres langues
- English: Bertazzoni REF24WCPRL User manual
- español: Bertazzoni REF24WCPRL Manual de usuario
Documents connexes
Autres documents
-
Haier WS53GDA Le manuel du propriétaire
-
-
-
Fulgor Milano F7IWC24O1-R Manuel utilisateur
-
Fhiaba BI30BI-LO Manuel utilisateur
-
Fulgor F7IRC36O1-L Manuel utilisateur
-
Thermador T24UW900LP Manuel utilisateur
-
Vinotemp SOWINE Mode d'emploi
-
KitchenAid KCVWX 20900L Mode d'emploi
-